
SAC 8.0 A1 - Camcorder SILVERCREST - Free user manual and instructions
Find the device manual for free SAC 8.0 A1 SILVERCREST in PDF.


| Product type | Camcorder |
| Brand | SilverCrest |
| Model | SAC 8.0 A1 |
| Dimensions (approx.) | 120 x 60 x 60 mm |
| Weight (approx.) | 200 g |
| Power supply | Rechargeable lithium-ion battery |
| Screen | 2.7 inch LCD |
| Maximum video resolution | Full HD 1080p |
| Photo resolution | 8 megapixels |
| Digital zoom | Yes (8x) |
| Storage | SD / SDHC card |
| Connections | USB, HDMI, AV output |
| Main functions | Video recording, photo, playback |
| Maintenance and cleaning | Clean the lens with a soft, dry cloth |
| Safety | Do not expose to moisture or shocks |
| Spare parts | Battery, charger, USB/HDMI cables |
| General information | Lidl distributor brand, 272-page manual |
Frequently Asked Questions - SAC 8.0 A1 SILVERCREST
User questions about SAC 8.0 A1 SILVERCREST
0 question about this device. Answer the ones you know or ask your own.
Ask a new question about this device
Download the instructions for your Camcorder in PDF format for free! Find your manual SAC 8.0 A1 - SILVERCREST and take your electronic device back in hand. On this page are published all the documents necessary for the use of your device. SAC 8.0 A1 by SILVERCREST.
USER MANUAL SAC 8.0 A1 SILVERCREST
CAMÉSCOPE WI-FI ACTION AVEC FULL HD
Operation and Safety Notes
NL BE
WIFI-ACTION-CAMCORDER MET FULL HD
Before reading, unfold both pages containing illustrations and familiarise yourself with all functions of the device.
FR BE
GB / IE Operation and Safety Notes Page 72
LEBAN SWANDJUNEALLGEFAHR
Zeitlupe-Symbol
Zeitraffer-Symbol
natural_image
Illustration of a smartwatch, a digital camera, and a wristwatch with signal waves (no text or symbols)natural_image
Interior view of a car showing front and side views of a vehicle seatbelt device (no text or symbols visible)57 DE/
Wasserschutzgehäuse
flowchart
graph TD
    A["Component 1: Bag and Valve"] --> B["Component 2: Cable and Cable"]
    B --> C["Component 3: Valve and Valve"]
    C --> D["Component 4: Valve and Valve"]
    D --> E["Component 5: Valve and Valve"]
    style A fill:#f9f,stroke:#333
    style E fill:#bbf,stroke:#333

natural_image
Mechanical assembly diagram showing a valve mechanism with directional arrows indicating motion (no text or symbols)62 DE/AT/CH
Rights to your images....Page 76
Intended Use Page 77
Parts description (see front flap) Page 78
Technical Data Page 79
Scope of delivery....Page 82
Safety Notices......Page 83
Initial use Page 88
Display Page 88
Inserting the rechargeable lithium battery....Page 89
Charging the lithium battery....Page 89
Inserting the memory card....Page 90
Switching on/off Page 91
Camera setup....Page 92
Selecting the operating mode....Page 93
Video mode......Page 94
Display in video mode......Page 95
Photo mode Page 95
Display in photo mode Page 96
Using the playback menu....Page 96
Menu operations......Page 98
Change language......Page 102
Using Time Lapse Page 103
All functions at a glance....Page 105
Using the remote control Page 110
Using the remote control......Page 110
Replacing the batteries....Page 111
Connecting the camera to an HDTV ......Page 112
APP (for Android and iOS systems)......Page 113
Obtaining the APP installation program......Page 113
Wi-Fi and System applications......Page 113
Troubleshooting......Page 118
Using accessory Page 119
Cleaning and Care Page 127
Waterproof housing cleaning and care......Page 128
Storage during non-use Page 130
Storing the waterproof housing......Page 131
Disposal Page 131
Warranty and Service Page 132
Warranty Declaration......Page 132
Service address......Page 133
Information about the EU declaration of conformity....Page 134
Trademark notices......Page 135
| List of pictograms used | |||
 | Read the instructions! |  | Only use the included rechargeable battery |
 | Output voltage (Direct current) |  | Wear safety gloves! |
 | Observe the warnings and safety notices! |  | Main menu with general settings |
 | Danger to life and risk of accident for infants and children! |  | Dispose of the packaging and product in an environmentally-friendly manner! |
 | Caution! Explosion hazard! | ||
WiFi Sports Action Camcorder with Full HD
- Introduction

Congratulations on the purchase of your new camera. You have selected a high quality product. Familiarise yourself with the product before using it for the first time. Please carefully read the following instructions for use and the safety instructions. Only use the product as described and for the specified purpose. The instructions for use are a part of this product. Keep these instructions in a safe place. When passing the product on to others, be sure to also include all documentation.
- Rights to your images
Be sure not to violate the personal rights of others or rights in one's own images as defined by the KunstUrhG.
§ 22 Sentence 1 KunstUrhG states:
"Images may only be distributed or publicly displayed with the approval of the person pictured."
The term "Image" refers to any type of portrayal conceivable, e.g. drawings, portraits, sculptures and in today's society of digital media particularly portrayals in photo and film. The pivotal question is always: Is an individual identifiable?
Pursuant to § 22, images may only be distributed or publicly displayed with the approval of the person pictured.
Pursuant to § 23, images where the persons only appear as a accessory next to a landscape or other places do not require approval.
IntendedUse
The Action Cam is an information electronic. It is suitable for use indoors and in protected outdoor locations and serves for private recording of pictures and audio. Please observe and protect the personal rights of others – this also and specifically applies to country-specific particularities. Any use other than described above or any modification of the product is prohibited and
will result in damage. The manufacturer is not liable for any damages caused by improper use. This product is not intended for commercial use.
- Parts description (see front flap)
Camera
1 Lens
2 Battery / status indicator
3 Infrared receiver
4 Display/Menu button
5 Microphone
6 2.0" colour display
7 Power indicator
8 OK button
9 Power / Mode button
10 Battery cover
11 Speaker
12 MicroSD slot
13 Micro-USB port
14 Mini-HDMI port
15 Wi-Fi button
Remote Control
16 Power button
17 -Photo button
18 -Video button
19 Battery cover (remote control)
- Technical Data
Camera
Model: Action Cam SAC 8.0 A1
Video resolution (adjustable): 1080 p 60 fps, 1080 p 30 fps, 720 p 120 fps, 720 p 60 fps
Photo resolution (adjustable): 16 m (4640 x 3480) interpolated, 8 m (3264 x 2448), 5 m (2592 x 1944)
Resolution: Photo: 8 MP; Video: FHD 60 FPS
WLAN standard: 802/11/b/g/n, no WLAN
Ports (input): Micro-USB
Ports (output): microSD, Mini HDMI™
Recording formats: MOV (video), JPG (photo)
Display: 5.08 cm / 2 inch
Sensor resolution: 8 megapixel
Sensor: CMOS
Operating temperature: 0 °C to +45 °C
Storage temperature: -20 °C to +85 °C
Picture angle: horizontal 110°, diagonal 130°
max. immersion depth with
waterproof housing: 45 m
max. recording time with
full charge: 90 min
Max. SD memory size: 32 GB
Power supply: Lithium-ion rechargeable battery
Supported memory cards: microSD
Protection class: IP54 (using the waterproof housing)
Dimensions: approx. 59 x 44 x 24 mm (W x H x D)
Weight: 57 g (without battery) / 77 g (with battery)
Rechargeable battery
Designation: GB/T18287-2013
Manufacturer: Dongguan JinLu Battery Technology Co., Ltd.
| Storage temperature: | |
| - 20 to 60 °C Less than one month | |
| - 20 to 45 °C Less than three months | |
| - 20 to 45 °C Less than one year | |
| Operating temperature: | |
| Charging 10 to 40 °C | |
| Discharge - 20 to 60 °C | |
Wall wart
Manufacturer: Shenzhen TeKa Technology Co., LTD.
Model: TEKA012-0502000EU
Input voltage: 100-240V\~/50/60Hz
Output voltage: 5V =/2A
Operating temperature: 0 °C - +40 °C
Storage temperature: -20 °C - +65 °C
Remote Control
Type: Infrared
Range: 5 m
Battery type: 3 V lithium battery CR2025
- Scope of delivery
Remove all parts from the packaging and remove all packaging material. Verify the product is complete and undamaged immediately after unpacking. If parts are missing or defective, please contact the manufacturer within two days.
1 Action Cam
1 Remote control with strap
1 Waterproof housing
1 Frame bracket
1 Handlebar mount
1 Suction cup holder
1 Helmet mount with strap
1 Helmet mount with adhesive pad
1 3M adhesive pad (for helmet mount)
1 Power supply with USB cable
1 Protective adhesive pad
2 Rechargeable batteries
1 Micro-SD card 8 GB

Safety Notices
Damage due to failure to comply with these operating instructions will void the warranty! We assume no liability for consequential damages! We assume no liability for property damage or personal injury due to improper handling or failure to observe the safety instructions!
Children and persons with impairments

DANG R/AONLIFE AND RISK OF
ACCIDENT FOR INFANTS AND CHILDREN! Never
leave children unsupervised with the packaging materials.
The packaging material poses a suffocation hazard. Packaging materials are not a toy. Children frequently underestimate dangers.
■ Always keep children away from the product. This appliance may be used by children age 8 years and up, as well as by persons with physical, sensory or mental impairments or lacking experience and / or
knowledge so long as they are supervised or instructed in the safe use of the product and understand the associated risks.
■ Never allow children to play with this device. Cleaning and user maintenance should not be performed by children without supervision.
CAUTION! DANGER TO LIFE! Keep children away from the work area during assembly. The scope of delivery includes a number of screws and small parts. These may prove life-threatening if swallowed or inhaled.
Damage
■ Never use the product if it is damaged in any way.
- Contact your service centre or a professional if the product is damaged, requires repairs, or for any other problems with the product.
■ Ensure that all electrical connections and cable connections to other devices comply with the respective standards and further comply with the instructions for use.
- Be sure not to overload sockets and extension cables. This can result in fire or electric shock. Please note the specifications on temperature and
humidity during operation and storage for proper use of the camera. These are specified in the technical data. Moist, very cold or hot environments or storage can damage the camera.
The camera is suitable for outdoor use, the power supply may only be used indoors.
- Avoid major shock. This can damage the electronic circuit.
■ Wireless systems are exposed to interference from telephones, microwaves and other electronics operating in the 2.4 GHz range (affects of interference include poor image quality or transmission problems). Maintain a minimum distance of 3 metres during installation and operation.
- Do not open the camera. This camera is maintenance-free. Opening the product will void the warranty.
Power supply
■ Only plug the power supply into easy to access sockets so it can easily be unplugged in the event of an emergency.
- Do not touch the power supply with wet hands. Otherwise there is a risk of electric shock!
■ Only use the power supply in dry indoor spaces.
■ Never unplug the device by the cable. Always touch the device by the housing.
Please note, the power supply will continue to draw a small amount of electricity even without the camera connected, so long as the power supply is plugged into the socket. To completely disconnect the power supply it must be unplugged from the mains socket.

CAUTION! DANGER TO LIFE! Never open the power supply.
Otherwise there is a risk of electric shock!
■ Never cover the power supply.
■ Unplug the power supply immediately if you notice unusual noises or smoke.
■ Position the cable so as to avoid a trip hazard.
■ Protect all connectors from moisture.
Rechargeable batteries and batteries

WARNING!
DANGER TO LIFE!
Batteries are not intended for children. Do not leave batteries lying around. They could be swallowed by children or pets. Seek immediate medical attention if accidentally swallowed.
■

CAUTION! EXPLOSION HAZARD! Never short-circuit
and / or open rechargeable batteries. The battery may overheat, ignite or explode. Never throw the battery into fire, water or expose it to extreme heat. The battery can explode.
■

Only use the rechargeable battery (Manufacturer: Dong-
guan JinLu Battery Technology Co., Ltd., Model: B1200) included with the SilverCrest SAC-8.0A1 Action Camera.
■
Routinely check the battery for leaks.
■

Leaking or damaged batteries may result in chemical burns
upon contact with the skin; always wear suitable safety gloves!
Application
- Do not use the camera in explosive environments, e.g. at tank plants, or in dusty environments.
- Observe the applicable national laws if you intend to use this camera to photograph or watch people.
- Do not place containers with liquids, e.g. vases or beverages, on or next to the product. Protect the power supply from drips or sprays.
- Keep away from open flames. Do not place e.g. burning candles on or near the product. That way you can avoid the spread of fire.
- Initial use
Display
Status indicator (red): This indicator will flash when the camera is in operation, e.g. in video mode, in photo mode or after the screen automatically shuts off. This will light up after the display automatically shuts off and in standby mode.
Charging indicator (blue): This indicator will light up when the camera is charging. Once charged, the indicator will extinguish. The indicators will flash red whilst recording video.
- Inserting the rechargeable lithium battery
☐ To open the battery compartment, slide the battery cover 10 sideways in the direction of the arrow and flip open.
☐ Insert the battery in the battery compartment. The gold contacts must face toward the display.
☐ To close the battery compartment, close the battery cover 10 and slide back into the original position.
- Charging the lithium battery
☐ To charge the battery, plug the end of the charging cable into the Micro-USB port 13. Then plug the power supply into a properly installed socket. The camera may also be plugged into a computer to charge. The charge indicator will light up blue. Once charged, the charge indicator will extinguish. The battery requires about 3 hours to charge.

Note: Always fully charge both rechargeable batteries.
- Inserting the memory card
☐ Slide the Micro SD card into the card slot until it locks into place. Insert as shown on the card slot. Install the memory card with the gold contacts facing toward the lens.

To remove the Micro SD card, carefully push the memory card in; the card will pop out.
Note: The camera has no internal memory. Verify a memory card is installed before use. (We recommend using a higher quality memory card, Speed Class 6).
- Switching on / off
☐ Switching on: Hold the power button for 3 seconds; the screen and the camera will switch on. The power indicator 7 will light up.

flowchart
graph LR
    A["Hand pressing Mode"] --> B["Process: Silvercrest Display"]
    style A fill:#f9f,stroke:#333
    style B fill:#bbf,stroke:#333
☐ Switching off: Hold the power button for 3 seconds to switch the camera off.
Screen auto shut-off: Use the menu to enable the Power Save option. To save power, the screen will automatically switch off after 1, 2 or 3 minutes when the camera is not being used. After this, only the power indicator 7 will still be lit.
With this function enabled, the screen will also automatically switch off whilst recording. Press any button to reactivate the screen.
Auto shut-off on drained battery
If the battery is very weak, the 📄 icon will appear in the LCD, indicating the battery needs to be recharged. When the icon lights up red and flashes, the camera will automatically be switched off.
- Camera setup
☐ You can configure several basic settings in the main menu before using the camera for the first time.
☐ With the camera on, press the Display / Menu button 4 to open the main menu.
- Press the Power / Mode button 9 to switch between the main menu for the camera settings (☐/☐) and the main menu for the general settings ✿ (e.g. language, basic settings).
☐ Press the Wi-Fi button 15 to browse the menu items.
☐ Press the OK button 8 to select a menu item or a setting.
☐ Press the Display / Menu button 4 to return from a settings option to the main menu.
From the main menu, press the Display / Menu button 4 to exit the menu.
- Selecting the operating mode
The camera has 3 modes – video mode, photo mode and playback mode. After switching the camera on, press the power button to select a mode.

Video mode
After being switched on the camera will always be in video mode. Press the OK button in preview mode to start recording video. Press the button again to stop recording. Recording will also stop if the memory card is full, the battery is too weak or after 29 minutes of recording:
Taking pictures whilst recording: Press the power mode whilst recording to take a picture. When taking a picture, the display will read "CAPTURE COMPLETE".
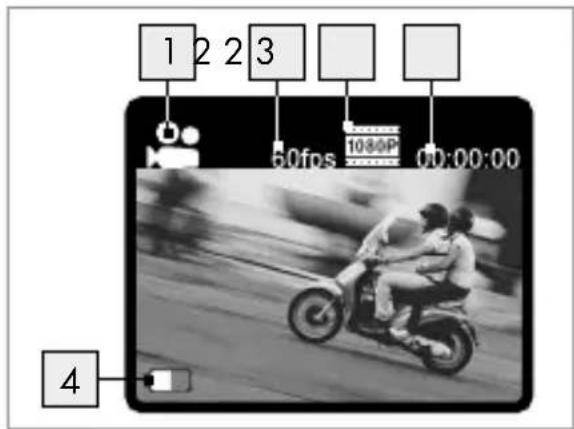
• Display in video mode
-
Mode icon; indicates video mode. Indicates the video quality.
-
Indicates the video size; options are FHD 1080 p 60 fps, 1080 p 30 fps, 720 p 120 fps, 720 p (60 fps).
-
Recording time; indicates the remaining recording time.
-
Battery icon; indicates the current battery level.
- Photo mode
After switching the camera on, press the power button to select photo mode. Press the OK button in preview mode to take a picture:
• Display in photo mode
-
Mode icon; indicates photo mode.
-
Timer/Photo Burst
-
Photo resolution options are 5M/8M/12M/16MP.
-
Counter; indicates the number of pictures remaining.
-
Battery level icon.

• Using the playback menu
Photos
☐ Press the Power / Mode button 9 to open the playback menu.
☐ Press the Wi-Fi button 15 to select the option JPG.
☐ Press the OK button 8 to confirm. This will take you to the picture gallery.
☐ Press the Wi-Fi button 15 to scroll through the gallery.
☐ Press the Display / Menu button 4 to access the options.
☐ Press the Wi-Fi button 15 to select the option "Lock" or "Delete" and press the OK button 8 to confirm.
☐ Press the Power / Mode button 9 to exit the picture gallery. You can then switch to the video gallery or press the Power / Mode button 9 again to return to camera mode.
Video
☐ Press the Power / Mode button 9 to open the playback menu.
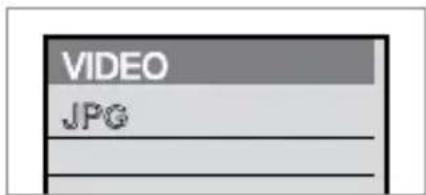
☐ Press the Wi-Fi button 15 to select the VIDEO option.
☐ Press the OK button 8 to confirm. This will take you to the video gallery.
☐ Press the Wi-Fi button 15 to scroll through the video gallery.
☐ Press the OK button 8 to play a video. Press the OK button 8 again to stop playback.
☐ Press the Display / Menu button 4 to access the options.
☐ Press the Wi-Fi button 15 to select the option "Lock" or "Delete" and press the OK button 8 to confirm.
☐ Press the Power / Mode button 9 to exit the video gallery. You can then switch to the picture gallery or press the Power / Mode button again to return to camera mode.
- Menu operations
Each operating mode has a menu specific to the mode; see pictures below:


Video Mode Menu Photo Mode Menu


Settings Mode Menu Playback Mode Menu
Press the Menu button 4 to open the menu for the current mode. Press the power button 9 to switch between the two tabs. Press the Wi-Fi button to navigate the cursor down. Then press the OK button 8 to open the menu item and view the settings options. Use the Wi-Fi button to select the respective setting and press the OK button 8 to confirm. After configuring your settings, press the Menu button 4 to exit the menu.
Explanation of the "Slow Motion" function
Slow Motion means recording at the normal frame rate and playing it back at a slower frame rate. For example, recording a video at a frame rate of 60 fps and playing it back at a frame rate of 30 fps is slow motion.
Use: In the menu, select the "Slow Motion" option and press OK to open the submenu. Use the cursor to select the option „On“ and press OK to confirm. The display will show:

Slow Motion icon
☐ Press the OK button to start recording. Press the OK button again to stop recording.
☐ Press the Power button to switch to playback mode. Select the video.
Press OK to play the video in Slow Motion: see image at the right.

Change language
Press "Menu", then "On" to open the settings in the menu. Press the Wi-Fi button 15 to browse through the menu items. Select the „Language" option and press the OK button 8 again to confirm. Press the Wi-Fi button 15 to select the desired language and press the OK button 8 to confirm.


Using Time Lapse
The Time Lapse function is primarily intended for cityscapes, landscapes, astronomical phenomena and biological evolutions. This function allows the device to automatically take pictures based on the preset time intervals and then create a video by compiling, analysing and processing photos. The playback speed for the video can be configured by changing the picture interval (photos), which creates a special video effect.
Use:
-
In the ✝ menu, select the "Time Lapse" option and press OK to open the submenu. Press the Wi-Fi button 15 to select the time interval (3s/5s/10s/30s/1 min) and press OK to confirm.
-
Select the "Time Lapse Duration" option from the menu and press OK to open the submenu. Press the Wi-Fi button 15 to select a duration (5 min / 10 min / 15 min / 20 min / 30 min / 60 min / unlimited) and press OK to confirm. Press the Display / Menu button 4. The display will show:

Time Lapse icon
Press the OK button to start the time lapse recording. Press the OK button again to stop recording.
To play the video recording, press the Power button to switch to playback mode. Press the Wi-Fi button 15 to select the video. Press OK to play the video in Time Lapse mode; see image at the right.

Note: With the Time Lapse function enabled in photo mode, the camera will only take pictures at the selected intervals. At the end of the set duration the camera will stop taking pictures.
All functions at a glance
Select the desired options as described in section "Camera Setup".
| Video Size | 1080p 60fps |
| 1080p | |
| 720p (120fps, 60fps) | |
| Image Stabiliser | OFF |
| ON | |
| Invert Mode | OFF |
| ON | |
| Slow Motion | OFF |
| ON | |
| White Balance | Auto |
| Daylight | |
| Cloudy | |
| Fluorescent | |
| Glowing | |
| P | |
| Resolution | 16 m (4640 x 3480) |
| 8 m (3264 x 2448) | |
| 5 m (2592 x 1944) | |
| Timer | OFF |
| 2 s | |
| 10 s | |
| double | |
| Photo Burst | OFF |
| 3 photos | |
| 5 photos | |
| 10 photos | |
| more bursts | |
| Power Save | OFF |
| 1 min | |
| 3 min | |
| 5 min | |
| Date / Time | YYYY/MM/DD XX:XX |
| Language | EN English |
| FR Français | |
| NL Nederlands | |
| Language | ES Español |
| PT Português | |
| DE Deutsch | |
| SE Svenska | |
| DA Dansk | |
| Time Lapse | 30 s |
| 1 min | |
| Time Lapse Duration | Unlimited |
| 5 min | |
| 10 min | |
| 15 min | |
| 20 min | |
| Time Lapse Duration | 30 min |
| 60 min | |
| Date Stamp | OFF |
| Date | |
| Date / Time | |
| System | Reset All |
| System Information | |
| Wi-Fi Password | |
| Format | NO/YES |
● Using the remote control
Use the remote control to record videos or take pictures, and to switch off the camera. (The camera cannot be switch on via the remote control, only directly on the camera.) Please note, the remote control will only work with Wi-Fi disabled.

natural_image
Illustration of smartwatches and a camera with signal waves, no text or symbols present• Using the remote control
In photo mode, press the Photo button 17 to take a picture.
In video mode, press the Photo button 17 to switch to photo mode P.
In video mode, press the Video button 18 to record a video. Press the button again to stop recording.
In photo mode, press the Video button 18 to switch to video mode.
Press the Power button to switch the camera off.
● Replacing the batteries
Remove the wrist strap on the remove control for better access to the battery compartment.
To open the battery compartment, use a coin to unscrew the battery cover 19, turning counter-clockwise, until the dot on the battery cover 19 is next to the dot and the mark „OPEN“ on the house.
Remove the used battery and insert a new battery of the same type (3 V lithium battery CR2025). Be sure the positive terminal is facing up.
☐ Reinstall the battery cover on the battery compartment and use a coin to turn it clockwise to lock.
● Connecting the camera to an HDTV
Use an HDMI cable to connect the camera to an HDTV as shown in the images below. The camera display will change and the camera image will automatically be transmitted to the HDTV. You can use the HDTV to browse and view HD videos and photos you have taken and saved. If necessary, use an adapter (mini-HDMI to HDMI).

● APP (for Android and iOS systems)
- Obtaining the APP installation program
☐ For Android systems, go to the Play Store and search for "SILVERCREST SAC 8.0 A1" download the respective installation software. Follow the instructions to install the software.
☐ For iOS systems, go to the App Store and search for "SILVERCREST SAC 8.0 A1" to download the respective installation software. Follow the instructions to install the software.
• Wi-Fi and System applications
Android applications
☐ Install the "SILVERCREST SAC 8.0 A1" application software (provided by the supplier or available online) on your Android mobile or tablet. The display will read "Wi-Fi ON".
☐ Insert a memory card in the camera and switch on the camera. Press the Wi-Fi button to connect to Wi-Fi. The camera display will show the Wi-Fi Signal icon and the screen will show the Wi-Fi connection.
Enable the Wi-Fi function on your Android mobile or tablet; select Silvercrest SAC 8.0A1 Wireless Network. Connect and wait for the device to connect. When connecting for the first time you will need to enter the password: 1234567890. After setting up the connection, change the password.
☐ To do so, press the Display / Menu button 4, then the Power / Mode button 9 to open the ✕ menu.
☐ Press the Wi-Fi button 15 several times to select the option „Wi-Fi Password“. Use the Power / Mode button 9 and the Wi-Fi button 15 to enter a new password and press the OK button 8 to confirm.
Once Wi-Fi has been enabled the Wi-Fi button 15 will light up red. The display will show the wireless network data SSID, the password and the status of the Wi-Fi connection.
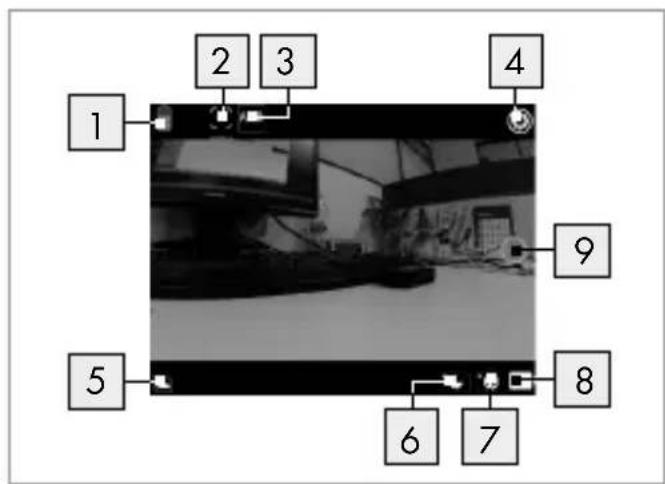
Tap the program icon on your Android mobile or tablet to enable. The image transmitted from your camera will appear (see image below) and you can use the corresponding functions.
- Proposed solution
- White Balance
- Settings (open settings menu)
- Wi-Fi Signal icon
- Camera Battery Level icon
- Enable Playback mode
- OK button
- Video mode
- Photo mode

IOS applications
☐ Install the "SILVERCREST SAC 8.0 A1" application software (provided by the supplier or available online) on your iOS mobile or tablet. The display will read "Wi-Fi ON".
☐ Insert a memory card in the camera and switch on the camera. Press the Wi-Fi button to connect to Wi-Fi. The camera display will show the Wi-Fi Signal icon and the screen will show the Wi-Fi connection.
Enable the Wi-Fi function on your iOS mobile or tablet; select Silver-crest SAC 8.0A1 Wireless Network. Connect and wait for the device to connect. When connecting for the first time you will need to enter the password: 1234567890. After setting up the connection, change the password.
☐ To do so, press the Display / Menu button 4, then the Power / Mode button 9 to open the ✕ menu.
Press the Wi-Fi button 15 several times to select the option „Wi-Fi Password“. Use the Power / Mode button 9 and the Wi-Fi button 15 to enter a new password and press the OK button 8 to confirm.
Once Wi-Fi has been enabled the Wi-Fi button 15 will light up red. The display will show the wireless network data SSID, the password and the status of the Wi-Fi connection.
Tap the program icon on your IOS mobile or tablet to enable. The image transmitted from your camera will appear (see image below) and you can use the corresponding functions.
- DV battery icon
- Video resolution
- White Balance
- Setup (open Setup menu)
- Enable Playback mode
- Time Lapse mode
- Photo mode
- Video mode
- OK button
WARNING!
Lithium battery inside!
■ Protect from heat, water, moisture and direct sunlight!
Troubleshooting
| Problem Solution | |
| The camera won't switch on. The battery is drained. Recharge the battery. The battery takes 3 hours to fully charge. | |
| The camera switches off automatically. | 1. The battery is drained. Recharge the battery. The battery takes 3 hours to fully charge. |
| The camera switches off automatically. | 2. Automatic shut-own is enabled. If desired, disable the function per section “Switching on / off”. |
| Video and photos are blurry. The lens or the waterproof housing are dirty. Clean the lens or the waterproof housing per section “Cleaning and Care”. | |
| The computer doesn't detect the camera. | The USB cable or the USB port on the computer are defective. Use a different USB cable or a different USB port. |
• Using accessory
Suction cup holder
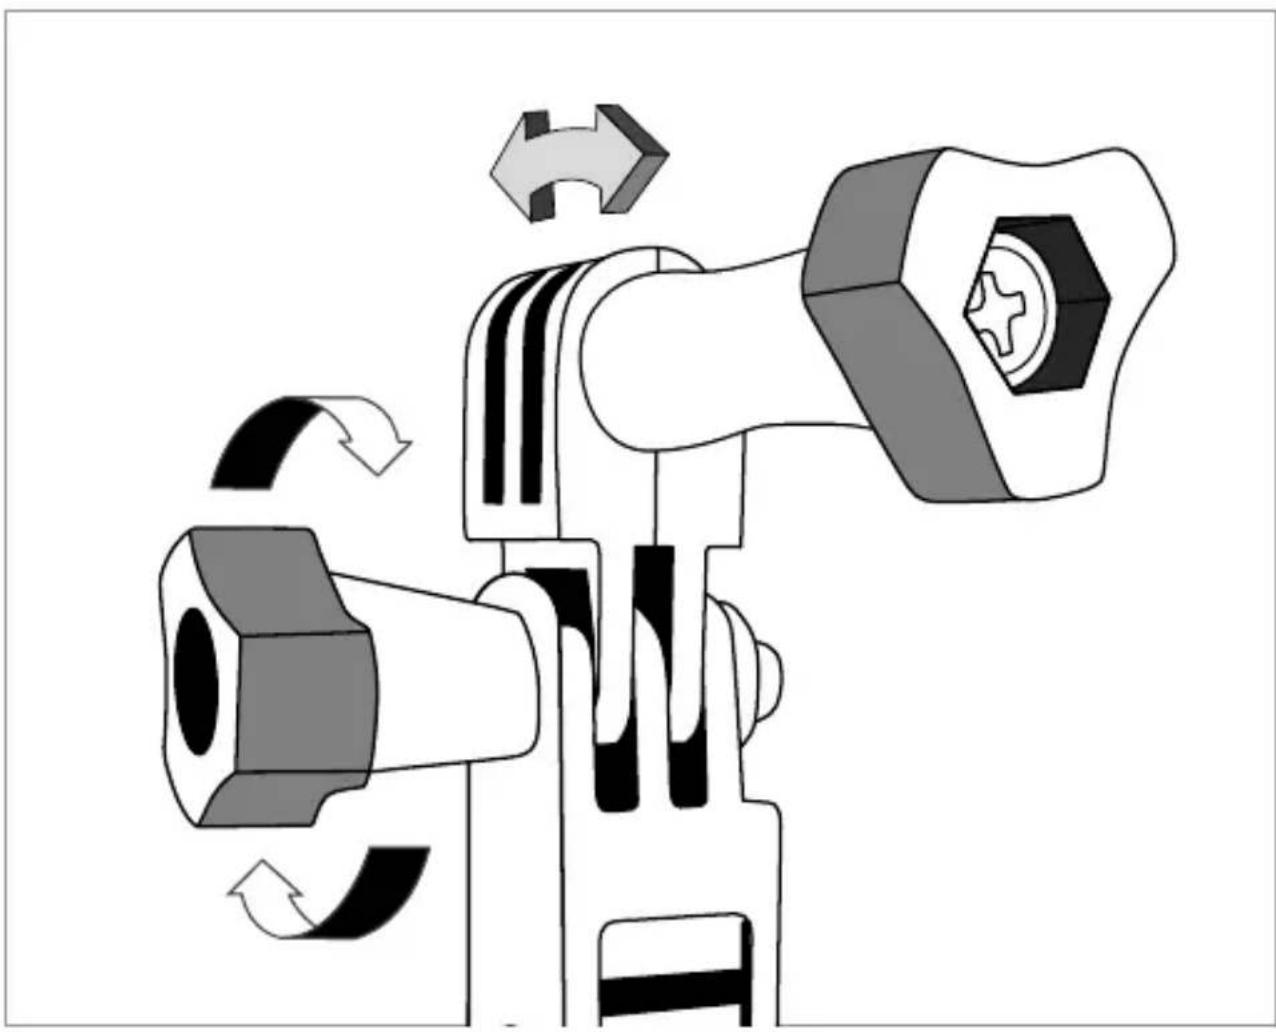
☐ Use the suction cup holder as shown.
☐ To adjust to the desired camera position, loosen then tighten the pivot screws (A horizontal / B vertical).

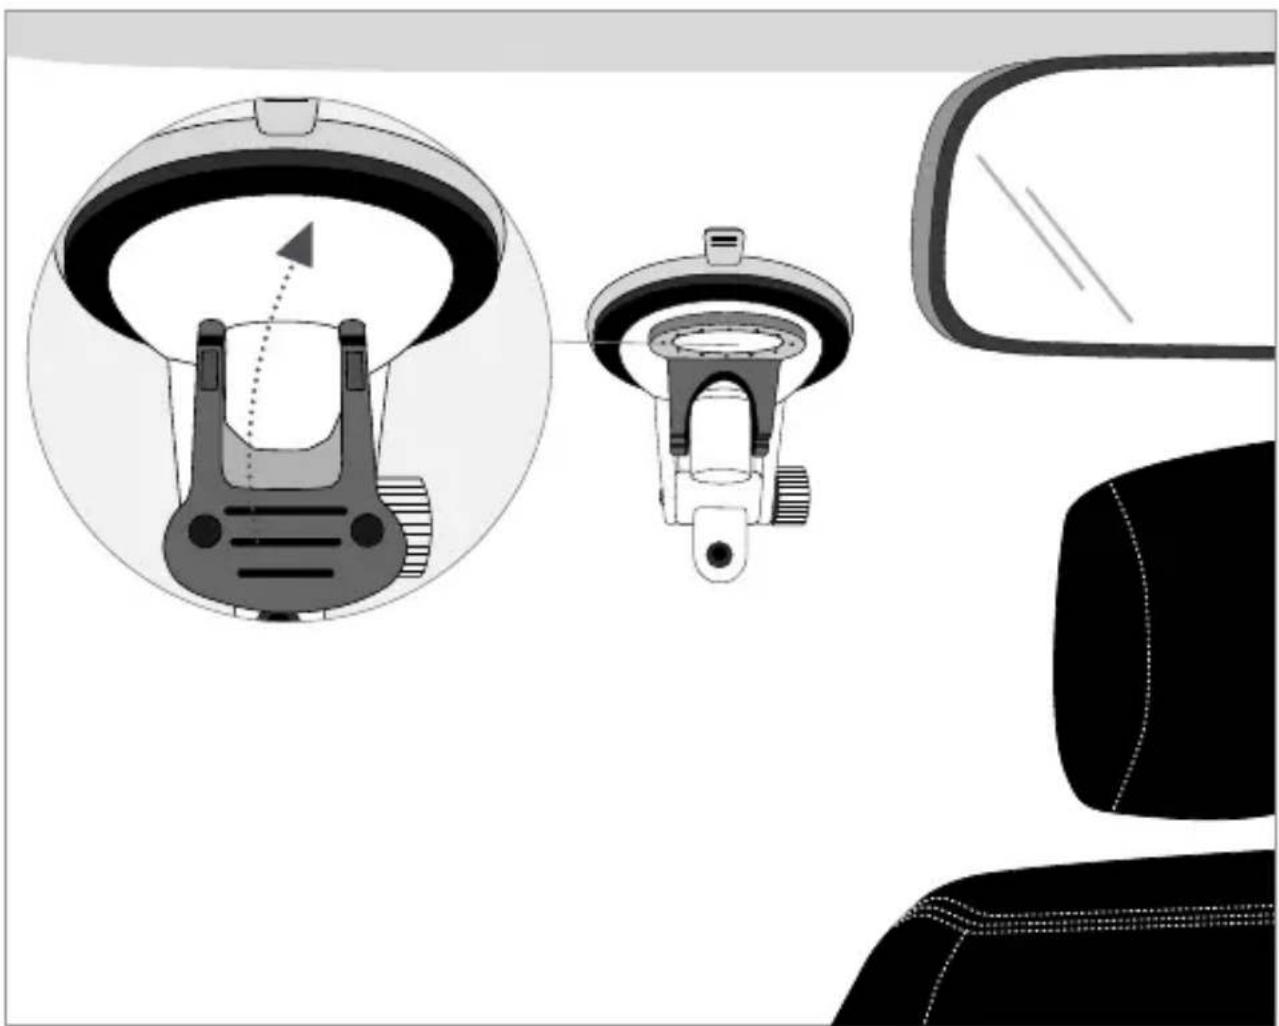
natural_image
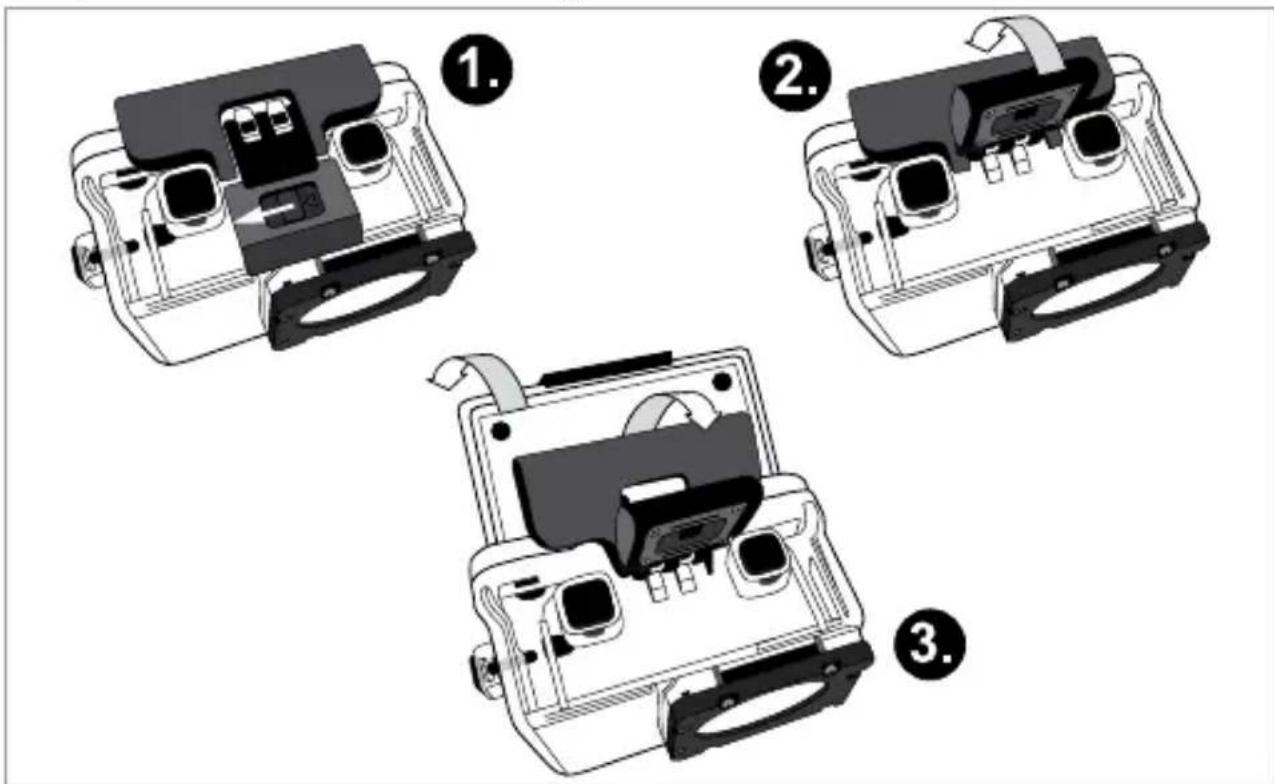
Interior view of a car showing front and rear seat profiles with mechanical components (no text or symbols)Waterproof housing
Open the waterproof housing as shown.
☐ Verify the waterproof housing is completely and correctly closed, thus protected from water entering.
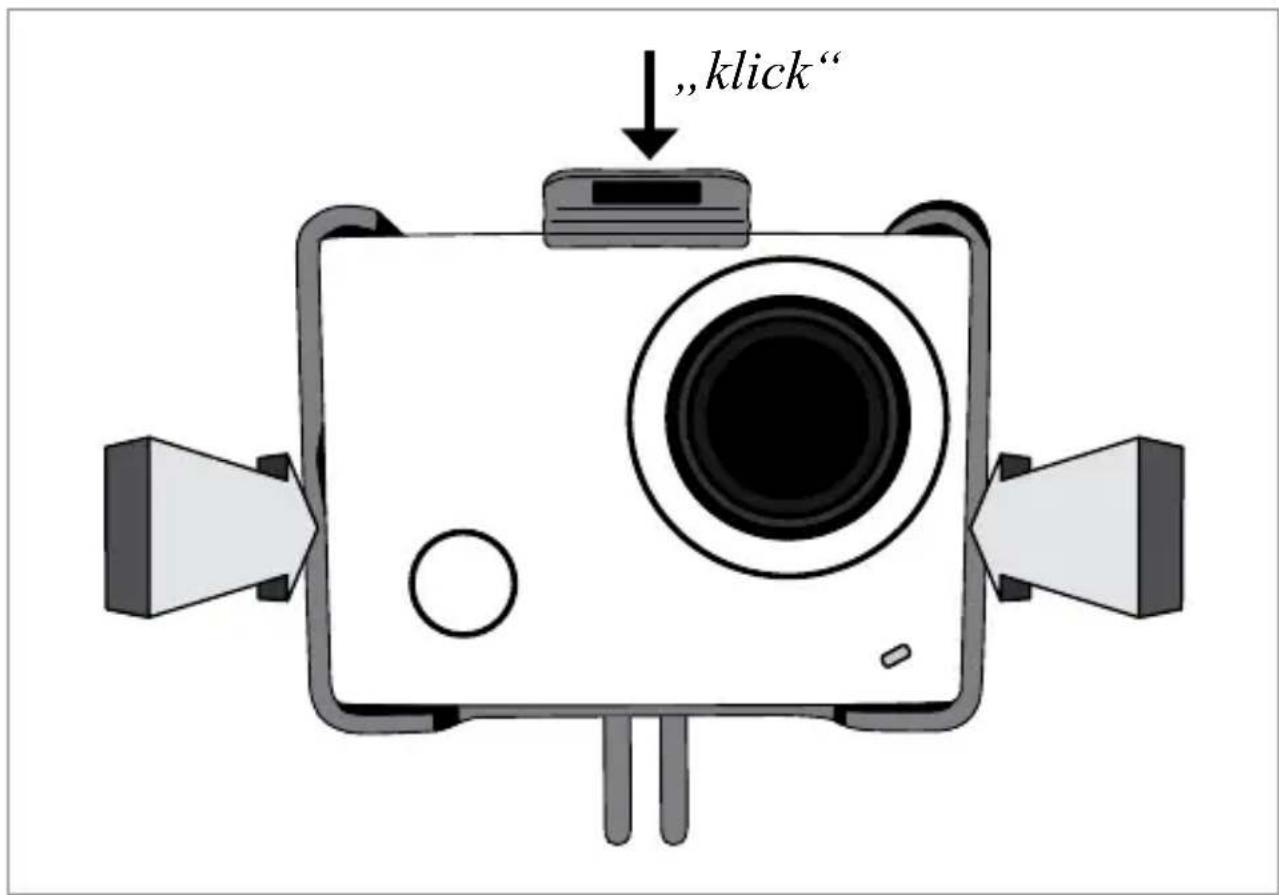
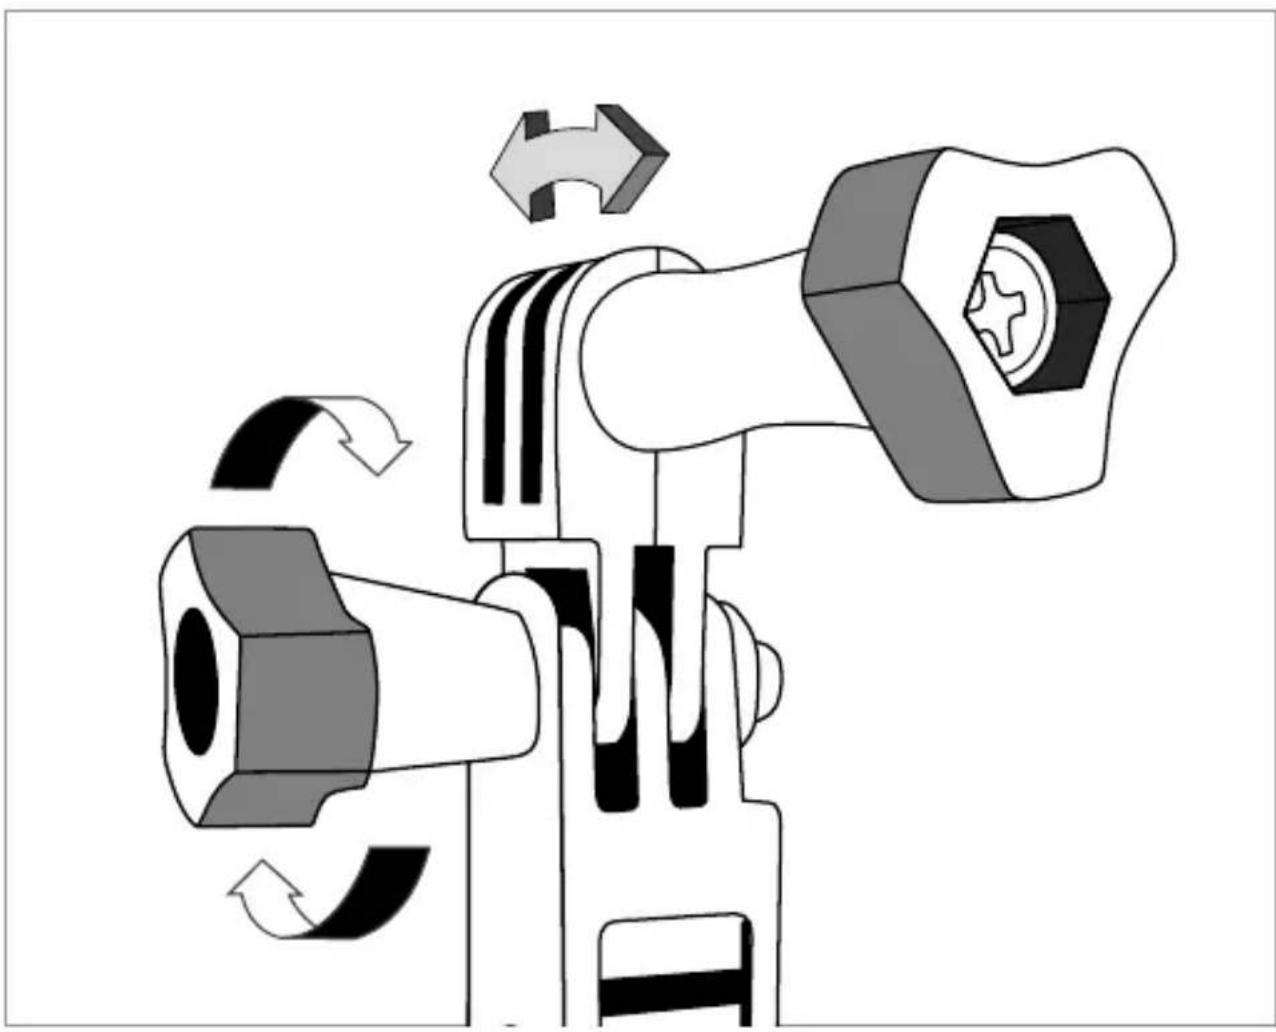
Using the frame bracket
☐ Use the frame bracket as shown.
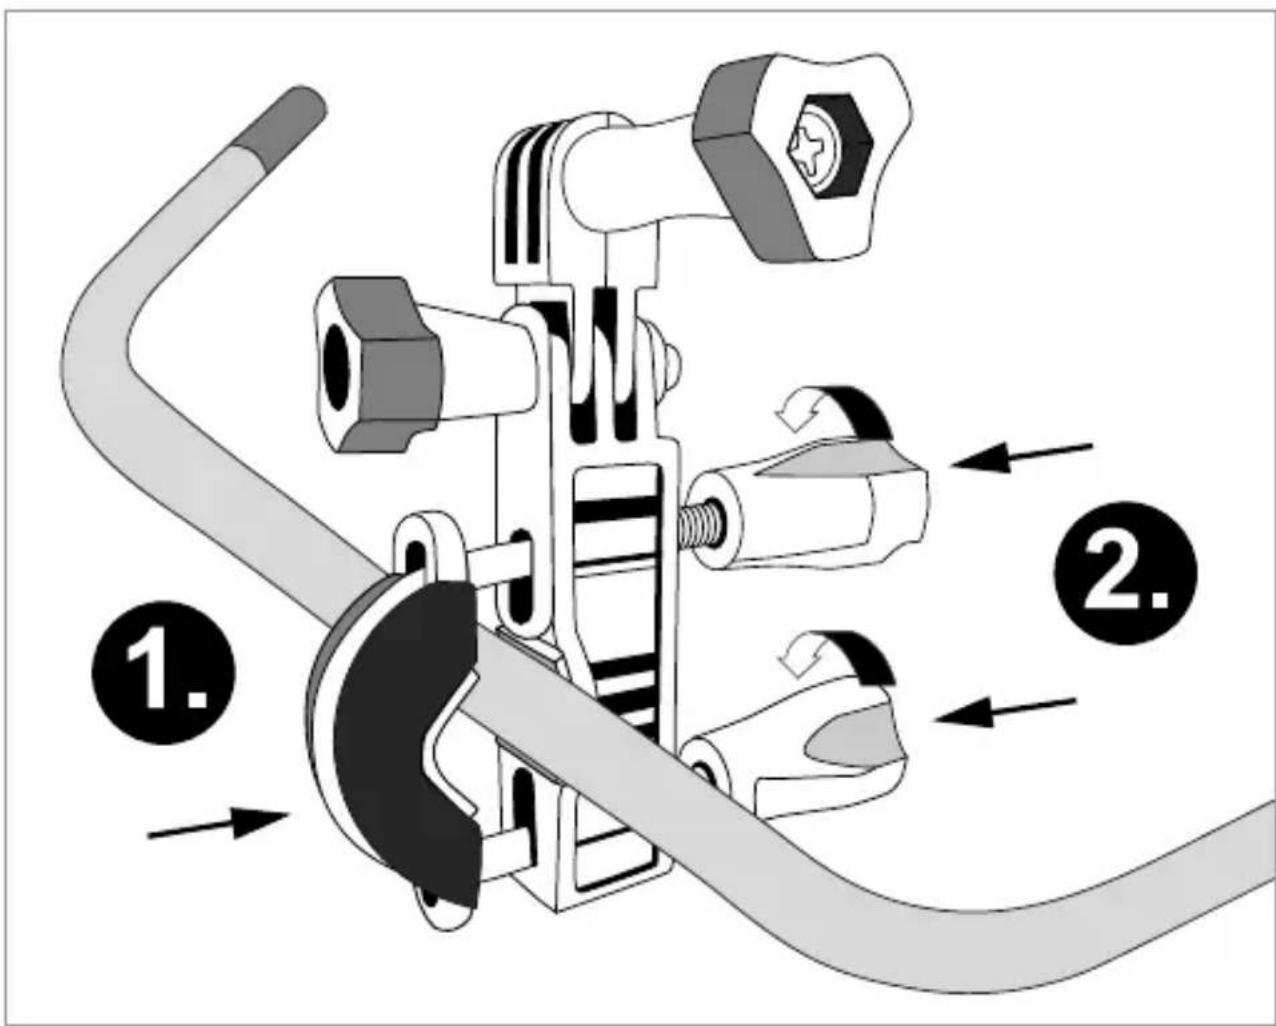
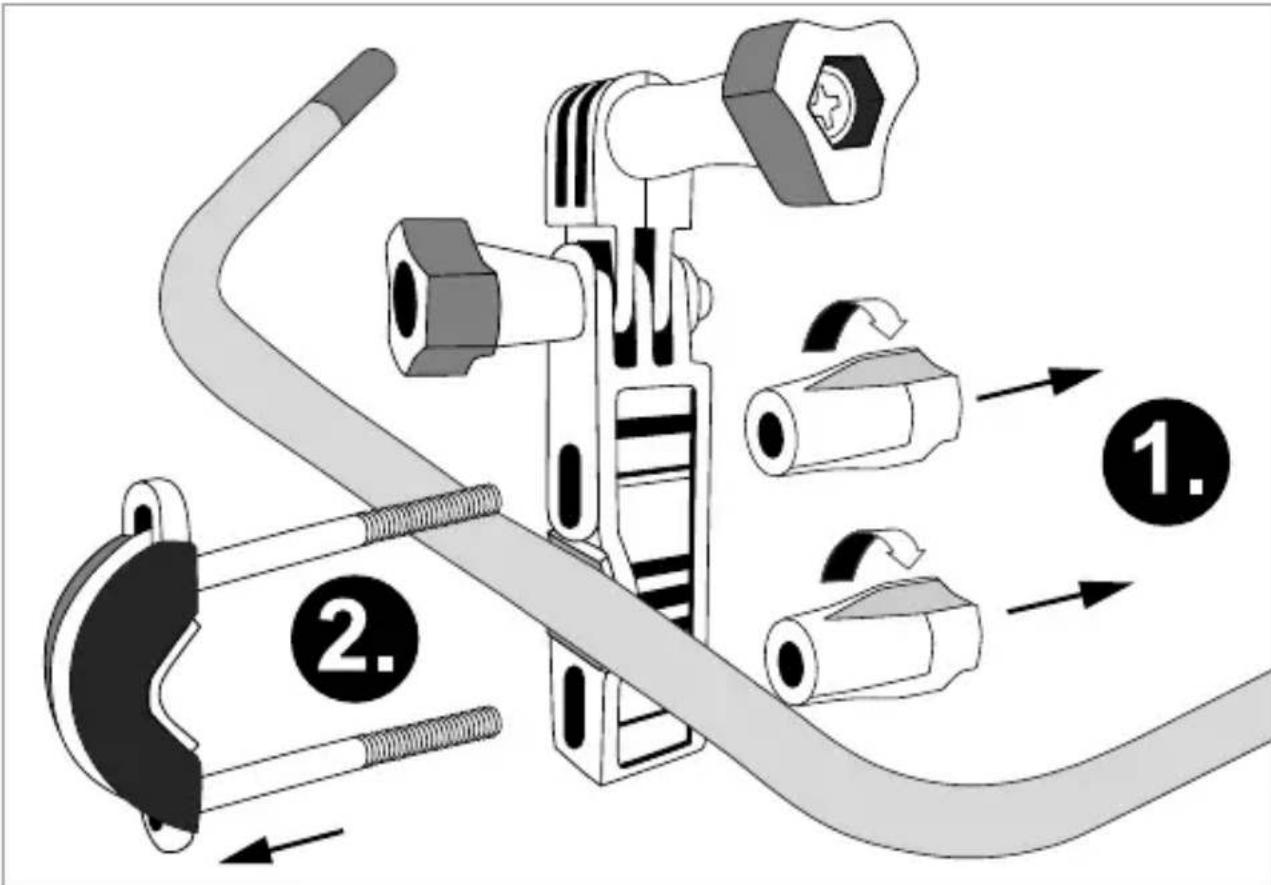
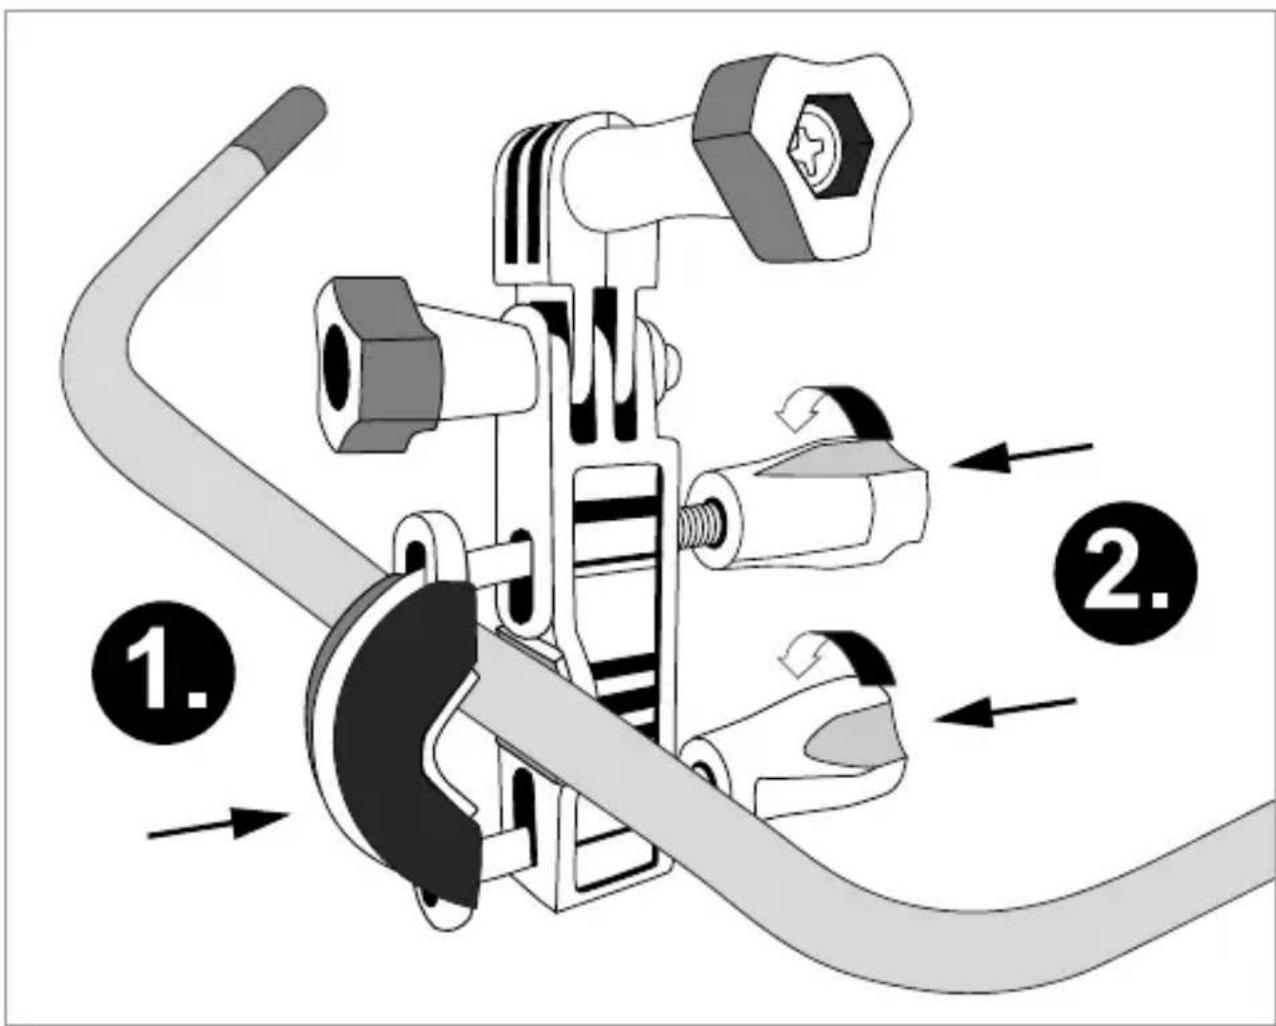
Handlebar mount
☐ Use the handlebar mount as shown.
flowchart
graph TD
    A["Component 1: Bag and Valve"] --> B["Component 2: Cable and Cable"]
    B --> C["Component 3: Valve and Valve"]
    C --> D["Component 4: Valve and Valve"]
    D --> E["Component 5: Valve and Valve"]
    style A fill:#f9f,stroke:#333
    style E fill:#bbf,stroke:#333

natural_image
Mechanical assembly diagram showing a valve mechanism with directional arrows indicating motion (no text or symbols)Helmet mount with strap
☐ Select a helmet mount to fit the shape of your helmet.
Apply the respective adhesive pad in the location where you wish to attach the helmet mount. This will prevent the helmet from being scratched by the helmet mount.
Now loosen the strap at one side of the helmet mount and insert it in and out of one of the vents in the helmet.
Thread the strap into the buckle same as on the other side, pull tight and close the clip. Verify the helmet mount is attached tight to the helmet.
- Cleaning and Care
■ Always disconnect the product from power before cleaning it.
- Do not use solvents, petrol, etc. These will damage the product.
■ Never immerse the product in water.
☐ Only use a dry, lint-free cloth for cleaning.
● Waterproof housing cleaning and care
To ensure your waterproof housing will last a long time, you should keep a few things in mind when caring for the waterproof housing and take your time. The materials are subject to special requirements under water. If the housing leaks, salt water may enter and damage the camera beyond repair.
Routine cleaning
☐ Routinely clean the housing and clean it thoroughly after every dive.
☐ Thoroughly rinse the housing with clean fresh water. If necessary, add a little washing-up liquid to remove grease or dirt from the parts. Immersing it in warm, distilled water is also advisable.
☐ Then always rinse again with clean water.
Ideally let the housing sit open for a while after cleaning to allow moisture in crevices to dry.
□ Clean the lens with mild washing-up liquid.
☐ Use a microfibre cloth to clean and dry.
☐ Never expose to direct sunlight. Divers are already familiar with this rule for their gear. UV light and heat will cause premature wear in diving gear.
Caring for seals
☐ Regularly grease seals with a thin layer of silicon grease. This will keep the seal pliable and prevent cracks. Be sure to follow the manufacturer instructions for compatible greases. Only use non-silicone grease on silicone seals.
Checking the seal
☐ Verify the seal is in good condition before every use. It must be free from cracks.
□ Always immediately remove any dirt – including tiny grains of sand and every single hair. Hair in particular can affect the seal, thus damage the camera.
Removing condensation
Sometimes condensation will collect in the housing due to the oftentimes cooler water when diving. To prevent this, add silicate gel to the housing. These packs can be reused by drying them in the oven or in the sun between uses.
● Storage during non-use
- Avoid hard impact during storage.
Store the camera in a cool location protected from dust when it will not be used for extended periods (see „Technical Data“).
Store the camera inside the original packaging.
Store the accessories with the camera so you will find all the necessary parts when using it again.
☐ Regularly recharge the batteries during storage to maintain the battery capacity.
- Storing the waterproof housing
Store the waterproof housing in a safe place. A suitable bag or a special carton are advisable. The housing should be dry before storing it to prevent mould and mildew.
- Keep the housing open during storage. This will protect the seals and prevent germs from collecting.
- Protect the housing from chemicals and store in a well ventilated, cool, shaded location.
- Disposal

The package and packaging materials consist entirely of environmentally-friendly materials. They can be disposed of through your local recycling facility.

Do not dispose of electric equipment in the household waste!
The symbol with the crossed out wheelie bin means that the device is subject to the 2012 / 19 / EU regulations and is under no circumstances to be disposed of in normal household waste. You must take it to a special collection point for old machines.
Information on free and environmentally-friendly disposal of old electronic devices can be found at your local council or at a disposal site.
Keep your environment clean and dispose of the device correctly. Thank you.
- Warranty and Service
- Warranty Declaration
This product is covered by a non-transferable warranty of 3 years from the date of purchase. Please keep your receipt as proof of purchase. The warranty applies to material or manufacturing defects only and does not cover wear parts or damage caused by improper use. Any modifications will void the warranty. This warranty does not limit your legal rights. Please phone the service centre for warranty claims. This is the only way to return your product free of charge.
Service address
Regiofixx GmbH
Monday to Friday 8:00–18:00 (toll-free)
IAN 279257
Please have your receipt and the item number (IAN 279257) ready as your proof of purchase when enquiring about your product.
● Information about the EU declaration of conformity
Inter Sales A / S hereby declares this product (SAC 8.0 A1) to meet the requirements and further relevant provisions of Directives 1999 / 5 / EC, 2011 / 65 / EU and 2009 / 125 / EC. For the full EU declaration of conformity, please contact:
Inter Sales A/S
Stavneagervej 22,
DK-8250 Egaa
DENMARK
iOS and Apple are registered trademarks of Apple Inc in the USA and other countries. App Store is a registered trademark of Apple Inc.
Android and Google Play are registered trademarks of Google Inc.
Other names, trademarks and products listed in these instructions are the property of the respective owners and may be protected.
Fabricant : Dongguan JinLu Battery Technology
Co., Ltd.
Symbole Ralenti
Symbole Accéléré
natural_image
Illustration of smartwatches and a digital camera with signal waves (no text or symbols)natural_image
Interior view of a car showing front and side views of a vehicle seatbelt device (no text or symbols visible)190 FR/BE
Utiliser le support-cadre
natural_image
Mechanical assembly diagram showing a valve mechanism with directional arrows indicating motion (no text or symbols)195 FR/
flowchart
graph LR
    A["Hand pressing Mode"] --> B["Switch OK"]
    B --> C["Silvercrest"]
natural_image
Illustration of smartwatches and a camera with signal waves, no text or symbols presentnatural_image
Interior view of a car showing front and rear seat profiles with mechanical components (no text or symbols)257 NL,
Waterafstotende behuizing
261 NL,
natural_image
Mechanical assembly diagram showing a valve mechanism with directional arrows indicating motion (no text or symbols)262 NL/BE
Helmhouder met riem


- FR BE
- LEBAN SWANDJUNEALLGEFAHR
- Wasserschutzgehäuse
- Safety Notices......Page 83
- Initial use Page 88
- Using the remote control Page 110
- Connecting the camera to an HDTV ......Page 112
- APP (for Android and iOS systems)......Page 113
- Cleaning and Care Page 127
- Storage during non-use Page 130
- Disposal Page 131
- Warranty and Service Page 132
- Information about the EU declaration of conformity....Page 134
- Trademark notices......Page 135
- WiFi Sports Action Camcorder with Full HD
- - Introduction
- - Rights to your images
- § 22 Sentence 1 KunstUrhG states:
- IntendedUse
- - Parts description (see front flap)
- Camera
- Remote Control
- - Technical Data
- Rechargeable battery
- Wall wart
- - Scope of delivery
- Safety Notices
- Children and persons with impairments
- DANG R/AONLIFE AND RISK OF
- Damage
- Power supply
- Rechargeable batteries and batteries
- WARNING!
- DANGER TO LIFE!
- Application
- - Initial use
- Display
- - Inserting the rechargeable lithium battery
- - Charging the lithium battery
- - Inserting the memory card
- - Switching on / off
- Auto shut-off on drained battery
- - Camera setup
- - Selecting the operating mode
- Video mode
- • Display in video mode
- - Photo mode
- • Display in photo mode
- • Using the playback menu
- Photos
- Video
- - Menu operations
- Explanation of the "Slow Motion" function
- Change language
- Using Time Lapse
- Use:
- All functions at a glance
- ● Using the remote control
- • Using the remote control
- ● Replacing the batteries
- ● Connecting the camera to an HDTV
- ● APP (for Android and iOS systems)
- - Obtaining the APP installation program
- • Wi-Fi and System applications
- Android applications
- IOS applications
- Troubleshooting
- • Using accessory
- Suction cup holder
- Waterproof housing
- Using the frame bracket
- Handlebar mount
- Helmet mount with strap
- - Cleaning and Care
- ● Waterproof housing cleaning and care
- Routine cleaning
- Caring for seals
- Checking the seal
- Removing condensation
- ● Storage during non-use
- - Storing the waterproof housing
- - Disposal
- - Warranty and Service
- - Warranty Declaration
- Service address
- IAN 279257
- ● Information about the EU declaration of conformity
- Utiliser le support-cadre
- Waterafstotende behuizing
- Helmhouder met riem
Brand : SILVERCREST
Model : SAC 8.0 A1
Category : Camcorder