
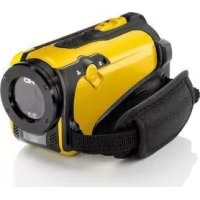
SCA 5.00 A1 - Camcorder SILVERCREST - Free user manual and instructions
Find the device manual for free SCA 5.00 A1 SILVERCREST in PDF.


| Product Type | Digital HD Pocket Camcorder |
| Brand | SilverCrest |
| Model | SCA 5.00 A1 |
| Dimensions (W x H x D) | 58 x 108 x 18 mm |
| Weight | 96 g (without battery) |
| Power Supply | Rechargeable Li-Ion battery NP40 (3.7V, 700mAh) or via USB port; charger Technics-GP TC03G-2U025-0421D |
| Video Resolution | 1080p (1920x1080), 720p, WVGA, QVGA (120 fps) |
| Photo Resolution | 12M (4000x3000 interpolated), 5M, 3M |
| Digital Zoom | 4x (video, except 1080p and QVGA; photo) |
| Display | 3-inch TFT LCD touchscreen, 960x240 pixels, 16:9 |
| Storage Media | Built-in 128MB flash (approx. 75MB available), SD/SDHC card up to 16GB (Class 6) |
| Lens | Fixed f=5.1mm, F/3.2; Focus: Normal 1.5m-infinity, Macro 20-21cm |
| Video Format | H.264 (AVI) |
| Photo Format | JPEG (EXIF 2.2), DCF |
| Macro Mode | Yes, switch on top panel |
| Video Light | Yes, LED, range <1m |
| Self-Timer | Off, 5 sec, 10 sec |
| TV Output | HDMI and USB/AV (PAL/NTSC) |
| PC Interface | USB 2.0 |
| Software Included | TotalMediaHDCam on CD |
| Safety Features | Automatic power-off (1 min, 5 min, off); write-protection tab on SD card |
| Care and Cleaning | Wipe gently with a soft, dry cloth. Avoid water, solvents, and abrasive cleaners. |
| Spare Parts / Repairability | Battery and charger replaceable; SD card user-replaceable. No user repair; contact hotline for service. |
| Warranty | 36 months (battery: 12 months) |
Frequently Asked Questions - SCA 5.00 A1 SILVERCREST
User questions about SCA 5.00 A1 SILVERCREST
0 question about this device. Answer the ones you know or ask your own.
Ask a new question about this device
Download the instructions for your Camcorder in PDF format for free! Find your manual SCA 5.00 A1 - SILVERCREST and take your electronic device back in hand. On this page are published all the documents necessary for the use of your device. SCA 5.00 A1 by SILVERCREST.
USER MANUAL SCA 5.00 A1 SILVERCREST
Digital HD Pocket Camcorder
SE Digital HD-videokamera i fickformat
IE User manual and service information
DK ^* Digitalt HD-lommevideokamera
natural_image
Black and white photo of a HiD flip phone with 'SOSA' branding, displayed on reflective surface (no text beyond branding)

natural_image
Close-up of a black rectangular object with a circular hole and a labeled dimension '21' (no text or symbols on the object itself)EC Declaration of Conformity –
natural_image
Black digital camera module with open screen and external panel (no visible text or symbols)Videokamera SilverCrest SCA 5.00 A1

Laddningsbart litiumjonbatteri, FUJI ELECTRONICS (SHENZHEN) CO., LTD. NP40 (2 delar)

natural_image
Black rectangular device with ports and a black cable with a power plug, shown side by side (no text or symbols visible)natural_image
Coiled black cable with USB port connectors and a white connector (no text or symbols visible)USB/AV-kabel

natural_image
Coiled black cable with two USB connectors (no text or symbols visible)HDMI-kabel Bärrem


natural_image
Close-up of a dark, rectangular object with a slightly curved top edge (no visible text or symbols)
natural_image
Circular metallic object with radial blades and central hub (no text or symbols)natural_image
Illustration of a handheld device with a scroll and control panel, showing a curved arrow indicating rotation (no text or symbols present)2.

3.

natural_image
Close-up of a black electronic device casing with a white arrow pointing to a component labeled 'EC' (no readable text or symbols on the device itself)natural_image
Warning symbol with exclamation mark inside a triangle (no text or numbers)natural_image
Simple icon of a light bulb inside a circle, no text or symbols presentnatural_image
Line drawing of a handheld electronic device with a stylus and screen, showing no text or symbols.2

natural_image
Line drawing of a handheld electronic device with a screen and antenna (no text or symbols)3
natural_image
Illustration of a handheld electronic device with a stylus and screen, showing no text or symbols.natural_image
Illustration of a rectangular electronic device with a scroll wheel and a button, showing no text or symbols.natural_image
Line drawing of a printer with an open slot and a paper clip inserted (no text or symbols)natural_image
Diagram of a computer monitor with an open port and a directional arrow indicating action (no text or symbols present)natural_image
Close-up of a black USB flash drive with a white arrow pointing to it (no text or symbols on the chip itself)
natural_image
Close-up of a black USB flash drive chip with a white arrow pointing to it (no text or symbols on the chip itself)natural_image
Black-and-white photo of a herd of deer grazing in a sandy field, no visible text or symbolsBildförhållande 4:3
QVGA
natural_image
Black-and-white photo of a herd of deer grazing in an open field with trees in the background (no text or symbols visible)
natural_image
Warning symbol with exclamation mark inside a triangle (no text or numbers)natural_image
Warning symbol with exclamation mark inside a triangle (no text or numbers)natural_image
Illustration of a laptop connected to a USB cable via a device, with an inset magnified view showing internal components (no text or symbols present)natural_image
Black handheld digital camera with open screen (no visible text or symbols)Videokamera SilverCrest SCA 5.00 A1
Punjiva litij-ionska baterija, FUJI ELECTRONICS (SHENZHEN) CO., LTD. NP40 (2 kom.)

natural_image
Black electronic device with attached power cord and terminal ports (no visible text or symbols)Punjač Technics-GP TC03G-2U025-0421D i strujni kabel
natural_image
Coiled black cable with USB port connectors and white connectors (no text or symbols visible)USB/AV kabel

natural_image
Coiled black cable with two USB connectors (no text or symbols visible)HDMI kabel Pojas za nošenje

natural_image
Simple black tool with loop handle and curved tip (no text or symbols)
natural_image
Close-up of a dark, textured object with a rounded top and bottom (no visible text or symbols)Torbica CD sa softverom

natural_image
Circular metallic object with radial blades, resembling a fan or impeller (no text or symbols visible)
Upute za uporabu (nisu prikazane)
Memorijska kartica SD (2 GB)

natural_image
Illustration of a handheld electronic device with a scroll and control panel, showing a curved arrow indicating rotation (no text or symbols present)2.
3.

natural_image
Close-up of a black plastic electronic device casing with ports and a partially visible card label (no readable text or symbols)Baterija mora uskočiti u punjač. Potom spojite strujni kabel u punjač, a drugi kraj kabela u strujnu utičnicu.

natural_image
Warning symbol with exclamation mark inside a triangle (no text or numbers)Za rad videokamere koristite samo punjivu litijionsku bateriju FUJI ELECTRONICS (SHENZHEN) CO., LTD. NP40.
natural_image
Simple icon of a light bulb inside a circle, no text or symbols presentnatural_image
Line drawing of a handheld electronic device with a stylus and screen, showing no text or symbols2

natural_image
Line drawing of a handheld electronic device with a screen and antenna, showing no text or symbols.3
natural_image
Line drawing of a device with a pen and a screen showing a button, no text or symbols present-
Potom stavite bateriju u videokameru kao što je prikazano na slici 2. Pritom najprije stavite metalne kontakte u odjeljak za bateriju i pritisnite je tako da uskoči. Pri stavljanju punjive baterije provjerite je li jezičak postavljen oko baterije kako biste lakše izvukli baterije iz odjeljka kad bude potrebno.
-
Zatvorite odjeljak za baterije tako da prvo stavite donji dio poklopca, a zatim ga pritisnete dok ne uskoči (vidi sliku 3).
Stavljanje SD kartice
Priložena SD memorijska kartica povećava kapacitet prostora za pohranu videosnimki i fotografija u videokameri. Kada stavite memorijsku karticu, sav snimljeni materijal spremat će se na nju. Ako u videokameri nema memorijske kartice, fotografije i snimke spremat će se u unutarnju memoriju videokamere.
natural_image
Illustration of a rectangular electronic device with a scroll wheel and indicator lights (no text or symbols)- Potom stavite memorijsku karticu tako da metalni kontakti budu okrenuti prema utoru za karticu. Naljepnica mora biti okrenuta prema desnoj strani kućišta videokamere. Gurnite karticu do kraja u utor dok ne uskoči.
natural_image
Line drawing of a printer with an open slot and paper holder (no text or symbols)- Zatvorite odjeljak za memorijsku karticu tako da zatvorite poklopac i oprezno ga pritisnete dok ne uskoči.

natural_image
Line drawing of a printer with an arrow indicating print direction (no text or symbols)Pri vađenju memorijske kartice otvorite odjeljak za memorijsku karticu i nježno pritisnite stavljenu karticu. Ona će iskočiti i tada je možete izvaditi.

Ako se memorijska kartica ili unutarnja memorija napuni, na zaslonu će se prikazati poruka Memorija puna. Videosnimka koja se upravo snima će se spremiti, a snimanje će se prekinuti.
Zaštita memorijske kartice od snimanja
Memorijska kartica ima klizač za zaštitu od snimanja. Kad uključite zaštitu od snimanja (vidi desnu sliku), moći ćete samo pregledavati postojeće snimke i fotografije, ali ih nećete moći brisati i mijenjati. Osim toga, na memorijsku karticu ne možete snimati nove snimke i fotografije.

natural_image
Close-up of a black USB flash drive with a white logo and an arrow pointing upward (no readable text or symbols beyond branding)
natural_image
Close-up of a black USB flash card with a white logo and arrow pointing to it (no readable text or symbols beyond branding)natural_image
Simple icon of a light bulb inside a circle, no text or symbols presentFunkcija zumiranja nije dostupna u razlučivostima 1080p i QVGA. Vidi i stranicu 96 – Razlučivost.
natural_image
Black-and-white photo of a herd of deer grazing in a sandy field (no visible text or symbols)Omjer dimenzija 4:3
QVGA

natural_image
Black-and-white photo of a herd of deer grazing in an open field, no visible text or symbols
Razlučivost QVGA snima uz veliku brzinu kadrova (120 kadrova u sekundi). To je četiri puta brže od uobičajene brzine te je stoga prikladno za brze scene (poput utrka automobila, sportskih događaja, itd.).
natural_image
Warning symbol with exclamation mark inside a triangle (no text or numbers)Upozorenje! Spremljene videosnimke i fotografije će se nepovratno izbrisati. To se odnosi i na zaštićene datoteke. Snimke koje želite sačuvati prethodno kopirajte na drugi medij.
Zadano
-
Odaberite izvor HDMI signala koji odgovara gore navedenim ulaznim priključcima televizora. Ako je potrebno, pojedinosti o tome pročitajte u uputama za uporabu televizora.
-
Pritisnite glavnu sklopku (18) kako biste uključili videokameru. Zaslon uređaja ostaje isključen dok se slika prikazuje na televizoru.

- Odaberite AV kanal koji odgovara gore opisanim ulaznim priključcima televizora. Ako je potrebno, pojedinosti o tome pročitajte u uputama za uporabu televizora.
- Pritisnite glavnu sklopku (18) kako biste uključili videokameru. Zaslon uređaja ostaje isključen dok se slika prikazuje na televizoru.
natural_image
Warning symbol with exclamation mark inside a triangle (no text or numbers)natural_image
Illustration of a laptop connected to a USB cable via a device, with an inset magnified view showing internal components (no text or symbols present)Safety Instructions....125
Children....127
Charger and Rechargeable Battery....127
Cables....128
Repair and Maintenance....128
Intended Use....129
Conformity....129
Disposal of Old Devices....130
Introduction....131
Package Contents....131
Controls and buttons....132
Front Panel....133
Rear Panel....133
Left Panel (display closed)....134
Left Panel (display open)....134
Top View....135
Bottom....135
Opening the Display....136
Charging the Batteries....137
Table of Contents SilverCrest SCA 5.00 A1
Inserting the Battery....138
Inserting an SD Card....139
Write-Protecting the Memory Card....140
Switching the Camcorder On and Off....141
Switching the Operating Mode....142
Setting the Menu Language....142
Setting Date and Time....142
Recording....144
Recording Videos....144
Video Light....146
Macro Mode....146
Exposure Compensation....147
Capturing Pictures....148
Video Light....149
Macro Mode ....150
Exposure Compensation....150
Playback....151
Playing Back Video Clips....151
Playing Back Photos....154
The Menus.... 156
The Recording Menus....156
Video Recording Menu....156
Photo Capture Menu....159
The Playback Menus....162
Video Playback Menu....162
Photo Playback Menu....165
Setup Menu....168
Date / Time....168
Beep....169
Auto PowerOff....169
TV Standard....169
Format....169
Default....170
Language....170
Frequency....170
Connectors and Ports....171
Viewing Recordings on a Television Screen....171
Connecting via the HDMI Cable....171
Connecting via the USB/AV Cable....172
Transferring Recordings to the Computer....174
Using the USB port....175
Using a Card Reader....176
Table of Contents SilverCrest SCA 5.00 A1
Appendix.... 177
Installing the Software....177
System Requirements....177
Software....177
Technical Specifications....179
Warranty Information....181
EC Declaration of Conformity....183
Important Notice
Safety Instructions
- Before you use this device for the first time, please read the following notes in this manual and heed all warnings, even if you are familiar with handling electronic devices. Always check that the product works correctly.
- Keep this manual with the instructions in a safe place for future reference.
- If you sell the device or pass it on, it is essential you hand over this manual also.
- Do not try to open the housing or reassemble the product. You are at risk of receiving an electric shock. Maintenance and repairs should only be carried out by qualified technicians.
- Do not look at the sun or other sources of intense light. Doing so may damage your eyesight.
- Keep the device away from water and other liquids. Do not operate the device with wet hands and do not use it in rain or snow. Dampness can cause danger through fire or electric shock.
- Keep the device out of the reach of children and animals to avoid accidents or damage.
- Switch the device off immediately if you notice it emitting smoke or strange noises. Contact customer service. Never try to repair the device yourself.
- Only use the supplied charger cradle TC03G-2U025-0421D to recharge the product battery.
- Only use this device with the supplied rechargeable Li-Ion battery (FUJI ELECTRONICS (SHENZHEN) CO., Ltd. NP40) in order to avoid overheating, deformation of the cover, fire, electric shocks, explosion and other dangers.
- Unplug the power cord from the mains outlet before you remove the rechargeable battery from the charger or separate the charger from the power cord.
- In the event of a defect in the charger or its accessories, unplug the power cord from the mains immediately.
- Also, when there is the possibility of thunderstorms, unplug the power cord from the wall outlet.
- Never try to heat, disassemble or short-circuit the rechargeable battery. Do not throw the rechargeable battery into fire. Otherwise there is risk of explosion.
Warning: Notice concerning separation from the mains
In order to completely disconnect the charger from the mains, unplug the power cord from the wall outlet. The wall outlet where the charger is connected must be easy to access so that the power cord can be pulled out quickly in case of emergency. Unplug the power cord from the mains when it is not used for a while (e.g. when going on holiday) in order to avoid the danger of fire. Do not hold the power cord with wet hands.

The charger consumes electricity in idle mode. To avoid any kind of power consumption, you should separate it from the mains. To do this, unplug the mains plug from the wall outlet.
The device is not for use in rooms with a high temperature or humidity and must be kept free of dust. Position the device on a stable, even surface and do not place any objects on the device.
Always make sure that:
- no direct heat sources (e.g. heating) can affect the device;
- no direct sunlight or bright artificial light reaches the device;
- contact with spray, dripping water and corrosive liquids must be avoided and the device should never be operated near water, and it must especially never be immersed (do not place any
objects filled with liquids such as vases or drinks near the device);
- no fire sources (e.g. burning candles) are placed on or near the device;
- no foreign bodies are introduced into the device;
- the device must not be subject to any great temperature changes as this may cause moisture through condensation;
- the device should not be subject to excessive shock and vibrations.
Children
Electrical devices do not belong in the hands of children. Do not allow children to use electrical devices when not under supervision. Children may not comprehend the presence of potential risks. Rechargeable batteries and small parts represent potential choking hazards. Keep batteries out of reach of children. If a rechargeable battery is swallowed, seek medical help immediately. Keep all packaging away from children as this can cause suffocation.
Charger and Rechargeable Battery
Insert the rechargeable battery with the correct polarity. Never throw a rechargeable battery into fire. Remove the rechargeable battery when the device is not to be used for a long time.
Danger of Explosion!
Non-intended use may cause explosion and danger to life. Only replace the rechargeable battery with an equivalent or a type recommended by the manufacturer. Never replace any batteries in an explosion-sensitive environment. While inserting or removing the batteries a spark may be produced causing an explosion. Explosion-sensitive areas will normally (but not always) be labelled. These include fuel storage areas such as below deck on a boat, fuel line or tank areas, environments where the air contains inflammable substances (e.g. cereals, dust or metal powder, etc.) and any areas where you should normally switch off your car engine.
Respect the environment. Old rechargeable batteries do not belong in with domestic waste. They must be handed in to a collection point for old batteries.
Cables
Always hold cables by the plug and never pull on the cable itself. Never hold the power cord with wet hands as this may cause a short circuit or electric shock. Never place the device, heavy objects or furniture on the cable and take care that the cord does not become trapped, especially at the plug and sockets. Never make knots in the cable and do not tie it together with other cables. All cables should be positioned so that nobody can trip over them or be obstructed by them. A damaged power cord can cause a fire or an electric shock. Inspect the power cord from time to time. Do not use an adapter plug or extension cable that does not meet the required safety standards.
Repair and Maintenance
Repairs are required when this device has been damaged in any way: for example, when the charger or the housing of the SilverCrest SCA 5.00 A1 is damaged, when liquid or objects have entered the device, when the product has been exposed to rain or moisture, when the product does not work normally or if the product has been dropped. If you notice any smoke, unusual noise or strange smells, switch off the device immediately and unplug the power cord from the power supply. In these cases the device should not be used further and should be inspected by authorized service personnel. Please contact qualified personnel when servicing is needed.
Intended Use
This is an information technology electronics device. It has been designed for video and photo recording and playback. It may only be used for private use, not industrial or commercial purposes. In its default configuration, this product has not been designed for medical, lifesaving, rescue or life-maintaining purposes. Only connection cables and external devices may be used that comply with safety standards and the electromagnetic compatibility and shielding quality of this device.
Do not modify the device or the supplied accessories yourself. The manufacturer will not be liable for any damages resulting from unauthorised modifications. Furthermore, modifying the device in any way will void the warranty.
Conformity
CE
This device and its supplied accessories have been tested and approved for compliance with the basic and other relevant requirements of the EMC Directive 2004/108/EC, as well as the Low-voltage Directive 2006/95/EC. The Declaration of Conformity can also be found at the end of this User's Manual.
Any changes to the equipment other than those recommended by the manufacturer may lead to these directives no longer being met. Only use the accessories recommended by the manufacturer. If you are not using the device within the Republic of Germany, you must observe the regulations and laws in the country of use.
Disposal of Old Devices

Devices marked with this symbol are subject to the European Directive 2002/96/EC. All electric and electronic devices must be disposed of separately from household waste at established bodies.
Avoid hazards to the environment and dangers to your personal health by disposing of the device properly. For further information about proper disposal, contact your local government, disposal bodies or the shop where you bought the device.
Respect the environment. Old rechargeable batteries do not belong in with domestic waste. They must be handed in to a collection point for old batteries.
Introduction
Package Contents
Take all supplied devices and accessories out of the packaging and inspect them for any damaged or missing items.

natural_image
Black digital camera module with open screen and external ports (no visible text or symbols)Camcorder SilverCrest SCA 5.00 A1

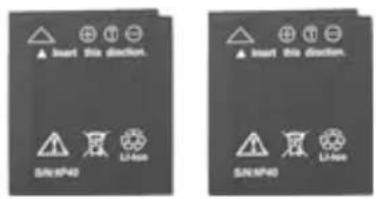
Rechargeable Li-Ion battery,
FUJI ELECTRONICS
(SHENZHEN) CO., LTD. NP40
(2 pieces)

natural_image
Black rectangular device with ports and a black cable with a power plug (no visible text or symbols)Charger Technics-GP TC03G-2U025-0421D and power cord
natural_image
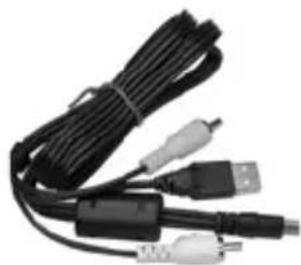
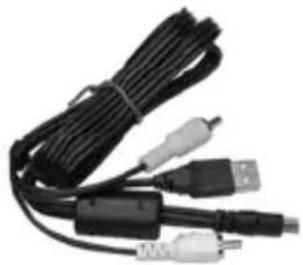
Coiled black cable with USB port connectors and a white connector (no text or symbols visible)USB/AV cable

natural_image
Coiled black cable with two USB connectors (no text or symbols visible)HDMI cable Carrying strap

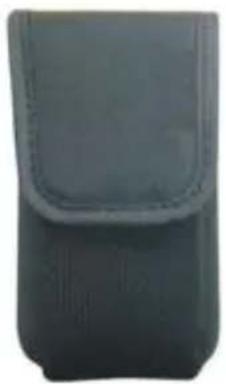
natural_image
Black leather pouch with a dashed sleeve, no visible text or symbolsPouch CD with software
natural_image
Circular metallic object with radial blades and central hole, no visible text or symbols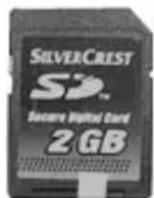
User's manual (not shown) SD memory card (2 GB)

Keep the packaging material in case you have to ship or transport the product in the future.
Controls and buttons
An additional illustration of the items and controls and their corresponding numbers can be found on the inner page of the fold-out cover of this User's Manual. You can keep this page folded out whilst reading the different chapters of this User's Manual. This will permit you to refer to the corresponding items or connection port of your camcorder at any time.
Front Panel
1 Lens
2 Video lamp
3 Eyelet for carrying strap

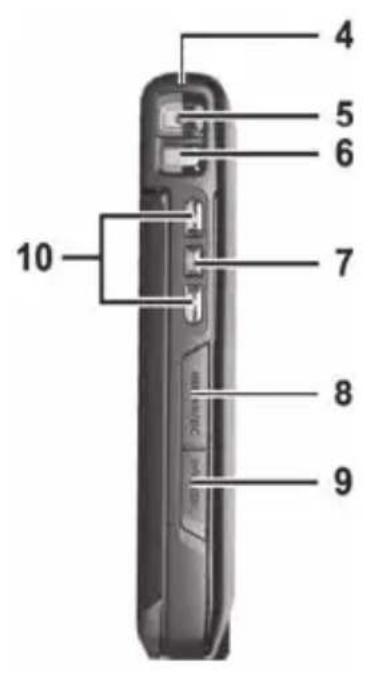
Rear Panel
4 Power indicator
5 RECORD button
6 Mode selection switch
7 Confirmation button / LED lamp on/off
8 USB/AV cable receptacle
9 HDMI jack
10 Menu navigation

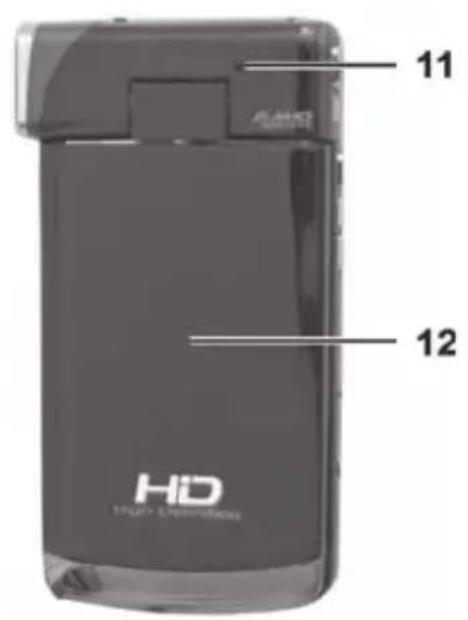
Left Panel (display closed)
11 Microphone
12 Fold-out touchscreen

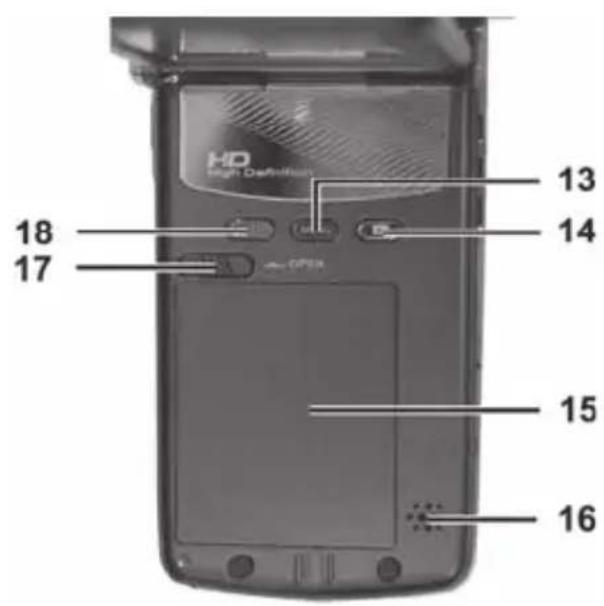
Left Panel (display open)
13 Menu button
14 PLAY button
15 Battery
compartment
cover
16 Speaker
17 Battery compartment lock
18 On/Off button

Top View
19 Macro switch
20 Memory card compartment

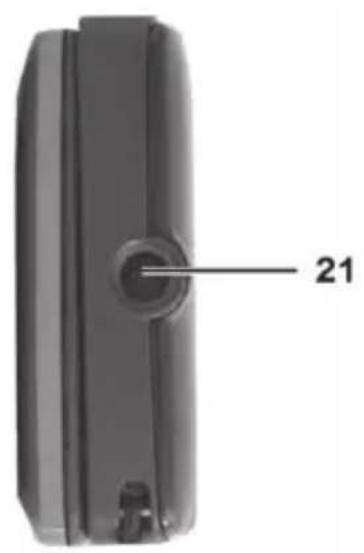
Bottom
21 Tripod mount
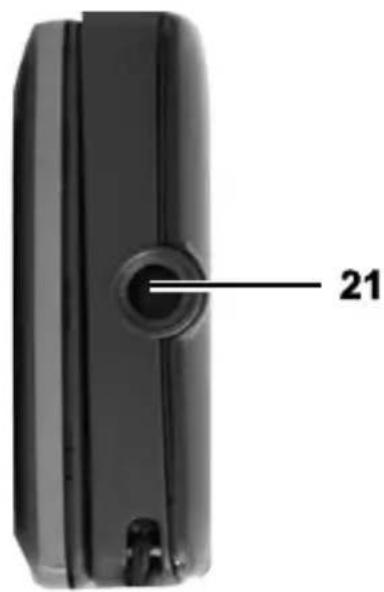
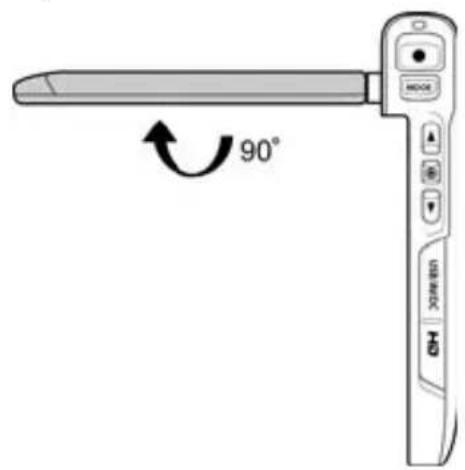
Opening the Display
Open the display and then rotate it according to your needs.
1.

natural_image
Illustration of a handheld device with a scroll and control panel, showing a curved arrow indicating rotation (no text or symbols present)2.

3.

You can also rotate the display so it faces the front. In this case, the picture orientation will be adjusted automatically. However, this applies to recordings in landscape format only.
Charging the Batteries
The camcorder is powered by a rechargeable Lithium-Ion (FUJI ELECTRONICS (SHENZHEN) CO., LTD. NP40) battery. On delivery, the batteries are not charged. Please charge the batteries before first use of the device.
Insert the rechargeable battery in the charger cradle Technics-GP TC03G-2U025-0421D so that the contacts (+) and (-) correspond to the rechargeable battery and charging tray markings.

natural_image
Close-up of a black plastic electronic device casing with a white arrow pointing to a component, no visible text or symbols.Make sure that the battery clicks into place on the charger. Next connect the power cord to the charger and plug the power cord to a wall outlet.

natural_image
Warning symbol with exclamation mark inside a triangle (no text or numbers)To power the camcorder, use only the rechargeable Lithium-Ion battery FUJI ELECTRONICS (SHENZHEN) CO., LTD. NP40.
Remove the rechargeable battery from the camcorder when the device is not to be used for a long time.

During charging, the rechargeable battery and charging device will become warm. This is not a malfunction.
The status indicator of the charging cradle will light orange whilst the battery is charging. When the charging process is completed, the status indicator will light green. You can then insert the rechargeable battery into the camcorder. Depending on the charge level, the charging cycle can take up to 2 hours.


If, after inserting the rechargeable battery, the indicator remains green, this means the rechargeable battery is already charged or it is not correctly inserted. In this case, check the polarity.
You can also charge the camcorder battery by leaving it in the camcorder and connecting the camcorder to the computer by using the USB/AV cable. To do this, proceed as described in steps 1-3 on page 175 – Using the USB Port. If you keep the camcorder powered off after the USB cable has been connected to the computer, the battery will charge. The power indicator (4) will light red to indicate that the camcorder battery is being charged via the computer. As soon as the battery is fully charged, the indicator stops lighting. To charge the battery via the computer takes approx. 3 hours.
Inserting the Battery
When the battery is fully charged, insert it into the camcorder as indicated below.
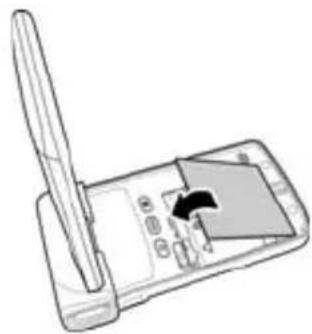
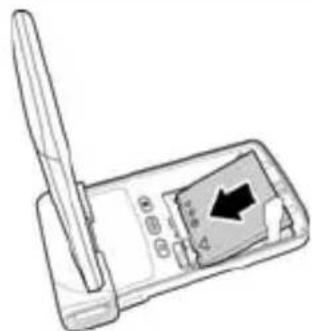
- Open the battery compartment. To do this, slide the lock (17) to the left and release it. This will release the cover on top and it will protrude a little.
- Insert your fingernail behind the cover and pull it off (see figure 1 on page 139).
1

natural_image
Line drawing of a handheld electronic device with a stylus and screen, showing no text or symbols.2
natural_image
Illustration of a handheld electronic device with a screen and antenna, no visible text or symbols3
natural_image
Illustration of a stylus interacting with a device (no text or symbols visible)-
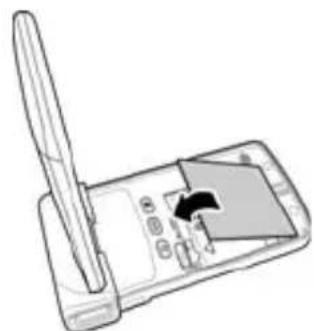
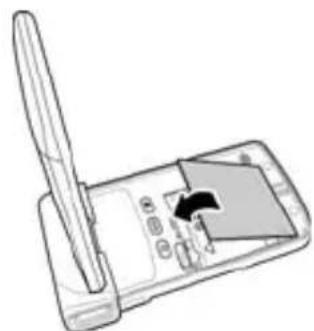
Next insert the battery into the camcorder, as shown in figure 2. To do this, insert its metal contacts first into the battery compartment and then push it downwards so that it clicks into place. When inserting the rechargeable battery, make sure that the tag is placed around the battery so that you can remove the battery easily from the compartment when required.
-
Close the battery compartment by first inserting the bottom part of the cover and then push it downwards until it clicks into place (see figure 3).
Inserting an SD Card
By using the supplied SD memory card you can increase the camcorder storage capacity for saving your videos and photos. When a memory card is inserted, all the recorded contents will be saved onto it. If there is no memory card inserted, your photos and videos will be saved to the internal memory of the camcorder.
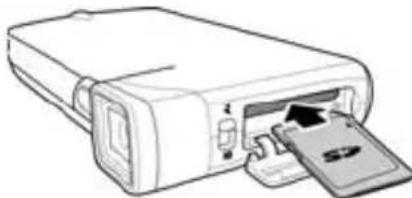
- Open the memory card compartment (20) by inserting your fingernail below the cover slot and then carefully pull it upwards and to the front.

natural_image
Illustration of a rectangular electronic device with a scroll wheel and indicator lights (no text or symbols)- Then insert the memory card with the metal contacts facing forwards into the card slot. The label must face towards the right panel of the camcorder housing. Slide the card fully into the slot opening until the card clicks into place.

natural_image
Line drawing of a printer with an open slot and a separate card inserted (no text or symbols)- Close the memory card compartment by closing the cover and carefully pressing on it until it clicks into place.

natural_image
Illustration of a printer with an arrow indicating print direction (no text or symbols present)To remove the memory card, open the memory card compartment and gently press on the inserted card. This will protrude a little so that you can get a hold of it and remove it.

If the memory card or the internal memory is full, the message Memory full will appear on the display. The video being currently recorded will be saved and the recording will be cancelled.
Write-Protecting the Memory Card
The memory card features a write-protection tab. When the write protection is enabled (see the right figure) you will only be able to view existing videos and pictures, but not delete or edit them. Also, it will not be possible to record any new videos or pictures onto the memory card.
Write protection disabled Write protection enabled
While the write protection is enabled the indication SD will appear in the lower-right corner of the display, and when you press the recording button a double beep will be heard.
Switching the Camcorder On and Off
- Press the On/Off button (18) to power the camcorder on.
- Press the On/Off button (18) to power the camcorder off.
When opening the display, the camcorder will power on automatically. As soon as you close it, the device will power off.
The following table shows an overview of the different states of the power indicator (4):
Colour Description
Green Powered on
Alternate blinking red/green Recording in progress
Red Data processing in progress
Blinking green Photo self-timer enabled
Quickly blinking green Photo self-timer enabled, last 2 seconds
Switching the Operating Mode
Press the mode selector button (6) multiple times to toggle between the modes Movie, Photo and Setup. An icon for the currently selected operating mode will appear in the upper-left corner of the display: 📁 Movie recording or 📄 Photo capture. As soon as the setup menu appears, the live preview will be disabled and only the menu will be visible.
Setting the Menu Language
-
Power the device on by pressing the On/Off button (18) or by opening the camcorder display.
-
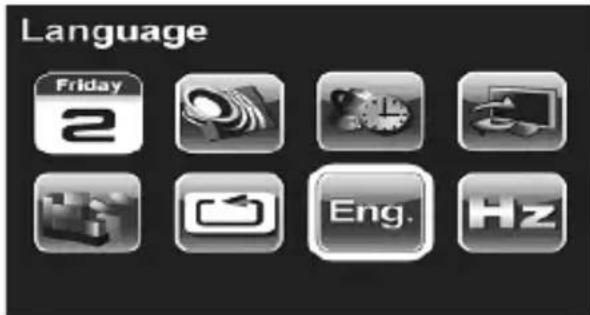
Press the mode selector button (6) twice. The setup menu will appear and the first option "Date/Time" is highlighted (with a yellow frame).
-
Use the navigation buttons (10) to move the highlight to the "Language" option and press the confirmation button (7). Alternatively, you can use your finger to tap the icon.
-
Use the navigation button to select the desired menu language or tap on the desired language.
-
Press the confirmation button (7) or tap on the "OK" button.
-
Press the mode selector button (6) to quit the setup menu and return to recording mode.
Setting Date and Time
- Open the camcorder display. The device powers on automatically.
If the display was already open but the device was off, press the On/Off button (18).
- Press the mode selector button (6) twice. The setup menu will appear and the first option "Date/Time" is highlighted (with a yellow frame).
- Press the confirmation button (7) to show the menu for setting the date and time.

- Press the navigation buttons (10) to set the year.
- Press the recording button (5) to toggle between the year, month, day, hours and minutes fields.
- Press the navigation buttons (10) to set the highlighted (red background) option.
- Repeat steps 5 and 6 until you have finished setting the date and time. Please note that the time has to be in 24-hour format and the date in year/month/day notation.
- Press the confirmation button (7) or tap on the "OK" button to save the settings and return to the setup menu.
- Press the mode selector button (6) to quit the setup menu and return to recording mode.
Recording
Recording Videos
- Open the display and then rotate it according to your needs. The device powers on automatically.
- If the current mode is not set to video recording, select it by using the mode selector (6).
- Point the device towards the desired scene by using the display.
- Press the record button (5) to start recording. During recording the power indicator (4) will blink alternating red/green.
- If necessary, press the navigation buttons (10) to select a larger to smaller scene area. Press the ▲ button to zoom in or press the ▼ button to zoom out.

natural_image
Simple icon of a light bulb inside a circle, no text or symbols presentThe zoom function is not available for the 1080p and QVGA resolutions. See also page 157 - Resolution.
- Press the record button (5) to stop recording. The power indicator (4) will light solid green.
The video will be saved automatically under a unique name.

The maximum allowable size for video files is 3.66GB. This value results from the maximum allowable file size for the used FAT32 file system. If during recording a file reaches this maximum size, it will be saved automatically and recording continues in a second file.
During recording, different icons may appear on the display informing you about the current settings.
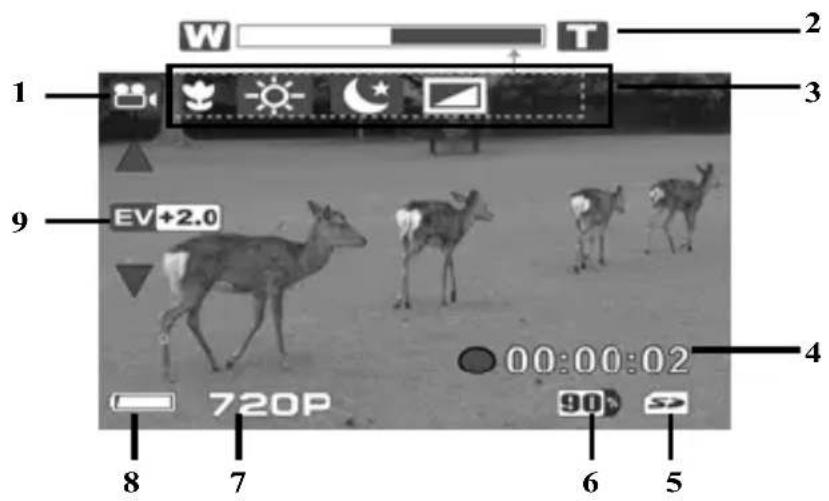
| 1 |  | Video recording mode indicator |
| 2 Zoom bar | ||
| 3 |  | Macro recording |
 | White Balance | |
 | Night mode | |
 | Effect | |
| 4 Recording time counter | ||
5 Memory type:  | : an SD memory card has been inserted and all recordings are being stored on it. | |
| there is no SD memory card inserted and all recordings are being stored on the internal camcorder memory. | ||
| 6 | 90% | Remaining memory capacity |
| 7 Resolution | ||
| 8 Battery level | ||
| 9 | ▲EV+2.0▼ | Exposure Compensation |
Video Light
In dark environments you can enable the built-in LED lamp (2) for video or photo recording. To do this, press the confirmation button (7). Pressing this button again will turn the video lamp off.
Macro Mode
This device features a macro function allowing you to focus on very close subjects. This allows you to position the lens as close as 20-21 cm (7-8 inches) from the subject. The macro switch (19) is located on the top panel of the device.
Slide the switch to the left to enable the macro mode. Slide the switch to the right to disable the macro mode.
While the macro mode is enabled, the icon will appear on the display.
Exposure Compensation
During video and photo recording you can set an exposure compensation value.
- While in video recording or photo capture mode (icons

), tap on the ▲ or ▼ display icons to set an exposure compensation value.
If the picture is too bright you can set a negative value f exposure compensation.
If the picture is too dark you can set a positive value for exposure compensation.
Capturing Pictures
-
Open the display and then rotate it according to your needs. The device powers on automatically.
-
If the current mode is not set to photo capturing, select it by using the mode selector (6).
-
Point the device towards the desired scene by using the display.
-
If necessary, press the navigation buttons (10) to select a larger to smaller scene area. Press the ▲ button to zoom in or press the ▼ button to zoom out.

The zoom for enlarging or reducing the scene area does not work in Macro mode.
- Press the record button (5) to take the picture.
The photo taken will be shown on the display for a few seconds. After this, the device will return to photo capture mode.
The picture will be saved automatically under a unique name.
In photo mode, different icons may appear on the display informing you about the current settings.

| 1 |  | Photo capture mode indicator |
| 2 Zoom bar | ||
| 3 | 0042 | Remaining number of pictures |
| 4 |  | Macro recording |
 | White Balance | |
 | Night mode | |
 | Effect | |
| 5 Memory type: | ||
| an SD memory card has been inserted and all pictures are being stored on it. | ||
| there is no SD memory card inserted and all pictures are being stored on the internal camcorder memory. | ||
| 6 |  | Picture resolution |
| 7 Battery level | ||
| 8 |  | Self-timer indicator |
| 9 | [ISTH][SCCD] | Exposure Compensation |
Video Light
You can use the video lamp to take pictures under bad lighting conditions. It works in exactly the same way as for video recording. See page 146 - The Video Light.
Macro Mode
The macro function for photography works in exactly the same way as for video recording. See page 146 – Macro Mode
Exposure Compensation
During photo capture you can set an exposure compensation value. It works in exactly the same way as for video recording. See page 147 – Exposure Compensation.
Playback
You can play back your recorded videos and photos on the camcorder screen to check if the results are satisfactory. Depending on the selected mode you can use the Play button (14) to switch to the corresponding playback mode.
Playing Back Video Clips
In video mode you can use the Play button (14) to switch to playback mode (icon). The last-recorded video will appear. Press this button once again to return to video mode. The icon in the upper-left corner of the display shows the current mode.
The following options are available:
- Press the navigation buttons ▲ / ▼ (10) to choose a recording.
- To start or stop playback, press the confirmation button (7) or tap the icon on the display.

You can also play recorded videos on your computer. See also page 174 - Transferring Recordings to the Computer.
In playback mode you will see further information on the display:
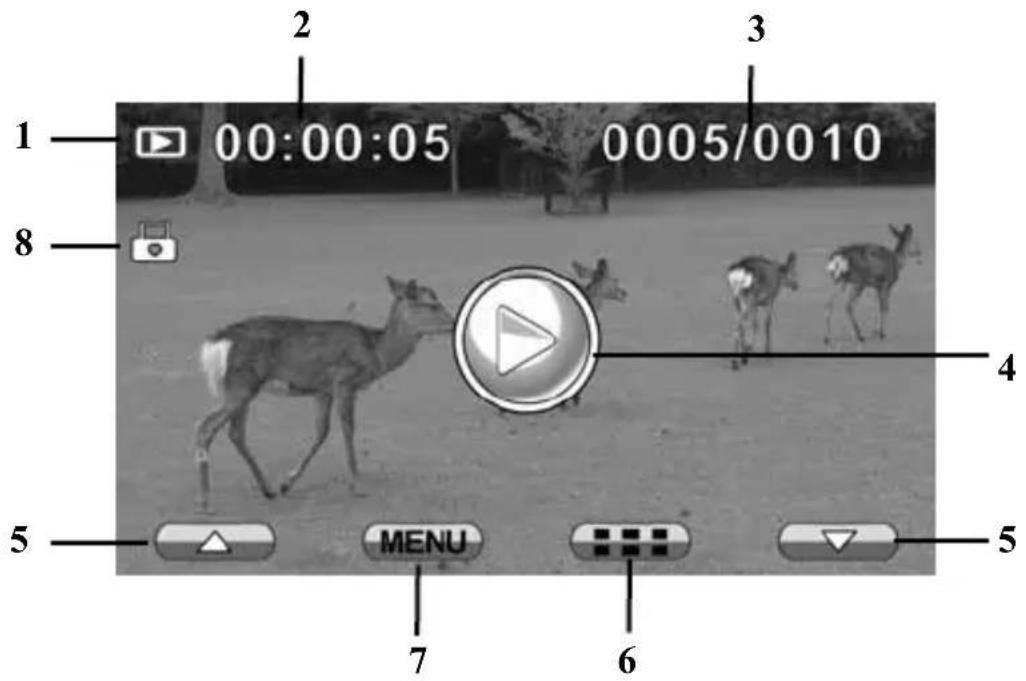
| 1 | Video  | mode indicator |
| 2 | Total duration of | the current video |
| 3 | 0005/0010 | Number of current video / Total number of recorded videos |
| 4 |  | Playback icon. Tap on this icon to start video playback. |
| 5 |  | Tap these icons to skip to the previous video. |
| 6 |  | Thumbnail view. Tap on this icon to get a thumbnail view of all videos. While in thumbnail view, tap the ▲ or ▼ icons multiple times to skip to the previous or next thumbnail page. If the desired video has been selected, tap the OK button to view it in fullscreen mode and to play it back, if necessary. |
| 7 Tap on the icon to open the playback menu. | |
| 8 Protected file indicator |
During video clip playback you can increase or decrease the playback speed or pause the video. To do this, use the following buttons.
- The icon pauses the current playback. The button will change into a playback icon. Tap this playback icon to resume playback.
- Tap the icon for fast forward playback or the icon to rewind. Press the confirmation button (7) briefly to resume normal playback.

The playback control buttons will be hidden after a few seconds so you can obtain a better view of your recording. To show them again, give a quick tap anywhere on the display.
Playing Back Photos
In Photo mode you can use the Play button (14) to switch to picture playback mode. The last-captured picture will appear. Press this button once again to return to capture mode. The icon in the upper-left corner of the display shows the current mode.

flowchart
graph LR
    A["Camera"] --> B["Play Button"]
    B --> C["Video Player"]
The following options are available:
- Press the navigation buttons ▲ / ▼ (10) to choose a picture.
- Tap the button to toggle to obtain an overview of all pictures. Press the navigation buttons (10) or tap on a picture to select it. The current picture will be highlighted with a white border. Press the confirmation button (7) or tap on the OK button to display the picture in fullscreen mode.
During picture playback you will see further information on the display:

| 1 | Pict  | layback mode indicator |
| 2 | 0005/0010 | Number of current picture / Total number of captured pictures |
| 3 |  | Tap these icons to skip to the previous picture. |
| 4 |  | Thumbnail view. Tap on this icon to get a thumbnail view of all pictures. While in thumbnail view, tap the or icons multiple times to skip to the previous or next thumbnail page. If the desired picture has been selected, tap the OK button to view it in fullscreen mode. |
| 5 |  | Tap on the icon to open the playback menu. |
| 6 |  | Protected file indicator |
The Menus
The camcorder uses different menus that offer multiple settings under each operating mode. Furthermore there is a setup menu allowing you to set the preferences for your camcorder.
The Recording Menus
Video Recording Menu
The video recording menu allows you to set the different video recording parameters. How to open the video recording menu:
-
Open the display and then rotate it according to your needs. The device powers on automatically.
-
If the current mode is not set to video recording, select it by using the mode selector (6).
-
Press the menu button (13) or tap on the bottom of the screen to display the menu.
-
Press the ▲ or ▼ navigation button (10) to select the desired function and then press the confirmation button (7) or tap on it on the display to open it.
-
Make the desired adjustments (see below) and tap OK.
-
Press the menu button (13) again or tap on the hide the menu.
icon to
The following sections contain a description of the different parameters available in the video recording menu.
White Balance
White balance is used to determine a colour temperature suitable for the current lighting conditions. Select one of the preset options or use the Automatic setting.
The icons have the following meanings:

Automatic

Daylight

Cloudy
Fluorescent

Tungsten
Resolution
The resolution determines the size of the recording in pixels. As a general rule: The higher the resolution, the more storage space is required. The following settings are available:
| Designation Resolution in pixels | Description |
| 1080P | 1920 x 1080 High quality |
| 720P | 1280 x 720 Average quality |
| WVGA | 720 x 480 Normal quality |
| QVGA | 352 x 240 Low quality(recommended for Internet applications) |
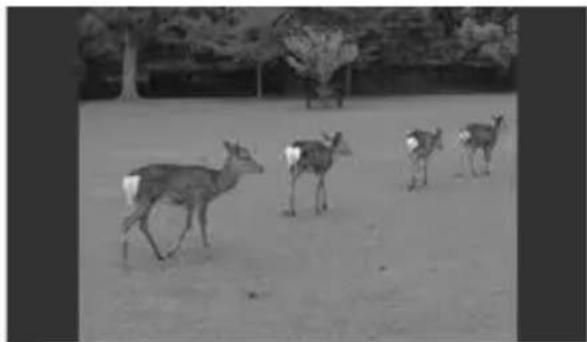
Your camcorder supports recording in modern wide-screen format. However, not all of the resolutions available offer a 16:9 aspect ratio: for the QVGA setting the aspect ratio is downscaled to 4:3 automatically. In this case, when aiming the device to the scene, the screen preview already contains black bars on the left and right.
Video resolution Preview/Playback
16:9 aspect ratio
1080P 720P WVGA

natural_image
Black-and-white photo of a herd of deer grazing in a sandy field (no text or symbols visible)4:3 aspect ratio
QVGA

natural_image
Black-and-white photo of a herd of deer grazing in an open field, no visible text or symbols
The QVGA video resolution records at a very high frame rate (120 fps). This is four times the normal frame rate and therefore suitable for very fast-moving scenes (like car racing, sports events etc.). Playback is always performed in slow-motion so you can check the exact details of the scene.

Videos in QVGA resolution are recorded without sound. This is due to the fact that this recording mode has been designed for slow-motion playback and that sound output in slow-motion makes no sense.

The zoom function is disabled when recording videos in 1080P or QVGA resolution.
Effect
You can record contents using the settings Default, Black and White, and Sepia. To do this, select the corresponding icon.
Night Mode
In order to obtain properly exposed recordings in dark environments, select Night mode. This will improve the quality of any night recordings. Select the corresponding icon: Off, On. The icon will appear.
Quality
The Quality setting determines the compression ratio of the captured video when saved onto the memory card or internal memory. The higher the compression, more or longer videos can be stored.
You can record using the quality presets Normal (green, ) and High (red, 📄). To do this, select the corresponding icon.
Photo Capture Menu
The photo capture menu allows you to set the different picture recording parameters. How to open the photo capture menu:
- Open the display and then rotate it according to your needs. The device powers on automatically.
- If the current mode is not set to photo capture, select it by using the mode selector (6).
- Press the menu button (13) or tap on the bottom of the screen to display the menu.
- Press the ▲ or ▼ navigation button (10) to select the desired function and then press the confirmation button (7) or tap on it on the display to open it.
-
Make the desired adjustments (see below) and tap OK.
-
Press the menu button (13) again or tap on the hide the menu.

icon to
The following sections contain a description of the different parameters available in the photo capture menu.
White Balance
White balance is used to determine a colour temperature suitable for the current lighting conditions. Select one of the preset options or use the Automatic setting.
The icons have the following meanings:

Automatic
Daylight
Cloudy
Fluorescent
Tungsten
Resolution
The resolution determines the size of the recording in pixels. As a general rule: The higher the resolution, the more storage space is required. The following settings are available:
Designation Resolution in pixels Description
| 12M | 4000 x 3000 Best quality |
| 5M | 2592 x 1944 Average quality |
| 3M | 2048 x 1536 Normal quality |

Your camcorder supports recording videos in modern wide-screen format. For pictures, however, the aspect ratio is downscaled to 4:3 automatically. This is due to the fact that printouts in the photo lab normally have a 4:3 aspect ratio. In this case, when pointing the device towards a scene, the screen preview contains black bars on the left and right.
Effect
You can record contents using the settings Default, Black and White, and Sepia. To do this, select the corresponding icon.
Night Mode
In order to obtain properly exposed recordings in dark environments, select Night mode. This will improve the quality of any night recordings. Select the corresponding icon: Off, On. The

icon will appear.
Self-timer
The self-timer delays the capture for a preset time after pressing the recording button (5). This allows you to participate in the scene (e.g. for a group photo). Proceed as follows:
- Select the self-timer with a 5-second or 10-second delay. The corresponding icon will show on the display.
- Point the camcorder at the subject and make sure you position it on a stable surface (or better still, a tripod).
- Press the Recording button (5).
- The self-timer indicator (4) on the back panel flashes and a countdown will appear on the display. After the preset time, the picture is taken automatically.
- After the picture has been taken, the self-timer will be disabled. You may continue using your camcorder normally.
Quality
The Quality setting determines the compression ratio of the captured picture when saved onto the memory card or internal memory. The higher the compression, the more pictures can be stored.
You can take pictures using the quality presets Normal (green, 📄) and High (red, 📋). To do this, select the corresponding icon.
The Playback Menus
The playback menus contain options for deleting the current or all recordings, for protecting the current recording, for automatic playback of all recordings as well as for setting the playback volume.
Video Playback Menu
- Open the display and then rotate it according to your needs. The device powers on automatically.
- If the current mode is not set to video recording, select it by using the mode selector (6).
- Press the playback button (14) to switch to video playback mode.
- Press the menu button (13) or tap on the bottom of the screen to display the menu.
- Press the ▲ or ▼ navigation button (10) to select the desired function and then press the confirmation button (7) or tap on it on the display to open it.
- Make the desired adjustments (see below) and tap OK.
- Press the menu button (13) again or tap on the icon to hide the menu.
The following sections contain a description of the different parameters available in the video playback menu.
Delete one
Use this option to delete a single video recording.

Protected recordings cannot be deleted. See also on page 164 – Protect.
- Perform steps 1 to 4 from “Video Playback Menu” (see page 162).
- Select "Delete One" and press the confirmation button (7) to confirm.
- Use the navigation buttons (10) or the ◀ / ▶ buttons on the display to select the video that you want to delete.
- Press the confirmation button (7) or tap on the delete icon to confirm the deletion.

Warning! After a recording has been erased, it cannot be restored. After performing step 4, no further safety prompt will appear: the selected video will be erased immediately and the next video will be displayed.
- Press the menu button (13) twice to return to video playback.
Delete all
Use this option to delete all saved videos at once.

Protected recordings cannot be deleted. See also on page 164 – Protect.
- Perform steps 1 to 4 from "Video Playback Menu" (see page 162).
-
Select "Delete All" and press the confirmation button (7) to confirm.
-
Select the trash bin icon and press the confirmation button (7) to confirm the deletion. Or tap on the trash bin icon on the display and then on the OK button.

If you decide not to delete your videos, in step 3 select the “Cancel” icon and press the confirmation button (7). Or tap on the “Cancel” icon on the display and then tap on the OK button.
Protect
Here you can protect one or more recordings to avoid accidental deletion. Proceed as follows:
- Perform steps 1 to 4 from "Video Playback Menu" (see page 162).
- Select "Protect" and press the confirmation button (7) to confirm.
- Use the navigation buttons (10) or the ◀ / ▶ buttons on the display to select the video that you want to protect.
- Press the confirmation button (7) to protect the currently displayed video. The icon will appear. Press the confirmation button once again to unprotect.
- If required, use the navigation buttons to select another recording and repeat these steps.
- Press the Menu button (13) to return to the video playback menu.
Automatic Playback
This function allows you to play all recorded videos in sequence.
- Perform steps 1 to 4 from “Video Playback Menu” (see page 162).
- Select "Autoplay" and press the confirmation button (7) to confirm.
During playback, press the recording button (5) to pause playback. Press it again to resume playback. During this
process, the playback control buttons will be shown. They allow fast forward or rewind of the video, as described on page 153.
- To finish playback, press the confirmation button (7).
Volume
This function allows you to set the video playback volume.
- Perform steps 1 to 4 from “Video Playback Menu” (see page 162).
- Select "Volume" and press the confirmation button (7) to confirm.
- Use the navigation buttons (10) or the ▲ / ▼ buttons on the display to select the desired sound volume.
You can choose from volume levels between 1 (low) and 10 (high). If you keep pressing the ▼ button after the value 1 has been reached, a Mute icon will appear and the sound output is disabled.
-
Press the confirmation button (7) or tap on the OK button to apply the selected sound volume.
-
Press the Menu button (13) to return to the video playback menu.
Photo Playback Menu
- Open the display and then rotate it according to your needs. The device powers on automatically.
- If the current mode is not set to photo capture, select it by using the mode selector (6).
- Press the playback button (14) to switch to photo playback mode.
- Press the menu button (13) or tap on the bottom of the screen to display the menu.
-
Press the ▲ or ▼ navigation button (10) to select the desired function and then press the confirmation button (7) or tap on it on the display to open it.
-
Make the desired adjustments (see below) and tap OK.
-
Press the menu button (13) again or tap on the hide the menu.

icon to
The following sections contain a description of the different parameters available in the photo playback menu.
Delete one
Use this option to delete a single picture.

Protected pictures cannot be deleted. See also on page 167 – Protect.
- Perform steps 1 to 4 from “Photo Playback Menu” (see page 165).
- Select "Delete One" and press the confirmation button (7) to confirm.
- Use the navigation buttons (10) or the ◀ / ▶ buttons on the display to select the picture that you want to delete.
- Press the confirmation button (7) or tap on the delete icon to confirm the deletion.

Warning! After a picture has been erased, it cannot be restored. After performing step 4, no further safety prompt will appear: the selected picture will be erased immediately and the next picture will be displayed.
- Press the menu button (13) twice to return to photo playback.
Delete all
Use this option to delete all saved pictures at once.

Protected pictures cannot be deleted. See also on page 167 – Protect.
- Perform steps 1 to 4 from "Photo Playback Menu" (see page 165).
- Select "Delete All" and press the confirmation button (7) to confirm.
- Select the trash bin icon and press the confirmation button (7) to confirm the deletion. Or tap on the trash bin icon on the display and then on the OK button.

If you decide not to delete your pictures, in step 3 select the “Cancel” icon and press the confirmation button (7). Or tap on the “Cancel” icon on the display and then tap on the OK button.
Protect
Here you can protect one or more pictures to avoid accidenta deletion. Proceed as follows:
- Perform steps 1 to 4 from “Photo Playback Menu” (see page 165).
- Select "Protect" and press the confirmation button (7) to confirm.
- Use the navigation buttons (10) or the ◀ / ▶ buttons on the display to select the picture that you want to protect.
- Press the confirmation button (7) to protect the currently displayed picture. The 🔒 icon will appear. Press the confirmation button once again to unprotect.
- If required, use the navigation buttons to select another picture and repeat these steps.
- Press the Menu button (13) to return to the photo playback menu.
Autoplay
This function allows you to play all captured photos in sequence like a slideshow.
- Perform steps 1 to 4 from “Photo Playback Menu” (see page 165).
- Select "Autoplay" and press the confirmation button (7) to confirm.
- To stop the slideshow, press the confirmation button (7).
Setup Menu
The setup menu contains basic settings for your camcorder. These include date and time, the button beep, the automatic power-off delay time (power-saving function), the TV system for direct display on a TV set, a formatting function for the internal memory or the inserted SD memory card, a function for restoring the factory defaults, menu language setting, and setting the mains frequency for avoiding picture interference.
- Open the display and then rotate it according to your needs. The device powers on automatically.
- Press the mode selector button (6) twice to display the setup menu.
The menu offers 8 functions that you can select by using the navigation buttons (10). - Use the navigation buttons (10) to select one of the settings and then press the confirmation button (7) to confirm.
- Use the navigation buttons (10) to adjust one of the possible values and press the confirmation button (7) to confirm.
In the following we describe the available options:
Date / Time
Set the date and time (see also page 142 – Setting the Date and Time).
Beep
Here you can determine if a sound is output when pressing any button. This option enables or disables the power-on sound at the same time.
Auto PowerOff
You can have the device power off automatically after a certain time to save battery power. If no operation is performed during the preset time, the device will power off. To power the camcorder back on, press the On/Off button (18).
You can choose between the power-off times of 1 minute, 5 minutes or disable the automatic power-off function. The icons have the following meanings:

Auto PowerOff disabled
Power off after 1 minute
Power off after 5 minutes
TV Standard
Choose between the TV systems PAL or NTSC. NTSC is the colour system used in America and Japan, PAL is used in most European countries. This setting only applies when playing back directly on a TV set using the USB/AV cable.
Format
This function lets you delete all contents from your memory card and renew the file saving structure on your card (formatting). If there is no SD memory card inserted, the internal memory will be formatted.

natural_image
Warning symbol with exclamation mark inside a triangle (no text or numbers)Warning! All saved videos and pictures will be erased and cannot be restored. This also applies to protected files. Make sure that all recordings you want to keep have been backed-up on a different medium.
Default
All device parameters will be reset to their factory-default values.
This will not erase any data from your memory card.
Language
Select the desired display menu language (see also page 142 – Setting the Menu Language).
Frequency
Select the mains frequency to avoid any interference caused by fluorescent lighting. A mains frequency of 50 Hz is used across Europe; in America the mains uses a frequency of 60 Hz.
Connectors and Ports
Viewing Recordings on a Television Screen
Any recordings that you can view on the camcorder display can also be played back on a regular TV set. For this, your television set must have an appropriate Video In connector.
Depending on the connectors available on the TV set, you can use the USB/AV cable or the HDMI cable. The HDMI cable will provide digital picture and sound and therefore offers the best quality. The HDMI (9) and USB/AV (8) ports are located behind a protective cover.
Simply operate the device as usual. For instance, enable the Autoplay (slideshow) function to view all pictures in sequence (see also page 168 - Autoplay)
Connecting via the HDMI Cable
- Please make sure that your camcorder is powered off.
- Open the port cover and insert the smaller connector of the HDMI cable into the HDMI port (9) of your camcorder (see also page 133 – Rear Panel).
- Plug the larger connector of the HDMI cable into the HDMI receptacle of your TV set.

-
Select the HDMI signal source corresponding to the above input connectors on your TV set. If necessary, read the User Manual of your TV set for more information on how to do this.
-
Press the On/Off button (18) to power the camcorder on. The device display remains off while the picture will be shown on the TV screen.

While the camcorder is connected to the TV via the HDMI cable, video recording and photo capture are not available. It is only possible to play already-recorded content.
Connecting via the USB/AV Cable
- Please make sure that your camcorder is powered off.
- Open the port cover and insert the connector of the USB/AV cable into the USB/AV port (8) of your camcorder (see also page 133 – Rear Panel).
- Insert the AV connector into the corresponding inputs of your TV set (yellow connector to VIDEO IN, white connector to AUDIO IN). The USB connector on the same end of the cable is not needed for this connection type. Please also consult the User Manual of your TV set for more information.

-
Select the AV channel corresponding to the above input connectors on your TV set. If necessary, read the User Manual of your TV set for more information on how to do this.
-
Press the On/Off button (18) to power the camcorder on. The device display remains off while the picture will be shown on the TV screen.
Transferring Recordings to the Computer
There are two possible ways to copy recordings from the camcorder to a computer:
- by connecting the device to a computer via the USB/AV cable
- by inserting the SD memory card into a card reader

natural_image
Warning symbol with exclamation mark inside a triangle (no text or numbers)Be careful when renaming any folders and files. Do NOT try to change the folder or file names stored on the device from the computer otherwise you may not be able to play back any files contained here with your camcorder.
After you have copied your files or folders to the computer, you can rename or edit them on the computer.
Using the USB port
Windows ^® 7, Windows Vista ^® and Windows ^® XP operating systems will detect the camcorder automatically as a mass storage device.
- Please make sure that your camcorder is powered off.
- Open the port cover and insert the connector of the USB/AV cable into the USB/AV port (8) of your camcorder (see also page 133 – Rear Panel).
- Plug the USB connector into a free USB port on your powered-on computer.

natural_image
Illustration of a laptop connected to a USB cable via a device, with an inset magnified view showing internal components (no text or symbols present)-
Press the On/Off button (18) to power the camcorder on. The computer will detect the built-in memory and the memory card (if any) as a removable disk and will create a new drive with the next available driver letter. The camcorder display remains off and the power indicator (4) lights red.
-
Open My Computer on your PC and double-click on the new removable disk drive. All recorded files can be found in the folder "DCIM" on this disk drive.
-
Now you can copy the recorded files from the camcorder into a folder of your choice on the computer's hard disk.
Using a Card Reader
If your computer features a card reader supporting SD memory cards, you can read the memory card's contents directly. To do this, power the camcorder off and remove the memory card (see page 139 - Inserting the SD Card).
- Insert the memory card into the card reader of your computer (normally labelled SD/MMC).
- The PC will add the memory card contents under the drive letter in My Computer representing the card reader.
- Open My Computer on your PC and double-click on the disk drive representing the card reader.
- All recorded files can be found in the folder "DCIM" on this disk drive.
- Now you can copy the recorded files from the camcorder into a folder of your choice on the computer's hard disk.
Appendix
Installing the Software
System Requirements
- Windows ^ 7, Windows Vista ^ or Windows ^ XP
- Intel ^ or AMD ^ Dual-Core processor or higher
- Minimum 1 GB RAM
- DirectX 9-compatible graphics adapter (DirectX 10 recommended)
- minimum 2 GB of available hard disk space
- free USB port or card reader
Software
The software can be found on the supplied CD. You can use it to edit your videos and even upload them easily to YouTube, Facebook, etc., store them on AVCHD media, or create photo books and albums.

You must connect your camcorder to the computer before inserting the CD into your CD or DVD drive otherwise the software will not detect the camcorder and not install.
- Use the USB cable to connect the device to your computer (see page 175 - Using the USB port).
- Power the camcorder on.
- Insert the supplied CD into the CD or DVD drive of your computer. The software should install and launch automatically otherwise double-click on the file "TotalMediaHDCam.exe" contained in the CD main folder.
The files stored on your camcorder should be imported automatically into TotalMediaHDCam. After this you can edit them. For more information, see the online help of TotalMediaHDCam.
Technical Specifications
| Capture sensor 1/3 | .2-inch CMOS sensor with 5.0 megapixel |
| Lens Fixed lens | F/3.2, f=5.1mm |
| Focus area Norma | : 1.5 m – infinityMacro: 20 - 21cm |
| TFT display 3-inch | TFT LCD touchscreen, 960 x 240 pixel, 16:9 |
| LED video lamp range | <1.0m (<3 feet) |
| Storage media Built-in Flash memory 128 MB (approx. 75MB available for videos and pictures)SD card, SDHC-compatible (up to max. SDHC Class 6, 16 GB) | |
| Zoom Video: 4x digital zoom (except for 1080p and QVGA)Photo: 4x digital zoom | |
| Photo Picture file formats: JPEG (EXIF 2.2), DCFResolution: 3M, 5M, 12M (firmware interpolation) | |
| Video Format: H.264 (AVI)Resolution: QVGA (120 fps), WVGA (60 fps), HD 720p (30 fps), HD 1080p (30 fps) | |
| Colour effects Colour/Black and White/Sepia | |
| White Balance Automatic / Daylight / Cloudy / Tungsten / Fluorescent | |
| Exposure Compensation | -2.0 EV to +2.0 EV |
Appendix SilverCrest SCA 5.00 A1
| Self-timer Off, 5, 10 seconds | |
| PC interface USB 2.0 | |
| Signal for TV output | NTSC/PAL / HDMI |
| Shutter speed Photo: 2 to 1/4000 secVideo: 1/15 to 1/2000 sec | |
| Auto power off Off, 1 min., 5 min. | |
| Power Supply Li-Ion battery FUJI ELECTRONICS (SHENZHEN) CO., LTD. NP40, 3.7V, 700mAh or via computer USB port | |
| Charger Technics-GP TC03G-2U025-0421DInput: 100-240VAC, 50/60Hz, max. 0.11 AOutput: 4.2 V = 0.6 A | |
| Dimensions 58 (W) x 108 (H) x 18 (D) mm | |
| Weight 96 g (without battery) | |
Warranty Information
36 month warranty from date of purchase

Ireland
Important warranty information
SILVERCREST®
Dear Customer,
Thank you for purchasing a Silvercrest product.
We ask you to read carefully through the enclosed documentation or online help before putting your Silvercrest product into service. If you have a problem, which can not be solved in this way, please contact our hotline.
In case that trouble solving over the telephone is not possible, our hotline will arrange the service depending on the fault of the device. This will contain the elimination of defects by production and material at no charge.
Up-to-date information and answers to the most frequently asked questions are available on the internet from: www.silvercrest.cc
Please note that the warranty period for rechargeable batteries is 12 months.
This guarantee is valid in Ireland.
Your statutory guarantees from the seller are in addition to this warranty and are not limited by it.
BT


month warranty
Hotline number
01 - 242 15 83
(Please have your serial number at hand!)
Manufacturer:
TARGA GmbH
Postfach 22 44
D-59482 Soest
www.silvercrest.cc
36 month warranty from date of purchase

UK
Important warranty information
SILVERCREST®
Dear Customer,
Thank you for purchasing a Silvercrest product.
We ask you to read carefully through the enclosed documentation or online help before putting your Silvercrest product into service. If you have a problem, which can not be solved in this way, please contact our hotline.
In case that trouble solving over the telephone is not possible, our hotline will arrange the service depending on the fault of the device. This will contain the elimination of defects by production and material at no charge.
Up-to-date information and answers to the most frequently asked questions are available on the internet from: www.silvercrest.cc
Please note that the warranty period for rechargeable batteries is 12 months.
This guarantee is valid in United Kingdom.
Your statutory guarantees from the seller are in addition to this warranty and are not limited by it.
BT

36
month warranty
Hotline number
0207 - 36 50 744
(Please have your serial number at hand!)
Manufacturer:
TARGA GmbH
Postfach 22 44
D-59482 Soest
www.silvercrest.cc
EC Declaration of Conformity
CE
EC-Declaration of Conformity
Address:
Targa GmbH
Lange Wende 41
59494 Soest, Germany
Product:
Camcorder
Model:
Silvercrest SCA 5.00 A1
The product complies with the requirements of the following European directives:
2004/108/EC
Electromagnetic Compatibility
2006/95/EC
Low Voltage
Compliance was proved by the application of the following standards:
EMC:
EN 55024:1998 + A1: 2001 + A2: 2003
EN 55022:2006
EN 61000-3-2:2006
EN 61000-3-3:1995 + A1:2001 + A2:2005
Safety:
EN 60950-1:2006 +A11:2009
Year of CE marking:
2010

natural_image
Abstract line drawing with intertwined curves (no text or symbols)Soest. 23 ^rd of November 2010
Matthias Klauke, Managing Director
TARGA GmbH
Lange Wende 41
D-59494 Soest
www.silvercrest.cc




- Digital HD Pocket Camcorder
- SE Digital HD-videokamera i fickformat
- DK * Digitalt HD-lommevideokamera
- Stavljanje SD kartice
- Zaštita memorijske kartice od snimanja
- Zadano
- Table of Contents SilverCrest SCA 5.00 A1
- Recording....144
- Playback....151
- The Menus.... 156
- Connectors and Ports....171
- Important Notice
- Safety Instructions
- Warning: Notice concerning separation from the mains
- Children
- Charger and Rechargeable Battery
- Danger of Explosion!
- Cables
- Repair and Maintenance
- Intended Use
- Conformity
- CE
- Disposal of Old Devices
- Introduction
- Package Contents
- Controls and buttons
- Front Panel
- Rear Panel
- Left Panel (display closed)
- Left Panel (display open)
- Top View
- Bottom
- Opening the Display
- Charging the Batteries
- Inserting the Battery
- Inserting an SD Card
- Write-Protecting the Memory Card
- Switching the Camcorder On and Off
- Colour Description
- Switching the Operating Mode
- Setting the Menu Language
- Setting Date and Time
- Recording
- Recording Videos
- Video Light
- Macro Mode
- Exposure Compensation
- Capturing Pictures
- Playback
- Playing Back Video Clips
- Playing Back Photos
- The Menus
- The Recording Menus
- White Balance
- Resolution
- Effect
- Night Mode
- Quality
- Photo Capture Menu
- Self-timer
- The Playback Menus
- Video Playback Menu
- Delete one
- Delete all
- Protect
- Automatic Playback
- Volume
- Photo Playback Menu
- Autoplay
- Setup Menu
- Beep
- Auto PowerOff
- TV Standard
- Format
- Default
- Language
- Frequency
- Connectors and Ports
- Viewing Recordings on a Television Screen
- Connecting via the HDMI Cable
- Connecting via the USB/AV Cable
- Transferring Recordings to the Computer
- Using the USB port
- Using a Card Reader
- Appendix
- Installing the Software
- System Requirements
- Software
- Warranty Information
- month warranty from date of purchase
- Important warranty information
- SILVERCREST®
- Please note that the warranty period for rechargeable batteries is 12 months.
- BT
- EC Declaration of Conformity
- EC-Declaration of Conformity
Brand : SILVERCREST
Model : SCA 5.00 A1
Category : Camcorder