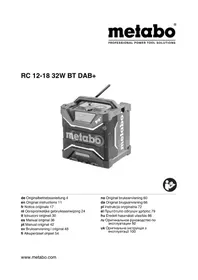
UR 18DSAL - Radio METABO - Free user manual and instructions
Find the device manual for free UR 18DSAL METABO in PDF.
User questions about UR 18DSAL METABO
0 question about this device. Answer the ones you know or ask your own.
Ask a new question about this device
Download the instructions for your Radio in PDF format for free! Find your manual UR 18DSAL - METABO and take your electronic device back in hand. On this page are published all the documents necessary for the use of your device. UR 18DSAL by METABO.
USER MANUAL UR 18DSAL METABO
natural_image
Technical line drawing of a device casing with control panel and display (no text or symbols)
Bluetooth®
SAFETY INSTRUCTIONS AND INSTRUCTION MANUAL
WARNING
IMPROPER OR UNSAFE use of this radio can result in death or serious bodily injury!
This manual contains important information about product safety. Please read and understand this manual BEFORE operating the radio. Please keep this manual available for other users and owners before they use the radio.
This manual should be stored in safe place.
INSTRUCTIONS DE SECURITE ET MODE D'EMPLOI
⚠ AVERTISSEMENT
IMPORTANT SAFETY INSTRUCTIONS .....3
IMPORTANT SAFETY INFORMATION .....3
MEANINGS OF SIGNAL WORDS AND SYMBOLS .....3
SAFETY......4
GENERAL SAFETY RULES ....5
SPECIFIC SAFETY RULES 5
IMPORTANT SAFETY INSTRUCTIONS FOR BATTERY CHARGER 6
IMPORTANT SAFETY INSTRUCTIONS FOR USE OF THE BATTERY AND BATTERY CHARGER......6
PROTECTING YOUR HEARING 8
PRECAUTIONS WHEN CONNECTING TO EXTERNAL EQUIPMENT....8
DISPOSAL OF THE EXHAUSTED BATTERY.....8
REGULATORY GUIDELINES......8
FUNCTIONAL DESCRIPTION ......10
NAME OF PARTS 10
SPECIFICATIONS....12
MAIN FUNCTIONS ....12
ASSEMBLY AND OPERATION....13
BEFORE USE 13
LISTENING TO THE RADIO 15
LISTENING TO THE PORTABLE MUSIC PLAYER....16
CONNECTING WITH BLUETOOTH DEVICES ...17
USING THE TIMER FUNCTION .....17
CHARGING A SMARTPHONE OR CELL PHONE...19
MAINTENANCE AND INSPECTION....20
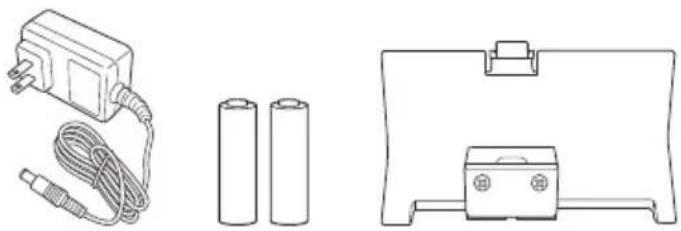
ACCESSORIES 21
STANDARD ACCESSOIRES ......21
OPTIONAL ACCESSORIES ....21
PARTS LIST......64
TABLE DES MATIÈRES
Page Page
Français
IMPORTANTES INSTRUCTIONS DE SÉCURITÉ .....22
INFORMATIONS IMPORTANTES DE SÉCURITÉ ....22
SIGNIFICATION DES MOTS D'AVERTISSEMENT ET SYMBOLES....22
SECURITE 23
REGLES GENERALE DE SECURITE .....24
RÈGLES DE SÉCURITÉ SPÉCIFIQUES ....25
CONSIGNES DE SÉCURITÉ IMPORATANTES POUR LE CHARGEUR DE BATTERIE......25
CONSIGNES DE SÉCURITÉ IMPORTANTES POUR L'UTILISATION DE LA BATTERIE ET DU CHARGEUR DE BATTERIE....26
PROTEGER VOTRE AUDITION .....27
IMPORTANT SAFETY INSTRUCTIONS
1) Read these instructions.
2) Keep these instructions.
3) Heed all warnings.
4) Follow all instructions.
5) Do not use this apparatus near water.
6) Clean only with dry cloth.
7) Do not block any ventilation openings. Install in accordance with the manufacturer's instructions.
8) Do not install near any heat sources such as radiators, heat registers, stoves, or other apparatus (including amplifiers) that produce heat.
9) Protect the power cord from being walked on or pinched particularly at plugs, convenience receptacles, and the point where they exit from the apparatus.
10) Only use attachments/accessories specified by the manufacturer.
11) Unplug this apparatus during lightning storms or when unused for long periods of time.
12) Refer all servicing to qualified service personnel. Servicing is required when the apparatus has been damaged in any way, such as power-supply cord or plug is damaged, liquid has been spilled or objects have fallen into the apparatus, the apparatus has been exposed to rain or moisture, does not operate normally, or has been dropped.
IMPORTANT SAFETY INFORMATION
Read and understand all of the safety precautions, warnings and operating instructions in the Instruction Manual before operating or maintaining this tool.
Most accidents that result from tool operation and maintenance are caused by the failure to observe basic safety rules or precautions. An accident can often be avoided by recognizing a potentially hazardous situation before it occurs, and by observing appropriate safety procedures.
Basic safety precautions are outlined in the “SAFETY” section of this Instruction Manual and in the sections which contain the operation and maintenance instructions.
Hazards that must be avoided to prevent bodily injury or machine damage are identified by WARNINGS on the tool and in this Instruction Manual.
NEVER use this tool in a manner that has not been specifically recommended by metabo HPT.
MEANINGS OF SIGNAL WORDS AND SYMBOLS
WARNING indicates a potentially hazardous situations which, if ignored, could result in death or serious injury.
CAUTION indicates a potentially hazardous situations which, if not avoided, may result in minor or moderate injury, or may cause machine damage.
NOTE emphasizes essential information.

This mark is intended to alert the user to the presence of uninsulated “dangerous voltage” within the product’s enclosure that may be of sufficient magnitude to constitute a risk of electric shock to persons.

This mark is intended to alert the user to the presence of important operating and maintenance (servicing) instructions in the literature accompanying the product.
SAFETY
When using an electrical appliance, basic precautions should always be followed, including the following:
READ ALL INSTRUCTIONS BEFORE USING (THIS APPLIANCE)
WARNING
To reduce the risk of fi re, electric shock, or injury:
- Use indoors only.
- Use only the specified power supply voltage.
- Do not allow to be used as a toy. Close attention is necessary when used by or near children.
- Use only as described in this manual.
- Use only manufacturer's recommended attachments.
- Do not handle appliance with wet hands.
- Do not touch the power plug (AC adapter) with wet hands.
- Do not use the radio in the bathroom or shower.
- To reduce the risk of fire or electric shock, do not expose this radio to rain or moisture.
- Radio shall not be exposed to dripping or splashing and no objects fi lled with liquids, such as vases, shall be placed on radio.
- Do not operate radio in explosive atmospheres, such as in the presence of fl ammable or combustible liquids, gasses or dust.
- Never use when the temperature is below 23^ F ( -5^ C) or above 104^ F ( 40^ C).
- Do not put any object into openings.
- Avoid damaging the AC adapter cord. Do not modify, forcibly bend, twist or pull the cord, place heavy objects on it or place it near heating appliances.
- When not in use, remove the power plug (AC adapter) from the electric socket and from the radio. Failure to do so may lead to electric shock or fi re.
- Remove the AC adapter from the outlet during thunderstorms.
-
Do not touch the FM antenna during thunderstorms.
-
Do not disassemble or modify the radio.
Inspections and repairs should be performed by the store where purchased or by a metabo HPT power tool service center. - Insert the power plug (AC adapter) securely as far as it will go.
Dust or dirt between the power plug and the electric socket may lead to fire. Remove the power plug periodically and wipe off any dust or dirt with a dry cloth. - Do not let any unspecified objects or water get inside the radio body.
With the exception of the AC adapter and the rechargeable battery, if any metal or flammable object or water gets inside the back door, it may lead to electric shock or fire.
Take care to prevent iron powder from the bass reflex speakers, dust or water getting into the radio. - Do not sit or stand on the radio.
- Do not place the radio on an unstable surface or in a high place. Do not hang the radio from the handle or guard bar.
- When no slide battery is loaded, attach the slide terminal cover to the terminal to prevent cuts and other injuries that may result from touching the terminal area.
- Handle the backup batteries with care.
● Danger of explosion if battery is incorrectly replaced. Replace only with the same or equivalent type. - Incorrect handling of the batteries may result in rupture or leakage, leading to fire, injury or pollution of the surrounding area. Be sure to observe the following precautions.
– Use only the specified batteries - Do not heat or disassemble the batteries
- Do not throw the batteries into fire or water
- Do not charge the batteries
- Make sure the batteries are correctly oriented and avoid short-circuiting
- Do not reuse batteries or use different types of battery
- Remove the batteries when the radio is not in use
In the event of leakage from the batteries, wipe the battery case clean.
Should any battery fluid get on your body, wash it off carefully.
- If is displayed when you turn the power on with the rechargeable battery inserted, the battery power is low.
Power the radio from the AC adapter or insert a charged battery.
GENERAL SAFETY RULES
SAVE THESE INSTRUCTIONS
1) Work area safety
a) Keep work area clean and well lit.
Cluttered or dark areas invite accidents.
b) Do not operate radio in explosive atmospheres, such as in the presence of fl ammable liquids, gases or dust.
2) Electrical safety
a) Avoid body contact with earthed or grounded surfaces such as pipes, radiators, ranges and refrigerators.
There is an increased risk of electric shock if your body is earthed or grounded.
b) Do not expose radio to wet conditions.
Water entering a radio will increase the risk of electric shock.
3) Battery powered radio use and care
a) Recharge only with the charger specified by the manufacturer.
A charger that is suitable for one type of battery pack may create a risk of fire when used with another battery pack.
b) Use radio only with specifically designated battery packs.
Use of any other battery packs may create a risk of injury and fire.
c) When battery pack is not in use, keep it away from other metal objects like paper clips, coins, keys, nails, screws, or other small metal objects that can make a connection from one terminal to another.
Shorting the battery terminals together may cause burns or a fire.
d) Under abusive conditions, liquid may be ejected from the battery, avoid contact. If contact accidentally occurs, flush with water. If liquid contacts eyes, additionally seek medical help.
Liquid ejected from the battery may cause irritation or burns.
4) Service
a) Have your radio serviced by a qualified repair person using only identical replacement parts.
This will ensure that the safety of the radio is maintained.
b) If appliance is not working as it should, has been dropped, damaged, left outdoors, or dropped into water, return it to a service center.
SPECIFIC SAFETY RULES
- Do not use in locations where inflammable materials such as lacquer, paint, benzene, thinner or gasoline are present.
Explosion or fires might result.
- If you notice the unit is operating poorly or making abnormal noises, immediately stop using and shut off the power switch. Request an inspection and repair from the dealer where you purchased the unit or a metabo HPT Authorized Service Center.
Continuing to use while operating abnormally might cause injuries.
-
If the unit is mistakenly dropped or strikes another object, make a thorough check of the unit for cracks, breakage or deformation, etc. Injuries might occur if the unit has cracks, breakage or deformation.
-
Do not use near objects generating high heat such as stoves.
-
Handle radio correctly.
Operate the blower according to the instructions provided herein. Do not drop or throw the blower.
- Keep all screws, bolts and covers tightly in place.
Keep all screws, bolts, and plates tightly mounted.
Check their condition periodically.
- NEVER use a radio which is defective or operating abnormally.
If the radio appears to be operating unusually, making strange noises, or otherwise appears defective, stop using it immediately and arrange for repairs by a metabo HPT authorized service center.
- Carefully handle radio.
Should a radio be dropped or struck against hard materials inadvertently, it may be deformed, cracked, or damaged.
- Do not wipe plastic parts with solvent.
Solvents such as gasoline, thinner benzine, carbon tetrachloride, and alcohol may damage and crack plastic parts. Do not wipe them with such solvents.
Wipe plastic parts with a soft cloth lightly dampened with soapy water and dry thoroughly.
IMPORTANT SAFETY INSTRUCTIONS FOR BATTERY CHARGER
WARNING
Death or serious bodily injury could result from improper or unsafe use of battery chargers. To avoid these risks, follow these basic safety instructions:
READ ALL INSTRUCTIONS
-
This manual contains important safety and operating instructions for battery charger Model UC18YKSL.
-
Before using battery charger, read all instructions and cautionary markings on (1) battery charger, (2) battery, and (3) product using battery.
-
Plug of battery charger must match the outlet.
Never modify the plug in any way.
Unmodified plugs and matching outlets will reduce risk of electric shock.
- Do not abuse the cord. Never use the cord for carrying, pulling or unplugging the battery charger.
Keep cord away from heat, oil, sharp edges or moving parts.
Damaged or entangled cords increase the risk of electric shock.
- To reduce risk of injury, charge metabo HPT rechargeable battery type, BSL1830. Other type of batteries may burst causing personal injury and damage.
- When charging slide battery BSL1830, always use charger UC18YKSL.
- Do not expose battery charger to rain or snow.
- Use of an attachment not recommended or sold by the battery charger manufacturer may result in a risk of fi re, electric shock, or injury to persons.
- To reduce risk of damage to electric plug and cord, pull by plug when disconnecting battery charger.
- Make sure cord is located so that it will not be stepped on, tripped over, or otherwise subjected to damage or stress.
- Do not operate battery charger with damaged cord or plug-replace them immediately.
- Do not operate battery charger if it has received a sharp blow, been dropped, or otherwise damaged in any way; take it to a qualified serviceman.
- Do not disassemble battery charger; take it to a qualified serviceman when service or repair is required. Incorrect reassembly may result in a risk of electric shock or fire.
- To reduce risk of electric shock, unplug charger from receptacle before attempting any maintenance or cleaning. Removing the battery will not reduce this risk.
IMPORTANT SAFETY INSTRUCTIONS FOR USE OF THE BATTERY AND BATTERY CHARGER
You must charge the battery before you can use the radio. Before using the model UC18YKSL, be sure to read all instructions and cautionary statements on it, the battery and in this manual.
CAUTION
USE ONLY metabo HPT BATTERY TYPE, BSL1830. OTHER TYPES OF BATTERIES MAY BURST AND CAUSE INJURY!
Danger of explosion if battery is incorrectly replaced.
Replace only with the same or equivalent type.
Follow these instructions to avoid the risk of injury:
WARNING
Improper use of the battery or battery charger can lead to serious injury. To avoid these injuries:
- NEVER disassemble the battery.
- NEVER incinerate the battery, even if it is damaged or is completely worn out. The battery can explode in a fire.
- NEVER short-circuit the battery.
- NEVER insert any objects into the battery charger's air vents. Electric shock or damage to the battery charger may result.
- NEVER charge outdoors. Keep the battery away from direct sunlight and use only where there is low humidity and good ventilation. Batteries (battery pack or batteries installed) shall not be exposed to excessive heat such as sunshine, fire or the like.
- NEVER charge when the temperature is below 32^ F ( 0^ C) or above 104^ F ( 40^ C).
- NEVER insert foreign objects into the hole for the battery or the battery charger.
- NEVER store the battery or battery charger in places where the temperature may reach or exceed 104^ F ( 40^ C).
- ALWAYS operate charger on standard household electrical power (120 volts). Using the charger on any other voltage may overheat and damage the charger.
- ALWAYS wait at least 15 minutes between charges to avoid overheating the charger.
- ALWAYS disconnect the power cord from its receptacle when the charger is not in use.
- The manufacturer's specified charging instructions shall be included for secondary batteries. Primary batteries shall include instructions indicating that the batteries shall not be charged.
Furthermore, please heed the following warning and caution.
WARNING
In order to prevent any battery leakage, heat generation, smoke emission, explosion and ignition beforehand, please be sure to heed the following precautions.
-
Do not incinerate this appliance even if it is severely damaged. The batteries can explode in a fire.
-
Do not pierce battery with a sharp object such as a nail, strike with a hammer, step on, throw or subject the battery to severe physical shock.
- Do not use an apparently damaged or deformed battery.
- Do not use the battery in reverse polarity.
- Do not connect directly to an electrical outlets or car cigarette lighter sockets.
- Do not use the battery for a purpose other than those specified.
- If the battery charging fails to complete even when a specified recharging time has elapsed, immediately stop further recharging.
- Do not put or subject the battery to high temperatures or high pressure such as into a microwave oven, dryer, or high pressure container.
- Keep away from fire immediately when leakage or foul odor are detected.
- Do not use in a location where strong static electricity generates.
- If there is battery leakage, foul odor, heat generated, discolored or deformed, or in any way appears abnormal during use, recharging or storage, immediately remove it from the equipment or battery charger, and stop use.
- Caution-Risk of fire and burns.
The battery used in this device may present a risk of fi re or chemical burn if mistreated. Do no disassemble, crush, heat above 104°F (40°C), or incinerate. Follow manufacturer's instructions. Replace battery with metabo HPT battery type, BSL1830 only. Use of another battery may present a risk of fi re or explosion.
- Dispose of used battery promptly.
Keep away from children. Do not crush disassemble and do not dispose of in fire.
CAUTION
- If liquid leaking from the battery gets into your eyes, do not rub your eyes and wash them well with fresh clean water such as tap water and contact a doctor immediately. If left untreated, the liquid may cause eye-problems.
-
If liquid leaks onto your skin or clothes, wash well with clean water such as tap water immediately. There is a possibility that this can cause skin irritation.
-
If you find rust, foul odor, overheating, discolor, deformation, and/or other irregularities when using the battery for the first time, do not use and return it to your supplier or vendor.
PROTECTING YOUR HEARING
Continuous exposure to loud noise may result in permanent hearing loss. The louder the volume, the shorter the time in which hearing loss may occur.
If you listen to large volume sound over a long period of time, your ears will become accustomed to it. This creates the illusion that the volume level is appropriate, despite the fact that it may be damaging your hearing.
Observe the following to prevent hearing loss.
CAUTION
- Make sure you give your ears a rest by taking regular breaks and not listening for long periods of time.
Even when set at safe volume levels, listening continuously over long periods of time may cause hearing loss.
- Be careful not to increase the volume as your hearing adapts to the sound output.
Beware of being accustomed to a certain volume level. Adjust the volume to a safe level before your ears become accustomed to loud volumes.
- If your ears begin to ring, if you feel any discomfort, or if conversation seems faint or indistinct, discontinue listening to music and have your ears examined by a doctor.
PRECAUTIONS WHEN CONNECTING TO EXTERNAL EQUIPMENT
Unexpected problems may result in the loss or corruption of data stored in smartphones and other peripheral equipment connected to the radio. With this possibility in mind, a backup of the data should always be made in advance.
Note that metabo HPT cannot be held responsible for the corruption or loss of data stored within smartphones and other peripheral equipment connected to the radio, nor any damage to the equipment itself.
DISPOSAL OF THE EXHAUSTED BATTERY
WARNING
Do not dispose of the exhausted battery. The battery must explode if it is incinerated. The product that you have purchased contains a rechargeable battery. The battery is recyclable. At the end of it's useful life, under various state and local laws, it may be illegal to dispose of this battery into the municipal waste stream. Check with your local solid waste offi cials for details in your area for recycling options or proper disposal.
REGULATORY GUIDELINES
— For the USA —
FEDERAL COMMUNICATIONS COMMISSION
WARNING
Changes or modifications to this unit not expressly approved by the party responsible for compliance could void the user's authority to operate the equipment.
NOTE
This equipment has been tested and found to comply with the limits for a Class B digital device, pursuant to Part 15 of the FCC Rules. These limits are designed to provide reasonable protection against harmful interference in a residential installation. This equipment generates, uses and can radiate radio frequency energy and, if not installed and used in accordance with the instructions, may cause harmful interference to radio communications.
However, there is no guarantee that interference will not occur in a particular installation. If this equipment does cause harmful interference to radio or television reception, which can be determined by turning the equipment off and on, the user is encouraged to try to correct the interference by one or more of the following measures:
☐ Reorient or relocate the receiving antenna.
☐ Increase the separation between the equipment and receiver.
□ Connect the equipment into an outlet on a circuit different from that to which the receiver is connected.
□ Consult the dealer or an experienced radio/TV technician for help.
- For Canada -
This device complies with Industry Canada licence-exempt RSS standard(s). Operation is subject to the following two conditions: (1) this device may not cause interference, and (2) this device must accept any interference, including interference that may cause undesired operation of the device.
French
SAVE THESE INSTRUCTIONS AND MAKE THEM AVAILABLE TO OTHER USERS AND OWNERS OF THIS RADIO!
FUNCTIONAL DESCRIPTION
NOTE
The information contained in this Instruction Manual is designed to assist you in the safe operation and maintenance of the radio.
NEVER operate, or attempt any maintenance on the radio unless you have first read and understood all safety instructions contained in this manual.
Some illustrations in this Instruction Manual may show details or attachments that differ from those on your own radio.
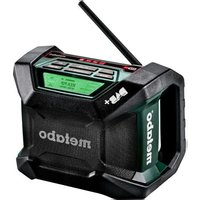
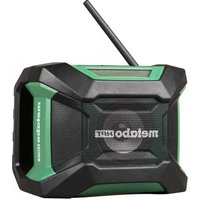
NAME OF PARTS
text_image
Technical diagram of a device with numbered labels pointing to internal components
text_image
Technical diagram of a mechanical housing with numbered components for identification
text_image
SOURCE MENU ENTER INFO 11 12 13 14 15 16 17 18 19 20
text_image
AM FM RDS ALARM SLEEP Bluetooth AUX STEREO AM PM 88:88 MHz kHz A B C D G F E I K L N M P| 1 | FM antenna | 13 | Enter / Information button | E | RDS indicator |
| 2 | Handle | 14 | Volume button (-) | F | Stereo indicator |
| 3 | Rear cover | 15 | Volume button (+) | G | Alarm indicator |
| 4 | Speaker | 16 | Search button (-) | H | Buzzer alarm indicator |
| 5 | Storage case for external devices | 17 | Search button (+) | I | Radio ON alarm indicator |
| 6 | AC adapter port | 18 | Select button (-) | J | Sleep timer indicator |
| 7 | AUX input port | 19 | Select button (+) | K | Battery exhausted indicator |
| 8 | USB charging port | 20 | Play / Stop button (for bluetooth mode) | L | Information indicator |
| 9 | Cable access hole | A | Bluetooth indicator | M | Clock |
| 10 | Power button | B | AM broadcast indicator | N | AM / PM indicator |
| 11 | Source select button | C | AUX indicator | P | MHz / KHz indicator |
| 12 | Menu button | D | FM broadcast indicator |
SPECIFICATIONS
| Model UR18DSAL | ||
| Frequency band | FM: 87.5 to 108 MHzAM: 530 to 1710 KHz | |
| Antenna | FM: Rubber antennaAM: Ferrite bar antenna (built-in) | |
| Speaker 3 – 17/32” (90 mm) (8 Ω) × 2 | ||
| Input terminal AUX IN (3.5 mm dia.) | ||
| Output terminal USB Charging jack (5 V 1 A) | ||
| Maximum available output | AC adapter: 5 W × 218 V: 7 W × 2 | |
| Power supply | Slide battery: DC 18 VBackup batteries: DC 3 V, two AA batteriesHousehold power supply: AC 120 V (using provided AC adapter) | |
| Bluetooth | Bluetooth Ver. 2.1 + EDRProfile: A2DP (Advanced Audio Distribution Profile)AVRCP (AV Remoto Control Profi le)Send/receive Sensitivity: Class 2 | |
| Exterior dimensionsLength × width × height(with antenna retracted) | 14 – 13/32” × 11 – 15/16” × 10 – 9/32”(366 mm × 303 mm × 261 mm) | |
| Weight 7.5 lbs. (3.4 kg) | ||
| Standard accessories AC adapter (DC 12 V 1.2 A), two AA batteries | ||
| Usablebatteries(Optionalaccessories) | Model BSL1830 (Slide battery) | |
| Type Lithium – ion battery | ||
| Voltage DC 18V | ||
| Charging &dischargingfrequency | about 1,300 | |
| Usable charger(Optional accessories) | Model: UC18YKSL | |
NOTE
Rechargeable battery
Do not use any battery other than an 18V rechargeable battery with this radio.
SERVICE TIME PER BATTERY CHARGE
| Battery capacity Service time* | |
| 3.0 Ah Approx. | 1 hours |
* The service time is approximate (at 0.05W × 2 output, FM Radio). It varies depending on the type of battery, charging condition and conditions of use.
MAIN FUNCTIONS
● Playback of Bluetooth devices
● Manual/Auto select
● Save (Memory) (10 AM + 10 FM stations)
● Radio On/Off /Alarm
- Dock for playing audio from smartphones and portable audio players.
● Smartphone and cell phone recharging
- Compatibility with metabo HPT power tool rechargeable battery and AC adapter
ASSEMBLY AND OPERATION
BEFORE USE
Inserting the backup batteries
Time settings and radio station frequencies can be saved by installing batteries in the unit.
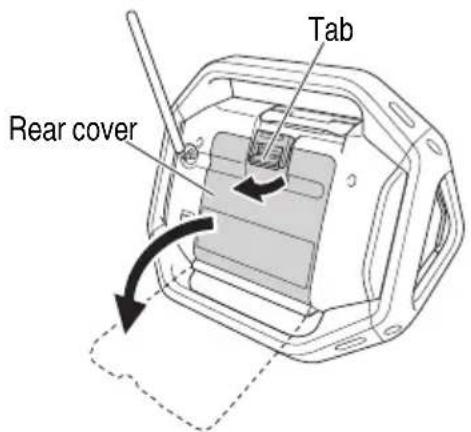
- To access the storage box for the backup batteries, unlatch the tab and open the rear cover. (Fig. 1)
text_image
Tab Rear coverFig. 1
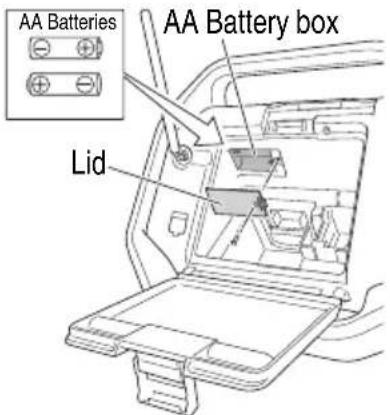
- Open the backup battery storage box and insert the two AA batteries (included) into the storage box in the direction indicated. (Fig. 2)
text_image
AA Batteries AA Battery box LidFig. 2
CAUTION
● Make sure that the batteries are correctly oriented.
- Replace all the batteries at the same time. Do not use old batteries and new batteries at the same time.
● Do not discard the batteries with household garbage or throw them into fi re.
AC adapter installation
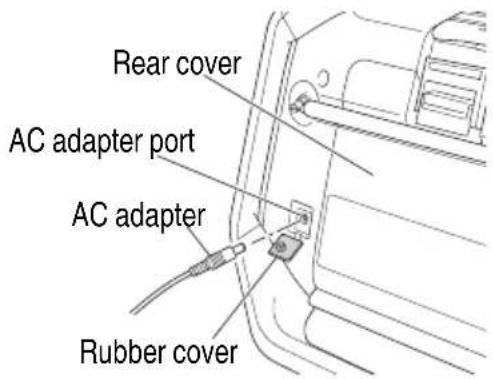
Power can be supplied by plugging the AC adapter (included) into a standard household outlet. Pull back the rubber cover and connect the AC adapter to the AC adapter port. (Fig. 3) Next, plug the AC adapter into an electrical outlet.
text_image
Rear cover AC adapter port AC adapter Rubber coverFig. 3
NOTE
When used together with the batteries, the AC adapter is the main power source and no battery power is consumed.
When used together with the AC adapter, the batteries will not recharge as this device has no recharge function.
Storing the AC adapter
The AC adapter can be stored in the compartment behind the rear cover. (Fig. 4)
text_image
AC adapter Rear coverFig. 4
Loading the rechargeable battery
CAUTION
When no slide battery is loaded, attach the slide terminal cover to the terminal to prevent cuts and other injuries that may result from touching the terminal area.
NOTE
When inserting the battery, do not use unnecessary force. If the battery does not go in easily, it is not being inserted correctly.
Check that the battery is correctly oriented and that no foreign object has been trapped.
○ The radio has no charging function. Using the AC adapter and rechargeable battery simultaneously will not charge the battery.
If is displayed when you turn the power on with the rechargeable battery inserted, the battery power is low.
Power the radio from the AC adapter or insert a charged battery.
Loading a slide battery (Fig. 5)
Match the battery with the grooves in the radio body and insert the battery as far as it will go.

text_image
Battery Terminals Rear coverFig. 5
Changing the date display
The following selections are available for date display.
YYYY/MM/DD (Year/Month/Day)
MM/DD/YYYY (Month/Day/Year)
DD/MM/YYYY (Day/Month/Year)
- Press the Menu button.

- Press the Select button and display "DATE DISP".

DATE DISP
- Press the Enter / Information button.

- Press the Select button and display the date display selection of your choice.

YYYY/MM/DD
- Press the Enter / Information button.

Set the date
Using the control panel, follow the steps below to set up the date.
- Press the Menu button.

- Press the Select button and display "DATE ADJ".

DATE ADJ
- Press the Enter / Information button.

- Press the Select button and adjust "year" digits.

2014
- Press the Enter / Information button.

- Press the Select button and adjust "month" digits.

03 / 01
- Press the Enter / Information button.

- Press the Select button and adjust "day" digits.

03 / 31
- Press the Enter / Information button.

Set the time
Using the control panel, follow the steps below to set up the time.
- Press the Menu button.

- Press the Select button and display "CLOCK ADJ".

CLOCK ADJ
- Press the Enter / Information button.

- Press the Select button and adjust "hour" digits.

12:00
- Press the Enter / Information button.

- Press the Select button and adjust "minute" digits.

12:55
- Press the Enter / Information button.

- Press the Select button and select "12H" or "24H"

12H 24H
- Press the Enter / Information button.

Selecting FM or AM bandwidth
- Power ON.

- Press the Source select button and select the radio's bandwidth (FM/AM).


Selecting stations Auto station selection
A long press of the Search button will automatically scan and search clear station broadcast frequencies. To select the next station broadcast, long press the Search button again.
Long Press
Manual station selection
Press the Search button to change frequencies and select a station.

Preset station selection
Press the Select button to quickly switch between preset stations.

At the time of purchase, there are no preset stations. Follow the steps below to register preset stations.
- Tune into a radio station of your choice and press the Menu button.

- Press the Select button and display "PRESET".

PRESET
- Press the Enter / Information button.

- Press the Select button and select a preset number from 0 to 9 for registering the station.

PRESET 2
- Press the Enter / Information button to register the station.

This feature allows the automatic registration of available radio stations in the area of use. (Maximum of 10 stations)
- Press the Menu button.

- Press the Select button and display "AUTO SCAN".

AUTO SCAN
- Press the Enter / Information button to begin auto preset registration of available radio stations.

NOTE
○ A broadcasting radio station will not be registered if its frequency is weak.
○ Depending on location of use, non-radio signals such as noise may be registered.
○ See page 19 when recharging with USB in "FM" mode.
For better reception
FM broadcasts
Adjust reception by changing the facing and angle of the antenna.
"STEREO" will be displayed when receiving a stereo broadcast.
Switching to monaural reception can reduce noise.
- Press the Menu button.

- Press the Select button and display "STEREO".


- Press the Enter / Information button.

- Press the Select button and display "OFF".


- Press the Enter / Information button to complete setup.

AM broadcasts
Move the device and face it in a direction in which the reception is best.
Use the Volume button to adjust the volume from 0 to 30.

Audio can be played back from smartphones, portable music players and other external devices.
CAUTION
Make sure to lower the volume output of the player before playback.
NOTE
There are two types of connector cable, straight type and L type.
Use an L type cable when connecting or storing large external devices.
1. Open the external device storage area
Switch the radio's power OFF and open the front cover. (Fig. 6)
text_image
Front coverFig. 6
2. Connect an external device
Using a commercially available stereo mini-plug connector cable (ø3.5 mm), connect the radio's AUX input port to the audio output port of the external device. (Fig. 7)
text_image
AUX input port Smartphone Audio output port Recharge cable holder Stereo mini plug connector cableFig. 7
3. Secure the external device
The right and left holders can be moved to the right or left by pinching the top and bottom of each holder.
Secure the external device between the two holders. (Fig. 8)
text_image
Holder ① ② ① ②Fig. 8
4. Playback
With the radio's power switched ON, press the Source select button and display "AUX".


Make sure to lower the volume output of the external device before music playback.
Volume can be adjusted through the radio.
(Volume)
Close the front cover after selecting tracks and adjusting volume.
NOTE
You may be unable to raise the volume level if the volume level of the external device is too low.
NOTE
○ When connecting a smartphone, please be aware that the ringtones of incoming calls for some models are not output to speaker.
○ External devices may be damaged if used in locations exposed to the sun or hot temperatures.
○ See page 19 when recharging with USB in "AUX" mode.
CONNECTING WITH BLUETOOTH DEVICES
If smartphones, portable music players and other devices are Bluetooth compatible, audio can be output from this product via Bluetooth communication.
1. Pairing (Registering devices)
Pairing is required for Bluetooth communication.
Set your Bluetooth device to pairing mode.
(For instructions on pairing, see the manual for the Bluetooth device to be used.)
2. Set the radio for pairing mode
Press the Source select button and display "Bluetooth".

Long press the Play / Stop button (located between the Search buttons) until the displayed "Bluetooth" is flashing.

text_image
(Long Press) READYSelect "UR18DSAL" on your Bluetooth device's list of connected devices to complete the pairing.
3. Input pass key
Some Bluetooth devices may require pass key input when connecting.
If this should be the case, input "0000".
Also, if connection authorization is requested, input "authorized".
Connection is successful once "CONNECTED" is displayed.

NOTE
Once paired, connection will be automatically established the next time the devices are switched on. If the Bluetooth connection is lost, re-pair the devices.
○ No more than two devices can be paired simultaneously.
○ Connection with all Bluetooth devices cannot be guaranteed. Before attempting connection, always check for compatibility.
4. Playback
Make sure to lower the volume output of the Bluetooth device before music playback.
Volume can be adjusted through the radio.
Use the Bluetooth device to select tracks.
You can also select tracks with the radio's control buttons.
text_image
(Volume) (Play / Stop, Search)NOTE
Some Bluetooth devices may not respond to the radio's control buttons.
○ See page 19 when recharging with USB in "Bluetooth" mode.
USING THE TIMER FUNCTION
○ The radio turns on/off at the preset time
○ Use the radio as an alarm clock
Sleep Timer
Power can be set to automatically switch OFF after a certain amount of time has elapsed by using the sleep timer function.
- Press the Menu button.

- Press the Select button and display "SLEEP".

- Press the Enter / Information button.

- Press the Select button to adjust the time period to elapse (between "0 - 90" minutes) before the power is switched OFF.

- Press the Enter / Information button.

- "SLEEP" will be displayed on the LCD.
To check the remaining time, press the Menu button once again and select "SLEEP".
○ To cancel the sleep timer, set the time to switch OFF at 0 minutes.
Buzzer Alarm
The radio can be set up to activate a beeping alarm at a specific time.
- Press the Menu button.

- Press the Select button and display "BUZZER ALM".

BUZZER ALM
- Press the Enter / Information button.

- Press the Select button and display "ON".

ON
- Press the Enter / Information button.

- Press the Select button and adjust "hour" digits.

12:00
- Press the Enter / Information button.

- Press the Select button and adjust "minute" digits.

12 : 30
- Press the Enter / Information button.

- Press the Select button to set up repeat.
| Once ONCE | |
| Daily DAILY | |
| Weekdays only WEEKDAY | |
| Saturday and Sunday only WEEKEND | |

DAILY
- Press the Enter / Information button to complete setup.

will be displayed on the LCD.
To cancel the alarm setting, go to "BUZZER ALM" once again and change the setting to "OFF".
☐ The alarm sound will automatically switch off after 10 minutes. The sound can also be switched off by pressing any button.
NOTE
The volume of the buzzer alarm cannot be changed.
Radio Alarm
Using the radio ON alarm timer function, the radio can be set up to switch ON at a specific time to enjoy a station broadcast.
- Press the Menu button.

- Press the Select button and display "RADIO ALM".

RADIO ALM
- Press the Enter / Information button.

- Press the Select button and display "ON".

ON
- Press the Enter / Information button.

- Press the Select button and adjust "hour" digits.

12:00
- Press the Enter / Information button.

- Press the Select button and adjust "minute" digits.

12:55
- Press the Enter / Information button.

- Press the Select button to set up repeat.
| Once ONCE | |
| Daily DAILY | |
| Weekdays only WEEKDAY | |
| Saturday and Sunday only WEEKEND | |

DAILY
- Press the Enter / Information button.

- Select radio bandwidth.
Press the Select button to display "AM" or "FM".

- Press the Enter / Information button.

- Press the Select button to display a preset station.

P2 FM 79.5 MHz
To select a station by broadcast frequency, use the Search button.

FM 80.0 MHz
- Press the Enter / Information button to complete setup.

will be displayed on the LCD.
○ To cancel the radio alarm setting, go to "RADIO ALM" once again and change the setting to "OFF".
NOTE
The radio's volume will be at the level when the radio was last switched OFF.
CHARGING A SMARTPHONE OR CELL PHONE
Devices such as a smartphone and mobile phone can be recharged by connecting the device to this radio.
The recharge function is only available for the "FM", "AUX" or "Bluetooth" mode. (Recharging cannot be done in "AM" mode.)
NOTE
○ When recharging in “AUX” or “Bluetooth” mode, set the volume output at 20 or less.
The radio is designed to deactivate USB output and disable the recharging of smartphones and mobile phones when the volume is at 21 or more. (For “FM” mode, USB recharging will continue even if the volume output is 21 or more.)
On rare occasions, sound output may be interrupted or power could shutdown during USB recharging.
If either should occur, lower the volume level or stop recharging with the USB.
☐ The radio is designed to deactivate USB output and disable the recharging of smartphones and mobile phones when the power level of the battery is low.
Should the aforementioned occur, recharge the battery or replace with a fully charged battery.
○ If the voltage is low when the AC adapter is in use, the USB output may be cut off, discontinuing any recharging.
- Using a commercially available USB connection/recharge cable, connect to the USB charging port located in the radio's storage case for external devices. (Fig. 9)
text_image
Smartphone USB charging port USB charging cable Recharge cable holderFig. 9
- Secure the smartphone with the holders and close the cover. (Fig. 8)
(See "Secure the external device" on page 16)
NOTE
○ Use a fully charged battery when using a battery as this device's power source.
You will not be able to recharge smartphones or mobile phones when the battery power level becomes low.
○ The time required for charging varies in accordance with the smartphone or mobile phone being recharged.
○ Do not use the recharge function for any devices other than a smartphone or mobile phone.
○ The radio may not be able to recharge some smartphone or mobile phone models.
Two recharge cable holders, one for Android and the other for Apple (Lightning connector) are included.
Select the holder that best suits your device.
- Should your device be too large for the radio's external device storage case, draw the cable through the cable access hole. (Fig. 10)
text_image
Cable access hole Rubber capFig. 10
NOTE
As the recharge cable holders are designed for standard size terminals, the holders may not be able to securely fasten certain terminals depending on the recharge cable used.
MAINTENANCE AND INSPECTION

WARNING:
When not in use or during inspection and maintenance, be sure to remove the AC plug, rechargeable battery and backup batteries.
Inspecting the mounting screws
Regularly inspect all mounting screws and ensure that they are properly tightened. Should any of the screws be loose, retighten them immediately. Failure to do so could result in serious hazard.
Cleaning on the outside
When the radio is stained, wipe with a soft dry cloth or a cloth moistened with soapy water. Do not use chloric solvents, gasoline or paint thinner, for they melt plastics.
Storing the Radio
Do not store the radio in the following places.
○ Within reach of or easily accessible to children
○ In humid or dusty places
○ In high temperature such as inside a car or exposed to direct sunlight
○ In extremely cold places or directly exposed to cold draughts
○ Where the temperature changes drastically
○ Where it is exposed to smoke or steam such as near a cooking appliance or humidifi er
Service parts list

CAUTION
Repair, modification and inspection of metabo HPT Power Tools must be carried out by a metabo HPT Authorized Service Center. This Parts List will be helpful if presented with the tool to the metabo HPT Authorized Service Center when requesting repair or other maintenance. In the operation and maintenance of power tools, the safety regulations and standards prescribed in each country must be observed.
MODIFICATIONS:
metabo HPT Power Tools are constantly being improved and modified to incorporate the latest technological advancements.
Accordingly, some parts may be changed without prior notice.
ACCESSORIES
WARNING:
ALWAYS use Only authorized metabo HPT replacement parts and accessories. NEVER use replacement parts or accessories which are not intended for use with this tool. Contact metabo HPT if you are not sure whether it is safe to use a particular replacement part or accessory with your tool.
The use of any other attachment or ac
and could cause injury or mechanical damage.
NOTE: Accessories are subject to change without any obligation on the part of the metabo HPT.
STANDARD ACCESSOIRES
○ AC adapter ....1
○ AA batteries ....2
○ Recharge cable holder (Code No. 338371) .....1 (for Apple Lightning connector)
* Android holder is built into the main unit.
OPTIONAL ACCESSORIES.....sold separately
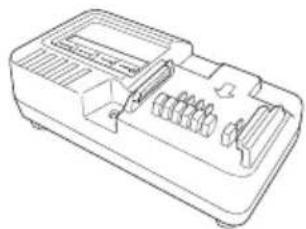
- Slide battery (BSL1830)
When charging slide battery (BSL1830), always use charger (UC18YKSL).
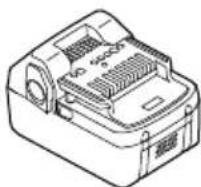
- Charger (UC18YKSL)
Charging voltage: 14.4 V - 18 V
natural_image
Line drawing of a mechanical device casing with internal compartments and ports (no text or symbols)NOTE
Specifications are subject to change without any obligation on the part of the metabo HPT.
IMPORTANTES INSTRUCTIONS DE SÉCURITÉ
This device complies with Industry Canada licence-exempt RSS standard(s). Operation is subject to the following two conditions: (1) this device may not cause interference, and (2) this device must accept any interference, including interference that may cause undesired operation of the device.
GARDEZ CES INSTRUCTIONS ET RENDEZ LES DISPONIBLES POUR D'AUTRES UTILISATEURS ET PROPRIÉTAIRES DE CETTE RADIO !
DESCRIPTION FONCTIONNELLE
REMARQUE
text_image
Technical diagram of a device with labeled components including a digital display and control buttons
text_image
Technical diagram of a mechanical housing with numbered components for identification
text_image
SOURCE MENU ENTER INFO 11 12 13 14 15 16 17 18 19 20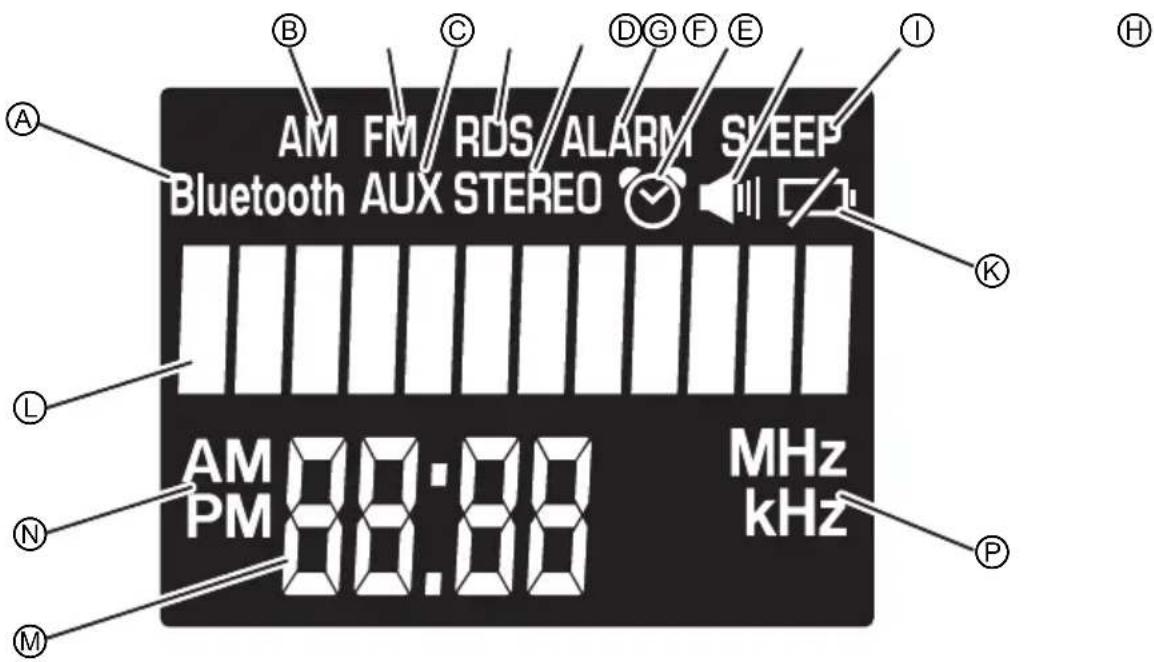
text_image
AM FM RDS ALARM SLEEP Bluetooth AUX STEREO AM PM 88:88 MHz kHz A B C D G F E I K L N M PBatterie rechargeable
text_image
Support ① ② ① ②Fig. 8
4. Lecture
(Lecture/Pause, Recherche)
REMARQUE
natural_image
Line drawing of a device casing with internal compartments and ventilation slots (no text or symbols)REMARQUE
text_image
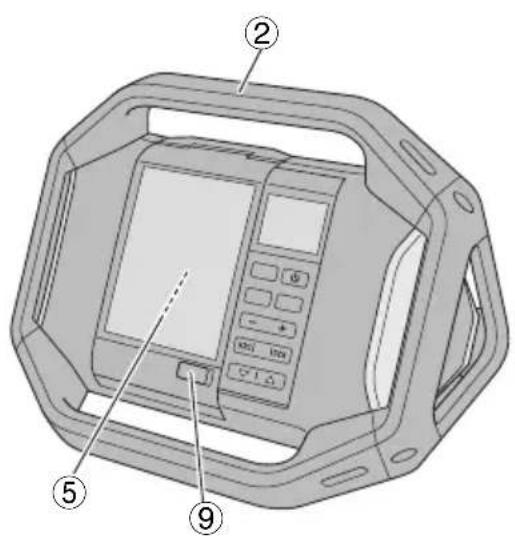
Technical diagram of a device with numbered parts labeled ②, ⑤, and ⑨ pointing to internal components.
text_image
Technical diagram of a mechanical housing with numbered components for identification
text_image
SOURCE MENU ENTER INFO 11 12 13 14 15 16 17 18 19 20
text_image
AM FM RDS ALARM SLEEP Bluetooth AUX STEREO AM PM 88:88 MHz kHz A B C D G F E I K L N M Pnatural_image
Simple line drawing of a flatboard with a clip and two circular buttons at the base (no text or symbols)ACCESORIOS OPCIONALES.....de venta por separado
natural_image
Line drawing of a device casing with internal compartments and ventilation slots (no text or symbols)NOTA
natural_image
Line drawing of a quill pen with inkwell (no text or symbols)
| ITEM NO. | PART NAME Q'TY | |
| 47 NUT M3 | 8 | |
| 48 | HEX. SOCKET HD. BOLT M4X8 | 6 |
| 49 FRONT COVER SET | 1 | |
| 50 USB EXIT COVER | 1 | |
| 52 FRONT CABINET SET B | 1 | |
| 53 CONNECTOR D 1 | ||
| 71 MACHINE SCREW M5X30 | 6 | |
| 72 NUT M5 | 12 | |
| 73 DSAL FRAME (A) OUTER | 3 | |
| 74 DSAL FRAME (A) INNER | 3 | |
| 75 TAPPING SCREW D3X8 | 12 | |
| 76 DSAL FRAME (B) OUTER | 2 | |
| 77 DSAL FRAME (B) INNER | 2 | |
| 78 | MACHINE SCREW M5X20 | 6 |
| 501 | AC ADAPTER | 1 |
| 502 | AA BATTERY | 2 |
| ITEM NO. | PART NAME Q'TY | |
| 22 DC JACK BRACKET | 1 | |
| 23 DC JACK | 1 | |
| 24 CONNECTOR B 1 | ||
| 25 CABLE HOLDER (ANDROID) | 1 | |
| 26 SUPPORT | 1 | |
| 27 BRACKET SET | 1 | |
| 28 SQUARE WASHER | 7 | |
| 29 TAPPING SCREW D2X6 | 6 | |
| 30 LEFT LATCHING | 1 | |
| 31 LEFT LATCH MOUNTING | 1 | |
| 32 LIGHT LATCHING | 1 | |
| 33 RIGHT LATCH MOUNTING | 1 | |
| 34 LATCHING PLATE | 1 | |
| 35 PCB ASS'Y (USB) | 1 | |
| 36 PCB PLATE | 1 | |
| 37 TAPPING SCREW D2×10 | 4 | |
| 38 PCB ASS'Y (AUX) | 1 | |
| 39 CABLE HOLDER (APPLE) | 1 | |
| 40 PCB ASS'Y(A) | 1 | |
| 41 SPEAKER RESISTNCE STRIP 2 | ||
| 42 SPEAKER (DSAL) | 2 | |
| 43 MACHINE SCREW M3X6 | 8 | |
| 44 TAPPING SCREW D2X7 | 2 | |
| 45 SIDE PLATE | 2 | |
| 46 SPEAKER GRILL SET | 2 | |
| ITEM NO. | PART NAME Q'TY | |
| 1 | TAPPING SCREW (W/FLANGE) D2.3X8 | 33 |
| 2 AD | APTER STORAGE CASE 1 | |
| 3 | BUTTERY COMPARTMENT SET | 1 |
| 4 | MACHINE SCREW (W/FLANGE) M3X8 | 1 |
| 5 CONNECTOR A 1 | ||
| 6 TAPPING SCREW D4X12 7 | ||
| 7 RUBBER ANTENNA 1 | ||
| 8 | TAPPING SCREW (W/FLANGE) D2X8 | 2 |
| 9 | LOWER BACK COVER BUTTON | 1 |
| 10 | UPPER BACK COVER BUTTON | 1 |
| 11 BACK COVER LATCHING B 1 | ||
| 12 NAME PLATE 1 | ||
| 13 SOCKET COVER 1 | ||
| 14 BACK CABINET SET 1 | ||
| 15 UPPER CONTACT BRAKET 1 | ||
| 16 BATTERY TERMINAL 1 | ||
| 17 LOWER CONTACT BRACKET 1 | ||
| 18 INTERNAL WIRE (B) 1 | ||
| 19 CONNECTOR C 2 | ||
| 20 BATTERY COVER 1 | ||
| 21 SCREW M3 | 1 | |

natural_image
Line drawing of a quill pen with inkwell (no text or symbols)
natural_image
Line drawing of a quill pen with inkwell (no text or symbols)
Please contact Koki Holdings America Ltd. at 1-800-59-TOOLS (toll free), or metabo HPT AUTHORIZED POWER TOOL SERVICE CENTER regarding COLLECTION.

Pour le RAMASSAGE, contacter Koki Holdings America Ltd. au 1-800-59-TOOLS (appel gratuit), ou UN SERVICE APRÈS-VENTE D'OUTILS ÉLECTRIQUE AGRÉÉ PAR metabo HPT.

Shinagawa Intercity Tower A, 15-1, Konan 2-chome, Minato-ku, Tokyo 108-6020, Japan
Distributed by
Koki Holdings America Ltd.
1111 Broadway Ave, Braselton, Georgia, 30517
Koki Holdings America Ltd. Canadian Branch
3405 American Drive, Units 9-10, Mississauga, ON, L4V 1T6