
UC 18YSL3 - Battery charger HITACHI - Free user manual and instructions
Find the device manual for free UC 18YSL3 HITACHI in PDF.

| Product Type | Battery Charger |
| Brand | Hitachi |
| Model | UC 18YSL3 |
| Input Voltage | 120 V AC, 60 Hz |
| Charging Voltage | 14.4 V - 18 V DC |
| Charging Current (max) | 8.0 A (high capacity batteries) / 6.0 A (standard batteries) |
| Weight | 0.6 kg (1.3 lb) |
| Compatible Batteries | Hitachi BSL14 and BSL18 series (Li-ion 14.4 V and 18 V) |
| USB Charging Port | Yes, for USB devices (5 V) |
| Charging Indicator | Multicolor LED (red, blue, green, purple) depending on status |
| Protection | Overheating, short circuit, overvoltage |
| Charging Temperature | 0 °C to 50 °C (32 °F to 122 °F) |
| Charging Time (typical) | 15 to 38 minutes depending on battery capacity |
| Usage | Recharging Hitachi power tool batteries |
| Maintenance | Clean with a soft, dry cloth; check contact cleanliness |
| Safety Instructions | Do not expose to water; use only with recommended batteries; unplug before cleaning |
| Repairs | Entrust to a Hitachi authorized service center |
| Warranty | Refer to the manual or retailer |
Frequently Asked Questions - UC 18YSL3 HITACHI
User questions about UC 18YSL3 HITACHI
0 question about this device. Answer the ones you know or ask your own.
Ask a new question about this device
Download the instructions for your Battery charger in PDF format for free! Find your manual UC 18YSL3 - HITACHI and take your electronic device back in hand. On this page are published all the documents necessary for the use of your device. UC 18YSL3 by HITACHI.
USER MANUAL UC 18YSL3 HITACHI
SAFETY INSTRUCTIONS AND INSTRUCTION MANUAL
WARNING
IMPROPER OR UNSAFE use of this power tool can result in death or serious bodily injury! This manual contains important information about product safety. Please read and understand this manual before operating the power tool. Please keep this manual available for other users and owners before they use the battery charger. This manual should be stored in safe place.
INSTRUCTIONS DE SECURITE ET MODE D'EMPLOI
AVENTISSEMENT
IMPORTANT SAFETY INSTRUCTIONS 3
MEANINGS OF SIGNAL WORDS 3
SAFETY 4
IMPORTANT SAFETY INSTRUCTIONS FOR BATTERY CHARGER 4
IMPORTANT SAFETY INSTRUCTIONS FOR USE OF THE BATTERY AND BATTERY CHARGER 5
USB DEVICE CONNECTION PRECAUTIONS 6
DISPOSAL OF THE EXHAUSTED BATTERY 6
SERVICE AND REPAIRS 13
PARTS LIST 40
TABLE DES MATIÈRES
Français
Page Page
CONSIGNES DE SECURITE IMPORTANTES 14
SIGNIFICATION DES MOTS D'AVERTISSEMENT 14
SECURITE 15
CONSIGNES DE SECURITE IMPORTANTES POUR LE CHARGEUR DE BATTERIE 15
CONSIGNES DE SECURITE IMPORTANTES POUR L'UTILISATION DE LA BATTERIE ET DU CHARGEUR DE BATTERIE 16
PRECAUTIONS LORS DE LA ConnexION DU DISPOSITIF USB 17
MISE AU REBUT D'UNE BATTERIE USEE. 17
UTILISATION ET ENTRETIEN 19
NOM DES PARTIES 19
SPECIFICATIONS 19
UTILISATIONS 20
MÉTHODE DE RECHARGE 20
CHARGEMENT DU DISPOSITIF USB 23
IMPORTANT SAFETY INSTRUCTIONS
Read and understand all of the safety precautions, warnings and operating instructions in the Instruction Manual before operating or maintaining this battery charger.
Most accidents that result from battery charger operation and maintenance are caused by the failure to observe basic safety rules or precautions. An accident can often be avoided by recognizing a potentially hazardous situation before it occurs, and by observing appropriate safety procedures.
Basic safety precautions are outlined in the "SAFETY" section of this Instruction Manual and in the sections which contain the operation and maintenance instructions.
Hazards that must be avoided to prevent bodily injury or machine damage are identified by WARNINGS on the battery charger and in this Instruction Manual.
NEVER use this battery charger in a manner that has not been specifically recommended by HITACHI.
MEANINGS OF SIGNAL WORDS
WARNING indicates a potentially hazardous situations which, if ignored, could result in death or serious injury.
CAUTION indicates a potentially hazardous situations which, if not avoided, may result in minor or moderate injury, or may cause machine damage.
NOTE emphasizes essential information.
SAFETY
IMPORTANT SAFETY INSTRUCTIONS FOR BATTERY CHARGER
WARNING: Death or serious bodily injury could result from improper or unsafe use of battery chargers. To avoid these risks, follow these basic safety instructions:
READ ALL INSTRUCTIONS
- SAVE THESE INSTRUCTIONS: This manual contains important safety and operating instructions for battery charger Model UC18YSL3.
- Before using battery charger, read all instructions and cautionary markings on (1) battery charger, (2) battery, and (3) product using battery.
- CAUTION: To reduce risk of injury, charge only HITACHI rechargeable BSL14 and BSL18 series. Other type of batteries may burst causing personal injury and damage.
- Do not expose battery charger to rain or snow.
- Use of an attachment not recommended or sold by the battery charger manufacturer may result in a risk of fire, electric shock, or injury to persons.
- To reduce risk of damage to electric plug and cord, pull by plug when disconnecting battery charger.
- Make sure cord is located so that it will not be stepped on, tripped over, or otherwise subjected to damage or stress.
- An extension cord should not be used unless absolutely nec extension cord could result in a risk of fire and electric shock.
If extension cord must be used make sure:
a. That blades of extension cord are the same number, size, and shape as those of plug on battery charger:
b. That extension cord is properly wired and in good electrical condition; and
c. That wire size is large enough for AC ampere rating of battery charger as specified in Table 1.
Table 1
RECOMMENDED MINIMUM AWG SIZE FOR
EXTENTION CORDS FOR BATTERY CHARGERS
| AC Input Rating Amperes* | AWG Size of Cord | ||||
| Equal to or greater than | but less than | Length of Cord, Feet (Meter) | |||
| 25 (7.5) | 50 (15) | 100 (30) | 150 (45) | ||
| 0 | 2 | 18 | 18 | 18 | 16 |
| 2 | 3 | 18 | 18 | 16 | 14 |
| 3 | 4 | 18 | 18 | 16 | 14 |
- If the input rating of a battery charger is given in watts rather than in amperes, the corresponding ampere rating is to be determined by dividing the wattage rate voltage rating-for example:
$$ \frac {1 , 2 5 0 \text {w a t t s}}{1 2 5 \text {v o l t s}} = 1 0 \text {a m p e r e s} $$
- Do not operate battery charger with damaged cord or plug-replace them immediately.
- Do not operate battery charger if it has received a sharp blow, been dropped, or otherwise damaged in any way; take it to a quali ed serviceman.
- Do not disassemble battery charger; take it to a qualified serviceman when service or repair is required. Incorrect reassembly may result in a risk of electric shock or fire.
- To reduce risk of electric shock, unplug charger from receptacle by maintenance or cleaning. Removing the battery will not reduce this risk.
- This battery charger might be attached to HITACHI battery operated tools as a standard accessory. In this case, please confirm Instruction Manual of the HITACHI battery operated tools before using the battery charger.
IMPORTANT SAFETY INSTRUCTIONS FOR USE OF THE BATTERY AND BATTERY CHARGER
You must charge the battery before you can use the power tool. Before using the model UC18YSL3 battery charger, be sure to read all instructions and cautionary statements on it, the battery and in this manual.
CAUTION: USE ONLY HITACHI BATTERY TYPES BSL14 SERIES AND BSL18 SERIES. OTHER TYPES OF BATTERIES MAY BURST AND CAUSE INJURY!
Follow these instructions to avoid the risk of injury:

WARNING: Improper use of the battery or battery charger can lead to serious injury. To avoid these injuries:
- NEVER disassemble the battery.
- NEVER incinerate the battery, even if it is damaged or is completely worn out. The battery can explode in a fire.
- NEVER short-circuit the battery.
- NEVER insert any objects into the battery charger's air vents. Electric shock or damage to the battery charger may result.
- NEVER charge outdoors. Keep the battery away from direct sunlight and use only where there is low humidity and good ventilation.
- NEVER charge when the temperature is below 14^ (-10^) or above 104^ (40^) .
- NEVER connect two battery chargers together.
- NEVER insert foreign objects into the hole for the battery or the battery charger.
- NEVER use a booster transformer when charging.
- NEVER use DC power to charge.
-
NEVER store the battery or battery charger in places where the temperature may reach or exceed 104^ (40^) .
-
ALWAYS operate charger on standard household electrical power (120 volts). Using the charger on any other voltage may overheat and damage the charger.
- ALWAYS wait at least 15 minutes between charges to avoid overheating the charger.
- ALWAYS disconnect the power cord from its receptacle when the charger is not in use.
USB DEVICE CONNECTION PRECAUTIONS
When an unexpected problem occurs, the data in a USB device connected to this product may be corrupted or lost. Always make sure to back up any data contained in the USB device prior to use with this product.
Please be aware that our company accepts absolutely no responsibility for any data stored in a USB device that is corrupted or lost, nor for any damage that may occur to a connected device.
DISPOSAL OF THE EXHAUSTED BATTERY
WARNING: Do not dispose of the exhausted battery. The battery must explode if it is incinerated. The product that you have purchased contains a rechargeable battery. The battery is recyclable. At the end of it's useful life, under various state and local laws, it may be illegal to dispose of this battery into the municipal waste stream. Check with your local solid waste officials for details in your area for recycling options or proper disposal.
SAVE THESE INSTRUCTIONS AND MAKE THEM AVAILABLE TO OTHER USERS AND OWNERS OF THIS TOOL!
The information contained in this Instruction Manual is designed to assist you in the safe operation and maintenance of the battery charger.
NEVER operate, or attempt any maintenance on the battery charger unless you have first read and understood all safety instructions contained in this manual.
Some illustrations in this Instruction Manual may show details or attachments that differ from those on your own battery charger.
NAME OF PARTS
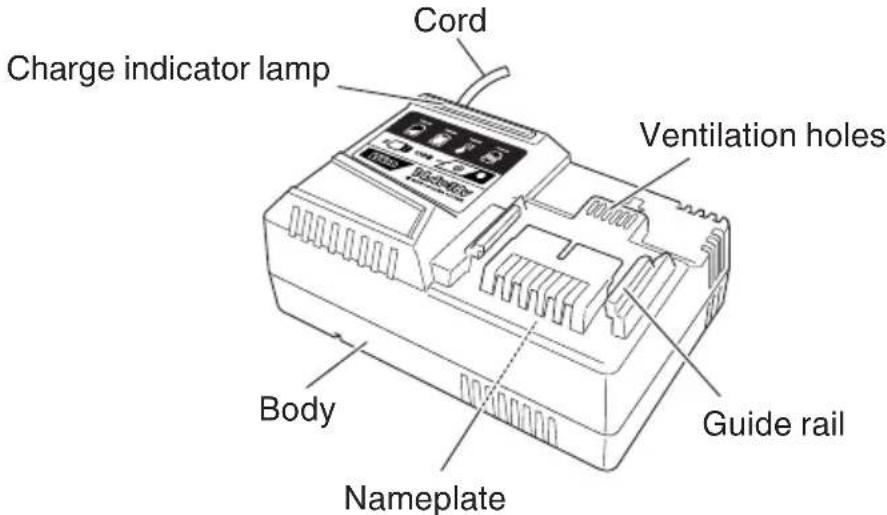
Fig. 1
SPECIFICATIONS
| Model UC18YSL3 | |
| Input power source Single phase: AC | 120 V, 60 Hz |
| Charger | Charging voltage..............................................DC 14.4 V - 18 V Charging current BSL1860 / BSL1850 / BSL1840 / BSL1830 / BSL1460 / BSL1450 / BSL1440 / BSL1430 ...DC 8.0 A BSL1830C / BSL1825 / BSL1820 / BSL1815 / BSL1815X / BSL1815S BSL1430C / BSL1425 / BSL1420 / BSL1415 / BSL1415X / BSL1415S..............................................DC 6.0 A |
| Weight 1.3 lbs (0.6 kg) |
APPLICATIONS
For charging the HITACHI batteries types BSL14, BSL18 series.
CHARGING METHOD
NOTE: Before plugging into the receptacle, make sure the following points.
The power source voltage is stated on the nameplate.
The cord is not damaged.
WARNING: Do not charge at voltage higher than indicated on the nameplate. If charged at voltage higher than indicated on the name charger will burn up.
- Connect the battery charger's power cord to the receptacle.
When connecting the plug of the charger to a receptacle, the charge indicator lamp will blink in red. (At 1-second intervals).


WARNING:
Do not use the electrical cord if damaged. Have it repaired immediately.
- Insert the battery to the battery charger. Insert the battery into the battery charger as shown in Fig. 2.
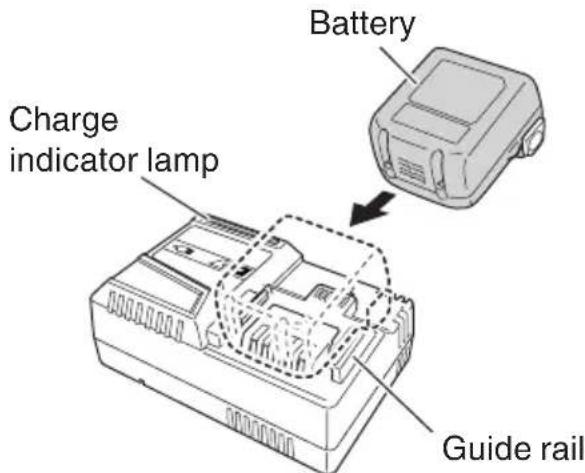
Fig. 2
3. Charging
When inserting a battery in the charger, the charge indicator lamp will blink in blue.
When the battery becomes fully recharged, the charge indicator lamp will light up in green.
(See Table 2)
(1) Charge indicator lamp indication
The indications of the charge indicator lamp will be as shown in Table 2, according to the condition of the battery charger or the battery.
Table 2
| Indications of the charge indicator lamp | ||||
| Charge indicator lamp (RED / BLUE / GREEN / PURPLE) | Before charging | Blinks (RED) | Lights for 0.5 seconds. Does not light for 0.5 seconds. (off for 0.5 seconds) | Plugged into power source |
| While charging | Blinks (BLUE) | Lights for 0.5 seconds. Does not light for 1 second. (off for 1 second) | Battery capacity at less than 50% | |
| Blinks (BLUE) | Lights for 1 second. Does not light for 0.5 seconds. (off for 0.5 seconds) | Battery capacity at less than 80% | ||
| Lights (BLUE) | Lights continuously | Battery capacity at more than 80% | ||
| Charging complete | Lights (GREEN) | Lights continuously (Continuous buzzer sound: about 6 seconds) | ||
| Overheat standby | Blinks (RED) | Lights for 0.3 seconds. Does not light for 0.3 seconds. (off for 0.3 seconds) | Battery overheated. Unable to charge. (Charging will commence when battery cools) | |
| Charging impossible | Flickers (PURPLE) | Lights for 0.1 seconds. Does not light for 0.1 seconds. (off for 0.1 seconds) (Intermittent buzzer sound: about 2 seconds) | Malfunction in the battery or the charger | |
(2) Regarding the temperature of the rechargeable battery.
The temperatures for rechargeable batteries are as shown in the Table 3, and batteries that have become hot should be cooled for a while before being recharged.
Table 3
| Rechargeable batteries | Temperatures at which the battery can be recharged |
| BSL1415, BSL1415X, BSL1425, BSL1430C, BSL1815, BSL1815X, BSL1825, BSL1830C, BSL1420, BSL1430, BSL1450, BSL1460, BSL1830, BSL1440, BSL1840, BSL1850, BSL1860 | 32°F – 122°F (0°C – 50°C) |
(3) Regarding recharging time
Table 4 shows the recharging time required according to the type of battery.
Table 4 Recharging time (approx. min.) at 20^
| Battery Capacity | Li-ion BATTERY | |||
| Battery Voltage | ||||
| 14.4 V 18 V | ||||
| 1.3 Ah BSL1 | 415S 15 min. | BSL1815S 15 min. | ||
| 1.5 Ah | BSL1415 | 15 min. | BSL1815 | 15 min. |
| BSL1415X | BSL1815X | |||
| 2.0 Ah BSL1 | 420 20 min. | BSL1820 20 min. | ||
| 2.5 Ah BSL1 | 425 25 min. | BSL1825 25 min. | ||
| 3.0 Ah | BSL1430C | 30 min. | BSL1830C 30 min. | |
| BSL1430 20 | min. | BSL1830 20 min. | ||
| 4.0 Ah BSL1 | 440 26 min. | BSL1840 26 | min. | |
| 5.0 Ah BSL1 | 450 32 min. | BSL1850 32 min. | ||
| 6.0 Ah BSL1 | 460 38 min. | BSL1860 38 | min. | |
NOTE: The recharging time may vary according to the ambient temperature.
4. Disconnect battery charger from the receptacle.

CAUTION: Do not pull the plug out of the receptacle by pulling on the cord. Make sure to grasp the plug when removing from receptacle to avoid damaging cord.
5. Remove the battery from the battery charger.
Supporting the battery charger with hand, pull out the battery from the battery charger.
NOTE
Be sure to pull out the battery from the battery charger after use, and then keep it.
Regarding electric discharge in case of new batteries, etc.
As the internal chemical substance of new batteries and batteries that have not been used for an extended period is not activated, the electric discharge might be low when using them the first and second time. This is a temporary phenomenon, and normal time required for recharging will be restored by recharging the batteries 2 - 3 times.
How to make the batteries perform longer.
Recharge the batteries before they become completely exhausted.
When you feel that the power of the tool becomes weaker, stop using the tool and recharge its battery. If you continue to use the tool and exhaust the electric current, the battery may be damaged and its life will become shorter.
Avoid recharging at high temperatures.
A rechargeable battery will be hot immediately after use. If such a battery is recharged immediately after use, its internal chemical substance will deteriorate, and the battery life will be shortened. Leave the battery and recharge it after it has cooled for a while.
CAUTION:
- When the battery charger has been continuously used, the battery charger will be heated, thus constituting the cause of the failures. Once the charging has been completed, give 15 minutes rest until the next charging.
- If the battery is charged while it is heated because it has been left for a long time in a location subject to direct sunlight or because the battery has just been used, the charge indicator lamp of the charger lights for 0.3 seconds, does not light for 0.3 seconds (off for 0.3 seconds).
The battery will not be recharged. In such a case, let the battery cool before charging.
- When the charge indicator lamp flickers (at 0.2-second intervals), check for and take out any foreign objects in the charger's battery connector. If there are no foreign objects, it is probable that the battery or charger is malfunctioning. Take it to your authorized Service Center.
HOW TO RECHARGE USB DEVICE
WARNING
Prior to use, check the connecting USB cable for any defect or damage.
Using a defective or damaged USB cable can cause smoke emission or ignition.
- When the product is not being used, cover the USB port with the rubber cover.
Buildup of dust etc. in the USB port can cause smoke emission or ignition.
NOTE
The time required for charging will be longer when a USB device and battery are being simultaneously charged.
There may be an occasional pause during USB recharging.
- When a USB device is not being charged, turn the USB power switch OFF and remove the USB device from the charger.
Failure to do so may not only reduce the battery life of a USB device, but may also result in unexpected accidents.
(1) Select a charging method
Depending on the charge method selected, either the battery is inserted into the charger or the power cord is plugged into an outlet.
- Charging a USB device by battery (Fig. 3-a)
Charging a USB device from a electrical outlet (Fig. 3-b) - Charging a USB device and battery from a electrical outlet (Fig. 3-c)
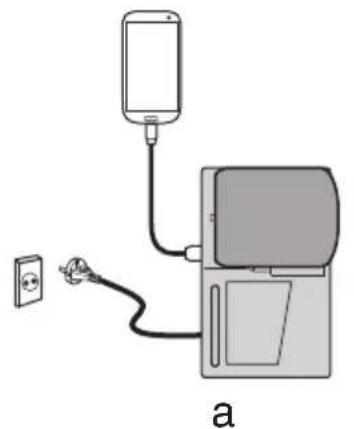
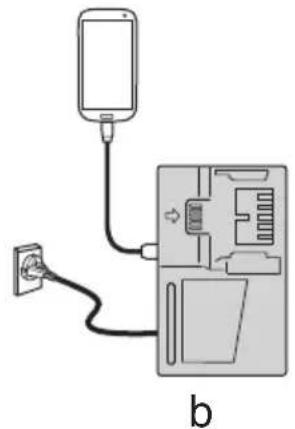
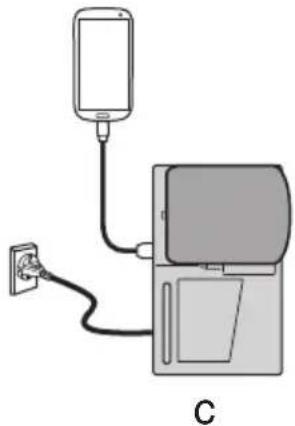
Fig. 3
(2) Turn the USB power switch ON (Fig. 4)
When you turn the USB power switch ON, the USB power indicator lamp will light up.
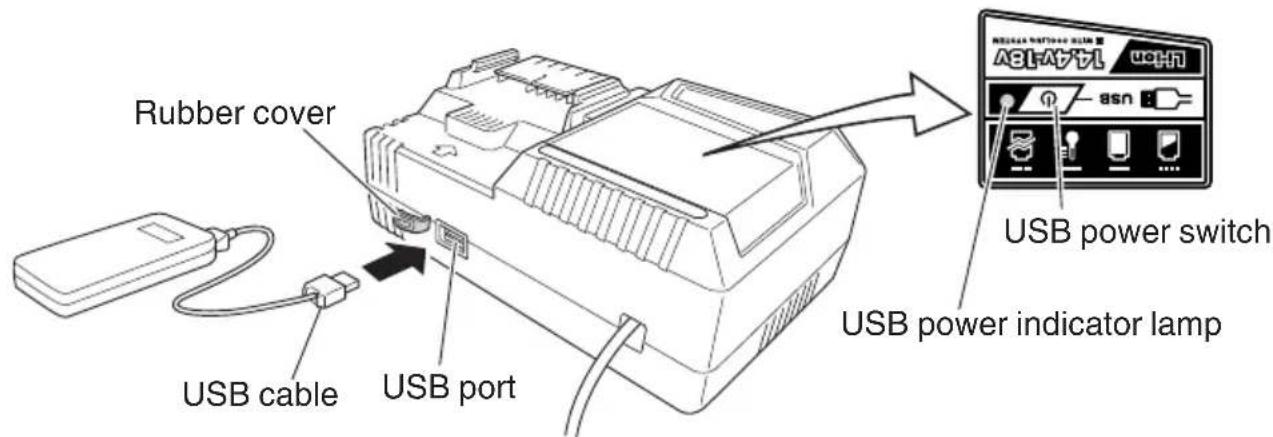
Fig.4
(3) Connect the USB cable. (Fig. 4)
Pull back the rubber cover and firmly plug in a commercially available USB cable (appropriate to the device being charged) into the USB port.
- When the power cord is not plugged into an outlet and the battery runs out of power, power output will stop and the USB power indicator lamp will shut off.
- When the USB power indicator lamp goes out, change the battery or plug the power cord into an electrical outlet.
(4) When charging is completed
The USB power indicator lamp will not go out when a USB device has been completely charged.
To verify charge status, check the USB device.
Turn the USB power switch OFF and unplug the power cord from the electrical outlet. (Fig. 4)
- Remove the battery from the charger and place the rubber cover over the USB port.
BEFORE USE
Check the work area to make sure that it is clear of debris and clutter.
Clear the area of unnecessary personnel. Ensure that lighting and ventilation is adequate.
MAINTENANCE AND INSPECTION
CAUTION: Pull out battery before doing any inspection or maintenance.
- Check the Screws
Loose screws are dangerous. Regularly inspect them and make sure they are tight.
CAUTION: Using this battery charger with loosened screws is extremely dangerous.
- Check for Dust
Dust may be removed with a soft cloth or a cloth dampened with soapy water.
Do not use bleach, chlorine, gasoline or thinner, for they may damage the plastics.
- Service parts list
CAUTION:
Repair, modification and inspection of Hitachi Power Tools must be carried out by an Hitachi Authorized Service Center.
This Parts List will be helpful if presented with the tool to the Hitachi Authorized Service Center when requesting repair or other maintenance. In the operation and maintenance of power tools, the safety regulations and standards prescribed in each country must be observed.
MODIFICATIONS:
Hitachi Power Tools are constantly being improved and modified to incorporate the latest technological advancements.
Accordingly, some parts may be changed without prior notice.
STORAGE
Storing in a place below 104^ (40^) and out of the reach of children.
SERVICE AND REPAIRS
All quality power tools will eventually require servicing or replacement of parts because of wear from normal use. To assure that only authorized replacement parts will be used, all service and repairs must be performed by a HITACHI AUTHORIZATION SERVICE CENTER, ONLY.
NOTE: Specifications are subject to change without any obligation on the part of the HITACHI.
CONSIGNES DE SECURITE IMPORTANTES
Shinagawa Intercity Tower A, 15-1, Konan 2-chome, Minato-ku, Tokyo 108-6020, Japan
Distributed by
Koki Holdings America Ltd.
1111 Broadway Ave, Braselton, Georgia, 30517
Koki Holdings America Ltd. Canadian Branch
3405 American Drive, Units 9-10, Mississauga, ON, L4V 1T6

- SAFETY INSTRUCTIONS AND INSTRUCTION MANUAL
- WARNING
- INSTRUCTIONS DE SECURITE ET MODE D'EMPLOI
- AVENTISSEMENT
- TABLE DES MATIÈRES
- Français
- IMPORTANT SAFETY INSTRUCTIONS
- MEANINGS OF SIGNAL WORDS
- SAFETY
- IMPORTANT SAFETY INSTRUCTIONS FOR BATTERY CHARGER
- READ ALL INSTRUCTIONS
- IMPORTANT SAFETY INSTRUCTIONS FOR USE OF THE BATTERY AND BATTERY CHARGER
- WARNING: Improper use of the battery or battery charger can lead to serious injury. To avoid these injuries:
- USB DEVICE CONNECTION PRECAUTIONS
- DISPOSAL OF THE EXHAUSTED BATTERY
- SAVE THESE INSTRUCTIONS AND MAKE THEM AVAILABLE TO OTHER USERS AND OWNERS OF THIS TOOL!
- NAME OF PARTS
- SPECIFICATIONS
- APPLICATIONS
- CHARGING METHOD
- WARNING:
- Charging
- Charge indicator lamp indication
- Regarding the temperature of the rechargeable battery.
- Regarding recharging time
- Disconnect battery charger from the receptacle.
- Remove the battery from the battery charger.
- NOTE
- Regarding electric discharge in case of new batteries, etc.
- How to make the batteries perform longer.
- CAUTION:
- HOW TO RECHARGE USB DEVICE
- BEFORE USE
- MAINTENANCE AND INSPECTION
- MODIFICATIONS:
- STORAGE
- SERVICE AND REPAIRS
- CONSIGNES DE SECURITE IMPORTANTES
- Koki Holdings America Ltd.
- Koki Holdings America Ltd. Canadian Branch
Brand : HITACHI
Model : UC 18YSL3
Category : Battery charger