Clip Phone 100 - Desk Phone TOPCOM - Free user manual and instructions
Find the device manual for free Clip Phone 100 TOPCOM in PDF.
User questions about Clip Phone 100 TOPCOM
0 question about this device. Answer the ones you know or ask your own.
Ask a new question about this device
Download the instructions for your Desk Phone in PDF format for free! Find your manual Clip Phone 100 - TOPCOM and take your electronic device back in hand. On this page are published all the documents necessary for the use of your device. Clip Phone 100 by TOPCOM.
USER MANUAL Clip Phone 100 TOPCOM
Congratulations with your Clip Phone 100!
IMPORTANT
Before installing your Clip Phone 100, please contact your telephone provider to obtain the CLIP subscription (display caller). Without this subscription, the Clip function does not work!
3 WERKING TELEFOON 3
4 WERKING NUMMERWEERGAVE 4
4WERKING NUMMERWEERGAVE
4.1 Klok instellen
4.1 Setting the clock 18
4.2 Setting a language 18
4.3 Setting LCD contrast 18
4.4 Receiving and saving calls 18
4.5 Message indications 19
4.6 Erasing and checking calls 19
4.6.1 Erasing 19
4.6.2 Checking 19
4.7 Setting the area code 19
4.8 Recalling a memory number 20
4.9 Message on hold 20
5 WARRANTY 20
TOPCOM
Clip Phone 100
1 INSTALLATION
You can use batteries or an AC adaptor to activate the display of the telephone. When you install the batteries, the telephone lines at the back of the phone have to be disconnected.
To insert the batteries, take the following steps:
- Use a screwdriver or any other flat tool to open the battery compartment.
- Put three 1,5V (AA) batteries inside the battery compartment.
- Close the battery compartment carefully.
To install the phone, you have to do the following :
- Connect one end of the telephone cable to the back of the Clip Phone 100 and the other end to the receiver.
- Connect one end of the telephone line to the back of the phone and the other end to the telephone line wall socket.
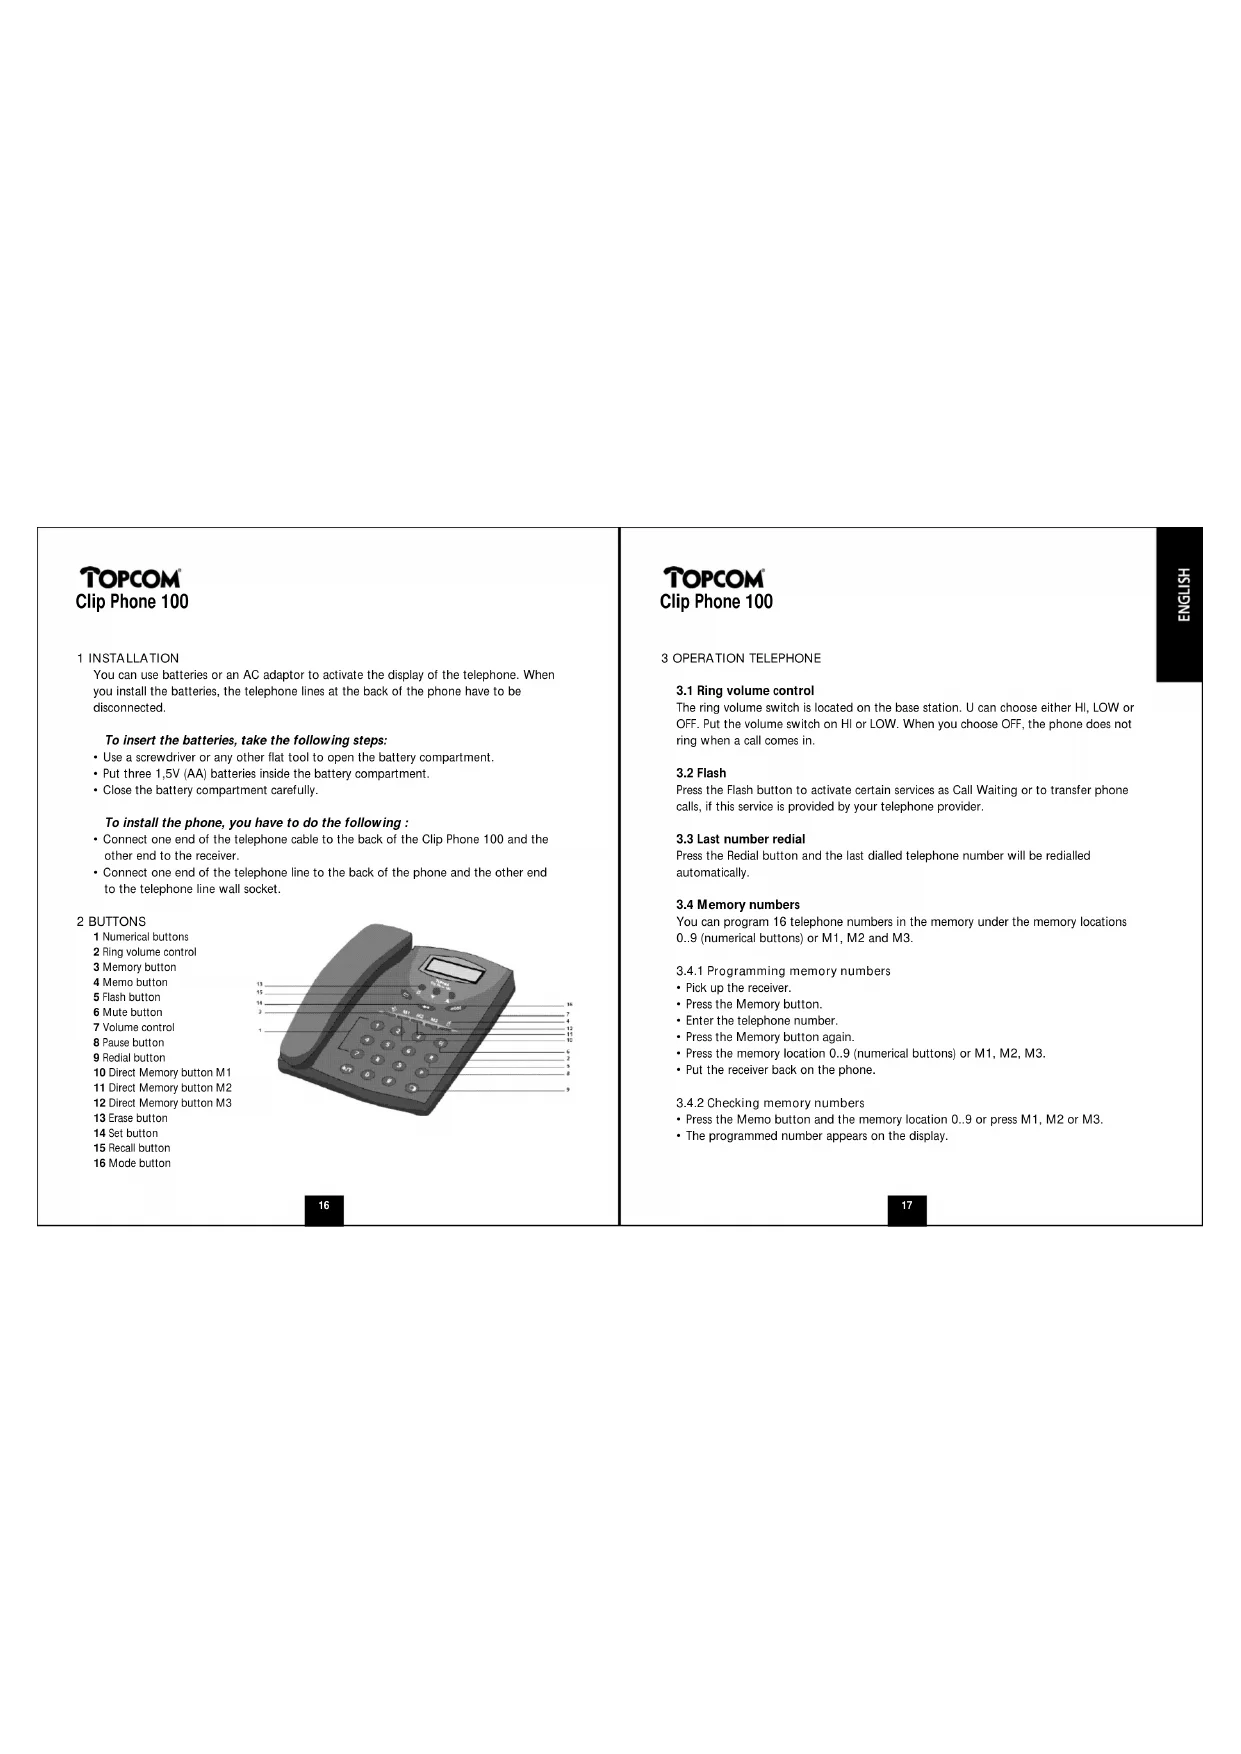
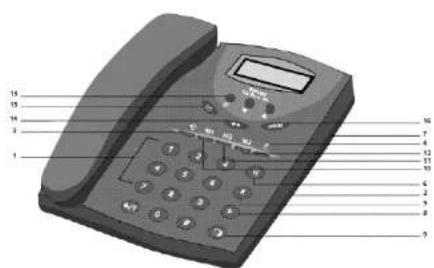
2BUTTONS
1 Numerical buttons
2 Ring volume control
3 Memory button
4 Memo button
5 Flash button
6 Mute button
7 Volume control
8. Pause button
9 Redial button
10 Direct Memory button M1
11 Direct Memory button M2
12 Direct Memory button M3
13 Erase button
14 Set button
15 Recall button
16 Mode button
TOPCOM
Clip Phone 100
The ring volume switch is located on the base station. U can choose either HI, LOW or OFF. Put the volume switch on HI or LOW. When you choose OFF, the phone does not ring when a call comes in.
3.2 Flash
Press the Flash button to activate certain services as Call Waiting or to transfer phone calls, if this service is provided by your telephone provider.
3.3 Last number redial
Press the Redial button and the last dialled telephone number will be redialled automatically.
3.4 Memory numbers
You can program 16 telephone numbers in the memory under the memory locations
0..9 (numerical buttons) or M1, M2 and M3.
3.4.1 Programming memory numbers
Pick up the receiver.
- Press the Memory button.
- Enter the telephone number
- Press the Memory button again.
- Press the memory location 0..9 (numerical buttons) or M1, M2, M3.
- Put the receiver back on the phone.
3.4.2 Checking memory numbers
- Press the Memo button and the memory location 0..9 or press M1, M2 or M3.
The programmed number appears on the display.
TOPCOM
Clip Phone 100
3.4.3 Dialling memory numbers
Pick up the receiver and press M1, M2 or M3; or press the Memo button first, followed by the memory location 0..9. The programmd number will be called automatically.
4.1 Setting the clock
- Press the Mode button to go through the different possibilities.
- Press the Set button when "SET TIME" appears on the display.
- Press the or buttons to set the month.
- Press the Set button to confirm.
- Repeat steps 3 and 4 to set the day and the hour.
4.2 Setting a language
This phone can show the display texts in several languages.
To set the desired language, take the following steps:
- Press the Mode button to go through the different possibilities.
- Press the Set button to confirm your choice.
4.3 Setting LCD contrast
You can change the LCD contrast of this phone :
- Press the Mode button until "SET CONTRAST" appears on the display.
- Press the Set button.
- Press the or buttons to set the desired contrast.
- Press the Set button to confirm.
4.4 Receiving and saving calls
The Clip Phone 100 receives a call and shows the information sent by the local telephone provider. This information can consist of the caller's telephone number, the date and the time; or the caller's name, his telephone number, the date and the time. The phone can save 20 to 50 calls which can be reviewed later.
TOPCOM
Clip Phone 100
It never saves the same call twice. When the memory is full, the old calls will be replaced by the new ones in the memory.
4.5 Message indications
The following special messages show the status of the phone :
NO CALLS There are no calls in the memory.
LOW BATTERY The battery is almost empty.
OUT OF AREA The received call doesn't have the clip service or their service
is not connected to your clip service.
PRIVATE CALL The caller has a private number and therefore the information
is not visible on the display.
LINE ERROR The clip information was interrupted during transmission of
the data.
END OF LIST There are no more calls.
NO DATA SENT The number of the caller was interrupted during transmission.
R # Number of the same calls that came in.
4.6 Erasing and checking calls
4.6.1 Erasing
- Press the Delete button twice to erase the number on the display.
- Press and hold the Erase button for 6 seconds and all calls will be erased.
4.6.2 Checking
- Press the the button to go to the next call. When you have gone through all calls,
'END OF LIST' appears on the display. - Press the button to look at the previous call.
4.7 Setting the area code
If you do not want the area code to appear on the display every time a new call comes in, you can program this in the memory.
TOPCOM
Clip Phone 100
Please take the following steps:
- Press the Mode button until 'SET AREA CODE' appears on the display.
- Press the Set button to set the area code (max. 3 digits).
- Press the or buttons first to change the first digit. Then you press the Set button to confirm. Do the same thing to change the second and third digit.
- Press the Mode button to leave the menu.
4.8 Recalling a memory number
- Press the or buttons to look for the desired number in the memory.
Pick up the receiver. - Press the Recall button once. The selected telephone number will be dialled automatically.
Remark :
The redialed telephone number will also be saved in the Redial memory.
4.9 Message on hold
When the caller has left a message in your personal mailbox, 'MESSAGE WAITING' appears on the display. As soon as you have received the message the display text disappears.
Remark:
This function is only possible when you have a subscription to this service.
5 WARRANTY
Warranty :
1 year
- Ask your dealer for your free swop warranty
Attention :
Do not forget to include your purchase invoice when you return the damaged device.
TOPCOM
Clip Phone 100
The equipment has been approved to 98/482/EG (TSR 21) for pan-European single terminal connection to the Public Switched Telephone Network (PSTN). However, due to differences between the individual PSTNs provided in different countries the approval does not, of itself, give an unconditional assurance of successful operation on every PSTN network termination point. Should you have problems, contact your dealer.
This list will indicate the networks with which the equipment is designed to work and any notified networks with which the equipment may have interworking difficulties.
| Network Compatibility Network Compatibility | |||
| Austria A Luxembourg A | |||
| Belgium A The Netherlands A | |||
| Denmark A Portugal A | |||
| Finland | A Spain | A | |
| France e | C | Sweden | A |
| Germany A | United Kingdom | C | |
| Greece | C Norway | A | |
| Ireland | C | Switzerland | C |
| Italy | C | ||
A equipment designed to work with country's network
B - equipment may have interworking difficulties with country's network
C - equipment not tested against compliance to country's network
TOPCOM
Clip Phone 100
1 INSTALLATION 23
2 TASTEN 23
3 TELEFONBETRIEB 24
it's nice talking to you.