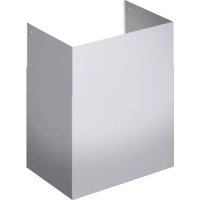
UCVM36RS - Basket THERMADOR - Free user manual and instructions
Find the device manual for free UCVM36RS THERMADOR in PDF.

User questions about UCVM36RS THERMADOR
0 question about this device. Answer the ones you know or ask your own.
Ask a new question about this device
Download the instructions for your Basket in PDF format for free! Find your manual UCVM36RS - THERMADOR and take your electronic device back in hand. On this page are published all the documents necessary for the use of your device. UCVM36RS by THERMADOR.
USER MANUAL UCVM36RS THERMADOR
Masterpiece® Series Downdraft Hood

THERMADOR.COM
Table of CONTENTS
ABOUT THIS MANUAL 4
How This Manual is Organized 4
Signal Words for Safety and Best Use 4
IMPORTANT SAFETY INSTRUCTIONS. 4
General Notes. 4
Proper Installation and Maintenance. 5
Fire Safety 6
Child Safety. 7
Cleaning Safety. 7
State of California Proposition 65Warnings
Protecting The Environment. 7
FEATURES 8
Filters. 8
OPERATING THE APPLIANCE 9
To Raise the Hood Intake Housing 9
To Lower the Hood Intake Housing. 9
Heat Sentry 9
Downdraft Hood Control Panel. 9
Automatic Operation 9
10-Minute Delay Off 9
Filter Clean Reminder 9
CLEANING AND MAINTENANCE 10
To Clean Grease Filters. 10
To Clean By Hand 11
To Clean Intake Housing 11
Cleaning Agents 11
TROUBLESHOOTING 12
Troubleshooting Tips 12
STATEMENT OF LIMITED PRODUCT WARRANTY. 13
What this Warranty Covers & Who it Applies to 13
How Long the Warranty Lasts. 13
Repair/Replace as Your Exclusive Remedy. 13
Out of Warranty Product 13
Warranty Exclusions 14
THERMADOR® SUPPORT 14
Service 14
Parts and Accessories 14

ABOUT THIS MANUAL
How This Manual is Organized
You can get the most out of your new appliance by reading this manual from beginning to end. This way you will systematically get to know your appliance and become familiar with its operation and features.
The manual consists of the following sections:
- The "Safety" section provides information on how to safely operate your appliance.
- "Features" introduces you to the appliance components and features.
The "Operating the Appliance" section offers you step-by-step instructions on how to operate your downdraft hood. - "Cleaning and Maintenance" provides you with information on how to clean and care for the various hood parts.
The "Troubleshooting" section provides do-it-yourself troubleshooting tips.
The "Customer Service" section provides information on contacting the manufacturer of your hood.
The "Warranty" section contains information on your product warranty.
Pay special attention to the important safety instructions in the "Safety" section.
Signal Words for Safety and Best Use
WARNING
This indicates that death or serious injuries may occur as a result of non-observation of this warning.
CAUTION
This indicates that minor or moderate injuries may occur as a result of non-observation of this warning.
NOTICE: This indicates that damage to the appliance or property may occur as a result of non-compliance with this advisory.
Note: This alerts you to important information and/or tips.
IMPORTANT SAFETY INSTRUCTIONS
READ AND SAVE THESE INSTRUCTIONS
General notes
Examine the appliance after unpacking it. In the event of transport damage, do not plug it in.
WARNING
TO REDUCE THE RISK OF FIRE, ELECTRIC SHOCK, OR INJURY TO PERSONS, OBSERVE THE FOLLOWING:
Use this unit only in the manner intended by the manufacturer. If you have questions, contact the manufacturer.
Before servicing or cleaning unit, switch power off at service panel and lock the service disconnecting means to prevent power from being switched on accidentally.
- When the service disconnecting means cannot be locked, securely fasten a prominent warning device, such as a tag, to the service panel.
WARNING
WARNING - TO REDUCE THE RISK OF FIRE, ELECTRIC SHOCK, OR INJURY TO PERSONS, OBSERVE THE FOLLOWING:
Installation work and electrical wiring must be done by qualified person(s) in accordance with all applicable codes and standards, including fire-rated construction.
- Sufficient air is needed for proper combustion and exhausting of gases through the flue (chimney) of fuel burning equipment to prevent back drafting. Follow the heating equipment manufacturer's guideline and safety standards such as those published by the National Fire Protection Association (NFPA), and the American Society for Heating, Refrigeration and Air Conditioning Engineers (ASHRAE), and the local code authorities.
- When cutting or drilling into wall or ceiling, do not damage electrical wiring and other hidden utilities.
Ducted fans must always be vented to the outdoors.
IMPORTANT SAFETY INSTRUCTIONS
READ AND SAVE THESE INSTRUCTIONS
WARNING
When properly cared for, your new appliance has been designed to be safe and reliable. Read all instructions carefully before use. These precautions will reduce the risk of burns, electric shock, fire, and injury to persons. When using kitchen appliances, basic safety precautions must be followed, including those in the following pages.
Proper Installation and Maintenance
Have the installer show you the location of the circuit breaker or fuse. Mark it for easy reference.
This appliance must be properly installed and grounded by a qualified technician. Connect only to properly grounded outlet. Refer to Installation Instructions for details.
This appliance is intended for normal family household use only. It is not approved for outdoor use. See the Warranty. If you have any questions, contact the manufacturer.
Do not store or use corrosive chemicals, vapors, flammable or non food products in or near this appliance. It is specifically designed for use when heating or cooking food. The use of corrosive chemicals in heating or cleaning will damage the appliance and could result in injury.
Do not operate this appliance if it is not working properly, or if it has been damaged. Contact an authorized servicer.
Do not repair or replace any part of the appliance unless specifically recommended in this manual. Refer all servicing to a factory authorized service center.
CAUTION
Grease left on filters can melt and move into the vent.
CAUTION
Turn power off at breaker before removing a damaged bulb. Do not touch the bulbs immediately after use. The bulbs will remain hot for several minutes.
Hidden surfaces may have sharp edges. Use caution when reaching behind or under appliance.
WARNING
Tie long hair so that it does not hang loose, and do not wear loose fitting clothing or hanging garments, such as ties, scarves, jewelry, or dangling sleeves.
WARNING
When the hood is operated in exhaust-air mode simultaneously with a different burner which also makes use of the same chimney (such as gas, oil or coal-fired heaters, continuous-flow heaters, hot-water boilers) care must be taken to ensure that there is an adequate supply of fresh air which will be needed by the burner for combustion.
This can be achieved if combustion air can flow through non-lockable openings, e.g. in doors, windows and via the air-intake/exhaust-air wall box or by other technical measures, such as reciprocal interlocking, etc.
WARNING
Avoid carbon monoxide poisoning - Provide adequate air intake so combustion gases are not drawn back into the room.
An air-intake/exhaust-air wall box by itself is no guarantee that the limiting value will not be exceeded.
Note: When assessing the overall requirement, the combined ventilation system for the entire household must be taken into consideration. This rule does not apply to the use of cooking appliances, such as cooktops and ovens.
IMPORTANT SAFETY INSTRUCTIONS
READ AND SAVE THESE INSTRUCTIONS
Fire Safety
WARNING
Use this appliance only for its intended use as described in this manual. NEVER use this appliance as a space heater to heat or warm the room. Doing so may result in overheating the appliance. Never use the appliance for storage.
Always have a working smoke detector near the kitchen. In the event that personal clothing or hair catches fire, drop and roll immediately to extinguish flames.
Have an appropriate fire extinguisher available, nearby, highly visible and easily accessible near the appliance.
Smother flames from food fires other than grease fires with baking soda. Never use water on cooking fires.
WARNING
TO REDUCE THE RISK OF INJURY TO PERSONS IN THE EVENT OF A RANGE TOP GREASE FIRE, OBSERVE THE FOLLOWING:a
a. SMOTHER FLAMES with a close-fitting lid, cookie sheet, or metal tray, then turn off the burner. BE CAREFUL TO PREVENT BURNS. If the flames do not go out immediately, EVACUATE AND CALL THE FIRE DEPARTMENT.
b. NEVER PICK UP A FLAMING PAN - You may be burned.
c. DO NOT USE WATER, including wet dishcloths or towels - a violent steam explosion will result.
d. Use an extinguisher ONLY if:
- You know you have a Class ABC extinguisher, and you already know how to operate it.
- The fire is small and contained in the area where it started.
- The fire department is being called.
- You can fight the fire with your back to an exit.
a Based on "Kitchen Fire Safety Tips" published by NFPPA.
Whenever possible, do not operate the ventilation system during a cooktop fire. However, do not reach through fire to turn it off.
WARNING
RISK OF FIRE
When gas burners are in operation without any cookware placed on them, they can build up a lot of heat. A ventilation appliance installed above the cooker may become damaged or catch fire. Only operate the gas burners with cookware on them.
WARNING
RISK OF FIRE
Hot oil and fat catch fire fast. Never leave hot oil and fat unsupervised. Never extinguish a fire with water. Switch off the cooking position. Suffocate flames carefully with a lid, a fire blanket or similar.
WARNING
RISK OF FIRE
Grease deposits in the grease filter can ignite.
Clean the grease filter at least every two months.
Never operate the appliance without the grease filter.
WARNING
RISK OF FIRE
Grease deposits in the grease filter can catch fire. Never work with a naked flame near the appliance (e.g. flambéing). Install the unit near a heat-producing appliance for solid fuels (e.g. wood or coal) only if there is a closed, non-detachable cover. There must be no flying sparks.
WARNING
RISK OF BURNS
The accessible parts get hot during operation. Never touch hot parts.
Keep children away.
IMPORTANT SAFETY INSTRUCTIONS
READ AND SAVE THESE INSTRUCTIONS
Child Safety
When children become old enough to use the appliance, it is the responsibility of the parents or legal guardians to ensure that they are instructed in safe practices by qualified persons.
Do not allow anyone to climb, stand, lean, sit, or hang on any part of an appliance. This can damage the appliance or cause injury.
Cleaning Safety
WARNING
Be sure the entire appliance (including the grease filters and light bulbs, if applicable) has cooled and grease has solidified before attempting to clean any part of the appliance.
Do not use steam cleaners to clean the appliance.
State of California Proposition 65Warnings
WARNING
This product can expose you to chemicals including vinyl chloride, which is known to the State of California to cause cancer and birth defects or other reproductive harm. For more information go to www.P65Warnings.ca.gov
Protecting The Environment
Unpack the appliance and dispose of the packaging in line with environmental requirements.
CAUTION
Risk of damage due to corrosion. Always turn appliance on when cooking to avoid condensation buildup. Condensation can lead to corrosion damages.
Risk of damage due to moisture entering into the electronic circuitry. Never clean operator controls with a wet cloth.
Surface damage due to incorrect cleaning. Clean stainless steel surfaces in the grind direction only. Do not use any stainless steel cleaners for operator controls. Never use strong or abrasive cleaning agents, since they can cause surface damage.
Risk of damage from condensation back flow. Install exhaust vent at a slight downward slope away from the appliance (1^ slope).
FEATURES
The Downdraft Hood takes the place of an overhead hood and can be conveniently hidden away (lowered) when not in use. It has a blower fan that draws the cooking byproducts into the intake housing, through two filters and out of the house or recirculated back into the home with the separate purchase of a recirculation kit.
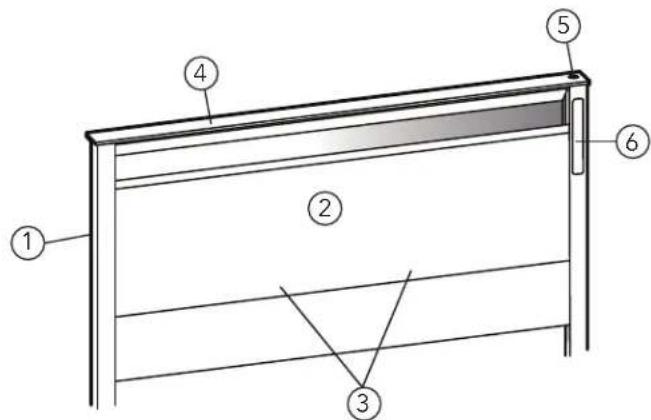
① Hood Intake Housing
② Removable Front Panel
③ Filters (behind removable front panel)
④ Intake Top Cap
⑤ Intake Up / Down Pushbutton
⑥ Downdraft Hood Control Panel
Hood Intake Housing
The hood intake housing, when raised, captures and channels the cooking odors, steam and grease from the cooktop through two filters located within the intake housing.
Filters
The air is cleaned by the filters and conveyed to the building exterior by a series of ducts.
The filters are located at the bottom of the intake housing, behind the removable front panel. They condense and trap the grease in the air.
Filters include protective film that must be removed before use.
Ventilation
Note: Ventilation may not exit through an already operational smoke or exhaust chimney, nor a duct used for ventilating furnace installation areas.
If the ventilation is intended to pass through a smoke or exhaust that is not in operation, the responsible area heating inspector must give approval.
If the ventilation passes through an external wall, use a telescoping wall sleeve.
OPERATING THE APPLIANCE
Always turn the downdraft blower on before you begin cooking to establish an air flow in the kitchen. Let the blower run for a few minutes to clean the air after you turn the cooktop off. This will keep the whole kitchen cleaner and brighter.
It is recommended to use the rear burners when cooking with tall pots or when the cooking method will generate high amounts of smoke or steam. The combination of using the rear burners and operating the unit at high speed will increase the likelihood that all the smoke and steam will be removed by the downdraft.
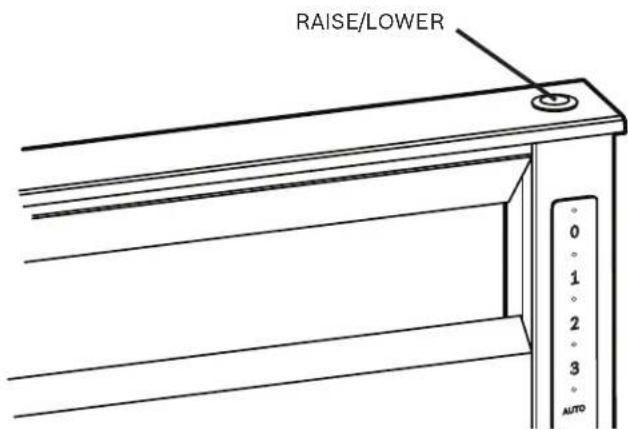
To Raise the Hood Intake Housing:
Press and release the push button switch.
Note: Press the push button switch once to raise the intake housing. All previous control functions will be restored.
To Lower the Hood Intake Housing:
Press and release the push button switch.
Note: The hood housing can be lowered without setting any controls to the Off position. All functions will stop and the hood will lower.
If hood intake housing movement stops:
Locate and remove any obstruction. Press the push button switch again to resume movement.
Over-Temperature Sensor
When the hood detects excessive heat, the auto icon will blink 3 times. The fan will increase in speed to protect sensitive components. The lower speeds will light up and cannot be selected until the hood cools down. Once the hood cools down, the fan will stay on the same speed with only the icon for that speed illuminated. The hood will resume normal operation.
Downdraft Hood Control Panel
All hood controls, located on the right side panel of the intake housing frame, are visible when the hood is raised.
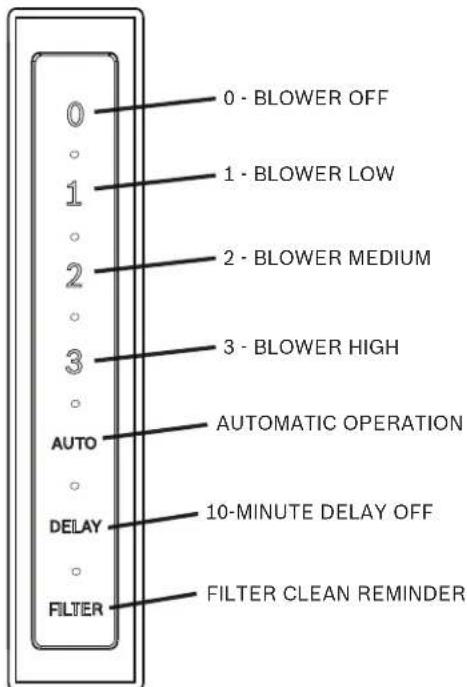
Adjust downdraft hood blower speed:
Press and release 0, 1, 2 or 3 on the control panel to adjust the hood blower speed
0 = Off
1 = Low
2 = Medium
3 = High
Automatic Operation:
Press and release AUTO on the control panel to activate the AUTO ON feature. When the control senses a high level of heat, the fan will turn on to Medium speed. When the control no longer senses a high level of heat, the fan will turn off.
10-Minute Delay Off:
Touch and release the DELAY icon on the control panel to start a 10-minute timer that will shut off the fan set at any speed after 10 minutes.
Filter Clean Reminder:
After 30 hours of accumulated blower run time, the FILTER icon on the control panel will begin to blink continuously as a reminder to clean the hood filters.
To reset the reminder timer and turn the FILTER icon OFF, touch and hold the FILTER icon for 2 or more seconds.
CLEANING AND MAINTENANCE
The efficiency of the downdraft ventilation system depends on the cleanliness of the intake housing and filters. The frequency of cleaning depends on the amount and type of cooking.
Always use the mildest cleaner that will do the job. Use clean, soft cloths, sponges or paper towels.
Use all products according to package directions.
Rub stainless steel finishes in the direction of the grain. Wipe area dry to avoid water marks.
After cleaning, place all parts in their proper positions before using.
Do not use the ventilating system without the filters in place or with grease-laden filters or surfaces.
Do not use steam cleaners to clean the appliance.
Hidden surfaces may have sharp edges. Use caution when reaching behind or under appliance.

WARNING
To avoid risk of fire and explosion do not use flammable liquids or solvents.
Always unplug or disconnect the appliance from the power supply before servicing.

WARNING
RISK OF BURNS
The appliance will become hot when in use. Let cool before cleaning.

WARNING
RISK OF ELECTRIC SHOCK
Moisture penetration can cause electric shock. Only clean appliance with a damp cloth. Prior to cleaning, pull the plug or flip the breaker in the fusebox.
To Clean Grease Filters:
For best performance: Replace grease filters with half-moon openings facing out and in orientation shown.

Remove front panel and take out the (2) grease filters.
WARNING
RISK OF FIRE
Grease deposits in the grease filter can ignite. Clean the grease filter at least every two months. Never operate the appliance without the grease filter.
Notes:
- Do not use any aggressive, acidic or alkaline cleaning agents.
DO NOT use abrasive products such as steel wool.
DO NOT use cellulose sponges. Some sponges are processed with salt and can cause corrosion by leaving salt deposits on the metal.
DO NOT allow any cleaning compounds to remain in contact with stainless steel for extended periods.
DO NOT USE CHLORINE-BASED CLEANERS. When cleaning the grease filters, also clean the metal grease filter holder in the appliance with a moist cloth. - You can clean the grease filters in a dishwasher or by hand.
In the dishwasher:
Note: Slight discoloration is possible when cleaning the grease filters in the dishwasher. This does not affect the grease filter's functioning.
- Do not clean extremely dirty grease filters with dishes.
- Loosely position the grease filter in the dishwasher. The grease filters must not be jammed in.
Replace filters and front panel before using downdraft. Be sure to engage TABS on front panel behind EARS as shown.
CAUTION
Failure to engage tabs properly may cause chimney to jam and fail to raise up.
To Clean By IIand:
Note: You can use a degreer if soiling is stubborn. The THERMADOR Stainless Steel Conditioner can be purchased online (US only) at: www. thermador-eshop.com.
NOTICE: The use of brand names is intended only to indicate a type of cleaner. This does not constitute an endorsement. The omission of any brand name cleaner does not imply its adequacy or inadequacy. Many products are regional in distribution and can be found in the local markets. It is imperative that all products be used in strict accordance with instructions on the package.
Soak the grease filters in hot soapy solution using a mild detergent.
Use a brush for cleaning and then rinse the filters well.
- Allow the grease filters to drip dry.
Clean and dry intake housing, then reinstall or replace filters before using downdraft.
To Clean Intake Housing:
Pull front panel up and out.
Remove both filters.
Use a mild detergent. DO NOT USE ABRASIVE CLOTH, STEEL, WOOL PADS, OR SCOURING POWDERS.
Clean and reinstall or replace both filters and install front panel before using downdraft.
NOTICE: The use of brand names is intended only to indicate a type of cleaner. This does not constitute an endorsement. The omission of any brand name cleaner does not imply its adequacy or inadequacy. Many products are regional in distribution and can be found in the local markets. It is imperative that all products be used in strict accordance with instructions on the package.
NOTE: Do not use cooktop while hood is disassembled.
Cleaning Agents
To prevent various surfaces from becoming damaged due to incorrect cleaning agents, follow the specifications given in the table. Do not use:
cleaning agents that are harsh or scouring,
cleaning agents with high alcohol content,
hard scouring pads or sponges,
high-pressure cleaners or steam cleaners.
Rub stainless steel finishes in the direction of the grain. Wipe area dry to avoid water marks.
After cleaning, place all parts in their proper positions before using.
Thoroughly rinse all new sponges before use.
Observe all instructions and warnings accompanying cleaning agents.
| Area Cleaning agents | |
| Stainless steel Warm | soapy water:Clean with a dish rag and dry with a soft towel.Only clean stainless steel with the grain. Specific products for stainless steel care are available from customer service or from specialized retailers. Apply a thin layer of the care product with a soft cloth. |
| Varnished surfaces W | warm soapy water:Clean with a damp dish rag and dry with a soft towel.Do not use stainless steel cleaner. |
| Aluminum and plastic | Glass cleaner:Clean with a soft cloth. |
| Glass Glass cleaner: | Clean with a soft cloth. Do not use a glass scraper. |
| Controls Warm soap | water:Clean with a damp dish rag and dry with a soft towel.Risk of damage to electronics due to moisture penetration. Never clean controls with a wet cloth.Do not use stainless steel cleaner. |
TROUBLESHOOTING
You can often easily eliminate problems that may occur on your own. Before calling customer service, take into account the following information.
WARNING
RISK OF ELECTRIC SHOCK
Improper repairs are dangerous. Only an authorized servicer may perform repairs and may replace damaged wiring. Unplug the appliance or switch power off at the service panel if the appliance needs servicing. Call an authorized servicer.
Toubleshooting Tips:
If the downdraft stops working, check the power cord and the connections to the electrical boxes, a connection may have come loose.
- If the downdraft unit stops working or the unit malfunctions, unplug the unit, wait 30 seconds, and plug it back in to reset.
If gas burners click or go out on low when the downdraft is operating, check that the blower and ductwork below are properly sealed.
If the front cover rattles, slide it left or right. The tolerance is to allow for heating and simple removal.
- If an obstruction is placed into the unit, the safety mechanism will activate. Remove the obstruction and the unit should reset. If not, lift up on the unit and release.
STATEMENT OF LIMITED PRODUCT WARRANTY
What this Warranty Covers & Who it Applies to
The limited warranty provided by BSH Home Appliances Corporation ("BSH") in this Statement of Limited Product Warranty applies only to the THERMADOR® appliance ("Product") sold to you, the first using purchaser, provided that the Product was purchased:
For your normal, household (non-commercial) use, and has in fact at all times only been used for normal household purposes.
New at retail (not a display, "as is", or previously returned model), and not for resale, or commercial use.
Within the United States or Canada, and has at all times remained within the country of original purchase.
The warranties stated herein apply only to the first purchaser of the Product and are not transferable.
BSH reserves the right to request proof of purchase at the time any warranty claim is submitted to confirm that the Product falls within the scope of this limited product warranty.
Please make sure to return your registration card; while not necessary to effectuate warranty coverage, it is the best way for BSH to notify you in the unlikely event of a safety notice or product recall.
How Long the Warranty Lasts
BSH warrants that the Product is free from defects in materials and workmanship for a period of seven hundred and thirty (730) days from the date of purchase.
The foregoing timeline begins to run upon the date of purchase, and shall not be stalled, tolled, extended, or suspended, for any reason whatsoever.
This Product is also warranted to be free from cosmetic defects in material and workmanship (such as scratches of stainless steel, paint/ porcelain blemishes, chip, dents, or other damage to the finish) of the Product, for a period of thirty (30) days from the date of purchase or closing date for new construction. This cosmetic warranty excludes slight color variations due to inherent differences in painted and porcelain parts, as well as differences caused by kitchen lighting, product location, or other similar factors. This cosmetic warranty specifically excludes any display, floor, "As Is", or "B" stock appliances.
Repair/Replace as Your Exclusive Remedy
During this warranty period, BSH or one of its authorized service providers will repair your Product without charge to you (subject to certain limitations stated herein) if your Product proves to have been manufactured with a defect in materials or workmanship. If reasonable attempts to repair the Product have been made without success, then BSH will replace your Product (upgraded models may be available to you, in BSH's sole discretion, for an additional charge). All removed parts and components shall become the property of BSH at its sole option. All replaced and/or repaired parts shall assume the identity of the original part for purposes of this warranty and this warranty shall not be extended with respect to such parts. BSH's sole liability and responsibility hereunder is to repair manufacturer-defective Product only, using a BSH-authorized service provider during normal business hours. For safety and property damage concerns, BSH highly recommends that you do not attempt to repair the Product yourself, or use an un-authorized servicer; BSH will have no responsibility or liability for repairs or work performed by a non-authorized servicer. If you choose to have someone other than an authorized service provider work on your Product, THIS WARRANTY WILL AUTOMATICALLY BECOME NULL AND Void. Authorized service providers are those persons or companies that have been specially trained on BSH products, and who possess, in BSH's opinion, a superior reputation for customer service and technical ability (note that they are independent entities and are not agents, partners, affiliates or representatives of BSH). Notwithstanding the foregoing, BSH will not incur any liability, or have responsibility, for the Product if it is located in a remote area (more than 100 miles from an authorized service provider) or is reasonably inaccessible, hazardous, threatening, or treacherous locale, surroundings, or environment; in any such event, if you request, BSH would still pay for labor and parts and ship the parts to the nearest authorized service provider, but you would still be fully liable and responsible for any travel time or other special charges by the service company, assuming they agree to make the service call.
Out of Warranty Product
BSH is under no obligation, at law or otherwise, to provide you with any concessions, including repairs, prorates, or Product replacement, once this warranty has expired.
Warranty Exclusions
The warranty coverage described herein excludes all defects or damage that are not the direct fault of BSH, including without limitation, one or more of the following:
Use of the Product in anything other than its normal, customary and intended manner (including without limitation, any form of commercial use, use or storage of an indoor product outdoors, use of the Product in conjunction with air or water-going vessels).
Any party's willful misconduct, negligence, misuse, abuse, accidents, neglect, improper operation, failure to maintain, improper or negligent installation, tampering, failure to follow operating instructions, mishandling, unauthorized service (including selfperformed "fixing" or exploration of the appliance's internal workings).
Adjustment, alteration or modification of any kind.
A failure to comply with any applicable state, local, city, or county electrical, plumbing and/or building codes, regulations, or laws, including failure to install the product in strict conformity with local fire and building codes and regulations.
Ordinary wear and tear, spills of food, liquid, grease accumulations, or other substances that accumulate on, in, or around the Product.
Any external, elemental and/or environmental forces and factors, including without limitation, rain, wind, sand, floods, fires, mud slides, freezing temperatures, excessive moisture or extended exposure to humidity, lightning, power surges, structural failures surrounding the appliance, and acts of God.
In no event shall BSH have any liability or responsibility whatsoever for damage to surrounding property, including cabinetry, floors, ceilings, and other structures or objects around the Product. Also excluded from this warranty are: Products on which the serial numbers have been
altered, defaced, or removed; service visits to teach you how to use the Product, or visits where there is nothing wrong with the Product; correction of installation problems (you are solely responsible for any structure and setting for the Product, including all electrical, plumbing or other connecting facilities, for proper foundation/flooding, and for any alterations including without limitation cabinetry, walls, floors, shelving, etc.); and resetting of breakers or fuses.
TO THE EXTENT ALLOWED BY LAW, THIS WARRANTY SETS OUT YOUR EXCLUSIVE REMEDIES WITH RESPECT TO PRODUCT, WHETHER THE CLAIM ARISES IN CONTRACT OR TORT (INCLUDING STRICT LIABILITY, OR NEGLIGENCE) OR OTHERWISE. THIS WARRANTY IS IN LIEU OF ALL OTHER WARRANTYES, WHETHER EXPRESS OR IMPLIED. ANY WARRANTY IMPLIED BY LAW, WHETHER FOR MERCHANTABILITY OR FITNESS FOR A PARTICULAR PURPOSE, OR OTHERWISE, SHALL BE EFFECTIVE ONLY FOR THE PERIOD THAT THIS EXPRESS LIMITED WARRANTY IS EFFECTIVE. IN NO EVENT WILL THE MANUFACTURER BE LIABLE FOR CONSEQUENTIAL, SPECIAL, INCIDENTAL, INDIRECT, "BUSINESS LOSS", AND/OR PUNITIVE DAMAGES, LOSSES, OR EXPENSES, INCLUDING WITHOUT LIMITATION TIME AWAY FROM WORK, HOTELS AND/OR RESTAURANT MEALS, REMODELLING EXPENSES IN EXCESS OF DIRECT DAMAGES WHICH ARE DEFINITIELY CAUSED EXCLUSIVELY BY BSH, OR OTHERWISE. SOME STATES DO NOT ALLOW THE EXCLUSION OR LIMITATION OF INCIDENTAL OR CONSEQUENTIAL DAMAGES, AND SOME STATES DO NOT ALLOW LIMITATIONS ON HOW LONG AN IMPLIED WARRANTY LASTS, SO THE ABOVE LIMITATIONS MAY NOT APPLY TO YOU. THIS WARRANTY GIVES YOU SPECIFIC LEGAL RIGHTS, AND YOU MAY ALSO HAVE OTHER RIGHTS WHICH VARY FROM STATE TO STATE.
No attempt to alter, modify or amend this warranty shall be effective unless authorized in writing by an officer of BSH.
THERMADOR® SUPPORT
Before Calling Service
See the Use and Care Manual for troubleshooting information. Refer to the "Statement of Limited Product Warranty".
To reach a service representative, see the contact information at the front of the manual. Please be prepared with the information printed on your product data label when calling.
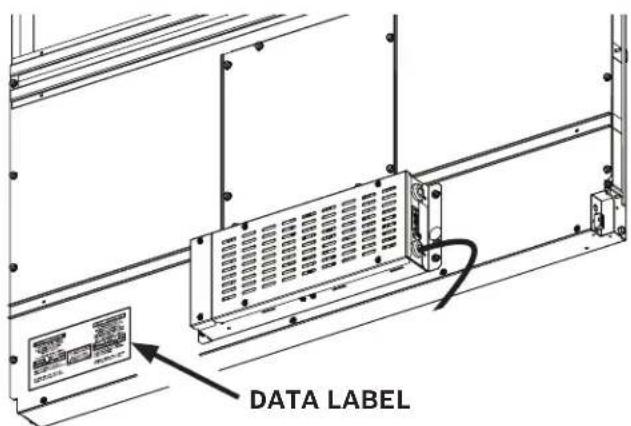
Data Label
The data label shows the model and serial number. Refer to the data plate on the appliance when requesting service.
The data label can be found on the front / lower / left of the downdraft housing.
To avoid having to search for each piece of information when calling, you can enter the four items needed in the spaces below.
| Model No. | |
| Serial No. | |
| Date of Purchase | |
| Customer Service No. |
Keep your invoice or escrow papers for warranty validation if service is needed.
Service
We realize that you have made a considerable investment in your kitchen. We are dedicated to supporting you and your appliance so that you have many years of creative cooking.
Please don't hesitate to contact our STAR Customer Support Department if you have any questions or in the unlikely event that your THERMADOR appliance needs service. Our service team is ready to assist you.
USA
800-735-4328
www.thermador.com/support
Canada
800-735-4328
www.thermador.ca
Parts and Accessories
Parts, filters, descalers, stainless steel cleaners and more can be purchased in the THERMADOR® eShop or by phone.
USA
http://store.thermador.com/us
Canada
If you live in any of the Atlantic provinces, Ontario or Quebec, contact: Marcone 1.800.287.1627
If you live in any of the Territories, Manitoba, Saskatchewan, Alberta, or British Columbia, contact: Reliable Parts 1.800.663.6060
Table des
MATIÈRES
A PROPOS DE CE MANUEL 16
Thermostat Heat Sentry 21
1901 Main Street, Suite 600
1901 Main Street, Suite 600
Irvine, CA 92614
Preguntas?
1-800-735-4328
www.thermador.com
iEsperamos tener notices tuyas!