HIR4 EP8V PT - Oven BAUKNECHT - Free user manual and instructions
Find the device manual for free HIR4 EP8V PT BAUKNECHT in PDF.
User questions about HIR4 EP8V PT BAUKNECHT
0 question about this device. Answer the ones you know or ask your own.
Ask a new question about this device
Download the instructions for your Oven in PDF format for free! Find your manual HIR4 EP8V PT - BAUKNECHT and take your electronic device back in hand. On this page are published all the documents necessary for the use of your device. HIR4 EP8V PT by BAUKNECHT.
USER MANUAL HIR4 EP8V PT BAUKNECHT
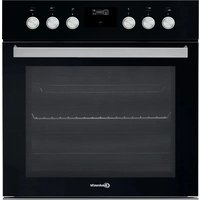
BEDIENKNOPFESKOCHFELDS
A. Kochfeld vorne links.
A. Kochfeld hinten links.
A. Kochfeld hinten rechts.
A. Kochfeld vorrechts.
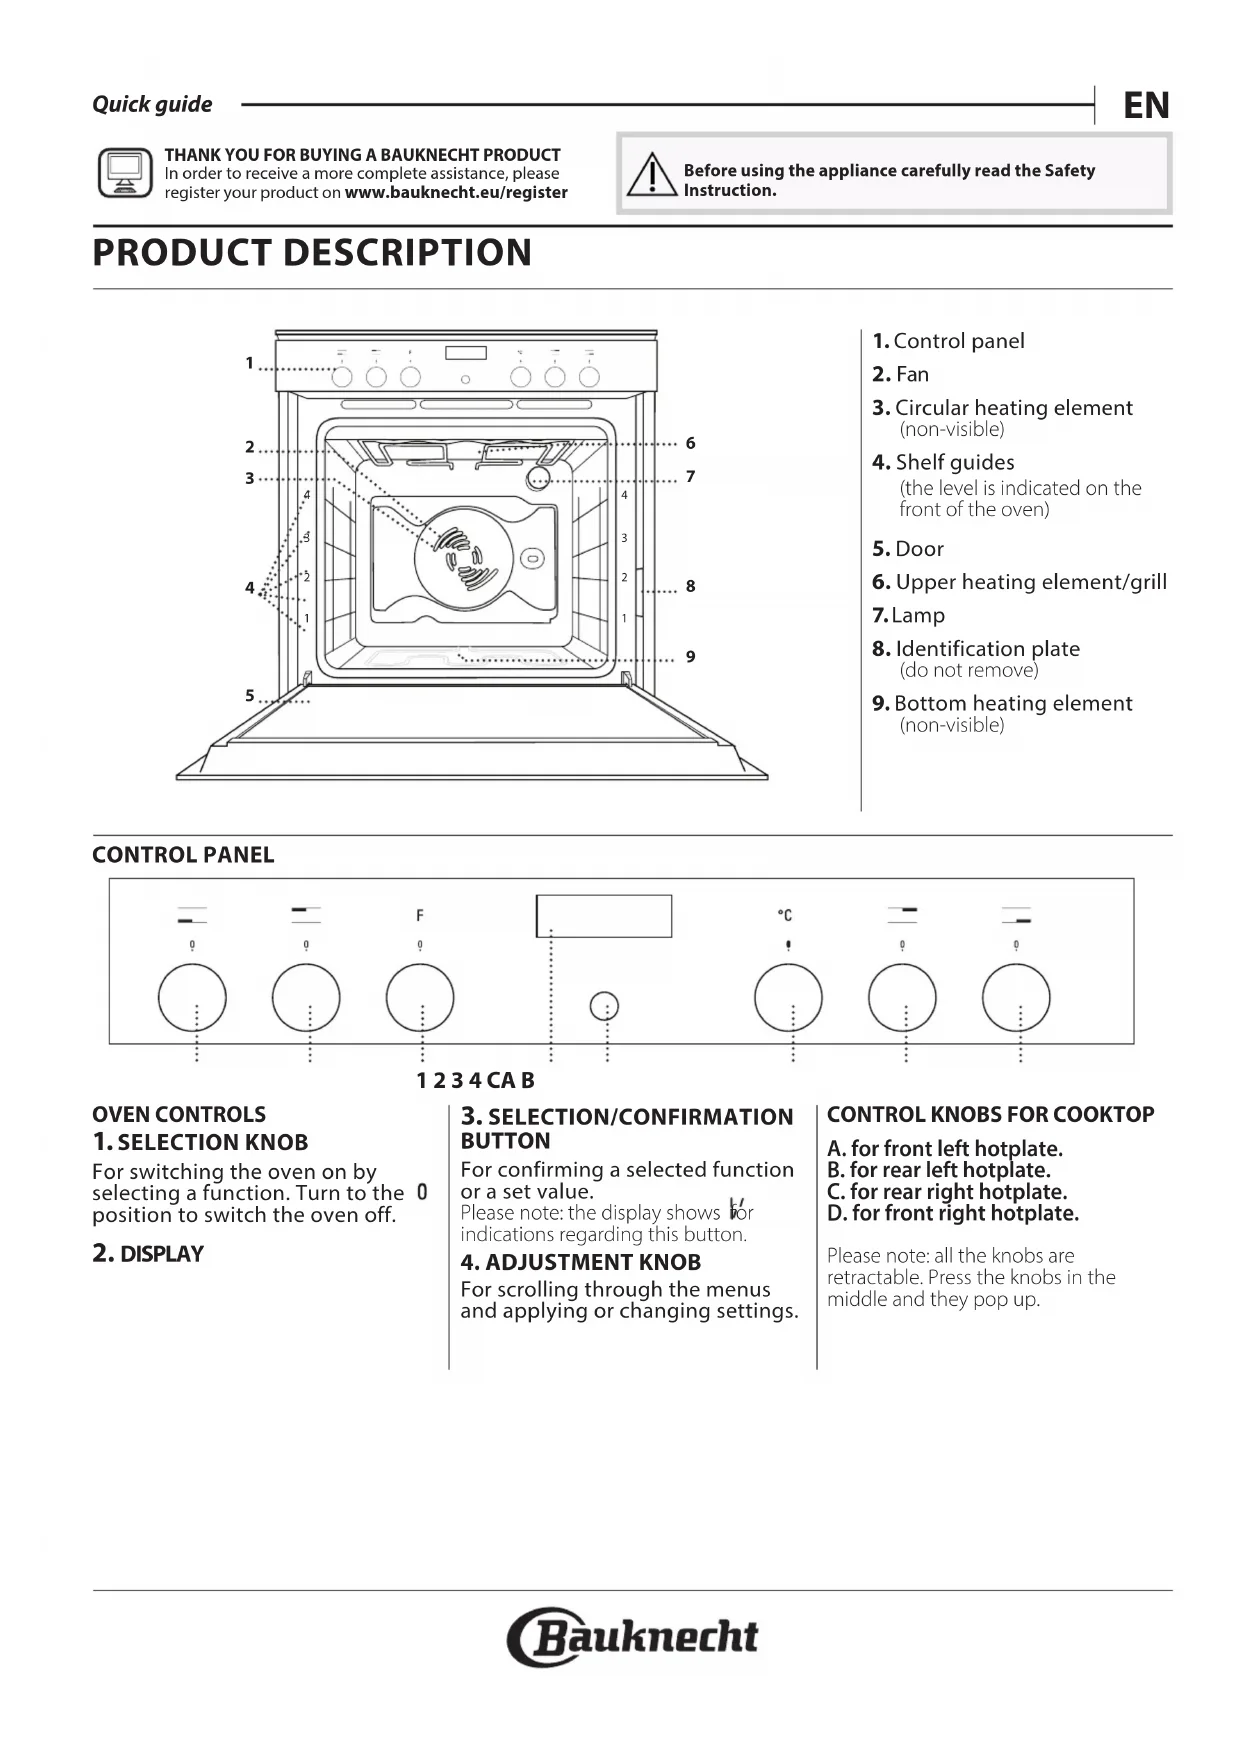
- Control panel
2.Fan - Circular heating element (non-visible)
- Shelf guides (the level is indicated on the front of the oven)
- Door
- Upper heating element/grill
7.Lamp - Identification plate (do not remove)
- Bottom heating element (non-visible)
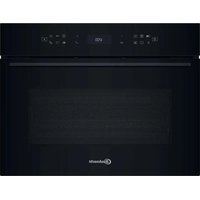
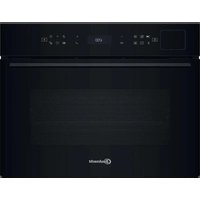
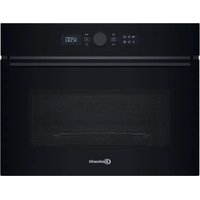
CONTROL PANEL

1234CAB
OVEN CONTROLS
1. SELECTION KNOB
For switching the oven on by selecting a function. Turn to the 0 position to switch the oven off.
2. DISPLAY
3. SELECTION/CONFIRMATION BUTTON
For confirming a selected function or a set value.
Please note: the display shows for indications regarding this button.
4.ADJUSTMENT KNOB
For scrolling through the menus and applying or changing settings.
CONTROL KNOBS FOR COOKTOP
A. for front left hotplate. B. for rear left hotplate.
C. for rear right hotplate.
D. for front right hotplate.
Please note: all the knobs are retractable. Press the knobs in the middle and they pop up.
The number and the type of accessories may vary depending on which model is purchased. Other accessories that are not supplied can be purchased separately from the After-sales Service.
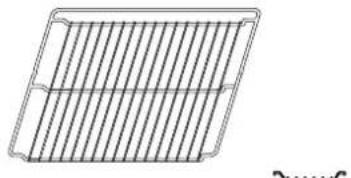
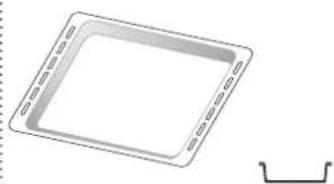
INSERTING THE WIRE SHELF AND OTHER ACCESSORIES
Insert the wire shelf horizontally by sliding it across the shelf guides, making sure that the side with the raised edge is facing upwards
Other accessories, such as the drip tray and the baking tray, are inserted horizontally in the same way as the wire shelf.
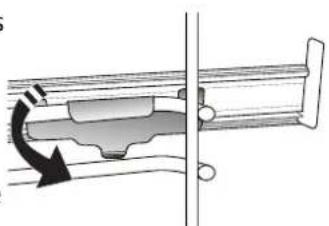
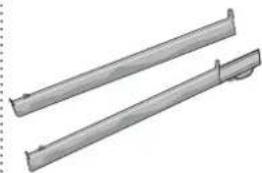
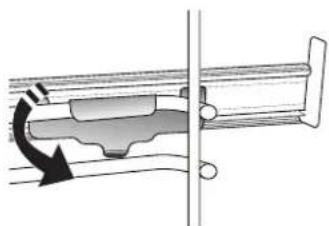
REMOVING AND REFITTING THE SHELF GUIDES
. To remove the shelf guides, remove the fixing screws (if present) on both sides with the aid of a coin or a tool. Lift the guides up and pull the lower parts out of their seatings: The shelf guides can now be removed.
. To refit the shelf guides, first fit them back into their upper seating. Keeping them held up, slide them into the cooking compartment, then lower them into position in the lower seating. Refit the fixing screws.
Please note: The sliding runners can be already mounted on the shelf guides: to remove them, pull outward, releasing first the lower clip.
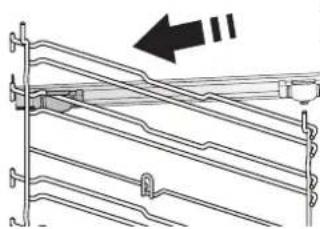
Remove the shelf guides from the oven and remove the protective plastic from the sliding runners.
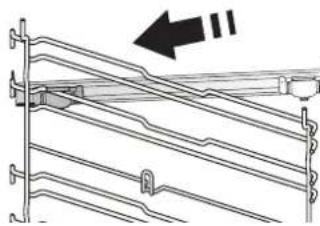
Fasten the upper clip of the runner to the shelf guide and slide it along as far as it will go. Lower the other clip into position.
To secure the guide, press the lower portion of the clip firmly against the shelf guide. Make sure that the runners can move freely. Repeat these steps on the other shelf guide on the same level.
Please note: The sliding runners can be fitted on any level.
FUNCTIONS
OFF
For switching off the oven.

LIGHT
To switch the oven light on/off.

SPECIAL FUNCTIONS
DEFROST
To speed up defrosting of food.

WARM KEEPING
For keeping just-cooked food hot and crisp.

RISING
For optimal proving of sweet or
savoury dough. To maintain the quality of proving, do not activate the function if the oven is still hot following a cooking cycle.

AUTO SLOW COOKING MEAT
For slow cooking of meat at 90^
This function offers slow cooking which ensures the food remains tender and succulent. For roast joints, brown in the pan first in order to seal in the meat's natural juices. Cooking times range from 4 hours for 1Kg joints to 6-7 hours for 3kg joints. For optimum results, avoid opening the oven door during cooking and use a cooking thermometer to check the core temperature of the meat.

SLOW COOKING FISH
To cook fish gently at 85^ .This
function offers slow cooking which ensures the food remains tender and succulent. Thanks to the low temperature, the food does not brown on the outside and the end result is similar to steam cooking. Cooking times range from 2 hours for 300g fish to 4-5 hours for 3kg fish. For optimum results, keep oven door openings to a minimum during cooking in order to avoid heat dispersion.

AUTO ECOFORCED AIR*
ECO For cooking stuffed roasting joints and
fillets of meat on a single shelf. Food is prevented from drying out excessively by gentle, intermittent air circulation. When this function is in use, the light will remain switched off throughout cooking but can be switched back on temporarily by pressing the confirm button. To use the ECO cycle and therefore optimise power consumption, the oven door should not be opened until the food is completely cooked.
- Function used as reference for the energy efficiency declaration in accordance with Regulation (EU) No. 65/2014

CONVENTIONAL
For cooking meat or baking cakes with liquid centre on a single shelf.

CONVECTION BAKE
For cooking meat or baking cakes with liquid centre on a single shelf.

FORCED AIR
For cooking different foods that require the same cooking temperature on several shelves(maximum three) at the same time. This function can be used to cook different foods without odours being transferred from one food to another.

GRILL
For grilling steaks, kebabs and sausages, cooking vegetables au gratin or toasting bread. When grilling meat, we recommend using a drip tray to collect the cooking juices: Position the pan on any of the levels below the wire shelf and add 500 ml of drinking water.

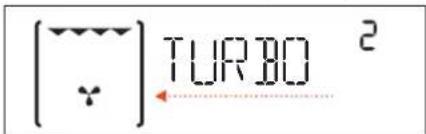
TURBO GRILL
For roasting large joints of meat (legs, roast beef, chicken). We recommend using a drip tray to collect the cooking juices: Position the pan on any of the levels below the wire shelf and add 500ml of drinking water. The turnspit (if provided) can be used with this function.

SETTINGS
For changing the oven settings (time, language, audible signal volume, brightness, ECO mode).
Please note: When Eco mode is active, the brightness of the display will be reduced and the light switches off to save energy. They are reactivated temporarily whenever any of the buttons are pressed.

BREAD /PIZZA
To bake different types and sizes of pizza and bread. This function contains two programmes with predefined settings. Simply indicate the values required (temperature and time) and the oven will manage the cooking cycle automatically. Place the dough on the 2nd shelf after preheating the oven.

AUTOMATIC CLEANING - PYRO
For eliminating cooking residues with an extra-high temperature cycle. Two self-cleaning cycles are available: a complete cycle and a quick cycle (ECO). It is advisable to use the complete cycle only in case of a very dirty oven, and the shorter cycle if the function is used at regular intervals.

FAST PREHEATING
For preheating the oven quickly.
COOKTOP FUNCTIONS TABLE
0 OFF For switching off the hotplate.

GENTLE HEAT
To allow dough to rise, to soften butter taken from the fridge, to keep baby bottles or food warm, also for making yoghurt, melting chocolate, etc. This function is only available when the residual heat indicator is on. For this function, make sure the residual heat indicator of the desired hotplate is on. Turn the knob to . To deselect the function, change the position of the knob.

HEAT MAINTENANCE
To maintain a constant temperature of 60^ until the end of cooking. To select this function, turn the knob to i.

FAST BOIL
This function is used to bring water to the boil rapidly and remains on for a preset time. At the end of the preset time, the cooktop automatically returns to the maximum power setting. This function can be selected even during cooking. Important: before selecting this function, make sure the pot is positioned on the selected hotplate in order to avoid any damage to the cooktop surface. The stated performance values for this function are those guaranteed for all glass ceramic cooktops. For this function, place the pot on the selected hotplate and turn the knob to To deselect, change the position of the knob.

MULTIZONE
The multizone symbol, featured on the knobs, can only be switched on for those hotplates of the cooktop equipped with double or triple zone function. These functions extend the heating area of the cooktop in order to allow the use of large, oval or rectangular pots or cooking receptacles. To switch on the dual zone (if available), turn the knob to and wait until the residual heat indicator for the hotplate begins to flash. To switch on the triple zone function (if available), wait until the LED begins flashing quickly. Select the power setting required by turning the knob anticlockwise. The residual heat indicator remains on to indicate that the cooktop is in use. To deselect, turn the knob to 0 by turning the knob anticlockwise.
FIRST TIME
1. SELECT THE LANGUAGE
You will need to set the language and the time when you switch on the appliance for the first time. ENGLISH will scroll along the display. Turn the adjustment knob to scroll through the list of available languages and select the one you require.

Press the selection/confirmation button to confirm your selection.
Please note: The language can subsequently be changed from the "Settings" menu.
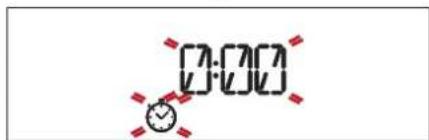
2. SET THE TIME
After selecting the language, you will need to set the current time: The two digits for the hour will flash on the display

Turn the adjustment knob to set the correct hour and press the selection/confirmation button: the minutes will flash on the display.

Turn the adjustment knob to set the minutes and press the selection/confirmation button to confirm
Please note: You may need to set the time again following lengthy power outages.
3. SET THE POWER CONSUMPTION
The oven is programmed to consume a level of electrical power that is compatible with a domestic network that has a rating of more than 3kW : If your household uses a lower power, you will need to decrease this value.
Turn the selection knob until " SETTINGS" is shown on the display, then press OK to confirm.
Turn the adjustment knob to select the "POWER" menu item and press OK to confirm.

Turn the adjustment knob to select "Low" and press OK to confirm.

3. HEAT THE OVEN
A new oven may release odours that have been left behind during manufacturing: This is completely normal. Before starting to cook food, we therefore recommend heating the oven with it empty in order to remove any possible odours.
Remove any protective cardboard or transparent film from the oven and remove any accessories from inside it.
Heat the oven to 200^ for around one hour, ideally using a function with air circulation (e.g. "Forced Air" or "Convection Bake").
Follow the instructions for setting the function correctly.
Please note: It is advisable to air the room after using the appliance for the first time.
DAILY USE
1. SELECT A FUNCTION
Turn the selection knob to switch on the oven and show the function you require on the display: The display will show the icon for the function and its basic settings.
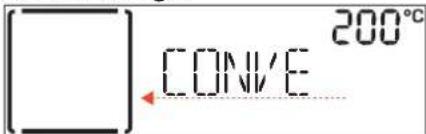
To select an item from the menu (the display will show the first available item), turn the adjustment knob until the item you require is shown.
Press the selection/confirmation button to confirm selection: the display will show the basic settings.
2. SET THE FUNCTION
After having selected the function you require, you can change its settings.
The display will show the settings that can be changed in sequence.
TEMPERATURE/GRILL LEVEL
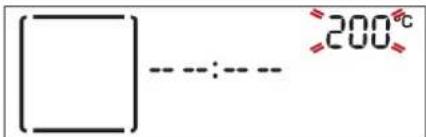
When the value flashes on the display, turn the adjustment knob to change it, then press the selection/ confirmation button to confirm and continue to alter the settings that follow (if possible).
Please note: Once the function has been activated, the temperature can be changed using the adjustment knob. DURATION

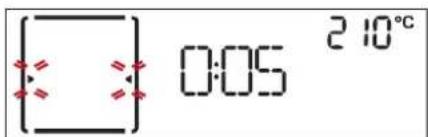
When the icon flashes on the display, use the adjustment knob to set the cooking time you require and then press the selection/confirmation button to confirm.
You do not have TO set the cooking time if you want to manage cooking manually: Press the selection/ confirmation button to confirm and start the function. In this case, you cannot set the end cooking time by programming a delayed start.
SETTING THE END COOKING TIME (DELAYED START) In many functions, once you have set a cooking time you can delay starting the function by programming its end time.
The display shows the current end time that is set and the icon flashes.
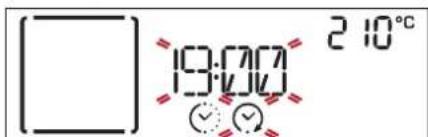
Turn the adjustment knob to set the time you want cooking to end, then press the selection/confirmation button to confirm and start the function.
Place the food in the oven and close the door: The function will start automatically after the period of time that has been calculated in order for cooking to finish at the time you have set.

Note: Programming a delayed cooking start time will disable the oven preheating phase: The oven will reach the temperature your require gradually, meaning that cooking times will be slightly longer than those listed in the cooking table.
Note: Delay to start functionality is not available for Grill and Turbo Grill functions.
During the waiting time, you can use the adjustment knob to amend the programmed end time.
3. ACTIVATE THE FUNCTION
Once you have applied the settings you require, press the selection/confirmation button to confirm the time that cooking will end and activate the function.
Please note: Once cooking has started, the display will recommend the most suitable level for each function.
You can turn the selection knob to 0 to pause the function that has been activated at any time.
.FAST PREHEATING
Turn the selection knob to the symbol to select the fast preheating function and confirm by pressing the selection/confirmation button: the settings are shown on the display. If the proposed temperature is that desired, press the selection/confirmation button. To change the temperature, proceed as described in previous paragraphs.
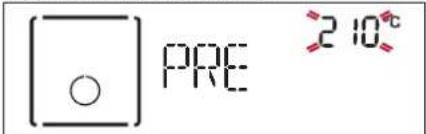
Once this phase has finished, an audible signal will sound and the display will indicate that the oven has reached the set temperature.
At this point, open the door, place the food in the oven, close the door and start cooking.
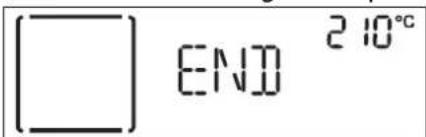
At the end of preheating, the oven automatically selects the conventional function: If you wish to set a different cooking function, turn the selection knob and select the desired function.
Please note: Placing the food in the oven before preheating has finished may have an adverse effect on the final cooking result. Opening the door during the preheating phase will stop pause it.
The cooking time does not include a preheating phase. You can always change the temperature you want the oven to reach using the adjustment knob.
5.END OF COOKING
An audible signal will sound and the display will indicate that cooking is complete.
Press the selection/confirmation button to continue cooking in manual mode (without a programmed cooking time) or turn the adjustment knob to extend the cooking time by setting a new duration.
BROWNING
Some functions of the oven enable you to brown the surface of the food by activating the grill once cooking is complete.
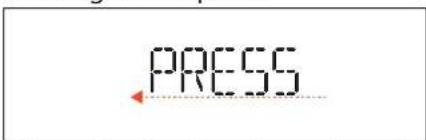
When the display shows the relevant message, if required press the selection/confirmation button to start a five-minute browning cycle.
You can stop the function at any time by turning the selection knob to 0 to switch the oven off.
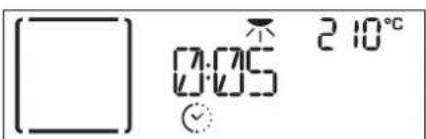
.TIMER
When the oven is switched off, the display can be used as a timer. To activate this function, make sure that the oven is switched off and turn the adjustment knob: The icon will flash on the display.

Turn the adjustment knob to set the length of time you require and then press the selection/confirmation button to activate the timer. An audible signal will sound and the display will indicate once the timer has finished counting down the selected time.
Please note: The timer does not activate any of the cooking cycles. Use the adjustment knob to change the time set on the timer; turn the selection knob to t0 switch the timer off at any time.
COOKTOP OPERATION
(see the instructions supplied with the cooktop).
The oven control panel features 4 adjustable knobs for cooktop operation.
The cooktop control knobs are marked with a numerical scale corresponding to different power settings, and a series of function symbols.

Please note: The multizone function can only be switched on for the double and triple hotplates of the cooktop.
- Turn the control knob of the relevant hotplate clockwise to the desired power setting.
COOKING TABLE
| RECIPE FUNCTION PREHEAT. | TEMPERATURE (℃) | COOK TIME (Min.) | LEVEL AND ACCESSORIES | ||
| Leavened cakes | Yes 160 - 180 30 - 90 | 2 | |||
| Yes 160 - 180 30 - 90 | 3 1 | ||||
| Filled cakes(chesecake, strudel, apple pie) | Yes 160 - 200 30 - 85 | 2 | |||
| Yes 160 - 200 35 - 90 | 3 1 | ||||
| Biscuits / Tartlets | Yes 170 - 180 15 - 45 | 3 | |||
| Yes 160 - 170 20 - 45 | 3 1 | ||||
| Choux buns | Yes 180 - 200 30 - 40 | 2 | |||
| Yes 180 - 190 35 - 45 | 3 1 | ||||
| Meringues | Yes 90 110 - 150 | 2 | |||
| Yes 90 130 - 150 | 3 1 | ||||
| Bread / Pizza / Focaccia | Yes 190 - 250 15 - 50 | 2 | |||
| Yes 190 - 250 25 - 50 | 3 1 | ||||
| Bread | Yes 180 - 220 30 - 50 | 2 | |||
| Pizza | Yes 220 - 250 15 - 30 | 2 | |||
| Frozen pizza | Yes | 250 | 10 - 15 | 2 | |
| Yes | 250 | 10 - 20 | 3 1 | ||
| Savoury pies(vegetable pie,quiche) | Yes 180 - 190 35 - 45 | 2 | |||
| Yes 180 - 190 45 - 60 | 3 2 | ||||
| Vols-au-vent / Puff pastry crackers | Yes 190 - 200 20 - 30 | 2 | |||
| Yes 180 - 190 20 - 40 | 3 1 | ||||
| Lasagne / Baked pasta /Cannelloni / Flans | Yes 190 - 200 45 - 65 | 2 | |||
| Lamb / Veal / Beef / Pork 1 kg | Yes | 190 - 200 | 70 - 100 | 2 | |
| Chicken / Rabbit / Duck 1 kg | Yes | 200 - 230 | 50 - 100 | 2 | |
| Turkey / Goose 3 kg | Yes | 190 - 200 | 80 - 130 | 1/2 | |
| Baked fish / en papillote(fillets, whole) | Yes 180 - 200 40 - 60 | 2 | |||
| Stuffed vegetables(tomatoes, courgettes, aubergines) | Yes 180 - 200 50 - 60 | 2 | |||
| Toast | - | 3 (high) | 2 - 5 | 4 | |
| Fish fillets / Steaks | - | 2 (medium) | 20 - 35 | 4 3 | |
| Sausages / Kebabs / Spare ribs / Hamburgers | - | 2-3 (medium-high) | 15 - 40 | 4 3 | |
| Roast chicken 1-1,3 kg | - | 2 (medium) | 50 - 65 * | 2 1 | |
| Roast beef rare 1 kg | - | 2 (medium) | 35 - 45 * | 2 | |
| Leg of lamb / Shanks | - | 2 (medium) | 60 - 90 ** | 2 | |
| Roast potatoes | - | 2 (medium) | 45 - 55** | 2 | |
| Vegetable gratin | - | 3 (high) | 10 - 15 | 2 | |
| Lasagna & Meat | Yes | 200 | 50 - 100 *** | 3 1 | |
| Meat & Potatoes | Yes | 200 | 45 - 100 *** | 3 1 | |
| Fish & Vegetables | Yes | 180 | 30 - 50 *** | 3 1 | |
| Stuffed roasts | ECD F AFO ECO | - | 200 | 80 - 120 *** | 3 |
| Meat pieces (rabbit, chicken, lamb) | ECD F AFO ECO | - | 200 | 50 - 100 *** | 3 |
- Turn food halfway through cooking.
Turn food two thirds of the way through cooking (if necessary).
* Estimated length of time: dishes can be removed from the oven at different times depending on personal preference.
Download the Use and Care Guide by visiting the website docs.bauknecht.euto consult the table of tested recipes filled out for the assessment institutes in accordance with the IEC 60350 - 1 standard.
| FUNCTIONS | Conventional | Grill | TurboGrill | Forced Air | Convection Bake | Bread / Pizza | Eco Forced Air |
| ACCESSIONS | Wire shelf | Cake tin on wire shelf | Drip tray / baking tray or cake tin on wire shelf | Drip tray | Drip tray with 500 ml of water | Baking tray |
Make sure that the oven has cooled down before carrying out any maintenance or cleaning.
Do not use steam cleaners.
Do not use wire wool, abrasive scourers or abrasive/corrosive cleaning agents, as these could damage the surfaces of the appliance.
Wear protective gloves.
The oven must be disconnected from the mains before carrying out any kind of maintenance work.
EXTERIOR SURFACES
- Clean the surfaces with a damp microfibre cloth.
- If they are very dirty, add a few drops of pH-neutral detergent. Finish off with a dry cloth.
- Do not use corrosive or abrasive detergents. If any of these products inadvertently comes into contact with the surfaces of the appliance, clean immediately with a damp microfibre cloth.
INTERIOR SURFACES
After every use, leave the oven to cool and then clean it, preferably while it is still warm, to remove any deposits or stains caused by food residues. To
dry any condensation that has formed as a result of cooking foods with a high water content, leave the oven to cool completely and then wipe it with a cloth or sponge.
- Clean the glass in the door with a suitable liquid detergent.
- The oven door can be removed to facilitate cleaning.
ACCESSIONS
Soak the accessories in a washing-up liquid solution after use, handling them with oven gloves if they are still hot. Food residues can be removed using a washing-up brush or a sponge.
CLEANING THE COOKING COMPARTMENT WITH THE PYRO CYCLE
Do not touch the oven during the Pyro cycle. Keep children and animals away from the oven during and after (until the room has finished airing) running the Pyro cycle.
This function enables you to eliminate cooking spatters using a high temperature. At this temperature, food residues turn into deposits that can be easily wiped away with a damp sponge once the oven has cooled down.
If the oven is installed below a hob, make sure that all the burners or electric hotplates are switched off while running the self-cleaning cycle.
Remove all accessories from the oven before running the Pyro function (including the shelf guides).
For optimum cleaning results, remove excessive residuals inside the cavity and clean the inner door glass before using the Pyro function.
Then oven has two different pyrolytic cleaning functions: the complete cycle provides for a thorough cleaning if the oven is extremely dirty, while the quick cycle (ECO) is shorter and consumes less energy, thus making it suitable for use at regular intervals.
Only run the Pyro function if the appliance contains heavy soiling or gives off bad odours during cooking. Please note: The oven door cannot be opened while pyrolytic cleaning is in progress. It will remain locked until the temperature has returned to an acceptable level.
Ventilate the room during and after the pyrolytic cleaning cycle (until the room has been completely aerated).
REPLACING THE LAMP
- Disconnect the oven from the power supply.
- Unscrew the cover from the light, replace the bulb and screw the cover back on the light.
- Reconnect the oven to the power supply.
Please note: Only use 20-40W/230 V type G9, T300°C halogen lamps. The bulb used in the product is specifically designed for domestic appliances and is not suitable for general room lighting within the home (EC Regulation 244/2009). Light bulbs are available from our After-sales Service.
- If using halogen bulbs, do not handle them with your bare hands as your fingerprints could cause damage. Do not use the oven until the light cover has been refitted.
REMOVING AND REFITTING THE DOOR
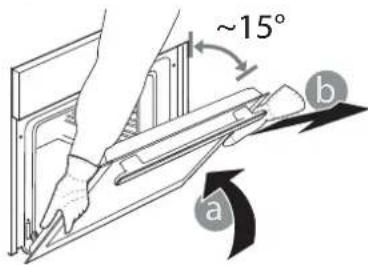
- To remove the door, open it fully and lower the catches until they are in the unlock position.
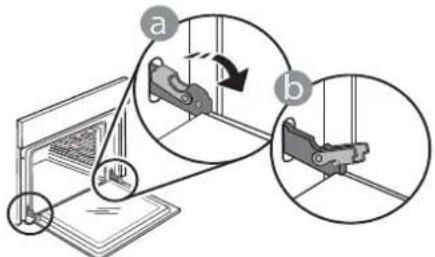
- Take a firm hold of the door with both hands - do not hold it by the handle. Simply remove the door by continuing to close it while pulling it upwards at the same time until it is released from its seating. Put the door to one side, resting it on a soft surface.
-
Refit the door by moving it towards the oven, aligning the hooks of the hinges with their seating and securing the upper part onto its seating.
-
Lower the door and then open it fully. Lower the catches into their original position: Make sure that you lower them down completely.
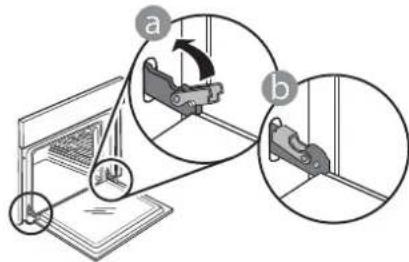
Apply gentle pressure to check that the catches are in the correct position.
- Try closing the door and check to make sure that it lines up with the control panel. If it does not, repeat the steps above: The door could become damaged if it does not work properly.
TROUBLESHOOTING

Download the Use and Care Guide from docs.bauknecht.eufor more information
| Problem Possible cause Solution | ||
| The oven is not working. Power cut. | Disconnection from the mains. | Check for the presence of mains electrical power and whether the oven is connected to the electricity supply. |
| Turn off the oven and restart it to see if the fault persists. | ||
| The door will not open. Cleaning cycle in progress. Fault with the door lock. | Wait for the function cycle to end and the oven to cool down. | Turn off the oven and restart it to see if the fault persists. |
| The display shows the letter “F” followed by a number. | Software problem. Contact you nearest Client After-sales Service Centre and state the number following the letter “F”. | |
HOW TO READ THE COOKING TABLE
The table lists the best function, accessories and level to use to cook various different types of food. Cooking times start from the moment food is placed in the oven, excluding preheating (where required). Cooking temperatures and times are approximate and depend on the amount of food and the type of accessory used. Use the lowest recommended settings to begin with and, if the food is not cooked enough, then switch to higher settings. Use the accessories supplied and preferably dark-coloured metal cake tins and baking plates. You can also use Pyrex or stoneware pans and accessories, but bear in mind that cooking times will be slightly longer.
COOKING DIFFERENT FOODS AT THE SAME TIME
Using the "Forced Air" function, you can cook different foods which require the same cooking temperature at the same time (for example: fish and vegetables), using different shelves. Remove the food which requires a shorter cooking time and leave the food which requires a longer cooking time in the oven.
DESCRIPTION DU PRODUIT

55° MAINTIEN AU CHAUD
ROOSTER OPVANGBAK BAKPLAAT


SCHUIFRAILS (INDIEN AANWEZIG)
(ALLEEN BU BEPAALDE MODELLEN)
WERKING VAN DE KOOKPLAAT
(SOLO IN ALCUNI MODELLI)
TELECKONMUECKNE HANPABJIOUNE (IPN HAIJHIN)
KoHecTBO N TIN npHaJnxHoCTe MoKeT BapbIPOBaTbCBy 3aBNCIMOCn OT npNo6peTeHHoM OMeJI. He BxOJaIeB KOMnEeK Tnp6opAp npHaJnxKHOCTN MOKHO npNo6peCTN OTJeIbHO B CepBnCHOM LcHTpe.
YCTAHOBKA PEWETKIN IpyuNXIPIHADJIEXHOCTEIN
BctabBepeWetkyropn3oHTaJIbHO BdepxKaTeNpacnoIarag ee TaK,TO6bl npnOJHrTbe Kpa 6bln06paueHb BBepx.
Дугп epнHaДлжHOCtN, taKne KaK noДон И npOTnBeHb, BCTaBnIOTc rOpu3OHTaJIbHo Tem JKe cnOco6OM, yTo n peWeTka.
CHATNE UCTAHOBKA DEPKATEJEI NOJOK
.ДяСНТЯДерхаTeEN NOJOK BbIBePHnTe ydepxNBAOuNE BNHTbl (pnpHaHnUu) C o6exxCTOPOH, NcNoJIb3yMa MOHeTy nIN INHCTpyMeHT. IOnHMnITE depxKaTeBn IN3BNeKeTne HxKHOU qAcTb nI3 rHe3da.Tenepb DePkaTeN NOJOK MoXHO BbHyTb.
YCTAHOBKA TELECKONNUCHEKNX HANPABJIOUX
(TOJIbKO B HEKOTOPbIX MOJENIAX)
PnmeHHe:TeeckOnuueckne HappaBIOUne MOryT 6bTy b yKe yCTaHOBNeHbHa DepeKaTeN NOLOK: DnA CHrTIN HaPaBnIOxN NotAHnTE INX B HAppaBJeHn HApxy, OTOeDHHB HxKHN 3aKIM.
BbHbTe DepeKaTeN NOJOK N3 DyXOBKn I CHIMNTe PnactIKOByIO 3aunTy C TeNECKONNuYeCKNX HappaBIAIOxN.
3akpeNTe BepxHn
3aKIM HappaBnaOuei
Ha dePkaTeI NOIOK n
CdBnHbTe ee Brny6b Do
ynopa. OnyCTnte BTOPO
3aKIM B npedymOTpeHHoe
noJoxHe.
YTo6b3aKpeNTb
depXaTeJIb, CnIbHO
HaXMMte Ha HxHIOU qAcTb
3aXIMa B HApabJIeHN
OT dEpXaTeJIa NOLKn.
Y6eINTEcB, yTO NOdBxHna
yactb HAnpabJIOuei
MOKeT CBO6OJHO
Nepemeuatbc. NobTopnte
3Tu Ke DeJCTBnI DnA
BTOPOO DepkaTeNa NOOK Ha TOM Xe ypOBHe.
PpmeaHne:TeeckoNueeCKne Ha npablaIOuIe MoryT KpeiNbCra Ha IIO6OM yPoBHe.

OFF (BblKJI.)
BbIKIoueHne dyXOBKn.

LIGHT (CBET)
BkIoueHne/BBkIIOueHneOCBeUeHnnyxOBKn.

CNEUAlbHbIE PEXKIMbl

DEFRO AUTO
DEFROST (PA3MOPAXKUBAHNE)
PexkumДЯ уckopeHHoro
pa3MopaxnBaHnI npOdyKToB.

WARM KEEPING (COXPAHEHNE TENLA)
PexkM, no3BOJALIOUcN coXpaHrB bKO yTO nprirotobnHeHHbIe 6nOda.

RISING (ПОДьEM TECTA)
Pekim, oecpeuBaOuN
ONTUMaJIbHbIe ycNoBnJa IJy NODbeMa TeCTa. JIy NOnyuHeNJa KaueCTBeHHOro TeCTa He NCNoJIb3yItepeXm,ecnI dyXOBKa He OCTbIJa NocJe nprirotobHeHn.

SLOW COOKING MEAT (TOMJIEHNE MRCA)
Pekm dme MeHHeHOr npuroToBneHnMa c npTtemepaType 90°C. Pnp npuroToBneHn C nCnoJb3OBAHNem 3TOrO pexm npOyKtbi OCTaOTc HxNbIMn ucoHyBMn. Pnp npuroToBneHn XapKoro cNepBa o6XapBeMraHo cKOBoPOde, yTo6bl B HEM coXpaHnncb eCTeTBHeHbIe cOKn. Bpem npuroToBneHn BapbnpyETc8 OT 4 cAcOB dJa KycOB Mca BecOM 1 Kr Do 6-7 cAcOB dJa KycOB Mca BecOM 3 Kr. DJa NOnyuEHn HaunuWux Pe3yJbTaTOB CTapaNTecb He OTKpbIBaTb DBepuy DyxOBKn BO Bpem npuroToBneHn. IcNoJb3yIte CneuaJIbHbI TepMometp dJa N3MepeHn BHyTpHeH TeMnpaTypbl MaCA.

SLOW COOKING FISH (TOMJIEHNE Pbl5bl)
PexnIM dIy MeIeHHO npiroTOBHeHn pyb6bl npTtempeHype 85^ .Pi npri npiroToBHeHn C nCNOb3OBAHneM 3TOro pexnMa npOdyKtbl OCTaOTc HxHBIMn COHyBMn. BlaOapra Hn3KOi TemnpaType 6NIO He NOpymAHBaETc CahyKn IN KOHeHbI pe3yIbTaT CXOJeH CTEm, KOTOpbl NOnyuaTc npri npiroTOBHeHn Ha napy.Bpem npiroTOBHeHn BapbNypuETc oT 2 Yacob dIpy pb6bl BECOM 300 rdo4-5 Yacob dIpy pb6bl BECOM 3 Kr.DIy NOnyuHn HauNyUwix pe3yIbTaTOB CTapaNTecb Ka MoxHo pExe OTkpBbABydBepu DyXOBKn BO BpeM npiroTOBHeHNo I36ExaHne pacceuBaHn TeIIa.

ECO F ECO FORCED AIR* (KOHBEKLUNA KO)
PexmIa3aneKaHnApaHnpoBaHHoro McaNMCbIX HnHe Ha ODHOM yPOBHe.
ДeикathяперьИстаяцрк�лсьвOSTуха npedotbpaaaetpepecuWbAHne npodyktob.В npocece npnroTOBLeHn6blD bdaHHOM pexKIme lamna dYxOBKn He rOpnt B celenx 3KOHOMn 3NeKtpo3HeprIn. Ee moXHo Ha BpemBaKlOuHTb, Haxkab KhoNky noDTBepKdEHN.
IpnncnoJb3ObaHnpeXnMa ^ npedymatpnbauoero ONTUMN3aunO 3Hepronotpe6JeHna,DbepcaDyXOBKn DOnjKa octabaTcBc3aKpbToI Do Tex nop, noka 6JIOHO He 6ydet nonHoCTbIO roTOBO.

CONVENTIONAL (ObIyHbI)
Pexm dI npiroTOBHeM MaCa N BbIneKaHn HnporOB C MArKOHaunHKo Ha OdHom ypOBHe.

CONVECTION BAKE (KOHBEKLIOHHOE BbIIEKAHNE)
Pexm dI npiroTOBJIeHn Mca n BblKeHaHn NnporOB C mIrkOHaunHKo Ha OJHom ypOBHe.

FORCED AIR (KOHBEKLUN)
PekmДЯ npuroToBHeH6Iou npuOHaKOBoTemNepaType cpa3y Ha
HeckoIbKnx ypoBHX (He 6oJee Tpex).3ToT peXIM N03BOJnEe OndHOBpeMeHHO rTOBnTB pa3HbIe 6nIOda 6e3 nepeHoCa 3aNaXOB c OndHO Ha dpyroJ.

GRILL (ΓPηMb)
PexKIM nI npiroTOBHeHnHa rpnIe 6nΦwTeKcOB, WAsMbIka, KOn6aCOK, OBOUHbIX 3aNEKaHOK uXNe6HbIX TOCTOB. Ppi npiroTOBHeHn MraCa Ha rpnIe peKOMeHyETcNcNoNb3OBA Tb NOdoH dJa c6opa coka: Pa3MeCTnte NoDoH Ha NIO6oM yPoBHe nOd peWetKoH, HAnB B Hero 500 mN NTBeBOI BObl.

TURBO GRILL (TYP60FPTnIb)
PeknM nJxKApKn KpynHbIX KyCKOB
mca (poct6nΦ, 6apaHbN HOxKn, ubinnaT).
PeKomeHnyetc nCNoIb3ObaTb NOdON dNra c6opa
coKOB. Pa3MeCTnte NOdoH Na IIO6OM ypOBHe NOd
peWetKoH, HAnB B Hero 500 Mn NtBeBOB BObl. B
3TOM peXnme MoXHO NoIb3ObaTbcBepTeJOM (pnu
HaInuHn).

SETTINGS (HACTPOIKN)
N3MeHeHHe HAcTpoeK DyXOBKN (aacbl, 3bIK, rPOMKOCTb 3ByKOBOrO CnIHana, RpKOCTb, peKIM "3KO").
PnmeHn: Pn deNCTByoIepeXnme"3KO npKoCTb Dcner CHxKaetc nOCBeIeHne dYXOBKn BIKIOaETC B ceJAX KOHOMnn 3NeKtpO3Heprnn. NcJIeN nOCBeIeHne BpemHo BKIOuOAIOTc npHaXaTIN IIOBOI KHONK.
TABJIUZA PEXKIMOB BAPOUHOI PAHEJI

BREAD / PIZZA (XJIEB / NIIUCA)
PexnIM nI npiroTOBHeHnXle6o6yIoUhbx
n3deHn nPiuCbI pa3NnuHoro BnA n pa3Mepa.B
ETOM pexnime npedyCMOTpeHO DBe CTAHpTbIe
nporpaMMbl. IocTaToUHO yKa3aTb HyxHbIe 3HaueHnra
(temnepatpy n Bpem) n B dyXOBke 6ydet
ABTomatunueckn Bbl6paH ONtUmalhbHn pexnIM
npiroTOBHeHn. YcTaHOBnte TecTo Ha 2-ynypobeh,
npedBaPnteHn nporpeB nyXOBky.

AUTOMATIC CLEANING - PYRO (ABTOMATUHECKA ONUCTKA - PYRO)
YcTpaHHeNcOCTaTKOB NnC NOMOuBb BbICOKOTempeAtypHOro uKNa.IpeDyCMOTpeHO Dba pa3nUHybIX uKNa cAmooUcHTKn: NOHbI uKIn 6bICTpbI uKn ("3ko").NoHbI uKn peKOMeHdyETcB bIIOJNHATb,TOIbKO eCnn dYXOBKa CnIbHO 3aRp3HeHa,60nee KOpOTkn -ecnn daHHa fYHKcua BblONHReTcpeYlnpHo.

FAST PREHEATING (BbICTpbl HAPPEB)
Быстpbи прдварптельньн HarpeB dYxOBKn.

OFF (BblKJI.)
BbIKIouHeHne 3OHbI HarpeBa.

GENTLE HEAT (UADJH HAPPB)
Pekn m nnojema TecTa, pa3mrgehn CInBouHOro MaCna nXOJOniNbHnKa, noDepKahn TEnblIMn DetCKOro nHTAHN n 6yTBIOuek, nprirotoblenhny IorgypTOB, pactaJIINBaHn WOKoJaA n np. DaHHbI peKm IOCTypeH ToIbKO npr ropJeM HndNKatope octaToCHoro TeNla. YTo6bl NCNoJIb3OBaTb peKm, y6eINTecb, YTO HHdkaTOp OCTaToCHoro TENla BbIbpaHHo3OHO bHarpeBa rOpNT. NObepHnte pyuKy Ha .YTo6bl OTMeHNtB BbIbOp peKmA, n3MeHnte nOLOKeHne pyuKn.

HEAT MAINTENANCE (IOДЕРЖAHNE TEMNEPATypbl)
Iopdepxahne noctoHHHou TemnepaTypb60° Cdo 3aBepweHn npiroTOBneHn. YTo6b BbI6paTb 3TOT pexm, NOBepHnTe pyky Ha n

FAST BOIL (БыICTРАВAPKA)
DaHHbI pexnM NO3BOJare 6bICTPO DOBODNTB BDO KINHeH N C NocJeDyUoH N OndepXaHneM TemnepaTypb I TeueHne 3aHaHoro BpeMeH. No IcTeueHn 3aHaHHO BpeMeH BapOuHaN aHEnb ABTomatueeCKN BO3BpaAaETcK HAcTpoKe MaKcImaJIbHO MOUHOCTN. 3TOT peXm MOxHO Bbl6pTaB N IpoceCE npriTOBLeHn NIIu. BaxHo: Pepd Bb6Opom pexnMa y6eHntecb, YTO Ha COOTBeTCTByIOSe 30He HArpeBa IMeETcK kAcTpION. B npotNBOM cIyuae BO3MOxHO NOBpeKDeHne NOBepXHO BabOuHO NaHeN. Pa6Oue NOKa3aTei DJa DAHHOro pexnMa COOTBeTCTBYOT Tem, KOTOpbIe IMeOTcR y BCEx CTekNOkopePAMNUeCKNX BapOuHBx NaHeJe. DInr NCNoB3OBaHnpeXma NOCTaBBte KAcTpIO Ha BBb6paHHyO 3OHy HaPeBa INOBepHNTE pyky Ha .ДЯ OTMeHbI N3MeHnTe NOLOKeHne pyUKn.

MULTIZONE (OBbEINHEHNE 3OH)
CnmboI 06beHHeHna 3OH,paCnoLoKeHHbIn Ha pykax,3aTogapaeTcA TOBko B TOM Cnyae,ecn BlbopaHna 3OHa HarpBa BapouHOI NaHeNl NODepKNaBAeT cyHKUIO DBOHNO IIN TPOHNO 3OHb.I DaHhie FyHKUIN NO3BOJAO T O6beDHNHTb HECKOBKO 3OH HarpBa B ONDHY O6UYO 3OHy IIN BO3MOXHOCTN INCNoJIb3OBAHNA KpyHNO NOCyDbI OBaJIbHOIN INPRAMOYTOBHOH OPMBI. Yo6bl BKIOuHTb FyHKUIO DBOHNO 3OHb (ecn npedyCMOTpeHa), NOBepHNTe pyky Ha n DOxJNTecb MIRAHNA INDnKAToPA OCTaTOHORo TEIIHa 3OHe HarpBa. YTO6bl BKIOUHTb FyHKUIO TPOHNO 3OHb (ecn INpeDyCMOTpeHa),DOxJNTecb Haaya qactoro MIRAHNA INDnKAToPA. Bbl6epnte Tpe6yembl yPoBeHb MOUHOCTN, NOBepHyB pyky IpOTNB YACOBON CTpeKN. INDnKAToP OCTaTOHORo TEIIHa HauHet RopeTB HenpepbIBHO, yKa3bIBaAR, YTO BApOuaH naHENb NCNoJIb3yeTcN. IIN OTMeHbI NOBepHNTe pyky IpOTNB YACOBON CTpeKN Ha 0 .
TAbncaPnPuroBHeHbIou