BCW7O7HTSK - Oven BAUKNECHT - Free user manual and instructions
Find the device manual for free BCW7O7HTSK BAUKNECHT in PDF.

User questions about BCW7O7HTSK BAUKNECHT
0 question about this device. Answer the ones you know or ask your own.
Ask a new question about this device
Download the instructions for your Oven in PDF format for free! Find your manual BCW7O7HTSK - BAUKNECHT and take your electronic device back in hand. On this page are published all the documents necessary for the use of your device. BCW7O7HTSK by BAUKNECHT.
USER MANUAL BCW7O7HTSK BAUKNECHT
PRODUKTBESCHREIBUNG

natural_image
Simple line drawing of a rectangular grid structure with no text or symbolsnatural_image
Simple line drawing of a square frame with side tick marks (no text or symbols)natural_image
Illustration of a mechanical tool with a curved handle and pointed tip (no text or symbols)
THANK YOU FOR BUYING A BAUKNECHT PRODUCT
In order to receive a more complete assistance, please register your product on www.register10.eu

Before using the appliance carefully read the Safety Instruction.
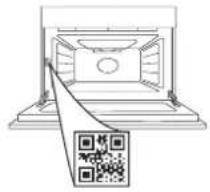
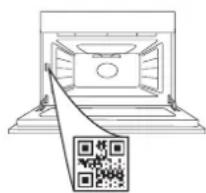
PLEASE SCAN THE QR CODE ON YOUR APPLIANCE IN ORDER TO REACH MORE INFORMATION
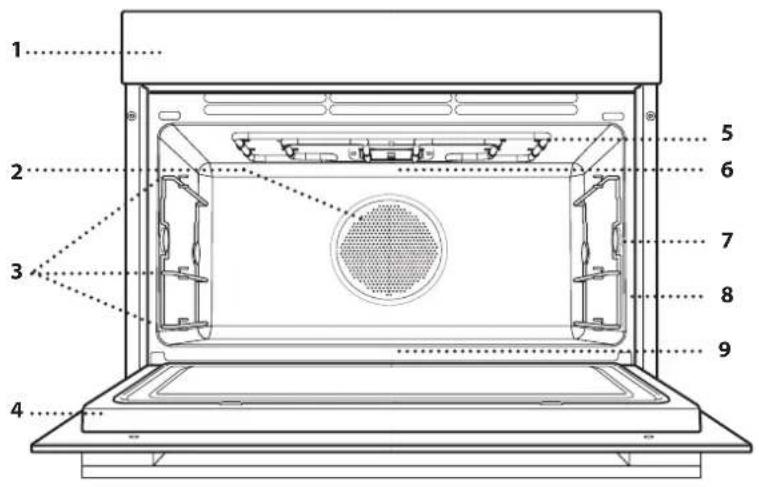
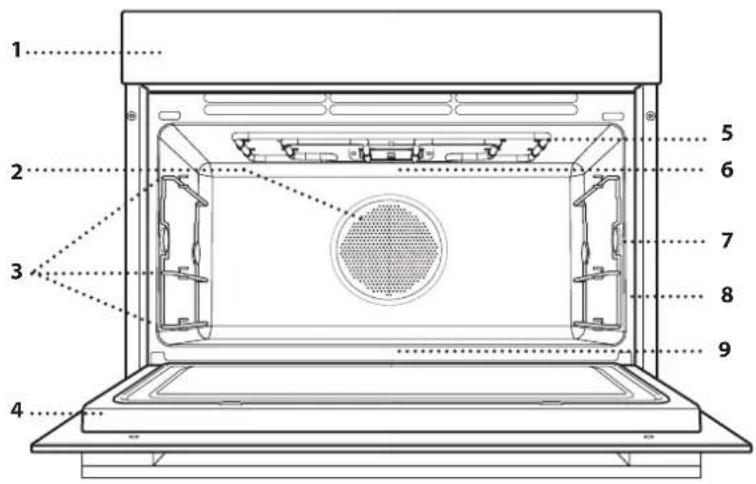
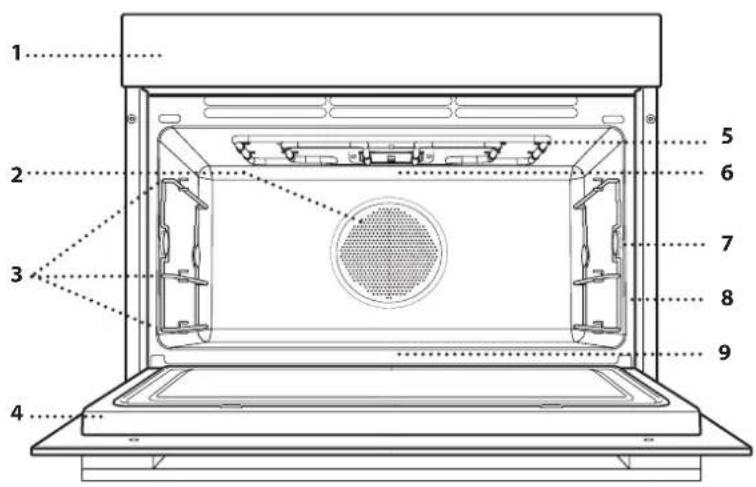
PRODUCT DESCRIPTION
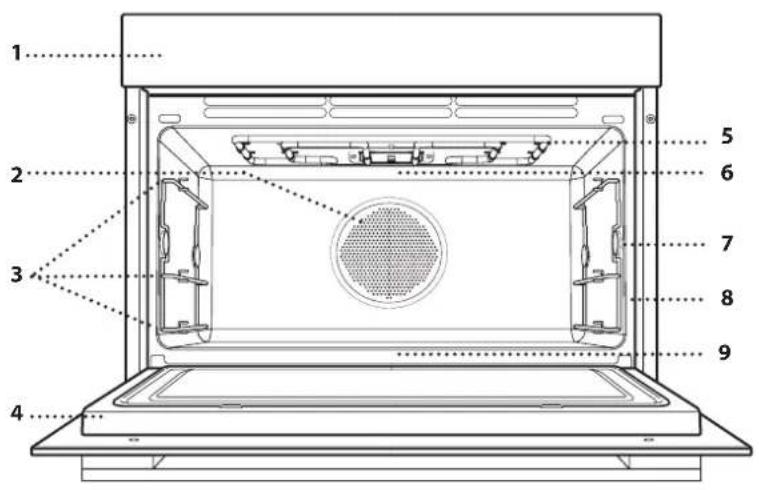
- Controlpanel
- Cavity Fan (not visible) and Circular heating element (not visible)
- Ladder racks (the level is indicated on the front of the oven)
- Door
- Upper heating element/grill
- Lamp
- Food probe insert point (if present)
- Identification plate (do not remove)
- Lower heating element (not visible)
CONTROL PANEL DESCRIPTION

1. ON / OFF
For switching the oven on and off and for stopping an active function.
2. MENU / FUNCTIONS DIRECT ACCESS
For quick access to the functions and menu.
3. NAVIGATION BUTTON MINUS
For scrolling through a menu and decreasing the settings or values of a function.
4. BACK
For returning to the previous screen. During cooking, allows settings to be changed.
5. DISPLAY
6. CONFIRM
For confirming a selected function or a set value.
7. NAVIGATION BUTTON PLUS
For scrolling through a menu and increasing the settings or values of a function.
8. OPTIONS / FUNCTIONS DIRECT ACCESS
For quick access to the functions, settings and favorites.
9. START
For starting a function using the specified or basic settings.
ACCESSORIES
Before purchasing other accessories that are available on the market, make sure that they are heat-resistant and suitable for steaming.
Make sure that there is a gap of at least 30 mm between the top of any container and the walls of the
cooking compartment in order to allow steam to flow sufficiently.
Accessories during microwave function may raise in temperature. It is recommended to use protection to handle accessories at the end of the cycle.
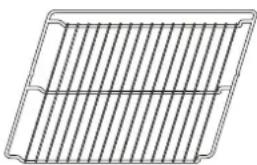
WIRE SHELF BAKING TRAY CRISP PLATE
natural_image
Simple line drawing of a rectangular grid structure with diagonal lines (no text or symbols)The wire shelf is suitable for all cooking modes, also in Microwave cooking. When using microwaves place the wire shelf always on level 1 (the lower one). You can place food directly on the wire shelf or use it to support baking trays and tins or other ovenware resistant to heat and microwaves.

natural_image
Simple line drawing of a square frame with dashed cutouts (no text or symbols)The baking tray is suitable for all cooking modes except for "Microwave" functions. Can be used to cook all kind of foods without container. Use it to collects the cooking juices, placing it below the wire shelf.
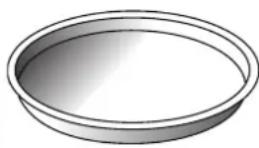
Only for use with the designated functions. The Crisp plate must always be placed in the center of the wire shelf and can be pre-heated when empty, using the special function for this purpose only. Place the food directly on the Crisp plate. Place the silicone feet between the bars of the wire shelf for added stability.
HANDLE FOR CRISP PLATE
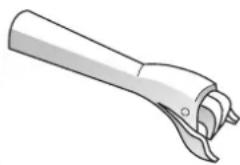
natural_image
Illustration of a mechanical tool with a curved handle and pointed tip (no text or symbols)Useful for removing the hot Crisp plate from the oven.
STEAMER*
(ONLY IN SOME MODELS)
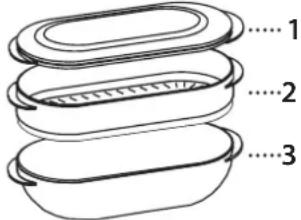
To steam foods such as fish or vegetables, place these in the basket (2) and pour drinking water (100 ml) into the bottom of the steamer (3) to achieve the right amount of steam. To boil foods such as potatoes, pasta, rice or cereals, place these directly on the bottom of the steamer (the basket is not required) and add an appropriate amount of drinking water for the amount you are cooking. For best results, cover the steamer with the lid (1) provided. Always place the steamer on the wire shelf at level 1 and only use it with the appropriate cooking functions, or with microwave function.
The number of accessories may vary depending on which model is purchased.
*Other accessories can be purchased separately from the After-sales Service.
INSERTING THE WIRE SHELF AND OTHER ACCESSORIES
Insert the wire shelf onto the level you require by holding it tilted slightly upwards and resting the raised rear side (pointing upwards) down first.
Then slide it horizontally along the runners as far as possible.
Other accessories, like the baking tray, are to be inserted horizontally, letting them slide on the runners.
Push the accessories all the way in, making sure, that it does not touch the appliance door.
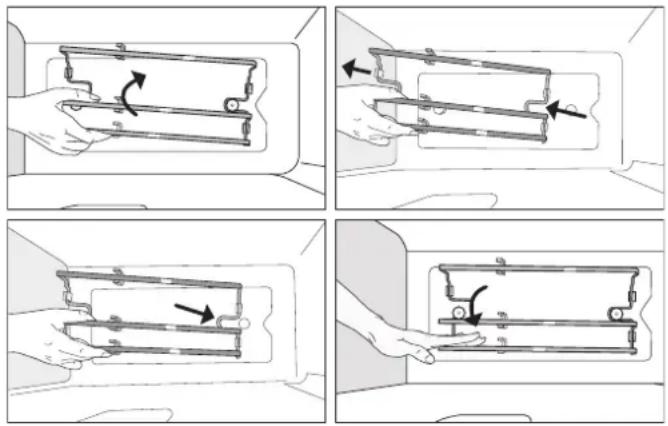
REMOVING AND REFITTING THE LADDER RACKS
There are two ladder racks on both sides of the oven cavity, anchored on two button-shaped supports. The ladder racks are removable to make cleaning more convenient.
- To remove the ladder racks, firmly grip the external part of the guide, and pull it upwards to extract it from the frontal support while rotating on the rear support, then slide out the whole part from the cavity.
- To reposition the ladder racks, slide the back part onto the rear support. Then, once anchored, push the assy down until the ladder rack is inserted into the frontal support.
FIRST TIME USE
1. SELECT THE LANGUAGE
You will need to set the language and the time when you switch on the appliance for the first time: "English" will show on the display.
| English | .1 |
Press or to scroll through the list of available languages and select the one you require.
Press to confirm your selection.
Please note: The language can subsequently be changed by selecting "LANGUAGE" in "SETTINGS" menu, available by pressing 🔒
2. SET THE TIME
After selecting the language, you will need to set the current time: The two digits for the hour will flash on the display.

Press + or — to set the current hour and press √: The two digits for the minutes will flash on the display. Press + or to set the minutes and press √ to confirm.
Please note: You may need to set the time again following lengthy power outages. Select "CLOCK" in "SETTINGS" menu, available by pressing 🔊
3. SET POWER CONSUMPTION
The oven is programmed to consume a level of electrical power that is compatible with a domestic network that has a rating of more than 3 kW (16 A): If your household uses a lower power, you will need to decrease this value (13 A). Select POWER in SETTINGS menu avialable by pressing ⚙ and select desired power setting.

4. HEAT THE OVEN
A new oven may release odours that have been left behind during manufacturing: this is completely normal. Before starting to cook food, we therefore recommend heating the oven with it empty in order to remove any possible odours.
Remove any protective cardboard or transparent film from the oven and remove any accessories from inside it. Heat the oven to 200 °C for around one hour, using the "Fast Preheat" function. Odors and smoke are normal when the oven is used the first few times, or when it is heavily soiled. Follow the instructions for setting the function correctly.
Please note: It is advisable to air the room after using the appliance for the first time.
FUNCTIONS

DYNAMIC MENU
With the Dynamic Functions, simply select the type and weight or the quantity of the food items to obtain the best results. The oven will automatically calculate the optimum settings and continue to change them as cooking progresses.
To use at best this function, follow the indications on the relative cooking table.
Due to food variability, the cooking duration is set on an average grade. We always recommend to check the internal doneness of food and in case prolong the cooking time to achieve proper doneness.
Some automatic cycles give the possibility of previously setting a cooking level lower or higher than the default (see the Doneness paragraph in the Daily Use section).
DYNAMIC REHEAT
For reheating ready-made food that is either frozen or at room temperature. The oven automatically calculates the settings required to achieve the best results in the shortest amount of time. Place food on a microwave-safe and heatproof dinner plate or dish directly on wire shelf at level 1.
Food Weight/portions/pieces Note
| Plated Meal 250 - 800 g | Take out from packaging being careful to remove any aluminium foil. At the end of reheating process 1-2 minutes standing time always improves the result. | |
| Lasagna [frozen] | 400g - 1.5 kg | Take out from packaging being careful to remove any aluminium foil. |
| Soup 100 - 800 g Heat uncovered in a single container. | ||
| Water 100 - 500 g Heat uncovered in a single container. | ||
DYNAMIC MELT & SOFT
For melting and softening food. The oven automatically calculates the settings required to achieve the best results in the shortest amount of time. Place food on a microwave-safe and heatproof container directly on the wire shelf at level 1.
Food Weight/portions/pieces Note
| Butter Soften | 100 - 500 g | Place the butter on a container directly on the wire shelf for best results. |
| Ice Cream Soften | 100 - 500 g | If you put the ice cream container directly in the oven, be sure that the container is microwave safe. |
| Chocolate Melting | 100 - 500 g | Cut the chocolate in pieces for best results. At the end stir the chocolate to complete the melt process. |
| Cheese Melting | 100 - 500 g | Cut the cheese in pieces for best results. At the end stir the cheese to complete the melt process. |
DYNAMIC COOK TABLE
For cooking several kinds of dishes and foods and achieving optimal results in the easiest and quickest way. To get the best from this function, follow the indications on the relative cooking table.
| Category Food | Weight/portions/ pieces | Note Accessory | |
| PASTA & CEREALS | Pasta Boil 1 - 3 portions | Set recommended cook time for the pasta. Add salted water and pasta all together into the steamer bottom and cover with steamer lid. Consider around 100g of pasta for each portion. Use 400g of water for each portion of pasta. | 1+ |
| Lasagna 600 g - 2.0 kg | Prepare according to your favorite recipe. Pour bechamel sauce on top and sprinkle with cheese to get perfect browning. | 1+ | |
| Rice 1 - 4 portions | Set recommended cook time for rice. Add water and rice all together into the steamer bottom and cover with lid. Consider around 100g of rice for each portion. Use 300g of water for each portion of rice. | 1+ | |
| MEAT | Roast Beef 800 g - 1.7 kg | Brush with oil and rub with salt and pepper. Season with garlic and herbs as you prefer. At the end of cooking let rest for at least 15 minutes before carving. | 1+ |
| Burger Patties 100 - 500 g | Lightly grease the crisp plate before preheating. The crisp plate needs to be preheated before inserting the food. The oven will notify you when it's time to insert the food. To get perfect results, during cooking you will be asked to turn food. | 1+ | |
| Roast Pork 800 g - 2.0 kg | Brush with oil and rub with salt and pepper. Season with garlic and herbs as you prefer. At the end of cooking let rest for at least 15 minutes before carving. | 1+ | |
| Pork Ribs 400 g - 1.5 kg | Brush with oil and season as you prefer. Rub with salt and pepper. Distribute evenly in the container with the bone side downwards. | 1+ | |
| Bacon 50 - 400 g | The crisp plate needs to be preheated before inserting the food. The oven will notify you when it's time to insert the food. Distribute evenly in the crisp plate after preheat. To get perfect results, during cooking you will be asked to turn food. | 1+ | |
| Sausages & Wurstel 200 g - 1.0 kg | Distribute evenly on the crisp plate. Pierce the sausages with a fork to prevent bursting. To get perfect results, during cooking you will be asked to turn food. | 1+ | |
| Roast Chicken 800 g - 2.5 kg | Brush with oil and season as you prefer. Rub with salt and pepper. Insert into the oven with the breast side up. | 1+ | |
| Poultry Breast Steamed | Add around 200g of water in the steamer bottom and distribute evenly the food in the steamer basket. Cover with lid. | 1+ | |
| Breaded Fried Chicken 100 - 500 g | Brush with oil. Distribute evenly in the crisp plate. | 1+ | |
| ACCESSORIES | |||||||
| Wire shelf | Heathproof tray on wire shelf | Drip tray / Baking tray | Heath and MW-proof container | Steamer bottom and lid | Entire steamer | Crisp plate |
| Category Food | Weight/portions/ pieces | Note Accessory | ||
| FISH | Roasted Whole Fish 400 g - 1.5 kg Brush with oil and season as you prefer. | 1 | ||
| Fish Steak Roasted 200 - 800 g Brush with oil and season as you prefer. | 1 | |||
| Fish Fillets Steamed 100 - 500 g | Add around 200g of water in the steamer bottom and distribute evenly the food in the steamer basket. Cover with lid. | 1 | ||
| Fish and Chips [frozen] | 1-3 portions | Distribute evenly in the crisp plate alternating the fish fillets and the potatoes. Consider around 100g of fish and 100g of chips for each portion. | 1 | |
| Fried Seafood [frozen] | 200-600 g | Distribute evenly in the crisp plate. | 1 | |
| Fish Fingers [frozen] 200-600 g | Distribute evenly in the crisp plate. To get perfect results, during cooking you will be asked to turn food. | 1 | ||
| VEGETABLES | Roasted Potatoes 300 g - 1.0 kg | Cut in pieces, season with oil, salt and flavor with herbs. Distribute evenly in the crisp plate. To get perfect results, during cooking you will be asked to stir food. | 1 | |
| Stuffed Vegetables | 600 g - 2.0 kg | Scoop out the vegetable and fill with a mixture of the vegetable flesh itself, minced meat and shredded cheese. Season with garlic, salt and flavor with herbs as you prefer. | 1 | |
| Potatoes Gratin | 400 g - 1.5 kg | Slice and place into a large container. Season with salt, pepper and pour over cream. Sprinkle cheese on top. | 1 | |
| Roots Vegetables Steamed | 100 - 800 g | Add around 200g of water in the steamer bottom. Cut in pieces and distribute evenly the food in the steamer basket. Cover with lid. | 1 | |
| Soft Vegetables Steamed | 100 - 800 g | Add around 200g of water in the steamer bottom. Cut in pieces and distribute evenly the food in the steamer basket. Cover with lid. | 1 | |
| Vegetables Steamed [frozen] | 100 - 800 g | Add around 200g of water in the steamer bottom and distribute evenly the food in the steamer basket. Cover with lid. | 1 | |
| Potatoes Fried [frozen] | 200 - 600 g | Distribute evenly in the crisp plate. | 1 | |
| Pepper Fried | 100 - 500 g | Cut in pieces and season with oil. Distribute evenly in the crisp plate. | 1 | |
| SALTY BAKERY | Sandwich Loaf | 400 g - 1.0 kg | Prepare dough according to your favorite recipe for a light bread. Form into a loaf container before rise. Use the oven's dedicated rise function. | 1 |
| Pizza | 400 g - 1.2 kg | Prepare pizza dough according to your favorite recipe. Leave it to rise using the oven's dedicated function. Roll out the dough into a lightly greased baking tray. Add topping as you prefer. | 2 | |
| Pizza [frozen] | 250 - 700 g | Take out from packaging being careful to remove any aluminium foil. | 1 | |
| Salty Cake | 800 g - 1.5 kg | Line a pie dish for 8-10 portions with a pastry and pierce it with a fork. Fill the pastry according to your favorite recipe. | 1 | |
| Category Food | Weight/portions/pieces | Note Accessory | ||
| SWEET BAKERY | Sponge Cake 400 g - 1.2 kg | Prepare a fatless sponge cake batter. Pour into lined and greased baking pan. | ||
| Muffins 1 batch | Prepare a batter for 16-18 pieces according to your favorite recipe and fill in paper moulds. Distribute evenly on the baking tray. | |||
| Cookies 1 batch | Make a batch of 500g flour, 200g salted butter, 200g sugar, 2 egg. Flavor with fruit essence. Let cool down. Stretch evenly the dough and shape as you prefer. Lay the cookies on a baking tray. | |||
| Apple Pie 800 g - 1.5 kg | Line a pie dish with the pastry and sprinkle the bottom with bread crumbs to absorb the juice from the fruit. Fill with chopped fresh fruit mixed with sugar and cinnamon. Roll out the pastry scraps to make a lid, seal the edges and brush with egg. | |||
| Brownies 1 batch | Prepare according to your favorite recipe. Spread batter on the baking pan covered with baking paper. | |||
| EGGS & SNACKS | Popcorn 90 - 100 g | Always place the bag directly on the wire shelf. Pop only one bag at a time. | ||
| Chicken Nuggets [frozen] | 200 - 700 g Distribute evenly in the crisp plate. | 1 | ||
| Onion Rings [frozen] 100 - 500 g Distribute evenly in the crisp plate. | 1 | |||
| Scrambled Eggs 2 - 10 pieces | Prepare according to your favorite recipe into a single container. | |||
| ACCESSORIES | |||||||
| Wire shelf | Heathproof tray on wire shelf | Drip tray / Baking tray | Heath and MW-proof container | Steamer bottom and lid | Entire steamer | Crisp plate |

CRISP MENU
CRISP
For perfectly browning a dish, both on the top and bottom of the food. This function must only be used with the special Crisp plate.
Required accessories: wire shelf at level 1, Crisp plate, handle for the Crisp plate.
| FOOD DURATION (min) | |
| Leavened cake 10 - 12 | |
| Hamburgers* | 9 - 15 |
| *Turn food halfway through cooking | |
CRISP FRY: Fresh Foods and Frozen Foods
This healthy and exclusive function combines the quality of crisp function with the properties of the warm air circulation. It allows crunchy, tasty frying results to be achieved, with a remarkable reduction of oil needed compared to the traditional way of cooking, even removing the need for oil in some recipes.
To achieve best results with fresh foods brush or season with a little quantity of oil. Cook frozen food directly without any addition of oil.
Required accessories: wire shelf at level 1, Crisp plate, handle for the Crisp plate.

MICROWAVE
Use microwave function only with food or beverages inside to preserve the correct functionality of the product.
Required accessories: wire shelf, microwave-safe and heatproof container.
| POWER (W) | RECOMMENED FOR |
| 1000 | Quickly reheating drinks or other foods with a high water content. If the food contains egg or cream choose a lower power. |
| 750 | Cooking vegetables. |
| 600 | Cooking meat, fish and dishes that cannot be stirred. |
| 500 | Cooking meaty sauces, or sauces containing cheese or egg. Finishing off meat pies or pasta bakes. |
| 350 | Slow, gently cooking. Perfect for melting butter or chocolate. |
| 160 | Defrosting frozen foods or softening butter and cheese. |
| 90 | Softening ice cream. |
ACTION FOOD POWER (W) DURATION (min)
| Reheat 2 cups 1000 1 - 2 | ||
| Cook Sponge cake 750 5 - 6 | ||
| Cook Egg custard 750 10 - 12 | ||
| Cook Meat loaf 600 15 - 25 |

OTHER FUNCTIONS MENU
TRADITIONAL FUNCTIONS
FAST PREHEAT
For quickly preheating the oven before a cooking cycle. Wait for the function to finish before placing food inside the oven. Once preheating has finished, the oven will select the "Forced Air" function automatically.
Required accessories: wire shelf with pan or baking tray
GRILL
For browning, grilling and gratins. We recommend turning the food during cooking.
Recommended accessories: wire shelf
| FOOD GRILL LEVEL | DURATION (min) | ||
| Toast | High | 5 - 6 | |
TURBO GRILL
For perfect results, combining the grill and oven air convection. We recommend turning the food during cooking.
Recommended accessories: wire shelf
CONVECTION BAKE
For cooking meat, baking cakes and pies with fillings on one shelf only. To achieve best results this function have the preheating phase: wait the end of preheat to insert the food.
Required accessories: wire shelf with pan or baking tray
MW COMBI FUNCTIONS
GRILL + MW
For quickly cooking and gratinating dishes, combining the microwave and grill functions.
Required accessories: wire shelf at level 1, microwave-safe and heatproof container.
TURBO GRILL + MW
For quickly cooking and browning your food, combining the microwave, grill and the oven air convection.
Required accessories: wire shelf at level 1, microwave-safe and heatproof container.
| FOOD POWER (W) | GRILL LEVEL | DURATION (min) | |
| Roast CHicken | 350 | Medium | 20 - 30 |
*Turn food halfway through cooking
CONVENTIONAL + MW
For preparing baked dishes more quickly by combining the conventional oven and the microwave.
Required accessories: wire shelf at level 1, microwave-safe and heatproof container.
FORCED AIR + MW
For cooking any kind of dish on one shelf only combining hot air circulation and the microwave.
Required accessories: wire shelf at level 1, microwave-safe and heatproof container.
CONVENCTION BAKE + MW
For quickly cooking all food with a liquid filling, by combining the microwave, conventional heating and air convection.
Required accessories: wire shelf at level 1, microwave-safe and heatproof container.

CONVENTIONAL
For perfectly cooking and browning both on the top and bottom any kind of dish on one shelf only. To achieve best results this function have the preheating phase: wait the end of preheat to insert the food. Required accessories: baking tray or wire shelf and heatproof container.
| FOOD | TEMP. (°C) | DURATION (min) |
| Cupcake / Smallcake | 160 | 20 - 25 |
| Cookies | 165 | 15 - 20 |

FORCED AIR
For cooking sweets and meats with hot air circulation. To achieve best results this function have the preheating phase: wait the end of preheat to insert the food. Is possible to use it for cooking different foods that require the same cooking temperature on several shelves at the same time. This function can be used to cook different foods without odours being transferred from one food to another. Required accessories: baking tray or wire shelf and heatproof container.

DYNAMIC SENSE DEFROST
For quickly defrosting various different types of food. Always place the food in a container directly on the wire shelf for best results, except for Crisp Bread Defrost. At the end let the food stand for 5 minutes.
CRISP BREAD DEFROST
This exclusive Whirlpool function allows you to defrost frozen bread. Combining both Defrost and Crisp technologies, your bread will taste and feel as if it were freshly baked. Use this function to quickly defrost and heat frozen rolls, baguettes & croissants. The Crisp Plate must be used in combination with this function, directly placed on wire shelf.
| FOOD | WEIGHT |
| Timed Defrost | - |
| Meat | 100g - 2.0 kg |
| Poultry | 100g - 3.0 kg |
| Fish | 100g - 2.0 kg |
| Crisp Bread Defrost | 50 - 800 g |

SPECIAL FUNCTIONS
KEEP WARM
For keeping just-cooked food hot and crisp, including meat, fried foods or cakes.
RISING
For optimal proving of sweet or savoury dough. To maintain the quality of proving, do not activate the function if the oven is still hot following a cooking cycle.
Required accessories: wire shelf and heatproof container.
YOGURT
For making yoghurt.
Required accessories: wire shelf and heatproof container.
DEHYDRATION
To dehydrate fruits and vegetables. Cut in thin slices and place directly on wire shelf.
Required accessories: wire shelf
MAXI-COOKING
For cooking large joints of meat (above 2.5 kg). It is advisable to turn the meat over during cooking, to obtain even browning on both sides. It is best to baste the meat every now and again to prevent it from drying out.
Required accessories: baking tray at level 2.
ECO CYCLE
For cooking stuffed roasting joints and fillets of meat on a single shelf. When this ECO function is in use, the light will remain switched off during cooking. To use the ECO cycle and therefore optimise power consumption, the oven door should not be opened until the food is completely cooked.
Required accessories: wire shelf with pan or baking tray.
HYDRO SELF CLEAN
The action of the steam released during this special low-temperature cleaning cycle allows dirt and food residues to be removed with ease. Pour 200 ml of drinking water on the bottom of the oven and only activate the function when the oven is cold.
COOK 3
For cooking different foods that require the same cooking temperature on three levels at the same time without mixing flavors and smells.
This function can be used to cook cookies, tarts, frozen pizzas and to prepare a complete meals. The oven does have to be preheated.
COOKIES
Use this function to cook three trays of similar shortbread biscuits to maximize results. The function includes a preheat. Take the three trays out of the oven at the same time.
TART
Use this function to cook three trays of similar tarts to maximize results. The function includes a preheat. Take the three trays out of the oven at the same time.
PIZZA (frozen)
Use this function to cook three trays of similar frozen pizzas to maximize results. The function includes a
DAILY USE
1. SELECT A FUNCTION
Press to switch on the oven: the display will show the last running main function or the main menu.
The functions can be selected by pressing the icon for one of the main functions or by scrolling through a menu. To select a function contained in a menu, press + or to select the desired one, then press to √ confirm.
Please note: Once a function has been selected, the display will recommend the most suitable level for each function.
2. SET THE FUNCTION
After having selected the function you require, you preheat. Take the three trays out of the oven at the same time.
COOK 3 MENU 1
This cycle is designed to cook a complete meat-based meal and a dessert. The oven requires preheating. Example of complete meal
Prepare a fruit tart according to your preferences in a round pan to be placed on the wire shelf at level 3. Prepare a lasagna according to your preferences (1.5-2kg) in a pan to be placed on the wire shelf at level two. Prepare 6-10 chicken drumsticks with diced potatoes (500-800g) directly in the baking tray to be placed on level 1. After preheating, bake all the dishes at the same time. After 50-60 minutes take out the tart, after 60-70 minutes take out the lasagna, after 80-90 minutes take out the chicken with potatoes.
COOK 3 MENU 2
This cycle is designed to cook a complete fish or vegetarian meal and a dessert. The oven requires preheating.
Example of complete meal
Prepare a fruit tart according to your preferences in a round pan to be placed on the wire shelf at level 3. Prepare pesto lasagna or cannelloni according to your preferences (1.5-2kg) in a metal or pyrex tray to be placed on the wire shelf at level two. Prepare fish fillets in foil (700-900g) with sliced vegetables (600-900g) directly in the baking tray to be placed on level 1. After preheating, bake all the dishes at the same time. After 45-55 minutes take out the tart, after 55-65 minutes take out the lasagna, after 60-70 minutes take out the fish with vegetables.
OTHER FUNCTIONS

MINUTEMINDER
For keeping time without activating a function.

FAVORITES
For retrieving the list of 9 favorite functions.

SETTINGS
For adjusting the oven settings.
When "ECO" mode is active the brightness of the display will be reduced to save energy and lamp switches off after 1 minute.
When "DEMO" is "On" all commands are active and menus available but the oven doesn't heat up. To deactivate this mode, access "DEMO" from "SETTINGS" menu and select "Off". By selecting "FACTORY RESET", the product switches off and then it returns to first switch on. All settings will be deleted.
can change its settings. The display will show the settings that can be changed in sequence. Pressing ◀ allows you to change the previous setting again.
TEMPERATURE / POWER
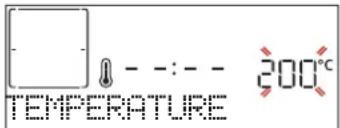
When the value flashes on the display, press or to change it, then press to confirm and continue with the settings that follow (if possible).
The microwave power or the grill level can be set in
the same way.
There are defined three power levels for grilling: 3 (high), 2 (mid), 1 (low).
![[■■■] 750w MW POWER](/content/2026/04/729578/images/ccf9ea482e69a770352bfdb8d23ec500cf3d62fc78edc6d06d192083c3079814.jpg)
Please note: Once the function has been activated, the temperature can be changed using dr.
When combined with other functions, microwave power will be reduced to 500 W max.
DURATION
![[ ] - - : - - DURATION](/content/2026/04/729578/images/167ae4c67f972864b561b226a797e684dd86e5e7b81db6c462714c55bee7a56a.jpg)
When the icon flashes on the display, press or + to set the cooking time you require and then press √ to confirm.
Please note: You can adjust the cooking time that has been set during cooking by pressing press or to amend it and then press to confirm.
In not-microwave functions you do not have to set the cooking time if you want to manage cooking manually (untimed): Press √ or to confirm and start the function. By selecting this mode, you cannot program a delayed start.
END TIME (START DELAY)
In functions which do not activate the microwave such as "Conventional" or "Forced air", once you have set a cooking time you can delay starting the function by programming its end time. In microwaves functions the end time is equal to the duration. The display shows the end time while the ⏻ icon flashes.
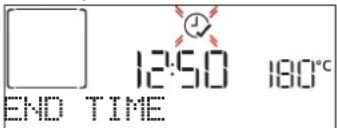
Press or to set the time you want cooking to end, then press √ to confirm and activate the function. Place the food in the oven and close the door: The function will start automatically after the period of time that has been calculated in order for cooking to finish at the time you have set.
Please note: Programming a delayed cooking start time will disable the oven preheating phase: The oven will reach the temperature you require gradually, meaning that cooking times will be slightly longer than expected. During the waiting time, you can press or to amend the programmed end time or press to change other settings. By pressing on order to visualize information, it is possible to switch between end time and duration.
3. DYNAMIC MENU
These functions automatically select the best cooking mode, temperature and duration to cook, roast or bake all the dishes available.
When required, simply indicate the characteristic of food to obtain an optimal result.
WEIGHT / PORTIONS / BATCH / PIECES
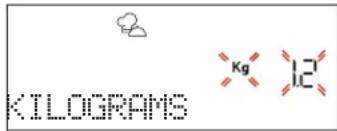
To set the function correctly, follow the indications on the display, when prompted, and press+ or to set the required value then press √ to confirm.
DONENESS
In some Dynamic functions it is possible adjust the doneness level.
![[ ] DONENESS](/content/2026/04/729578/images/30807cbe934c6ae41ed490969ab17b5085bfbe737e507cc0ea2995af75ed49ca.jpg)
When prompted, press or to select the desired level from rare (-1) to well done (+1). Press or to confirm and start the function.
4. ACTIVATE THE FUNCTION
At any time, if the default values are those desired or once you have applied the settings you require, press ▶ to activate the function.
During the delay phase, press ▶ to skip this phase and start the function immediately.
Please note: At any time you can stop the function that has been activated by pressing Ⓓ
If the oven is hot and the function requires a specific maximum temperature, a message will be shown on the display. Press ◀ to return to previous screen and select a different function or wait for a complete cooling.
JET START
When the oven is switched off, press to activate cooking with the microwave function set at full power (1000 W) for 30 seconds.
5. PREHEATING
Some functions have an oven preheating phase: Once the function has started, the display indicates that the preheating phase has been activated.
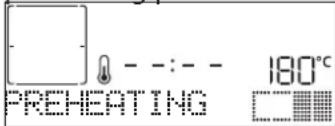
Once this phase has finished, an audible signal will sound and the display will indicate that the oven has reached the set temperature, requiring food to be added. At this point, open the door, place the food in the oven, close the door and start cooking by pressing √ or ▶
Please note: Placing the food in the oven before preheating has finished may have an adverse effect on the final cooking result. Opening the door during the preheating phase will stop pause it.
The cooking time does not include a preheating phase. You can always change the temperature you want the oven to reach by using + or .—
6. PAUSE COOKING / ADD OR TURN FOOD
PAUSE
By opening the door, the cooking will be temporarily paused through deactivating heating elements.
To resume the cooking, close the door and press.
Please note: During Dynamic functions open the door only when prompted.
ADD OR TURN FOOD
Some Dynamic Cook recipes will require the food to be added after the preheating phase or ingredients to be added to complete cooking. In the same way, there will be prompts to turn or stir the food during cooking.
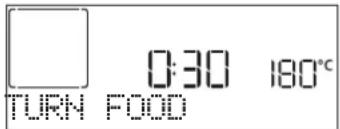
An audible signal will sound and the display shows the action to be done.
Open the door, do the action prompted by the display and close the door, then press ▶ to continue cooking.
Please note: When turning is needed, after 2 minutes, even if no action is performed, the oven will resume the cooking. The "ADD FOOD" phase last 2 minutes: if no action is taken, the function will be ended.
In the same way, near to the cooking completeness, the oven should ask you to check on food.

An audible signal will sound and the displays shows the action must to be done. Check the food, close the door and press ▶ or to continue cooking.
Please note: Press to skip these actions. Otherwise, after a certain time with no action taken, the oven will continue cooking.
7.END OF COOKING
An audible signal will sound and the display will indicate that cooking is complete.
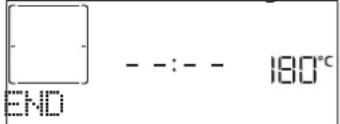
Press to continue cooking in manual mode (untimed) or press + to extend the cooking time by setting a new duration. In both cases, the cooking parameters will be retained.
8. FAVORITES
To make the oven easier to use, it can save up to 20 of your favorite functions. Once cooking is complete the display will prompt you to save the function in a number between 1 and 20 on your list of favorites.
![[ ] - - : - - ADD FAVORITE?](/content/2026/04/729578/images/f8a10ae94bd147a9220800097e99cce3c651b377576fe298e805a1606140310e.jpg)
If you would like to save a function as a favorite and store the current settings for future use, press √ otherwise, to ignore the request press.
Once √ has been pressed, press or to select the number position, then press √ to confirm.
Please note: If the memory is full or the number chosen has already been taken, the oven will ask you to confirm overwriting the previous function.
To call up the functions you have saved at a later time, press ♥: The display will show your list of favorite
functions.
![[ ] 100 180℃ CONVENTIONAL](/content/2026/04/729578/images/2dadc46f7a3de99a91bded9257fb362c1aa812304914974ca13c0a1219e665a2.jpg)
Press or to select the function, confirm by pressing √, and then press to activate.
9. HYDRO SELF CLEAN FUNCTION
Press 8d select "Hydro Self Clean" Function.

Press to activate the function: the display will prompt you to carry out all actions needed to obtain the best cleaning results: Follow the indications and then press √ when done. Once all the steps have been completed, when required, press ▶ to activate the cleaning cycle.
Please note: It is recommended to do not open the oven door during the cleaning cycle to avoid a loss of water vapor that could get an adverse effect on the final cleaning result.
An appropriate message will start flashing on the display once the cycle has finished. Leave the oven to cool and then wipe and dry the interior surfaces with a cloth or sponge.
10. MINUTEMINDER
When the oven is switched off, the display can be used as a timer. To activate this function, make sure that the oven is switched off and press ⏻: The ⏻ icon will flash on the display.

Press or to set the length of time you require and then press √ to activate the timer.
An audible signal will sound and the display will indicate once the minuteminder has finished counting down the selected time. Once the minuteminder has been activated, you can also select and activate a function. Press Ⓞ to switch on the oven and then select the function you require. Once the function has started, the timer will continue to count down independently without interfering with the function itself. During this phase, it isn't possible to see the minuteminder (only the ⏻ icon will be displayed), that will continue counting down in background. To retrieve the minuteminder screen press Ⓞ to stop the function that is currently active.
11. KEYLOCK
To lock the keypad, press and hold for at least three seconds. Do this again to unlock the keypad.
![[ * ] ① 0:30 180℃ KEYLOCK](/content/2026/04/729578/images/b98c57c1603a8dc4dc3233c0198ea3cc716b327c520bd80f1e47bb66f917ae71.jpg)
Please note: This function can also be activated during cooking. For safety reasons, the oven can be switched off at any time by pressing Ⓞ
ATTENTION!
Observe these instructions when using the microwave.
- If metal comes into contact with the cooking compartment wall, sparks occur which can damage the appliance or destroy the internal glass of the door.
- Metal components, for example teaspoons contained in glasses, must remain at a distance of no less than 2 cm from the walls of the cooking compartment and from the inside of the door. Accessories placed directly on top of each other generate sparks.
- Do not combine the grill with the dripping pan.
- Insert accessories only at their respective heights.
• Sparks could form and damage the cooking compartment.
• The appliance is damaged due to the formation of sparks.
- Do not use aluminum trays in the appliance. Operating the appliance without food inside the cooking compartment leads to an overload.
- Never start the microwave oven without first placing the food in it. The only exception allowed is that of a short test for dishes.
USEFUL TIPS
Microwaves only penetrate food to a certain depth, so when cooking several items at the same time space them out as much as possible to allow the maximum surface area to be exposed to the microwaves.
Small pieces cook more quickly than large pieces: in order to ensure uniform cooking, cut the food items into pieces of equal size.
Most foods will continue to cook after microwave has finished cooking it. Therefore, always allow for standing time to complete the cooking.
Remove any twist ties from paper or plastic bags before placing them in the oven for microwave cooking.
Plastic film should be scored or perforated with a fork in order to relieve the pressure and prevent bursting due to the steam building up during the cooking process.
LIQUIDS
Liquids may overheat beyond boiling point without visibly bubbling. This could cause hot liquids to suddenly boil over. To prevent this, avoid using narrow-necked containers, stir the liquid before placing the container in the microwave oven and leave a teaspoon immersed in the container. After heating, stir again before carefully removing the container from the microwave oven.
FROZEN FOOD
For best results, we recommend defrosting directly on the wire shelf. If needed, it is possible to use a light-plastic container that is suitable for microwave.
Boiled foods, stews and meat-based sauces will defrost better if stirred occasionally while defrosting. Separate the food items once they begin to defrost: the separated portions will defrost more quickly.
FOOD FOR INFANTS
When heating food or liquids in a baby food container or a baby bottle, always stir and check the temperature before serving. This will ensure that the heat is evenly distributed and avoid the risk of scalding or burns.
Ensure that the container lid or bottle teat are removed before heating.
CAKES AND BREAD
For cakes and bread products we recommend using the "Forced Air" function, while for cakes containing liquid we recommend the "Convect bake" function.
Alternatively, to shorten the cooking times, select "Forced Air + microwave", with the microwave set to a maximum power of 160 W in order to keep the products soft and fragrant.
With the "Forced Air" and "Convect Bake" functions use dark metal cake tins and place them on the wire shelf supplied.
MEAT AND FISH
To obtain perfect surface browning quickly while keeping the inside of the meat or fish soft and juicy, we recommend using functions combining convection heating and microwave cooking.
In order to obtain the best possible cooking results, set the microwave power level to the value of 160 W.
CLEANING AND MAINTENANCE
Make sure that the oven has cooled down before carrying out any maintenance or cleaning.
Do not use steam cleaners.
Wear protective gloves.
Do not use wire wool, abrasive scourers or abrasive/corrosive cleaning agents, as these could damage the surfaces of the appliance.
The oven must be disconnected from the mains before carrying out any kind of maintenance work.
EXTERIOR SURFACES
- Clean the surfaces with a damp microfibre cloth. If they are very dirty, add a few drops of pH-neutral detergent. Finish off with a dry cloth.
- Do not use corrosive or abrasive detergents. If any of these products inadvertently comes into contact with the surfaces of the appliance, clean immediately with a damp microfibre cloth.
INTERIOR SURFACES
- After every use, leave the oven to cool and then clean it, preferably while it is still warm, to remove any deposits or stains caused by food residues. To dry any condensation that has formed as a result of cooking foods with a high water content, let the oven to cool completely and then wipe it with a cloth or sponge.
- Activate the "Hydro Self Clean" function for optimum cleaning of the internal surfaces.
- Clean the glass in the door with a suitable liquid detergent.
ACCESSORIES
Soak the accessories in a washing-up liquid solution after use, handling them with oven gloves if they are still hot. Food residues can be removed using a washing-up brush or a sponge.
TROUBLESHOOTING
Problem Possible cause Solution
| The display shows letter ‘F’ followed by a number or letter different from F4E1. | Oven failure. | Contact the Call Center and state the number following the letter ‘F’. |
| The oven is not switching on. | Power cut.Disconnection from the mains. | Check the presence of mains electrical power and whether the oven is connected to the electricity supply.Turn off the oven and restart it to see if the fault persists. |
| The display shows unclear text and appears to be broken. | Another language set. Contact the Call Center | |
| The oven makes noises, even when it is switched off. | Cooling fan active. | Open the door or hold or wait until the cooling process has finished. |
| The oven does not heat up. | When “DEMO” is “On” all commands are active and menus available but the oven doesn’t heat up.DEMO appears on display every 60 seconds. | Access “DEMO” from “SETTINGS” and select “Off”. |
Policies, standard documentation and additional product information can be found by:
- Visiting our website docs.bauknecht.eu
- Using QR Code
• Alternatively, contact our After-sales Service (See phone number in the warranty booklet). When contacting our After-sales Service, please state the codes provided on your product's identification plate.

MERCI D'AVOIR ACHETÉ UN PRODUIT BAUKNECHT
natural_image
Simple line drawing of a rectangular grid structure with no text or symbolsnatural_image
Simple line drawing of a square frame with no text or symbolsnatural_image
Illustration of a mechanical tool with a cylindrical handle and curved tip (no text or symbols)
DANK U WEL VOOR UW AANKOOP VAN EEN BAUKNECHT PRODUCT
PRODUCTBESCHRIJVING

3. NAVIGATIETOETS MIN
natural_image
Simple line drawing of a rectangular grid structure with no text or symbolsnatural_image
Simple 3D rendering of a square frame with dashed border (no text or symbols)natural_image
Illustration of a mechanical tool with a curved handle and pointed tip (no text or symbols)4. DE OVEN VERWARMEN
natural_image
Simple line drawing of a rectangular grid structure with vertical lines (no text or symbols)natural_image
Simple 3D rendering of a square frame with dashed border (no text or symbols)natural_image
Illustration of a mechanical tool with a curved handle and pointed tip (no text or symbols)
GRACIAS POR COMPRAR UN PRODUCTO BAUKNECHT
natural_image
Pure geometric diagram of a rectangular grid with diagonal lines, no text or symbols presentnatural_image
Simple line drawing of a square frame with dashed border (no text or symbols)natural_image
Illustration of a mechanical tool with a cylindrical handle and curved blade (no text or symbols)POPIS VÝROBKU
natural_image
Simple line drawing of a rectangular grid structure with no text or symbolsnatural_image
Simple line drawing of a square frame with dashed border (no text or symbols)natural_image
Illustration of a mechanical tool with a cylindrical handle and curved blade (no text or symbols)natural_image
Hand holding a mechanical component with a curved arrow indicating rotation (no text or symbols)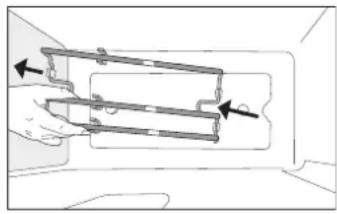
natural_image
Diagram of a mechanical assembly with two components and directional arrows indicating movement (no text or symbols)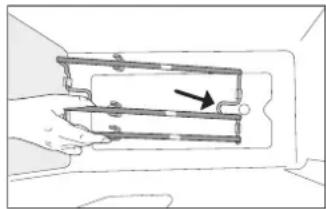
natural_image
Diagram of a mechanical assembly with a hand holding a component, showing internal components and an arrow indicating direction (no text or symbols present)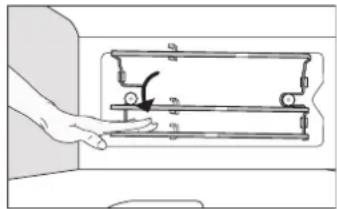
natural_image
Hand pressing a mechanical component with an arrow indicating motion (no text or symbols)3. NASTAVENÍ SPOTŘEBY ENERGIE
UDRŽOV. JÍDLA V TEPLE
chemical
Chemical structure diagram showing KILOGRAMY with two Mg and Li atoms, likely representing a kilogram or potassium ion compound
TAK FORDI DU HAR K∅BT ET BAUKNECHT PRODUKT
PRODUKTBESKRIVELSE

natural_image
Simple line drawing of a rectangular grid structure with no text or symbolsnatural_image
Simple 3D rendering of a square frame with dashed cutouts (no text or symbols)natural_image
Illustration of a mechanical tool with a curved handle and pointed tip (no text or symbols)INDSÆT RIST OG ANDET TILBEH∅R
TUOTEKUVAUS
8. VALINNAT / SUORA PÄÄSY TOIMINTOIHIN
natural_image
Simple line drawing of a rectangular grid with vertical lines, no text or symbols presentnatural_image
Simple line drawing of a square frame with dashed border (no text or symbols)DYNAMIC SULATUS & PEHMENNYS
PERINTEISET TOIMINNOT
NOPEA ESIKUUMEN.

TAKK FOR AT DU KJ∅PTE ET BAUKNECHT-PRODUKT
PRODUKTBESKRIVELSE

natural_image
Simple line drawing of a rectangular grid structure with no text or symbolsnatural_image
Simple line drawing of a square frame with dashed border (no text or symbols)natural_image
Illustration of a mechanical tool with a cylindrical handle and curved blade (no text or symbols)SLUTTID (UTSATT START)
chemical
Chemical structure diagram showing KILOGRAM with a small molecule and two labeled ligands (Kg and Li2)BESKRIVNING AV PRODUKTEN