
CookYoo 100 - Hand blender YOO DIGITAL - Free user manual and instructions
Find the device manual for free CookYoo 100 YOO DIGITAL in PDF.
| Product type | Immersion blender |
| Brand | YOO DIGITAL |
| Model | CookYoo 100 |
| Power supply | 220-240 V, 50/60 Hz, 800 W |
| Package contents | Multifunction motor, 3 attachments (blender, whisk, double whisk), large graduated blender bowl (800 ml), bowl for grating/slicing/chopping (1250 ml), mini chopper bowl (500 ml), "Baby Food" bowl (150 ml), 3 S-blades, storage stand, user manual, warranty card |
| Included accessories | Blender foot, whisk, double whisk, blender bowl 800 ml, chopper bowl 500 ml, grater/chopper bowl 1250 ml, baby food bowl 150 ml, S-blade (x3), gratin blade, rubber support, storage stand |
| Functions | Blend, chop, whisk, beat, grate, slice |
| Safety | Very sharp blades (handle with care); do not immerse the motor block; unplug before assembly/disassembly/cleaning; do not use unattended; do not blend foods without water; do not chop very hard foods (ice cubes, coffee, cereals) |
| Maintenance and cleaning | Motor block: damp cloth only. Accessories: dishwasher safe (remove blades after contact with salty foods, use vegetable oil if discoloration) |
| Maximum usage durations | Blender: 1 minute; Chopper: 10 seconds; Whisk: 2 minutes; Double whisk beater: 2 minutes |
| Bowl capacities | Graduated blender bowl: 800 ml; Mini chopper bowl: 500 ml (max 250 g meat); Grater/chopper bowl: 1250 ml; Baby food bowl: 150 ml |
| Blades provided | 3 S-blades (large, small, etc.), gratin blade, slicing/grating blade (integrated in the support disc) |
| Main material | Motor block: plastic; blades: stainless steel; bowls: transparent plastic (graduated) |
| Plug polarity | Polarized plug (one wider prong) |
| Intended use | Household only, family quantities |
| Repairability | Do not open or repair yourself; contact an authorized YOO DIGITAL retailer |
| Warranty | Included (warranty card in the package) |
Frequently Asked Questions - CookYoo 100 YOO DIGITAL
User questions about CookYoo 100 YOO DIGITAL
0 question about this device. Answer the ones you know or ask your own.
Ask a new question about this device
Download the instructions for your Hand blender in PDF format for free! Find your manual CookYoo 100 - YOO DIGITAL and take your electronic device back in hand. On this page are published all the documents necessary for the use of your device. CookYoo 100 by YOO DIGITAL.
USER MANUAL CookYoo 100 YOO DIGITAL
natural_image
Blurred image of indistinct objects including a hat, lamp, and glass (no visible text or symbols)
natural_image
Close-up of a white electric shaver with dual buttons labeled 'D' and 'TUF', no visible text or symbols beyond the labels.When using electrical appliances especially when children are present, basic safety precautions should always be followed, including the following :
Read all instructions before using.
- To protect against electrical shock, do not submerge the mixer or allow AC cord to come in contact with water or other liquids.
- Unplug from outlet when not in use, before putting on or taking off parts, and before cleaning.
- Do not operate any appliance with a damaged cord or plug, or after the appliance malfunctions, or has been dropped or damaged in any matter. Return appliance to the nearest authorized service facility for examination, repair or electrical or mechanical adjustment.
Do not use outdoors.
- Do not let cord hang over edge of table or counter or touch hot surfaces, including the stove. Always unplug the appliance before assembling, disassembling, cleaning.
Blades are sharp. Handle carefully.
- Before plugging into a socket, check whether your voltage corresponds to the rating label of the appliance.
- Don't plug the appliance into the power supply until it is fully assembled and always unplug before disassembling the appliance or handle the blade.
Don't allow children to use the blender without supervision.
- Don't let the motor unit, cord, or plug get wet.
- Don't place the appliance in the hot ingredients.
• The appliance is constructed to process normal household quantities.
- Short-time operating. Use the appliance for no longer than 1 minute, and don't operate hard food for no longer than 10 seconds.
- If you press switch I, you can run the inching switch to meet your request. But the switch II is immu- table.
• Always disconnect the blender from the supply if it is left unattended and before assembling, disassembling or cleaning.
• It shall warn of potential injury from misuse
- They shall state that care shall be take when handling the sharp cutting blades, emptying the bowl and during cleaning.
- Switch off the appliance and disconnected from supply before changing accessories or approaching parts which move in use.
- This appliance is not intended for use by children or other persons without assistance or supervision if their physical, sensory or mental capabilities prevent them form using it safely.
• Children should be supervised to ensure that they do not play with the appliance.
- This appliance has a polarized plug (one blade is wider than the other). To reduce the risk of electric shock, this plug will fit in a polarized outlet .reverse the plug. If it still does not fit. Contact a qualified electrician. Do not modify the plug in any way.
- Keep hands and utensils out of the container while blending / away from the cutting blade while chopping food to prevent the possibility of severe injury to persons or damage to the unit. A scraper may be used but must be used only when the unit is not running.
Your safety and the safety of others are very important.
We have provided many important safety messages in this manual and on your appliance. Always read and obey all safety messages.

This is the safety alert symbol. This symbol alerts you to potential hazards that can kill or hurt you and others. All safety messages will follow the safety alert symbol and either the word "DANGER" or "WARNING." These words mean:

DANGER
You can be killed or seriously injured if you don't immediately follow instructions.

WARNING
You can be killed or seriously injured if you don't follow instructions.
All safety messages will tell you what the potential hazard is, tell you how to reduce the chance of injury, and tell you what can happen if the instructions are not followed.
ELECTRICAL REQUIREMENTS
Volts:220/240 V.A.C. Hertz: 50/60 Hz
The wattage rating for your hand blender multifunction is printed on a tag under the mixer base. It is also listed on the trim band. If the power cord is too short, have a qualified electrician or serviceman install an outlet near the appliance. The maximum rating is based on the attachment that draws the greatest load (power). Other recommended attachments may drawsignifi cantly less power.

WARNING

Electrical Shock Hazard
Plug into a grounded 3 prong outlet.
Do not remove ground prong.
Do not use an adapter.
Do not use an extension cord.
Failure to follow these instructions can result in death, fire, or electrical shock.
DESCRIPTION
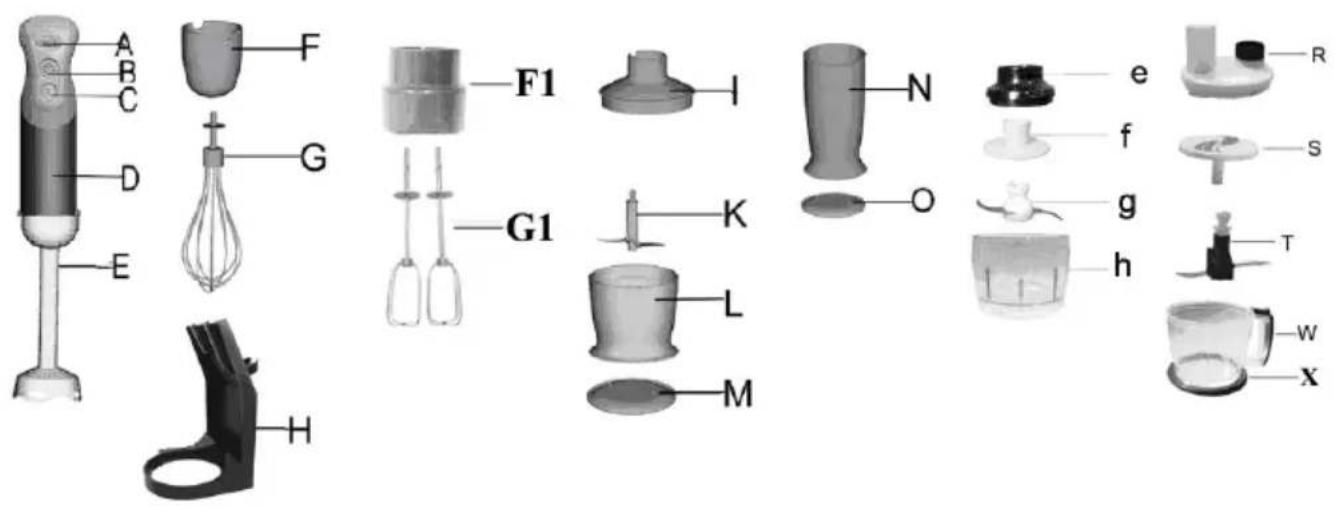
A. Inching switch
B. Switch ON
C. Switch TURBO
D. Motor unit
E. Blender stick
F. Whisk holder
G. Whisk
H. Accessory base
F1. Beater holder
G1.Double beaters
I. Chopping bowl
K. "S" blade a
L. 500ml chopping bowl lid
M. Cover a
N. 800 ml vessel
O. Cover b
e. Small cover
f. Break water
g. Small "S"blade
h. Small bowl (150ml)
R. Bowl cover
S. Gratin/silic Knife
T. "S" blade b
W. Gratin/silic bowl
X. Rubber pillow
Voltage/frequency : 220-240V - 50/60Hz (800W)
BEFORE FIRST USE
- All parts of the hand blender multifunction are to be thoroughly cleaned before being used for the first time. (see section: Cleaning).
- Take out the required length of cable from the cable tidy on the base of the blender and connect the device to the mains supply.
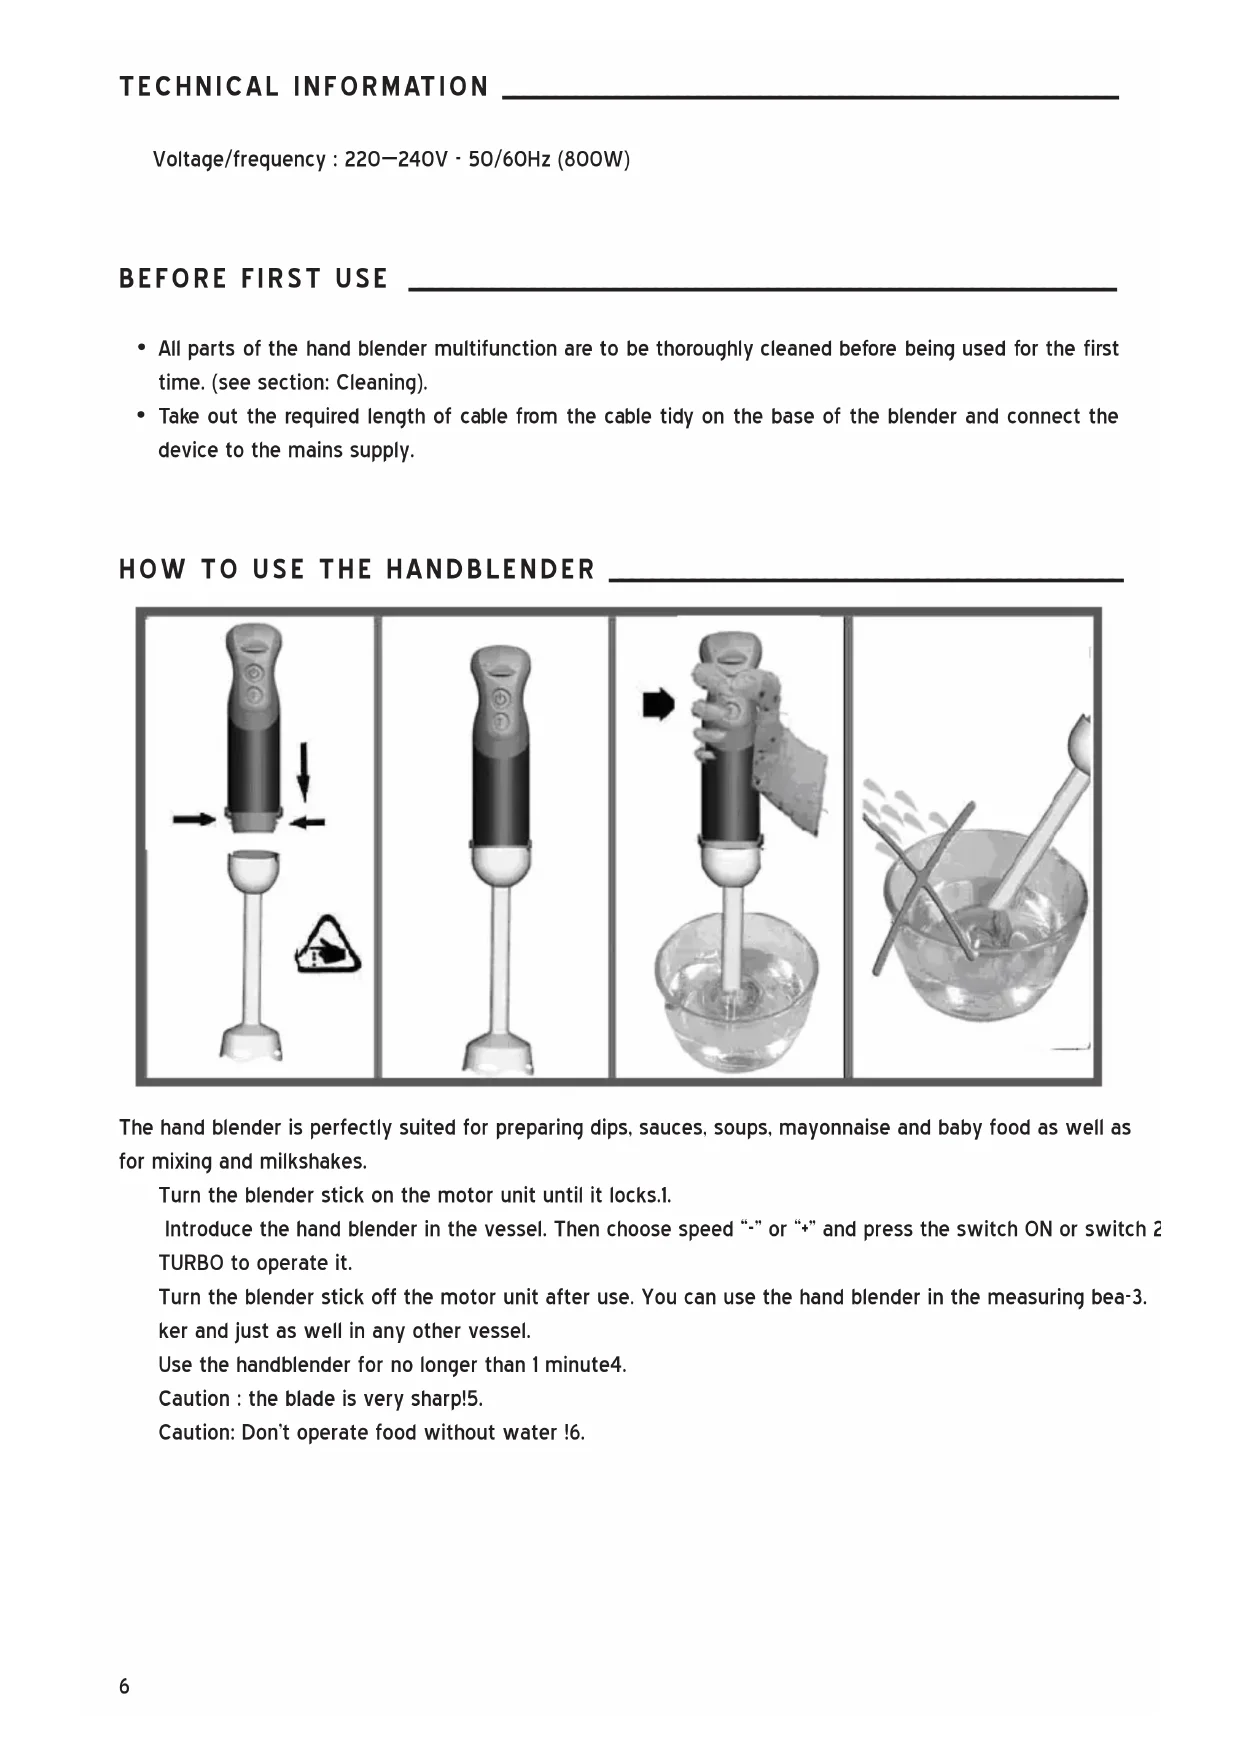
HOW TO USE THE HANDBLENDER
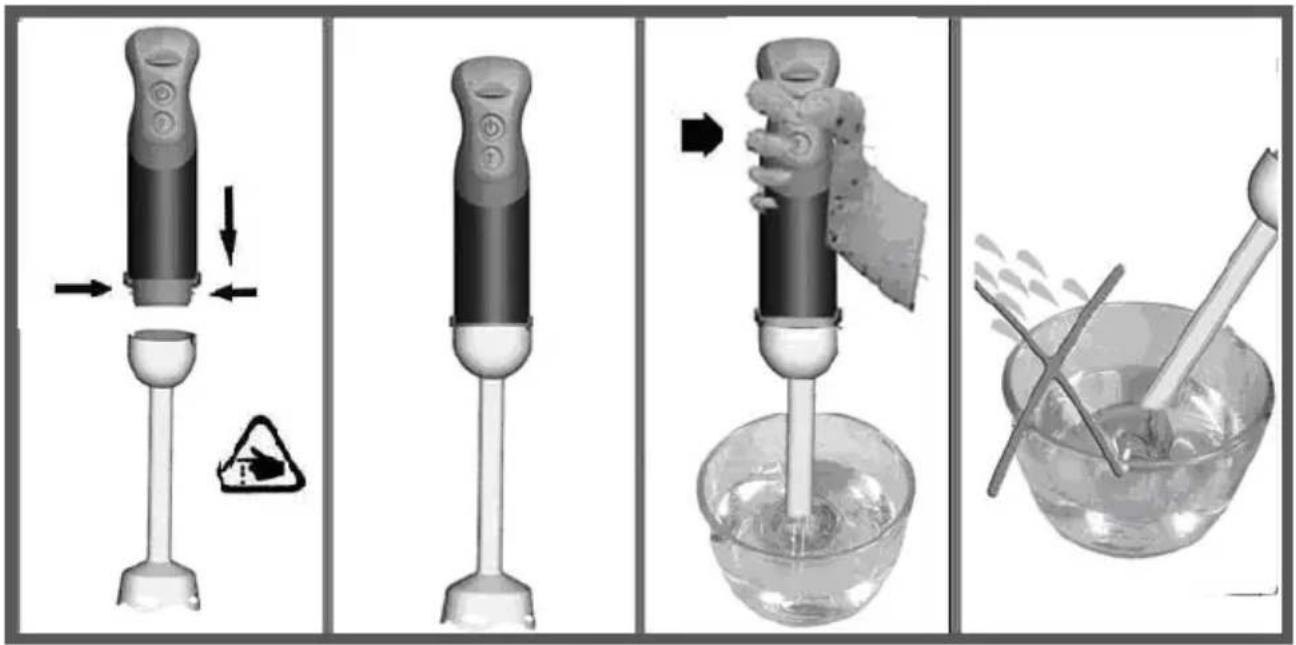
The hand blender is perfectly suited for preparing dips, sauces, soups, mayonnaise and baby food as well as for mixing and milkshakes.
Turn the blender stick on the motor unit until it locks.1.
Introduce the hand blender in the vessel. Then choose speed "-" or "+" and press the switch ON or switch 2 TURBO to operate it.
Turn the blender stick off the motor unit after use. You can use the hand blender in the measuring bea-3.
ker and just as well in any other vessel.
Use the handblender for no longer than 1 minute4.
Caution : the blade is very sharp!5.
Caution: Don't operate food without water!6.
flowchart
graph TD
    A["Initial Bottle"] --> B["Preparation"]
    B --> C["Add Plastic Box"]
    C --> D["Assembly"]
    D --> E["Final Product with Stabilization"]
    style A fill:#f9f,stroke:#333
    style E fill:#bbf,stroke:#333
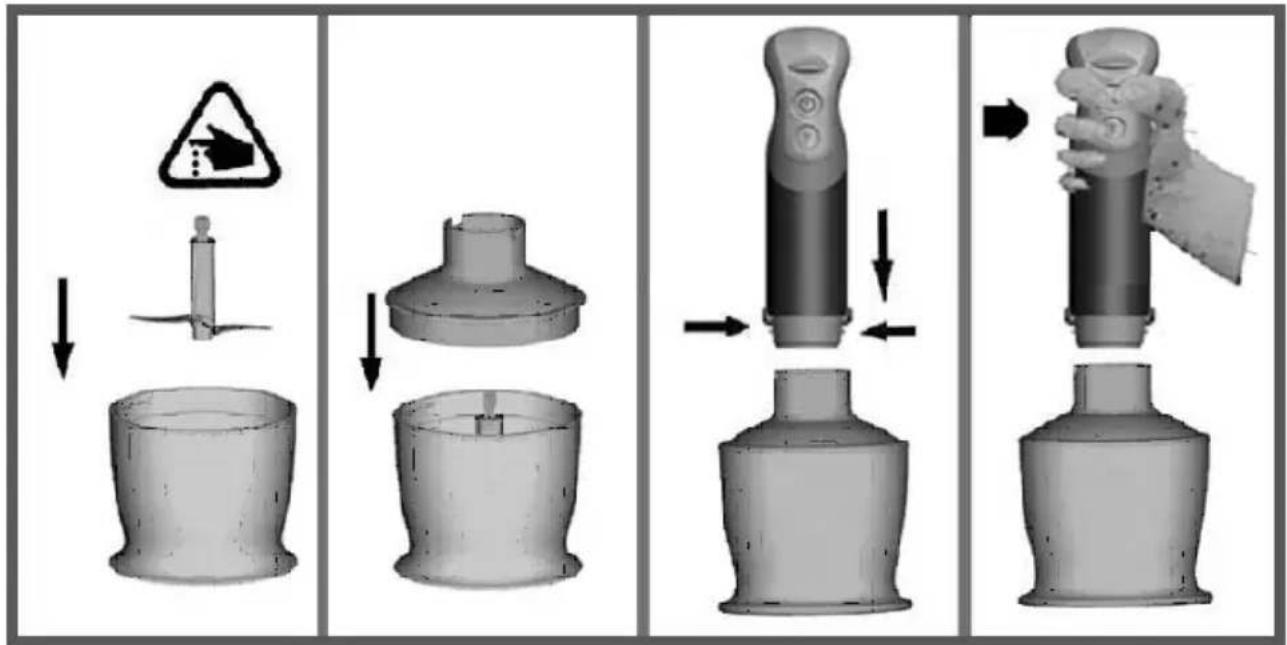
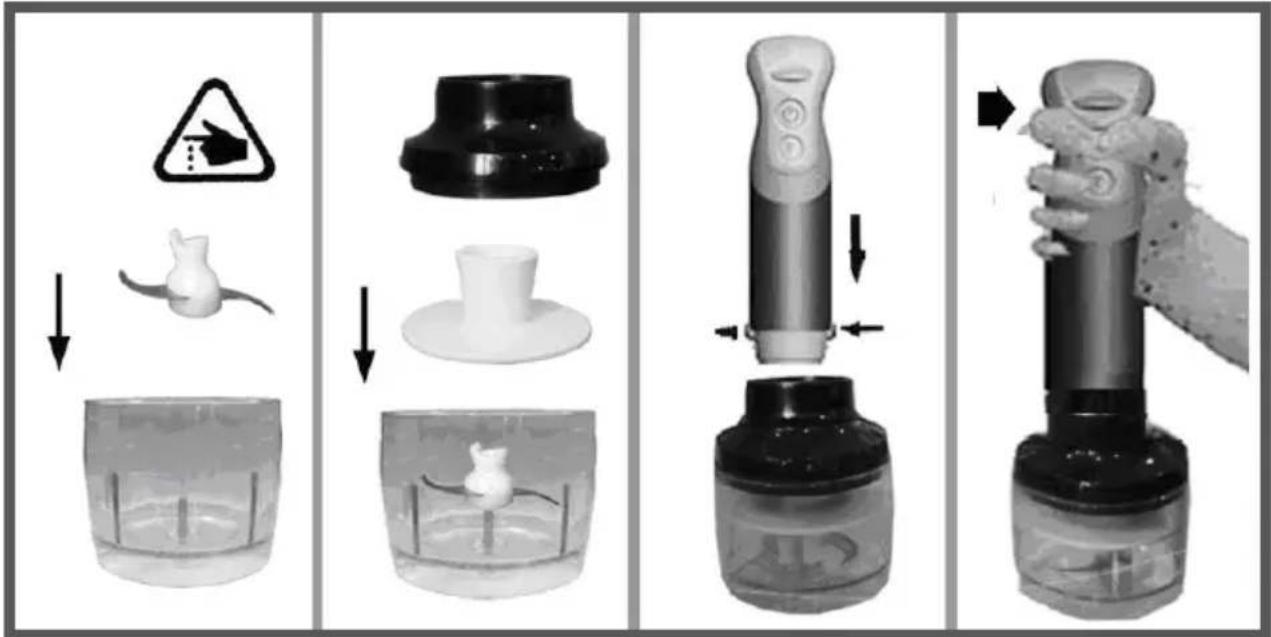
Chopper is perfectly suited for hard food, such as chopping meat, cheese, onion, herbs, garlic, carrots, 1. walnuts, almonds, prunes etc.
Don't chop extremely hard food, such as ice cubes, nutmeg, coffee beans and grains.2.
Before chopping...
Carefully remove the plastic cover from the blade. Caution: the blade is very sharp! Always hold it by the 1. upper plastic part.
Place the blade on the center pin of the chopper bowl. Press down the blade and lock bowl. Always place the chopper bowl on the anti-slip base.
Place the food in the chopper bowl. 3.
Place the chopping bowl lid on the chopper bowl.4.
Turn the motor unit on the chopping bowl lid until it locks.5.
Choose speed "-" or "+" and press switch ON or switch TURBO to operate the chopper. During processing, it holds the motor unit with on hand and the chopper bowl the other.
After use, turn the motor unit off the chopping bowl lid.7.
Then remove the chopping bowl lid. Carefully take out the blade.8.
Carefully take out the blade.9.
Remove the processed food from the chopper bowl.10.
Don't operate hard food for no longer than 10 seconds.11.

WARNING

Keep hands and utensils out of the container while blending / away from the cutting blade while chopping food to prevent the possibility of severe injury to persons or damage to the unit.
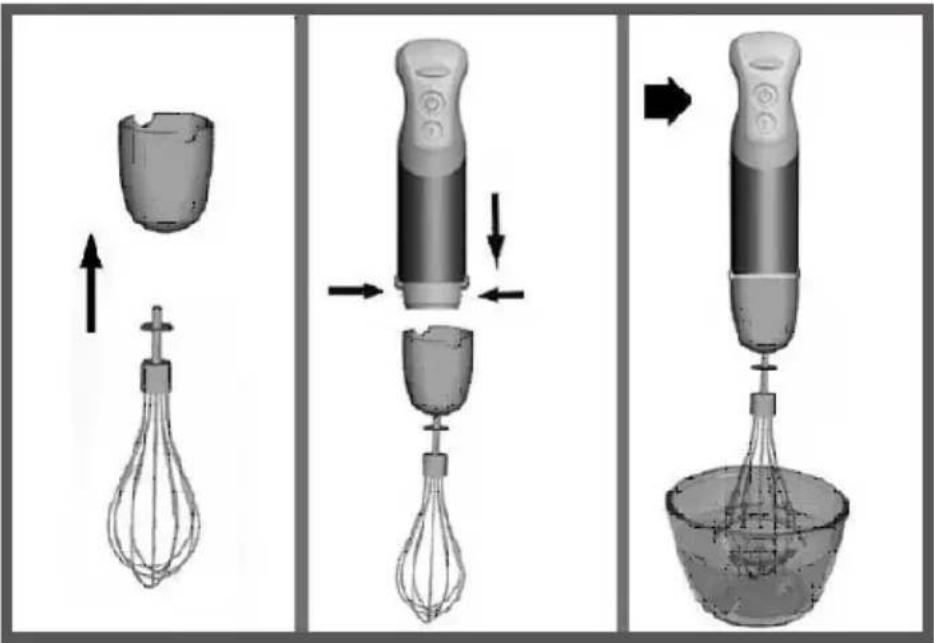
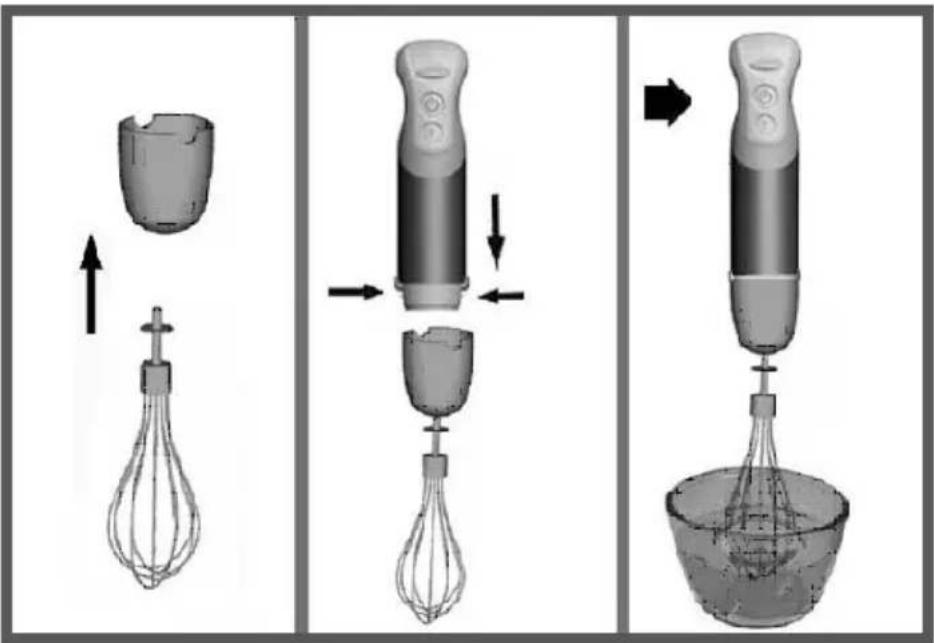
Use the whisk only for whipping cream, beating egg whites and mixing sponges and Ready-mix desserts.
Inset the whisk into the whisk holder, and then turn the gear box on the motor unit until it locks.1.
Place the whisk in a vessel and only then. Choose speed "-" or "+" and press the switch ON or switch 2.
TURBO to operate it.
Use the whisk for no longer than 2 minute.3.
Turn the gear box off the motor unit after use. Then pull the whisk out of the gear box. 4.

WARNING
Injury Hazard
Unplug mixer before touching beaters.
Failure to do so can result in broken bones, cuts or bruises.
NOTE :
The hand blender multifunction may warm up during use. Under heavy load with extended mixing time, you may not be able to comfortably touch the top of the hand blender multifunction. This is normal.
natural_image
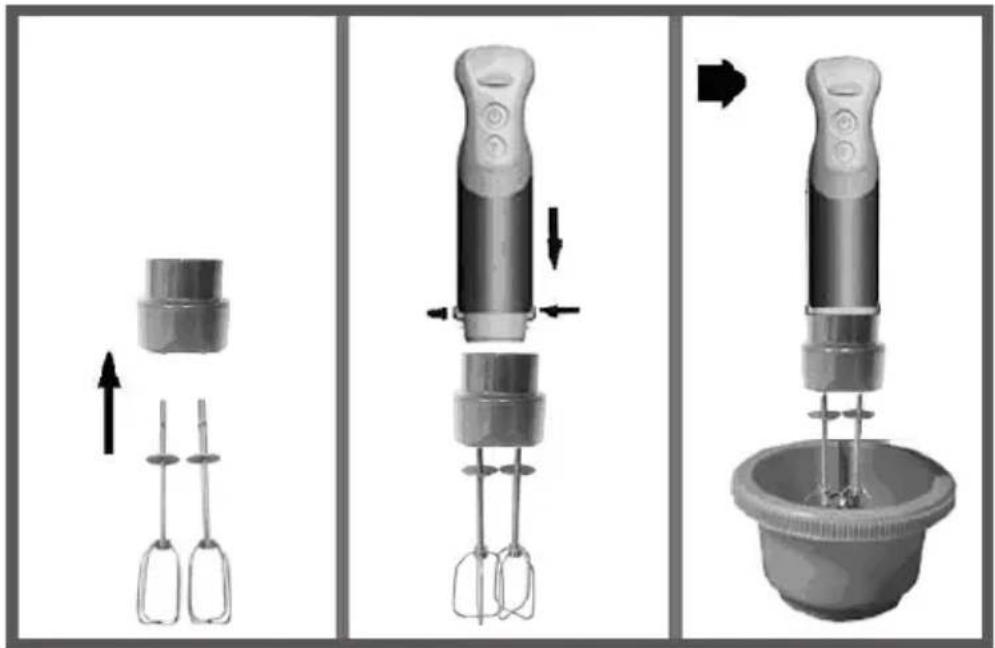
Three-step illustration of a hand mixer, motor, and bowl with directional arrows indicating motion (no text or symbols)Use the double beater accessories you can easily make the preparation such as cake dough, omelet, crepe dough and mayonnaise.
Mount the beater accessories firstly by pushing until it fits well in its place in order to use the beater 1. accessories.
Turn the beater adapter to the motor block to mount without tightening too much.2.
Place the double beaters in a vessel and only then choose speed "-" or "+" and press the switch ON or 3. switch TURBO to operate it.
Use the double beater accessories for no longer than 2 minute.4.
Turn the gear box off the motor unit after use. Then pull the double beaters out of the gear box. 5.
HOW TO USE THE SLICING/GRATING
flowchart
graph TD
    A["Preparation with lid and plastic bag"] --> B["Add liquid into cup"]
    B --> C["Add a side panel with lid and plastic bag"]
    C --> D["Add liquid into cup with lid and plastic bag"]
    D --> E["Add a side panel with lid and plastic bag"]
    E --> F["Product with lid and plastic bag"]
    F --> G["Product with plastic bag and plastic bag"]
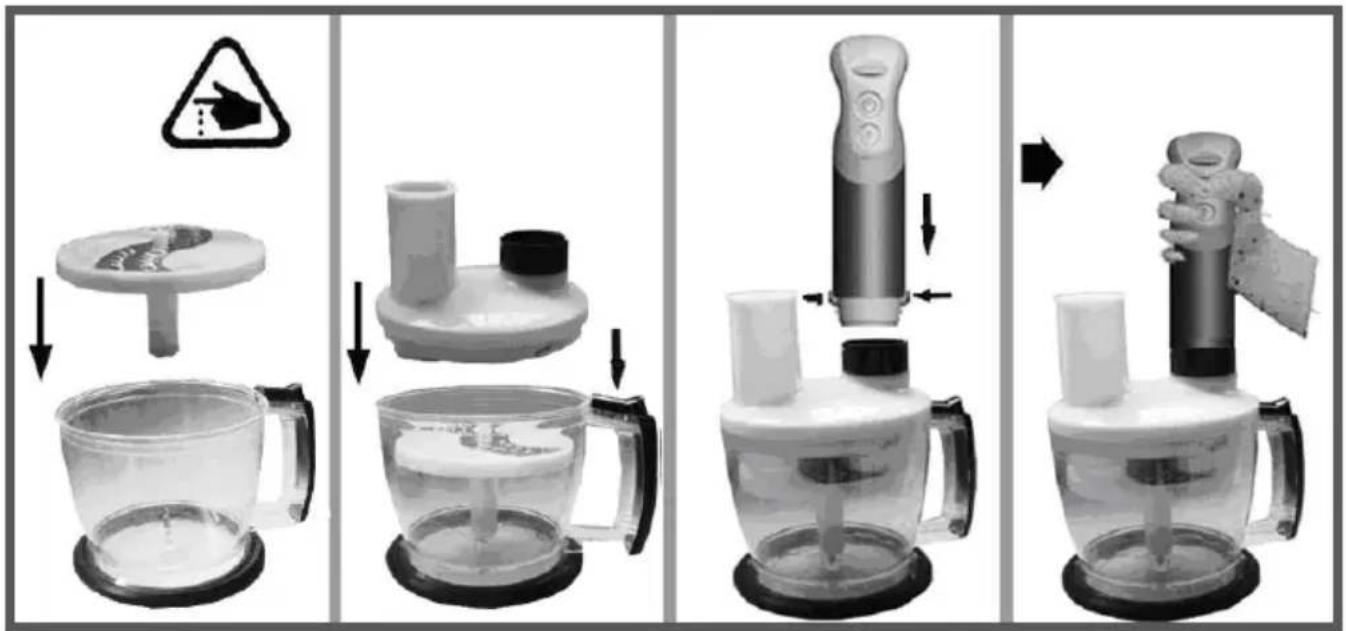
For preparing a maximum of 500g of foodstuffs at once (no meat) Blade Slicing : potatoes for gratins dauphinois, carrots, cucumbers, etc
Blade Grating : grated carrots, celery.
Silde the blade "S" into the blade -holder disc. place the spindle drive onto the spindle in the middle of the 1 bowl, then the blade -holder disc onto the spindle drive, and then the blender lid adaptor on the lid. Position and lock the lid.2.
Put the motor unit in place on the adaptor then start the appliance.3.
- Put the foodstuffs into the feeder tube and guide them using the pudher, never your fingers, or a utensil.
HOW TO USE THE "S"BLADE
flowchart
graph TD
    A["Add food into bowl"] --> B["Preparation with plastic bag"]
    B --> C["Ordering setup with lid and lid cap"]
    C --> D["Assembly of kitchen bowl with lid"]
    D --> E["Product packaging with container and door handle"]
    E --> F["Final packaging with bag and hand icon"]
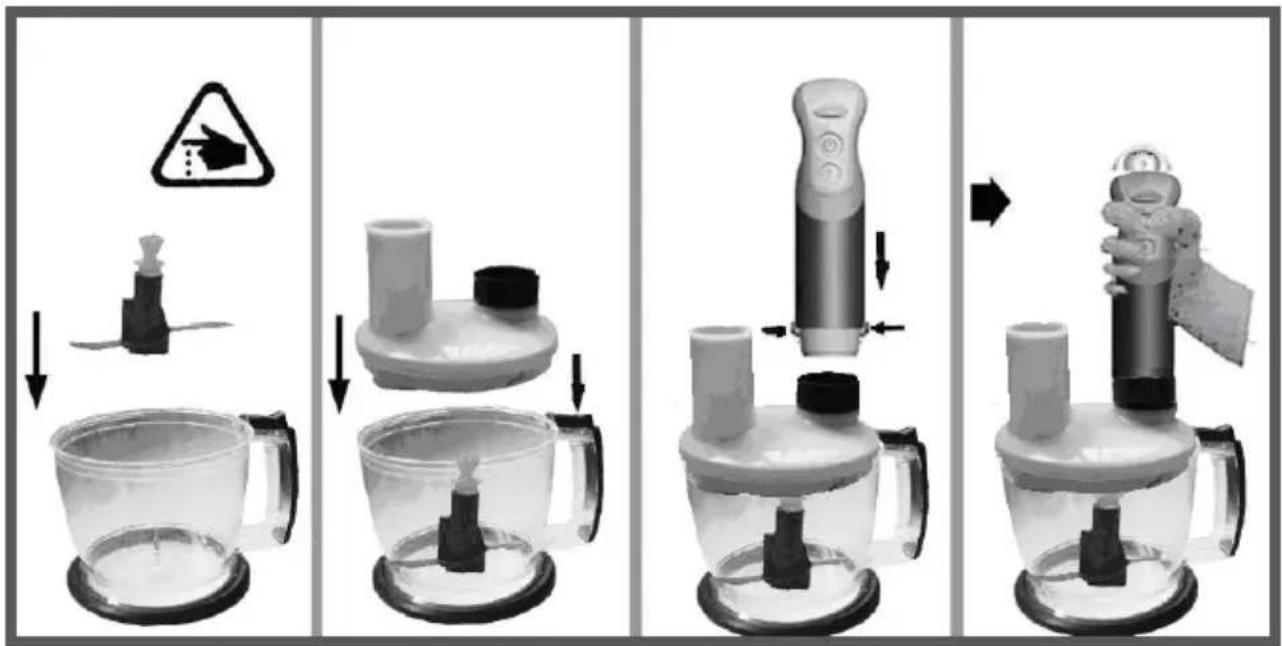
Chopper is perfectly suited for hard food, such as chopping meat, cheese, onion, herbs, garlic, carrots, 1. walnuts, almonds, prunes etc.
Don't chop extremely hard food, such as ice cubes, nutmeg, coffee beans and grains.2.
Before chopping...
Carefully place the blade onto the central spindle in the bowl, holding it by the plastic part. Caution: the 1. blade is very sharp! Always hold it by the upper plastic part.
Put the foodstuffs into the bowl .never fill the bowl above the maximum limit indicated.2.
Place the blade on the center pin of the chopper bowl. Press down the blade and lock bowl. Always place the chopper bowl on the anti-slip base. Operation of the direction, please see the figure as show.
Place the food in the chopper bowl. 4.
Place the chopping bowl lid on the chopper bowl.5.
Turn the motor unit on the chopping bowl lid until it locks.6.
Choose switch ON to operate the chopper. During processing, hold the motor unit with on hand and the 7. chopper bowl the other.
After use, turn the motor unit off the chopping bowl lid.8.
9.Then remove the chopping bowl lid. carefully take out the blade.
- Don't operate hard food for no longer than 10 seconds.
flowchart
graph TD
    A["Initial setup: mouse model"] --> B["Preparation with warning symbol"]
    B --> C["Assembly of plastic cup"]
    C --> D["Assembly of plastic cup with mouse model"]
    D --> E["Assembly of plastic cup with mouse model"]
    E --> F["Final packaging with hand holding mouse model"]
Chopper is perfectly suited for hard food, such as chopping meat, cheese, onion, herbs, garlic, carrots, 1. walnuts, almonds, prunes etc.
Don't chop extremely hard food, such as ice cubes, nutmeg, coffee beans and grains.2.
Before chopping...
Carefully place the blade onto the central spindle in the bowl, holding it by the plastic part. Caution: the 1. blade is very sharp! Always hold it by the upper plastic part.
Put the foodstuffs into the bowl. never fill the bowl above the maximum limit indicated.2.
Place the inner lid into the bowl and then put the lid in place, making sure that the lid drive system is 3. properly positioned on the blade, put the motor unit in place on the lid.
To dismantle the appliance after use, remove the motor unit from the lid, lift off the lid and the inner lid, 4. then carefully remove the food before lifting off the blade, holding it at the top...
Choose switch ON to operate the chopper. During processing, hold the motor unit with on hand and the 5. chopper bowl the other.
After use, turn the motor unit off the chopping bowl lid.6.
Don't operate hard food for no longer than 10 seconds.7.

WARNING

Keep hands and utensils out of the container while blending / away from the cutting blade while chopping food to prevent the possibility of severe injury to persons or damage to the unit.
Cleaning the motor unit and chopping bowl lid only with a damp cloth only. Do not immerse the motor unit in water!
natural_image
Illustration of a hammer striking a surface with a tool, no text or symbols presentAll other parts can be cleaned in the dish washer. However, after processing 1. very salty food, you should rise the blades right away.
Also, be careful not to use an overdose of cleaner or decalcifier in your 2. dishwasher.
When processing food with color, the plastic parts of the appliance may 3. become discolored Wipe these parts with vegetable oil before placing them in the dishwasher.
The blades are very sharp, please attention. 4.
Unplug the appliance before cleaning.5.
PROCESSING GUIDE (FOR CHOPPING BOWL)
| Food Maximum | Operation time | |
| 500ml chopper bowl | ||
| Meat 250g 8sec | ||
| Herbs 50g 8sec | ||
| Nut | 100g 8sec | |
| Cheese 100g 5sec | ||
| Bread 80g | 5sec | |
| Onions | 150g | 8sec |
| Biscuits | 150g | 6sec |
| Soft fruit | 200g | 6sec |
| Flour | / | / |
| Barm | / | / |
| Water | / | / |
| Sugar / | / | |
| Salt | / | / |
| Food Maximum | Operation time | Preparation | |
| Gratin/silic bowl | |||
| Meat 200g | 15sec | 1~2cm | |
| Herbs 50g 8sec | |||
| Nuts, almonds | 150g | 15sec | |
| Bread 75g | 8sec | 2cm | |
| Onion 150g | 8sec | 1/2 demi | |
| Biscuits 150g 8sec 1cm | |||
| Soft fruit 200g 10sec | 1~2cm | ||
| Egg frost 4 eggs 15sec | |||
| 150ml bowl | |||
| Parsley 10g 60sec 1cm | |||
| Garlic 40g 60sec 1cm | |||
| Onion 40g 60sec 1cm | |||
| Pork 80g 60sec 1cm | |||
PACKING LIST
Multifunction motor •
• 3 feet : blender, beat, beat double
• Large mixing bowl graduated (800ml)
• Grate, slice, chopper bowl (1250ml)
- Mini chopper bowl (500ml)
- «Baby Food» bowl
- 3 blade S
- Storage Rack
- User's manual
- Warranty card
HAND BLENDER MULTIFUNCTIONWHEN YOU NEED SERVICE

WARNING

Electrical Shock Hazard
Unplug before servicing.
Failure to do so can result in death or electrical shock.
Please read the following before calling your service center.
- The hand blender multifunction may warm up during use. Under heavy loads with extended mixing time periods, you may not be able to comfortably touch the top of the unit. This is normal.
- The hand blender multifunction may emit a pungent odor, especially when new. This is common white electric motors.
If your Stand Mixer should malfunction or fail to operate, please check the following :
- Is the hand blender multifunction plugged in?
-
Is the fuse in the circuit to the hand blender multifunction in working order? If you have a circuit breaker box, be sure the circuit is closed.
-
Turn the hand blender multifunction off for 10-15 seconds, then turn it back on. If the mixer still does not star, allow it to cool for 30 minutes before turning it back on.
- If the problem is not due to one of the reasons above, please contact the dealer or distribiteur YOO Digital™ HOME.
flowchart
graph TD
    A["Initial Bottle"] --> B["Preparation"]
    B --> C["Assembly of Plastic Bottle"]
    C --> D["Product with Component 1"]
    D --> E["Assembly of Plastic Bottle"]
    E --> F["Final Product with Stabilized Material"]
FRANCIALS
natural_image
Three-step illustration of a hand mixer, motor, and bowl with directional arrows indicating motion (no text or symbols)flowchart
graph TD
    A["Add food blender into container"] --> B["Add container with lid"]
    B --> C["Add side panel with lid and handle"]
    C --> D["Add side panel with lid and handle and handle"]
    D --> E["Add side panel with lid and handle and handle"]
    E --> F["Add side panel with lid and handle and handle"]
    F --> G["Product with lid and handle"]
flowchart
graph TD
    A["Feeding Device"] --> B["Preparation"]
    B --> C["Add Food to Dish with Warning Symbol"]
    C --> D["Assembly of Dish with Cover"]
    D --> E["Product Packaging"]
    E --> F["Ordering to Dish with Bag and Shoulder"]
    F --> G["Product Packaging with Bag and Shoulder"]
flowchart
graph TD
    A["Warning"] --> B["Product with mouse"]
    B --> C["Product with hat and mouse"]
    C --> D["Product with brush and tool"]
    D --> E["Final packaging with hand holding a mouse"]
FRANCIALS
natural_image
Illustration of a hammer striking a surface with sparks, no text or symbols presentflowchart
graph TD
    A["Initial Bottle"] --> B["Preparation"]
    B --> C["Add Plastic Box"]
    C --> D["Adjustment to Plastic Box"]
    D --> E["Product with Stamped Part"]
    E --> F["Final Product with Stamped Part"]
DEUTSCH
natural_image
Three-step illustration of a hand mixer, motor, and cup holder (no text or symbols)DEUTSCH
flowchart
graph TD
    A["Add food blender into bowl"] --> B["Add container with lid"]
    B --> C["Add side panel with lid and handle"]
    C --> D["Add side plate with lid and handle"]
    D --> E["Add side tray with lid and handle"]
    E --> F["Add side tray with lid and handle"]
    F --> G["Product with plastic bag and brush"]
flowchart
graph TD
    A["Feeding Device"] --> B["Preparation"]
    B --> C["Add Food to Dish"]
    C --> D["Assembly of Dish"]
    D --> E["Product Packaging"]
    E --> F["Ordering to Dish with Paper"]
    F --> G["Final Packaging"]
flowchart
graph TD
    A["Warning"] --> B["Shrinker"]
    B --> C["Add 3D printing into container"]
    C --> D["Assembly"]
    D --> E["Product with 3D printing"]
    E --> F["Final packaging with mouse and hand gesture"]
DEUTSCH
natural_image
Diagram of a hammer striking a surface with a tool, showing mechanical components and motion lines (no text or labels)A. Tipschakelaar
B. Schakelaar ON
C. Schakelaar TURBO
D. Motoreenheid
E. Staafmixer
F. Gardehouder
G. Garde
H. Opzetstuk
F1. Klopperhouder
G1.Dubbele kloppers
I. Hakmes kom
K. "S" blad a
L. Deksel hakmes kom 500 ml
M. Dekplaatje a
N. Beker 800 ml
O. Dekplaatje b
e. Dekplaatje
f. Waterstop
- Klein "S" blad
h. Kleine kom (150 ml)
R. Deksel kom
flowchart
graph TD
    A["Initial Bottle"] --> B["Preparation"]
    B --> C["Add Plastic Box"]
    C --> D["Adjustment to Plastic Box"]
    D --> E["Product with Stabilizer"]
    E --> F["Final Product with Stabilizer"]
Keep hands and utensils out of the container while blending / away from the cutting blade while chopping food to prevent the possibility of severe injury to persons or damage to the unit.
natural_image
Three-step illustration of a hand mixer, motor, and cup holder (no text or symbols)flowchart
graph TD
    A["Add food blender into bowl"] --> B["Add container with lid"]
    B --> C["Add side panel with lid and handle"]
    C --> D["Add side plate with lid and handle"]
    D --> E["Add side tray with lid and handle"]
    E --> F["Add side tray with lid and handle"]
    F --> G["Product with lid and handle"]
flowchart
graph TD
    A["Add food into bowl"] --> B["Preparation with plastic bag"]
    B --> C["Add product with lid and stand"]
    C --> D["Product with lid and stand"]
    D --> E["Product with lid and stand"]
    E --> F["Product with lid and stand"]
flowchart
graph TD
    A["Preparation"] --> B["Add a mouse-shaped component"]
    B --> C["Close-up of container with plastic bag"]
    C --> D["Close-up of plastic cup with lid"]
    D --> E["Close-up of plastic brush holder with handle"]
    E --> F["Final packaging with hand holding mouse-shaped object"]
Keep hands and utensils out of the container while blending / away from the cutting blade while chopping food to prevent the possibility of severe injury to persons or damage to the unit.
natural_image
3D rendered illustration of a hammer and sickle with a handle, showing mechanical components (no text or symbols)natural_image
Symbol of a trash bin crossed out by two crossed lines, no text or labels presentRecyclage


- Your safety and the safety of others are very important.
- DANGER
- WARNING
- ELECTRICAL REQUIREMENTS
- DESCRIPTION
- BEFORE FIRST USE
- HOW TO USE THE HANDBLENDER
- Before chopping...
- Injury Hazard
- NOTE :
- HOW TO USE THE SLICING/GRATING
- HOW TO USE THE "S"BLADE
- PROCESSING GUIDE (FOR CHOPPING BOWL)
- PACKING LIST
- HAND BLENDER MULTIFUNCTIONWHEN YOU NEED SERVICE
- Please read the following before calling your service center.
- If your Stand Mixer should malfunction or fail to operate, please check the following :
- Recyclage
Brand : YOO DIGITAL
Model : CookYoo 100
Category : Hand blender