— Radio — Mode d'emploi PDF")
LIFE E66314 (MD 84954) - Radio MEDION - Free user manual and instructions
Find the device manual for free LIFE E66314 (MD 84954) MEDION in PDF.
User questions about LIFE E66314 (MD 84954) MEDION
0 question about this device. Answer the ones you know or ask your own.
Ask a new question about this device
Download the instructions for your Radio in PDF format for free! Find your manual LIFE E66314 (MD 84954) - MEDION and take your electronic device back in hand. On this page are published all the documents necessary for the use of your device. LIFE E66314 (MD 84954) by MEDION.
USER MANUAL LIFE E66314 (MD 84954) MEDION
- Lichtnetadapter (DongGuan Yingna Electronic Technology Co., Ltd, model: YN12W-0750120VZ)
Lichtnetadapter DongGuan Yingna Electronic Technology Co.,
Ltd, model: YN12W-0750120VZ
Ingang 100-240 V~ / 50/60 Hz, 0,3 A
Uitgang
DC


- Lysnetadapter (DongGuan Yingna Electronic Technology Co., Ltd, model: YN12W-0750120VZ)
-FM-antenne
-Holder
-Monteringsmaterialie
-Brugsanvisning inkl. garantibevis
Lysnetadapter DongGuan Yingna Electronic Technology Co.,
Ltd, model: YN12W-0750120VZ
Input 100 - 240V 50 / 60Hz,0,3A
Output DC 7,5 V
Beskyttesesklasse, beskyttesesklasse
1,2A

Radio
-
Package contents
-
About these operating instructions 103
2.1. Warning symbols and keywords used in these instructions 103
-
Proper use
-
Safety information
4.1. Mounting the device safely 105
4.2. Power supply 106
4.3. Handling batteries 107
4.4. Mains adapter 108
4.5. Malfunctions 108
4.6. Repairs 108
EN
..107
- Overview of the device 109
5.1. Controls 109
5.2. Side view 110
5.3. Remote control 111
- Unpacking and mounting/setting up the device 112
6.1. Mounting the radio 112
6.2. Free-standing set-up 113
- Inserting the battery in the remote control 113
- Connecting the device 113
-
Switching the device on/off 114
-
Adjusting the aerial 114
- Setting the volume 114
- Settings 114
12.1. Setting the timer 114
12.2. Setting date/time.. 115
12.3. Selecting the sound mode 115
12.4. Selecting display brightness 116
12.5. Selecting the display language 116
12.6. Resetting the device to factory settings 116
12.7. Software version 116
12.8. Setting audio mode 116
12.9. Setting the alarm 116
12.10. Setting the sleep timer 117
- Radio operation 118
13.1. DAB mode 118
13.2. FM mode 119
- Audio playback in AUX mode 120
- Cleaning 120
- Troubleshooting 120
- Disposal 121
- Technical data 122
19.Declaration of conformity 122 - Legal notice 123
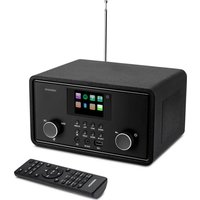
1. Package contents
Please check your purchase to ensure all items are included and contact us within 14 days of purchase if the delivery is incomplete.
The product you have purchased includes:
-Under-cabinet radio
-Remote control including battery (3V CR2025 button cell)
- Mains adapter (DongGuan Yingna Electronic Technology Co., Ltd, model: YN12W-0750120VZ for EU; YN12W-0750120BZ for UK)
-FM wire aerial
-Mounting bracket
-Fixing material
-Operating instructions, including warranty card
2. About these operating instructions

Ensure that you read these operating instructions carefully and follow all instructions given. The instructions will help you to operate the device reliably and help increase its service life. Always store these operating instructions near the device. Keep these operating instructions so that you can pass them on with the device if you sell it.
2.1. Warning symbols and keywords used in these instructions

DANGER!
Warning of immediate mortal danger!
WARNING!
Warning of possible risk of fatal injury and/or serious irreversible injuries!

WARNING!
Warning: risk of electric shock!

CAUTION!
Please follow the instructions to prevent injuries and property damage!
ATTENTION!
Please follow the instructions to avoid property damage!

NOTICE!
Additional information on using the device!

NOTICE!
Please follow the guidelines in the operating instructions!
Bullet points
Instructions to be carried out
3. Proper use
The device is used to play radio programmes and display the time; it also has a sleep timer, timer and alarm function. Never use the device for any other purpose.
The device is intended for private use only and not for industrial/ commercial use.
Please note that we shall not be liable in cases of improper use:
- Do not modify the device without our consent and do not use any auxiliary equipment which we have not approved or supplied.
- Use only spare parts and accessories that we have supplied or approved.
- Heed all the information in these operating instructions, especially the safety information. Any other use is deemed improper and can cause personal injury or damage to the device.
- Do not use the device in areas where there is a risk of explosion. These areas include e.g. tank systems, fuel storage depots, or areas in which solvents are being used. It is also not permitted to use this device in areas where the air is contaminated with fine particles (e.g. flour dust or sawdust).
- Do not expose the device to extreme conditions; it is intended for indoor use only.
The following should be avoided:
- High humidity or moisture
-Extremely high or low temperatures
-Direct sunlight
-Naked flames
4. Safety information

DANGER
There is a risk of suffocation from plastic packaging!
- You should therefore keep plastic packaging out of the reach of children.

WARNING
Risk of injury due to improper handling
- This product is not intended for use by people (including children) with reduced physical, sensory or mental abilities or by people who lack the experience or knowledge to use it, unless they are supervised by a person responsible for their safety or have been instructed on its use.
- Do not let children play with electrical devices without supervision. Children are not always aware of potential hazards.
4.1. Mounting the device safely

ATTENTION
Risk of injury due to improper handling
- If the product has been moved from a cold room to a warm room, wait before connecting it to the power supply. The resulting condensation may damage the device. The device can be operated safely as soon as it has reached room temperature.
- Only use the device in dry rooms.
- The device should be mounted under a horizontal mounting
surface.
- Never mount the device over a cooker or other heat or steam source (such as a kettle, etc.).
- Never allow the mains cable to hang over a cooker or other heat source.
-
When mounting the device, make sure that
-
there is adequate ventilation space around the device and the ventilation slots are never covered;
- the device is not exposed to direct sources of heat (e.g. heaters);
--the device is not placed in direct sunlight; -
contact with moisture, water or splashes is avoided, and that no objects filled with liquids (for example, vases) are placed on the device;
--the device is not exposed to dripping or sprayed water; -
the device is not placed close to magnetic fields (for example, television sets or other speakers);
-naked flames, such as lit candles, are not placed near the device;
-the mains cable is not taut or bent.
4.2. Power supply

DANGER
Risk of injury from electric shock!
- Only connect the mains adapter to a properly installed safety socket (230 V ~ 50 Hz) that is easy to reach and close to the place where you have set up the device. Always keep the socket free of obstructions so that the mains adapter can be pulled out easily.
- Before cleaning, always pull the mains adapter from the socket.
-
When disconnecting the device from the mains supply, always pull on the mains adapter rather than on the cable.
-
If the mains adapter, power cable or the device is damaged or if liquids or foreign bodies enter the device, remove the mains adapter immediately from the socket.
- If the housing of the mains adapter or the power cable is damaged, the mains adapter must be disposed of and replaced with a new mains adapter of the same type.
- Never open the device housing. Touching electrified components or modifying the electrical or mechanical structure could put you at risk and lead to a malfunction of the device.

ATTENTION
Damage to the device due to improper handling
- Unplug the device from the mains during a storm or when it is not going to be used for an extended period.
- When not in use, pull the mains adapter from the socket outlet, or use a master-slave power strip to prevent power consumption when switched off.
4.3. Handling batteries
The remote control is operated with a 3V CR2025 button cell battery.

WARNING
Risk of injury from improper handling of batteries
- Batteries may contain combustible materials. If handled improperly, batteries may leak, heat up excessively, ignite or even explode, which could result in damage to the device and your health.
- Do not throw batteries into open flames, do not short circuit or use force to open.
- Never expose batteries to excessive heat such as direct sunlight, fire or similar! There is an increased risk of leakage.
-
Never attempt to charge the batteries – risk of explosion!
-
Ensure correct polarity!
- Use only approved batteries.
- Keep batteries away from children (risk of swallowing). In the event of swallowing, seek medical advice immediately.
- Remove the batteries if you are not going to use the device for an extended period of time.
- Remove dead or leaking batteries from the device immediately. Avoid contact with skin, eyes and mucous membranes. In the event of contact, rinse the affected areas with plenty of clean water and consult a doctor immediately. Clean the contacts before inserting new batteries. There is a risk of skin irritations from battery acid!
- Remove empty or leaking batteries from the device and dispose of them in an environmentally friendly manner.
4.4. Mains adapter
- Use only the supplied mains adapter YN12W-0750120VZ for EU or YN12W-0750120BZ for UK.
- The mains adapter may only be used in dry rooms.
4.5. Malfunctions
If the device is malfunctioning, it may be due to an electrostatic discharge.
- If this is the case, unplug the mains cable and then plug the device back into the mains.
- This will reset the device.
4.6. Repairs
- Please contact our service centre if you have technical problems with your device.
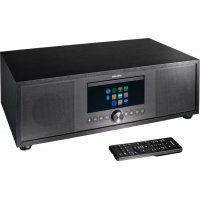
5. Overview of the device
5.1. Controls
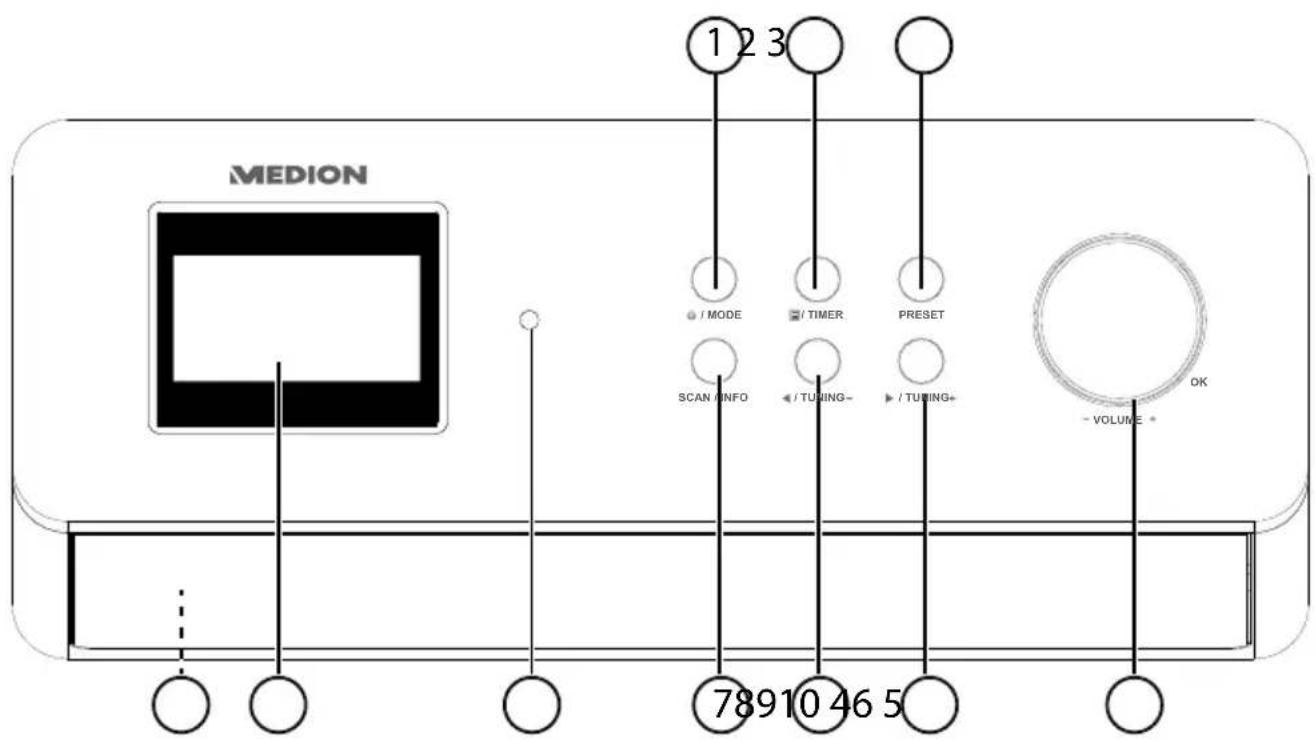
1) : switch mode to standby mode; set operating mode (DAB/FM/AUX)
2) / TIMER: open menu; activate timer
3) :opRESetavourites list
4) Turn -VOLUME+: increase/decrease volume; press OK: confirm/select entries
5) TUNING +: navigate forward in the menu; next frequency, scan forward for stations
6) TUNING: navigate backward in the menu; previous frequency, scan backward for stations
7) : autoand sInFon scan, call up station information
8) Infrared sensor: reception field for the infrared signals from the remote control
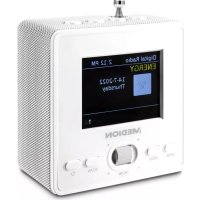
9) Display
10) Speakers (on the bottom)
5.2. Side view

1) Mounting bracket/cover (not shown)
2) Wire aerial (not shown)
3) Stand
4) Type plate
5) Stand
6) Connection for mains adapter
7) LINE OUT: audio output, 3.5 mm stereo socket
8) AUX IN: audio input, 3.5 mm stereo socket
9) ON/OFF: switch device on/off
5.3. Remote control
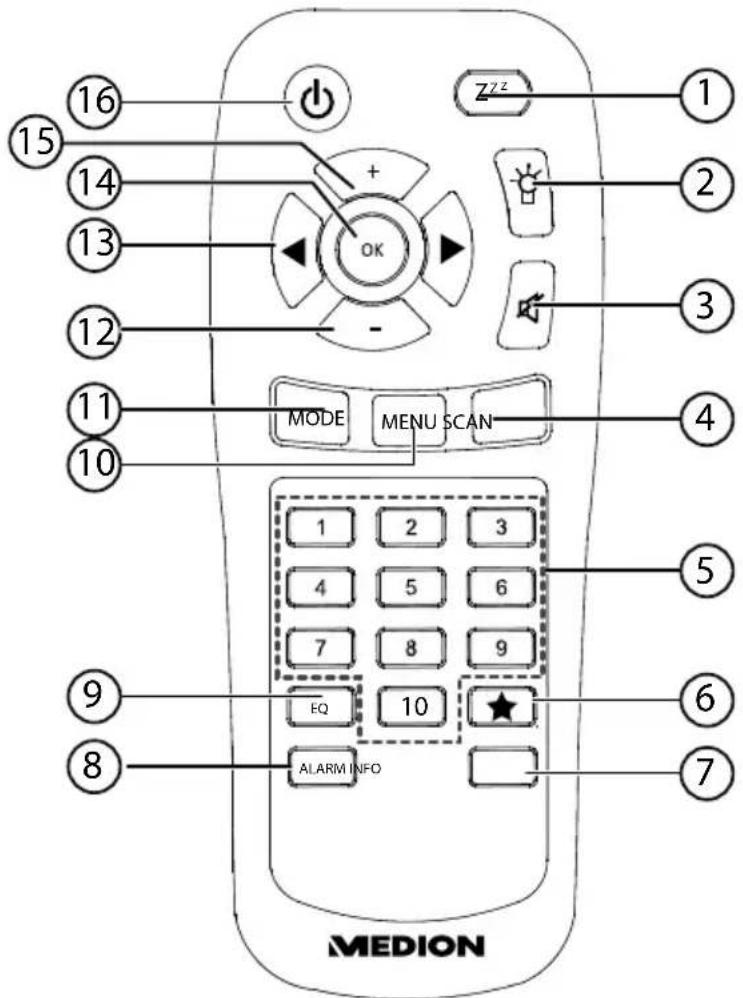
1):setzfeep/snooze time
2) Dim display
3) MUTE: switch off sound
4) SCAN: automatic station scan
5) NUMBER BUTTONS: for direct selection of stored stations
6) Open favourites
7) INFO: call up station information
8) ALARM: set alarm function
9) EQ: (Equalizer) sound mode, choose from various sound presets
10) MENU: open main menu
11) MODE: select operating mode
12) Reduce volume
13) Navigation button ; station search backward/forward
14) Increase volume
15) switch device to standby mode
6. Unpacking and mounting/setting up the device
Remove all packaging materials.

DANGER!
Keep plastic packaging out of the reach of children. There is a risk of suffocation.
Make sure that:
- the device and the battery are not exposed to strong heat sources;
- the device and the battery are not placed in direct sunlight;
- the device (DAB radio and mains adapter) never comes into contact with liquids, including drips and splashes.
6.1. Mounting the radio
The under-cabinet radio is for mounting to the underside of a wall cabinet or shelf unit. To mount the device, you will need 8 screws (included in the delivery). The size and length of the screws must match the mounting plate and bracket.
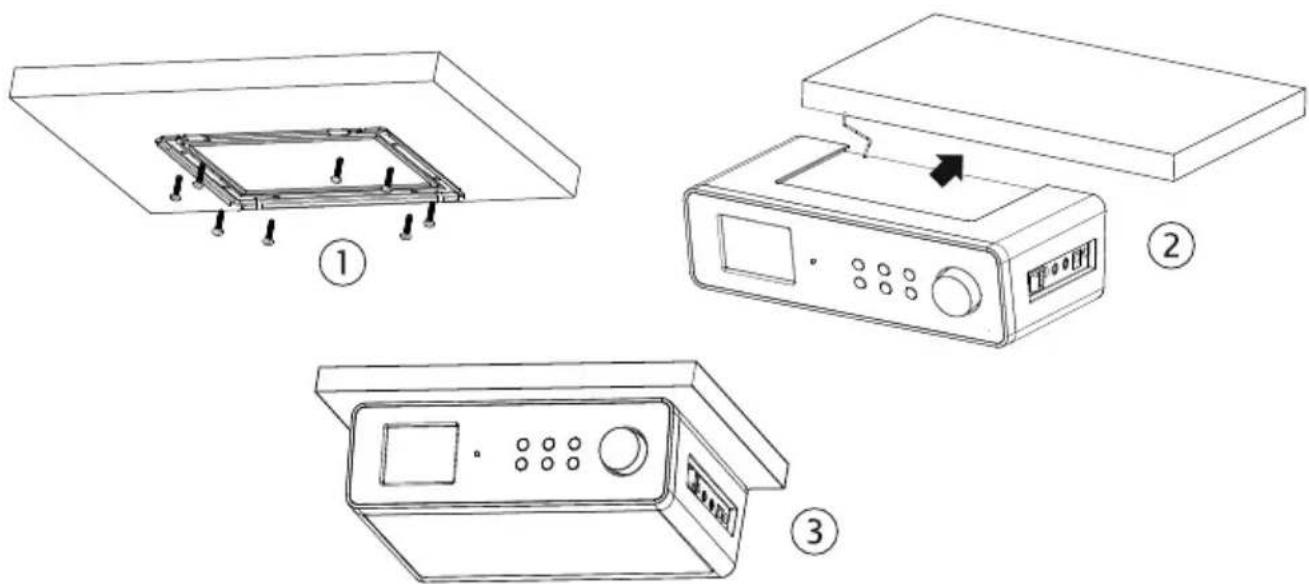
Select a suitable space near a mains socket.
Remove the cover by pulling it back (in the direction of the arrow) and off the radio.
Use the mounting bracket or the template to mark the drill holes (1).
- Drill 8 holes on the underside of the shelf unit (where you made your markings) in order to fix the screws.
Screw the mounting bracket to the bottom of the cabinet or shelf. Make sure that UP faces up and FRONT faces to the front.
Now place the device onto the notch of the mounting bracket and carefully push the device back until it audibly clicks into place (2).
Make sure that the wire aerial does not get caught.

ATTENTION!
Never mount the device above a cooker or any other heat or steam source. Never allow the mains cable to hang over a heat source.
6.2. Free-standing set-up
Instead of mounting the device on a cupboard/shelf, you can also put it on a table or a cupboard without having to fix it permanently into place.
Place the device on its feet on a stable, level surface near a mains socket.
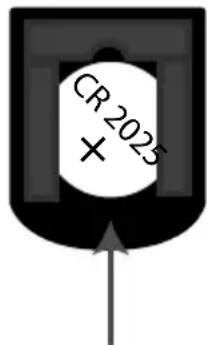
7. Inserting the battery in the remote control
The remote control works with one 3 V button battery, type CR2025.

WARNING!
There is a risk of explosion if batteries are replaced incorrectly.
Replace batteries only with the same or equivalent type.
- Slide down the battery compartment cover on the back of the remote control. Remove any spent batteries by pushing them down and out of the guide and dispose of them at a collection point for used batteries.
Insert a fresh CR 2025 battery into the battery compartment with the positive pole facing up. Ensure the + / - terminals are correct.
Replace the cover.
8. Connecting the device
Before connecting the radio, switch it off using the power switch at the side of the unit.
Operation of the FM/DAB radio: Adjust the aerial at the rear of the device for reception.
- Mains adapter: Connect the connector plug on the supplied mains adapter to the DC IN port and plug the mains plug into an AC 230V 50Hz socket.
LINE OUT: Connect a 3.5mm stereo jack to the LINE OUT socket to transfer the stereo sound output of the radio to other audio devices.
- AUX IN: Connect a 3.5 mm stereo jack to the AUX IN socket to play back stereo sound output from other audio devices via the radio.
9. Switching the device on/off
Switch the device on using the power switch at the side of the unit.
Press the / MODE button on the device for approximately 2-3 seconds or the button on the remote control to switch on the radio.
Press the button again to switch to standby mode.

NOTICE
The time is displayed in standby mode.
To switch the device off completely, switch the power switch to the OFF position.
10. Adjusting the aerial
Unwind the wire aerial fully.
Adjust the wire aerial to get optimal reception.
The bar display gives the current signal strength.
11. Setting the volume
Press the + button on the remote control or turn the -VOLUME+ dial in a clockwise direction to increase the volume.
Press the - button on the remote control or turn the -VOLUME+ dial in an anti-clockwise direction to reduce the volume.
A status bar on the display indicates the volume level.
12. Settings
Before you can make settings, you need to make sure the device is switched on or in standby mode. System settings are only possible if the device is switched on.
Any settings you make are retained in standby mode.
Proceed as follows to make settings:
Press the 目 / button on the device or the MENU button on the remote control.
Press TUNING + / TUNING-on the device or on the remote control to navigate within the menu.
Press OK to confirm your menu selection.
Press INFO to return to the higher-level menu.
12.1. Setting the timer
You can set a timer of up to two hours (maximum).
Select SET EGG TIMER.
Press TUNING + / /TUNING-on the device or on the remote control to set the hour, minute and second.
Confirm each entry by pressing OK.
The timer starts. The timer symbol and the elapsed time are shown on the display.
Press any button (other than TIMER) to return to the last display.
If you press the buttmers the specified time elapses, the timer is stopped and is reset to 00:00:00.
The timer will sound when the specified time has elapsed.
Press the button to switch off the acoustic signal.
12.2. Setting date/time
- Select SET TIME to set the time and date. Confirm your selection by pressing OK.
Manual
- Select SET CLOCK to set the time. Press / TUNING + / / TUNING - on the device or in the remote control to set the hour and the minutes, and confirm each entry by pressing OK.
- Select SET DATE to set the date. Press / TUNING + / / TUNING - on the device or on the remote control to set the day, month and year, and confirm each entry by pressing OK.
Automatic
Select AUTO UPDATE and then select FROM RADIO to automatically synchronise the date and time via the radio reception.
If you select NO UPDATE, the date and time are not synchronised.
Time/date format
- Select SET 12/24 HOURS. Press / TUNING + / / TUNING - on the device or in the remote control to select a 12-hour or 24-hour display.
12.3. Selecting the sound mode
Select SET EQ in the menu in order to choose from various sound settings:
NORMAL
- FLAT
POP
JAZZ
- ROCK
CLASSIC
NEWS
MOVIES
Confirm your entry by pressing OK.
or
Press the EQ button on the remote control repeatedly in order to choose from
various sound settings.
12.4. Selecting display brightness
Select DIMMER in the menu and press /iTUNING / TUNING - choose from various dimmer settings:
LOW
MEDIUM
·HIGH
Confirm your entry by pressing OK.
or
Press the button on the remote control repeatedly in order to choose from various dimmer settings.
12.5. Selecting the display language
You can set the display language to one of the following languages: English, German, Dutch and French. English is the language set at the factory.
Select SET LANGUAGE in the menu in order to choose the language.
Confirm your entry by pressing OK.
12.6. Resetting the device to factory settings
Resetting the device will discard your own settings and station presets, and the device is returned to the state when shipped.
Select SYSTEM RESET in the menu to reset the device.
Confirm your entry by pressing OK.
A confirmation prompt will appear; confirm again by pressing OK.
12.7. Software version
You can view the software version of the device under S/W VERSION.
12.8. Setting audio mode
You can either set the sound to AUTO so that it is output in stereo or mono depending on station, or you can explicitly select MONO for the sound.
Select SET AUDIO MODE in the menu in order to choose between AUTO and MONO.
Confirm your entry by pressing OK.
12.9. Setting the alarm
You can use the device as a radio alarm clock. You can set two alarm times.
Proceed as follows to set the alarm:
Before you set the alarm, make sure that the date and time have been set.
- Select SET ALARM in the menu or press the ALARM button on the remote control to set the alarm time.
Confirm your entry by pressing OK.
Pre / Tuning +/on Tuning Ice or on the remote control to select Alarm 1 or 2.
Confirm your entry by pressing OK.
Pre TUNING+onTunice or on the remote control to switch the alarm on or off.
- With the alarm switched on, use the / TUNING + / / TUNING - buttons on the device or the buttons on the remote control to select the alarm time.
Confirm each entry by pressing OK.
Use the //Tbntingson tufHnGe or the buttons on the remote control to select whether you would like the alarm to sound daily, on weekdays, at the weekend or just once.
Confirm your entry by pressing OK.
Use the //TbntingGson tUHmGeor the buttons on the remote control to select the type of alarm: DAB/FM radio or alarm tone.
Confirm each entry by pressing OK.
Use the / TUNING +/ button on the device or the buttons on the remote control to select the volume of the alarm tone.
Confirm each entry by pressing OK.

NOTICE
If the "Radio" alarm signal is set, the radio station that was last listened to will begin playing at the specified alarm time.
The alarm is now active and the 1 or 3 symbol is shown on the display.
12.10. Setting the sleep timer
With the sleep timer, the radio automatically switches off after a specified period of time (between 15 and 90 minutes maximum) has elapsed. The sign on the display indicates that the sleep timer is enabled.
- Select SET SLEEP in the menu or press the button on the remote control to set the sleep time.
Use the //Tbntingson thuHnge-or the buttons on the remote control to select the time remaining until the radio will switch off.
Confirm your entry by pressing OK.
13. Radio operation
You can receive FM stations and DAB stations with this radio.
You can store up to 10 FM stations and 10 DAB stations as resets.

NOTICE
When the device is switched on, the radio will play the last station to which you were listening.
If you are using the device for the first time, the radio will be set to DAB mode.
Radio Data System
Radio Data System (RDS) is a service provided by radio stations. In addition to traditional music and voice services, they also broadcast additional information in the form of encrypted digital signals that can be analysed and displayed by the car radio. On the display you can see the programme name and other information (traffic information, the title of the track currently being played, etc.).
If the reception of the radio station is weak the radio switches automatically to an RDS station that is broadcasting the same programme.
When listening to the radio, you can access the available information by (repeatedly) pressing the INFO button.
13.1.DAB mode
In order to receive DAB stations, the device must be set to DAB mode.
Press the / MODE button on the device / MODE until DAB is shown on the display.
13.1.1. Searching for DAB stations
To search for DAB stations or programmes in DAB mode, press the SCAN button for approximately two seconds.
The device now searches for all available DAB stations. Once the station search has been completed, the number of available stations will be shown on the display.

NOTICE
In order to keep your list of DAB stations up to date, regularly complete a DAB station search.
13.1.2. Storing DAB stations
You can store up to 10 DAB stations as resets.
Use the //Tbngs on the damage or the buttons on
the remote control to set the desired DAB station:
Press the PRESET button on the device or the button on the remote control until the PRESET EMPTY X preset is shown on the display and the preset number flashes.
Use the //TbIMngs on the UHMG or the buttons on the remote control to select the desired preset.
Confirm your entry by pressing OK.
The station name or the frequency, as well as the preset are now shown on the display.
13.1.3. Selecting DAB stations
Press the PRESET button on the device or the button on the remote control.
Use the //Tbngs on the damage or the buttons on
the remote control to select the desired station. You can also select the station directly using the number buttons on the remote control.
13.2.FM mode
You can listen to FM radio in this mode.
Press the / MODE button on the device / MODE until FM is shown on the display.
13.2.1. Searching for FM stations and storing them
You can store up to 10 FM stations as presets.
Press the SCAN button for a few seconds to scan the waveband for the next receivable station.
or
Use the //Tbngs on the change or the buttons on the remote control to set the desired FM station.
-
Press the TUNINGs and TUNINGve the received frequency one step upwards/downwards.
-
Press and hold the TUNING + / TUNING - / buttons to quickly change the radio frequency.
Press the PRESET button on the device or the button on the remote control until the PRESET EMPTY X preset is shown on the display and the preset number flashes.
Use the //Tbunngs on the AHNGe or the buttons on the remote control to select the desired preset.
Confirm your entry by pressing OK.
The station name or the frequency, as well as the preset are now shown on the display.
13.2.2. Selecting FM stations
Press the PRESET button on the device or the button on the remote control.
Use the TUNING +/ buttoning the device or the buttons on the remote control to select the desired station. You can also select the station directly using the number buttons on the remote control.
14. Audio playback in AUX mode
You can play stereo sound from other audio devices via the radio. The volume control is available in AUX mode.
Connect a 3.5mm stereo jack to the AUX IN socket.
Set the volume of the external audio device to medium.
Press the / MODE button on the device / MODE button on the remote control until AUX is shown on the display.
Start playback on the external audio device.
15. Cleaning
Before cleaning, pull the plug out of the mains socket.
Use a dry, soft cloth to clean the housing and remote control. Avoid the use of chemical solutions and cleaning products because these may damage the device surface or markings.
16. Troubleshooting
| PROBLEM POSSIBLE CAUSE SUGGESTIONS | ||
| The device cannot be switched on. | Mains adapter not connected. | Check whether the mains adapter is connected. |
| Radio and automatic time/station save function do not work. | The station signals are too weak. | Try setting the time/station manually. If necessary, move the radio to a different location or adjust the direction of the antenna to improve reception. |
| No sound The volume is set too low. | Increase the volume. | |
| The device does not work | Fault caused by a thunderstorm, a static discharge or another external factor. | Pull out the mains cable and plug it back in. |
| The device does not respond to the remote control | Batteries are dead or in-serted incorrectly | Replace the batteries/insert batteries correctly. |
| Infrared sensor receives no signal | Remove anything which may be blocking the signal between the infrared transmitter on the remote control and the device's sensor. Reduce the distance from the device. | |
17. Disposal

Packaging
Your device is packaged to protect it from transportation damage. Packaging is raw material and can be reused or added to the recycling system.

Appliance
Old appliances should not be disposed of with the normal household rubbish.
In accordance with Directive 2012/19/EU, the appliance must be properly disposed of at the end of its service life.
This involves separating the materials in the appliance for the purpose of recycling and avoiding any impact on the environment.
Take old appliances to a collection point for electrical scrap or a recycling centre. Contact your local waste disposal company or your local authority for more information on this subject.

Batteries
Batteries must be properly disposed of. Retailers who stock batteries and local authority collection points have appropriate disposal containers for this purpose. You can contact your local waste disposal company or municipal authorities for further information.
18. Technical data
Power supply
Mains adapter DongGuan Yingna Electronic Technology
Co., Ltd, model: YN12W-0750120VZ for EU;
YN12W-0750120BZ for UK
Input 100 - 240V 50 / 60Hz,0.3A
Output DC 7.5 V 1.2 A
Protection class , Protection class II


Intertek

Radio
Output power: 2 × 2.8 Watt RMS
FM frequency range: 87.5-108 MHz
DAB+ frequency range: 174.928-239.200 MHz (III)
DCin DC7.5V 1.2A
AUX in 3.5mm jack
Line out 3.5 mm jack
Dimensions (W x H x D) / Weight approx. 238 x 72 x 137 mm / approx. 940 g
19. Declaration of conformity

Medion AG hereby declares that product MD 84954 conforms to the following European Directives and standards:
EMC Directive 2004/108/EC
Low Voltage Directive 2006/95/EC
Ecodesign Directive 2009/125/EC
RoHS Directive 2011/65/EU.
Full declarations of conformity are available at www.medion.com/conformity.
This product satisfies the basic requirements and relevant regulations of the Ecodesign Directive 2009/125/EC (Commission Regulation 1275/2008).
Subject to technical modifications!
20. Legal notice
Copyright © 2015
All rights reserved.
This operating manual is protected by copyright.
Mechanical, electronic and any other form of reproduction is prohibited without the written permission of the manufacturer. Copyright is owned by the company:
Medion AG
Am Zehnhof 77
45307 Essen
Germany

The operating manual can be reordered via the service hotline and is available for download via the service portal at www.medion.com/gb/service/start/.
You can also scan the QR code above and download the operating manual onto your mobile device via the service portal.