
IAN 300415 - Indoor bike trainer CRIVIT - Free user manual and instructions
Find the device manual for free IAN 300415 CRIVIT in PDF.

| Product type | Indoor mini exercise bike for arms and legs |
| Brand | Crivit |
| Model | IAN 300415 |
| Dimensions (L × H × D) | 42 × 31 × 38 cm |
| Weight | Approx. 4.8 kg |
| Maximum user weight | 100 kg |
| Power supply | 1 AAA / LR03 1.5 V battery |
| Adjustable resistance | Yes, via adjustment screw (+/-) |
| Display | Dual line: speed, time, total distance, distance per session, RPM, calories, SCAN mode |
| Use | Leg and arm training, seated on a chair or on a table |
| Device class | HC (household use) – not suitable for therapeutic or high-precision use |
| Required clearance zone | Approx. 0.6 m around the device |
| Material | Not specified (plastic and metal) |
| Pedals with adjustable straps | Yes, adjustment via rotary closure |
| Assembly required | Yes – assembly of feet and pedals (tools included) |
| Batteries included | Yes, one AAA battery |
| Cleaning | Damp cloth and mild cleaner – avoid moisture in the display |
| Warranty | 3 years from date of purchase |
| Customer service (Belgium) | Tel.: 070 270 171 (€0.15/min) – Email: deltasport@lidl.be |
| Wear parts | Drive belt – replace the device if no more resistance |
| Recycling | Electronic device – do not dispose of with household waste, remove battery before disposal |
Frequently Asked Questions - IAN 300415 CRIVIT
User questions about IAN 300415 CRIVIT
0 question about this device. Answer the ones you know or ask your own.
Ask a new question about this device
Download the instructions for your Indoor bike trainer in PDF format for free! Find your manual IAN 300415 - CRIVIT and take your electronic device back in hand. On this page are published all the documents necessary for the use of your device. IAN 300415 by CRIVIT.
USER MANUAL IAN 300415 CRIVIT
Before reading, fold out the ilustration page and get to know all of the functions of your unit.
Knee n r
g
F
[答案]
M ①
GB/IE/NI Instruction and safety notice Page 8
Part names (figure A) 8
Technical data 8
Correct use 8
Symbols used 8
Safety notes 8-10
Assembly 10-11
Assembly of foot parts (figure B) 10
Assemble pedals (figure C) 10
Adjust pedal straps (figure D) 10
Reducing/increasing resistance (figure E) . 11
Replacing the battery 11
Training notes 11
Use 11-12
Leg training (figure 1) 11
Arm training (figure J) 11-12
Display functions 12
Setting values to zero. 12
Troubleshooting 12
Cleaning and care. 12
Disposal 12
Disposef batteries carefully 12
Notes on the guarantee and
service handling 13
DK
Leveringsomfang/
beskrivelse of dele (afb. A) 14
Tekniske data 14
Tilsigtetbrug 14
Brugte symboler 14
Bentraening (afb.1) 17
Armtraening (afb. J) 17
Visningsfunktioner pà display 17 - 18
Fejalfhjaelpning 18
With your purchase you have decided on a high-quality product. Get to know the product before you start to use it. Carefully read the following instructions for use.
Use the product only as described and only for the given areas of application. Keep these instructions safe. When passing the product on to a third party, always make sure that the documentation is included.
Scope of delivery/ Part names (figure A)
1 x Arm and leg trainer with resistance screw and display (incl. AAA battery LRO3) (1)
1 x Foot, small (2)
1 x Foot, large (3)
2 × Pedals (4)
4 × Screws (5)
4 x Washers (6)
1 x Allen key with screwdriver (7)
1 x Wrench (8)
1 x Instructions for use
Technical data
Dimensions: approx. 42 × 31 × 38cm
$$ (W \times H \times D) $$
Weight: approx. 4.8kg

Maximum load capacity: 100kg
Device class: HC (for use in private households, exactitude C)/not suitable for therapeutic training; Non-speed dependent exerciser.
WARNING! This stationary exerciser is not suitable for high accuracy purposes.
Rotational speed-independent exerciser The resistance can be set independent of the speed.
Energy supply: 1.5V = = battery type AAA, LRO3
Correct use
The article is not designed for commercial use. The article allows the user to train arms and legs; fitted with a resistance screw to increase and maintain mobility. An integrated display shows the training progress.
Symbols used

Date of manufacture (month/year): 06/2018
Safety notes Important: Read the instructions for use through carefully and always keep them for future reference!
The article is not suitable for therapeutic purposes.
- Sit in a relaxed, upright position with a straight back during the exercises.
- Exchange any defective parts of the article immediately and discontinue use until the maintenance is carried out.
- Please note that incorrect or excessive training can cause injury to health.
- Stand the article on a horizontal, level surface.
- Use a non-slip mat on a smooth surface.
- Pay attention to wear to the parts. If the article no longer exhibits any resistance on the pedals then the drive belt is worn and the article needs to be replaced.
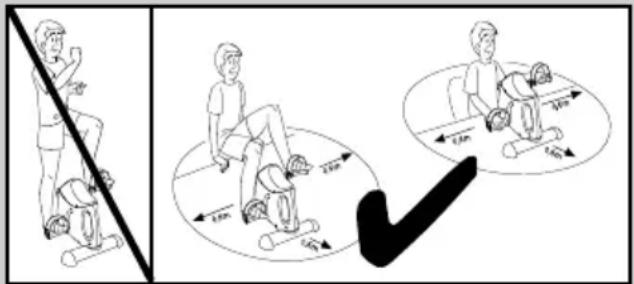
- An area of approx. 0.6m must be present around the training area (figures I and J).
Children may not carry out cleaning and user-maintenance without supervision.
- It is better to train on a slip-resistant surface. The feet may cause a colour abrasion and should therefore only be placed on a hard-wearing surface.

Risk of death!
- Do not leave children unattended with the packaging material. There is a risk of suffocation.
- The article is not a toy! Please ensure that people, particularly children, do not stand on the article or pull themselves up on it. The article could tip over.
Children may not play with the apparatus. - The article is not designed to support the weight of the whole body.
-
This device can be used by children over the age of 14 and by persons with reduced physical, sensory, or mental capabilities, or people who are lacking in experience and knowledge if they are supervised or have been instructed on the safe use of the article and understand the consequent risks.
-
Consult your doctor before you begin use or if you experience discomfort.

Risk of injury!
- Do not stand on the article with your full body weight. It may only be used in the way described in the instructions.
- Make sure the article is properly stable before using it.
- Stand the article on a level surface.
- Make sure that the article is fully extended before using it.
- Inspect the article before each use for damage or wear. Exchange damaged or worn parts on the article immediately, otherwise they can impede the function and safety of the article.
The article may only be used for the intended purpose. - Do not touch the metal parts of the article (particularly the pedal cranks) after use as they can heat up during use.
Warning: batteries!
- Only use batteries from the same manufacturer and of the same type.
- Remove the battery if it is dead or if the product is not used for a long period.
- Warning! Batteries may not be charged or reactivated by other means and may not be dismantled, thrown in the fire, or short-circuited.
Always store the batteries out of the reach of children. - Batteries that are not rechargeable may not be charged.
- Rechargeable batteries may only be charged under adult supervision.
- Rechargeable batteries must be removed from the article before they are charged.
- The terminal clamps may not be short-circuited.
- Please handle a damaged or dead battery with extreme care and dispose of it correctly, wearing gloves.
- If you come into contact with battery acid then wash the relevant area with water and soap. If battery acid gets in your eyes rinse them out using water and consult a doctor immediately.
Assembly
Assembly of foot parts (figure B)
- Remove the packaging materials.
- Turn the article over so that the underside is facing upwards.
- Screw the small foot (2) to the article using 2 × screws (5) and washers (6) with the help of the Allen key (7).
Note: The small foot must be fitted at the front where the resistance screw (1a) and the display (1b) are located (figure E).
4. Screw the large foot (3) onto the article with two screws and washers.
Assemble pedals (figure C)
When assembling the pedals please ensure that the right pedal is mounted on the right pedal crank and the left pedal on the left pedal crank. The letter R is printed on the right pedal crank and the letter L on the left pedal crank as guides.
Note: Turn the pedal crank upwards to make it easier to mount the pedals.
- Stand the article on the feet.
- Insert the thread end into the threaded hole on the pedal crank.
- Hold the pedal tight in the thread on the pedal crank with one hand and turn it with the other hand using the wrench until it is tightly attached to the pedal crank.
Caution! Turn the right pedal to the right and the left pedal to the left to tighten.
Adjust pedal straps (figure D)
The pedal straps (4b) are preassembled.
You can adjust the straps to various widths.
- Loosen the screw cap (4c) on the end of the pedal (4a) by turning it to the left.
- Adjust the pedal straps (4b) to the desired width by moving them up or down.
- Set the adjustment by turning the screw cap (4c) to the right.
Reducing/increasing resistance (figure E)
Stand the article in front of you and turn the resistance screw (1a) to the right to increase resistance and to the left to reduce resistance.
Note: There are + and - symbols on the resistance screw to adjust the resistance.
The ^+ signifies increasing the resistance and the - signifies reducing it.
Replacing the battery
WARNING! Please follow these instructions in order to prevent mechanical and electrical damage. The training data will be lost when the battery is replaced.
Danger!
The article contains one battery. If the battery stops working, then you can replace it.
- Lift the display (1b) from above using your fingers and remove it with care (figure F). The battery is located on the reverse of the display (figure G).
- Carefully remove the empty battery from the battery compartment (1c) and replace it with a new battery (figure G).
Note: Pay attention to the positive and negative polarities on the battery and that it is inserted correctly. The battery must be located entirely inside the battery compartment.
Warning! Please ensure that the sensor (1d) is placed correctly in the sensor mount (1e) (figure H). Insert the sensor into the sensor mount if necessary.
3. Insert the lower edge of the display into the article and press the display in carefully (figure F).
Note: Please ensure that the button is facing downwards when you insert the display.
Training notes
- Consult a doctor before using the article.
- Stop training as soon as you experience discomfort during training.
- Start training slowly and increase intensity as necessary.
We recommend training legs and arms for 30 minutes each every day. - Wear comfortable clothing to use the article, but make sure that trouser legs or sleeves are not too wide and cannot get caught in the pedals.
- Do some simple stretches before using the article and begin with slow, easy pedalling. Increase slowly until you have reached the desired speed.
- Increase the resistance gradually.
End the session by reducing speed.
Use
Stand the article in front of you to begin training.
Start with easy training and resistance levels.
Release the resistance screw for this purpose. The tighter the resistance screw is turned, the more difficult it is to turn the pedals.
Warm up before each training session by carrying out stretching and warm-up exercises. Relax after each training session.
Leg training (figure I)
- Stand the article on a level, stable, and non-slip surface and sit on a chair in front of the article in a relaxed position with your back straight.
Note: Please ensure that the chair is stable and comfortable. - Place your feet on the pedals in such a way that the pedal strap is over your foot.
- 'Ride' the bicycle with your feet.
- You can cycle forwards or backwards.
Arm training (figure J)
- Place the article in front of you on a level, stable, and non-slip surface (e.g. at table height) and sit in front of it in a relaxed position on a chair with your back straight.
-
Place the palm of your hand on the pedals in such a way that the pedal strap is over your hand.
-
'Ride' the bicycle with your hands.
- You can cycle forwards or backwards.
Display functions
The display comprises of a two-line screen with various modes. The top line shows the speed (km / h) and by pressing the button, the bottom line can display the following functions:
- Time: This mode displays the duration of your current training session in minutes and seconds.
- ODO: This mode displays the total distance (km) since the battery was inserted.
- RPM: This mode displays the revolutions per minute of the pedals.
- DISTANCE: This mode displays the distance covered in kilometres since the beginning of the exercise.
- CAL: This mode displays the calories burned during your current training session.
- SCAN: This mode shows the various display modes in turn.
Note: The number of calories burned is only an approximate value.
Note: The display will switch off automatically after approximately 4 minutes when not in use.
Setting values to zero
Press the button for approximately 4 seconds in order to set the value back to 0.
Troubleshooting
Error
Display does not show measurement despite pedal movement.
Possible causes
The sensor is not placed correctly in the sensor mount.
Solution
Check that the sensor is positioned correctly if the display does not show anything even though the pedals are moving (figure H).
- Open the display and remove it carefully, as if to replace the battery.
- Insert the sensor carefully into the sensor mount if it is not positioned correctly inside the sensor mount.
- Insert the display back in the article and ensure that the button on the display is facing downwards.
Cleaning and care
Clean the article with a damp cloth and a mild cleaning agent.
Caution! Do not allow moisture to penetrate the display. Fold the legs away as described in the section 'folding the article'. Store the article in a dry place.
Parts that are susceptible to wear: If the article is no longer offering any step resistance then the drive belt is worn. The article must be replaced.
Disposal
Dispose of the article and the packaging materials in accordance with current local regulations. Packaging materials such as foil bags are not suitable to be given to children. Keep the packaging materials out of the reach of children.

Devices that are marked with the symbol shown here may not be disposed of with domestic waste. You are obliged to dispose of these kinds of used electrical and electronic uses separately. Ask your local authority about suitable methods for regulated disposal. Remove batteries from the article before disposing of it.
Dispose of batteries carefully

Please note: Batteries are hazardous waste and may not be disposed of with domestic waste by law. You can hand over batteries free of charge at local collections or at retail outlets. Special containers are ded here for this purpose.
Notes on the guarantee and service handling
The product was produced with great care and under constant supervision. You receive a three-year warranty for this product from the date of purchase. Please retain your receipt.
The warranty applies only to material and workmanship and does not apply to misuse or improper handling. Your statutory rights, especially the warranty rights, are not affected by this warranty. With regard to complaints, please contact the following service hotline or contact us by e-mail.
Our service employees will advise as to the subsequent procedure as quickly as possible. We will be personally available to discuss the situation with you.
Any repairs under the warranty, statutory guarantees or through goodwill do not extend the warranty period.
This also applies to replaced and repaired parts. Repairs after the warranty are subject to a charge.
IAN:300415
GB Service Great Britain
Tel.: 08715000720
(£ 0.10/Min.)
E-Mail: deltasport@lidl.co.uk
IE Service Ireland
NI Tel.: 1890930034
(0,08 EUR/Min., (peak))
(0,06 EUR/Min., (off peak))
E-Mail: deltasport@lidl.ie
