HMV1472BHS - Microwave Oven HAIER - Free user manual and instructions
Find the device manual for free HMV1472BHS HAIER in PDF.
| Product Type | Microwave Oven |
| Brand | Haier |
| Model | HMV1472BHS |
| Dimensions (W x D x H) | 59.7 x 41.9 x 43.5 cm |
| Net Weight | 23.7 kg |
| Power Supply | 120 V / 60 Hz, 15 or 20 A |
| Input Power (Microwave) | 1500 watts |
| Output Power (Microwave) | 1000 watts |
| Capacity | 38 L |
| Turntable Diameter | 34.3 cm |
| Number of Power Levels | 10 (0% to 100%) |
| Auto Cooking Functions | Sensor Cook, Sensor Reheat, Popcorn |
| Defrost | By weight (max 6 lb) or timed (max 99 min 99 s) |
| Lighting | LED (replacement by authorized service) |
| Exhaust Fan | 3 speeds (Hi/Low/Off) |
| Child Lock | Yes (press and hold STOP/CANCEL) |
| Display | Digital (12-hour) |
| Clock | 12-hour, adjustable via numeric keys |
| Kitchen Timer | Yes, independent |
| Construction Materials | Stainless steel, glass, plastic |
| Grease Filters | Removable, hand washable (not dishwasher safe, no ammonia) |
| Compatible Utensil Types | Glass, ceramic, plastic, paper, silicone; no metal |
| Safety | Door safety interlock, grounding required |
| Warranty | 1 year (parts and labor); 90 days for commercial use |
| Maintenance | Clean with warm water and mild soap; do not immerse cord |
Frequently Asked Questions - HMV1472BHS HAIER
User questions about HMV1472BHS HAIER
0 question about this device. Answer the ones you know or ask your own.
Ask a new question about this device
Download the instructions for your Microwave Oven in PDF format for free! Find your manual HMV1472BHS - HAIER and take your electronic device back in hand. On this page are published all the documents necessary for the use of your device. HMV1472BHS by HAIER.
USER MANUAL HMV1472BHS HAIER
Microwave Energy Safety 4
Electrical Requirements 5
PARTS AND FEATURES 6
Specifications 7
Turntable 7
CONTROL PANEL 8
Clock 8
Features 9
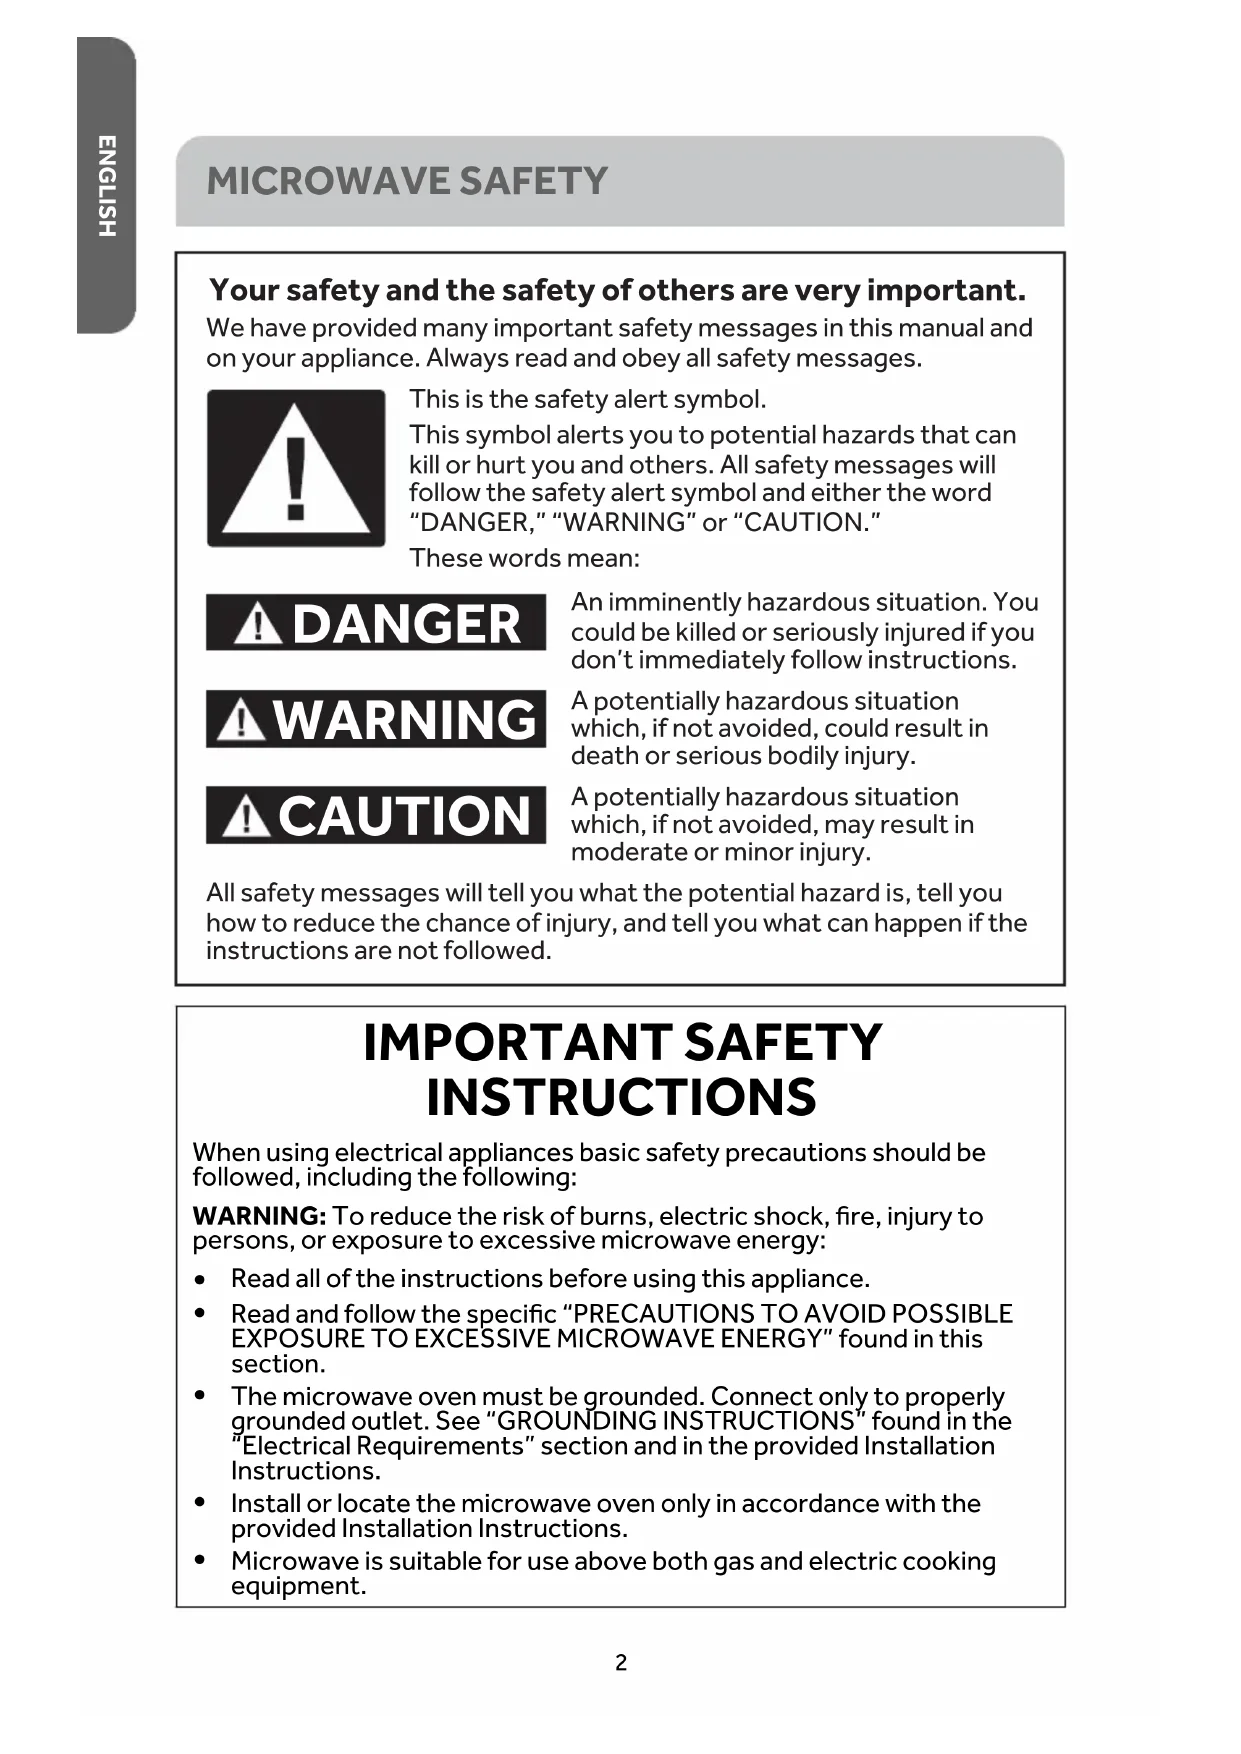
Your safety and the safety of others are very important.
We have provided many important safety messages in this manual and on your appliance. Always read and obey all safety messages.

This is the safety alert symbol.
This symbol alerts you to potential hazards that can kill or hurt you and others. All safety messages will follow the safety alert symbol and either the word "DANGER," "WARNING" or "CAUTION."
These words mean:
DANGER
An imminently hazardous situation. You could be killed or seriously injured if you don't immediately follow instructions.
WARNING
A potentially hazardous situation which, if not avoided, could result in death or serious bodily injury.
CAUTION
A potentially hazardous situation which, if not avoided, may result in moderate or minor injury.
All safety messages will tell you what the potential hazard is, tell you how to reduce the chance of injury, and tell you what can happen if the instructions are not followed.
IMPORTANT SAFETY INSTRUCTIONS
When using electrical appliances basic safety precautions should be followed, including the following:
WARNING: To reduce the risk of burns, electric shock, fire, injury to persons, or exposure to excessive microwave energy:
- Read all of the instructions before using this appliance.
- Read and follow the specific "PRECAUTIONS TO AVOID POSSIBLE EXPOSURE TO EXCESSIVE MICROWAVE ENERGY" found in this section.
- The microwave oven must be grounded. Connect only to properly grounded outlet. See "GROUNDING INSTRUCTIONS" found in the "Electrical Requirements" section and in the provided Installation Instructions.
- Install or locate the microwave oven only in accordance with the provided Installation Instructions.
- Microwave is suitable for use above both gas and electric cooking equipment.
IMPORTANT SAFETY INSTRUCTIONS
- Intended to be used above ranges with maximum width of 36'' (91.44 cm).
- Some products such as whole eggs in the shell and sealed containers - for example, closed glass jars - can explode and should not be heated in the microwave oven.
- Use the microwave oven only for its intended use as described in the manual. Do not use corrosive chemicals or vapors in the microwave oven. This type of oven is specifically designed to heat, cook, or dry food. It is not designed for industrial or laboratory use.
- As with any appliance, close supervision is necessary when used by children.
- Do not operate the microwave oven if it has a damaged cord or plug, if it is not working properly, or if it has been damaged or dropped.
- The microwave oven should be serviced only by qualified service personnel. Call an authorized service company for examination, repair, or adjustment.
- Do not cover or block any openings on the microwave oven.
- Do not store or use this microwave oven outdoors. Do not use the microwave oven near water - for example, near a kitchen sink, in a wet basement, near a swimming pool, or similar locations.
- Do not immerse cord or plug in water.
- Keep cord away from heated surfaces.
- Do not let cord hang over edge of table or counter.
- See door surface cleaning instructions in the "Microwave Oven Care" section.
To reduce the risk offire in the oven cavity:
- Do not overcook food. Carefully attend the microwave oven when paper, plastic, or other combustible materials are placed inside the oven to facilitate cooking.
- Remove wire twist-ties from paper or plastic bags before placing bags in oven.
- If materials inside the oven ignite, keep oven door closed, turn oven off, and disconnect the power cord, or shut off power at the fuse or circuit breaker panel.
- Do not use the cavity for storage purposes. Do not leave paper products, cooking utensils, or food in the cavity when not in use.
To reduce the risk of injury to persons:
- Do not overheat the liquid.
- Liquids, such as water, coffee, or tea can be overheated beyond the boiling point without appearing to be boiling. Visible bubbling or boiling when the container is removed from the microwave oven is not always present. This could result in very hot liquids suddenly boiling over when the container is disturbed or a spoon or other utensil is inserted into the liquid.
- Stir the liquid both before and halfway through heating it.
- Do not use straight-sided containers with narrow necks.
IMPORTANT SAFETY INSTRUCTIONS
- After heating, allow the container to stand in the microwave oven for a short time before removing the container.
- Use extreme care when inserting a spoon or other utensil into the container.
- Do not store anything directly on top of the microwave oven when the microwave oven is in operation.
- Clean Ventilating Hoods Frequently - Grease should not be allowed to accumulate on hood or filter.
- Use care when cleaning the vent-hood filter. Corrosive cleaning agents, such as lye-based oven cleaners, may damage the filter.
- When flambéing foods under the hood, turn the fan on.
READ AND SAVE THESE INSTRUCTIONS
MICROWAVE ENERGY SAFETY
PRECAUTIONS TO AVOID POSSIBLE EXPOSURE TO EXCESSIVE MICROWAVE ENERGY
A Do not attempt to operate this oven with the door open since open-door operation can result in harmful exposure to microwave energy. It is important not to defeat or tamper with the safety interlocks.
B Do not place any object between the oven front face and the door or allow soil or cleaner residue to accumulate on sealing surfaces.
C Do not operate the oven if it is damaged. It is particularly important that the oven door close properly and that there is no damage to the:
- Door (bent),
- Hinges and latches (broken or loosened),
- Door seals and sealing surfaces.
D The oven should not be adjusted or repaired by anyone except properly qualified service personnel.
WARNING

Electrical Shock Hazard
Plug into a grounded 3 prong outlet.
Do not remove the ground prong from the power cord plug.
Do not use an adapter.
Do not use an extension cord.
Failure to do so can result in death, fire or electrical shock.
Observe all governing codes and ordinances.
Required:
A 120 volt, 60Hz , AC only, 15- or 20-amp electrical supply with a fuse or circuit breaker.
Recommended
A time-delay fuse or time-delay circuit breaker.
A separate circuit serving only this microwave oven.
GROUNDING INSTRUCTIONS
For a grounded, cord-connected microwave:
The microwave oven must be grounded. In the event of an electrical short circuit, grounding reduces the risk of electric shock by providing an escape wire for the electric current. The microwave oven is equipped with a cord having a grounding wire with a grounding plug. The plug must be plugged into an outlet that is properly installed and grounded.
WARNING: Improper use of the grounding plug can result in a risk of electric shock. Consult a qualified electrician or serviceman if the grounding instructions are not completely understood, or if doubt exists as to whether the microwave oven is properly grounded.
Do not use an extension cord. If the power supply cord is too short, have a qualified electrician or serviceman install an outlet near the microwave oven.
READ AND SAVE THESE INSTRUCTIONS
This device complies with Part 18 of the FCC Rules.
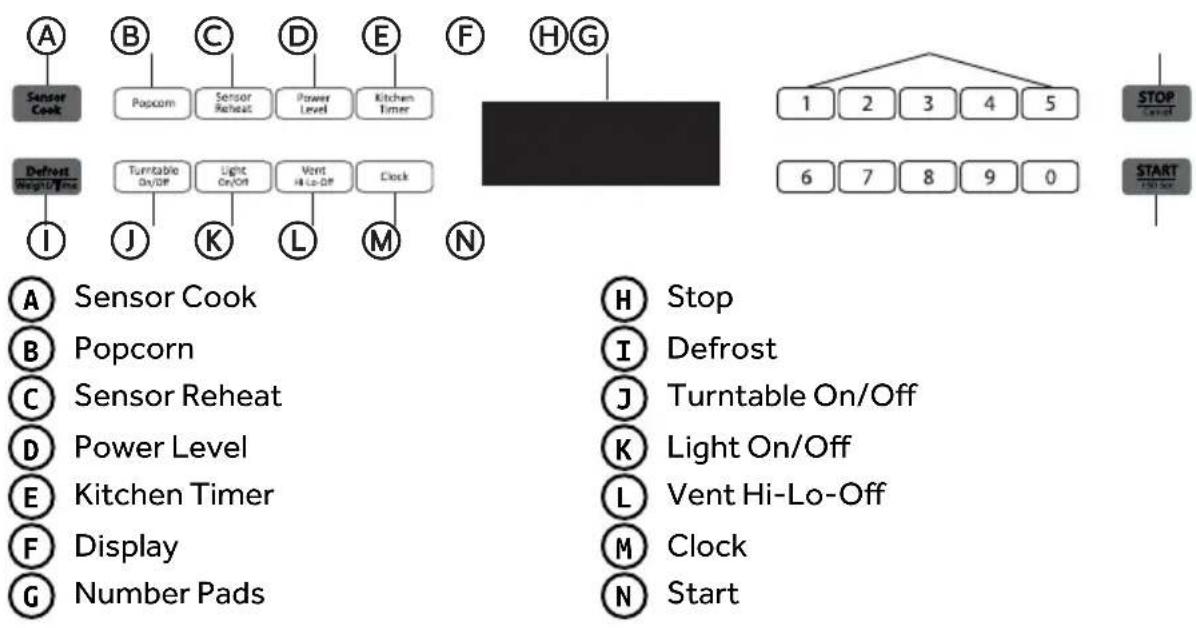
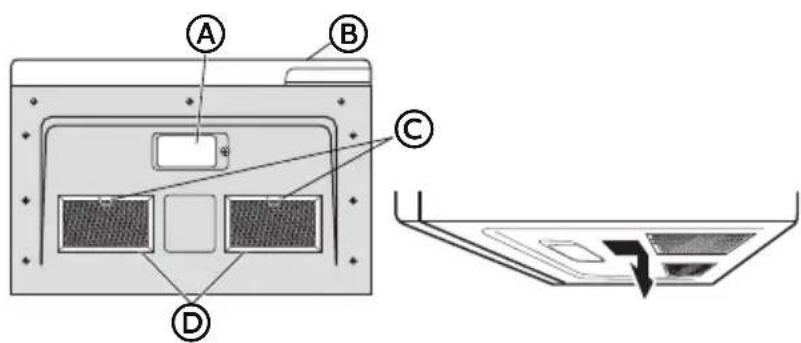
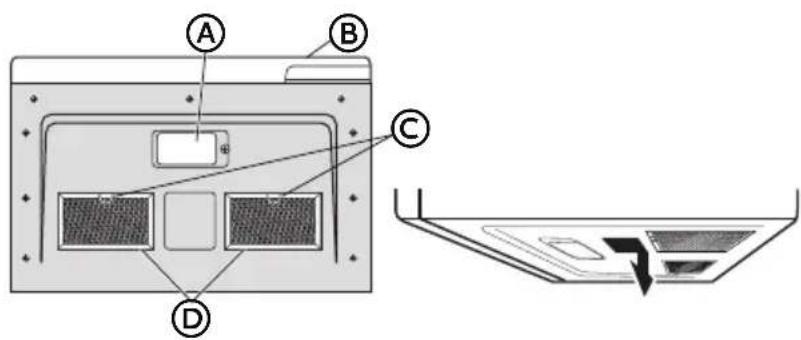
PARTS AND FEATURES
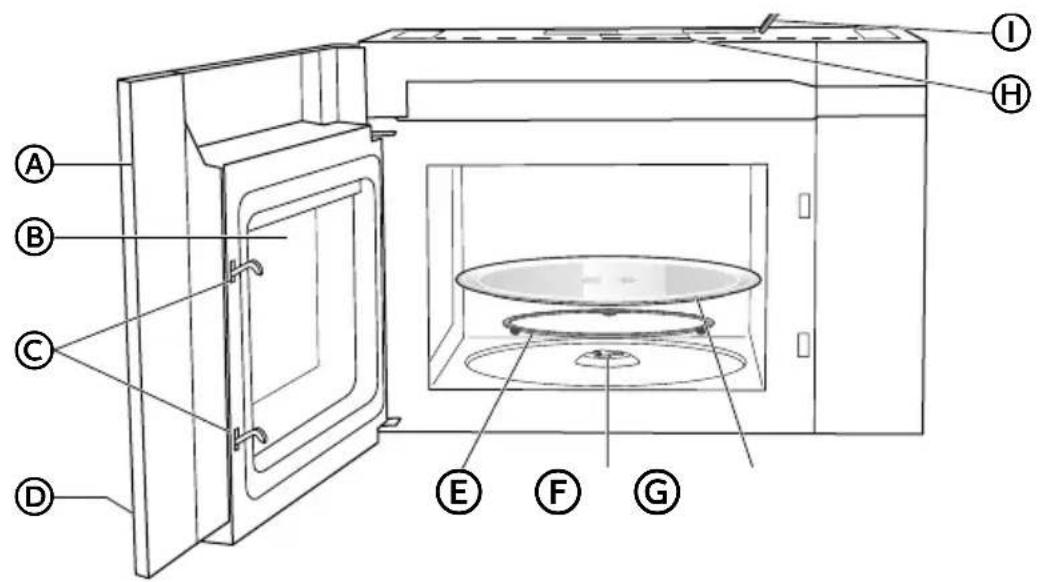
Front View
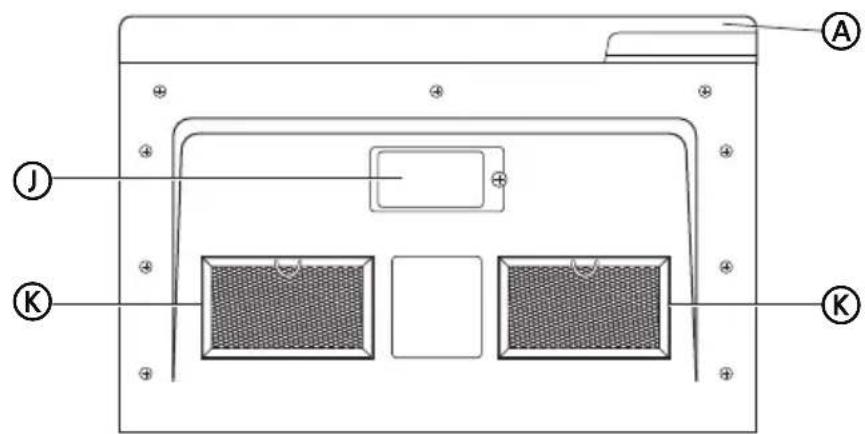
Bottom View
Door
B Window
Interlock System
D Control Panel
E Turntable Ring Assembly
F Turntable Coupler
G Glass Turntable
TopGrille
I Power Cord
Surface Lights
Grease Filters
SPECIFICATIONS
| Model number HMV1472BHS | |
| Rated Voltage 120V~60Hz | |
| Rated Input Power (Microwave) 1500 Watt | |
| Rated Output Power (Microwave) 1000 Watt | |
| Oven Capacity 1.34 cu.ft | |
| Turntable Diameter 13½" (34.3 cm) | |
| External Dimensions (W x D x H) 23½" x 16 | ½" x 17½" (59.7 cm x 41.9 cm x 43.5 cm) |
| Net Weight 52.3 lbs (23.7 kg) | |
| LED Lighting Service Replacement only |
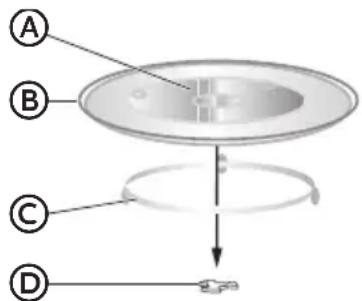
TURNTABLE
The turntable ring assembly and the glass turntable must be used during cooking. If you are using large or oblong-shaped cookware that would touch the walls of the microwave when the turntable spins, you can turn off the turntable. Press TURNTABLE. "OFF" and the icon will appear in the display.
OFF
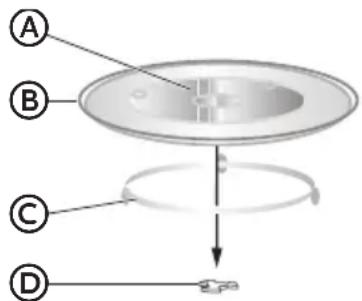
- Assemble the turntable as shown.
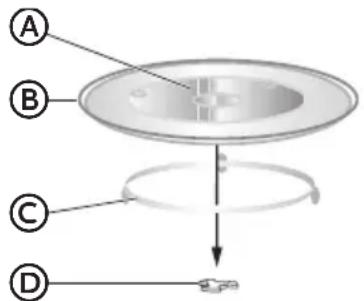
Hub (underside)
B Glass Turntable
Turntable Ring Assembly
D Turntable Coupler
NOTE:
- Do not place the glass turntable upside down.
The glass tray should never be restricted. - Place all food and containers of food on the glass tray for cooking.
- If glass turntable or turntable ring assembly cracks or breaks, contact the Customer Satisfaction Center at 1-877-337-3639 or the parts department at encompassparts.com.
CONTROL PANEL
CLOCK
Your model features a 12-hour clock.
SET TIME OF DAY
- Press CLOCK to enter the Clock Setting mode. "ENTER TIME" will appear in the display.

- Press the number pads to enter the correct time-of-day. For example, if the time is 10:12, press number pads "1, 0, 1, 2" to enter the time.

- Press START to confirm the time.
KITCHENTIMER
The microwave features a convenient timer for your cooking needs.
- Press KITCHEN TIMER. "ENTER TIME" will appear in the display.

- Press the number pads to input the desired cooking time.
NOTE: The maximum cooking time is 99 minutes and 99 seconds.

- Press START to begin counting down the time.
NOTE: When the set time has expired, "END" will appear in the display and three long alert tones will sound.
ENI
- Press STOP to exit the Kitchen Timer function.
FEATURES
VENT FAN
The Vent Fan feature allows you to exhaust heat and steam from the cooking surface below.
- Press VENT HI-LO-OFF to TurnOn/Off the fan and to regulate the fan speed.
NOTE:
The fan speed cannot be adjusted if the control panel is locked.
- When the control is pressed the first time, "High" appears in the display.
HIGH
High Speed - Press once
Low Speed - Press twice
Off - Press three times
SURFACE LIGHTING
The surface light feature illuminates the cooking surface below the microwave oven.
Press LIGHT to toggle among High, Low and Off.
CHILD LOCKOUT
The Child Lock feature allows you to lock the microwave control panel for easy cleaning or to avoid unintentionally changing the settings or turning on the microwave oven.
To Lock/Unlock the control panel:
- Press STOP/CANCEL for 3 seconds. Two beeps will sound to indicate the lock has been activated/deactivated and "LOCKED" or "UNLOCK" will appear in the display.
LOCKED
STATUS RECALL
The Status Recall feature allows you to check the Time and Power settings during microwave cooking.
- Press POWER LEVEL to display the set power level.
- Press CLOCK to display the time.
MICROWAVE OVENUSE
IMPORTANT: Never operate the microwave without food in the oven cavity; this can damage the magnetron tube or glass turntable. You may wish to leave a cup filled with water inside the oven when it is not in use to avoid damage if the oven is unintentionally turned on.
COOKWARE
IMPORTANT: Tightly closed containers could explode. Closed containers should be opened and plastic pouches should be pierced before cooking.
MICROWAVE-SAFE
- Browning dish (Sold separately. Follow manufacturer recommendations.)
- Ceramic glass, Glass
China, Earthenware (Follow manufacturer recommendations.)
Melamine (Follow manufacturer recommendations.) - Paper towels, Paper Plates, Napkins (Use non-recycled paper.)
- Plastic wraps, Bags, Covers, Dinnerware, Containers (Follow manufacturer recommendations.)
Pottery and Clay (Follow manufacturer recommendations.)
Silicone bakeware (Follow manufacturer recommendations.)
Wax paper
NOT MICROWAVE-SAFE
Metal cookware and bakeware
- Straw or Wicker
Gold, silver or pewter
Non-approved meat thermometers, skewers
- Twist ties
- Foil liners, such as sandwich wrappers
Staples
- Objects with gold or silver trim or with metallic glaze
Wood
To Test Cookware/Dinnerware:
Place dish in microwave oven with 1 cup (250 mL) of water beside it. Program 1 minute of cook time at 100% . If dish becomes hot and the water stays cool, do not use the dish in the microwave oven.
MICROWAVE COOKING
TIMED COOKING
- Press the number pads to set the cooking time. For example, to cook for 10 minutes, press "1,0,0,0" in turn.
NOTE:
The maximum cooking time is 99 minutes and 99 seconds.
- 100% power is the default. If you wish to cook at 100% power, skip steps 2 and 3, and go directly to Step 4.
- Press POWER LEVEL to activate Power mode.

- Press the number pads or press POWER LEVEL repeatedly to select the desired power level. See "Power Levels" chart later in this section.
- Press START to begin cooking. The time will count down.

NOTE: When cooking is finished, an alert tone sounds 3 times and "End" appears in the display.

Power Levels
Ten power levels are available.
| Level 10 | 987654 | 3210 | ||||||||
| Power 10 | 0% 90% | 80% 70% | 60% 50% | 40% 30% | 20% 10% | 0% | ||||
| Display | HI | PL-90 | PL-80 | PL-70 | PL-60 | PL-50 | PL-40 | PL-30 | PL-20 | PL-10 |
CONVENIENCE COOKING
- Press START/+ 30 SEC to begin cooking at 100% microwave power for 30 seconds.
- Press START/+ 30 SEC during microwave cooking, to increase the cooking time in 30-second increments.
NOTE: The maximum cooking time is 99 minutes and 99 seconds.
- Press number pads from 1 to 9 to start cooking with 100% microwave power for 1 to 9 minutes.
NOTE: During Convenience cooking, the microwave power level can be viewed, but not adjusted.
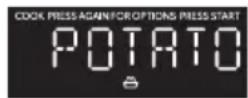
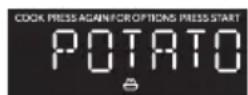
SENSOR COOK
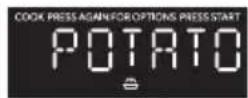
The Sensor Cook control automatically sets the appropriate cooking time calculated by sensing the moisture level of the food or beverage being cooked.
The Sensor Cook control is programmed to cook the following items: Potato, Fresh Veggies, Frozen Veggies, Bacon, Frozen Dinner, Rice, Frozen Breakfast, and Frozen Pizza.
- Press SENSOR COOK once, "Potato" will appear on the display. Continue to press SENSOR COOK to toggle among the choices. When the desired item appears in the display, press START to confirm and begin cooking.
- Once Start is pressed, the Sensing process begins. When the Sensing process is completed, alert tones will sound and the calculated cook time will begin to count down.
NOTE: Do not open the door during the Sensing process. If you do, the Sensor Cook program will be cancelled.
Sensor Cook Programs
| Program Item Quantity | |
| 1 Baked Potato 1 - 4 potatoes | |
| 2 Fresh Vegetable 2 cups | |
| 3 Frozen Vegetable 2 cups | |
| 4 Bacon 1 - 3 slices | |
| 5 Frozen Dinner 10 to 20 oz. | |
| 6 Rice 1 - 2 cups | |
| 7 Frozen Breakfast 8 to 12 oz. | |
| 8 Frozen Pizza 12 oz. |
DEFROST
The Defrost control allows you to choose to defrost by weight or by time.
Defrost by Weight
- Press DEFROST once. "Weight" will appear on the display.

- Press START. "Enter Weight" will appear on the display, and "lb" will flash.
- Press the number pads to enter the weight of the item to be defrosted. For example, if the food weight is 1.2 lbs, press "1" and then "2" to input the weight.
NOTE: The maximum weight that will be accepted is 6.0 Lbs.
- Press START to begin defrosting. Indicator "lb" will not be lit.
Defrost By Time
- Press DEFROST twice. "Time" will appear on the display.

- Press START. "Enter Time" will appear on the display.
- Press the number pads to enter the time to defrost. For example, if you want the food to defrost for 5 minutes, press "5" and then "0" to input the time.
NOTE: The maximum time that will be accepted is 99 minutes and 99 seconds.
- Press START to begin defrosting.
NOTE: When half of the total defrost time has passed, an alert tone will sound twice to remind you to turn the food over.
SENSOR REHEAT
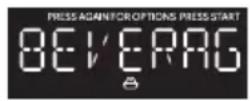
The Sensor Reheat control automatically sets the appropriate reheating time calculated by sensing the moisture level of the food or beverage being reheated.
The Sensor Reheat control is programmed to reheat the following items: Beverage, Dinner Plate, Pizza, Soup/Sauce and Casserole.
- Press SENSOR REHEAT once, "BEVERAGE" will appear on the display. Continue to press SENSOR REHEAT to toggle among the choices. When the desired item appears in the display, press START to confirm and begin reheating.

- Once Start is pressed, the Sensing process begins. When the Sensing process is completed, alert tones will sound and the calculated reheat time will begin to count down.
NOTE: Do not open the door during the Sensing process. If you do, the Sensor Cook program will be cancelled.
Sensor Reheat Programs
| Program Item Quantity | |
| 1 Beverage 1 to 3 cups | |
| 2 Dinner Plate 1 plate | |
| 3 Pizza 1 to 4 slices | |
| 4 Soup/Sauce 1 cup | |
| 5 Casserole/Lasagna | 10.5 oz. |
POPCORN
The popcorn control is programmed to pop microwave popcorn based on the size of the bag.
- Press POPCORN to toggle among the bag sizes.

- Press 1 time: To pop a 3.3 ounce bag of popcorn.
- Press 2 times: To pop a 3.0 ounce bag of popcorn.
-
Press 3 times: To pop a 1.75 ounce bag of popcorn.
-
Press START to confirm selection and begin cooking. The popping time will appear on the display.
CLEANING
WARNING

Electrical Shock Hazard
Disconnect power before cleaning.
Failure to do so can result in death or electrical shock.
IMPORTANT:
- Before cleaning, make sure all controls are off and the microwave oven is cool. Always follow label instructions on cleaning products.
-
To avoid damage to the microwave oven caused by arcing due to soil buildup, keep the oven cavity, top grille and the area where the door touches the oven frame clean.
-
Using a warm water and mild soap solution and a soft cloth or sponge, clean the oven cavity, frame and oven exterior.
- Rinse with clean warm water and dry with a soft cloth.
NOTE:
- Do not use scouring powder or rough scouring pads on the microwave.
The glass turntable may be washed and dried in the dishwasher. - For stainless steel models, a stainless steel cleaner may be used on the exterior.
FILTERS
WARNING

Electrical Shock Hazard
Disconnect power before servicing.
Replace all parts and panels before operating.
Failure to do so can result in death or electrical shock.
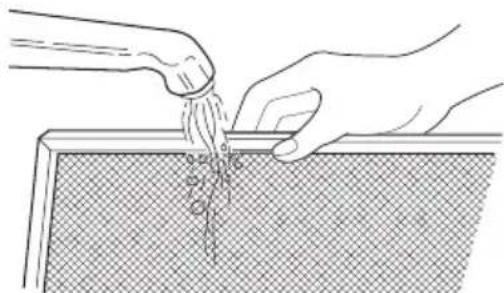
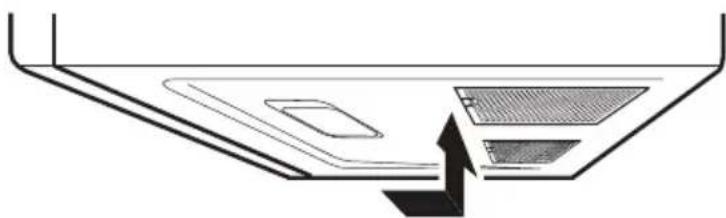
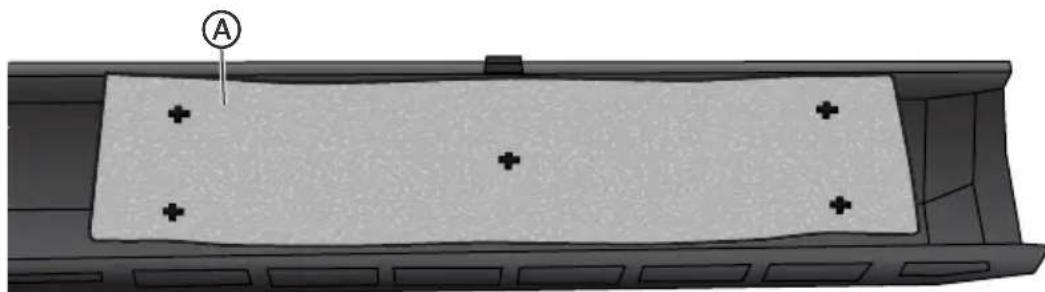
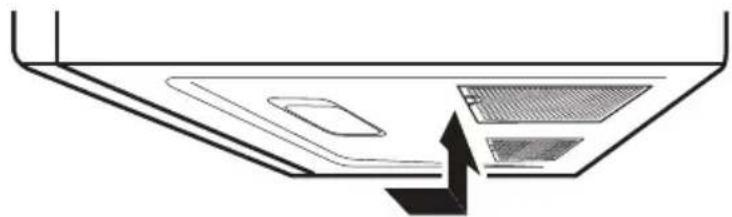
GREASE FILTER(S)
Grease filters are located on the underside of microwave oven. The grease filters should be removed and cleaned often; generally at least once every month.
- Remove the grease filter. Grasp the metal ring, slide the filter toward the back, and then gently pull the filter downward. Repeat for the second filter.

- Soak the grease filters in hot water with a mild detergent added. Rinse well and shake to dry.
NOTE: Do not use ammonia or wash in a dishwasher. The aluminum on the filter will corrode and darken.
- Reinstall the grease filter. Insert the back edge of the filter into the opening, and then gently push the filter up into place. Repeat for the second filter.
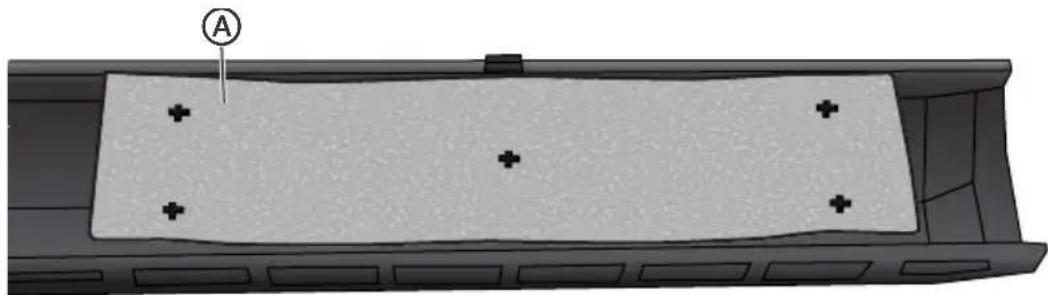
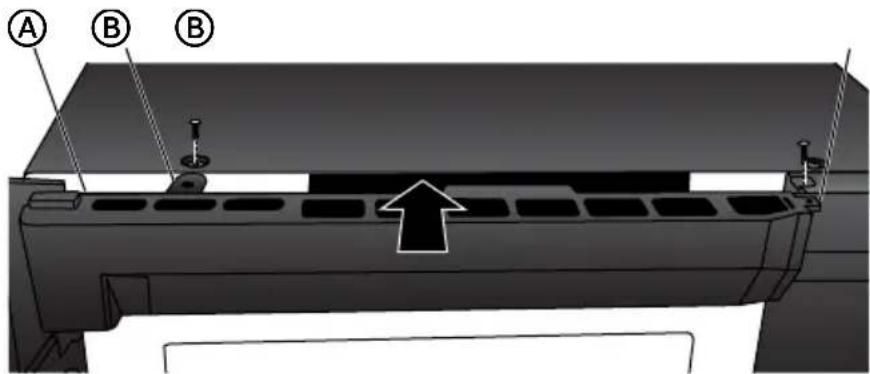
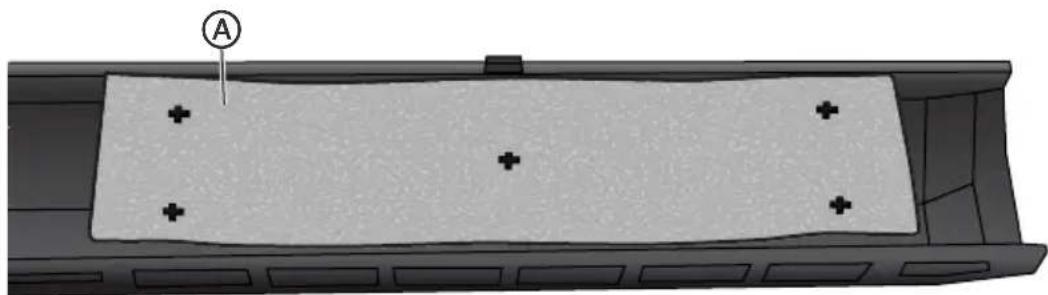
CHARCOAL FILTER
IMPORTANT: A charcoal filter must be installed in the microwave oven when it is used in a non-vented (recirculating) installation. Your microwave oven comes from the factory with the charcoal filter installed.
The charcoal filter cannot be cleaned, so it must be replaced at least every 6 months or more often depending on use. To order a replacement charcoal filter for your model, contact the Customer Satisfaction Center. See "Back Cover" for contact information.
- Unplug or disconnect power.
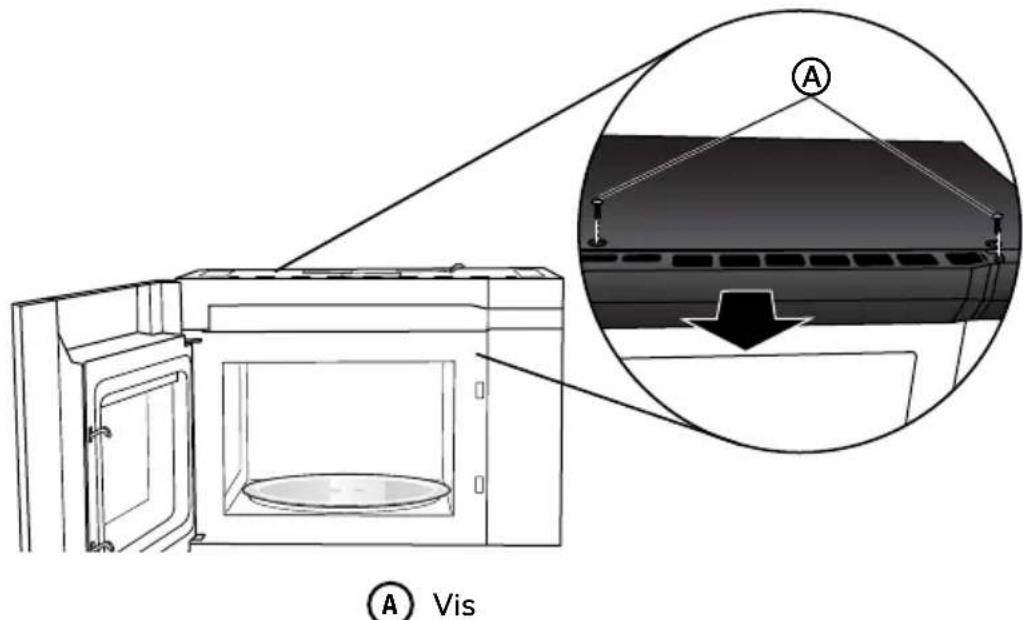
- Using a Phillips screwdriver, remove screws from the top grille.
- Open the microwave door so you can grasp the top grille, and then pull the grille straight out to remove.


Screws (2)
- Remove the used charcoal filter from the back of the grille, and then discard the filter.
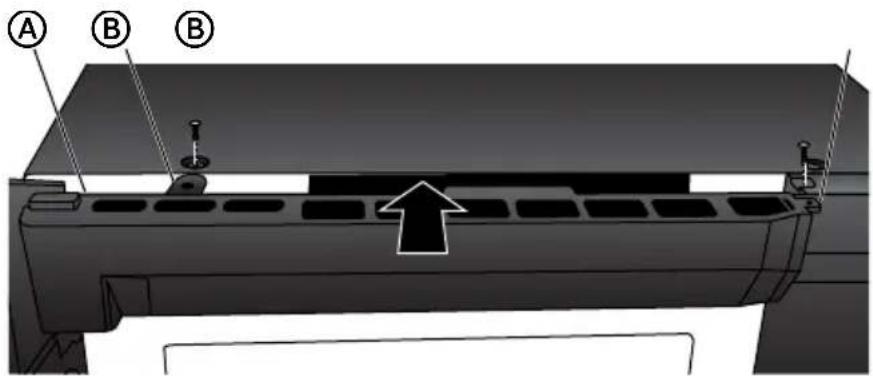
- Align the holes in the new charcoal filter with the five posts on the back of the grille, and gently press down to attach.

Charcoal Filter
- Align the top edge of the grille so that when the grille is pushed into place the screw hole tabs on the the grille will align with the holes in the microwave cabinet. Gently push on the grille until it snaps into place and the screw holes are aligned.
NOTE: Make sure that the wire harness, located near the door hinge, is not pinched when you are replacing the top grille.
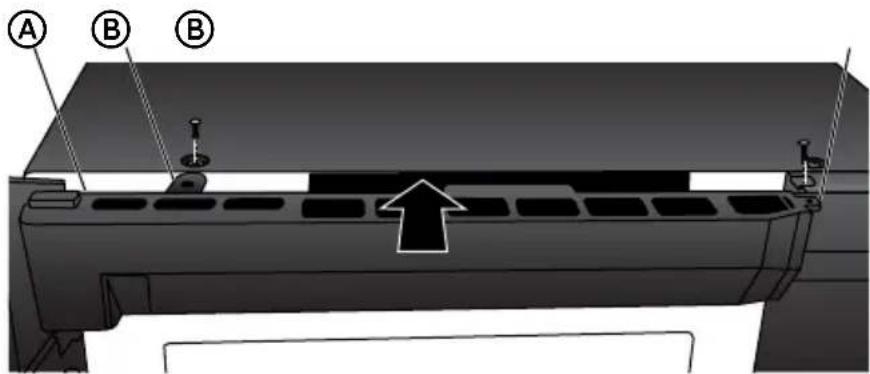

Wire Harness (not shown)

Screw Hole Tab (2)
- Replace the two screws removed earlier, and completely tighten the screws.
LIGHTS
IMPORTANT: Your microwave oven features LED interior lighting as well as LED surface lighting. These lights are designed to last for the life of your microwave oven. However, if the lights stop illuminating, please contact a qualified technician for replacement or the Customer Satisfaction Center for service. See the back cover for contact information.
TROUBLESHOOTING
First try the solutions suggested here to possibly avoid the cost of a service call.
| PROBLEM POSSIBLE CAUSE(S) SOLUTION | ||
| Oven will not start | Oven power cord is not plugged into an electrical outlet. | Plug into a grounded 3 prong outlet. |
| Door is open. Close the door and try again. | ||
| Wrong operation is set. Check | instruction. | |
| Arcing or sparking | Materials to be avoided in microwave oven are used. | Use microwave-safe cookware only. |
| The oven is operated when empty. | Do not operate with oven empty. | |
| Spilled food remains in the oven cavity. | Clean oven cavity with a damp cloth and dry thoroughly. See "Cleaning." | |
| Unevenly cooked foods | Materials to be avoided in microwave oven are used. | Use microwave-safe cookware only. |
| Food is not defrosted completely. | Completely defrost food. | |
| Cooking time, power level is not suitable. | Use correct cooking time, power level. | |
| Food is not turned or stirred. Turn or stir food. | ||
| Overcooked foods | Cooking time, power level is not suitable. | Use correct cooking time, power level. |
| Undercooked foods | Materials to be avoided in microwave oven are used. | Use microwave-safe cookware only. |
| Food is not defrosted completely. | Completely defrost food. | |
| Oven ventilation ports are restricted. | Check to see that oven ventilation ports are not restricted. | |
| Cooking time, power level is not suitable. | Use correct cooking time, power level. | |
| PROBLEM POSSIBLE CAUSE(S) SOLUTION | ||
| Improper defrosting | Materials to be avoided in microwave oven are used. | Use microwave-safe cookware only. |
| Cooking time, power level is not suitable. | Use correct cooking time, power level. | |
| Food is not turned or stirred. | Turn or stir food. | |
FOR MORE HELP, VISIT HAIERAMERICA.COM OR CALL THE CONSUMER HELP LINE AT 1-877-337-3639.
LIMITED WARRANTY
IN-HOME SERVICE
FULL ONE YEAR WARRANTY
For 12 months from the date of original retail purchase, Haier will repair or replace any part free of charge including labor that fails due to a defect in materials or workmanship.
Haier may replace or repair at their sole discretion any part or subsystem including the entire product.
Product must be accessible, without encumbrance and installed properly to receive warranty repair service.
LIMITED WARRANTY
NOTE: This warranty commences on the date the item was purchased, and the original purchase receipt must be presented to the authorized service representative before warranty repairs are rendered.
Exceptions: Commercial Use Warranty
90 days labor from date of original purchase
90 days parts from date of original purchase
No other warranty applies.
FOR WARRANTY SERVICE
All service must be performed by a Haier authorized service center. For the name and telephone number of the nearest authorized service center, please call 1-877-337-3639.
Before calling please have available the following information:
Model number and serial number of your appliance. The name and address of the dealer you purchased the unit from and the date of purchase.
A clear description of the problem.
A proof of purchase (sales receipt).
This warranty covers home appliance services within the contiguous United States and Canada and where available in Alaska, Hawaii and Puerto Rico.
What is not covered by this warranty:
Replacement or repair of household fuses, circuit breakers, wiring or plumbing.
A product whose original serial number has been removed or altered.
Any service charges not specifically identified as normal such as normal service area or hours.
Damage incurred in shipping.
Damage caused by improper installation or maintenance.
Damage from misuse, abuse accident, fire, flood, or acts of nature.
Damage from service other than an authorized Haier dealer or service center.
Damage from incorrect electrical current, voltage or supply.
Damage resulting from any product modification, alteration or adjustment not authorized by Haier.
Adjustment of consumer operated controls as identified in the owner's manual.
Hoses, knobs, lint trays and all attachments, accessories and disposable parts.
Labor, service transportation, and shipping charges for the removal and replacement of defective parts beyond the initial 12-month period.
Damage from other than normal household use.
Any transportation and shipping charges.
THIS LIMITED WARRANTY IS GIVEN IN LIEU OF ALL OTHER WARRANTYES, EXPRESSED OR, INCLUDING THE WARRANTYES OF MERCHANTABILITY AND FITNESS FOR A PARTICULAR PURPOSE
The remedy provided in this warranty is exclusive and is granted in lieu of all other remedies.
This warranty does not cover incidental or consequential damages, so the above limitations may not apply to you. Some states do not allow limitations on how long an implied warranty lasts, so the above limitations may not apply to you.
This warranty gives you specific legal rights, and you may have other rights, which vary from state to state.
Haier America
Wayne,NJ07470
RECORD KEEPING
Thank you for purchasing this Haier product. This user manual will help you get the best performance from your new microwave.
For future reference, record the model and serial number located on the inside frame of the microwave, and the date of purchase.
Staple your proof of purchase to this manual to aid in obtaining warranty service if needed.
Model number
Serial number
Date of purchase
TABLE DES MATIÈRES
SECURITE DE FOUR A MICRO-ONDES 21
[en] The turntable ring assembly and the glass turntable must be used during cooking.
[en] If you are using large or oblong-shaped cookware that would touch the walls of the microwave when the turntable spins, you can turn off the turntable. Press
TURNTABLE. "OFF" and the icon will appear in the display.

[en] Assemble the turntable as shown.
H [en] Stop
Conv (Décongélation)
[en]Turntable On/Off
K [en] Light On/Off
[en] Vent Hi-Lo-Off
M Horloge
N [en] Start
HORLOGE
- [en] Press CLOCK to enter the Clock Setting mode. "ENTER TIME" will appear in the display.

- [en] Press START to confirm the time.
MINUTERIE DE CUISINE
[en] The microwave features a convenient timer for your cooking needs.
- [en] Press KITCHEN TIMER. "ENTER TIME" will appear in the display.

- [en] Press START to begin counting down the time.
REMARQUE: [en] When the set time has expired, "END" will appear in the display and three long alert tones will sound.
ENI
- [en] Press STOP to exit the Kitchen Timer function.
CHARACTERISTIQUES
VENT FAN (VENTILATEUR D'EVACUATION)
[en] The Vent Fan feature allows you to exhaust heat and steam from the cooking surface below.
[en] The fan speed cannot be adjusted if the control panel is locked.
[en] When the control is pressed the first time, "High" appears in the display.
HIGH
[en] High Speed - Press once
[en] Low Speed - Press twice
[en] Off - Press three times
LAMPE DE SURFACE
[en] The surface light feature illuminates the cooking surface below the microwave oven.
[en] Press LIGHT to toggle among High, Low and Off.
VERROUILLAGE ENFANTS
IMPORTANT: [en] Never operate the microwave without food in the oven cavity; this can damage the magnetron tube or glass turntable. You may wish to leave a cup filled with water inside the oven when it is not in use to avoid damage if the oven is unintentionally turned on.
USTENSILE DE CUISSON
[en] The Sensor Cook control automatically sets the appropriate cooking time calculated by sensing the moisture level of the food or beverage being cooked.
[en] The Sensor Cook control is programmed to cook the following items: Potato, Fresh Veggies, Frozen Veggies, Bacon, Frozen Dinner, Rice, Frozen Breakfast, and Frozen Pizza.
- [en] Press SENSOR COOK once, "Potato" will appear on the display. Continue to press SENSOR COOK to toggle among the choices. When the desired item appears in the display, press START to confirm and begin cooking.
- [en] Once Start is pressed, the Sensing process begins. When the Sensing process is completed, alert tones will sound and the calculated cook time will begin to count down.
REMARQUE: [en] Do not open the door during the Sensing process. If you do, the Sensor Cook program will be cancelled.
[en] Sensor Cook Programs
| [en] Program [en] Item [en] Quantity | |
| 1 [en] Baked Potato | [en] 1 - 4 potatoes |
| 2 [en] Fresh Vegetable | ple [en] 2 cups |
| 3 [en] Frozen Vegetable | table [en] 2 cups |
| 4 [en] Bacon [en] 1 - 3 slices | |
| 5 [en] Frozen Dinner | [en] 10 to 20 oz. |
| 6 [en] Rice [en] 1 - 2 cups | |
| 7 [en] Frozen Breakfast | [en] 8 to 12 oz. |
| 8 [en] Frozen Pizza | [en] 12 oz. |
DéCONGÉLATION
[en] The Defrost control allows you to choose to defrost by weight or by time.
- [en] Press DEFROST once. "Weight" will appear on the display.

- [en] Press START. "Enter Weight" will appear on the display, and "lb" will flash.
- [en] Press the number pads to enter the weight of the item to be defrosted. For example, if the food weight is 1.2 lbs, press "1" and then "2" to input the weight.
- [en] Press DEFROST twice. "Time" will appear on the display.

- [en] Press START. "Enter Time" will appear on the display.
- [en] Press the number pads to enter the time to defrost. For example, if you want the food to defrost for 5 minutes, press "5" and then "0" to input the time.
[en] The Sensor Reheat control automatically sets the appropriate reheating time calculated by sensing the moisture level of the food or beverage being reheated.
[en] The Sensor Reheat control is programmed to reheat the following items: Beverage, Dinner Plate, Pizza, Soup/Sauce and Casserole.
- [en] Press SENSOR REHEAT once, "BEVERAGE" will appear on the display. Continue to press SENSOR REHEAT to toggle among the choices. When the desired item appears in the display, press START to confirm and begin reheating.
- [en] Once Start is pressed, the Sensing process begins. When the Sensing process is completed, alert tones will sound and the calculated reheat time will begin to count down.
REMARQUE: [en] Do not open the door during the Sensing process. If you do, the Sensor Cook program will be cancelled.
[en] Sensor Reheat Programs
| [en] Program | [en] Item [en] Quantity | |
| [en] 1 [en] Beverage | [en] 1 to 3 cups | |
| 2 [en] Dinner Plate | [en] 1 plate | |
| 3 [en] Pizza | [en] 1 to 4 slices | |
| 4 [en] Soup/Sauce | [en] 1 cup | |
| 5 [en] Casserole/Lasagna | [en] 10.5 oz. |
[EN]POPCORN
[en] The popcorn control is programmed to pop microwave popcorn based on the size of the bag.
- [en] Press POPCORN to toggle among the bag sizes.
![HAIER HMV1472BHS - [EN]POPCORN - 1](/content/2026/03/477076/images/cb1236b14511a2cd357540c1fee7716cf88acb4863dda0a50183b65f1fc0f419.jpg)
[en] Press 1 time: To pop a 3.3 ounce bag of popcorn.
[en] Press 2 times: To pop a 3.0 ounce bag of popcorn.
[en] Press 3 times: To pop a 1.75 ounce bag of popcorn.
- [en] Press START to confirm selection and begin cooking. The popping time will appear on the display.
NETTOYAGE
AVERAGEMENT

[en] Do not use scouring powder or rough scouring pads on the microwave.
[en] The glass turntable may be washed and dried in the dishwasher.
[en] For stainless steel models, a stainless steel cleaner may be used on the exterior.
AVERAGEMENT

[en] Grease filters are located on the underside of microwave oven. The grease filters should be removed and cleaned often; generally at least once every month.
- [en] Remove the grease filter. Grasp the metal ring, slide the filter toward the back, and then gently pull the filter downward. Repeat for the second filter.
A Lampes de surface
B Porte
[en] Metal Loop
D Filtres a graisse
- [en] Soak the grease filters in hot water with a mild detergent added. Rinse well and shake to dry.
- [en] Reinstall the grease filter. Insert the back edge of the filter into the opening, and then gently push the filter up into place. Repeat for the second filter.

FILTREÀ CHARBON
IMPORTANT: [en] A charcoal filter must be installed in the microwave oven when it is used in a non-vented (recirculating) installation. Your microwave oven comes from the factory with the charcoal filter installed.
[en] The charcoal filter cannot be cleaned, so it must be replaced at least every 6 months or more often depending on use. To order a replacement charcoal filter for your model, contact the Customer Satisfaction Center. See "Back Cover" for contact information.
- Debrancher ou déconnecter la source de courant électrique.
- [en] Using a Phillips screwdriver, remove screws from the top grille.
- [en] Open the microwave door so you can grasp the top grille, and then pull the grille straight out to remove.
- [en] Remove the used charcoal filter from the back of the grille, and then discard the filter.
- [en] Align the holes in the new charcoal filter with the five posts on the back of the grille, and gently press down to attach.
A [en] Charcoal Filter
- [en] Align the top edge of the grille so that when the grille is pushed into place the screw hole tabs on the the grille will align with the holes in the microwave
cabinet. Gently push on the grille until it snaps into place and the screw holes are aligned.
REMARQUE: [en] Make sure that the wire harness, located near the door hinge, is not pinched when you are replacing the top grille.
A [en] Wire Harness (not shown)
[B] [en] Screw Hole Tab (2)
- [en] Replace the two screws removed earlier, and completely tighten the screws.
ÉCLAIRAGE
IMPORTANT: [en] Your microwave oven features LED interior lighting as well as LED surface lighting. These lights are designed to last for the life of your microwave oven. However, if the lights stop illuminating, please contact a qualified technician for replacement or the Customer Satisfaction Center for service. See the back cover for contact information.
DéPANNAGE
[en] The turntable ring assembly and the glass turntable must be used during cooking.
[en] If you are using large or oblong-shaped cookware that would touch the walls of the microwave when the turntable spins, you can turn off the turntable. Press
TURNTABLE. "OFF" and the on will appear in the display.

[en] Assemble the turntable as shown.
A Cubo de acople (parte inferior)
B [en] Glass Turntable
C Ensamblaje del aro de la bandeja giratoria
Acoplador de la bandeja giratoria
NOTA:
[H] [en] Stop
1 Descongelado (Conv)
[en]Turntable On/Off
K [en] Light On/Off
L [en] Vent Hi-Lo-Off
M Reloj
[en] Start
RELOJ
- [en] Press CLOCK to enter the Clock Setting mode. "ENTER TIME" will appear in the display.

- [en] Press START to confirm the time.
[en] The microwave features a convenient timer for your cooking needs.
- [en] Press KITCHEN TIMER. "ENTER TIME" will appear in the display.

- [en] Press START to begin counting down the time.
NOTA: [en] When the set time has expired, "END" will appear in the display and three long alert tones will sound.
ENI
- [en] Press STOP to exit the Kitchen Timer function.
CHARACTERISTICAS
VENTILADOR
[en] The Vent Fan feature allows you to exhaust heat and steam from the cooking surface below.
[en] The fan speed cannot be adjusted if the control panel is locked.
- [en] When the control is pressed the first time, "High" appears in the display.
HIGH
[en] High Speed - Press once
[en] Low Speed - Press twice
[en] Off - Press three times
[en] The surface light feature illuminates the cooking surface below the microwave oven.
[en] Press LIGHT to toggle among High, Low and Off.
SEGURO PARA NINOS
IMPORTANT: [en] Never operate the microwave without food in the oven cavity; this can damage the magnetron tube or glass turntable. You may wish to leave a cup filled with water inside the oven when it is not in use to avoid damage if the oven is unintentionally turned on.
UTENSILIOS DE COCINA
[en] The Sensor Cook control automatically sets the appropriate cooking time calculated by sensing the moisture level of the food or beverage being cooked.
[en] The Sensor Cook control is programmed to cook the following items: Potato, Fresh Veggies, Frozen Veggies, Bacon, Frozen Dinner, Rice, Frozen Breakfast, and Frozen Pizza.
- [en] Press SENSOR COOK once, "Potato" will appear on the display. Continue to press SENSOR COOK to toggle among the choices. When the desired item appears in the display, press START to confirm and begin cooking.
- [en] Once Start is pressed, the Sensing process begins. When the Sensing process is completed, alert tones will sound and the calculated cook time will begin to count down.
NOTA: [en] Do not open the door during the Sensing process. If you do, the Sensor Cook program will be cancelled.
[en] Sensor Cook Programs
| [en] Program [en] Item [en] Quantity | |
| 1 [en] Baked Potato | [en] 1 - 4 potatoes |
| 2 [en] Fresh Vegetable | ble [en] 2 cups |
| 3 [en] Frozen Vegetable | able [en] 2 cups |
| 4 [en] Bacon [en] 1 - 3 slices | |
| 5 [en] Frozen Dinner | [en] 10 to 20 oz. |
| 6 [en] Rice [en] 1 - 2 cups | |
| 7 [en] Frozen Breakfast | [en] 8 to 12 oz. |
| 8 [en] Frozen Pizza | [en] 12 oz. |
DESCONGELACION
[en] The Defrost control allows you to choose to defrost by weight or by time.
- [en] Press DEFROST once. "Weight" will appear on the display.

- [en] Press START. "Enter Weight" will appear on the display, and "lb" will flash.
- [en] Press the number pads to enter the weight of the item to be defrosted. For example, if the food weight is 1.2 lbs, press "1" and then "2" to input the weight.
- [en] Press DEFROST twice. "Time" will appear on the display.

- [en] Press START. "Enter Time" will appear on the display.
- [en] Press the number pads to enter the time to defrost. For example, if you want the food to defrost for 5 minutes, press "5" and then "0" to input the time.
[en] The Sensor Reheat control automatically sets the appropriate reheating time calculated by sensing the moisture level of the food or beverage being reheated.
[en] The Sensor Reheat control is programmed to reheat the following items: Beverage, Dinner Plate, Pizza, Soup/Sauce and Casserole.
- [en] Press SENSOR REHEAT once, "BEVERAGE" will appear on the display. Continue to press SENSOR REHEAT to toggle among the choices. When the desired item appears in the display, press START to confirm and begin reheating.

- [en] Once Start is pressed, the Sensing process begins. When the Sensing process is completed, alert tones will sound and the calculated reheat time will begin to count down.
NOTA: [en] Do not open the door during the Sensing process. If you do, the Sensor Cook program will be cancelled.
[en] Sensor Reheat Programs
| [en] Program [en] Item [en] Quantity | |
| [en] 1 [en] Beverage [en] 1 to 3 cups | |
| 2 [en] Dinner Plate [en] 1 plate | |
| 3 [en] Pizza [en] 1 to 4 slices | |
| 4 [en] Soup/Sauce [en] 1 cup | |
| 5 [en] Casserole/Lasagna [en] 10.5 oz. |
[EN]POPCORN
[en] The popcorn control is programmed to pop microwave popcorn based on the size of the bag.
- [en] Press POPCORN to toggle among the bag sizes.
![HAIER HMV1472BHS - [EN]POPCORN - 1](/content/2026/03/477076/images/cf7b0bc1e8f1c5d9088698e72b83e47bb7532bf123e279f1db9bd35e9330b52a.jpg)
[en] Press 1 time: To pop a 3.3 ounce bag of popcorn.
[en] Press 2 times: To pop a 3.0 ounce bag of popcorn.
[en] Press 3 times: To pop a 1.75 ounce bag of popcorn.
- [en] Press START to confirm selection and begin cooking. The popping time will appear on the display.
LIMPIEZA
ADVERTENCIA

Peligro deCHOque elcctrico
[en] Do not use scouring powder or rough scouring pads on the microwave.
[en] The glass turntable may be washed and dried in the dishwasher.
[en] For stainless steel models, a stainless steel cleaner may be used on the exterior.
ADVERTENCIA

[en] Grease filters are located on the underside of microwave oven. The grease filters should be removed and cleaned often; generally at least once every month.
- [en] Remove the grease filter. Grasp the metal ring, slide the filter toward the back, and then gently pull the filter downward. Repeat for the second filter.
A Luces de la superficie
B Puerta
C [en] Metal Loop
D [en] Grease Filters
- [en] Soak the grease filters in hot water with a mild detergent added. Rinse well and shake to dry.
- [en] Reinstall the grease filter. Insert the back edge of the filter into the opening, and then gently push the filter up into place. Repeat for the second filter.
FILTRO DE CARBON
IMPORTANT: [en] A charcoal filter must be installed in the microwave oven when it is used in a non-vented (recirculating) installation. Your microwave oven comes from the factory with the charcoal filter installed.
[en] The charcoal filter cannot be cleaned, so it must be replaced at least every 6 months or more often depending on use. To order a replacement charcoal filter for your model, contact the Customer Satisfaction Center. See "Back Cover" for contact information.
- Desenchufe o desconnecte el suministro de energia.
- [en] Using a Phillips screwdriver, remove screws from the top grille.
- [en] Open the microwave door so you can grasp the top grille, and then pull the grille straight out to remove.

A [en] Screws (2)
- [en] Remove the used charcoal filter from the back of the grille, and then discard the filter.
- [en] Align the holes in the new charcoal filter with the five posts on the back of the grille, and gently press down to attach.
A [en] Charcoal Filter
- [en] Align the top edge of the grille so that when the grille is pushed into place the screw hole tabs on the the grille will align with the holes in the microwave
cabinet. Gently push on the grille until it snaps into place and the screw holes are aligned.
NOTA: [en] Make sure that the wire harness, located near the door hinge, is not pinched when you are replacing the top grille.
A [en] Wire Harness (not shown)
[B] [en] Screw Hole Tab (2)
- [en] Replace the two screws removed earlier, and completely tighten the screws.
LUCES
IMPORTANT: [en] Your microwave oven features LED interior lighting as well as LED surface lighting. These lights are designed to last for the life of your microwave oven. However, if the lights stop illuminating, please contact a qualified technician for replacement or the Customer Satisfaction Center for service. See the back cover for contact information.
SOLUTION DE PROBLEMAS
If you have a problem with this product, please contact the
"Haier Customer Satisfaction Center" at
1-877-337-3639.
DATED PROOF OF PURCHASE, MODEL #, AND SERIAL #
REQUIRED FOR WARRANTY SERVICE