Multi Chef Pro 822 - Saucepan Solis - Free user manual and instructions
Find the device manual for free Multi Chef Pro 822 Solis in PDF.


Frequently Asked Questions - Multi Chef Pro 822 Solis
User questions about Multi Chef Pro 822 Solis
0 question about this device. Answer the ones you know or ask your own.
Ask a new question about this device
Download the instructions for your Saucepan in PDF format for free! Find your manual Multi Chef Pro 822 - Solis and take your electronic device back in hand. On this page are published all the documents necessary for the use of your device. Multi Chef Pro 822 by Solis.
USER MANUAL Multi Chef Pro 822 Solis
J Einstellung KEEP WARM
Solis of Switzerland AG
EINFACHES OSSO BUCCO
Für 4 Portionen
Zutaten
TROPISCHER MANGO-REIS
Für 4-6 Portionen
Zutaten
H Programmation SLOW COOK LOW
I Programmation SLOW COOK HIGH
J Programmation KEEP WARM
LA FONCTION KEEP WARM
Solis of Switzerland SA
Solis-Haus · CH-8152 Glattbrugg-Zurich · Suisse
Telephone +41 44 874 64 54 • Telefonax +41 44 874 64 99
info@solis.ch · www.solis.ch · www.solis.com
Recettes
POULET AU ROMARIN, CITRON ET AIL
pour 4-6 personnes
- ingrédents
124 Appliance description
126 Important safety precautions
130 Before first use
131 How to make risotto
133 How to make rice
136 Rice cooking tables
137 Rice variations
139 How to use the SLOW COOK setting
142 Steaming foods
144 Steaming tables
144 KEEP WARM setting
147 Cleaning and Care
148 Storage
149 Troubleshooting / Technical Specifications
150 Disposal / SOLIS Helpline
151 Recipes

APPLIANCE DESCRIPTION
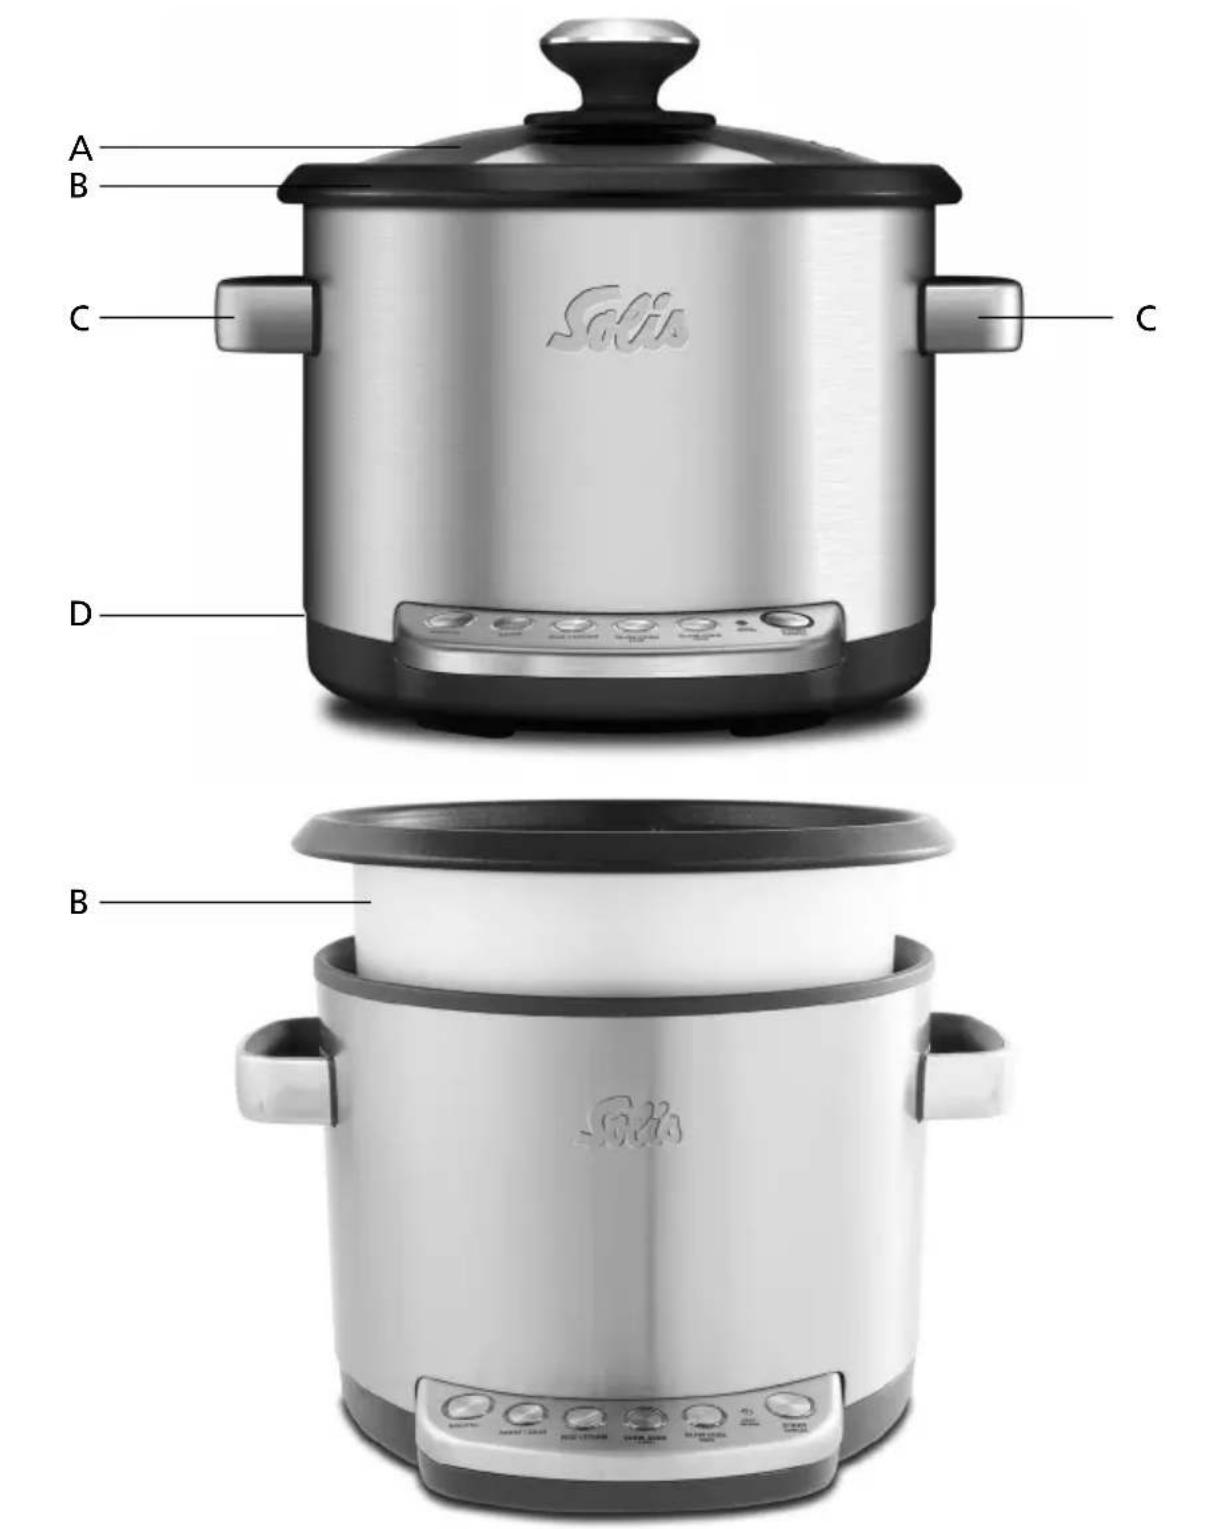
A Tempered domed glass lid
With steam vent. Dishwasher safe.
B Removable non-stick cooking bowl
Prevents risotto and rice from sticking.
C Cool-touch handles
D Removable power cord (not shown)
For convenient serving at the table and storage.
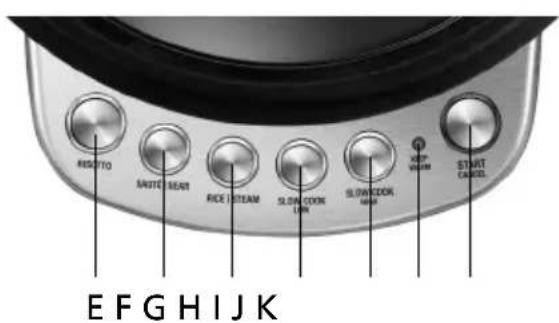
E RISOTTO setting
F SAUTÉ/SEAR setting for searing
G RICE/STEAM setting for cooking rice and steaming
Large 10 scoop capacity cooks up to 20 scoops of rice.
H SLOW COOK LOW setting
Gently simmers food for an extended period of time, for several hours.
(Temperature: approx. 70^
I SLOW COOK HIGH setting
Simmers food also for several hours, but is quicker as in the setting SLOW
COOK LOW, as the temperature is about 90^ .
J KEEP WARM setting
Automatically switches on after each setting, except SAUTÉ/SEAR. When
switched on, the function light is on.
K START/CANCEL button
To turn on and off the cooking process.
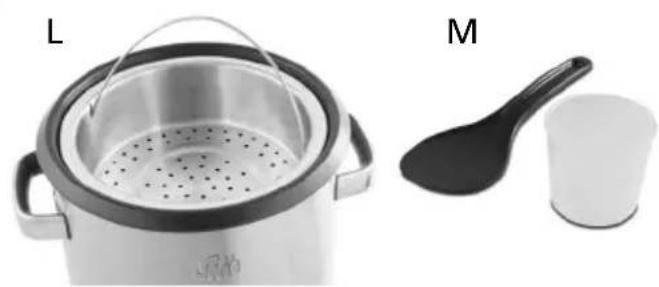
L Stainless steel steaming tray
Ideal for vegetables, seafood and poultry.
M Rice scoop and serving spoon

IMPORTANT SAFETY PRECAUTIONS
Please read through this user manual thoroughly before using your SOLIS Multi Chef Pro, so that you become familiar with your appliance and can use it safely. We thoroughly recommend that you keep these instructions and, if you pass the appliance on, that you also hand these instructions to the new owner.
For your own safety, please observe the following safety measures when using electrical appliances:
- To avoid electric shock, neither the multi cooker, power cable nor plug or connector end are allowed to come into contact with water or other fluids. Water can enter the housing and damage the appliance! If the appliance, power cable, power plug or connector end should come into contact with water, immediately pull the plug out from the socket using dry rubber gloves.
- Before using the appliance, check that the voltage stated on the appliance matches your mains voltage.
- Always insert the connector end of the power cord into the appliance inlet first before plugging in and switching on the appliance. Ensure the appliance inlet and connector end are completely dry before connecting them.
- Always operate the multi cooker on a stable, dry and heat resistant surface. Do not operate under hanging cabinets, shelves or other steam sensitive materials.
- Do not leave the power cable hanging over table edges so that it can not be pulled. Make sure that it does not come into contact with hot surfaces, such as hot-plates or a radiator, or that they come into contact with the appliance. Fully unwind the cord before use.
- Keep the appliance away from hot gas, hot ovens and other heat-emitting appliances or heat sources. Never use the appliance on a hot or wet surface. Never place the appliance near moisture, heat and naked flames. Keep the appliance away from moving parts or appliances.
- Never carry the appliance by the power cable and do not place it on the power cable.
- We recommend that you do not use an extension cable with this appliance. Do not place the appliance directly underneath a power socket.
- Unplug the appliance when it is not in use or unattended, and before cleaning. We recommend the use of a residual current device (RCD safety switch) to ensure additional protection during the use of electrical appliances. It is advisable to use a safety switch with a rated residual operating current of 30mA maximum. For professional advice consult an electrician.
-
Do not make any adjustments to the appliance, cable, plug or accessories.
-
Do not leave the multi cooker unattended when in use. Incorrect use may cause injury!
- Warning: The temperature of accessible surfaces of the appliance will be high when the multi cooker is operating and for some time after use.
- Never take hold of an appliance that has fallen into water. Always take the plug out of the power socket before removing the appliance from the water. Do not use the appliance again until you have had it's ability to function safely checked by SOLIS or a SOLIS approved service centre.
- Never place the multi cooker in a place where it could fall into water (e.g. next to a sink).
- Place the appliance so that it is never exposed to direct sunlight.
- Never put sharp or pointed objects and tools into the appliance openings. The appliance may become damaged - danger of electric shock!
- Do not shake or relocate the appliance while it is in operation.
- Only use the appliance as described in this manual. Only use with the provided accessories, incorrect accessories can lead to damage of the appliance.
- This appliance is only for domestic use and is not suitable for commercial use.
- The multi cooker is not for outdoor use. Do not use in moving vehicles or boats.
- Check your multi cooker before each use.
- In order to avoid electric shock, do not use the appliance if the cable or plug are damaged or the appliance is otherwise faulty, dropped or damaged. Never attempt repairs yourself, but take your appliance to SOLIS or a SOLIS approved service centre in order to get it inspected or mechanically and electrically repaired.
- People with limited physical, sensory or mental capacities (including children) are not permitted to use the multi cooker, except when supervised by a person responsible for their safety or are instructed by this person, exactly how to use the appliance.
- Children must be supervised to avoid them playing with the machine.
- Ensure that the SOLIS Multi Chef Pro is properly assembled before using it. How this is done you can learn from this manual.
- Never cover up the air vents while the machine is in use.
-
Always turn off the machine by pressing the START/CANCEL button before resetting or disassembling the appliance. Then, disconnect the power plug from the outlet and wait until the multi cooker has cooled down. This also applies when the machine is not in use.
-
Ensure the interior of the appliance, the heating plate and the exterior of the cooking bowl are absolutely clean and dry before using the appliance.
- Keep the machine clean. Please refer to notes given in the „Cleaning and care" section of this manual. Only the glas lid can be cleaned in the dishwasher. Other parts must not be placed in the dishwasher.
- Even when the machine is not in use, the lid should only be removed for short periods of time.
- Never store explosive or flammable substances like aerosol containers (deodorant sprays, hair sprays etc.) in the multi cooker.
- Always position steam vent on lid away from yourself so that it is not pointed in your direction. Lift and remove the lid carefully and away from yourself to avoid scalding from escaping steam.
- Use only the removable cooking bowl and, if needed, the steel steaming tray with the multi cooker. Do not use or put any other bowl inside the multi cooker housing.
- Do not use a damaged or dented removable cooking bowl. A replacement for the cooking bowl can be obtained from specialist shops or directly from SOLIS.
- Do not place anything on top of the lid when assembled, when in use and when stored.
- Do not touch hot surfaces. Use the handles for lifting and carrying the multi cooker.
- Do not use chemicals, steel wool, metal scouring pads or abrasive cleaners to clean the appliance or cooking bowl as these can damage the coating of the cooking bowl or the surface of the housing. To clean the multi cooker, only use a soft cloth and a mild detergent.
- Never plug in or switch on the multi cooker without having the removable cooking bowl placed inside the multi cooker housing.
- Do not place foods or liquids in the multi cooker housing. Only the removable cooking bowl and the steaming tray are designed to contain foods.
- Never operate the multi cooker without food and liquid in the removable cooking bowl.
- Do not touch hot surfaces, use oven mitts or heat protective gloves to remove the lid or the removable cooking bowl. Lift and remove the lid carefully and away from yourself to avoid scalding by escaping steam.
- Do not allow water from the lid to drip into the multi cooker housing, only into the removable cooking bowl.
-
Do not leave the multi cooker unattended when in use.
-
Extreme caution must be used when the multi cooker contains hot food and liquids. Do not move the appliance during cooking.
- Cover the appliance only with the lid provided when assembled, when in use and when stored. Do not place anything other on top of the multi cooker.
- To prevent scratching the non-stick surface of the removable cooking bowl, always use wooden or heat resistant plastic utensils.
- Ensure the removable cooking bowl is correctly positioned in the multi cooker base before you start cooking.
- Always have the glass lid placed correctly into position on the appliance throughout operation of the appliance unless stated in the recipe to have it removed.
- The glass lid has been specially treated to make it stronger, more durable and safer than ordinary glass, however it is not unbreakable. If struck extremely hard, it may break or weaken, and could at a later time shatter into many small pieces without apparent cause.
- Before cleaning, always turn the appliance off with the START/CANCEL button, unplug the power plug from the power outlet and the appliance connector end from the appliance inlet and remove the power cord from the appliance. Allow all parts to cool. The appliance inlet must be dried carefully before the multi cooker is used again.
- Position the appliance at a minimum distance of 20~cm away from walls, curtains and other heat or steam sensitive materials and provide adequate space above and on all sides for air circulation.
Important: Fully unwind the cord before use. If you want to store the power cord inside the cooking bowl, ensure appliance and bowl is fully cooled.

BEFORE FIRST USE
- Before first use of your SOLIS Multi Chef Pro, remove all promotional labels and wash the non-stick removable cooking bowl, stainless steel steaming tray and glass lid in hot soapy water, rinse and dry thoroughly.

HOW TO MAKE RISOTTO
FIRST STEP:
SEARING RISOTTO IN "SAUTÉ/SEAR" SETTING
- Ensure exterior of the cooking bowl is clean before placing it in the housing. This will ensure proper contact with the inner heating plate.
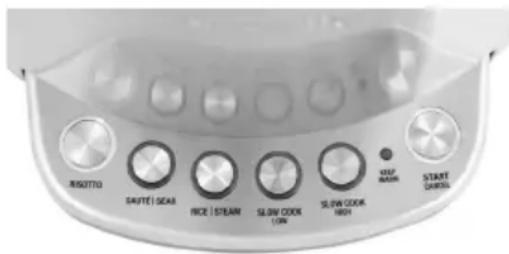
- Plug the appliance connector end into the multi cooker inlet. Then plug the power cord into a suitable power outlet. The START/CANCEL button and RISO button surrounds will illuminate in white.
- Press the SAUTÉ/SEAR button, the button surround will illuminate in white, the button surround of the RISOTTO button will go out. Press the START/CANCEL button to activate the sear setting, the button surround will illuminate red.
- Cover with lid and allow to pre-heat for approximately 2 - 3 minutes (do not preheat for longer than 5 minutes).
- Add oil or butter and allow to heat for approximately 1 minute.
- If using chicken or seafood in the recipe, sear in small batches, cover with lid and stir occasionally until food is cooked. Remove from cooking bowl.
- Add extra oil or butter to cooking bowl if necessary or if recipe states so. Allow to heat for approximately 1 minute.
- Add ingredients such as onions and garlic. Sauté, cover with lid if necessary and stir occasionally for about 4 to 5 minutes or until cooked to desired brownness.
- Stir in Risotto rice (Arborio or Carnaroli rice) and mix well. Sauté for approximately 2 - 3 minutes, stirring occasionally.
- Pour in wine (if wanted or mentioned in the recipe) and cook uncovered until rice has absorbed all liquid and alcohol has evaporated, stirring frequently.
- Press the START/CANCEL button to stop the SAUTÉ/SEAR setting.
- Proceed as described in the next section.
SECOND STEP: COOKING RISOTTO IN THE "RISOTTO" SETTING
-
Ratio rice : water or stock 1 Multi Chef Pro rice scoop filled with rice for 1 1/2 Multi Chef Pro rice scoop filled with water/stock.
-
Follow steps 1 - 11 in the above section.
- Add stock or water into the cooking bowl and stir well. Cover with lid and press the RISOTTO button, then press the START/CANCEL button to activate the setting. The START/CANCEL button surround will illuminate red, the RISOTTO button surround will illuminate in white and cooking will commence.
- Allow to cook until the ready beeps sound and the multi cooker automatically switches to the KEEP WARM setting. This will take approximately 20 - 30 minutes.
- Remove lid and stir well using the serving spoon provided. At this stage remaining ingredients can be added i.e., butter, parmesan cheese, herbs, salt and pepper.
- The SOLIS Multi Chef Pro will remain in the KEEP WARM setting for 30 minutes before switching off automatically. However, risotto is best served as soon as possible after completion of cooking.
Tip:
- Allow the risotto to rest in the KEEP WARM setting for 5 to 10 minutes to finish cooking.
- For optimum risotto results, we recommend to stir once after 15 - 20 minutes in the RISOTTO setting.
Note:
- If the SOLIS Multi Chef Pro switches to the KEEP WARM setting too early or switches off before cooking is complete, simply press the desired cooking button, then press the START/CANCEL button. The START/CANCEL button surround will illuminate red and the selected setting will be activated. This is a safety mechanism to prevent overheating due to certain cooking conditions.
HOW TO MAKE RICE
"RICE/STEAM" SETTING
- Use the multi cooker rice scoop provided to measure the required quantity of rice. (refer to rice cooking tables on page 136). Always measure level scoops, not heaped (see illustration).
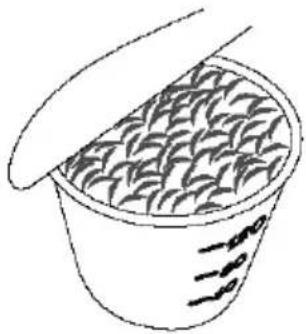
Note: The rice scoop of your SOLIS Multi Chef Pro is not a standard metric measuring cup. 1 Multi Chef Pro rice scoop is equal to 150g of uncooked rice and 180ml of water. If your rice scoop is lost or misplaced, use another cup but maintain the same cooking ratios and ensure you do not exceed the 10 scoop maximum line in the removable cooking bowl:
- Ratio rice : water
White Rice =
1 Multi Chef Pro scoop rice + 1 Multi Chef Pro scoop water
Brown Rice =
1 Multi Chef Pro scoop rice + 11/2 Multi Chef Pro scoops water
- Place rice into a sieve and wash with cold water to remove any excess starch. The rice is ready for cooking when the water runs from the rice clear. Drain well.
- Ensure the exterior, the bottom and the sides of the removable cooking bowl are clean before placing it in the housing – this will ensure proper contact with the inner cooking surface.
CAUTION:



- Before starting to cook, clean the bottom of the cooking bowl and the surface of the heating plate.
- To ensure the bowl is sitting flat on the heating plate, turn the bowl clockwise and anti clockwise inside the multi cooker.
- The bowl must be properly positioned inside the multi cooker or the unit will not work and may become damaged.
To reduce the risk of electric shock, cook only in the removable cooking bowl. Do not immerse the appliance in water.
- Add the washed rice to the cooking bowl, ensuring rice is spread evenly across the bottom of the bowl and not heaped to one side.
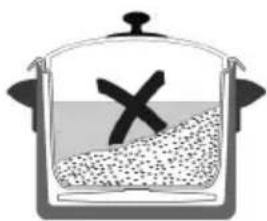
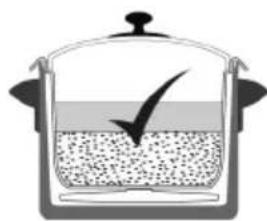
- Add water using the following ratios:
White Rice =
1 Multi Chef Pro scoop rice : 1 Multi Chef Pro scoop water
Brown Rice =
1 Multi Chef Pro scoop rice : 1 1/2 Multi Chef Pro scoops water
- Place the glass lid into position.
- Plug the appliance connector end to the appliance inlet. Plug power cord into a suitable power outlet. The START/CANCEL button and RISOTTO button surrounds will illuminate in white.
- Press the RICE/STEAM button, then press the START/CANCEL button to activate the setting. The START/CANCEL button surround will illuminate red, the RICE/STEAM button surround will illuminate in white and cooking will commence.
- When cooking is complete, the ready beeps will sound and the SOLIS Multi Chef Pro will automatically switch to the KEEP WARM setting.
- Open the lid carefully and turn the rice over with the serving spoon provided. Replace the lid and allow the rice to stand for 10 - 15 minutes in KEEP WARM setting before serving. This allows any excess moisture to be absorbed, resulting in a fluffier rice texture.
Note:
- After using the RICE/STEAM setting the appliance will automatically switch to the KEEP WARM setting for up to 5 hours.
- Do not remove the glass lid until ready to serve (the ready beeps will sound), except for when turning over rice after cooking is done or when suggested in the recipes.
- To end the KEEP WARM setting, press the START/CANCEL button or unplug the power cord.
Important:
- Always pour liquid into the cooking bowl before pressing the START/CANCEL button.
- Do not interfere with the cooking process by pressing the setting Buttons during operation.
- To prevent scratching the non-stick surface of the cooking bowl, always use wooden or heat resistant plastic utensils.
- Ensure the removable cooking bowl is correctly positioned in the appliance base before you start cooking.
Warning:
- Before removing the non-stick cooking bowl from housing, always ensure that the appliance is switched off and the power cord is unplugged.
- Always use heat protective gloves or oven mitts when removing the lid and the non-stick cooking bowl from the appliance.
- Always position steam vent on lid away from yourself to avoid scalding from escaping steam.
- Always lift and remove the lid carefully, angling it away from yourself to avoid scalding from escaping steam.
- To ensure continued protection against risk of electric shock, connect to properly grounded outlets only.
- Cook only in provided, removable non-stick cooking bowl.
- Do not use a damaged or dented removable cooking bowl. If damaged or dented, replace the bowl before using. A new removable Multi Chef Pro cooking bowl is available from good retailer stores or at SOLIS directly.

RICE COOKING TABLES
- The rice scoop provided with your SOLIS Multi Chef Pro is used in the following tables.
- Note: The SOLIS Multi Chef Pro rice scoop is not a standard metric measuring cup. 1 Multi Chef Pro rice scoop is equal to 150g of uncooked rice and 180ml of water. If your multi cooker rice scoop is lost or misplaced, use another cup but maintain the same cooking ratios and ensure that you do not exceed the 10 scoop maximum line in the cooking bowl.
Ratio Rice : Water
White Rice =
1 Multi Chef Pro scoop rice : 1 Multi Chef Pro scoop water
Brown Rice =
1 Multi Chef Pro scoop rice : 1 1/2 Multi Chef Pro scoops water
WHITE RICE
| Uncooked white rice * | Cold tap water * | Cooked rice – approx. * | Cooking time – approx. (minutes) |
| 2 | 2 | 5 | 10 – 12 |
| 4 | 4 | 9 | 12 – 15 |
| 6 | 6 | 15 | 15 – 20 |
| 8 | 8 | 16 | 20 – 25 |
| 10 | 10 | 27 | 25 – 30 |
BROWN RICE/ARBORIO OR CARNAROLI-RISOTTO-RICE
| Uncooked brown rice * | Cold tap water * | Cooked rice – approx. * | Cooking time – approx. (minutes) |
| 2 | 3 | 5 | 25 – 30 |
| 4 | 6 | 10 | 30 – 40 |
| 6 | 9 | 15 | 40 – 45 |
-
Using the Multi Chef Pro rice scoop
-
Note: Due to the extra water needed to cook brown rice, some starchy water bubbles may rise to the lid while cooking.
RICE VARIATIONS
- You can choose between many different kinds of rice and prepare them differently - we want to give you a brief overview.
SAVORY RICE
- Prepare rice in the Multi Chef Pro as specified, substituting all the water with the same quantity of chicken, beef, fish, or vegetable stock.
SWEET RICE
- Prepare rice in the Multi Chef Pro as specified substituting half the water with apple juice, orange juice or pineapple juice. Attention: Cooking rice with milk or cream is not recommended as it will burn into the bottom of the cooking bowl.
SAFFRON RICE
- Add 1/4 teaspoon of saffron powder or 2 saffron threads to every 2 cups of water. Use the white rice cooking tables. Mix well.
ARBORIO OR CARNAROLI RICE FOR RISOTTO
- Arborio and Carnaroli rice comes from Italy and is short round-grained pearly rice often used for Italian risotto cooking. Use the brown rice cooking tables.
JASMINE RICE
- Jasmine rice is fragrant long grain rice. Use the white rice cooking tables.
BASMATI RICE
- Basmati rice is an aromatic long grain rice. Use the white rice cooking tables.
WILD RICE
- It is not recommended to cook wild rice alone in the Multi Chef Pro as it requires a substantial amount of water. It is possible to cook wild rice as a blend with white or brown rice.
Hints:
-
Add a little extra water for fluffier rice and a little less water for firmer rice.
-
Some rice varieties may require more water for cooking, such as wild rice blends, Arborio rice or short grain rice. Follow the directions on the packet or use the brown rice cooking tables.
QUINOA
- Quinoa is an ancient South American grain that is high in protein with fluffy, creamy and slightly crunchy texture. Use the brown rice cooking tables.
SUSHI
- Sushi rice is short grained rice used in Japanese cooking. Use the brown rice cooking tables.

HOW TO USE THE SLOW COOK SETTING
- With your SOLIS Multi Chef Pro multi cooker you can not only prepare perfect rice or risotto but also cook using the healthy and gentle SLOW COOK method. SLOW COOK means that you cook longer at lower temperatures.
- Your Multi Chef Pro has two SLOW COOK settings for your choice: LOW (slowly) and HIGH (a little bit quicker). Use the recommended guidelines below to determine cooking time and heat settings and use recipes at the end of this instruction book. Dishes can be prepared well in advance and cooking time regulated so that food is ready to serve at a convenient time.
- A general rule of thumb for most slow cooked meat and vegetable recipes is:
Cooking Time: LOW setting: 6 - 7 hours
HIGH setting: 3 - 4 hours
- Your favourite traditional recipes can also be easily adapted to this slow cooker. Simply halve the amount of liquid and increase the cooking time.
- Note: These cooking times are approximates only and times can vary depending on ingredients, quantities in recipes and whether the cooking bowl and its ingredients are hot from searing.
- As a guide meats such as chicken or small pieces of meat will have best results when cooked on HIGH for 3 to 4 hours.
- Larger pieces of meat such as lamb shanks will have best results when cooked on LOW for 6 to 7 hours.
- When the SAUTÉ/SEAR setting is used prior to slow cooking, cooking times will be shortened slightly. Check for doneness intermittently during cooking.
- The SOLIS Multi Chef Pro is designed specifically for flavour layering. A technique professional chefs use to enhance and deepen the taste of meals by using the same pan for browning onions, searing meats and creating casseroles, curries, soups and bolognaise.
- For this reason, SOLIS has developed a multi cooker that not only cooks, but also sears - thanks to the SAUTÉ/SEAR setting to caramelise vegetables and sear meats before commencing the slow cooker function.
1. STEP FOR "SLOW COOK": SEARING WITH THE "SAUTÉ/SEAR" SETTING
-
Searing in the multi cooker may take a little extra time and whilst not strictly necessary, the rewards are evident in the end result. The cooking bowl keeps the heat stable and uniform allowing the meat to brown and form an even crust. Plus searing seals in the moisture, intensifies the flavour and provides more tender results.
-
Ensure exterior of the cooking bowl is clean before placing it in the housing.
- Plug appliance connector end in the multi cooker inlet. Plug power cord into a suitable power outlet. The START/CANCEL button and RISOTTO button surrounds will illuminate in white.
- Press the SAUTÉ/SEAR button, the button surround will illuminate in white, RISOTTO button surround will go out. Press the START/CANCEL button to activate the setting, the button surround will illuminate red.
- Cover with lid and allow to pre-heat for approximately 2 - 3 minutes (do not preheat for longer than 5 minutes).
- Add oil or butter and allow to heat for approximately 1 minute with the lid on.
- Always sear meat and poultry in small batches. Cover with lid and cook, stirring occasionally until food is evenly browned. Remove from cooking bowl. When finished searing, proceed to the „Slow Cook Settings“ section below. To stop the SAUTÉ/SEAR setting, always press the START/CANCEL button at the end.
2. STEP: SLOW COOK SETTINGS - CHOICE BETWEEN LOW AND HIGH
- Add all ingredients into the cooking bowl, ensuring denser foods are spread evenly across the bottom of the bowl and not heaped to one side and the liquid level is between MIN and MAX markings on the bowl.
- Place the glass lid into position.
- Press the SLOW COOK LOW or SLOW COOK HIGH button, then press the START/CANCEL button to activate the setting. The START/CANCEL button surround will illuminate red and cooking will commence.
- Allow to cook until the ready beeps sound. The unit then automatically switches to KEEP WARM setting.
- The Multi Chef Pro will remain in the KEEP WARM setting for 5 hours before switching off.
- Following is a guide to help simplify the process of SLOW COOK, allowing you to obtain optimum results very easily thanks to your SOLIS Multi Chef Pro. You will find recipes at the end of this instruction book.
HINTS FOR PREPARED MEAT AND POULTRY
- Select the freshest cuts when purchasing meat. Trim the meat or poultry of any visible excess fat. If possible, purchase chicken portions without the skin. Otherwise, the slow cooking process will result in extra liquid forming from the fat as it melts.
- For casserole type recipes, cut the meat into cubes, approximately 4cm to 5cm . Slow cooking allows less tender cuts of meat to be used. The bones can be left in meat or poultry. This imparts a good flavour and helps to keep the meat tender during cooking.
SUITABLE MEAT CUTS FOR "SLOW COOKING"
Beef: chuck, skirt, round steak, boneless shin (gravy) beef, bone-in-shin (osso bucco), tri tip.
Lamb: shanks, drumsticks (frenched shanks), neck chops, boned out forequarter or shoulder.
Veal: diced leg, shoulder/forequarter chops and steaks, neck chops, knuckle (osso bucco).
- Pork: leg steaks, diced belly, diced shoulder, boneless loin chops.
- Chicken: chicken pieces bone in (thigh cutlets/drumsticks), chicken thigh fillets.
HINTS FOR PREPARED VEGETABLES
- Vegetables should be cut into even-sized pieces to ensure more even cooking. Frozen vegetables must be thawed before adding to other foods cooking in the multi cooker.
STEAMINGFOODS
- Steamed foods retain most of their nutritional value when cooked in the Multi Chef Pro. Foods may be steamed by placing food in the stainless steel steaming tray over stock or water in the cooking bowl and covering with the glass lid. Keep the glass lid on while steaming food unless the recipe or chart specifically states to remove the lid. By removing the lid steam is lost unnecessarily and the cooking time will be extended.
- Measure 3 Multi Chef Pro rice scoops or more of water or stock and pour into the cooking bowl. Use up to a maximum of 6 rice scoop cups of water.
- Place food to be steamed directly into the stainless steel steaming tray and insert into the cooking bowl.
- Place removable cooking bowl with the steaming tray in housing and cover with the glass lid. Attention: Do not overfill the steaming tray to allow for proper fit of the lid on the cooking bowl.
- Plug the appliance connector end into appliance inlet. Plug power cord into a suitable power outlet. The START/CANCEL button and RISOTTO button surrounds will illuminate in white.
- Press the RICE/STEAM setting, the button surround will illuminate in white, the button surround of the RISOTTO button will go out. Then press the START/CANCEL button to activate the setting. The START/CANCEL button surround will illuminate red and cooking will commence.
- When steaming is complete, the ready beeps will sound and the multi cooker will automatically switch to the KEEP WARM setting.
- If no further steaming is required, press the START/CANCEL button to cease operation. Then unplug power cord and allow the appliance to cool.
Note:
- Keep the glass lid on while steaming food unless the recipe or chart specifically states to remove the lid. By removing the lid, steam is lost unnecessarily and the cooking time will be extended.
- Do not let the cooking bowl boil dry during steaming.
- Hot liquid can be added during the steaming process.
HINTS AND TIPS FOR STEAMING VEGETABLES
- Smaller pieces will steam faster than larger pieces.
- Try to keep vegetables to a standard size to ensure even cooking.
- Fresh or frozen vegetables may be steamed.
- If steaming frozen vegetables, do not thaw.
- The size and shape of vegetables as well as personal taste may call for adjustments to the cooking time. If softer vegetables are required, allow extra cooking time.
- Do not allow water or stock to reach the stainless steel tray. The steaming will not be effective. The same applies for the lid when it is not perfectly seated on the cooking bowl.
Warning:
- Always lift and remove the lid carefully, angling it away from yourself to avoid scalding from escaping steam.
VEGETABLES COOKING TIME
| Vegetables | Suggestions and tips | Quantity | Cooking time (min.) |
| Artichoke | remove hard outer leaves & stalk | 2 medium | 30 – 35 |
| Asparagus | trim, leave as spears | 2 bunches | 12 – 14 |
| Beans | top and tail, leave whole | 250g | 13 – 15 |
| Beets | trim, do not break skin | 300g | 12 – 13 |
| Bell Peppers | cut into strips 3 medium | 3 medium | 14 – 16 |
| Broccoli | cut into florets | 250g | 8 – 10 |
| Brussels Sprouts | cut a cross in the base | 375g | 17 – 19 |
| Cabbage | large pieces | 500g | 10 – 12 |
| Carrots | cut into strips | 3 medium | 14 – 16 |
| Celery | slice into strips | 3 stalks | 5 – 6 |
| Chickpeas | soak for 12 hours | 1 cup dried | 40 – 45 |
| Corn | whole corn cobs | 2 small cobs | 20 – 22 |
| Mushrooms | whole, unwashed | 300g | 8 – 10 |
| Onions | peeled, leave whole | 6 medium | 20 – 25 |
| Snow peas | topped and tailed | 250g | 4 – 5 |
| Peas | fresh, peeled | 250g | 8 – 10 |
| frozen | 250g | 4 – 5 | |
| Potatoes | all purpose, whole | 4 (150 – 180g) | 35 – 40 |
| Potatoes new | whole | 6 (125g each) | 25 – 30 |
| Sweet Potato | cut into pieces | 300g | 20 – 25 |
| Pumpkin | cut into pieces | 300g | 20 – 25 |
| Spinach | leaves and stems cleaned | 1/2 bunches | 5 |
| Squash (baby) | topped and tailed | 350g | 8 |
| Turnips | peeled, sliced & cut to 50g pieces | 350g | 15 – 17 |
| Zucchini | sliced | 350g | 6 |
HINTS AND TIPS FOR STEAMING FISH AND SEAFOOD
- Season fish with fresh herbs, onions, lemon etc. before cooking.
- Ensure fish fillets are in a single layer and do not overlap.
- Fish is cooked when it flakes easily with a fork and is opaque in color.
| Type | Suggestions and tips | Cooking time (min.) |
| Fish – fillets | Steam until opaque and easy to flake. A cutlet is cooked | 8 – 10 |
| – whole | when the centre bone is able to be easily removed | 15 – 20 |
| – cutlets | 12 – 14 | |
| Lobster – tails | Remove underside of shell | 18 – 20 |
| Mussels – in shell | Steam until just opened | 12 – 14 |
| Clams | Steam until just opened | 8 – 10 |
| Prawns – in shell | Steam until pink | 8 – 10 |
| Scallops | Steam until opaque | 4 – 6 |
HINTS AND TIPS FOR STEAMING POULTRY
- Select similar sized pieces of poultry for even cooking.
- For even cooking results arrange poultry in a single layer.
- Remove visible fat and skin.
- To obtain a browned appearance, sear the chicken with SAUTÉ/SEAR setting before steaming.
- Check if poultry is cooked by piercing the thickest part. The poultry is cooked when the meat juices run clear.
| Type | Suggestions and tips | Cooking time (min.) |
| Breast fillet | Place skin side up | 20 – 25 |
| Drumstick | Place thickest part to outside of the steaming tray | 30 – 35 |
| Thigh fillet | Place thickest part to outside of the steaming tray | 18 – 20 |
HINTS AND TIPS FOR STEAMING DUMPLINGS
- Fresh or frozen dumplings and savoury buns can be steamed perfectly in your SOLIS Multi Chef Pro. We recommend to place small pieces of baking paper, or cabbage or lettuce leaves, under the dumplings to avoid sticking to the steaming tray. Separate the dumplings before cooking.
- Frozen dumplings will need approx. 8 - 10 minutes to cook, fresh dumplings approx. 5 - 6 minutes.
KEEP WARM SETTING
- The SOLIS Multi Chef Pro will automatically switch to the KEEP WARM setting once the RICE/STEAM, RISOTTO and SLOW COOK settings have finished cooking. It will keep warm for up to 5 hours on the RICE and SLOW COOK settings and up to 30 minutes on the RISOTTO setting.
- To turn off the KEEP WARM setting, press the START/CANCEL button or unplug the power cord.
CLEANING AND CARE
- Press the START/CANCEL button to switch off the appliance and unplug the power cord from the power outlet. Remove the power cord from the appliance.
- Allow all parts to cool before removing the cooking bowl. Wash the cooking bowl, stainless steel steaming tray and glass lid in warm, soapy water, rinse and dry thoroughly.
- SOLIS does not recommend that any parts of your Multi Chef Pro, except the lid, are washed in a dishwasher as harsh detergents and hot water temperatures may stain or distort the cooking bowl and accessories.
- Do not use abrasive cleaners, steel wool or metal scouring pads as these can damage the non-stick surface.
- The housing can be wiped clean with a damp cloth and then dried thoroughly. To prevent damage to appliance do not use alkaline cleaning agents when cleaning, use a soft cloth and a mild detergent.
Tip:
- If rice has baked onto the bottom of cooking bowl, fill the bowl with hot, soapy water and leave to stand for approximately 10 minutes to allow for easy cleaning.
Warning:
- The appliance connector end must be removed from the inlet before the Multi Chef Pro is cleaned. The appliance inlet must be dried completely before the multi cooker is used again.
- To prevent damage to the multi cooker surface do not use alkaline cleaning agents when cleaning, use a soft cloth and mild detergent.
- Do not use chemicals, steel wool, metal scouring pads or abrasive cleaners to clean the multi cooker or accessories as these can damage the housing or the coating.
- Do not immerse appliance or power cord in water or any other liquid as this may cause electrocution.
STORAGE
- Check if the appliance is turned off and unplugged.
- Check if the housing and all accessories are cold, clean and completely dry.
- Put all accessories into the appliance and close the lid.
- Store the appliance in an upright position in a dry, dark place. Optimally use the original packaging. Do not place anything on top of the appliance.

TROUBLESHOOTING
| PROBLEM | WHAT TO DO |
| The Multi Chef Pro suddenly switches off. | ·Ensure appliance connector end is connected to the appliance inlet and power plug is connected properly to the power outlet. ·The appliance has been stressed or has overheated due to cooking conditions. Press the desired cooking button and then the START/CANCEL button to reset and continue cooking. Allow a few minutes for appliance to reheat and continue cooking. |
| The Multi Chef Pro has switched to KEEP WARM setting before cooking is complete. | ·Press the START/CANCEL button to reset. Then, select the desired cooking setting to continue cooking. |

TECHNICAL SPECIFICATIONS
Product description multi cooker
Voltage/Frequency 220-240V /50Hz
Output 640-760 watts
Measurements approx. 31,5 × 27 × 29 ~cm (W x H x D)
Weight approx. 3kg
Directions for proper disposal of the product according to EU directive 2002/96/EU
At the end of its working life this equipment must not be disposed of as an household waste. It must be taken to special local community waste collection centres or to a dealer providing this service. Disposing of electrical and electronic equipment separately avoids possible negative effects on the environment and human health deriving from an inappropriate disposal and enables its components to be recovered and recycled to obtain significant savings in energy and resources. In order to underline the duty to dispose of this equipment separately, the product is marked with a crossed-out dustbin.
SOLIS reserves the right to carry out technical and visual changes and modifications to improve the product at any time.

SOLIS HELpline:
844 84164 14
(Only for customers (or by foreclad)ers in Switzerland
This item stands out due to its long life cycle and reliability. Despite this thoroughness, if faarnaflurition ever occurs, simply give us a call. Often a breakdown can be easily avoided quickly and easily fixed with the right tip or technique without having to straight away send off the device for repair. We will give you all the advice and practical support you require.
Keep the original packaging in a safe place so that you may use it in the event that transportation or shipping of the product becomes necessary.
Solis of Switzerland Ltd
Solis-House · CH-8152 Glattbrugg-Zurich · Switzerland
Phone +41 44 874 64 54 Fax +41 44 874 64 99
info@solis.ch · www.solis.ch · www.solis.com
Recipes
Note: One cup in these recipes equals a cup size of 250ml.
When you are using the sear-function SAUTÉ/SEAR and want to change to RISOTTO or SLOW COOK settings, you first have to turn off the SAUTÉ/SEAR function with the START/CANCEL button. You can then select the new setting and press START/CANCEL again to start the selected function.
When removing anything from the cooking bowl or steaming tray, please note that the cooking bowl and steaming tray will heat up during operation.
SOLIS would like to wish you every success!

CREAMY TOMATO AND LENTIL SOUP
Serves 4-6
- INGREDIENTS
1 tablespoon olive oil
1 large red onion, sliced
2 cloves garlic, crushed
1 small red chilli, seeds removed and finely chopped
2 tablespoons tomato paste
3 cups tomato passatta
4 cups chicken stock
2 teaspoons brown sugar
3/4 cup red lentils
1 cup Greek yoghurt
Salt and freshly ground pepper
2 tablespoons chopped coriander
Method
- Press the SAUTÉ/SEAR button and then the START/CANCEL button. Heat removable cooking bowl for 3 minutes with the lid on.
- Remove lid, add oil and heat for 1 minute further.
- Add onion, garlic and chilli, cover with lid, cook for 3 - 4 minutes, stirring occasionally or until onion has softened.
- Add tomato paste and cook for a further minute. Stir in passatta, stock, sugar and lentils. Cover with lid.
- Press the SLOW COOK HIGH button and cook for 3 - 4 hours or SLOW COOK LOW button and cook for 6 - 7 hours. To activate the setting, press the START/CANCEL button.
- Stir through yoghurt and season with salt and pepper to taste.
Serve sprinkled with chopped coriander.
CHICKEN WITH ROSEMARY, LEMON AND GARLIC
Serves 4-6
- Ingredients
1 tablespoon olive oil
2kg chicken pieces, skin removed
1 onion, chopped
3 cloves garlic, sliced
1 teaspoon grated lemon rind
1 teaspoon cracked black pepper
1 tablespoon fresh chopped rosemary
1/2 cup white wine
1/2 cup chicken stock
2 tablespoons lemon juice
Salt and freshly ground black pepper
Method
- Press the SAUTÉ/SEAR button and then the START/CANCEL button. Heat removable cooking bowl for 3 minutes with the lid on.
- Remove lid, add oil and heat for 1 minute.
- Add chicken in batches, and cook until lightly browned. Remove and set aside.
- Add onion, garlic, lemon rind, pepper and rosemary. Cover and cook, stirring occasionally until softened.
- Stir in wine and simmer for 2 - 3 minutes to cook off alcohol. Add stock and lemon juice, return chicken to the removable cooking bowl and submerge in the sauce.
- Cover with lid. Press the SLOW COOK HIGH button and cook for 3 - 4 hours. To activate the setting, press the START/CANCEL button.
- Season to taste and serve hot accompanied with oven-roasted potatoes, pumpkin and steamed green beans.
CHICKEN CACCIATORE
Serves 4-6
- Ingredients
1 tablespoon olive oil
2kg chicken pieces (skin removed)
1 medium onion, sliced
2 cloves garlic, crushed
1 cup tomato passatta
1/2 cup pitted Kalamata olives
1/4 cup white wine
1/2 cup chicken stock
200 g button mushrooms, halved
2 teaspoons chopped fresh rosemary
2 teaspoons sugar
Salt and freshly ground black pepper
1/4 cup chopped fresh basil
Method
- Press the SAUTÉ/SEAR button and then the START/CANCEL button. Heat removable cooking bowl for 3 minutes with the lid on.
- Remove lid, add oil and heat for 1 minute.
- Add chicken in batches, and cook until lightly browned; remove and set aside. Drain off any excess oil and reheat removable cooking bowl for another 1 minute.
- Add onion and garlic and cook for 3 - 4 minutes, stirring occasionally, or until softened.
-
Stir in tomato passatta, olives, wine, stock, mushrooms, rosemary and sugar.
-
Return chicken to removable cooking bowl and submerge in sauce and veg - etables. Cover with lid.
- Press the SLOW COOK HIGH button and cook for 3 - 4 hours. To activate the setting, press the START/CANCEL button.
- Season to taste and stir through chopped basil.
LAMB SHANK RAGU
Serves 4
- Ingredients
2 tablespoons olive oil
1/4 cup plain flour
6 small lamb shanks, frenched
1 onion, chopped
2 cloves garlic, crushed
1 carrot, diced
1 large stick celery, diced
1/3 cup tomato paste
1/2 cup red wine
400g can diced tomatoes
1/2 cup chicken or beef stock
1 bay leaf
Salt and freshly ground black pepper
Method
- Press the SAUTÉ/SEAR button and then the START/CANCEL button. Heat removable cooking bowl for 3 minutes with the lid on.
- Remove lid, add oil and heat for 1 minute.
- Coat lamb shanks in flour, shaking off excess and cook until lightly browned; remove and set aside.
- Add onion, garlic, carrot and celery and cook for 3 - 4 minutes, stirring occasionally, or until softened.
-
Stir in tomato paste and cook for a further 1 minute.
-
Add wine and bring to the boil; simmer for 1 - 2 minutes, scraping up any of the sediment in the base of the bowl.
- Return shanks to removable cooking bowl and pour over tomatoes, stock and bay leaf; mix well to coat.
- Cover with lid. Press the or SLOW COOK LOW button and cook for 6 - 7 hours. To activate the setting, press the START/CANCEL button.
- Season with salt and pepper and serve immediately with mashed potato
FRAGRANT LAMB CURRY
Serves 4-6
- Ingredients
2 tablespoons vegetable oil
1.5 kg lamb leg, diced into 5cm cubes
1 large onion, sliced
2 cloves garlic, crushed
2 cm knob ginger, finely chopped
1 tablespoon ground coriander
1 tablespoon ground cumin
1 tablespoon curry paste
1 teaspoon ground turmeric
1/2 teaspoon ground cloves
5 cardamom pods
1 cinnamon stick
1 cup water or chicken stock
1/2 cup plain yoghurt
1/3 cup chopped coriander to serve
Salt and freshly ground black pepper
Method
- Press the SAUTÉ/SEAR button and then the START/CANCEL button. Heat removable cooking bowl for 3 minutes with the lid on.
- Remove lid, add half the oil and heat for 1 minute.
-
Add lamb in small batches and cook until lightly browned; remove and set aside.
-
Add remaining oil, onion and garlic and cook for 3 - 4 minutes, stirring occasionally, or until softened.
- Stir in spices and cook for 1 minute.
- Return lamb to removable cooking bowl and add stock; mix well.
- Cover with lid. Press the SLOW COOK HIGH button and cook for 3 - 4 hours or SLOW COOK LOW button and cook for 5 - 6 hours. To activate the setting, press the START/CANCEL button.
- Stir through yoghurt and coriander. Season to taste with salt and pepper. Serve with steam rice.
Note: To achieve even cooking, stir curry half way through cooking time.
EASY OSSO BUCCO
Serves 4
- Ingredients
6 × 4 cm thick Osso Bucco (Veal shanks)
2 tablespoons plain flour
2 tablespoons olive oil
1/3 cup white wine
400 g can diced tomatoes
2 teaspoons caster sugar
Salt and freshly ground black pepper
Gremolata:
4 cloves garlic, finely chopped
Finely grated rind of 1 lemon
1/2 cup chopped fresh parsley
Method
- Press the SAUTÉ/SEAR button and then the START/CANCEL button. Heat removable cooking bowl for 3 minutes with the lid on.
- Remove lid, add oil and heat for 1 minute.
- Coat osso bucco in flour, shaking off excess and cook in small batches until lightly browned. Remove and set aside.
- Add wine and bring to the boil; simmer for 1 - 2 minutes, scraping up any of the sediment in the base of the bowl.
- Return osso bucco to removable cooking bowl and add tomato, sugar, salt and pepper.
- Cover with lid. Press the SLOW COOK LOW button and cook for 6 - 7 hours. To activate the setting, press the START/CANCEL button.
- Serve sprinkled with gremolata.
STEAMED WHOLE FISH WITH GINGER & GREEN ONIONS
Serves 2
- Ingredients
300g - 400g whole snapper or bream, cleaned and scaled
2 cm piece fresh ginger, peeled and cut into thin strips
1 lime, sliced
1 cup coriander sprigs
3 cups water
2 tablespoons soy sauce
1 tablespoon peanut oil
3 green onions, finely sliced
Method
- Wash and dry the fish with kitchen paper. Cut 2 slits at a 45^ angle through each side of the fish. Place some of the ginger and some slices of lime into each slit.
- Place the coriander into the cavity of fish. Place fish into steaming tray.
- Pour 3 cups of water into the removable cooking bowl. Place steaming tray into removable cooking bowl, cover with lid.
- Press the RICE/STEAM button and then the START/CANCEL button.
- Steam fish for about 15 minutes or until flakes when tested with a fork.
- Remove fish from steaming tray and place onto a serving platter.
- Combine soy sauce, oil and shallots, pour over fish and serve immediately.
TEX-MEX BEEF AND BEANS
Serves 4-6
- Ingredients
1 1/2 cups dried red kidney beans, soaked overnight in cold water
2 tablespoons oil
1.3 kg chuck steak cut into 5 cm cubes
2 large onions, sliced
3 cloves garlic, chopped
1 tablespoon ground cumin
2 teaspoons chilli powder
2 teaspoons dried oregano flakes
400 g can diced tomatoes
1/2 cup beef stock
1 green capsicum cut into large pieces
Salt and freshly ground black pepper
Sour cream, guacamole, grated cheddar cheese to serve
Method
- Drain beans and rinse well; drain again and set aside.
- Press the SAUTÉ/SEAR button and then the START/CANCEL button. Heat removable cooking bowl for 3 minutes with the lid on.
- Remove lid, add a little of the oil and heat for 1 minute.
- Add meat in batches and cook for 2 - 3 minutes or until just browned. Remove and repeat with remaining meat and oil.
-
Add remaining oil and fry onion and garlic until softened but not browned.
-
Stir in spices, tomatoes, stock, capsicum, and return beef to removable cooking bowl.
- Cover with lid. Press the SLOW COOK HIGH button and cook for 3 - 4 hours or SLOW COOK LOW button and cook for 5 - 6 hours. To activate the setting, press the START/CANCEL button.
- Shred beef with fork and return to dish. Season to taste with salt and pepper. Serve with a dollop of sour cream, guacamole and grated cheese.
BOLOGNESE SAUCE
Serves 4
- Ingredients
2 tablespoons olive oil
1 kg beef or pork mince
1 large onion, chopped
2 cloves garlic, crushed
1/3 cup tomato paste
1/2 cup red wine
1 large carrot, grated
400 g can diced tomatoes
1 teaspoon dried oregano
1 bay leaf
1/2 cup beef stock or water
Salt and freshly ground black pepper
1/4 cup chopped fresh basil
Method
- Press the SAUTÉ/SEAR button and then the START/CANCEL button. Heat removable cooking bowl for 3 minutes with the lid on.
- Remove lid, add oil and heat for 1 minute.
- Add onion, garlic and cook for 3 - 4 minutes, stirring occasionally, or until softened.
- Add mince in batches, making sure to break up the lumps while the meat is cooking.
-
Stir in tomato paste and cook for a further 1 minute. Add wine and bring to the boil; simmer for 1 - 2 minutes to cook off the alcohol.
-
Stir in carrot, tomato, oregano, bay leaf and stock.
- Cover with lid. Press the SLOW COOK HIGH button and cook for 3 - 4 hours. To activate the setting, press the START/CANCEL button.
- Season to taste with salt and pepper and stir through basil just before serving.
SPICY MIXED DHAL
Serves 4-6
- Ingredients
1 tablespoon oil
1 tablespoon black mustard seeds
1 large red onion, sliced
4 cloves garlic, crushed
4 cm piece ginger, grated
1 tablespoon ground coriander
2 teaspoons ground turmeric
2 small red chillies, chopped
1/2 cup yellow split peas
1/2 cup red lentils
1/2 cup brown lentils
3 cups vegetable stock
3 tomatoes, chopped
Sea salt to taste
Juice of half a lemon
2 tablespoons chopped coriander
Plain thick yoghurt to serve
Method
- Press the SAUTÉ/SEAR button and then the START/CANCEL button. Heat removable cooking bowl for 3 minutes with the lid on.
- Remove lid, add oil and heat for 1 minute.
-
Add mustard seeds and cook until they start to pop. Add onion, garlic and ginger and cook 5 - 6 minutes, stirring occasionally, until onion is light golden.
-
Stir in spices, chilli, lentils, split peas, stock and tomatoes. Cover with lid. Press the SLOW COOK HIGH button and cook for 3 - 4 hours or SLOW COOK LOW button and cook for 4 - 6 hours. To activate the setting, press the START/CANCEL button.
- Season with salt and stir through lemon juice and chopped coriander. Serve with yoghurt.
RISOTTO MILANESE
Serves 4-6
- Ingredients
1 tablespoon olive oil
40 g butter
1 onion, finely chopped
2 cloves garlic, crushed
350 g Arborio or Carnaroli rice
1 cup white wine
4 cups hot chicken stock
Salt and freshly ground black pepper
1/2 cup grated parmesan cheese
Method
SAUTÉ/SEAR setting
- Press the SAUTÉ/SEAR button and then the START/CANCEL button. Heat removable cooking bowl for 3 minutes with the lid on.
- Remove lid, add oil and half of the butter, heat for 1 minute or until melted.
- Add onion and garlic, cover with lid, cook for 3 - 4 minutes, stirring occasionally, until onion has softened.
- Add rice, mix well, cover with lid, cook for 2 - 3 minutes or until rice is glossy.
- Stir in wine, cover and simmer for 2 - 3 minutes or until wine has been absorbed.
RISOTTO Setting
- Stir in chicken stock, mixing well. Cover with lid and press the RISOTTO button and then the START/CANCEL button.
- When it has automatically switched to the KEEP WARM setting, which will take about 20 - 30 minutes, remove lid and stir through remaining butter and half the parmesan.
Serve immediately topped with parmesan.
RISOTTO AI FUNGHI
Serves 4-6
- Ingredients
2 tablespoons oil
30 g butter
6 to 8 eschallots, finely chopped
400 g assorted mushrooms, sliced
350 g Arborio or Carnaroli rice
1/2 cup dry white wine
6 cups hot vegetable or chicken stock
1/2 cup grated pecorino or parmesan cheese
1 tablespoon chopped fresh sage
Salt and freshly ground pepper
Method
SAUTÉ/SEAR setting
- Press the SAUTÉ/SEAR button and then the START/CANCEL button. Heat removable cooking bowl for 3 minutes with lid on.
- Remove lid, add oil and butter, heat 1 minute or until butter has melted.
- Add chopped eschallots, cover with lid and cook, stirring occasionally for 3-4 minutes or until eschallots have softened.
- Add mushrooms, cover with lid and cook for 3 minutes or until mushrooms have softened slightly.
- Add rice, mix well, cover with lid and cook for 2 - 3 minutes, stirring occasionally.
- Stir in wine, and cook uncovered for 2 - 3 minutes or until all the wine is absorbed.
RISOTTO Setting
- Stir in stock, cover with lid and press the RISOTTO button and then the START/CANCEL button.
- When it switches to the KEEP WARM setting, which will take about 20 - 30 minutes, remove the lid and stir through grated pecorino cheese and chopped sage. Season to taste with salt and pepper.
Serve immediately.
Note: A variety of mushrooms can be used for this recipe i.e. Portobello, shi-take, field, yellow boletus, oyster etc.
CHICKEN RISOTTO WITH PESTO & ROCKET
Serves 4-6
- Ingredients
30 g butter
300g chicken breast fillet, thinly sliced
1 tablespoon oil
1 large onion, finely chopped
3 cloves garlic, finely chopped
350 g Arborio or Carnaroli rice
5 cups hot chicken stock
1/3 cup pesto
1/4 cup grated parmesan cheese
50 g baby rocket leaves
Extra 1/3 cup grated parmesan cheese
Method
SAUTÉ/SEAR setting
- Press the SAUTÉ/SEAR button and then the START/CANCEL button. Heat removable cooking bowl for 3 minutes with the lid on.
- Remove lid, add half of the butter, heat for 1 minute or until melted.
- Add half the chicken, cover with the lid and cook for 3 - 4 minutes.
-
Remove lid, stir and cook for a further 3 - 4 minutes or until chicken is lightly browned and cooked through. Remove from removable cooking bowl and keep warm. Repeat with remaining chicken, remove and set aside.
-
Heat remaining butter and oil until butter is melted. Add onion and garlic, cover with lid, cook for 3 - 4 minutes, stirring occasionally, until onion has softened.
- Add rice, mix well, cover with lid, cook for 2 - 3 minutes or until rice is glossy.
RISOTTO Setting
- Stir in chicken stock, mixing well. Cover with lid and press the RISOTTO button and then the START/CANCEL button.
- When it has automatically switched to the KEEP WARM setting, which will take about 20 - 30 minutes, remove lid and stir through cooked chicken, pesto, parmesan cheese and rocket.
Serve immediately with extra freshly grated parmesan
PRAWN AND ASPARAGUS RISOTTO
Serves 4-6
- Ingredients
40 g butter
400 g medium green prawns, peeled and veined
1 tablespoon oil
1 onion, finely chopped
1 small bulb of fennel, halved and thinly sliced
350 g Arborio or carnaroli rice
1/2 cup dry white wine
5 1/2 cups hot chicken or light fish stock
1/2 teaspoon ground white pepper
1 bunch asparagus, trimmed and thinly sliced diagonally
2 tablespoons fresh lemon juice
Finely grated rind of 1 lemon
Sea salt to taste
Method
SAUTÉ/SEAR setting
- Press the SAUTÉ/SEAR button and then the START/CANCEL button. Heat removable cooking bowl for 3 minutes with the lid on.
- Remove lid, add 10g of the butter, heat for 1 minute or until melted.
- Add prawns, cover with the lid and cook for 4 - 5 minutes or until prawns are cooked. Remove and set aside to keep warm.
-
Add oil and 20g of the butter to removable cooking bowl. Heat 1 minute or until butter has melted.
-
Add onion and sliced fennel; cover with lid, and cook for 6 - 7 minutes, stirring occasionally, until fennel is tender.
- Add rice, stir well, cover with the lid; cook for 3 minutes, stirring occasionally.
- Remove lid, stir in wine and cook uncovered for 2 - 3 minutes, stirring occasionally until all wine is absorbed.
RISOTTO Setting
- Stir in chicken stock or fish stock and pepper, mixing well. Cover with lid and press the RISOTTO button and then the START/CANCEL button.
- When it has automatically switched to the KEEP WARM setting, which will take about 20 - 30 minutes, remove lid and stir through asparagus slices and remaining butter. Cover with lid and leave on KEEP WARM setting for 5 minutes.
- Stir through lemon juice, lemon rind and season with salt.
Serve immediately with prawns.
TURKISH PILAF
Serves 4-6
- Ingredients
2 tablespoons olive oil
1 red onion, finely chopped
2 cloves garlic, finely chopped
1 teaspoon cardamom pods, finely crushed
1 teaspoon ground cumin
1/2 teaspoon ground black pepper
1 teaspoon ground turmeric
1 bay leaf
pinch salt
450 g Basmati rice, washed and well drained
4 cups chicken or vegetable stock
1/2 cup shelled pistachio nuts, chopped
1 cup dried apricots, chopped
3/4 cup currants
1/4 cup chopped coriander leaves
Method
SAUTÉ/SEAR setting
- Press the SAUTÉ/SEAR button and then the START/CANCEL button. Heat removable cooking bowl for 3 minutes with the lid on.
- Remove lid, add oil, heat 1 minute.
-
Add onion, garlic, spices and salt. Cover with lid and cook, stirring occasionally for 3 - 4 minutes, or until onion has softened slightly and spices are fragrant.
-
Add washed rice, stir well, cover with lid and cook for 2 - 3 minutes, stirring occasionally.
RISOTTO Setting
- Stir in stock, cover with lid and press the RICE/STEAM button and then the START/CANCEL button.
- When the cooker has automatically switched to the KEEP WARM setting, which should take about 15 – 20 minutes, remove lid and discard the bay leaf.
- Stir in pistachio nuts, apricots, currants and coriander.
Serve hot or warm.
600 g short grain sushi rice, washed and drained
4 cups water
2 tablespoons rice vinegar
2 tablespoons caster sugar
1/2 teaspoon salt
Extra tablespoon of rice vinegar for rolling
Method
- Place washed rice and water into the removable cooking bowl. Cover with lid.
- Press the RICE/STEAM button and then the START/CANCEL button.
- When the cooker has automatically switched to the KEEP WARM setting, which will take about 10 - 15 minutes, allow to stand covered on the KEEP WARM setting for 10 minutes
- Remove lid and spoon rice into a large shallow dish, set aside.
- Heat vinegar, sugar and salt in a small saucepan over a low heat until sugar dissolves. Sprinkle vinegar mixture over rice and mix well. Allow rice to cool completely before using.
Hint: Some sushi recipes require the rice to be shaped by hand. To do this combine 1 tablespoon rice vinegar with 1/4 cup water. Use this mixture to keep hands wet while shaping rice.
SUSHI ROLL
- Ingredients
6 sheets Nori seaweed
Prepared Sushi Rice (see recipe)
Wasabi paste, to taste
- Add any combination of fillings such as:
Smoked salmon, thinly sliced
Japanese pickled ginger and vegetables
Finely sliced cucumber
Sashimi salmon or tuna
Cooked prawns
Avocado
Shredded carrot
Finely shredded lettuce
Mayonnaise
Method
- Place a sheet of seaweed, shiny side down on a sheet of baking paper or a bamboo rolling mat.
- Spread a portion of the rice over a two third of the Nori sheet, leaving a border.
- Spread a very thin layer of wasabi paste in a narrow line down the centre of the rice. Top with a selection of fillings.
- Using the paper or mat as a guide, roll up the Nori sheet firmly to enclose the filling. Press to seal the edges.
- Place the roll seam side down on a chopping board and using a very sharp knife, cut the roll into small portions.
- Repeat with remaining Nori sheets and filling.
- Cover and refrigerate until ready to serve. Serve as soon as possible after preparing.
3 tablespoons olive oil
400 g pumpkin, peeled and cut into 1.5 cm cubes
2 rice scoops quinoa
3 rice scoops chicken stock
4 green onions, finely sliced
3-4 dried figs
50g baby spinach leaves
2 tablespoons lemon juice
Method
SAUTÉ/SEAR setting
- Press the SAUTÉ/SEAR button and then the START/CANCEL button. Heat removable cooking bowl for 3 minutes with lid on.
- Remove lid, add half the oil, heat 1 minute.
- Add pumpkin, cover with the lid and cook for 3 - 4 minutes, stirring occasionally, until softened and lightly golden. Remove and set aside
RICE/STEAM setting
- Add quinoa and stock, mix well, cover with the lid. Press the RICE/STEAM button and then the START/CANCEL button.
- When the cooker has automatically switched to the KEEP WARM setting, which will take about 10 - 15 minutes, remove lid and fluff up with a fork and cool completely.
Place cooked quinoa into a large salad bowl and toss through cooked pumpkin, figs and baby spinach leaves.
- Whisk lemon juice and remaining oil and season with salt and pepper. Drizzle over salad and serve immediately.
TROPICAL MANGO RICE
Serves 4-6
- Ingredients
275 g short grain white rice, washed and drained
1 cup mango nectar
1 cup water
450 g can sliced peaches,drained,juice reserved
2 teaspoons finely grated lime rind
270 ml can coconut cream
1/4 cup passionfruit pulp
1 tablespoon cinnamon sugar
Method
- Place washed rice, mango nectar, water and reserved peach juice (set peach slices aside) into the removable cooking bowl, mixing well. Cover with lid.
- Press the RICE/STEAM button and then the START/CANCEL button.
- When the cooker has automatically switched to the KEEP WARM setting, stir through lime rind, coconut cream and passionfruit pulp. Cover with lid and stand for 10 minutes on KEEP WARM setting.
Serve warm with reserved peaches and sprinkle with cinnamon sugar.