
MFP200T - Food Processor BLACK & DECKER - Free user manual and instructions
Find the device manual for free MFP200T BLACK & DECKER in PDF.
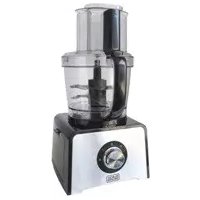
| Product Type | Mini food processor |
| Brand | Black & Decker |
| Model | MFP200T |
| Bowl Capacity | 480 ml (2 cups) |
| Speeds | High, low, off, pulse |
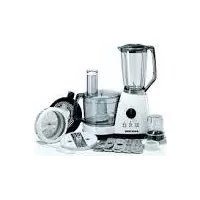
| Main Functions | Chop, slice, shred, blend, crumb, grind |
| Included Accessories | Knife, reversible slicing/shredding disc, discharge disc, pusher, chopping lid, lid with continuous feed chute |
| Power Supply | 120 V, 60 Hz, polarized plug |
| Power | Not specified (estimated ~250 W) |
| Dimensions (approx.) | Height 25 cm, width 15 cm, depth 15 cm (estimated) |
| Weight (approx.) | 1.2 kg (estimated) |
| Bowl Material | Clear plastic |
| Safety | Interlock device prevents operation if lid is not locked |
| Care and Cleaning | Removable parts are dishwasher safe (top rack) or wash in warm soapy water. Wipe base with damp cloth. |
| Replacement Parts | Spare parts available (part numbers MFP200T-01 to MFP200T-07) |
| Repairability | Do not attempt to repair yourself. Contact an authorized service center. |
| Warranty | 1 year limited (USA and Canada) |
| Intended Use | Household use only |
Frequently Asked Questions - MFP200T BLACK & DECKER
User questions about MFP200T BLACK & DECKER
0 question about this device. Answer the ones you know or ask your own.
Ask a new question about this device
Download the instructions for your Food Processor in PDF format for free! Find your manual MFP200T - BLACK & DECKER and take your electronic device back in hand. On this page are published all the documents necessary for the use of your device. MFP200T by BLACK & DECKER.
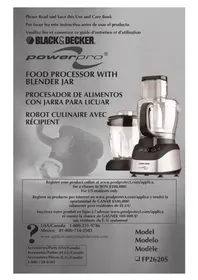
USER MANUAL MFP200T BLACK & DECKER
MFP200T 1/18/07 8:03 AM Page 1
Please Read and Save this Use and Care Book
natural_image
Black-and-white photo of a MiniPro blender with a tomato and pepper nearby (no visible text or symbols on the device itself)Register your product online at www.prodprotect.com/applica, for a chance to WIN \$100,000!
Accessories/Parts (USA/Canada)
When using electrical appliances, basic safety precautions should always be followed, including the following.
Read all instructions.
☐ To protect against risk of electrical shock, do not put base, cord, or plug in water or other liquid.
☐ Close supervision is necessary when any appliance is used by or near children.
☐ Unplug from outlet when not in use, before putting on or taking off parts, and before cleaning.
□ Avoid contacting moving parts.
☐ Do not operate any appliance with a damaged cord or plug or after the appliance malfunctions or is dropped or damaged in any manner.
☐ Return the appliance to the nearest authorized service facility for examination, repair, or electrical or mechanical adjustment. Or, call the appropriate toll-free number listed on the cover of this manual.
☐ The use of attachments not recommended or sold by the appliance manufacturer may cause fire, electric shock, or injury.
Do not use outdoors.
Do not let cord hang over edge of table or counter.
- Keep hands and utensils away from moving blades or discs while processing food to prevent the possibility of severe personal injury or damage to the food processor. A scraper may be used, but it must be used only when the food processor is not running.
□ Blades are sharp. Handle carefully.
☐ To reduce the risk of injury, never place cutting blade or discs on base without first putting bowl properly in place.
☐ Be certain cover is securely locked in place before operating appliance.
☐ Never feed food into chute by hand. Always use food pusher.
☐ Do not attempt to defeat the cover interlock mechanism.
☐ Do not use appliance for other than intended use.
SAVE THESE INSTRUCTIONS.
POLARIZED PLUG
This appliance has a polarized plug (one blade is wider than the other). To reduce the risk of electric shock, this plug is intended to fit into a polarized outlet only one way. If the plug does not fit fully into the outlet, reverse the plug. If it still does not fit, contact a qualified electrician. Do not attempt to modify the plug in any way.
TAMPER-RESISTANT SCREW
Warning: This appliance is equipped with a tamper-resistant screw to prevent removal of the outer cover. To reduce the risk of fire or electric shock, do not attempt to remove the outer cover. There are no user-serviceable parts inside. Repair should be done only by authorized service personnel.
Note: If the power supply cord is damaged, it should be replaced by qualified personnel or in Latin America by an authorized service center.
Product may vary slightly from what is illustrated.

+ 1 . F ood pusher (Part# MFP200T-01)
† 2 . Cover with continuous flow chute (Part# MFP200T-02)
+ 3 . Slice/shred disc with hub (Part# MFP200T-03)
† 4 . Discharge disc (Part# MFP200T-04)
+ 5 . C hopping lid (Part# MFP200T-05)
+ 6 . Chopping blade (Part# MFP200T-06)
† 7 . 2-Cup (480 ml) Bowl (Part# MFP200T-07)
-
Post
-
Base
-
High/Low/Off/Pulse Control
†Consumer replaceable/removable parts
How to Use
This product is for household use only.
- Before first use, unpack the product and remove packing material. Handle sharp chopping blade and slice/shred discs carefully.
- Wash all parts except base.
Note: Do not attempt to chop ice in this food processor; it will damage container and dull chopping blade. This unit will not whip cream, beat egg whites to a desirable volume, grind coffee beans or spices with a high oil content, or slice or shred hard-cooked eggs, marshmallows, or soft cheeses.
CONTROLS
OFF — Processor should always be left in OFF position when unit is not in use.
PULSE — PULSE button must be pressed and held for unit to operate. When released, unit will stop. Use PULSE for short processing tasks, such as chopping nuts, raw meats, or vegetables. This lets you check processed results and control the fineness.

Using the Food Processor
IMPORTANT: For your protection this unit has an interlock system. When you slip the bowl over the post, turn it toward the base so that it locks into place. Be sure to turn the cover (or chopping lid, depending on use) toward the lock position so that the Tab locks into the slot on the Base (A). This unit will not operate unless the cover (or chopping lid) is locked into place.
How to slice or shred
-
Slip the bowl over the center post and twist it toward the base so that the bowl locks into place.
-
Carefully grasp the slice/shred disc by the hub or its edges with the desired side (slice or shred) up, and push it down onto the top of the discharge disc. Slip the discharge disc (with slice/shred disc) over the center post.
-
Place the cover with continuous flow chute onto the bowl and twist it toward the base ( LOCK) until you hear it click into place (A). Position a large, low serving/prebowl under the continuous flow chute to catch food and spatter. Rimless bowls work better than bowls with a lip.

-
Plug the cord into an electrical outlet.
-
Use the food guide to help you prepare food for slicing or shredding. Fill the food chute and position the food pusher over the food.
-
Push down with a light but steady pressure on the food pusher while pressing the desired speed: Hi, Low (B). Press and hold the pulse position for short processing tasks, such as slicing a cucumber. The unit will stop when you release the pulse button. Use the Hi, Low, position for continuous, longer processing tasks, such as shredding cabbage or carrots.
NOTE: Let the processor do the work. Heavy pressure will not speed up operation. Do not use the processor continuously for more than 3 minutes at a time. Occasionally turn the serving bowl during processing to prevent food build up in the continuous flow chute that could fall out of the bowl. Be sure the processor and bowl are far enough back on the counter to prevent bits from falling on the floor.
- After processing food, turn the unit "Off" by pressing on the elevated end of the rocker "lever" so that it will be even with the top of the unit in the "Off" position or release the pulse button. Allow the disc to stop spinning completely before you remove the cover with Continuous flow chute by turning it toward the (UNLOCK) and lifting it off.
Chopping Blade
The chopping blade speeds up many everyday tasks and is designed to chop, crumb, grind, mince and mix quickly.

- Slip the bowl over the center post and twist it toward the base to be sure the bowl locks into place.
- Grasp the chopping blade by its center hub and slide it down onto the post (C).
- Use the food guide to help you prepare food for chopping/mincing/mixing and crumbing, then place the food into the bowl. Place the chopping lid onto the bowl and twist it toward the base until you hear it click into place.
-
Plug the cord into an electrical outlet.
-
Use the Hi or Low for longer processing tasks to make salad dressing, dips, or baby food. Use the pulse position for short processing like chopping nuts or crumbing bread. Hold the pulse position for about 2-3 seconds; check results; repeat for desired consistency. It is better to use several short pulses rather than a single long one unless mixing ingredients that require longer processing times.
- After processing food, turn the unit "off" by pressing on the elevated end of the rocker "lever" so that it will be even with the top of the unit in the "Off" position or release the pulse button. Let the chopping blade stop spinning before you twist the chopping lid off.
- Grasp the chopping blade by its hub and remove. Unlock the bowl by twisting it off the base. Empty the processed food.
FOOD PROCESSING TIPS
Liquids
- Hot liquids (not boiling) and hot foods can be processed in container.
- Be sure to process small amounts of liquids — 2 cups or less at a time. Larger amounts will leak from container.
Food Size, Preparation and Loading
- When preparing cookie, cake batter or quick bread, use the chopping blade to cream butter or shortening and sugar first. Add dry ingredients last. Place nuts and fruits on top of dry ingredients to prevent over-chopping. Process using short pulses until blended. Do not overprocess.
Meat
- When using the chopping blade for processing meal, cut the meat into 1" (2.54cm) cubes. Do not put more than 1/2 lb. (230g) of meat into the container at a time. Chop on pulse to the size desired.
Dry Ingredients
- When using different foods in a recipe, process dry ingredients first and moist ingredients later. This reduces the number of times container must be washed and dried.
Care and Cleaning
This appliance contains no user-serviceable parts. Refer service to qualified service personnel.
NOTE: Do not attempt to sharpen the cutting edges of the chopping blade or the reversible slice/shred disc. They are permanently sharpened at the factory and will be ruined by attempted sharpening.
Cleaning
- Before cleaning, be sure the unit is Off and unplugged.
- Rinse parts immediately after processing for easy cleanup. Removable parts can be washed by hand or in a dishwasher, top rack.
- If washing by hand, use warm soapy water, rinse, and dry thoroughly. If necessary, use a small bristle brush to thoroughly clean the bowl, cover with continuous flow chute, chopping blade, and slice/shred disc.
- In a dishwasher, place removable parts on the top rack only — not in or near the utensil basket.
- Wipe the base with a damp sponge or cloth and dry thoroughly. Remove stubborn spots with a damp cloth and a mild, non-abrasive cleaner. Do not immerse the base in liquid.
- Do not use rough scouring pads, abrasives, or cleansers on any parts.
- Do not fill the bowl with boiling water or place any parts in boiling water. Some foods, such as carrots, may temporarily stain the bowl. To remove stains, make a paste of 1 tablespoon baking soda and two tablespoons warm water. Apply the paste to the stains and rub with a cloth. Rinse in suddy water and dry.
Food Guide
| FOOD ATTACHMENT COMMENTS | |
| APPLES Disc, Slicing Side Stack 2 quarters horizontally in chute.Use moderate pressure. | |
| BANANAS Disc, Slicing Side Peel and cut in half; use light pressure. | |
| CABBAGE Disc, Shredding Side Cut to fit chute; shred into bowl.Add slaw ingredients (mayo, vinegar,salt, etc.) | |
| CARROTS Disc, Slicing Side Cut into 4" (10.2 cm) lengths and pack(Sliced, shredded) in chute, alternating thick and thinShredding Side ends. Position in chute & shred. | |
| CELERY, CHOPPED Chopping Blade Up to 1 cup cut into 1/2" (1.27 cm)Chopping Lid lengths. Pulse to desired texture. | |
| CUCUMBER Disc, Slicing Side Cut to fit chute; use light pressure. | |
| CHEESE, PARMESAN Chopping Blade Cut into 1/2" (1.27 cm) cubes andChopping Lid pulse up to 1/2 cup at a time. | |
| CHEESE, CHEDDAR | Disc, Shredding Side Cut chilled cheese to fit chute/shred. |
| EGGS(HARD COOKED) | Chopping Blade Quarter up to 3 eggs and pulse toChopping Lid desired texture. Add mayo, salt, andseasoning for egg salad. |
| NUTS, CHOPPED | Chopping Blade Add up to 1 cup; pulse to desiredChopping Lid fineness. |
| ONIONS | Chopping Blade Quarter or cut large onions intoChopping Lid 8 pieces. Add to bowl. Pulse. For even,coarse results, only chop 2 quartersat a time. |
| BREAD | Chopping Blade Use up to 2 slices/broken into pieces.Chopping Lid Pulse speed. |
| PARSLEY, OTHERHERBS | Chopping Blade Add up to 1 cup; pulse to desiredChopping Lid fineness. |
| PEPPERONI | Disc, Slicing Side Cut into 4" (10 cm) lengths. Slice 1piece at a time using firm pressure. |
| POTATOES | Disc, Shredding Side Cut to fit chute. After shredding, placein cold water to prevent darkeningbefore frying. |
| SQUASH (SHREDDED) | Disc, Shredding Side Cut to fit chute; shred, salt and drain.Fries well in butter or oil. |
Product may vary slightly from what is illustrated.

For service, repair or any questions regarding your appliance, call the appropriate "800" number on the cover of this book. Do not return the product to the place of purchase. Do not mail the product back to the manufacturer nor bring it to a service center. You may also want to consult the website listed on the cover of this manual.
One-Year Limited Warranty
(Applies only in the United States and Canada)
What does it cover?
- Any defect in material or workmanship; provided; however, Applica's liability will not exceed the purchase price of the product.
For how long?
• One year after the date of original purchase.
What will we do to help you?
- Provide you with a reasonably similar replacement product that is either new or factory refurbished.
How do you get service?
- Save your receipt as proof of the date of sale.
- Check our on-line service site at www.prodprotect.com/applica, or call our toll-free number, 1-800-231-9786, for general warranty service.
- If you need parts or accessories, please call 1-800-738-0245.
What does your warranty not cover?
• Damage from commercial use
- Damage from misuse, abuse or neglect
- Products that have been modified in any way
- Products used or serviced outside the country of purchase
• Glass parts and other accessory items that are packed with the unit
• Shipping and handling costs associated with the replacement of the unit
- Consequential or incidental damages (Please note, however, that some states do not allow the exclusion or limitation of consequential or incidental damages, so this limitation may not apply to you.)
How does state law relate to this warranty?
- This warranty gives you specific legal rights, and you may also have other rights that vary from state to state or province to province.
¿NECESITA AYUDA?
Lima, Peru Tal: 0.03
Tel.: 2 22 44 14
Fax. 2 22 44 04
Puerto Rico
Buckeye Service
Jesus P. Pinero #1013
Fucho Nuevo, SJ PR 00920 Tel: (787) 783 6175
Tel.: (767) 702-0475
Republica Dominicana
Plaza Lama, S.A. Av. Duvalo #91
Av, Duarte #34
Santo Domingo, República Dominicana
Tel : (809) 687-9171
Trinidad and Tobago
A.S. Bryden & Sons (Trinidad)
Limited
3.5 Independence Square,
Port of Spain Trinidad, W.J.
Tel : (868) 623-4696
- 2017年1月1日
Venezuela
Inversiones BDR CA An Cosmova C.C.
Nivel Plaza Local 153
Diagonal Hotel Melia.
Caracas
Tel. (582) 324 0969
Col. Centro, Mexico D. F., CP 06050
BLACK & DECKER is a trademark of The Black & Decker Corporation, Towson, Maryland, USA
Marca registrada de The Black & Decker Corporation, Towson, Maryland, E.U.
Copyright © 2007 Applica Consumer Products, Inc.
Made in People's Republic of China
Printed in People's Republic of China
Importado por:


- SAVE THESE INSTRUCTIONS.
- POLARIZED PLUG
- TAMPER-RESISTANT SCREW
- How to Use
- CONTROLS
- Using the Food Processor
- How to slice or shred
- Chopping Blade
- FOOD PROCESSING TIPS
- Liquids
- Food Size, Preparation and Loading
- Meat
- Dry Ingredients
- Care and Cleaning
- Cleaning
- One-Year Limited Warranty
- What does it cover?
- For how long?
- What will we do to help you?
- How do you get service?
- What does your warranty not cover?
- How does state law relate to this warranty?
- ¿NECESITA AYUDA?
- Puerto Rico
- Republica Dominicana
- Trinidad and Tobago
- Venezuela
Brand : BLACK & DECKER
Model : MFP200T
Category : Food Processor