
RI 642 C - Cooker ROSIERES - Free user manual and instructions
Find the device manual for free RI 642 C ROSIERES in PDF.
| Product type | Induction hob |
| Brand | Rosieres |
| Model | RI 642 C |
| Number of cooking zones | 4 zones including a flexible zone (can work as 2 separate zones or 1 large zone) |
| Power supply | 220-240 V ~ 50/60 Hz |
| Maximum total power | 7.0/7.1 kW (adjustable from P1 to P5) |
| Boost function | Yes, temporary power increase (up to 5 minutes) |
| Pause function | Yes, allows pausing cooking without turning off the hob |
| Child lock | Yes, locks controls (except stop) |
| Timer | Yes, programmable from 1 to 99 minutes |
| Automatic safety shut-off | Yes, according to power level: 8h (1-3), 4h (4-6), 2h (7-9) |
| Residual heat indicator | Yes, displays "H" when the zone is hot |
| Pan detection | Yes, audible signal if pan is incompatible or too small (<80 mm) |
| Cooking surface | Vitroceramic |
| Cutout dimensions (W x D) | 560 x 490 mm |
| Product dimensions (W x D x H) | Approximately 590 x 520 x 55 mm |
| Net weight | Approximately 8 kg |
| Installation type | Built-in, requires adequate ventilation (at least 50 mm gap between edge and furniture) |
| Cleaning | Clean with sponge and warm water; for stubborn residues, use white vinegar or a special vitroceramic scraper |
| After-sales service | Contact the manufacturer (Rosieres) or an approved centre |
| Spare parts | Available from the manufacturer (power cord, etc.); replacement by qualified personnel |
| Repairability | Must be done by a qualified professional; do not disassemble yourself |
Frequently Asked Questions - RI 642 C ROSIERES
User questions about RI 642 C ROSIERES
0 question about this device. Answer the ones you know or ask your own.
Ask a new question about this device
Download the instructions for your Cooker in PDF format for free! Find your manual RI 642 C - ROSIERES and take your electronic device back in hand. On this page are published all the documents necessary for the use of your device. RI 642 C by ROSIERES.
USER MANUAL RI 642 C ROSIERES
Thank you for purchasing the ROSIERES induction hob. Please read this instruction manual carefully before using the hob and keep it in a safe place for future reference.
By placing the CE C E marking on this product, we declare, on our own responsibility, compliance to all the European safety, health and environmental requirements stated in the legislation for this product. Asapplicable, the parts of this appliance are compliant to:
REGULATION (EC) No 1935/2004 on materials and articles intended to come into contact with food.
Safety Reminding and Maintenance:
- WARNING: The appliance and its accessible parts become hot during use. Care should be taken to avoid touching heating elements.
Children under 8 Year of age must be kept away from the appliance unless they are continuously supervised. - This appliance can be used by children aged from 8 years and above and persons with reduced physical, sensory or mental capabilities or lack of experience and knowledge if they have been given supervision or instruction concerning use of the
- appliance in a safe way and understand the hazards involved. Children must not play with the appliance.
- Cleaning and user maintenance shall not be made by children without supervision
- WARNING: Unattended cooking on a hob with fat or oil can be dangerous and may result in fire.
- NEVER try to extinguish a fire with water, but switch off the appliance and then cover flame e.g. with a lid or a fire blanket.
-
WARNING: Danger of fire: do not store items on the cooking surfaces.
-
WARNING: If the surface is cracked, switch off the appliance to avoid the possibility of electric shock.
- Do not use a steam cleaner for cleaning operations
- Metallic objects such as knives, forks, spoons and sauce pan lids must not be placed on the hob surface as they can get hot. Any spillage should be removed from the lid before opening.
- The hob surface must be allowed to cool down before closing the lid.
- After use, switch off the hob element by its control. Do not rely on the pan detector.
- This appliance is not intended to be operated by means of an external timer or separate remote - control system.
- The means for disconnection must be incorporated in the fixed wiring in accordance with the wiring rules.
- The instructions state the type of cord to be used, taking into account the temperature of the rear surface of the appliance.
- If the supply cord is damaged, it must be replaced by the manufacturer, its service agent or similarly qualified persons in order to avoid a hazard.
- CAUTION: In order to avoid a hazard due to inadvertent resetting of the thermal cutout, this appliance must not be supplied through an external switching device, such as a timer, or connected to a circuit that is regularly switched on and off by the utility.
WARNING: Use oly hob guards designed by manufacturer of the cooking appliance or indicated by the manufacturer of the appliance in the instructions for use as suitable or hob guards incorporated in the appliance. The use of inappropriate guards can cause accidents.
- Always use the appropriate cookware.
- Always place the pan in the center of the unit that you are cooking on.
- Do not place anything on control panel.
-
Do not use the surface as a cutting board.
-
The means for disconnection must be incorporated in the fi ed wiring in accordance with the wiring rules.- The instructions state the type of cord to be used, taking into account the temperature of the rear surface of the applicance.
- The hob surface must be allowed to cool down before closing the lid.- CAUTION: the cooking process must be supervised. A short term cooking process has to be supervised continuously
Dear Customer:
Thank you for purchasing the CANDY induction hob. We hope it will give many year service.
Please read this instruction manual carefully before using the hob and keep it in a for future reference.
Product Introduction
The induction hob caters for all kind of cooking, electromagnetic cookingzones, and its micro-computerised controls and multi-functions, mating ideal choce todays family.
Manufactured with specially imported materials, the CANDY induction hob is extremely fit friendly, durable and safe.
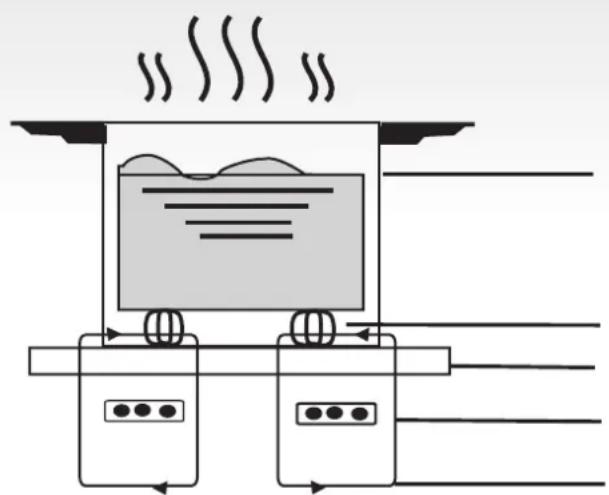
Working Principle
The induction hob comprises a coil, a hotplate made of ferromagnetic material and a system. Electrical current generates a powerful magnetic field through the coil. This produces a large number of vortices which in turn generate heat which is then transmitted through the cookingzone to the cooking vessel.
iron pot
magnetic circuit
ceramic glass plate
induction coil
Induced currents
Safety
Installation
This hob was specially designed for domestic use.
In its constant search to improve its product CANDY reserves the right to modify any technical, programme or aesthetic aspects of the appliance at any time.
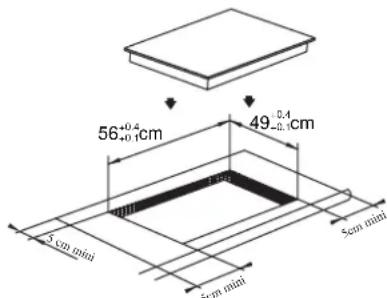
Cut a hole in the worktop of the dimensionshown in the diagram below. A minimum of50 mm space should be left around the hoThe worktop should be at least 30 mm thand made of heat-resistant material. As shown in Figure (1)
Protection from over-heating
A sensor monitors the temperature in the cooking zones. When the temperature exceeds a safe level, the cooking zone is automatically switched off.
Detection of small or non-magnetic items
When a pan with a diameter of less than 80~mm or some other small item (e.g. knife, fork, key) or a non-magnetic pan (e.g. aluminium) has been left on the hob, a buzzer sounds for approximately one minute, after which the hob goes automatically on to standby.
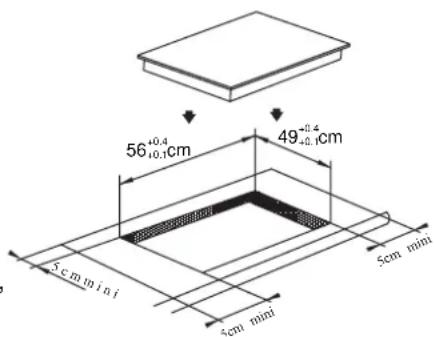
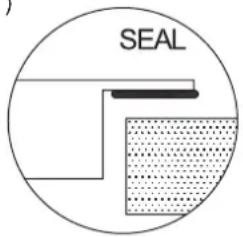
Figure (1)
Residual heat warning
When the hob has been operating for some time, there will be some residual heat. The letter 2H"lt appears to warn you to keep away from
Auto shutdown
Another safety feature of the induction hob is a shutdown. This occurs whenever you forget to switch off a cooking zone. The default shutdown times are shown in the table below:
Make sure the hob is correctly installed as shown in Figure 2.
Figure (2)
| Power level | The heating zone shut down automatically after |
| 1~3 | 8 hours |
| 4~6 | 4 hours |
| 7~9 | 2 hours |
When the pan is removed from the cooking zone, it stops heating immediately and switches itself off after the buzzer has sounded for one minute.
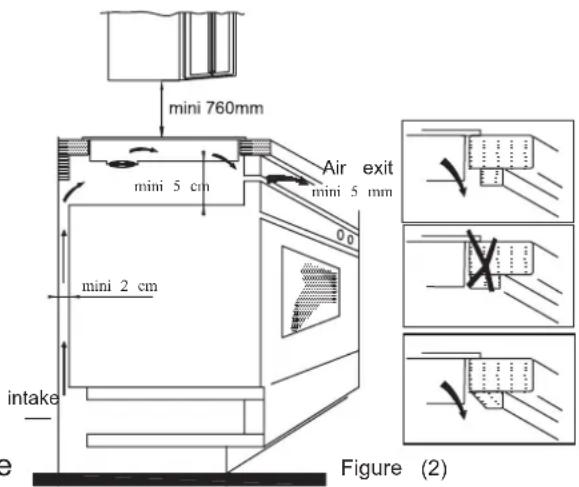
Warning: Anyone who has been fitted with NB: For safety, the gap between the hob a heart pacemaker should consult a doctor before cupboard above it should be at least 7 using the induction hotplate. mm.
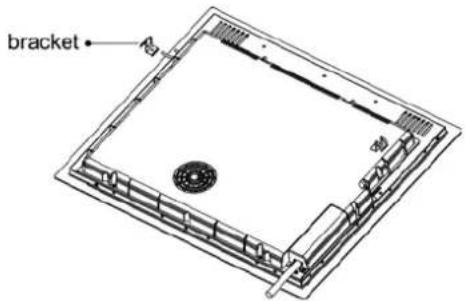
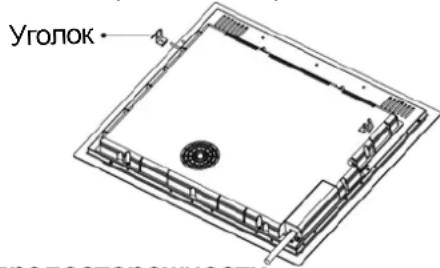
- Fix the hob to the worktop using the Iffothe appliance is being connected directly brackets on the base of the hob. The positinains supply, an omnipolar circuit brea of the brackets can be adjusted accordingsto be installed with a minimum gap of the thickness of the top. between the contacts.
The installer must ensure that the correct electrical connection has been made and that it complies with safety regulations.
The cable must not be bent or compressed. The cable must be checked regularly and only replaced by a properly qualified person.
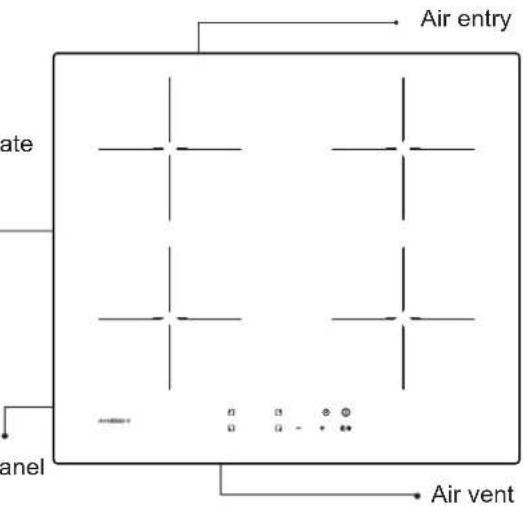
Diagram of induction hob:
Warnings:
(1) The induction hob must be installed by a properly qualified person. We have our own qualified installers. Never try to install the appliance yourself. Cara
(2) The induction hob must not be installed above refrigerators, freezers, dishwashers or tumble dryers.
(3) The induction hob should be installed so that optimum radiation of heat is possible.
(4) The wall and the area above the hob should be able to withstand heat.
(5) To avoid any damage, the sandwich layer and adhesive should be heat-resistant.
4. Connection to power supply
The socket should be connected in compliant with the relevant standard, to a single-pole circuit breaker. The method of connection is shown in Figure 3.
| Voltage | Wire connection | ||
| 380-415V 3N~ | 1 2 L1 L2 Black Brown | 3 4 N Blue | 5 1 Yellow/Green |
| 220-240V~ | 1 2 L Black& Brown | 3 4 N Blue | 5 1 Yellow/Green |
Schematic diagram of the control panel
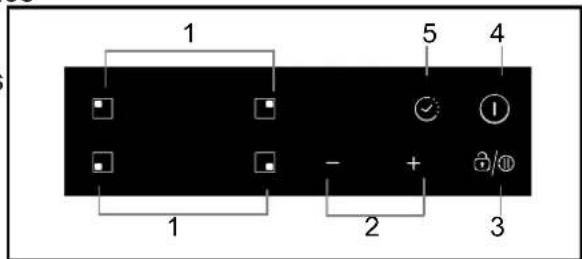
Figure (3)
- Heating zone selection controls 2. Power / Timer regulating key
3.Keylock/Pause control 4.ON/OFF control - Timer control
If the cable is damaged or needs replacing, this should be done by an after-sales technician using the proper tools, so as to avoid any accidents.
Instructions for Use
Preparation before using:
When the power is switched on, the buzzer will set sound once and all the indicators will come off for one second and then go out. The hob is in standby mode.
Place the pan in the centre of the cooking zone.

decreases the time by one minute. When the
er will
set time exceeds 99 minutes, it will automatica
the on
return to0" minutes. If the" and "+" keys are
is now
pressed simultaneously, the indicator will display

Operating instructions
When the ON/OFF key is pressed, all the indicators show-. Select the power level by pressing the"or"-key for the relevant hotplate. To begin with the indicator "Shows Adjust up or down by pressing"dhe"key. If you press and-"keys simultaneously, the power setting return\$0"and the cooking zone switches off.
See the table on Page for the power speciected zone."
to each cooking zone.
NB: When the ON/OFF key is pressed, the induction hob returns to standby mode if no other operation is carried out within oneminit
- Select the power level of the cooking zone and then press "thimer"key. The timer can now be set.
By. When the timing indicator has been flashin for 5 seconds, the settime will be automatically confirmed.
3. After selecting a set time, confirm by press the "Timer" key.
4. Once the "Timer" is confirmed, a dot appears on the bottom right of the power level of the
Timer cancellation
After setting the time again, hold down the timer key for 5 seconds. This will cancel the timer and the indicator will reveal to
Timing function
Press the timing key and the indicator will flashing. Then set the time for between 1 99 minutes, by pressing "t" and "-" keys.
Pressing the + " key once increases the time by one minute; pressing " -thkey once
Safety mode
To ensure the safety of children, the induction hob is fitted with an interlock device.
To lock: hold down "litterlock"; the hob then goes int'nterlock" mode, the timer shows "Lo" and the rest of the keys are except the "ON/OFF" key.
Unlicking
ABd down t'Interlock" key for 2 seconds andthe hob will return to normal working.

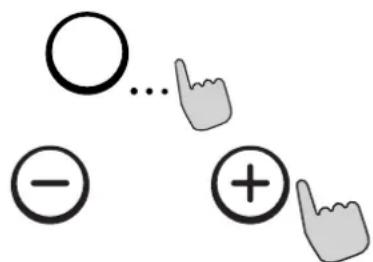
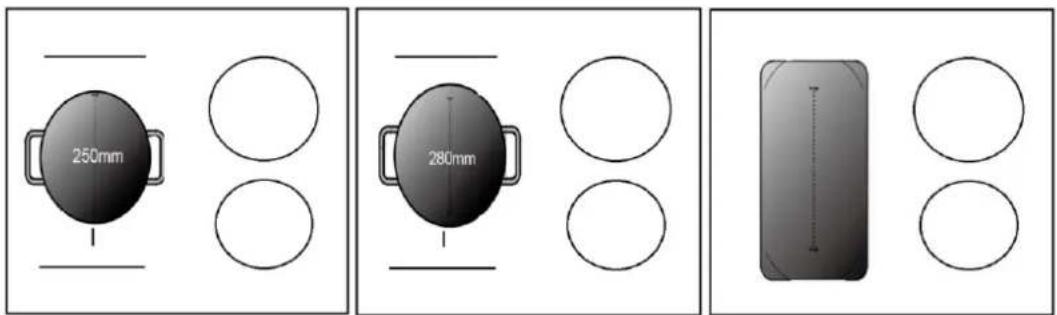
FLEXIBLE AREA
- This area can be used as a single zone or as two different zones, accordingly to the cooking needs anytime.
- Free area is made of two independent inductors that can be controlled separately.
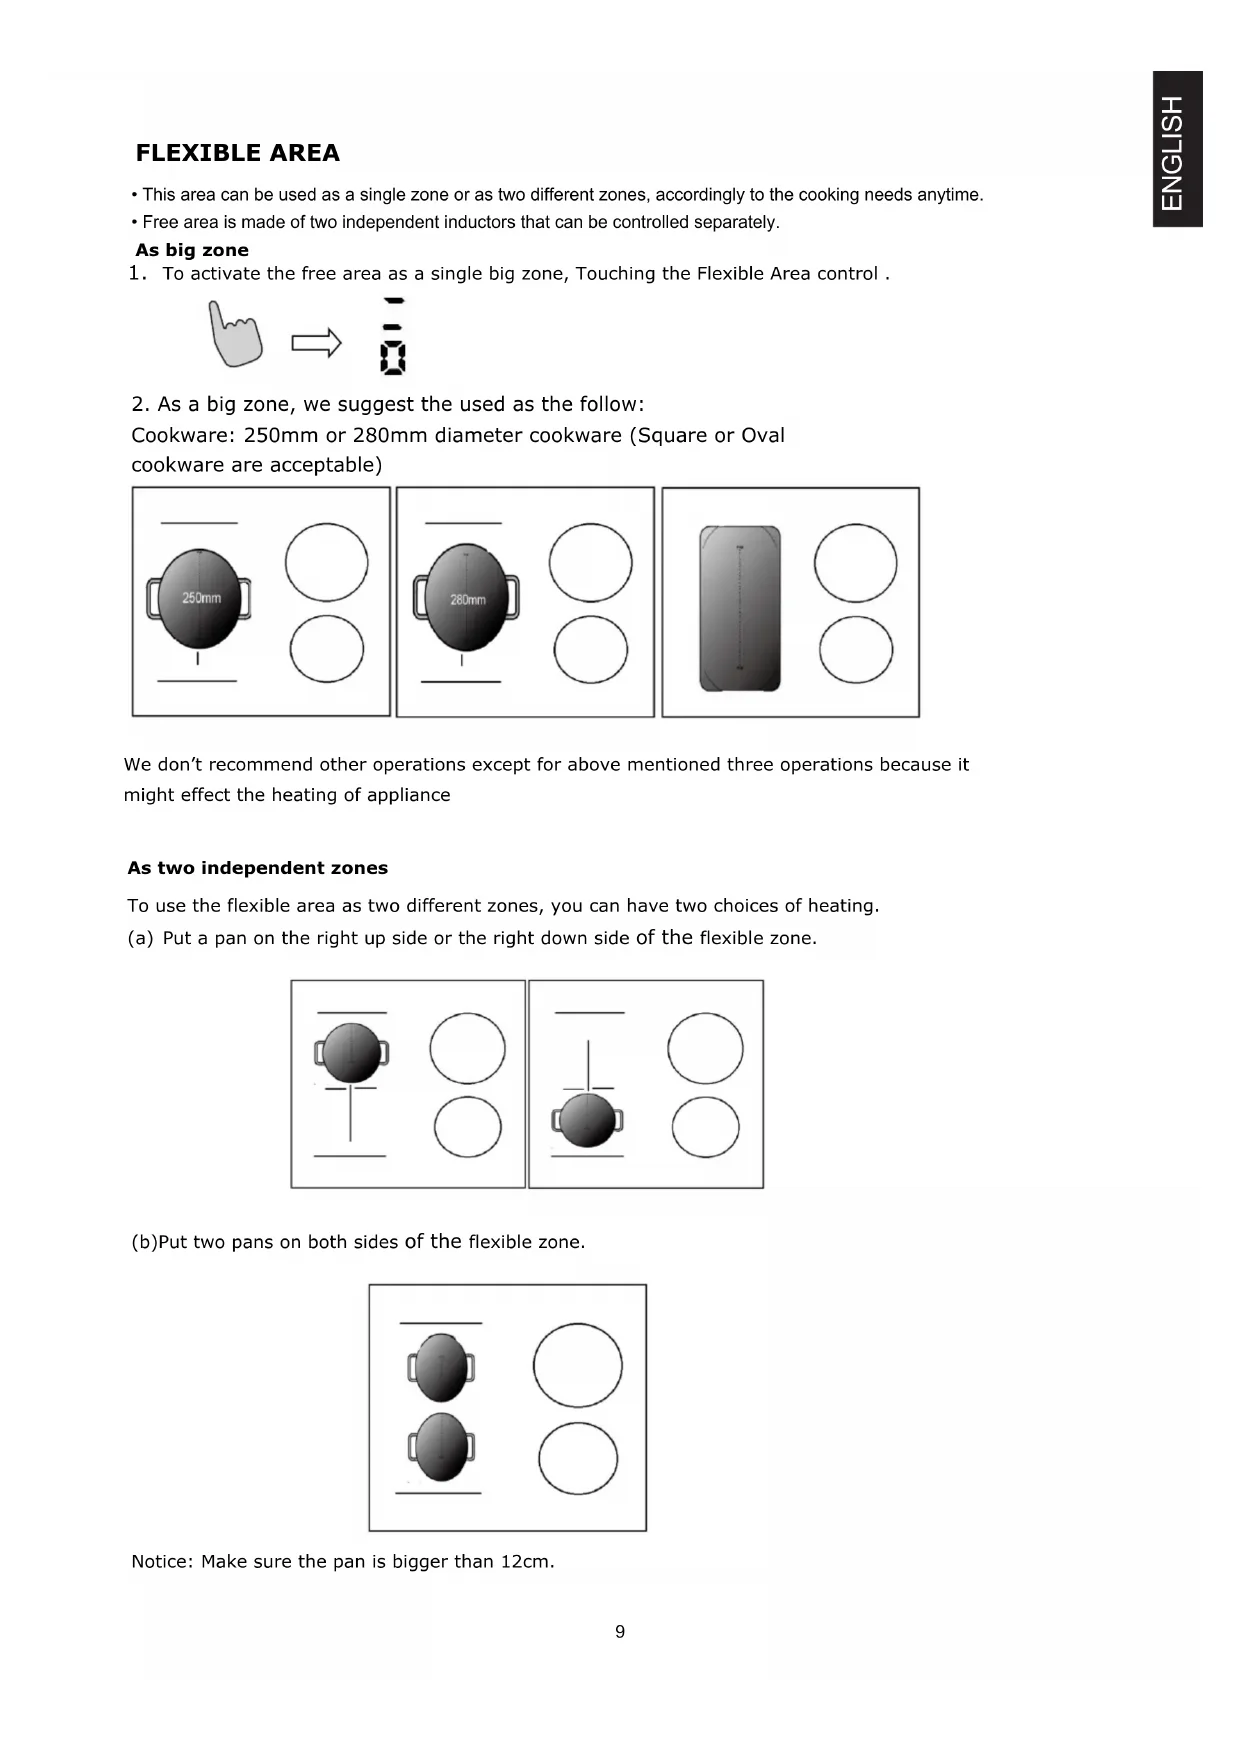
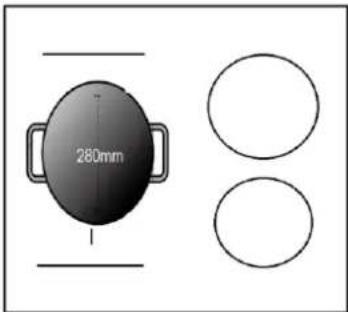
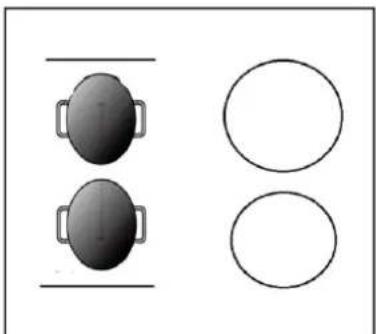
As big zone
- To activate the free area as a single big zone, Touching the Flexible Area control.
- As a big zone, we suggest the used as the follow:
Cookware: 250mm or 280mm diameter cookware (Square or Oval cookware are acceptable)

We don't recommend other operations except for above mentioned three operations because it might effect the heating of appliance
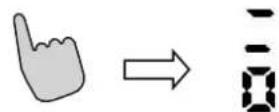
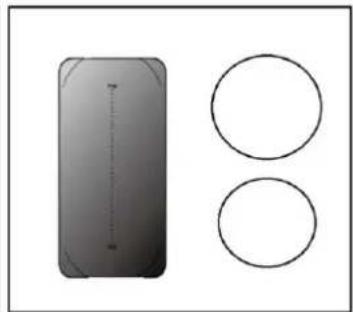
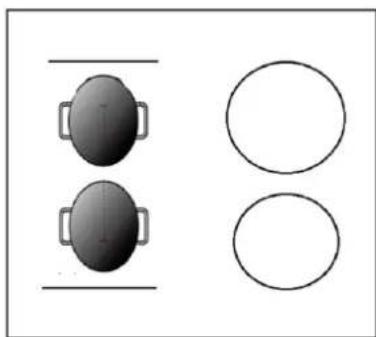
As two independent zones
To use the flexible area as two different zones, you can have two choices of heating.
(a) Put a pan on the right up side or the right down side of the flexible zone.
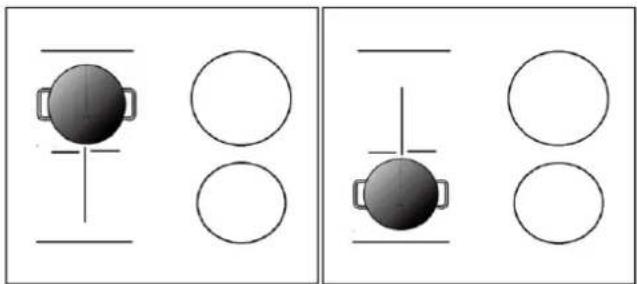
(b)Put two pans on both sides of the flexible zone.
Notice: Make sure the pan is bigger than 12cm.
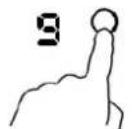
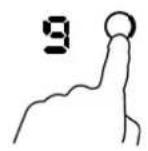
Boost mode
Touching the heating zone selection control, then touching "+" -Make sure the display shows "9". Touching the "+" button again, the zone indicator show "b" and the power reach Max

Cancel the Boost mode
Touching the "-" button to cancel the Boost function, then the cooking zone will revert to its original setting. Touching "-" and "+" control together, the cooking zone switch off and the boost function cancel automatically


- The cooking zone returns to its original setting after 5 minutes
Note: It is recommended that the cooker hood suction is switched on few minutes prior to cooking and switched off few minutes after terminating cooking.
Pause Mode
- You can pause the heating instead of shutting the hob off.
- When entering the Pause mode, all the controls except the ON/OFF control are disabled.
| To enter pause mode | |
| Touch the lock/pause control. | All the indicator will show " 11" |
| To unlock the controls | |
| Touch the lock/pause control. | |

When the hob is in the pause mode, all the controls are disable except the ON/OFF ① , you can always turn the induction hob off with the ON/OFF ① control in an emergency.
Power Management Function
- it is possible to set a maximum power absorption level for the induction hob, choosing up to different power ranges.
- induction hobs are able to limit themselves automatically in order to work at lower power level, to avoid the risk of overloading.
To enter Power Management Function
Turn on the hob, then Press at the same time the "+" (timer) and key lock.
The timer indicator will show " P5" which means power level 5. The default mode is on 7.0Kw/ 7.1Kw.

To switch to another level
press + / - from the timer There are 5 power levels, from "P1" to "p5". The timer indicator will show one of them.
"P1": the maximum power is 2.5Kw.
"P2": the maximum power is 3.5Kw.
"P3": the maximum power is 4.5Kw.
"P4": the maximum power is 5.5Kw.
"P5": the maximum power is 7.0Kw/ 7.1Kw.

Confirmation and Exit Power Management Function
Press at the same time + (timer) and key lock for Then the hob will be turned off. confirmation.

Selection of cooking vessels


Enamel stainless steel kettle

Enamel cooking utensil

Iron plate
You may have a number of different cooking vessels
This induction hob can identify a variety of cooking vessels, which you can take one of the following methods:
Place the vessel on the cooking zone. If the corresponding cooking zone disp a power level, then the vessel is sUutabashs, then the vessel is not suitable for use with the induction hob.
2 Hold a magnet to the vessel. If the magnet is attracted to the vessel, it is for use with the induction hob.
NB: The base of the vessel must contain magnetic material.
It must have a flat bottom with a diameter of more than 14 cm.
3 Use pans whose diameter is as large as the graphic of the zone selected.
Using a pot a slightly wider energy will be used at its maximum efficiency. If you use smaller pot efficiency could be less than expected. Pot less than 140mm could be undetected by the hob.
Cleanness and Maintenance
The surface of the induction hob may be easily cleaned in the following way:
| Type of contamination | Method of cleaning | Cleaning materials |
| Light Immersion | in hot water and wipe dry Cleaning | sponge |
| Rings and lime scale | Apply white vinegar to the area, wipe a soft cloth or use a commercially available product | Special adhesive for ceramic glass |
| Sweetmeat, melted aluminium or plastics | Use a special scraper for ceramic glass to remove residue (a silicon product best) | special adhesive for ceramic glass |
NB: Disconnect the power supply before cleaning.
Failure Display and Inspection
If any abnormality occurs, the induction hob will automatically go into protective mode and one of the following codes:
| Fault Possible cause Solutions | ||
| F0/F1/F2 | Fan failure | Contact the supplier |
| F3-F8 | Temperature sensor failure | Contact the supplier |
| E1/E2 | Abnormal voltage in power supply | Check if power supply is normal. Power on after power sup returns to normal. |
| E3/E4 | Abnormal temperature | Check the pan |
| E5/E6 | Poor heat radiation in cooking zone | Restart when cooking zone cools down |
The above table shows how to assess and check common faults.
Do not dismantle the appliance yourself, otherwise you may damage the induction hob.
Customer Care Service
If a fault should occur, before calling After Sales Service, please do the following:
-Check that the appliance is correctly plugged in
-Read the failure and display table above
If you are still unable to resolve the problem, switch off the appliance, do not try to and call
After Sales Service.
Special Declaration
The contents of this manual have been carefully checked. However, the company cannot be held responsible for any misprints or omissions. Also, any technical modifications may be included in a revised version of the manual without notice. The appearance and colour of the appliance in this manual may differ from the actual one.

DISPOSAL: Do not dispose this product as unsorted municipal waste. Collection of such waste separately for special treatment is necessary.
For more detailed information about treatment, recovery and recycling of this product, please contact your local city office, your household waste disposal service or the shop where you purchased the product.
This appliance is labelled in compliance with European directive 2012/ IBC for Waste Electrical and Electronic Equipment (WEEE).
By ensuring that this appliance is disposed of correctly, you will help prevent any possible damage to the environment and to human health, which might otherwise be caused if it were disposed of in the wrong way.
The symbol on the product indicates that it may not be treated as normal household waste. It should be taken to a collection point for the recycling of electrical and electronic goods.
This appliance requires specialist waste disposal. For further information regarding the treatment, recovery and recycling of this product please contact your local council, your household waste disposal service, or the shop where you purchased it.
Protection anti-surchauffe
IcNoJIb3OBAHnEM N3eJIy He B COOTBETCTBn C ero npraMbIM Ha3HaueHnEm IJIH He B DOMaUHnx HxKdax.
4. PemOH
BecnIaTHbI rapaHTHbI pEmOHr He npOn3BOIDTcR, ecNI n3deJIne:
IMeET CJIeIbI NOCTOpOHHeO BMeUaTeJIbCTBa IIN PemaHTa He yNOnHOMOeHHbIMn fIpMOJ
JIuCaM;
IMeET HecAHKcIOHOpOBaHHbIe FInpMoN I3MeHEnra KOHCTpyKcIMN IIN HeNpNiEMJIeMble
KOMPJIeKTyUoUne;
IMeET NOBpeXdEHN, Bbl3BaHHbIe HEPpeDcKa3yEmbIMn YBJIeHNAmN I DeiCTBnAMrN CTUXN;
IMeET NOBpeXdEHN, Bbl3BaHHbIe NCIOJIb3OBAHnEM HeCTaHdApTHbIX N HeNpNiEMJIeMbIX
pacXODhBX MaTePnaIOB IN PrnHaIeXHocTei;
IMeET NOBpeXdEHN, Bbl3BaHHbIe IOnaDaHnEM BHyTpB I3DeIINr NOCTOpOHHX IpEIMTOB,
arpeCCNBbIX BeIeCTB, XIBOTbIX INI HaceKOMbIX;
HE IMeET CepnHOrO HOMepa IIN eRO HeBO3MOxHO UCTaHOBtB.
Gamma He pacnpocTpaHareTcR Ha pacxoIDhbIe MaTePnaJIb I aKceccyapbl.
5. OTBETCTBEHHOCTb
ΦnnpMa He HecET OTBETCTBEHOCHTa 3a IIO60I npuHHeHHbI Bam n OkpykaIoUm yuep6 r npuHHe HapuWeHn npabIN NcTpyKcNn NO 3KnPyatauNN, B OcObeHocTN Bb3BaHHbI HnPaBnBnIM NODKNIOeHNEM 3DeJIa K CetAM 3NeKTPO, BOo N ra3OCHa6KeHn, IN HeDOnyCTnMbIM OTKIOHEHnA MnpaMeTPOB B BblwepeucNCHeHHbx CTeX, HnPaBnBHOJ 3KnPnyatauNE, HecAHKUnOHUPOBaHHbIM pEmoHTOM, NCNOb3OBAHnEM 3DeJIa N He N Pramomy Ha3NaueHIO.
BBoD n3deJIa B 3KnPnyatauIO u DopabOTKa CeTe 3NeKTPO, BOo N ra3OCHa6KeHn dJa COBMeCTnMOCTn C n3DeJIaEM He YBIAOTcra 3OHo OTBeTCTBEHOCTHn QnPMbl N qIpMoN He ONlaNuBaOTcra.
B clyuae Bo3NHKnHOBeHn KaNX-riNo npo6Lnem C BaUM n3DeJIaM, nepe TEm kak BblBaTb MacTepa, npobepbTe npabNJbHOCTb yCTaHOBkn N fynHKUnOHPOBaHn B COOTBeTCTBNI C INcTpyKcne no 3KnPnyatauNN. Onnaty BblIOBa Bbl6yeTe npou3BOdntb 3a CboN chet, ecnn n3DeJIe 6blno B pa6Ouem CoCTOARHN nn 6blINO HnPaBnJIbHO yCTaHOBJeHO nn INCNoB3OBAHO.
YBaXaEmbl KIneHT,
XOTIM no6laorodapntb Bac 3a TO, yTO Bbl octaHOBNi CBOB BBIOp Ha HNDyKUHOHOB BapouHoi naneHN CANDY - np6ope, KOtOpB, 6e3 COMHeHn, Ha npOTxKeHm MHOrnx JET yDobNetBopNT Baun notpe6hOCTn.
BHHMaTeIbHO npOHTaIe DaHHOe pyKOBOcTBo npeEd TeM, KaK npNCTyIuNTb K 3KcNJIyaTaUIN npIbopa, H 6epexKHO xpaHnte erO, YTObbl B 6dyuem Bbl MOrJIn O6paTnTbcR K HeMy BMOMeHT Heo6xOdImocTn.
BVeDeHne
Hndykuohna Bapouhna naneoc6ha yobTbOpntb MHOROHCHeHHbI HyKdbi, CB3aHHbIE c npiroTOBHeHem NnUcCNoC6om 3JNEKTpOMarHHTHO HArpeBa 6Naoradap MHoroofyHKuHOHaNbHOcNCTeMe ynpabHeHnRAOTPOEHbIM Mkponpoceccopom, YTO DeJaTe ee IDeaHbIM peWeHnEM dnn COBpeMbo
3TOT 3JIeKtpo6bIToB0 npu6op, BblIOJIHeHHbI N3 CneUaJIbHbIX MaTePnaIOB, OTNIuaeTcN pOcTOToB B IcNOJIb3OBaHN, IpOCHCTbIO N HaDeJXHOCTbIO.
PpHcnp pa60tbI
3aunTa nyTem aBTOMaTNUeCKORo BblKNIUOeHnA
ФункцянabTomatNueckoro BbIKJIOUeHne npedCTaBnIeT c6oB dONOJIHNTeJIbHyI0 3auNITy BaWei INdykUioHNOB BapOuHOI naHeII, KOtOpaB abTomatNueckn NOdkIIOUaETCra, ecnI NO 3a6bIBuNBOCTn NaHeIb OCTaETcB KNIQUeHHO. Bpemr CpaBaTbIBaHnA bTOMaTNUeCKORo BblKlIOUeHnRA BapOuHOI NaHeI N 3aBNCIT OT nCNOJb3yEmOro yPOBnRA MOUHOCTN B COOTBeTCTBmN C pINBeDEHHo HIXKe TabInCeI:
| Уровень Мошноctи 1-3 | HarpeBaTeьнай 30на авTomatynchecк OTKПюаETСя чeпз 8 уасов |
| 4-6 | 4 уаса |
| 7-9 | 2 уаса |
Korda no 3abepweHIO npoecca Bapkn kactpnoj CHNMAETc, HnykIOHHa BapOyHa naHeIb 60nbIe He HarpeBaet I NOCTe NODaun 3BykoBOrO CnHaJa npoJNOHTeNbHOCTbIO OKOLO 1 MNHyTBI OTKNIQUaETc.
Приимеанne:
JIuca,NCIOJIb3yIouNe 3JIeKTpOKapDIOCTMMyJITOpbl, MOrY T 3KcNIIyATnIpOBAbT DaHHbI nPn6Op TOnbKO pa3peUeHn CBOero NeaUero Bpaua.
MoHTax
Дллорадok MOHTака
- Bbipe3aTb npoem Ha nobepxHocTn ukaΦa, co6JIIOJa pa3Mepbl, yka3aHHbIe Ha cepTeXe; IJRA npABINbHOrO MOHTaxa Heo6xOIMO, UTO6bl OT NaHEJN Do KpaEB ONOPHOI NOBepxHOCTN OCTaBAIOCB He MeHee 5 cm. Y6eINTbcra, TTO TOIuHa ONOPHOI NOBepxHOCTN, B KOTOpYIO BCTpaINBaETCBApe, 30 MM, N TTO NOBepxHOCTB BbINOJIHeHa IN3 JapocToKoro MaTePnAa BAJeJX IN36ExAHn ee DeOpMaUIN IOD BO3dEInCTBnEM TEIIa, BblJeJIeMORO BapOCHOn PaHeNbIO (pncyHOK 1).
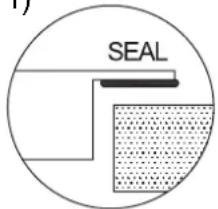
(pncyHOK1)
2.ОБаTeIbHOb npOBepNTb, qTo6bl INdYkuHnHa BapOuHa NaHeB 6bJa npOCHOBMOHTnPOBaHa B OOnOpHyIO NOBepXHOCTb H XopoO BoHTNlIpOBaJIacb (pucyHok 2).
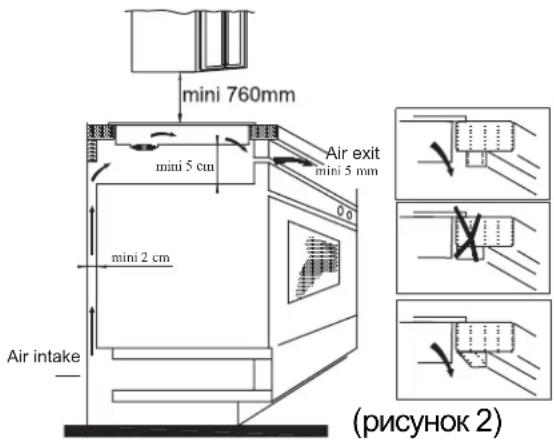
PpmeHHe:pacCTOAHne MeKdY BapOCHoI c NaHeJIbIO I paCNOJIOKeHHbIM BblSe IpeDMeTOM He DOJXHO 6bITb MeHee 760 MM.
3.Посл e yctaHOBKn BapOCHNo nAHeJIu 3aФИКСИРОВaTb ee YeTbIPbMЯ yTOIkaMn K ONOPHO NOBepxHOCTN ( KaK NOKa3aHo Ha pucyHke).OTpeRyIINpOBAt b KaXdbi OTdeJIbHbI yTOJOK B 3aBNCIMOCTN OT TOJIUHNbI ONOPHO NOBepxHOCTN.
MepbI npedoctopoxhocTH
(1) MoHTaK INdYkUHOHNoB BapOuHOI NaHeJI NDoJIKeH OcyUeCTBnAByTbCRA KBaJIInΦnIupoBaHHbIM TexHnueCKIM nepcoHaIOM. He nbTaIaNTEcb IpOBecTH yCTaHOBky CaMOCTOReTJIbHO.
(2) HeIb3a MOHTnpoBaTb INdYkuNHOHyo BapOCHyIO NaHeJIb Ha XOIoDINbHNkax, NocyIDOMOeHbIX IJIN CyUINbHbIX MaUINHaX.
(3) Heo6xOIMo yCTaHOBnTb INdyKmOHHyOBAPoCHyIO nHeJIb TaKIM 06pa3OM, YTO6blOBeCneHTb ONTMaIbHbI OTBOJ TeIIa.
(4)CTeHKn n 3OHa, HaxoJaUneCn POniNHyKUnHOH BApOuHOI NaHeJIbIO, DOnJXHbI6bITb XapocToKIMM.
(5)YTo6bI n36eKaTb NOBpeKdEHH, TOHka PJIeHka, C NOMOuIbIO KOtOpoi BapOuHaJ IOBepxHOCTb PrnKJIeNBaEtC K ONOpHO JIOBepxHOCTN, DoJIKHa 6bITb JApocToiKOi.
4.ПоdkлioуенkeетиЗл ektpoNTaHЯ
IopKlHcHHe K cETn 3neKtpoNTaHn IOnJXHO npOBODtbcra KBaINOpNtropOBaHHbIM nepcoHaJIOM B COOTBETCTBn C DeiCTBYOLUMn HopMaTnBaMn.Cxema CoedNHnnaHeJI noka3aHa Ha pncyHke 3.
IoproTOBka nepei nCnoJIb3OBaHHeM:
Cpa3y Xe nocne BKNIOHcHnBapOHa
NOBepxHOCtB NOaet 3ByKOBOI CnHaJI, BCE
CBETOIOIObl MNTAHT B TeueHne 1 MNHyTbI,
063Haay, yTO BapOHHa NOBepxHocTb HaxOHTc
B peKIMe OXnDaHn.
IocTaBnB KAcTpHJIO B BbIpaHHyIO
HarpeBaTeNbHyIO 3OHy.

3KcnnyaTaUna
IocJe HaxatnKaJbNtIN "BKN./BbIKJ." Bce CBeToNDIObl NOKa3bIBaHOT CmB0J "-. Bb16paTb HArpeBaTeJIbHyU 3OHy, B KOTOpOH HaxoHTcR KaCTPNO; CBToNDIOd yPOBHR MOUHOCTN Bb16paHHo 3Ohbl HaHTet MrrAub. HaxaTb KNaBNIy "+" nIi -", Ha IInCnIe OTO6pa3NTcR 6a3OBoe 3NaueHne 5, HAcTPOuTB Ha XeJaEMbl IyPoBEHb C NOMUbIO KNaBNIu "+" nIi -". OOnOBpemeHNo HaxIMMaK NaBNIuY +" n KNaBNIuY "-", 3NaHeHn PpeDbUdLnx HAcTpoEk OShyIHTcR HArpeBaTeJIbHa 3OHa BapOuHOJ NaHeJI N BbIKIIOHaeTcR.
B Ta6nue Ha Ctp. 89yka3aH MaKcImaIbHbI yPOBeHb MOUHOCTN DnA KAKDoH HarpeBaTeJIbHOI 30HbI NaHeN.
PnmeHne: Ecn nocJe HkaTna KnaBnJn "BKn./BblKl."Ha naHeJI B TeueHne 1 MmHyT He npOBODTCaKnx-ri6o OepauN, INdyKIOHOHna BapOHNaHnIb nepexOHT B pexIM OxndaHn.


Функця TAIMEP
Пи Нжати Клавиш TAVIMEP, CBetODnДдИСЛСЕп НЧИHAET MIRATь, И мохно 3адаВаТьВБЕМ ПИROTOВLEHЯ.С NOMOДБЮ Kлавиш +"И "ВЕРМ HaCTpanBaETC B ДИАЗОНе OT 1do 99MнHT.Пи Нжати Клавиш +" 3нauЧенe HAcTpoКИ YBeIINHBAETC C WArOM B 1 MнHyTu;Пи Hжати Клавиш +" 3нauЧENe HAcTpoKIN
ymHeBlaeTc C 1 MHyTu. PpeBbICNB 99
MHyT, 3HaueHne HaCTpOiKn TaMepa
ABTomatUeCKn yCTaHabIbNAeTCr Ha 0. Ppn
ODHOBPemEHOM HkaTIN KNaBNI " ^+ N - "3HaueHne Ha DnCnIee BO3BpaJaaetcK O.

IoTBePxDeHne fynKuNTAIMEP
- BbIbpaTb ypoBeHb MOUHOCTn HxHON HaPeBaTeJIbHOJ 3OHbl, HaxKaTb KlaBNUJy "TaIMep" n 3aDaTb BpEMr.
- Iocne TOrO, KaT TaIeMep MInaet B TeueHne npn6m3ntbHo 5 cekyHd, 3daHHOe Bpemr abTomatHeckn IOITBepKdaetcR.
- 3aIb INIePbI BpemeHn, HaxaTb KIaNbIuY "TAIMEP" Ipy npOBepKn 3aHaHHoro 3HaueHna.
- Пи нахаши Ha «Таймер» Визу спра вовляетс Точka obo3haueHne ypoBну MOшноCTN Bbl6paHHOJ 3OHbl.
OTmeHaФyHKUIN TAIMEP
HaxaTb ydepKnBaTb HaxaToN KnaBnSy "TaMep" B TeueHne 5 cekyHd dIy OTMeHbI 3aHaHHo neped 3TNM fynkCIn. HaIncPnee oTo6pa3ntc0.
Бezonachoe coCToHne
Дяобсесеня 630anacnoctn DeTei HdkyuOHHa NaHeIbObOpydoBaHa 6NOKINOBKoI DЯ 6NOKINOBKn: HaxMITE KHOKNY "Interlock", NaHeIb NepeIeT B COCTOHNIE 6NOKINOBKn "Interlock", Ha TaIMepe NOrBNTcR HaIINCb "Lo". BCE KHOKN, 3a NCKJIIOUeHneM ON/OFF pa6oTaTb He 6yDyT.
Pa36JIOKINPOBka
HaXMMTe uYdePxNBAaTe KHOKNy 2ceKyHdbI KHOKNy "Interlock", naHeJIb BepHeTcB pa6Ooee COCTOHNHe

ГИБКАЙОБЛACTь
- Ho H eo6xOIOMOCTn 3Ta o6laCTb MOXET NcNOHB3OBaTbCk KaK eDNHAR 3OH a NJI KAK DEE 3OHbl IpNTOBNEHN
Cbo6 Onda oobctb coctoNT nDByx He3aBnCmblx INdykTOpHbIX 3IeMe HTOB, KaKdbn N3 KOtOpbIX IMeET CBOHO CNTEmy VnpabHeHH.
IcnoJIb3OBAHne eINHOJ 6oJIbwo3OHBi
1.ДЯВКЛЮЧЕНСБОБД"HОйOBПACTN B pEXHMe eINHOJ 60JIbI O3HbI HEOxOIMO HaxaTb Ha KhoNky «ГИбкайобпactь》.
2.ПиИСПОЛБ3OBAHIN6OJIbWON3OHbI N3ROTOBnTeJIpeKOMeHdyeT:
Nocya: Dnametnpocydbi 250 MM mnn 280 MM (Onnyctma Kbaapthna ObaHbHa)
N3ROTOBHTJIpeKOMeHdyETNCNoJIb3OBAbTToJIbKOyka3aHHbIE TPNBaPnHTa pa3MeUeHn;INhIe BapNaHTbIMOrYT N3MeHHTbHarpeBaTeJIbHyIO CnOCo6HOCTb np60pa.
IcnoJb3OBAHnE DByx 3OH
IINcnoB0aHn r6kO o6NaCTu B pexime DByx 3OH BO3MOXHb I DaBa BapnaHTa HarpeBa.
(a) NocTaBbTe NoCydy B BepXHIOU NJIN HnXHIOU npaByIO 06Ja CTb n6KoN 3OHbl.

(b) NocTaBbTe DBe CKBOpOdbI NO O6eHM CTOpOHAM Rn6Ko OBJAcTn.
PnimeuHHe: Nocya He doJnxHa 6bItb MeHee 12 cm.
Pekm6bictporoHarpeBa
IOTPOHbTecbIO KHOKN BbIBopa 3OHbI HarpeBa, 3aTeM HaxMMte «+». Ha Iucnnee DoONKHO OTo6pa3ntbcra «9».
BHOBb DoTpoHbTeCb Do KhoNKn + , INHnKaTop 3OHbI NOKaKet b I MOUHOCTb DOCTuHET MaKcMAmhHoro npedena.

OTmeHa pexnma 6bictporo harpeBa
Hnue kactpnoI dOJXHO 6bITb nIOCKM, DnaMeTpom 6oJee 14 cm.
- | Kπacc 3aιntbɪ OT nopaxheny TOKOM
- Serial number / CepinHbI Homep: 33800842 - 0920 0001
CepnHbI HOMep COCTOnT n3 16 uΦp. IepBbIe 8 uΦp - kOd moEJI. CJeDyIOUne 4 uΦpbl - daTa npOn3BOcTBA (rO, HeDEnA). IocNeHnE 4 uΦpbl - 3aBOcKne Homepa.
Ynctka n texo6cnyxnbHne
IobepxHocTb BapouHoi naHeJIIM MOXHO YnCTHTb CneDyIOUIm 06pa3OM:
CJYKBA CEPBnCHO OBCJyKBAHN KJINEHTOB
IpeTeM, KaK 3BOHnTb B Cnyx6y cepBnCHoro 06CnyxuBaHHa
B cnyae BO3HKnHOBeHHn HEnoJaOK B pa6Ote np60pa peKOMeHdyTe:
-
y6eHtbc8, YTO wTeNceJIb npaBnIbHO NOcOeINHeH K 3JeKtpUeCKoP03ETke;
-
npoHTaTb npBBeHHyIO BblSe Ta6NcUy C NO BblBJeHNo HeNCnpaBHOCTeN.
Ecni npuHnHa HncnpaBHOCTn He yctaHOJIeHa:
BbIKIIOHTb np6op, He pa36upaTb erO I NO3BOHITb B cIyK6y cepBnCHOrO 06cIyKnBaHnKJIeHTOB.
CneuaJIbHaJeKnapaun
Bcra HnΦopMaZna, npuBeHnHa B DaHHOM pyKOBoDCTBe, 6bIa TuaTeJbHO npOBepHa. TeM He MeHee, npOn3BOIDTeJIb He He CeT OTBETCTBeHHOCTn 3a OUn6Kn, DOnyUeHNbIe npi NeaTn. Kpome Toro, B cIyae BbIXOda HOBo PeJaKznn pyKOBoDCTBa NO EKcPlyatauN, B Hero MOryt 6bITb BHOceHbI TexHnueckne N3MeHEnr 6e3 PpeBapNTeJbHoro yBeDMJeHn. N3o6paXeHne N3DeJIIn COOTBeTCTByeT DeIcTBtJIbHOCTn.


BHIMAHHE: He BbI6paCbIBaTb DaHHbI npH6Op, KaO obHyBle 6bIToBbIe OTXoDbI. OH NOJNEXHT pa3dJIbHOyTuIN3aUIN.
Hactoian 3eKtpnueckn np6op BblnoHNHe B COOTBeCTBUN C ebPoneckO dupeKtnBOI 2012/19/CE no yTnJIn3aun 3eKtpnueckoro n 3eKtpOnHO 6opdydoBaHna.
CobHDoHeHne DnpeKTHB, KacaIoUxCxra yTIN3aun DaHHoro np6opa, NOMoraet npedOTbpaNTb yuep6, KOtOpbIM MoXeT 6bItb HaHeceH OKpykaIooJe CpeDe n 3DopOBbIO B pe3yIbTaTe 06bIHHO yTIN3aUN. 3TOT cIMBOI O3HaayEt, YTO IN3dJIne He NOJNeKHT yTIN3aUN B KaueCTBe 6bITOBbIX OTXIOB, a DOJXHO 6bITb HAnpaBNeHO B OprAHN3aUN, 3aHmAoUyIOc C6OpOM 3JNEKTPnuCeCKNX i 3JNEKTPoHNbIX KOMNOHETOB.
Iyohn 60one noopbHn HOpMaun no nepepaOKe n ytnn3aun 3TOrO n3dneu o6paHTbcB MeTbui cHTp yTNn3aun OTXoOB INB Maar3NH, rde 6blno npno6peTeHO n3dne.
CepBnC npOdykun Bcex Mapok rpynnbI Candy, opnHnaHbHbIe 3aNaChbIe YactN, paCXoDhble MaTePnAbIb, akCEccyapbl