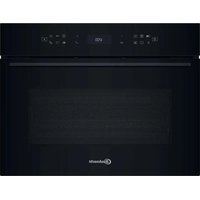
ECSK11 F845 - Oven BAUKNECHT - Free user manual and instructions
Find the device manual for free ECSK11 F845 BAUKNECHT in PDF.
| Technical Specifications | Built-in oven BAUKNECHT ECSK11 F845, 71-liter capacity, energy class A. |
|---|---|
| Cooking Modes | Convection, grill, traditional cooking. |
| Dimensions | Dimensions: 59.5 cm (height) x 59.5 cm (width) x 56.7 cm (depth). |
| Weight | Net weight: 36 kg. |
| Usage | Control panel with digital display, touch controls. |
| Cleaning | Pyrolytic cleaning function. |
| Safety | Door locking system during pyrolysis, enhanced thermal insulation. |
| Included Accessories | Grill rack, roasting pan. |
| Warranty | 2-year warranty. |
Frequently Asked Questions - ECSK11 F845 BAUKNECHT
User questions about ECSK11 F845 BAUKNECHT
0 question about this device. Answer the ones you know or ask your own.
Ask a new question about this device
Download the instructions for your Oven in PDF format for free! Find your manual ECSK11 F845 - BAUKNECHT and take your electronic device back in hand. On this page are published all the documents necessary for the use of your device. ECSK11 F845 by BAUKNECHT.
USER MANUAL ECSK11 F845 BAUKNECHT
> DESCALE (ENTKALKEN)
REMOTE ENABLE (ENTFERNT)
THANK YOU FOR BUYING A BAUKNECHT PRODUCT
In order to receive a more complete assistance, please register your product on www.bauknecht.eu/register

Before using the appliance carefully read the Safety Instruction.
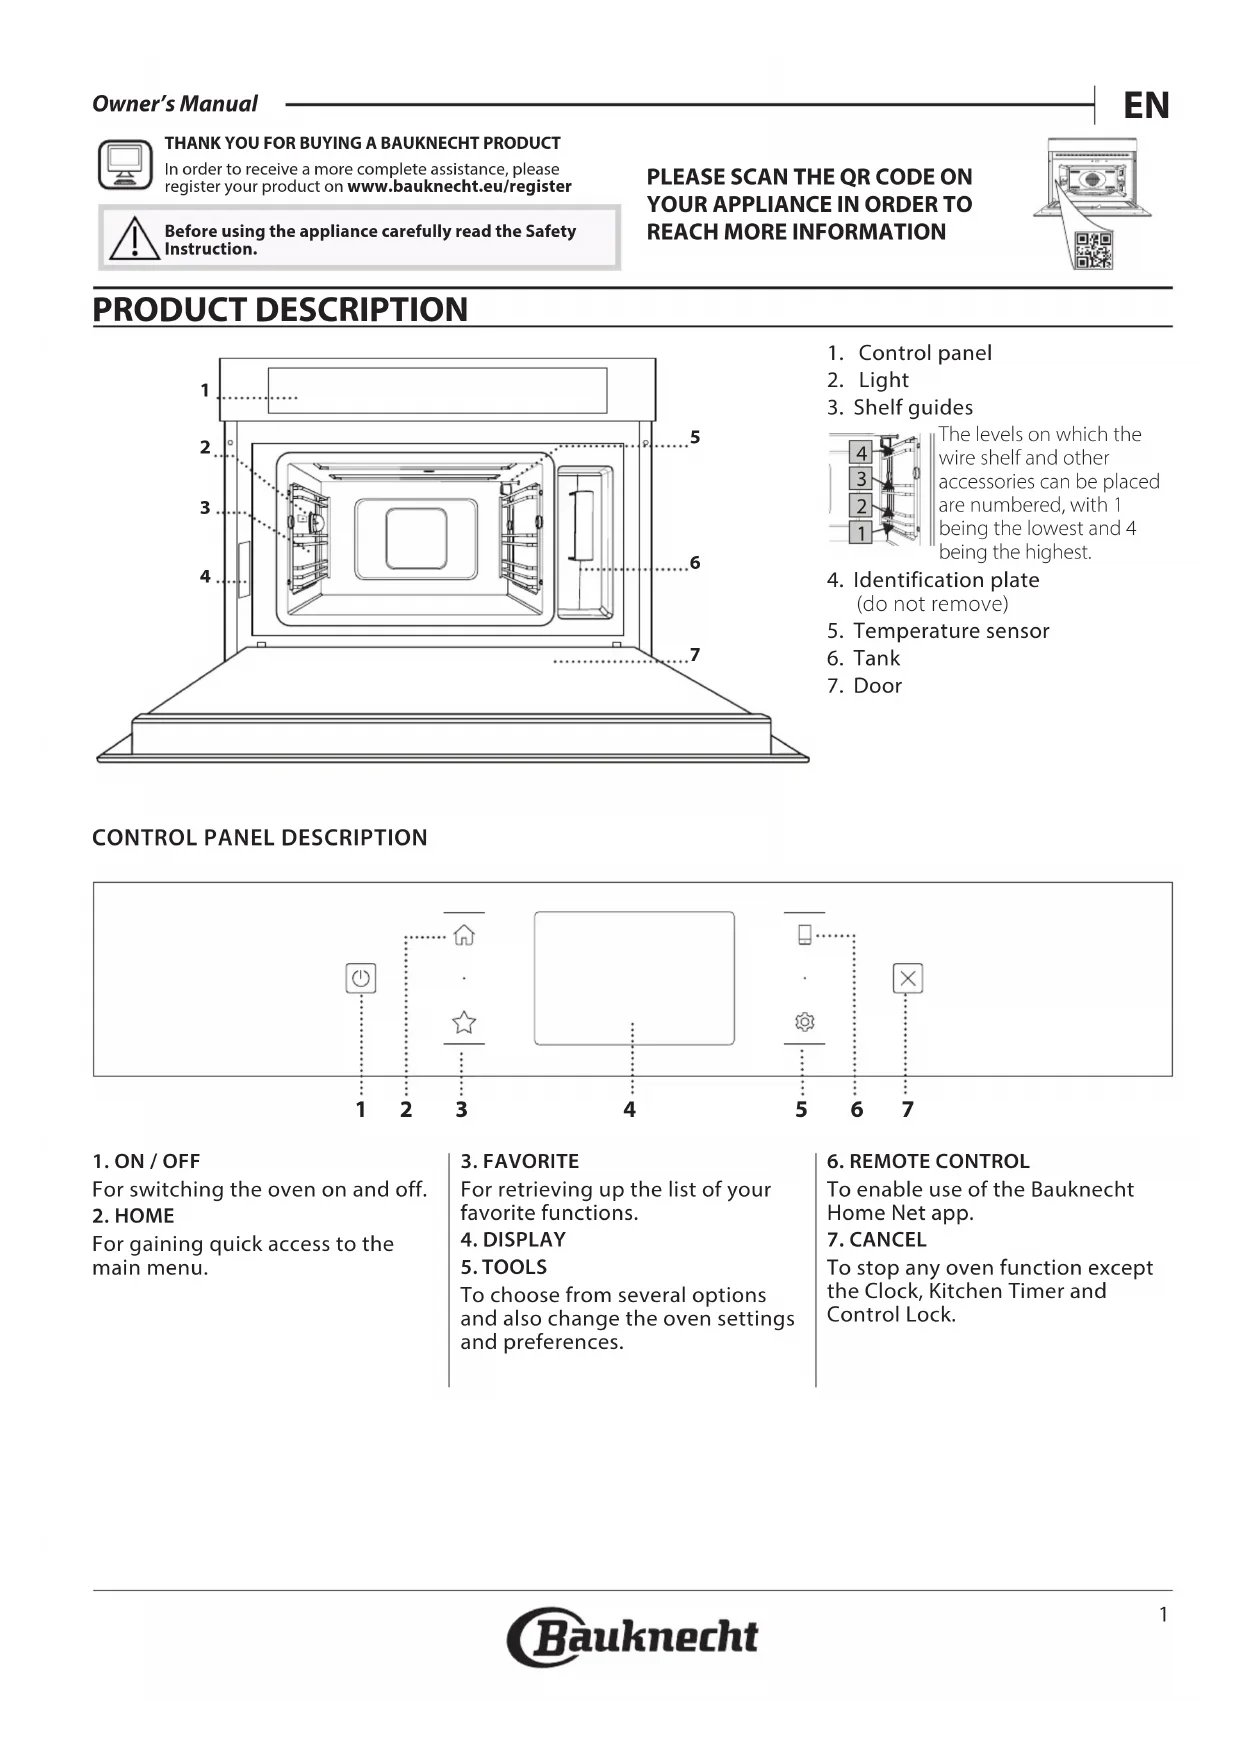
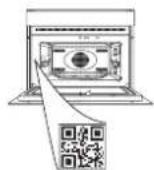
PLEASE SCAN THE QR CODE ON YOUR APPLIANCE IN ORDER TO REACH MORE INFORMATION
PRODUCT DESCRIPTION

- Control panel
- Light
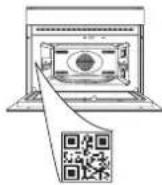
- Shelf guides
The levels on which the wire shelf and other accessories can be placed are numbered, with 1 being the lowest and 4 being the highest.
- Identification plate (do not remove)
- Temperature sensor
- Tank
- Door
CONTROL PANEL DESCRIPTION
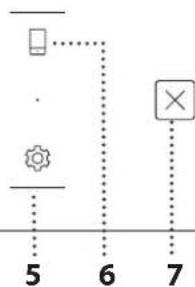
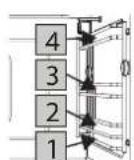
1.ON/OFF
For switching the oven on and off. 2.HOME
For gaining quick access to the main menu.
3. FAVORITE
For retrieving up the list of your favorite functions.
4. DISPLAY
5.TOOLS
To choose from several options and also change the oven settings and preferences.
6. REMOTE CONTROL
To enable use of the Bauknecht Home Net app.
7.CANCEL
To stop any oven function except the Clock, Kitchen Timer and Control Lock.
ACCESSIONS
WIRE SHELF
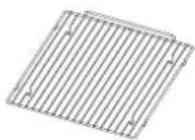
This allows the hot air to circulate effectively. Place food directly on the wire shelf or use it to support baking trays and tins or other heat-resistant ovenware. When cooking
food directly on the wire shelf, place the baking trayon the level below it. It can also be placed on top of either the baking tray or the steam tray on the same level.
BAKING TRAY

This is used as a tray with the "Forced Air" and "Forced Air+Steam" functions to cook meat, fish, vegetables, or different types of bread and pastries. It is also useful
for supporting heat-resistant ovenware as it means you do not have to place items on the bottom of the oven. It collects the cooking juices when placed below the wire shelf or the steam tray.
STEAM TRAY

This makes it easier for steam to circulate, which helps cook the food evenly. Place the baking tray below to collect the cooking juices.
FOOD PROBE

For measuring the core temperature of food during cooking.
INSERTING THE WIRE SHELF AND OTHER ACCESSORIES
Insert the wire shelf horizontally by sliding it across the shelf guides, making sure that the side with the raised edge is facing upwards.
Other accessories, such as the baking tray and the steam tray, are inserted horizontally in the same way as the wire shelf.
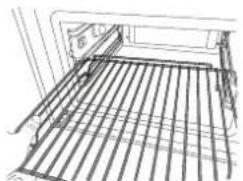

The number and the type of accessories may vary depending on which model is purchased.
Before purchasing other accessories that are available on the market, make sure that they are heat-resistant and suitable for steaming.
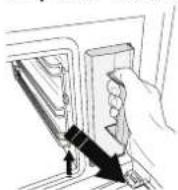
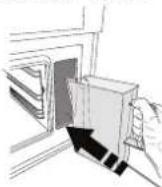
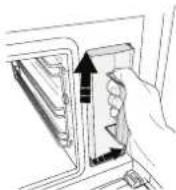
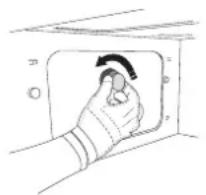
TANK
Fill with drinking water every time you use one of the steam functions.
The tank can be easily accessed by opening the door. Remove it by lifting it slightly upwards and then pulling it towards you.
Before placing the tank in its holder, make sure that the water tube is correctly positioned in the hollow at the top edge of the tank.
Fill the tank up to the "MAX" mark and place it in its holder: The top and the right-hand side of the tank should be touching the sides of the holder. Insert the tank fully and then push it downwards until it clicks into place. Empty the tank after every use. Take care to pour water out of the tube as well.

SPONGE

For removing any condensation that forms during cooking. Don't leave it inside the tank.
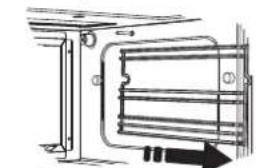
REMOVING AND REFITTING THE SHELF GUIDES
- To remove the shelf guides, slide them forwards and pull them towards you to unhook them from the brackets. (a)
- To refit the shelf guides, hook them into the brackets by pushing down on them gently until they click into place. (b)

a. b.
Other accessories that are not supplied can be purchased separately from the After-sales Service.
Make sure that there is a gap of at least 30mm between the top of any container and the walls of the cooking compartment in order to allow steam to flow sufficiently.
FUNCTIONS

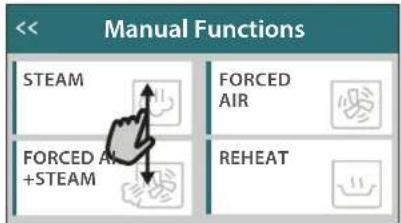
MANUAL FUNCTIONS
STEAM
For cooking natural and healthy dishes using steam to preserve the food's natural nutritional value. This function is particularly suited to cooking vegetables, fish and fruit, and also for blanching. Unless otherwise indicated, remove all packaging and protective film before placing the food in the oven.
| Gnocchi 90-100 10-15 | 3 1 18.8.8 | |
| Fish terrine 75-80 60-90 | 2 √### | |
| Boiled eggs 90 20-25 | 3 | |
| Beetroot 100 50-60 | 3 1 18.8.8 | |
| Red cabbage 100 30-35 | 3 1 18.8.8 | |
| White cabbage 100 25-30 | 3 1 18.8.8 | |
| White beans 100 75-90 | 3 2/1 18.8.8 |
FORCED AIR
For cooking dishes in a way that achieves similar results to using a conventional oven. We recommend using the wire shelf with this function as it allows the air to circulate effectively. Alternatively, the baking tray can be used to cook certain foods, such as cookies or bread rolls.
| Gateaux (Cakes) | Yes | 160 | 35-40 | 2 |
| Cookies | Yes | 150-165 | 12-15 | 2 |
| Choux buns | Yes | 190-200 | 25-30 | 2 |
| Swiss rolls | Yes | 230 | 7-8 | 2 |
| Quiche | Yes | 180-190 | 35-40 | 2 |
| Puff pastry | Yes | 180-190 | 15-20 | 2 |
| Frozen buffalo wings | Yes | 190-200 | 15-18 | 2 |
Note: Forced Air function has no preheat setting default. If you like to add preheating just tap on the top right corner on the display. Look at the dedicated paragraph for details.
FORCED AIR+STEAM
For cooking dishes in a way that are crispy on the outside but tender and succulent on the inside. It is especially suited to cooking roasting joints of meat or poultry, fish, potatoes, frozen ready meals, cakes and desserts.
| 10 | 8 | 7 | 6 | 5 |
| Bread | 180 - 190 | Low - Mid 35 | 40 | 2 |
| Turkey breast | 200 - 210 | Mid | 50 - 60 | 2 1 |
| Ribs | 160 - 170 | Low | 80 - 90 | 2 1 |
| Roasted fish | 190 - 200 | Low | 15- 25 | 2 1 |
| Roasted vegetables | 200 - 210 | Medium - High | 20 - 30 | 2 1 |
SPECIALS
STEAM DEFROST
For defrosting any kind of food. Place foods such as meat and fish without package or wrappings, on the steam tray on level 3. Place the drip tray on the level below to collect the thawing water. For best results, do not defrost the food completely but allow the process to finish during standing time. We recommend keeping bread wrapped up to prevent it from becoming too soft.
| Meat | Minced | 500 | 25-30 | 30-35 |
| Sliced | 20-25 | |||
| Bratwurst | 450 | 10-15 | 10-15 | |
| Poultry | Whole | 1000 | 60-70 | 40-50 |
| Filletts | 500 | 25-30 | 20-25 | |
| Legs | 30-35 | 25-30 | ||
| Fish | Whole | 600 | 30-40 | 25-30 |
| Filletts | 300 | 10-15 | 10-15 | |
| Portion | 400 | 20-25 | 20-25 | |
| Vegetables | Portion | 300 | 25-30 | 20-25 |
| Pieces | 400 | 10-15 | 5-10 | |
| Bread | Bread loaf | 500 | 15-20 | 25-30 |
| Slices | 250 | 8-12 | 5-10 | |
| Rolls / buns | 10-12 | 5-10 | ||
| Cake | 400 | 8-10 | 15-20 | |
| Fruit | Mixed | 400 | 10-15 | 5-10 |
| Berries | 250 5-8 | 3-5 |
STEAM REHEAT
For reheating ready-made food that is either frozen, chilled or at room temperature. This function uses steam to gently reheat food without drying it out, thus enabling it to retain its original flavour. Standing time improves the result. We recommend placing smaller or thinner pieces of food in the middle and larger or thicker pieces around the outside. If using the steamer tray, place the baking tray below it to collect any liquid running out of the food.
RISING
For optimal proving of sweet or savoury dough. To maintain the quality of proving, do not activate the function if the oven is still hot following a cooking cycle.
PRESERVATION
For making preserves out of fruit and vegetables. We recommend using only fresh, high-quality fruit or vegetables. Fill the jars with fruit or vegetables (precooked, if possible) and top them up with preserving liquid or canning syrup, leaving approx. 2cm at the top. Then put the lids on loosely without tightening them.
Place the wire shelf on level 2 with the baking tray on the level below and place the jars on the wire shelf. Alternatively, you can place the jars directly
on the baking tray. Activate the function. Once finished, tighten the lids on the jars fully (wearing oven gloves or protecting your hands with a heat-resistant cloth when doing so) and then leave them to cool down to room temperature.
YOGURTH
For making yoghurt. Before activating the function, add approx. 100g of commercially available fresh whole yoghurt to one litre of whole milk at room temperature.
Please note: If using unpasteurised milk, heat it to a simmer before leaving it to cool down to room temperature.
Pour the mixture into heat-resistant jars, cover them with heat-resistant lids or film and then place them on the wire shelf, inserted at level 2. Select the function and set the duration to five hours (the temperature cannot be changed). Once the function has finished, leave the yoghurt to cool in the refrigerator for several hours before serving.
DISINFECTION
For disinfecting baby bottles or jars using steam. Insert the wire shelf or the baking tray on level 1 and place the items on it, well spaced from each other to allow steam to reach all parts.
Wash all items and rinse with tap water before using the function.
Dry all parts thoroughly with a clean clothe before reassembling.
》FINISHING
For optimising the cooking of read-made food while keeping it soft and juicy. This function enables ready-made or partially pre-cooked meals, such as roasting joints, fish and gratins, to be reheated evenly. We recommend placing food in their container on wire shelf on level 3 or place the food directly into the steam tray on level 3 with the baking tray place on the level below. You should set the temperature of the oven at the final temperature you would like the food to have.
| 101 | 202 | 3 | 4 |
| Ready meal 100 18 - 25 | 3 2/1 | ||
| Soup / broth 100 20 - 25 | 3 2/1 | ||
| Vegetables 100 20 - 25 | 3 2/1 | ||
| Rice / pasta 100 15 - 20 | 3 2/1 | ||
| Potatoes 100 20 - 25 | 3 2/1 | ||
| Meat in slices 100 15 - 20 | 3 2/1 | ||
| Meat in sauce 100 25 - 30 | 3 2/1 | ||
| Fish fillets 100 10 - 15 | 3 2/1 |
》DRAIN
For draining the boiler, thereby ensuring it contains no residual water.
》DESCALE
For removing limescale deposits from the boiler. We recommend using this function at regular intervals.
> DIAMOND CLEAN
For making it easier to clean the cooking compartment.
Regular use prevents deposits from forming, which could damage the surface.
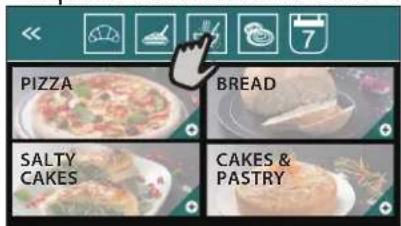
MY MENU For cooking
For cooking several kind of dishes and foods and achieving optimal results quickly and easily. To get the best from this function, follow the indications on the relative cooking table.
HOW TO READ THE COOKING TABLES
The tables list: recipes, if preheating is needed temperature, steam level weight cooking time resting time accessories and level suggested for cooking. Cooking times start from the moment food is placed in the oven, excluding preheating (where required). Cooking temperatures and times are approximate and depend on the amount of food and the type of accessory used. Wire Shelf, cake tin on wire shelf baking tray, steam tray, tray with water
HOW TO USE THE TOUCH DISPLAY

To scroll through a menu or a list:
Simply swipe your finger across the display to scroll through the items or values.

To select or confirm:
Tap the screen to select the value or menu item you require.
To go back to the previous screen:
Tap. <
To confirm a setting or go to the next screen:
Tap "SET" or "NEXT".
FIRST TIME USE
You will need to configure the product when you switch on the appliance for the first time.
The settings can be changed subsequently by pressing tools access the "Tools" menu.
1. SELECT THE LANGUAGE
You will need to set the language and the time when you switch on the appliance for the first time.
- Swipe across the screen to scroll through the list of available languages.
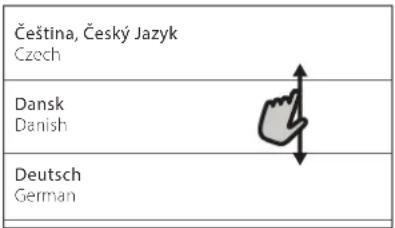
- Tap the language you require.
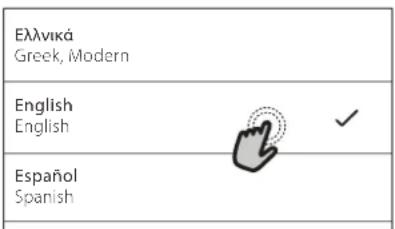
Tapping will take you back to the previous screen.
2. SETTING UP WIFI
The Bauknecht Home Net feature allows you to operate the oven remotely from a mobile device. To enable the appliance to be controlled remotely, you will need to complete the connection process successfully first. This process is necessary to Register your appliance and connect it to your home network.
- Tap "SETUP NOW" to set up the connection.

Otherwise, or tap "SKIP" to connect your product later.
HOW TO SET UP THE CONNECTION
To use this feature you will need: A smartphone or tablet and a wireless router connected to the Internet. Please use your smart device to check that your home wireless network's signal is strong close to the appliance.
Minimum requirements.
Smart device: Android with a 1280x720 (or higher) screen or iOS. See on the app store compatibility with Android or iOS versions.
Wireless router: 2.4Ghz WiFi b/g/n.
1. Download the Bauknecht Home Net app
The first step to connecting your appliance is to download the app on your mobile device. The Bauknecht Home Net app will guide you through all the steps listed here. You can download the Bauknecht Home Net app from the App Store or the Google Play Store.
2. Create an account
If you haven't done so already, you'll need to Create an account. This will enable you to network your appliances and also view and control them remotely.
3. Register your appliance
Follow the instructions in the app to register your appliance. For the registration process You will need the Smart Appliance Identifier (SAID) number. Its unique code the number following the word SERVICE on the identification plate attached to the product.
4. Connect to WiFi
Follow the scan-to-connect setup procedure. The app will guide you through the process of connecting your appliance to the wireless network in your home.
If your router supports WPS 2.0 (or higher), select "MANUALLY", then tap "WPS Setup": Press the WPS button on your wireless router to establish a connection between the two products.
If necessary, you can also connect the product manually using "Search for a network".
The SAID code is used to synchronise a smart device with your appliance.
The MAC address is displayed for the WiFi module.
The connection procedure will only need to be carried out again if you change your router settings (e.g. network name or password or data provider).
3. SETTING THE TIME AND DATE
Connecting the oven to your home network will set the time and date automatically. Otherwise you will need to set them manually
- Tap the relevant numbers to set the time.
- Tap "SET" to confirm.
Once you have set the time, you will need to set the date - Tap the relevant numbers to set the date.
- Tap "SET" to confirm.
After a long power loss, you need to set the time and date again.
4. HEAT THE OVEN
A new oven may release odours that have been left behind during manufacturing: this is completely normal.
Before starting to cook food, we therefore recommend heating the oven with it empty in order to remove any possible odours.
Remove any protective cardboard or transparent film from the oven and remove any accessories from inside it.
Heat the oven to 200^ , ideally using the "Forced Air" function.
It is advisable to air the room after using the appliance for the first time.
DAILYUSE
1. SELECT A FUNCTION
- To switch on the oven, press or touch anywhere on the screen.
The display allows you to choose between Manual and MY MENU Functions.
- Tap the main function you require to access the corresponding menu.
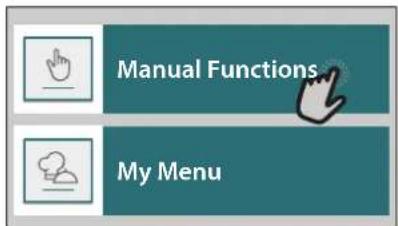
- Scroll up or down to explore the list.
- Select the function you require by tapping it.
2. SET MANUAL FUNCTIONS
After having selected the function you require, you can change its settings. The display will show the settings that can be changed.
- Scroll through the suggested values and select the one you require.

If allowed by the function, you can tap to activate preheating.
DURATION
You do not have to set the cooking time if you want to manage cooking manually. In timed mode, the oven cooks for the length of time you select.
At the end of the cooking time, the oven turns off automatically.
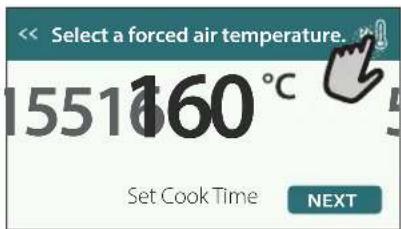
- To start setting the duration, tap "Set Cook Time".

- Tap the relevant numbers to set the cooking time you require.

- Tap "NEXT" to confirm.
To cancel a set duration during cooking and so manage manually the end of cooking, tap the duration value and then select "STOP".
3. SET MY MENU FUNCTIONS
The MY MENU functions enable you to prepare a wide variety of dishes, choosing from those shown in the list. Most cooking settings are automatically selected by the appliance in order to achieve the best results.
-
Choose a cooking type from the list.
-
Select a function.
Functions are displayed by food categories in the "MY MENU FOOD LIST" menu (see relative tables) and by recipe features in the "MY MENU SPECIAL OCCASIONS" menu.
- Once you have selected a function, simply indicate the characteristic of the food (quantity, weight, etc.) you want to cook to achieve the perfect result.
Some of the MY MENU Functions require use of the food probe. Plug it in before selecting the function. For best results with the probe, follow the suggestions in the relevant section.
- Follow the on-screen prompts to guide you through the cooking process.
4. SET START DELAY
You can delay cooking before starting a function: The function will start at the time you select in advance.
- Tap "DELAY" to set the start time you require.
- Once you have set the required delay, tap "START DELAY" to start the waiting time.
- Place the food in the oven and close the door: The function will start automatically after the period of time that has been calculated.
To program a delayed cooking start time the oven preheating phase must be disabled: The oven will reach the temperature you required gradually, meaning that cooking times will be slightly longer than those listed in the cooking table.
To activate the function immediately and cancel the programmed delay time, tap
5. START THE FUNCTION
- Once you have configured the settings, tap "START" to activate the function.
You can change the values that have been set at any time during cooking by tapping the value you want to amend.
If the oven is hot and the function requires a specific maximum temperature, a message will shown on the display
- Press to stop the active function at any time.
6. PREHEATING
If previously activated, once the function has been started the display indicates the status of preheating phase.
Once this phase has been finished, an audible signal will sound and the display will indicate that the oven has reached the set temperature.
-
Open the door.
-
Place the food in the oven.
-
Close the door and start cooking.
Placing the food in the oven before preheating has finished may have an adverse effect on the final cooking result. Opening the door during the preheating phase will pause it. The cooking time does not include a preheating phase.
You can change the default setting of the preheating option for cooking functions that allow you to do that manually.
- Select a function that allows you to select the preheating function manually.
- Tap icon to activate or deactivate preheating. It will be set as a default option.
7. PAUSING COOKING
Some of the MY MENU functions will require to carry out some actions during cooking. An audible signal will sound and the displays shows the action must to be done.
8.END OF COOKING
An audible signal will sound and the display will indicate that cooking is complete.
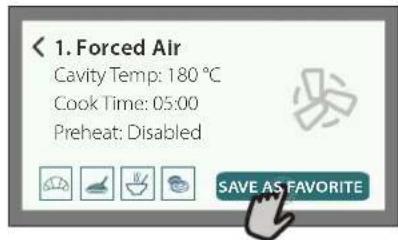
In some functions, once a cooking is finished, you can save it as favorite and use it quickly in the future, keeping the same settings or prolong the cooking.

- Tap to save it as a favorite.
- Tap ① to prolong the cooking.
9. FAVORITES
The Favorites feature stores the oven settings for your favorite recipe.
The oven automatically detects the functions you use most often. After a certain number of uses, you will be prompted to add the function to your favorites.
HOW TO SAVE A FUNCTION
Once a function has finished, you can tap to save it as favorite. This will enable you to use it quickly in the future, keeping the same settings.
The display allows you to save the function by indicating up to 4 favorite meals time including breakfast, lunch, snack and dinner.
- Tap the icons to select at least one.

- Tap "SAVE AS FAVORITE" to save the function.
ONCE SAVED
Once you have saved functions as favorites, the main screen will display the functions you have saved for the current the time of day.
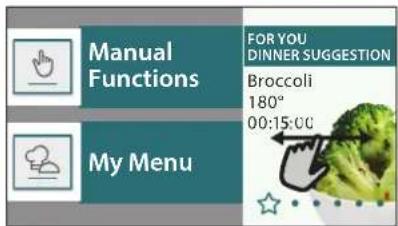
To view the favorite menu, press the functions will be divided by different meal times and some suggestions will be offered.
- Tap the meals icon to show the relevant lists
Tapping on also enables you to view your history of most recently used functions.
- Swipe the prompted list.
- Tap the recipe or function you require.
- Tap "START" to activate the cooking.
CHANGING THE SETTINGS
In the Favorites screen, you can add an image or name to each favorite to customise it to your preferences.
- Select the function you want to change.
- Tap“EDIT”.
- Select the attribute you want to change.
- Tap "NEXT": The display will show the new attributes.
- Tap "SAVE" to confirm your changes.
In the Favorites screen, you can also delete functions you have saved:
- Tap the on the relevant function.
- Tap "REMOVE IT".
You can also change the time when the various meals are shown:
Press
- Select "Preferences".
- Select "Times and Dates".
- Tap "Your Meal Times".
- Swipe through the list and tap the desired time.
- Tap the relevant meal to change it.
Each time slot can be combined with one meal only.
10.TOOLS
Press to open the "Tools" menu at any time.
This menu enables you to choose from several options and also change the settings or preferences for your product or the display.
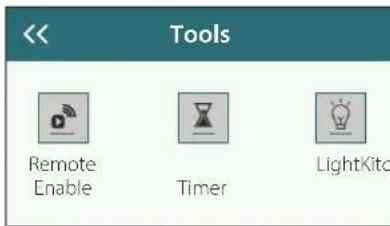

REMOTE ENABLE
To enable use of the Bauknecht Home Net app.

KITCHEN TIMER
This function can be activated either when using a cooking function or alone for keeping time.
Once started, the timer will continue to count down independently without interfering with the function itself.
Once the timer has been activated, you can also select and activate a function.
The timer will continue counting down at the top-right corner of the screen.
To retrieve or changhe the kitchen timer:
Press

Tap

An audible signal will sound and the display will indicate once the timer has finished counting down the selected time.
- Tap "DISMISS" to cancel the timer or set a new timer duration.
- Tap "SET NEW TIMER" to set the timer again.

LIGHT
To switch on or off the oven lamp.

PROBE
Using the probe enables you to measure the core temperature of the meat during cooking to ensure that it reaches the optimum temperature. The temperature of the oven varies according to the function that you have selected, but cooking is always programmed to finish once the specified temperature has been reached.
Place food in the oven and connect the food probe to the socket. Keep the probe as far away from the heat source as possible. Close the oven door.
Tap . You can choose between the manual (by cooking method) and MY MENU (by food type) functions if use of the probe is allowed or required.
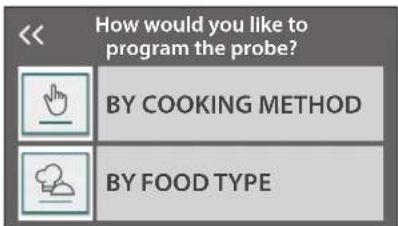
Once a cooking function has been started, it will be cancelled if the probe is removed. Always unplug and remove the probe from the oven when taking out the food.
Probe can be controlled remotely using Bauknecht Home NetApp on your mobile device.
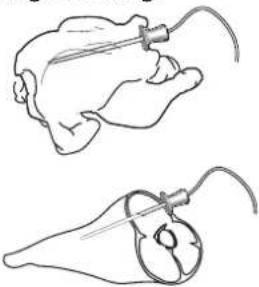
USING THE FOOD PROBE
Using the food probe enables you to measure the core temperature of the food during cooking.
Insert the food probe deep into the meat, avoiding bones or fatty areas:
Poultry: Insert the tip into the centre of the breast, avoiding hollow areas.
Joints or legs of meat: Insert the tip into the thickest part.
Fish (whole): Position the tip in the thickest part, avoiding the spine.

SELF CLEAN
The action of the steam released during this special cleaning cycle allows dirt and food residues to be removed with ease.
DRAIN
The drain function allows the water to be drained in order to prevent stagnation in the boiler. It is advisable to always carry out "Draining" after the oven has been used. The display will indicate when the boiler has to be completely drained. After a certain number of cooking this action will be mandatory and it will not possible start a steam function before done it.
Once selected the "DRAIN" function or when suggested from display, tap "START" and follow the actions indicated.
Once finished, drain and rinse the tank with drinking water.
Please note: If the boiler is too hot, the function will not be activated.
图 DESCALE
This special function, activated at regular intervals, allows you to keep the boiler and the water circuit in the best condition.
The average duration of the full function is around 240 minutes.
The function is divided into several phases: draining, descending, rinsing. Once the function is started, follow all the steps indicated on the display and tap "START" when done to start each phase.
For best results, we recommend filling the tank with product provided by After Sales Service (please follow instructions provided with the product).
Do not switch off the oven until the end. Cooking functions cannot be activated during the cleaning cycle.
Please note: A message will be shown on display, to remind you to execute this operation regularly.
MUTE
Tap the icon to mute or unmute all the sounds and alarms.
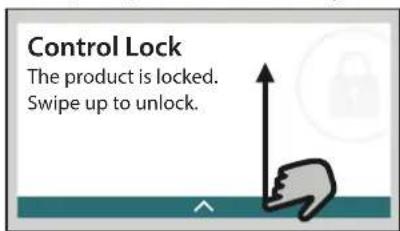
CONTROL LOCK
The "Control Lock" enables you to lock the buttons on the touch pad so they cannot be pressed accidentally. To activate the lock:
- Tap the icon.
To deactivate the lock: - Tap the display.
- Swipe up on the message shown.
PREFERENCES
For changing several oven settings.
WIFI
For changing settings or configuring a new home network.
INFO
For switching off "Store Demo Mode", resetting the product and obtaining further information about the product.
USEFUL TIPS
CAKES AND BREAD
We recommend using the "Forced Air" function for cakes and "Forced Air + Steam" for bread products.
Use dark-coloured metal cake tins and always place them on the wire shelf supplied.
Alternatively, the baking tray or other cookware that is suitable for oven use can be used to bake certain foods, such as biscuits or bread rolls.
To check whether the item you are baking is done, insert a skewer into the centre: If it comes out clean, the cake or bread is cooked.
If using non-stick cake tins, do not butter the edges as the cake may not rise evenly around the edges.
If the item "swells" during baking, use a lower temperature next time and consider reducing the amount of liquid you add or stirring the mixture more gently.
If the base of the cake is soggy, lower the shelf and sprinkle the bottom of the cake with bread crumbs or biscuit crumbs before adding the filling.
PIZZA
Lightly grease the trays to ensure the pizza has a crispy base.
PROVING
Cover the tin containing the dough with a damp cloth and place it on the baking tray. Place this in the oven on level 1 or 2.
We recommend proving dough in the oven because it provides a more constant temperature than ambient air. It is nevertheless advisable to check the dough early (roughly after a third of the total proving time has elapsed), otherwise it could rise too much.
You can also prove stretched or cut dough that has already partially risen: Cover the baking tray with a cloth and place it on level 2 or 3. The time required for this will be approximately half the normal proving time. The proving time for pizza starts at around one hour for 1kg of dough.
SAVING ENERGY
Make sure that the oven door is closed when the oven is in operation and keep it closed as much as possible during cooking.
If possible, place food directly on the accessories supplied and do not use additional cookware.
Do not preheat the oven before cooking if this is not necessary.
Cutting food into small, equally sized pieces will allow you to reduce cooking times and save energy as a result.
When cooking for long periods of time (i.e. more than 30 minutes), we recommend lowering the temperature during the final stage: The residual heat inside the oven will be sufficient to resume cooking.
Use this residual heat to heat up other food.
| Food Category / Recipes | Level & Accessories | Cooking Info | |
| CASSEROLE & BARED PASTA | Lasagna | 2 | Prepare according to your favorite recipe. Pour bechamel sauce on top and sprinkle with cheese to get perfect browning |
| Lasagna * | 2 | Take out from packaging being careful to remove any plastic foil | |
| RICE & CEREALS | White Rice | 3 | Add salted water and rice into the baking tray. Use 1 and half cups of water for each cup of rice |
| Brown Rice | 3 | ||
| Basmati Rice | 3 | ||
| Burghul | 3 | Add salted water and cereal into the baking tray. Use 2 cups of water for each cup of burghul | |
| Cous Cous | 3 | Add salted water and cereal into the baking tray. Use 2 cups of water for each cup of cous cous | |
| MEAT | Roast Beef | 2 2 | Brush with oil and rub with salt and pepper. Season with garlic and herbs as you prefer. At the end of cooking let rest for at least 15 minutes before carving |
| Roast Veal | 2 2 | Brush with oil or melted butter. Rub with salt and pepper. At the end of cooking let rest for at least 15 minutes before carving | |
| Roast pork | 2 2 | Brush with oil or melted butter. Rub with salt and pepper. At the end of cooking let rest for at least 15 minutes before carving | |
| Roast Lamb | 2 2 | Brush with oil or melted butter. Rub with salt, pepper and chopped garlic. At the end of cooking let rest for at least 15 minutes before carving | |
| Roast chicken | 2 2 | Brush with oil and season as you prefer. Rub with salt and pepper. Insert into the oven with the breast side up | |
| Chicken Pieces | 3 1 | Brush with oil and season as you prefer. Distribute evenly on steam tray with the skin side down | |
| Roast Duck | 2 2 | Brush with oil or melted butter. Rub with salt, pepper, and paprika. Insert into the oven with the breast side down | |
| Chicken fillets steamed | 3 1 | Distribute evenly in the steam tray | |
| Hot dog | 3 1 | Distribute evenly in the steam tray | |
| Meat loaf | 2 | Prepare according to your favorite recipe and shape into a loaf container pushing to avoid the formation of air pockets | |
| FISH & SEAFOOD | Roasted Whole Fish | 2 | Brush with oil. Season with lemon juice, garlic and parsley |
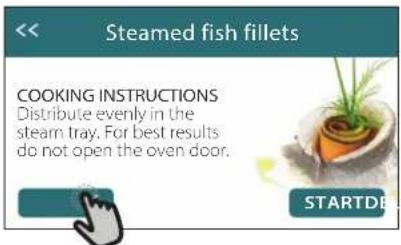
| Steamed Whole Fish | 3 1 | Distribute evenly in the steam tray | |
| Steamed Fish Fillets | 3 1 | ||
| Steamed Fish Cutlets | 3 1 | ||
| Fish Gratin | 2 | Take out from packaging being careful to remove any plastic foil | |
| Mussels | 3 3 | Season with oil, pepper, lemon garlic and parsley before cooking. Mix well | |
| Shrimps | 3 3 | Distribute evenly in the steam tray | |
- Frozen
| Food Category / Recipes | Level & Accessories | Cooking Info | ||
| VEGETABLES | Roasted Vegetables | Roasted Potatoes | 2 | Cut in pieces, season with oil, salt and flavor with herbs before placing into the oven |
| French fries | 2 | Distribute evenly in the baking tray | ||
| Potatoes wedges | 2 | Peel and cut in wedges. Soak in cold salted water for 30 minutes. Wash, dry and weigh. Mix with oil, approximately 10g each 200g of dry potatoes. Distribute evenly in the baking tray | ||
| Stuffed Peppers | 2 | Cut the peppers in half and remove the internal seeds. When clean fill with a mixture of minced meat, breadcrumb and screeded cheese. Season with garlic, salt and flavor with herbs as you prefer | ||
| Stuffed Squash | 2 | Scoop out the squash and finally chopped the internal pulp. Mix the squash cubes with minced meat, breadcrumb and screeded cheese. Season with garlic, salt and flavor with herbs as you prefer | ||
| Stuffed Egg Plant | 2 | Scoop out the eggplant and boil the internal pulp until very soft. Let cool down. When ready fill with a mixture of the cooked eggplant with minced meat, egg, breadcrumb and screeded cheese. Season with garlic, salt and flavor with herbs as you prefer | ||
| Stuffed Tomatoes | 2 | Slice the tops off the tomatoes and set aside. Scoop out the tomatoes pulp and cook the rice in it. Flavor with herbs / bouillon as you prefer. When the rice is tender, let cool down and fill the tomatoes generously with the risotto. Close with the tomatoes tops before cooking | ||
| Gratin Vegetables | Potatoes Gratin | 2 | Cut in pieces and place into a large container. Season with salt, pepper and pour over cream. Sprinkle cheese on top | |
| Vegetables Gratin | 2 | Take out from packaging being careful to remove any plastic foil | ||
| Steamed Vegetables | Whole potatoes | 3 1 | Distribute evenly in the steam tray | |
| Potatoes Pieces | 3 1 | Cut in pieces. Distribute evenly in the steam tray | ||
| Peas | 3 1 | Distribute evenly in the steam tray | ||
| Carrots | 3 1 | Cut in pieces. Distribute evenly in the steam trayBroccoli | ||
| Cauliflower | 3 1 | |||
| Asparagus | 3 1 | Distribute evenly in the steam tray | ||
| Squash | 3 1 | Cut in pieces. Distribute evenly in the steam tray | ||
| Artichokes | 3 1 | Cut in half. Distribute evenly in the steam tray | ||
| Brussel Sprouts | 3 1 | Distribute evenly in the steam tray | ||
| Corn on Cob | 3 1 | Distribute evenly in the steam tray | ||
| Peppers | 3 1 | Cut in pieces. Distribute evenly in the steam tray | ||
| Steamed Vegetables | 3 1 | Distribute evenly in the steam tray | ||
| SALTY Cakes | Quiche Lorraine | 2 | Line a baking pan with the pastry and pierce it with a fork. Prepare quiche lorraine mixture considering a quantity for 6 portions | |
| Quiche Lorraine | 2 | Take out from packaging being careful to remove any plastic foil | ||
| ACCESSORIES | ……… | Oven tray or cake tin on wire shelf | ……… | 12.2.2.1 |
| Wire shelf | Baking tray Steam tray Food probe | |||
| * Frozen | ||||
| Food Category / Recipes | Level & Accessories | Cooking Info | |
| BREAD | Rolls | 2 | Prepare dough according to your favorite recipe for a light bread. Form to rolls before rise. Use the oven's dedicated rise function |
| Rolls * | 2 | Take out from packaging. Distribute evenly on the baking traySandwich Loaf in Tin | |
| 2 | |||
| Rolls Prebaked | 2 | ||
| Scones | 2 | Shape into one scone or in smaller pieces on greased baking tray | |
| Rolls Canned | 2 | Take out from packaging. Distribute evenly on the baking tray | |
| PIZZA | Pizza | 2 | Prepare a pizza dough based on 150ml water, 15g yeast, 200-225g flour, oil and salt. Leave it to rise using the oven's dedicated function. Roll out the dough into a lightly greased baking tray. Add topping like tomatoes, mozzarella and ham |
| Thin Pizza * | 2 | Take out from packaging being careful to remove any plastic foil | |
| Thick Pizza * | 2 | ||
| Chilled Pizza | 2 | ||
| CAKES & PASTRIES | Sponge Cake in Tin | 2 | Prepare a fatless sponge cake batter of 700-800g. Pour into lined and greased baking pan |
| Cookies | 2 | Make a batch of 250g flour, 100g salted butter, 100g sugar, 1 egg. Flavor with fruit essence. Let cool down. Spread to reach 5mm thickness, shape as required and distribute evenly on the baking tray | |
| Meringues | 2 | Make a batch of 2 egg whites, 80g sugar and 100g desiccated coconut. Flavor with vanilla and almond essence. Shape into 20-24 pieces on greased baking tray | |
| Fruit Pie | 2 | Make a pastry of 180g flour, 125g butter and 1 egg. Line a baking pan with the pastry and fill with 700-800g sliced fresh fruit mixed with sugar and cinnamon | |
| Fruit Pie * | 2 | Take out from packaging being careful to remove any plastic foil | |
| Muffins | 2 | Prepare a batter for 10-12 pieces according to your favorite recipe and fill in paper moulds. Distribute evenly on the baking tray | |
| Souffle | 2 | Prepare a souffle mix with lemon, chocolate or fruit and pour into an ovenproof dish with high edge | |
| DESSERTS | Baked Apples | 2 | Remove the core and fill with marzipan or cinnamon, sugar and butter |
| Fruit Compote | 3 1 | Peel and core the fruit. Cut in pieces and distribute evenly in the steam tray | |
| Crème Brulée | 3 1 | Mix 2 egg yolks and 2 whole eggs with 3 tablespoons sugar and vanilla flavour. Heat a mixture of 100 ml cream and 200 ml milk and gently add into the eggs. Pour the mixture into 4 individual serve tins | |
| EGGS | Medium Egg | 3 1 | If the eggs will be eaten cold, rinse them immediately in cold waterHard Egg |
| 3 1 | |||
| Soft Egg | 3 1 | ||

| Food Category / Recipes | Level &Accessories | Cooking Info | ||
| SOUS VIDE | COOK | Whole Meat | 2 | Distribute evenly the packs around the center of the wire shelf. Make sure that the packs are under vacuum |
| Chopped Meat | 2 | |||
| Poultry | 2 | |||
| Fish | 2 | |||
| Mollusc | 2 | |||
| Shellfish | 2 | |||
| Vegetables | 2 | |||
| Fruit | 2 | |||
| Sweet Cream | 2 | |||
| Salty Cream | 2 | |||
| REHEAT | Frozen | 2 | Distribute evenly the packs around the center of the wire shelf | |
| Refrigerated | 2 | |||
ACCESSIONS
Wire shelf
Oven tray or cake tin on wire shelf
Baking tray Steam tray Food probe
- Frozen
CLEANING AND MAINTENANCE
Failure to carry out regular cleaning may cause the surfaces of the appliance to deteriorate. This in turn may shorten the service life of the appliance and cause dangerous situations to arise.
Make sure that the appliance has cooled down before carrying out any maintenance or cleaning.
Do not use wire wool, abrasive scourers or abrasive/ corrosive cleaning agents, as these could damage the surfaces of the appliance.
The appliance must be disconnected from the mains before carrying out any kind of maintenance work.
Wear protective gloves.
Do not use steam cleaners.
EXTERIOR SURFACES
- Clean the surfaces with a damp microfibre cloth. If they are very dirty, add a few drops of pH-neutral detergent. Finish off with a dry cloth.
- Clean the door glass with a suitable liquid detergent.
INTERIOR SURFACES
After every use, leave the oven to cool and then clean it, preferably while it is still warm, to remove any deposits or stains caused by food residues.
- To remove the moisture generated by steaming, leave the oven to cool and then wipe the compartment with a cloth or the sponge provided. We recommend using the "Steam Cleaning" function regularly.
REPLACING THE LIGHT
- Disconnect the oven from the power supply.
- Unscrew the cover from the light and carefully remove the seals and the washer.
- Replace the light and screw the cover back on, taking care to refit the seals and the washer correctly.
- Reconnect the oven to the power supply.

ACCESSIONS
- The majority of accessories can be washed in the dishwasher, including the shelf guides.
- Clean the tank carefully using a sponge and a little pH-neutral detergent. Rinse with drinking water.
Please note: Use 10 W/12 V type G4, T300°C halogen lamps. The bulb used in the appliance is specifically designed for domestic appliances and is not suitable for general room lighting within the home (EC Regulation 244/2009). Lamps are available from our After-sales ServiceDo not handle bulbs with your bare hands as your fingerprints could damage them. Do not use the oven until the lamp cover has been refitted.
WIFI FAQs
Which WiFi protocols are supported?
The WiFi adapter installed supports WiFi b/g/n for European countries.
Which settings need to be configured in the router software?
The following router settings are required: 2.4 GHz enabled, WiFi b/g/n, DHCP and NAT activated.
Which Version of WPS is supported?
WPS 2.0 or higher. Check the router documentation.
Are there any differences between using a smartphone (or tablet) with Android or iOS?
You can use whichever operating system you prefer, it makes no difference.
Can I use mobile 3G tethering instead of a router?
Yes, but cloud services are designed for permanently connected devices.
How can I check whether my home Internet connection is working and wireless functionality is enabled?
You can search for your network on your smart device. Disable any other data connections before trying.
How can I check whether the appliance is connected to my home wireless network?
Access your router configuration (see router manual) and check whether the appliance's MAC address is listed on wireless connected devices page.
Where can I find the appliance's MAC address?
Press then tap WiFi or look on your appliance: There is a label showing the SAID and MAC addresses. The Mac address MAC address consists of a combination of numbers and letters starting with "88:e7".
How can I check whether the appliance's wireless functionality is enabled?
Use your smart device and the Bauknecht Home Net app to check whether the appliance network is visible and connected to the cloud.
Is there anything that can prevent the signal reaching the appliance?
Check that the devices you have connected are not using up all the available bandwidth.
Make sure that your WiFi-enabled devices do not exceed the maximum number permitted by the router.
How far should the router be from the oven?
Normally the WiFi signal is strong enough to cover a couple of rooms, but this very much depends on the material the walls are made of. You can check the signal strength by placing your smart device next to
the appliance.
What can I do if my wireless connection does not reach the appliance?
You can use specific devices to extend your home WiFi coverage, such as access points, WiFi repeaters and power line bridges (not provided with appliance).
How can I find out the name of and password for my wireless network?
See the router documentation. There is usually a sticker on the router showing the information you need to reach the device setup page using a connected device.
What can I do if my router is using the neighbourhood WiFi channel?
Force the router to use your home WiFi channel.
What can I do if appears on the display or the oven is unable to establish a stable connection to my home router?
The appliance might have successfully connected to the router, but it is not able to access the Internet. To connect the appliance to the Internet, you will need to check the router and/or carrier settings.
Router settings: NAT must be on, firewall and DHCP must be properly configured. Password encryption supported: WEP, WPA,WPA2. To try a different encryption type, please refer to the router manual.
Carrier settings: If your Internet service provider has fixed the number of MAC addresses able to connect to the Internet, you may not be able to connect your appliance to the cloud. The MAC address of a device is its unique identifier. Please ask your Internet service provider how to connect devices other than computers to the Internet.
How can I check whether data is being transmitted?
After setting up the network, switch the power off, wait 20 seconds and then switch on the oven: Check that the app is showing the UI status of the appliance. Some settings take several seconds to appear in the app.
How can I change my Bauknecht account but keep my appliances connected?
You can create a new account, but remember to remove your appliances from your old account before moving them to your new one.
I changed my router - what do I need to do?
You can either keep the same settings (network name and password) or delete the previous settings from the appliance and configure the settings again.
TROUBLESHOOTING
| Problem Possible cause Solution | ||
| The oven is not working. | Power cut.Disconnection from the mains. | Check for the presence of mains electrical power and whether the oven is connected to the electricity supply. Turn off the oven and restart it to see if the fault persists. |
| The display shows the letter "F" followed by a number or letter. | Oven failure. | Contact you nearest Client After-sales Service Centre and state the number following the letter "F". |
| The oven makes noises, even when it is switched off. | Cooling fan active. | Open the door or hold or wait until the cooling process has finished. |
| The oven is not producing steam. | Tank not inserted correctly.Tank empty. | Check whether the tank has been placed in the correct position and whether it is filled with drinking water up to the "MAX" mark, then start the function you require again. |
| The function does not start.The function is not available in demo mode. | Demo mode is running. | Press ☑ , tap ☑ fo" and then select "Store Demo Mode" to exit. |
| The icon is shown on display. | The WiFi router is off.The router settings have changed.The wireless connections does not reach the appliance.The oven is unable to establish a stable connection to home network.The connectivity is not supported. | Check that the WiFi router is connected to the Internet. Check that the WiFi signal close to the appliance is strong.Try to restart the routerSee the "WiFi FAQs" section.If your home wireless network settings have changed, connect to the network: Press ☑ , tap ☑ Fi" and then select "Connect to Network". |
| The connectivity is not supported. | Remote operation is not permitted in your country. | Check whether your country allows remote operation of electronic appliances before purchasing. |
Policies, standard documentation and additional product information can be found by:
- Using the QR code in your appliance
- Visiting our website docs.bauknecht.eu
- Alternatively, contact our After-sales Service (See phone number in the warranty booklet). When contacting our After-sales Service, please state the codes provided on your product's identification plate.

MERCI D'AVOIR ACHETÉ UN PRODUIT BAUKNECHT
FUNCTIONS (FONCTIONS)

FONCTIONS MANUELLES
VAPEUR
Conditions requires minimales.