
10030980 - Fan Klarstein - Free user manual and instructions
Find the device manual for free 10030980 Klarstein in PDF.

| Product Type | Pedestal Fan |
| Brand | Klarstein |
| Model | 10030980 |
| Power Supply | 220-240 V ~ 50 Hz |
| Power | 45 W |
| Number of Speeds | 6 speeds |
| Operating Modes | Normal, Natural, Sleep |
| Oscillation Function | Yes |
| Timer | 0.5 to 12 hours (delayed stop or start) |
| Remote Control | Yes, range of 5 meters |
| Display Screen | LED |
| Remote Control Battery | Included |
| Housing Material | Plastic |
| Intended Use | Indoor only |
| Cleaning and Maintenance | Soft cloth and mild soap; do not use solvents |
| Safety | Do not immerse; do not insert objects into the grill; use on a flat surface |
| Repairability | Do not repair yourself; contact a professional |
| Recycling | Complies with Directive 2012/19/EU; do not dispose of with household waste |
| Package Contents | Fan, base, column, remote control, battery, mounting screws, manual |
| Certifications | CE (compliant with European directives) |
Frequently Asked Questions - 10030980 Klarstein
User questions about 10030980 Klarstein
0 question about this device. Answer the ones you know or ask your own.
Ask a new question about this device
Download the instructions for your Fan in PDF format for free! Find your manual 10030980 - Klarstein and take your electronic device back in hand. On this page are published all the documents necessary for the use of your device. 10030980 by Klarstein.
USER MANUAL 10030980 Klarstein
natural_image
Row of white icons representing kitchen appliances including blender, kettle, refrigerator, air conditioner, fan, and microwave (no text or symbols)
natural_image
Line drawing of a tall vertical electronic device with a grid-patterned interior (no text or symbols)Turmventilator
10030979 10030980
KLARSTEIN
natural_image
Technical line drawing of a mechanical component with mounting holes and a curved housing (no text or symbols)natural_image
Diagram showing a cylindrical mechanical component before and after assembly, with no visible text or symbolsnatural_image
Symbol of a trash bin crossed with a diagonal line, no text or numbers presentCongratulations on purchasing this equipment. Please read this manual carefully and take care of the following hints to avoid damages. Any failure caused by ignoring the mentioned items and cautions mentioned in the instruction manual are not covered by our warranty and any liability.
Contents
Technical Data 7
Safety Instructions 7
Product Description 8
Assembly 9
Use and Operation 10
Controls and Functions 10
Cleaning and Care 10
Hints on Disposal 11
Declaration of Conformity 11
Technical Data
| Item number 10030979, 10030980 | |
| Power supply 220-240 V ~ 50 Hz | |
| Power consumption 45 W |
Safety Instructions
- Read Rules for Safe Operation and Instructions Carefully.
- If the supply cord is damaged, it must be replaced by manufacturer or its service agent or a similarly qualified person in order to avoid a hazard.
- Indoor use only.
- To protect against the risk of electrical shock, do not immerse the unit, cord or plug in water or other liquid.
- This appliance can be used by children aged from 8 years and above and persons with reduced physical, sensory or mental capabilities or lack of experience and knowledge if they have been given supervision or instruction concerning use of the appliance in a safe way and understand the hazards involved.
- Children shall not play with the appliance. Cleaning and user maintenance shall not be made by children without supervision.
- Young children should be supervised to ensure that they do not play with the appliance.
- When the appliance is not in use and before cleaning, unplug the appliance from the outlet.
- When the fan was assembled, the rotor blade guard shall not be taken off anymore.
- Never insert fingers, pencils, or any other object through the grille when fan is running.
- Disconnect fan when moving from one location to another.
- Be sure fan is on a stable surface when operating to avoid overturning.
- DO NOT use fan in window, rain may create electrical hazard.
Product Description and Remote Control
a
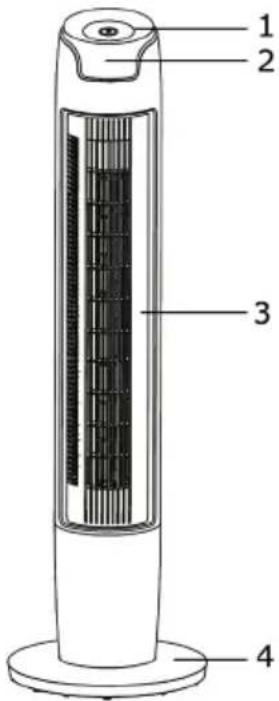
Product Description
1 Control Panel
2 Display window
3 Body
4 Base
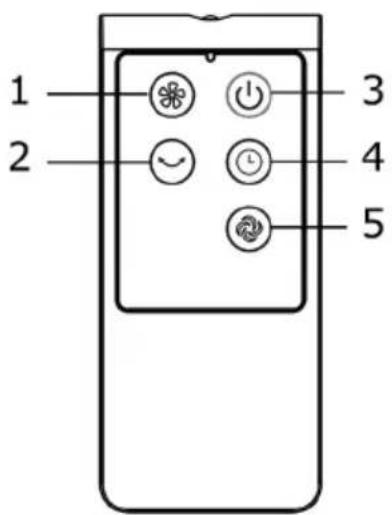
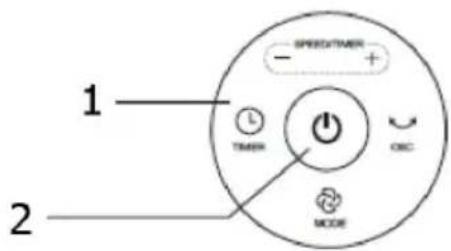
Remote Control
1 Speed key
2 Swing key
3 ON/OFF key
4 Timer key
5 Mode key
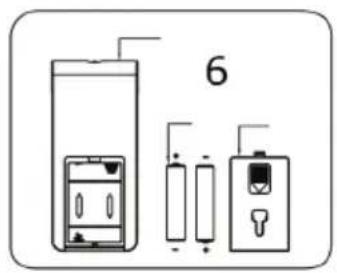
6 Battery
Note: Point the remote controller at the receptor on body of the fan and press the desired button. The remote controller will work at distances of up to roughly five meters and the angle of 30 degree included between right and left from the receptor.
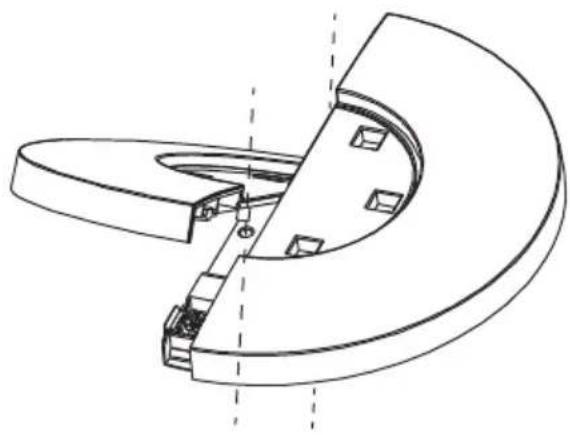
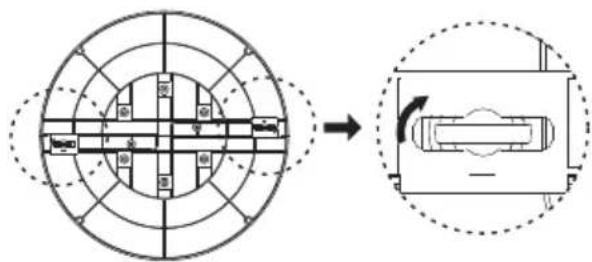
Assembly
- Align the column in middle of pedestal with the hole and revolve for fitting
natural_image
Technical line drawing of a mechanical component with curved and flanged sections (no text or symbols)- Revolve the arrows of two rotary knobs about 90^
- Assemble thea pedestal and body. Align three screws with corresponding hole locations and screw tightly.a.
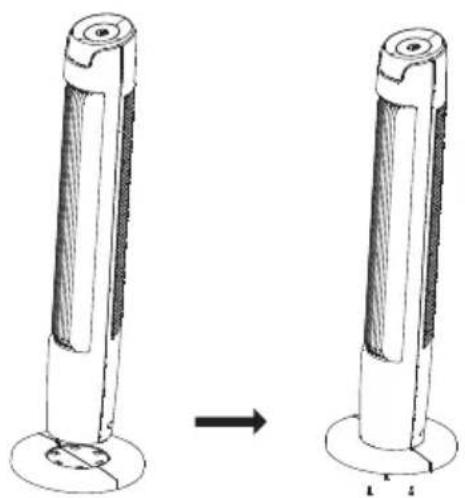
natural_image
Diagram showing two cylindrical objects with a base, one with a circular hole and the other with a ring, both without any text or symbols.Use and Operation
Press a button on the device to activate one of the following functions:
- Press the [+] button to set on of 6 speed levels of the air circulation.
- Press the Time button and use the [+] and [-] buttons to set the time. When the fan is running, press the timer button to turn off the fan after 0.5 to 12 hours. In Standby Mode, you can preset a start time of 0.5-12 hours.
- Press the Mode button to select normal, natural and sleep wind.
- Press the oscillating button to start or stop the swing function.
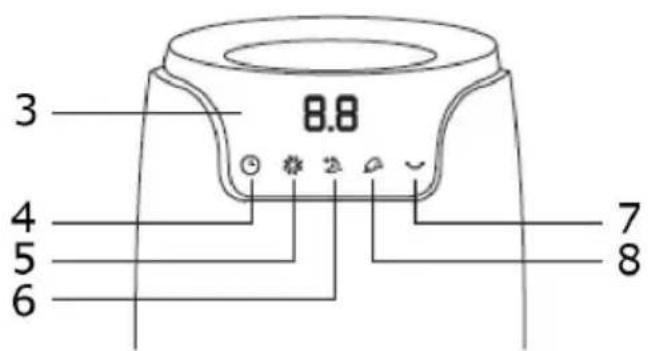
Controls and Functions
1 Control panel
2 ON/OFF
3 Display window
4 Timer
5 Normal wind
6 Sleep wind
7 Swing
8 Natural wind
Cleaning and Care
The fan requires little maintenance. Do not try to fix it by yourself. Refer it to qualified service personnel if service is needed.
- Before cleaning and assembling, fan must be unplugged.
- To ensure adequate air circulation to the motor, keep vents at the rear of the motor free of dust. Do not disassemble the fan to remove dust.
- Please wipe the exterior parts with a soft cloth soaking a mild detergent.
- Do not use any abrasive detergent or solvents to avoid scratching the surface. Do not use any of the following as a cleaner: gasoline, thinner, bending.
- Do not allow water or any other liquid into the motor housing or interior parts.
Cleaning
- Be sure to unplug from the electrical supply source before cleaning.
- Plastic parts should be cleaned with a soft cloth moisten with mild soap. Thoroughly remove soap film with dry cloth.
Hints on Disposal
natural_image
Symbol of a trash bin crossed with a diagonal line, no text or numbers presentAccording to the European waste regulation 2012/19/EU this symbol on the product or on its packaging indicates that this product may not be treated as household waste. Instead it should be taken to the appropriate collection point for the recycling of electrical and electronic equipment. By ensuring this product is disposed of correctly, you will help prevent potential negative consequences for the environment and human health, which could otherwise be caused by inappropriate waste handling of this product. For more detailed information about recycling of this product, please contact your local council or your household waste disposal service.
Your product contains batteries covered by the European Directive. 2006/66/EC, which cannot be disposed of with normal household waste. Please check local rules on separate collection of batteries. The correct disposal of batteries helps prevent potentially negative consequences on the environment and human health.
Declaration of Conformity
Producer: Chal-Tec GmbH, Wallstraße 16, 10179 Berlin, Germany.
CE
This product is conform to the following European Directives:
2014/30/EU (EMC)
2014/35/EU (LVD)
2011/65/EU (RoHS)
206/212/EU (ErP)
Estimado cliente,
natural_image
Technical line drawing of a mechanical component with curved and angular features (no text or symbols)natural_image
Diagram showing two cylindrical objects with a base, one being rotated to form a cross-section (no text or symbols)natural_image
Symbol of a trash bin crossed with a diagonal line, no text or numbers presentnatural_image
Technical line drawing of a mechanical component with curved and flanged sections (no text or symbols)natural_image
Diagram showing a mechanical component before and after assembly, with no visible text or symbolsnatural_image
Symbol of a trash bin crossed with a diagonal line, no text or numbers presentnatural_image
Technical line drawing of a mechanical component with curved and flanged sections (no text or symbols)natural_image
Diagram showing a cylindrical mechanical component before and after assembly, with no visible text or symbols.natural_image
Symbol of a trash bin crossed out by a diagonal line, with no text or labels present.

Brand : Klarstein
Model : 10030980
Category : Fan