
10031487 - Fan Klarstein - Free user manual and instructions
Find the device manual for free 10031487 Klarstein in PDF.

| Product type | Evaporative air cooler fan |
| Brand | Klarstein |
| Model | 10031487 |
| Power supply | 220-240 V ~ 50-60 Hz |
| Power | 110 W |
| Water tank capacity | 5.5 litres |
| Speed levels | 3 (low, medium, high) |
| Ventilation modes | Normal, Natural, Night |
| Timer | 0.5 to 7.5 hours |
| Oscillation | Yes (lateral) |
| Remote control | Yes (CR2032 battery included) |
| Refrigerant packs | 2 packs, to be filled with water and frozen |
| Dust filter | Washable, removable |
| Water filter | Integrated, cleanable |
| Casters | Yes, for easy movement |
| Display | LED, water level gauge |
| Safety | Automatic shut-off if tipping? Not specified, but unplug after use. |
| Cleaning | Surface with damp sponge; water and dust filters washable |
| Weight | Approx. 6 kg (estimate) |
| Dimensions (H x W x D) | Approx. 80 x 30 x 30 cm (estimate) |
Frequently Asked Questions - 10031487 Klarstein
User questions about 10031487 Klarstein
0 question about this device. Answer the ones you know or ask your own.
Ask a new question about this device
Download the instructions for your Fan in PDF format for free! Find your manual 10031487 - Klarstein and take your electronic device back in hand. On this page are published all the documents necessary for the use of your device. 10031487 by Klarstein.
USER MANUAL 10031487 Klarstein
natural_image
Row of white icons representing kitchen appliances including blender, blender, refrigerator, air conditioner, fan, and microwave (no text or symbols)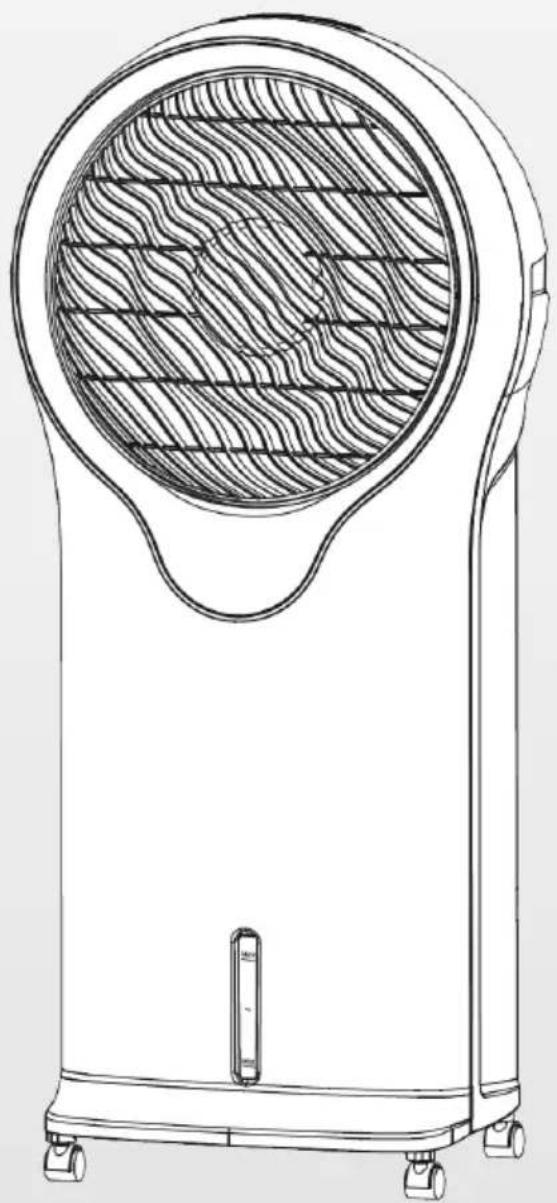
natural_image
Line drawing of a portable air conditioner unit with mesh grille and wheels (no text or symbols)natural_image
Technical line drawing of a portable industrial machine with internal compartments and external housing (no text or symbols)natural_image
Symbol of a trash bin crossed with a diagonal line, no text or numbers presentCongratulations on purchasing this equipment. Please read this manual carefully and take care of the following hints to avoid damages. Any failure caused by ignoring the mentioned items and cautions mentioned in the instruction manual are not covered by our warranty and any liability.
Contents
Technical Data 8
Safwety Instructions 8
Product Description 9
Use and Operation 10
Cleaning and Care 12
Hints on Disposal 13
Declaration of Conformity 13
Technical Data
| Item number 10029327, 10031487 | |
| Power supply 220-240 V ~ 50-60 Hz | |
| Power consumption 110 W | |
| Water tank volume 5.5 litres |
Safety Instructions
- Read all the safety and operating instructions carefully and retain them for future reference.
- Check the voltage indicated on the rating plate. This product is designed for a 220V-60Hz electric supply.
- Do not place the electrical cord under a cover. Do not overlay the cord with little covers or such element. Place the cord in an area where there are not any risk to stumble over it.
- Please place the fan on a flat, firm, safety surface before use.
- Disconnect the plug from socket when not in use, seize the plug and then pull it out. Do not pull the cord to pull out the plug.
- Please make sure that the fan will not meet any obstruction when oscillating.
- Do not put your fingers or any other object into the front case when the fan is operating.
- Please pay special attention when use near children, to avoid children play with fan.
- Do not let hair, net curtains, tablecloth, clothes or curtains be next to the openings of the fan. They could be aspiring into the fan, causing damaged or injuries.
- Do not use any fan having a cord or a plug damaged, after working default or if the fan is fallen or have been damaged by any way.
- Periodically check the electric cable of this fan. If the electric cable is damaged, it must be replaced by the manufacturer, its after-sales service or a similar qualified person in order to avoid a danger.
- Do not use this fan outside. Do not use this fan in a damp area such as bathroom.
- Do not use this fan near a window and under direct sunshine.
- Do not operate the fan in an area where gasoline is used, painting or such flammable liquids.
Important Hints on Use
- When adding water do not exceed the MAX level.
- When humidity levels are high choose 'normal' mode.
- Do not knock or move the unit once water has been added to the tank.
- Do not put any objects on the unit or cover the unit in anyway.
- Use a soft dry cloth to clean the surface of the product. Wipe dry with a clean cloth.
- Do not pour water onto or into the unit.
- If the unit is knocked over whilst the water tank is full switch off at the mains
- immediately and disconnect the plug. Do not switch the unit back on until it has
• dried for at least 24 hours. Serious damage may occur if the unit is still - wet when turned back on.
- Do not place the unit close to a wall or curtains as this will affect its performance.
- If the unit generates a lot of noise the air filter may need to be cleaned of dust.
• Always disconnect the unit from the mains power supply when not in use. - Never put any water on the control panel or remote control
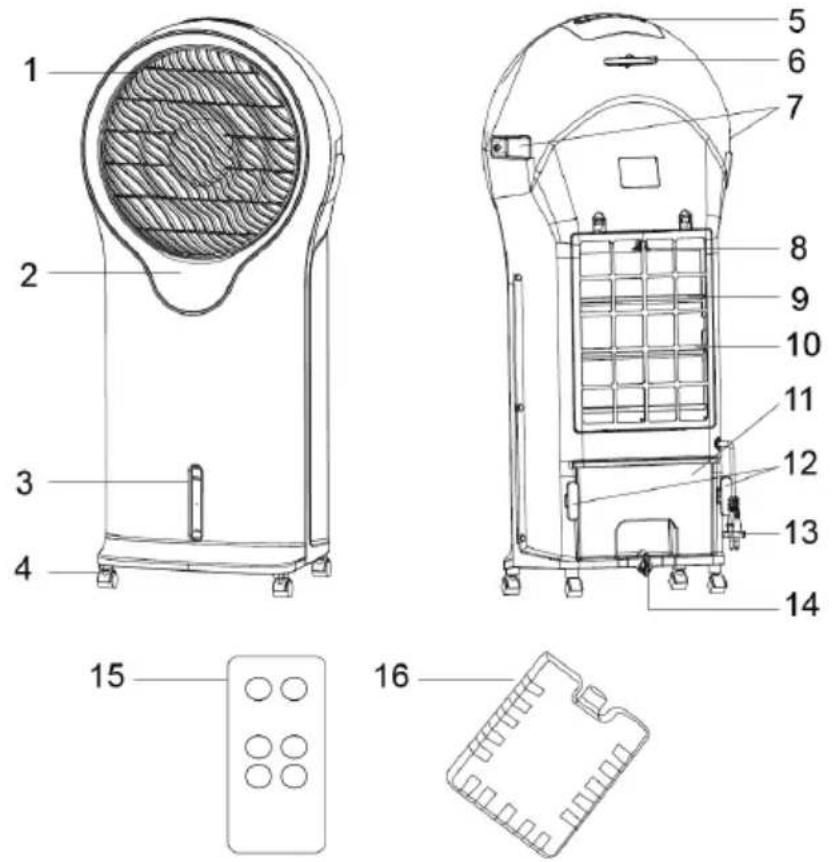
Product Description
1 Air outlet
2 Display
3 Water level indicator
4 Castor
5 Control Panel
6 Remote control receiver
7 Handle
8 Water filter lock
9 Water filter
10 Dust filter
11 Water tank
12 Power cord holder
13 Power cord
14 Water tank knob
15 Remote control
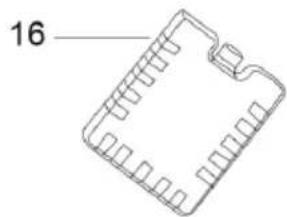
16 Ice packs
Use and Operation
Ensure all the packaging is removed and disposed of safely before connecting to the main power supply.
Adding Water
Rotate the water tank knob 90 degree to open the water tank, pull out the water tank and pour the water. After filling water, rotate the water tank knob 90 degree again to lock the water tank. The water level is visible via the water level indicator on the front of the unit.
IMPORTANT: Do not overfill the water and keep within the MIN and MAX indicated levels. Always lock the water tank after water has been added.
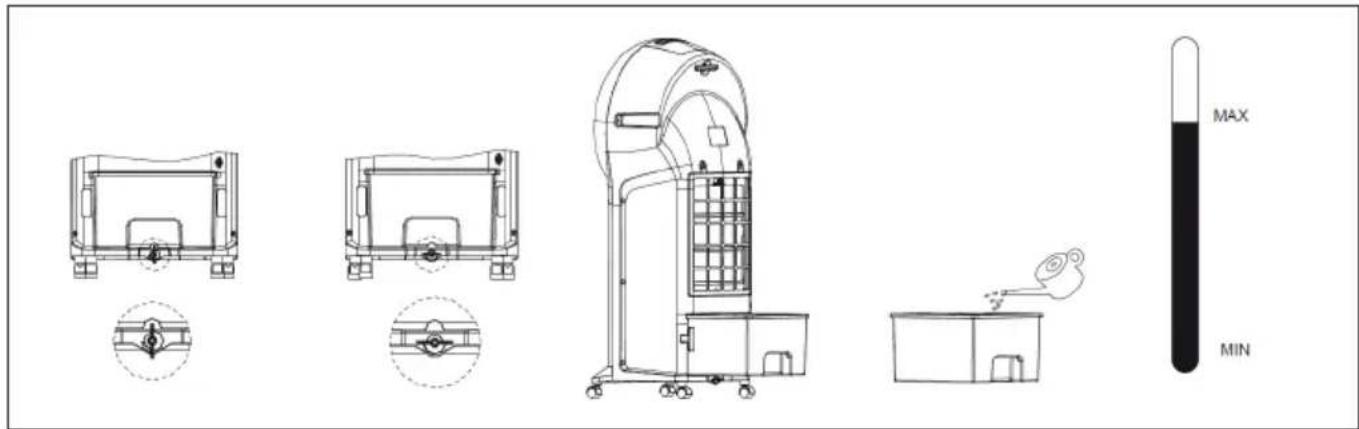
If you want to reduce the temperature of the air generated by the cooler the provided ice packs can be used and added to the water tank.
Ice Packs
The ice packs provided can be used with this product and are not suitable for use for cooling drinks or food. Before first use, add tap water to each pack filling to no more than 34 full (about 210ml) and ensure the screw cap is fitted tightly with the cap, fitted on top.
You do not need to open the lid again as this will damage the ice pack. Place the ice packs in a freezer and leave them for several hours until the water is frozen. Once frozen place one or both ice packs into the water tank ensuring the water level does not exceed the MAX level.
WARNING! ONLY USE THE ICE PACKS WITH THIS PRODUCT. DO NOT DRINK CONTENTS OF ICE PACKS.
Control Panel and Controls
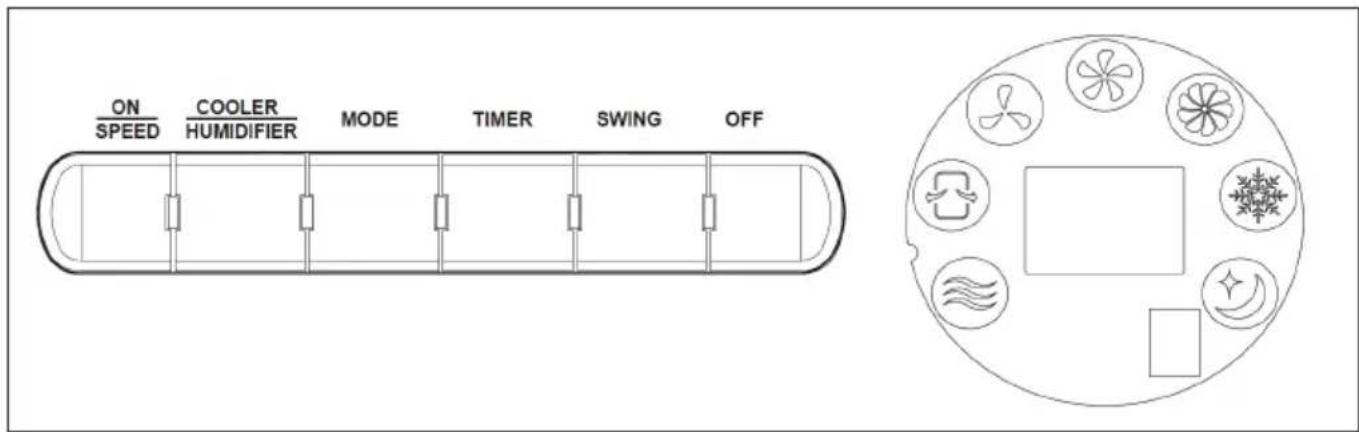
This appliance can be operated by the control panel located on the top of the appliance or by the remote control: Plug in and you would hear BiBi, the appliance is under standby mode, you can only use ON/SPEED button.
ON/SPEED button
Under standby mode, press this key and the appliance starts from medium speed, then changes to low speed within 3 seconds.
OFF button
Press this button to exit functions and enter into Standby mode.
COOLER/HUMIDIFIER button
Press this button to active Cooling/Humidifying function, the corresponding LED is on simultaneously.
MODE button
Press the button once to switch from normal to natural Mode, press again to enter into sleeping mode, Press for a third time to enter into normal mode. The LED lights change accordingly.
• NORMAL mode: the appliance operates in selected wind speed: High, Medium, Low.
• NATURAL mode: the appliance operates according to computerized intervals of changing.
- SLEEPING mode: the appliance operates according to computerized intervals of changing speeds.
TIMER button
Press this button to set timing from 0.5\~7.5 hours.
SWING button
Push this button to start the oscillation, press again to stop it.
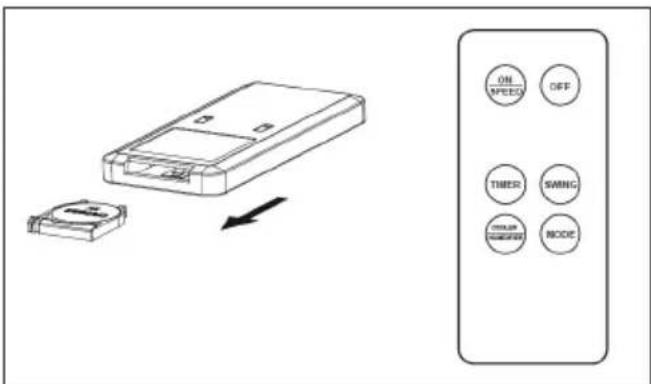
Remote Control
The remote control requires CR2032 size Batteries. Open the battery compartment by sliding the cover down and insert the batteries noting the polarity indicated in the battery compartment.
Remote control operations are identical to the functions on the control panel. Point the remote towards the unit and depress the appropriate button. The remote control will operate up to 6 metres from the unit.
Cleaning and Care
- Switch off and unplug from the power supply, then pull out the water tank according to instruction to clean the product. When cleaning the water tank, first drain the water inside then remove any dirt and dust and wipe dry.
• Using a soft, damp cloth, carefully clean the exterior surface of the product. - Do not allow water or other liquids to run into the interior of the product, as this could create a fire and/or electrical hazard.
• We also recommend the periodic cleaning of this appliance by lightly running a vacuum cleaner nozzle over the guards to remove any dust or dirt that may have accumulated inside or on the unit. - Do not use harsh detergents, chemical cleaners or solvents as they may damage the surface finish of the plastic components.
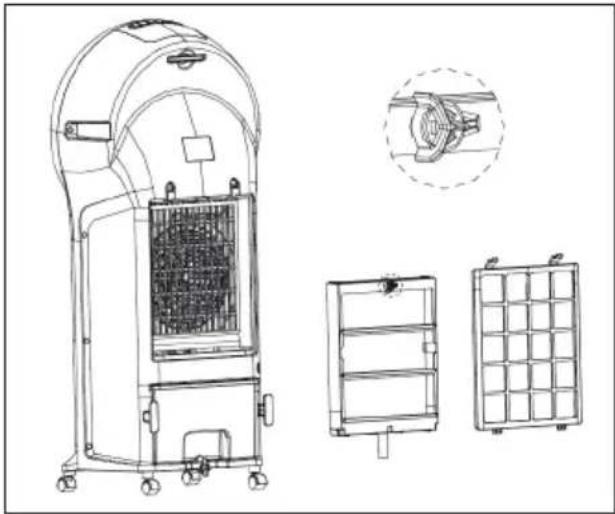
Filter Cleaning
The filter is supplied assembled and can be removed for cleaning as required. It is recommended that the filter be cleaned once every week.
- Take off the dust filter, turn the water filter lock:
- Clean the dust filter with abstergent or soft brush.
- Dip the water filter into detergent water and dry it.
natural_image
Technical line drawing of a portable industrial machine with internal compartments and external housing (no text or symbols)Hints on Disposal
natural_image
Symbol of a trash bin crossed with a diagonal line, no text or numbers presentAccording to the European waste regulation 2002/96/EG this symbol on the product or on its packaging indicates that this product may not be treated as household waste. Instead it should be taken to the appropriate collection point for the recycling of electrical and electronic equipment. By ensuring this product is disposed of correctly, you will help prevent potential negative consequences for the environment and human health, which could otherwise be caused by inappropriate waste handling of this product. For more detailed information about recycling of this product, please contact your local council or your household waste disposal service.
Your product contains batteries covered by the European Directive. 2006/66/EG, which cannot be disposed of with normal household waste. Please check local rules on separate collection of batteries. The correct disposal of batteries helps prevent potentially negative consequences on the environment and human health.
Declaration of Conformity
Producer: Chal-Tec GmbH, Wallstraße 16, 10179 Berlin.
CE
This product is conform to the following European Directives:
2014/30/EU (EMC)
2014/35/EU (LVD)
2011/65/EU (RoHS)
206/2012/EU (ErP)
Estimado cliente:
Limpieza y cuidado
natural_image
Technical line drawing of a portable industrial machine with internal compartments and external housing (no text or symbols)natural_image
Symbol of a trash bin crossed with a diagonal line, no text or numbers presentnatural_image
Technical line drawing of a portable industrial machine with internal compartments and mounting base (no text or symbols)natural_image
Symbol of a trash bin crossed with a diagonal line, no text or numbers present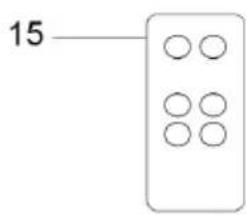
natural_image
Line drawing of a mechanical component with no text or symbolsnatural_image
Technical line drawing of a portable industrial machine with internal compartments and external housing (no text or symbols)Smaltimento
natural_image
Symbol of a trash bin crossed with a diagonal line, no text or numbers present

- Contents
- Technical Data
- Safety Instructions
- Important Hints on Use
- Product Description
- Use and Operation
- Adding Water
- Ice Packs
- Control Panel and Controls
- ON/SPEED button
- OFF button
- COOLER/HUMIDIFIER button
- MODE button
- TIMER button
- SWING button
- Remote Control
- Cleaning and Care
- Filter Cleaning
- Hints on Disposal
- Declaration of Conformity
- Estimado cliente:
- Limpieza y cuidado
- Smaltimento
Brand : Klarstein
Model : 10031487
Category : Fan