10032089 - Food Processor Klarstein - Free user manual and instructions
Find the device manual for free 10032089 Klarstein in PDF.
| Technical Specifications | Klarstein Food Processor 10032089 |
|---|---|
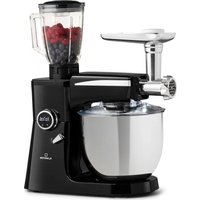
| Power | 800 W |
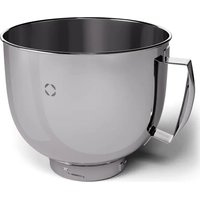
| Bowl Capacity | 5 liters |
| Bowl Material | Stainless steel |
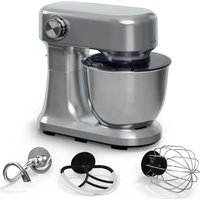
| Adjustable Speed | 6 speed levels |
| Included Accessories | Whisk, dough hook, beater |
| Dimensions | 38 x 24 x 30 cm |
| Weight | 4.5 kg |
| Usage | Preparation of doughs, creams, sauces, etc. |
| Maintenance | Bowl and accessories dishwasher safe |
| Safety | Overheat protection system |
| Warranty | 2 years |
| Additional Information | Ideal for cooking enthusiasts and bakers |
Frequently Asked Questions - 10032089 Klarstein
User questions about 10032089 Klarstein
0 question about this device. Answer the ones you know or ask your own.
Ask a new question about this device
Download the instructions for your Food Processor in PDF format for free! Find your manual 10032089 - Klarstein and take your electronic device back in hand. On this page are published all the documents necessary for the use of your device. 10032089 by Klarstein.
USER MANUAL 10032089 Klarstein
text_image
L M N O P Q A B C D E F G H I J K RBEDIENFELD
text_image
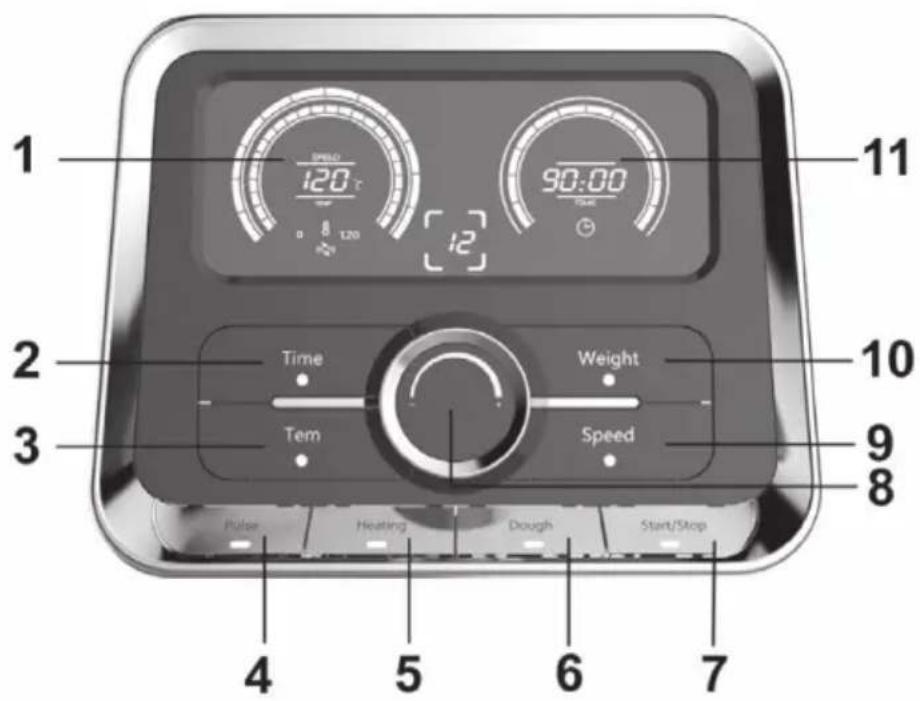
1 SPEED 120°C 8 120 90:00 11 2 Time Weight 3 Tem Speed Pulse Heating Dough Start/Stop 4 5 6 7 9 10 8natural_image
3D rendering of a mechanical component with a warning symbol (no text or labels)natural_image
Two identical diagrams showing a black object with red and gray arrows indicating movement, no text or symbols present.Messer anbringen
text_image
Diagram illustrating four stages of a mechanical device with warning symbols and red arrows indicating motion or movement.natural_image
Two-panel illustration showing a mechanical device before and after motion, with no visible text or symbols.Schüssel anbringen

text_image
Diagram showing four steps of a food processor's kitchen tool, labeled Z1 and Z2 with red arrows indicating process flow.text_image
SPEED 20 ℃ TIME 0 1.20 00 00:00 TIME Time Weight Tem Speed Pulse Healing Dough Start/StopTASTENFUNKTIONEN
flowchart
graph TD
    A["1: Preparation of kitchen bowl"] --> B["2: Cooking with a digital timer"]
    B --> C["3: Cooking with a pot on a stand"]
    C --> D["4: Transport of cooking oven"]
text_image
Four-step diagram showing a cooking process with labeled steps and warning symbolstext_image
Four-step cooking process diagram showing a kitchen appliance with a warning symbol and four steps of adding a temperature.natural_image
Symbol of a trash bin crossed with a diagonal line, no text or numbers presentCongratulations on purchasing this equipment. Please read this manual carefully and take care of the following hints to avoid damages. Any failure caused by ignoring the mentioned items and cautions mentioned in the instruction manual are not covered by our warranty and any liability.
CONTENTS
Safety Instructions 22
Product Description 23
Control Panel 24
Assembly 25
Getting Started 28
Button Functions 28
How to use the Steamer 31
How to use the Butterfly Attachment 32
How to use the Inner Basket 33
How to use the Blade Shield 35
Care and Cleaning 36
Error Codes and Troubleshooting 37
Hints on Disposal 38
TECHNICAL DATA
| Item number 10032089 | |
| Power supply 220-240 V ~ 50-60 Hz | |
| Motor 500 W | |
| Heating 1000 W |
DECLARATION OF CONFORMITY

Producer:
Chal-Tec GmbH, Wallstraße 16, 10179 Berlin, Germany.
This product is conform to the following European
Directives:
2014/30/EU (EMC)
2014/35/EU (LVD)
2011/65/EU (RoHS)
SAFETYINSTRUCTIONS
- Before using the appliance, Read these instructions and illustrations carefully.
- Keep these instructions for use for future reference.
- Check if the voltage indicated on the appliance corresponds to the local mains voltage before you connect the appliance.
- Never use any accessories of parts from other manufactures. Your guarantee will become invalid if such accessories or parts have been used.
- Don't use the appliance if the mains cord, the plug or other parts is damaged.
- Thoroughly clean the parts that will come into contact with food before you use the appliance for the first time.
• Always put the main appliance on a flat, dry and clean surface.

WARNING
Risk of injury! Don't touch the blade especially they are running. They are very sharp. Only hold the upper part of the blade while removing or re-inserting it.
- Don't use your attachment and/or appliance if it has been damaged. You should contact an approved service centre.
- This appliance shall not be used by children. Keep the appliance and its cord out of reach of children.
- Never let the appliance run unattended.
- Switch the appliance off before detaching and installing any accessory.
- Wait until moving parts have stopped running before you remove the parts of the appliance.
- Never immerse the main appliance in water or any other liquid, nor rinse it under the tap. Use only a moist cloth to clean the appliance.
- Unplug the appliance immediately after use.
- Switch off the appliance and disconnected from supply before changing accessories or approaching parts which move in use.
- Appliances can be used by persons with reduced physical, sensory or mental capabilities or lack of experience and knowledge if they have been given supervision or instruction concerning use of the appliance in a safe way and if they understand the hazards involved.
• Children shall not play with the appliance. - When processing hot food (for temperature above 60^ ) don't touch the measuring cup.
- Be sure to place the appliance on a clean, solid, even and non-heatable surface, particularly when using the steam tool.
- The Spatula is only used for moving the food out of the bowl. Don't use it while the blade is running.
- Be careful if hot liquid is poured into the food processor as it can be ejected out of the appliance due to a sudden steaming.
- The appliance is not designed for commercial use. It is intended for use in domestic households and in similar working and residential environments, such as staff kitchen areas, farm houses, hotels, motels and bed and breakfast type environments.
- When the current temperature of the bowl temperature is above 60^ C, the working speed will be limited at speed 1-4. The appliance will automatically switch the working speed to speed 4; Even through the current working speed is set at speed 5-12.
PRODUCT DESCRIPTION
A Measuring cup
B Bowl lid
C Airproof ring 1
D Blade
E Airproof ring 2
F Bowl
G Spanner
H Butterfly attachment
1 Main appliance
J LCD
K Control panel
L Blade shield
M Lid
N Steamer tray
O Steamer
P Spatula
Q Inner basket
R On/Off button

text_image
L M N O P Q A B C D E F G H I J K RCONTROL PANEL

text_image
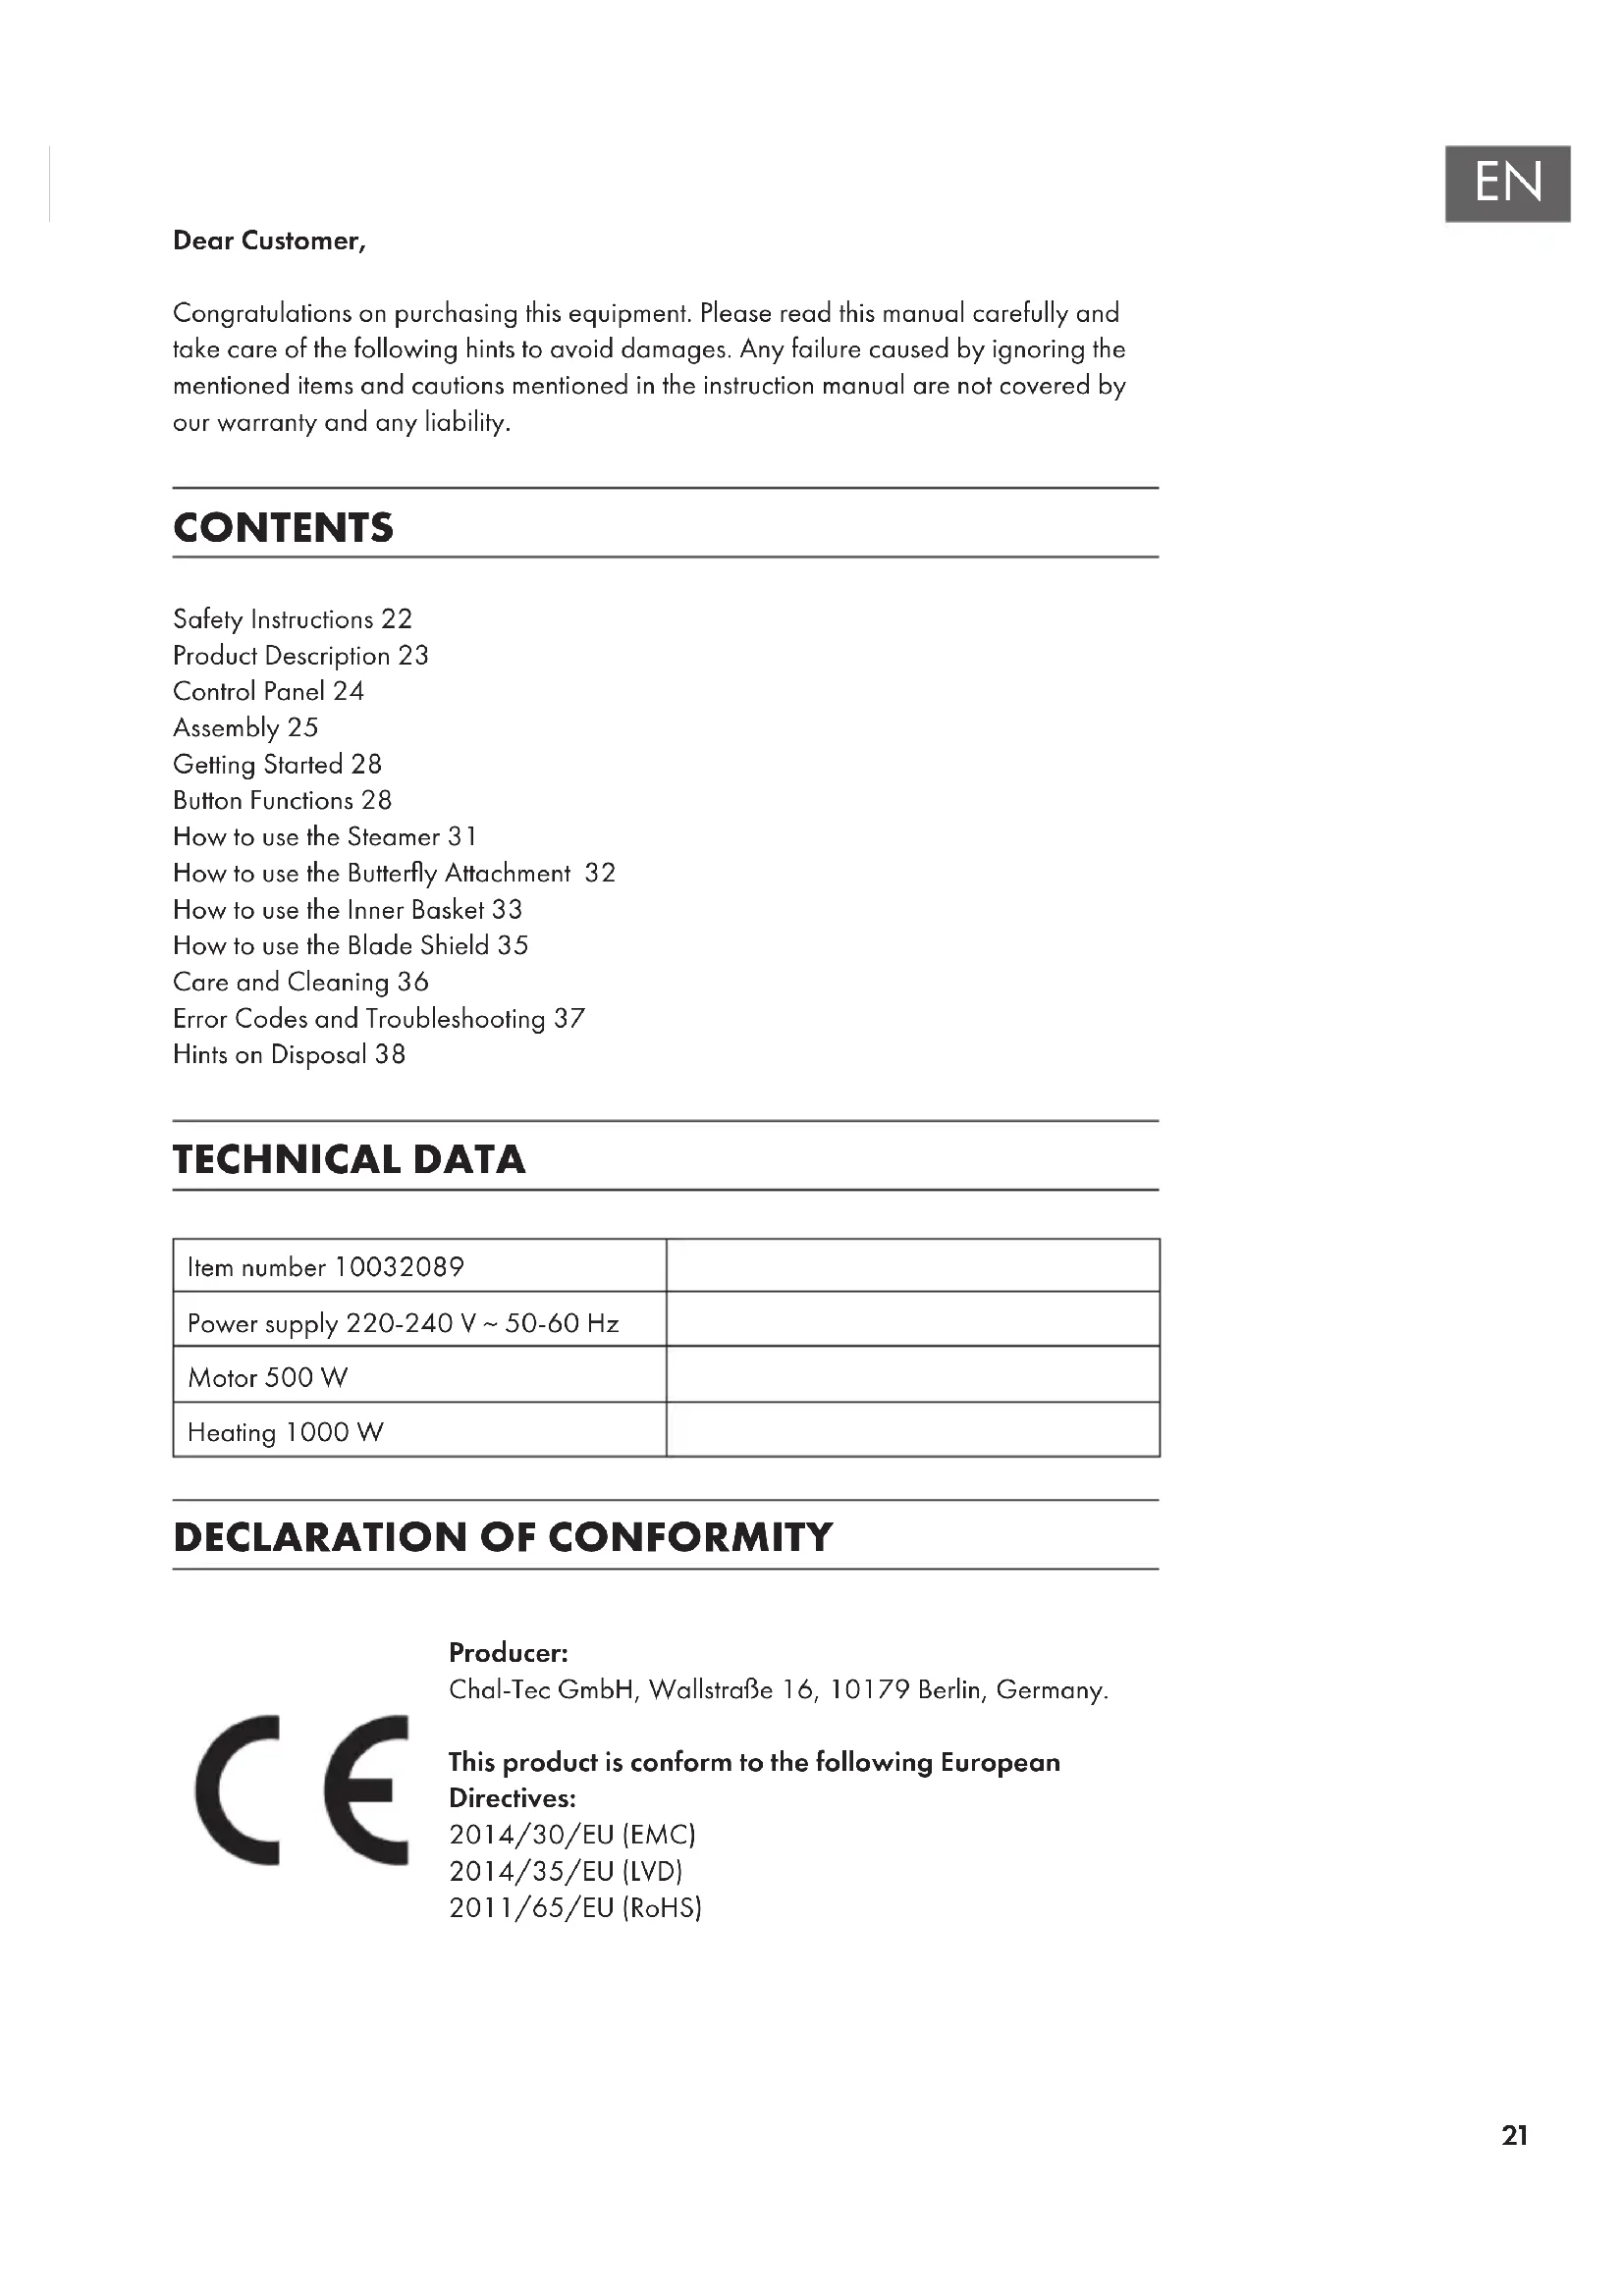
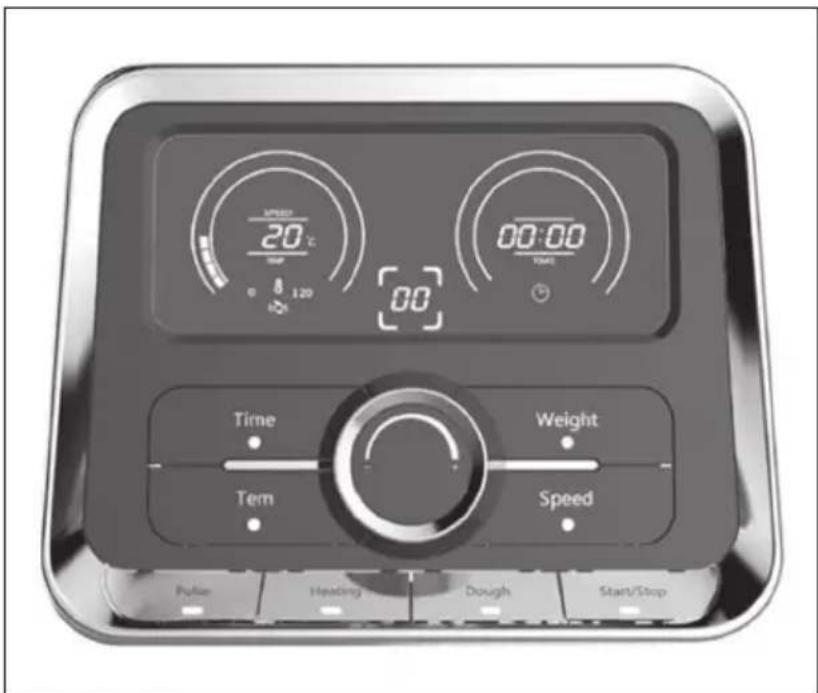
1 SPEED 120°C 8 120 12 90:00 TIME 11 2 Time Weight 3 Tem Speed 10 9 8 Pulse Heating Dough Start/Stop 4 5 6 7| 1 Speed/ Temperature display 7 Start/Stop button | |
| 2 Time button 8 Rotary knob | |
| 3 Temperature button 9 Speed button | |
| 4 Pulse button 10 Weight button | |
| 5 Heating button 11 Weight/Time display | |
| 6 Dough button |
ASSEMBLY
Important Hints on the Bowl
The Maximum capacity of the bowl is 2 liters. Don't process the food more than 2 liters!

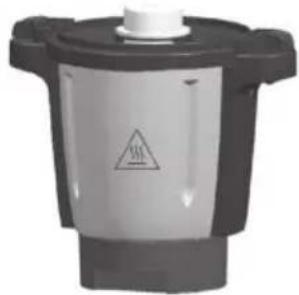
CAUTION
Risk of burns! To indicate that the marked item can be hot and should not be touched without taking care!
natural_image
Close-up of a mechanical component with a warning symbol and downward arrow (no readable text or labels)How to install the Airproof ring 1
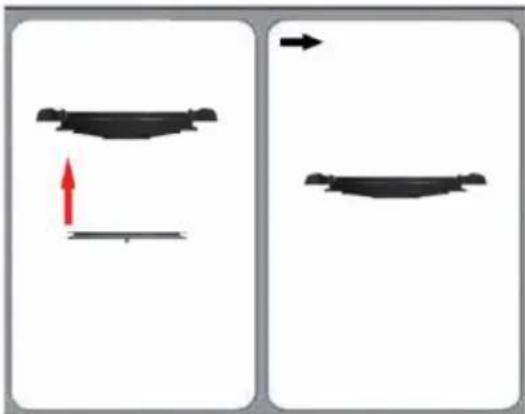
natural_image
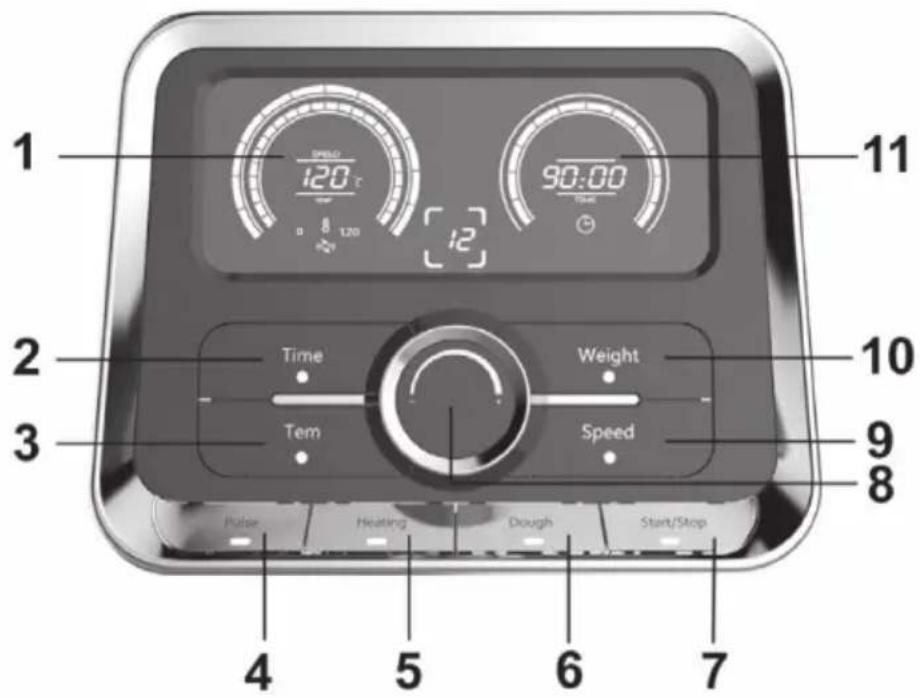
Two identical diagrams showing a curved object with red and gray arrows indicating direction, no text or symbols present.How to install the blade
text_image
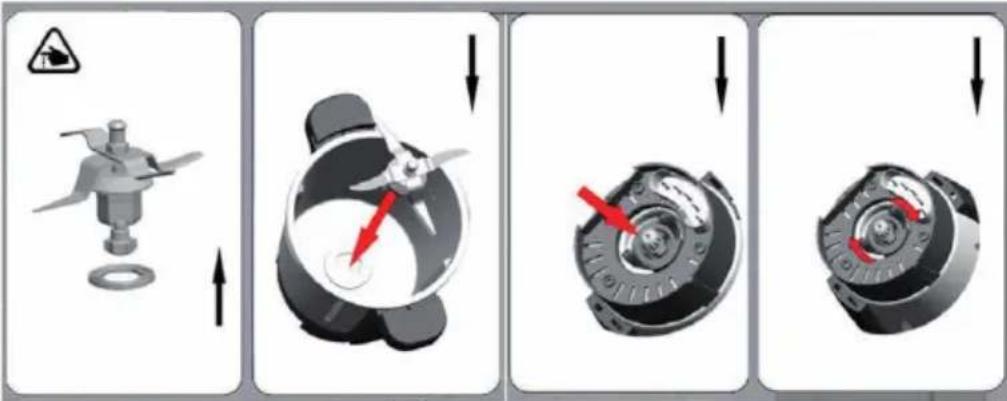
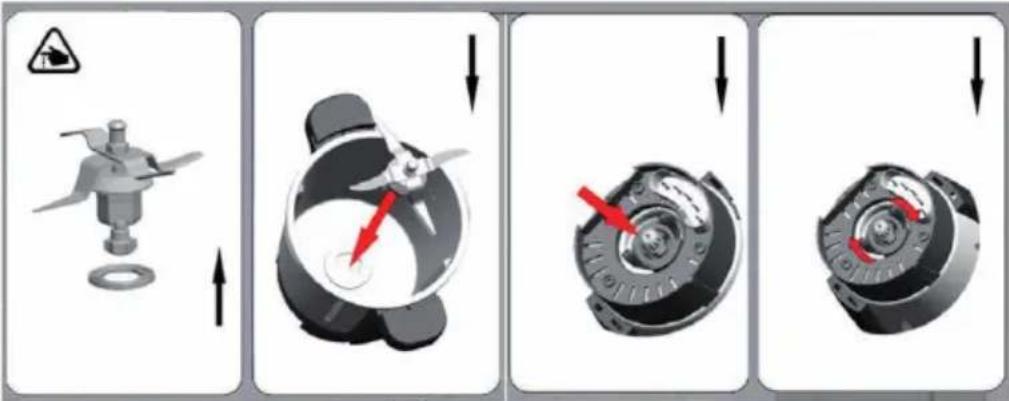
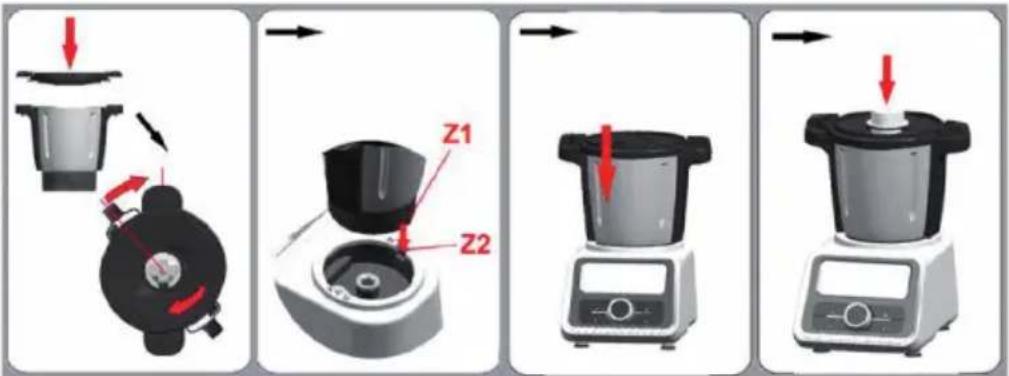
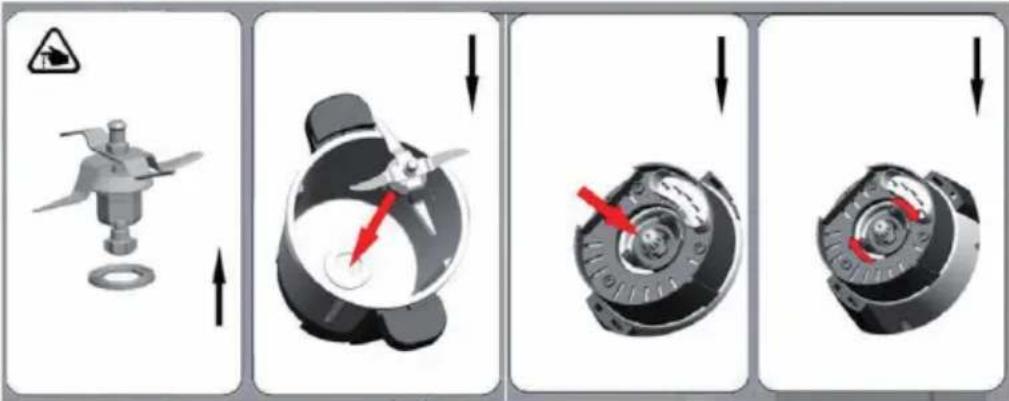
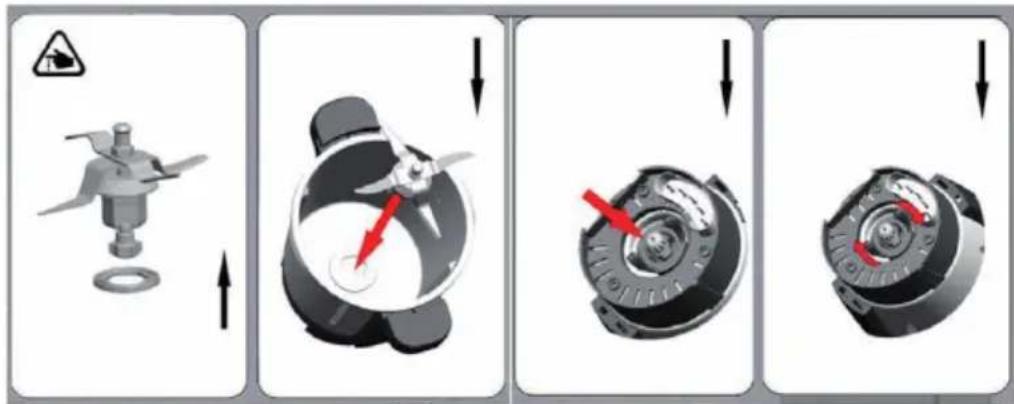
Diagram illustrating four stages of a mechanical device operation with warning symbols and red arrows indicating motion.1 Put the airproof ring on the blade. Push the blade through the opening in the bottom of the bowl.
2 Hold the upper part of the blade with one hand, and put the spanner with the other hand. And then insert the spanner on the bottom of the blade. Rotate the spanner clockwise to assemble tightly on the bowl. ( See above figure)

WARNING
Risk of injury! Don't touch the blade especially they are running. They are very sharp. Only hold the upper part of the blade while removing or re-inserting it.
Important: The airproof ring must to be fitted on the blade! If there is no airproof ring, the food to be chopped or cooked may leak out and damage the appliance.
How to remove the blade
1 Rotate the spanner anti-clockwise to remove the blade. (See above figure)
2 Note: The blade is very sharp! Please handle it with care! Only hold the upper part of the blade!
natural_image
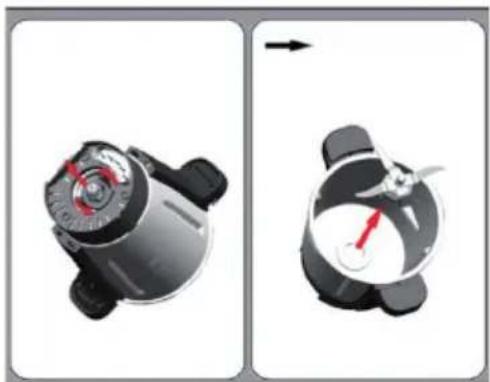
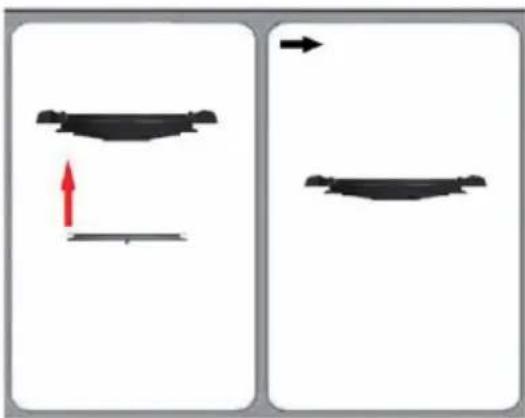
Two-step diagram showing a mechanical device before and after change, with no visible text or symbols.How to install the bowl
text_image
Diagram showing four steps of a food processor's kitchen tool, labeled Z1 and Z2 with red arrows indicating process flow.1 Put the bowl lid on the bowl. And rotate the bowl lid clockwise to lock it on the bowl. Sound "click" will be heard at this time, which means lid is correctly installed.
2 Insert the bowl onto the bowl socket. Be sure to make place Z1 point to place Z2. Sound "click" also will be heard at this time, which means the bowl is well in position.
3 Insert the measuring cup on the bowl lid. (See above figure)
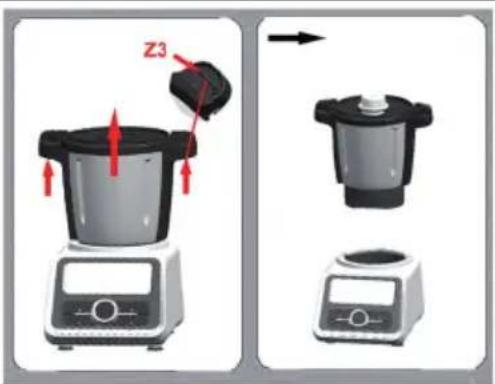
How to remove the bowl
Press the button "Z3" with both hands, and then draw the bowl out of the main appliance at the same time. The bowl can be easily removed.
text_image
Z3GETTING STARTED
Sand-by state
Plug in and power on, the appliance goes into stand-by state. The number of "speed/temperature" display on LCD is the current temperature of the bowl.
text_image
SPEED 20℃ 1:20 00 00:00 TIME Time Weight Term Speed Pulse Heading Dough Start/StopBUTTON FUNCTIONS
Speed/Temperature display
Denotes the speed (range: 01-12), or denotes the temperature (range: 30-120°C).
Time button
Usage: Firstly press "Time" button, "Time" button lights. Secondly rotate the knob (8) to set the time (1 second-90 minutes) you want.
Tips: If you don't set the working time, the working appliance will automatically stop after 90 minutes!
Temperature (Tem) button:
Usage: Firstly press "Tem." button, "Tem." button lights. Secondly rotate the knob (8) to set the temperature (30-120°C) you want. Tips: While using "Tem." button, you must use together with "Time" button and "Speed" button! And "Pulse" button is invalid!
Pulse button
Rapid speed acceleration function. It is unusable under the heating function operation.
Usage: Press this button at mixing function operation, the appliance instantly starts to run at the highest speed 12, and then appliance will recover the speed before if you release the button. You may use it to mix food quickly.
Heating button
Heat-preservation function. The factory default has been set at 37^ C. Usage: Press "Heating" button, the appliance will start to keep the temperature of the bowl at 37^ C. If you want to change the heat preservation temperature, Please follow below steps:
1 Press "Heating" button;
2 Set the target temperature (30 - 120°C);
3 Set the time (1 second-90 minutes) you want.
Dough button
Automatic making dough function. Usage: Add the flour and water in the bowl. Press this button under stand-by state, the appliance start to making dough automatically at speed 3, and the set working time is 8 minutes. Sound "Beep" will be heard while the time is left 5 seconds. When the time is up, the appliance stops running and "Start/Stop" button light keeps flashing. "Start/Stop" button light will be out if you don't perform any operation in 5 seconds. All the settings are cleared.
Example Carrot Bread: Add 500 g of flour and 300 ml of water into the bowl and set the time to 2 minutes and the speed to level 3. Cut 800 g of carrots into 15 mm cubes and add them together with 1200 ml of water. Mix everything together for 2 minutes at level 12.
Start/Stop button
To start/stop the working. Press "Start/Stop" button, the current working will be stopped. When you press it again, the stopped working will be recovered.
Tips: If you press "Start/Stop" button longer than 3 seconds under any working situation, the appliance will go back to stand-by state. All your settings will be cleared.
Speed button
Usage: Firstly press "Speed" button, "Speed" button lights. Secondly rotate the knob (8) to set the speed (01-12) you want.
Weight button
The maximum weight is 5000g. Weight range: 3-5000g. Usage: Press "Weight" button, "Weight" button lights, LCD shows as "0000". And then put the food in the bowl, read the number shown on the LCD. That is the weight of the food added.
Tips: Press "Weight" button longer than 3 seconds, the appliance will exit from weighting function.
Weight/Time display
Denotes the weight of the food added, or the timer (range: 1 second-90 minutes).
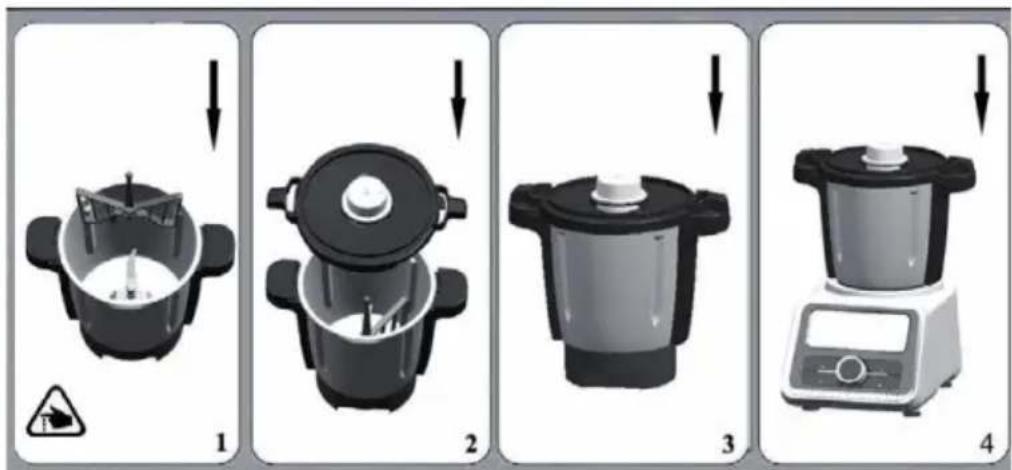
HOW TO USE THE STEAMER
Assembling the Steamer
flowchart
graph TD
    A["1: Preparation of kitchen bowl"] --> B["2: Cooking pot"]
    B --> C["3: Cooking pan"]
    C --> D["4: Transport to oven"]
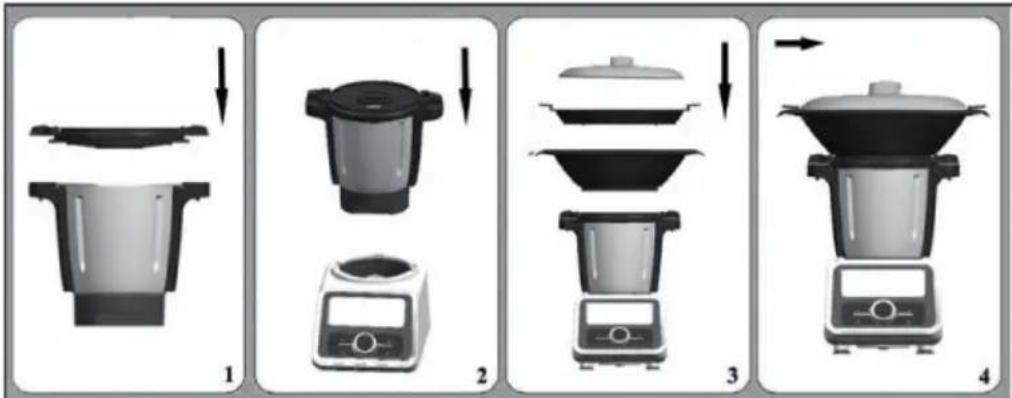
The steamer is perfectly suited for preparing some food such as vegetables with meat, sausages, steamed bread, steamed fish etc. You can use the steamers in either of the following two combinations:
Combination 1: Lid (M)+ steamer (Tray) (N) + Steamer (O)
Use this combination for cooking different foods.
Combination 2: Lid (M) + Steamer (O)
Use this combination for larger amount of the same food, e.g. vegetables, potatoes or large pieces of meat or sausages.
How to Use the Steamer
1 Install the blade, and then install the bowl on the main appliance.
2 Add the water 0.5L ≤ water ≤ 2L in the bowl. (Caution: The water in the bowl should be more than 0.5 liter. 0.5L water can be used for steaming food for 30 minutes.)
3 Put the airproof ring on the bowl lid, and then cover the bowl lid.
4 Turn the bowl lid until it is locked in position.
5 Put on the steamer.
6 Put the food on the steamer, and then cover the lid.
7 Plug in and press "On" button.
8 Set the speed (1), the time and the temperature you need.
9 Press "Start/Stop" button, the appliance starts to working and the timer is counting down.
10 Sound "Beep" will be heard while the working time is left 5 seconds.
11 When the time is up, the appliance stops running and "Start/Stop" button light keeps flashing. "Start/Stop" button light will be out if you don't perform any operation in 5 seconds. All the settings are cleared.
12 After use, turn the main appliance off and remove the steamer lid.
13 Take out the processed food from the steamer.
Important Hints on Steaming

CAUTION
Risk of scalding! During operation, hot steam and hot condenses water are generated. Be careful not to scald!
• Never heat up the bowl when it is empty.
- If the lid is not fitted properly, the steam will escape and food inside steamer will not cook properly.
- Never leave the measuring cup on the bowl lid when using the steamer.
• The hot steam and hot condensed water is dangerous. Please handle it carefully.
- Don't touch the metal part of the bowl while it is hot. Only hold the handle of the bowl to move the bowl.
- 30 minutes steam cooking requires 0.5 liter (500ml) of water, you need add around 250ml of water for each additional 15 minutes.
HOW TO USE THE BUTTERFLY ATTACHMENT
The butterfly will help you to achieve the best results while whisking cream, beating mayonnaise or egg white.
Install/remove the butterfly
text_image
Four-step diagram showing a cooking process with labeled steps 1 to 4, including a warning symbol and a digital kitchen.1 Hold the ball-shaped end of the butterfly.
2 Insert the butterfly on the upper part of the blade, a sound "click" will be heard. That means the butterfly is well installed on the blade. (See the above figure)
3 If you want to remove the butterfly from the blade, just hold the ball-shaped end and pull it out with rotations in both directions.
How to use butterfly attachment
1 Install the blade and the butterfly on the bowl.
2 Put the food in the bowl.
3 Then cover the bowl lid.
4 Turn the bowl lid until it is locked in position. And put the measuring cup on the bowl lid.
5 Plug in and press "On/Off" button.
6 Set the time and the speed (1-4) you need. Press "Start/Stop" button, the appliance starts to working and the timer is counting down. If you skip the timer setting, the timer is counting.
7 Sound "Beep" will be heard while the working time is left 5 seconds.
8 When the time is up, the appliance stops running and "Start/Stop" button light keeps flashing. "Start/Stop" button light will be out if you don't perform any operation in 5 seconds. All the settings are cleared.
9 After use, turn the main appliance off. Remove the bowl lid.
10 Take out the processed food from the bowl.
Note: Only switch on after the butterfly has been positioned into place correctly! Don't add ingredients that might damage or block the butterfly when the blade is in motion and the butterfly is fitted.
HOW TO USE THE INNER BASKET
The inner basket is suitable for cooking small quantity food, such as rice, fish and meat.
Install inner basket
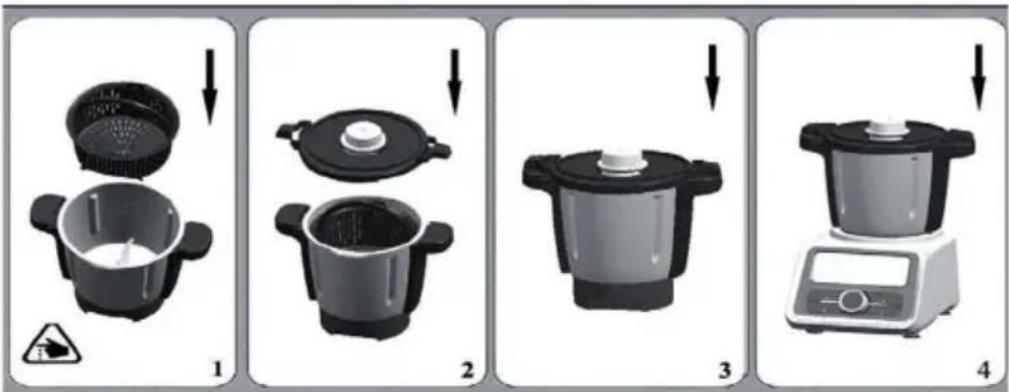
1 Put the inner basket in the bowl, and install the bowl lid correctly.
2 Insert the bowl on the main appliance.
Use the inner basket
1 Install the blade on the bowl.
2 Add the water in the bowl.
3 Put the inner basket in the bowl, and add the food in the basket.
4 Then cover the bowl lid.
5 Turn the bowl lid until it is locked in position. And put the measuring cup on the bowl lid.
6 Plug in and press "On/Off" button.
7 Set the time, the speed (1-4) and temperature you need. Press "Start/Stop" button, the appliance starts to working and the timer is counting down. If you skip the timer setting, the timer is counting.
8 Sound "Beep" will be heard while the working time is left 5 seconds.
9 When the time is up, the appliance stops running and "Start/Stop" button light keeps flashing. "Start/Stop" button light will be out if you don't perform any operation in 5 seconds. All the settings are cleared.
10 After use, turn the main appliance off. Remove the bowl lid and take out the inner basket.
Important Hints

CAUTION
Risk of scalding! During operation, hot steam and hot condenses water are generated. Be careful not to scald!
- The maximum water added in the bowl should be 600ml and with the level under the basket!
- Don't touch the metal part of the bowl while it is hot. Only hold the handle of the bowl to move it.
HOW TO USE THE BLADE SHIELD
The blade shield is suitable for making risotto.
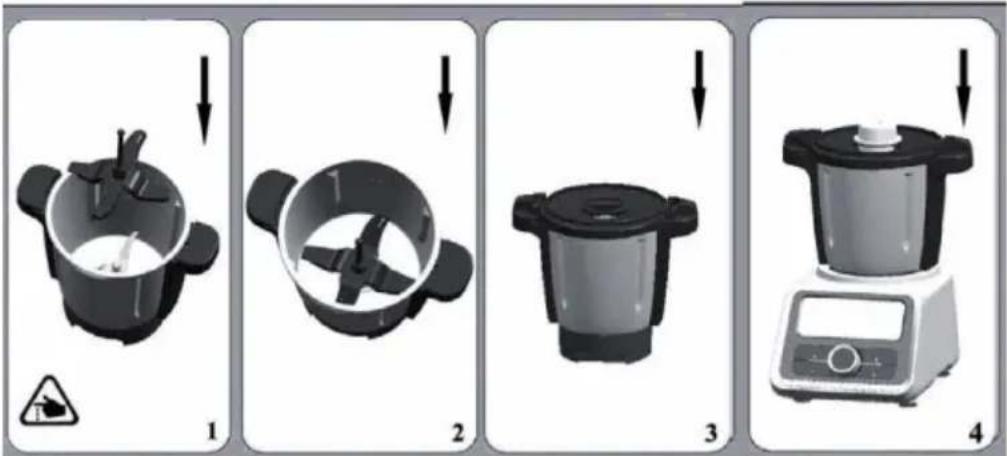
text_image
Four-step cooking process diagram showing a kitchen appliance with warning symbol and labeled steps 1 to 41 Install the blade and blade shield on the bowl.
2 Put the food in the bowl.
3 Then cover the bowl lid.
4 Turn the bowl lid until it is locked in position. And put the measuring cup on the bowl lid.
5 Plug in and press "On/Off" button.
6 Set the time, the speed (1-4) and temperature you need. Press "Start/Stop" button, the appliance starts to working and the timer is counting down. If you skip the timer setting, the timer is counting.
7 Sound "Beep" will be heard while the working time is left 5 seconds.
8 When the time is up, the appliance stops running and "Start/Stop" button light keeps flashing. "Start/Stop" button light will be out if you don't perform any operation in 5 seconds. All the settings are cleared.
9 After use, turn the main appliance off. Remove the bowl lid.
10 Take out the processed food.
Note: Only switch on after the blade shield has been positioned into place. Don't add ingredients that might damage or block the blade cover when the blade is in motion and the blade shield is fitted.
CARE AND CLEANING
NOTE: Turn off the unit, and unplug it from the wall outlet before maintenance or cleaning to avoid electric shock.
- While cleaning, don't immerse the bowl in water.
- After the bowl cool down, remove the blade from the bowl. Clean the inside and outside of the bowl. Always keep the contact pins at the bottom of the bowl clean and dry. Only Wipe the contact pins with a wet cloth!
- Unscrew the screw ring and remove all parts of the attachment. Don't clean the metal bowl and blade in the dishwasher!
- Never use pointed or sharp objects for cleaning as this may damage functional parts or affect the safety of the appliance.

WARNING
Risk of injury! Don't touch the blade especially they are running. They are very sharp. Only hold the upper part of the blade while removing or re-inserting it.
- Wash all parts (except the bowl and the motor base) in hot soapy water. Clean them immediately after use. Rinse them with clear hot water and dry them immediately.
• We advise you to lubricate the blade with some vegetable oil. - Only wipe the main appliance with a damp soft cloth!
- If the bowl and blade is hard to clean. You may add some hot soapy water in the bowl and run the appliance at speed 1 for few seconds.
ERROR CODES AND TROUBLESHOOTING
| Code State Suggested Solution | ||
| E01 “E01” on | LCD is flashing. Something goes | wrong with the appliance. It must be sent to the approved service centre for repairing. |
| E02 “E02” on | LCD is flashing. The bowl wasn’t installed. | Install the bowl according to the operating instruction. |
| E03 “E03” on | LCD is flashing. Install it according to the operating instruction. | |
| E04 “E04” on | LCD is flashing. The temperature of appliance is too hot. Firstly let it cool down 30 minutes to 2 hours, and then reboot it. It must be sent to the approved service centre for repairing if the previous cooperation doesn’t work. | |
| -- LCD is flashing. Press “Start/Stop” button | longer than 3 seconds to recover it. | |
HINTS ON DISPOSAL
natural_image
Symbol of a trash bin crossed with a diagonal line, indicating no waste or discharge (no text or labels present)According to the European waste regulation 2012/19/EU this symbol on the product or on its packaging indicates that this product may not be treated as household waste. Instead it should be taken to the appropriate collection point for the recycling of electrical and electronic equipment. By ensuring this product is disposed of correctly, you will help prevent potential negative consequences for the environment and human health, which could otherwise be caused by inappropriate waste handling of this product. For more detailed information about recycling of this product, please contact your local council or your household waste disposal service.
Estimado cliente:
text_image
L M N O P Q A B C D E F G H I J K RPANEL DE CONTROL

text_image
1 SPEED 120°C 8 120 12 90:00 TIME Time Weight Tem Speed Pulse Heating Dough Start/Stop 4 5 6 7 11 10 9 8natural_image
3D rendering of a mechanical component with warning symbol (no text or labels)natural_image
Two identical diagrams showing a black object with red and gray arrows indicating movement, no text or symbols present.Montar la cuchilla
text_image
Diagram illustrating four stages of a mechanical device operation with warning symbols and red arrows indicating motion.natural_image
Two-panel image showing a mechanical device before and after change, with no visible text or symbols.Montar el recipiente

text_image
Diagram showing four steps of a food processor's kitchen tool, labeled Z1 and Z2 with red arrows indicating process flow.text_image
SPEED 20℃ Hour 0 8 3:20 00 00:00 10ml Time Weight Tem Speed Pulse Heating Dough Start/Stopflowchart
graph TD
    A["1: Preparation of kitchen bowl"] --> B["2: Cooking pot"]
    B --> C["3: Cooking pan with lid"]
    C --> D["4: Transport of food pot"]
text_image
Four-step diagram showing a cooking process with labeled steps and warning symbolstext_image
Four-step cooking process diagram showing a kitchen appliance with lid, lid, and digital kitchen unit, each with warning symbol and labeled steps 1 to 4.text_image
Four-step cooking process diagram showing a kitchen appliance with warning symbol and labeled steps 1 to 4natural_image
Symbol of a trash bin crossed with a diagonal line, no text or numbers presentDÉCLARATION DE CONFORMITÉ

Fabricant :
Chal-Tec GmbH, Wallstraße 16, 10179 Berlin, Allemagne.
text_image
L M N O P Q A B C D E F G H I J K RPANNEAU DE COMMANDE

text_image
1 120°C 90:00 12 Time Weight Tem Speed Pulse Heating Dough Start/Stop 4 5 6 7 8 9 10 11natural_image
3D rendering of a mechanical component with a warning symbol (no text or labels)natural_image
Two identical diagrams showing a black object with red and gray arrows indicating movement, no text or symbols present.text_image
Diagram illustrating four stages of a mechanical device operation with warning symbols and directional arrows indicating process flow.natural_image
Two-panel image showing a mechanical device before and after change, with no visible text or symbols.Installation du bol

text_image
Diagram showing four steps of a food processor's kitchen tool, labeled Z1 and Z2 with red arrows indicating process flow.text_image
20°C 0 8 120 00 00:00 TIME Time Weight Tem Speed Polar Heating Dough Start/StopTOUCHES DE FONCTION
flowchart
graph TD
    A["1: Preparation of kitchen bowl"] --> B["2: Cooking with a digital timer"]
    B --> C["3: Cooking with a pot on a stand"]
    C --> D["4: Transport of cooking oven"]
text_image
Four-step diagram showing a cooking process with labeled steps and warning symbolstext_image
Four-step cooking process diagram showing a kitchen appliance with warning symbol and labeled steps 1 to 4natural_image
Symbol of a trash bin crossed with a diagonal line, no text or numbers presenttext_image
L M N O P Q A B C D E F G H I J K RPANNELLO DEI COMANDI
text_image
1 SPEED 120°C 8 120 12 90:00 TIME Time Weight Tem Speed Pulse Heating Dough Start/Stop 4 5 6 7 11 10 9 8natural_image
3D rendering of a mechanical component with a warning symbol (no text or labels)Installare l'anello ermetico 1
natural_image
Two identical diagrams showing a black object with red and gray arrows indicating movement, no text or symbols present.Assemblare la lama
text_image
Diagram illustrating four stages of a mechanical device operation with warning symbols and red arrows indicating motion.natural_image
Two-step diagram showing a mechanical device before and after change, with no visible text or symbols.text_image
Diagram showing four steps of a food processor's kitchen tool, labeled Z1 and Z2 with red arrows indicating process flow.text_image
20°C 0 8 120 00 00:00 TIME Time Weight Tem Speed Polar Heating Dough Start/StopTASTI FUNZIONE
flowchart
graph TD
    A["1: Preparation of kitchen bowl"] --> B["2: Cooking pot"]
    B --> C["3: Cooking pan"]
    C --> D["4: Transport to oven"]