
10028741 - Humidifier Klarstein - Free user manual and instructions
Find the device manual for free 10028741 Klarstein in PDF.

| Product type | Ultrasonic humidifier |
| Brand and model | Klarstein 10028741 |
| Power supply | 220-240 V, 50/60 Hz |
| Power | 110 W |
| Water tank capacity | 6 liters |
| Maximum evaporation rate | 350 ml/h |
| Humidity setting | 45% to 90% in 5% increments |
| Timer | 1 to 12 hours with remaining time display |
| Water heating function | Yes, warmer mist after 10 minutes |
| Ionizer | Yes, with indicator light |
| Display | Screen with indications: humidity, temperature, water level, timer |
| Remote control | Yes, included |
| Tank lighting | Yes, built-in |
| Automatic shut-off | Yes, when tank is empty |
| Filtration | Removable filter cartridge with ceramic beads |
| Transducer cleaning | Soft cloth and detergent, rinse with clean water |
| Tank cleaning | Clean water, vinegar for descaling |
| Safety instructions | Do not disassemble yourself, unplug before cleaning, do not use without water |
| Repairability | Replaceable filter cartridge; repairs by qualified professional |
| Recommended use | Indoor only, clean water <40 °C |
Frequently Asked Questions - 10028741 Klarstein
User questions about 10028741 Klarstein
0 question about this device. Answer the ones you know or ask your own.
Ask a new question about this device
Download the instructions for your Humidifier in PDF format for free! Find your manual 10028741 - Klarstein and take your electronic device back in hand. On this page are published all the documents necessary for the use of your device. 10028741 by Klarstein.
USER MANUAL 10028741 Klarstein
natural_image
Wooden industrial machine with visible internal components and a small black panel, placed on a surface (no text or symbols)natural_image
Hand placing a small object into a black box with a handle, no visible text or symbolsnatural_image
Hand pressing a button on a dark surface, no visible text or symbols
natural_image
Person pouring white liquid from a cup onto a black industrial machine (no visible text or symbols)natural_image
Hand holding a black device with circular ports, no visible text or symbolsCongratulations on purchasing this Klarstein equipment.
Please read this manual carefully and take care of the following hints on installation and use to avoid technical damages. Any failure caused by ignoring the mentioned items and cautions mentioned in the operation and installation instructions are not covered by our warranty and any liability.
Contents
Technical Data 10
Security Instructions....10
Appliance and panel 11
Before first use 13
Operation 14
Cleaning and Care 15
Trouble shooting 16
Disposal Considerations 17
Declaration of Conformity 17
Technical Data
| Item number 10028741 10028742 | |
| Voltage 220-240 V 50/60 Hz | |
| Power consumption 110 W | |
| Water tank (capacity) 6 litres | |
| Max. Verdunstungsleistung 350 ml/hour | |
Security Instructions
- Never disassemble the base unit without consult qualified personnel.
- If the supply cord is damaged, it must be replaced by the manufacturer, its service agent or similarly qualified persons in order to avoid a hazard.
- Do not add detergents, chemical solutions which are not made by our company into the unit.
- Unplug appliance before filling, cleaning and maintenance.
- Do not change attachment without definite permit from our company otherwise you might catch hazard.
-
If there is any abnormal smell during normal operation, please switch off and disconnect power supply and want qualified personnel amend.
-
Never touch water in the Water Basin & components in the water when the unit is in working.
- Never switch on when there is no water in the water basin.
- Never scrape transducer cpl at will.
- Never clean transducer cpl with detergents, or chemical solutions.
- Never let water splash into the inner base unit for avoiding components damage.
- Care should be taken when using the appliance due to emission of hot water vapour.
- This appliance is not intended for use by persons (including children) with reduced physical, sensory or mental capabilities, or lack of experience and knowledge, unless they have been given supervision or instruction concerning use of the appliance by a person responsible for their safety.
• Children should be supervised to ensure that they do not play with the appliance. - Indoor use only.
Appliance and panel
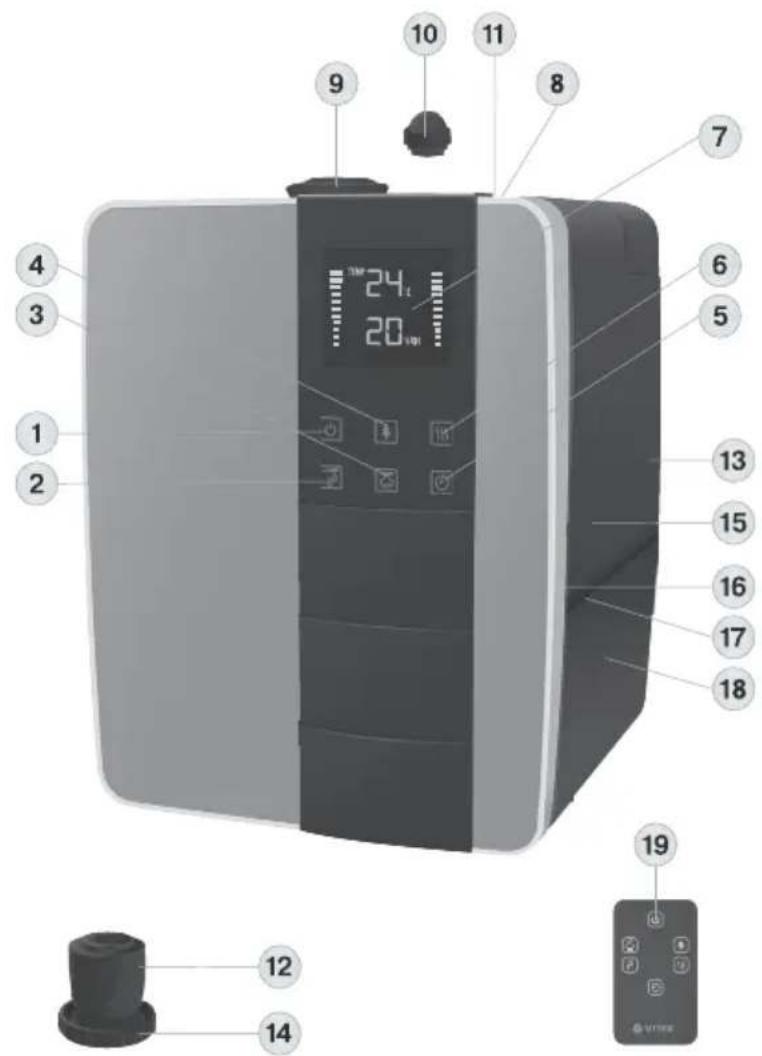
20 Display (7) and remote control (19)
1 On/off touch button
2 Setting the relative humidity in the room
3 Setting the the mist release intensity
4 Ionization on/off
5 Timer setting
6 Water heating on/off
7 display
8 Upper valve lid
9 Rotating nozzles of the steam release lid
10 Valve hermetic plug
11 Upper valve for filling the water tank
12 Cartridge filter
13 Water tank
14 Water tank lid
15 Water inlet
16 Water tank illumination
17 Process chamber with sprayer
18 Body
19 Remote control
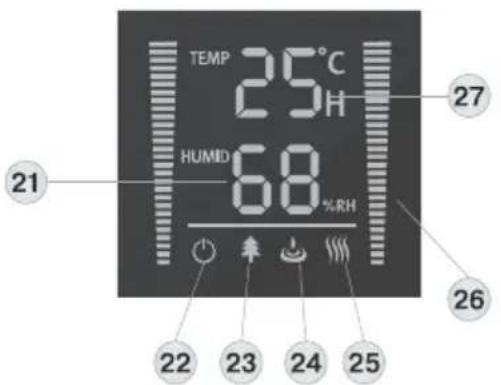
20 Display (7)
21 Room humidity/preset humidity indication
22 Humidifier on/off icon
23 Ionization mode icon
24 Water tank empty icon
25 Water heating mode icon
26 Humidity intensity icon
27 Room temperature icon
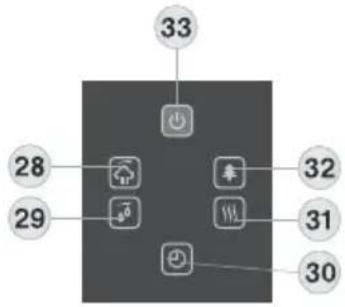
Remote control (19) - keys for
28 Mist release intensity setting
29 Room relative humidity setting
30 Timer setting
31 Water heating on/off
32 Ionization on/off
33 On/off
Before first use
- During first operation, put unit under the room temperature for half of an hour before running.
- It is recommended to use the unit under the temperature of 20 °C relative humidity less than 80% RH.
- Use clear water not over 40^ .
- Check the water basin, make sure it is clear.

natural_image
Exterior view of a wooden electronic device with a black control panel (no visible text or symbols)- Put the machine on a desk.

natural_image
Hand placing a dark object into a black rectangular container on a table (no visible text or symbols)- Open the top cover.

natural_image
Hand pressing a button on a black electronic device (no visible text or symbols)- Screw the lock
natural_image
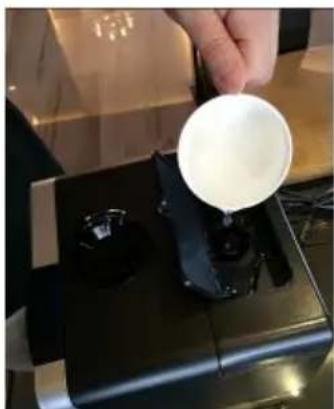
Person pouring white liquid from a small cup onto a black industrial machine (no visible text or symbols)- Add the water in the notch and fill the watertank completely.

natural_image
Hand inserting a small black component into a black device (no visible text or symbols)- Finally, re-seal the lock and close the top cover.
Operation
Usage:
- Plug in the socket.
- Switch on the machine; the background light of LED will be on. The machine begins to work.
- Touch the symbol "MAX-MIN", you may adjust the mist volume. On the remote control, just press the button of 🔒.
- Touch the symbol 🔊, the ozone generator works. On the LED display, it shows the shape of trees. Touch again to stop the function.
- Touch the symbol 📄, the warm mist will come out after 10 minutes. On the LED display, it shows the shape of fire. Touch again to stop the function. Mist will become cool.
- Constant humidity: Before you touch the symbol ☐, the LED display shows the current humidity. You may set the humidity arranged from 45%RH to 90%RH. Press once, it will increase by 5%RH. When it reaches 90%RH, press again, it will back to 45%RH. After you set the expected humidity, the machine will keep the memory after 5 seconds. 5 seconds later, the LED display shows the current humidity. If the expected humidity is less than the current humidity, the machine will be in sleeping state. But if the expected humidity is higher than the current humidity, the humidify function will work.
- Timer setting: The timer setting is from 1 to 12 hours. Touch the symbol Ⓑ, the LED display shows the timer. The timer shows the rest operation time and decrease by 1 hours, i.e., if set the timer at 12 hours, LED display shows 11 after one hour. Once you have set the timer, the value of time remaining in timer and the room temperature will display 30 seconds alternating in the middle of LED display.
- Once the water in the basin is too little to keep the machine working, the machine will automatically stop working. LED shows the symbol 🔊. Refill the water, and the machine will restart (see chapter on maintenance).
Cleaning and Care
Changing the water::
- Turn the device off and disconnect the power cord.
- Take the water tank out of the unit.
- Open the water tank cover.
- Fill the tank with clear water.
- Close the cover, and put the tank onto the base unit carefully.
- Put the nozzle into the socket on top of the water tank.
- Connect the main supply, switch on the unit.
In case when the water is hard which means water contains too much calcium and magnesium, they can cause “white powder” problem and give heavy scales on the surface of water basin, transducer and inner surface of the water tank. Scales on the surface of transducer will make it impossible for the unit to work properly.
We recommend:
- Use cold boiled water or distilled water.
- Clean the transducer, water tank and basin unit every week.
- Change the water in water tank more often to keep it fresh.
- Make sure to pull out the water from the water tank and dry the water basin before you store the unit unused for a long period of time.
- Clean the whole unit, and make sure that all parts of the unit are dried completely before unused for longer period of time.
How to clean the transducer
- Put 5-10 drops of cleaning abluent on the surface of the transducer, wait for 2-5 minutes;
- Brush out the scale on the surface.
- Rinse the transducer with clean water.
How to clean the basin unit
- Clean the water basin with soft cloth and the cleaning agent if there is scale in it.
- If the scale is covered on the security switch, drop the cleaning agent on the scale and clean it out with the brush.
- Rinsing the water basin with clean water.
Cleaning of the filter
Method A:
- Clean and activate the ceramic balls after use for 1000 litres of water.
-
Take the filter system away from the tank cover.
-
Put the filter system into white vinegar for about 10 minutes.
- Take the filter system away from the white vinegar; shake for several times, clean it with clear water.
- Make it dry. Pack it into a polybag. Keep it in a cool and shady place.
Method B:
- Clean and activate the ceramic balls after use for 1000 l of water regularly.
- Take the filter system away from the tank cover.
- Put out the ceramic balls and clean it with clear water.
- Sun them for several hours under sunshine.
- Put ceramic balls back to filter cartridge.
- Pack it into a polybag. Keep it in a cool and shady place.
Trouble shooting
| Problem Possible reason Solution | ||
| Power lamp off, Device does not work | No power supply Connect device to | power supply, switch on |
| Power lamp on, no mist outlet with wind | No water in water tank Fill water into | water tank |
| Security switch is too loose. Make the | switch tight. | |
| Abnormal smell of mist The unit is new. | Take out the water tank, open the | cover, let it stay in a cool position for 12 hours. |
| Dirty or stagnant water. Clean the water tank. Fill in clean water. | ||
| Power lamp on, unit does not work | There is too much water in the water basin. | Remove some water from the water basin. Close the cover of the water tank tightly. |
| Too little fog. To much scale in the water basin. Clean the transducer. | ||
| Water that is too dirty or stagnant. Clean the water tank. Refill with fresh water | ||
| Abnormal noise. Resonance in water tank when there is too little water. | Refill tank with water. | |
| Unit is on an unstable surface. Move the unit to a stable and flat surface. | ||
| Mist fog gathers around the nozzle. | There are apertures between the nozzle and water tank. | Dip the nozzle into water for a while and then fix it to the socket on the water tank. |
Disposal Considerations

natural_image
Symbol of a trash bin crossed with a diagonal line, no text or numbers presentAccording to the European waste regulation 2002/96/EC this symbol on the product or on its packaging indicates that this product may not be treated as household waste. Instead it should be taken to the appropriate collection point for the recycling of electrical and electronic equipment. By ensuring this product is disposed of correctly, you will help prevent potential negative consequences for the environment and human health, which could otherwise be caused by inappropriate waste handling of this product. For more detailed information about recycling of this product, please contact your local council or your household waste disposal service.
Declaration of Conformity
CE
This product is conform to the following European Directives:
2004/108/EC (EMC)
2006/95/EC (LVD)
2011/65/EU (RoHS)
Gentile Cliente,
20 Display (7) e telecomando (19)

natural_image
Wooden industrial machine with front panel and control panel, no visible text or symbolsnatural_image
Hand placing a small object into a black box with a handle, no visible text or symbolsnatural_image
Hand pressing a button on a black electronic device (no visible text or symbols)
natural_image
Person pouring white liquid from a cup onto a black industrial machine (no visible text or symbols)natural_image
Hand placing a small black object into a black device with two circular ports (no visible text or symbols)natural_image
Symbol of a trash bin crossed with a diagonal line, no text or numbers presentnatural_image
Wooden industrial machine with front panel and control panel, no visible text or symbolsnatural_image
Hand placing a small object into a black box with a handle, no visible text or symbolsnatural_image
Hand pressing a button on a black electronic device (no visible text or symbols)natural_image
Person pouring white liquid from a cup onto a black industrial machine (no visible text or symbols)natural_image
Hand placing a small black object into a black device with two circular ports (no visible text or symbols)1 Interruptor on/off
natural_image
Wooden industrial machine with front panel and control panel, no visible text or symbolsnatural_image
Hand placing a small object into a black box with a handle, no visible text or symbolsnatural_image
Hand pressing a button on a black electronic device (no visible text or symbols)
natural_image
Person pouring white liquid from a cup onto a black industrial machine (no visible text or symbols)natural_image
Hand placing a small black object into a black device with two circular ports (no visible text or symbols)
- Contents
- Technical Data
- Security Instructions
- Display (7) and remote control (19)
- Remote control (19) - keys for
- Before first use
- Operation
- Usage:
- Cleaning and Care
- Changing the water::
- We recommend:
- How to clean the transducer
- How to clean the basin unit
- Cleaning of the filter
- Method A:
- Method B:
- Disposal Considerations
- Declaration of Conformity
Brand : Klarstein
Model : 10028741
Category : Humidifier