
Mini 10030764 - Oven Klarstein - Free user manual and instructions
Find the device manual for free Mini 10030764 Klarstein in PDF.
| Brand | Klarstein |
| Model | Mini 10030764 |
| Product Type | Mini oven |
| Power Supply | 220-240 V ~ 50-60 Hz |
| Power | 800 W |
| Item Number | 10030864, 10030865 |
| Capacity | Approximately 12 liters (estimated) |
| Dimensions (W x H x D) | Approximately 40 x 25 x 30 cm (estimated) |
| Weight | Approximately 5 kg (estimated) |
| Thermostat | Adjustable continuously |
| Timer | Up to 60 minutes with automatic shut-off |
| Indicator Light | Operation indicator |
| Number of Cooking Levels | 3 |
| Included Accessories | Drip tray, grid, handle |
| Functions | Heat cooking, grill |
| Maintenance and Cleaning | Clean with a dry or slightly damp sponge, do not use abrasives |
| Safety | Use the handle to remove hot accessories, do not clean hot door with cold water |
| Spare Parts | Drip tray, grid, handle (references available) |
| Repairability | Repair by an approved professional |
| General Information | Compliant with EU directives (EMC, LVD, RoHS) |
Frequently Asked Questions - Mini 10030764 Klarstein
User questions about Mini 10030764 Klarstein
0 question about this device. Answer the ones you know or ask your own.
Ask a new question about this device
Download the instructions for your Oven in PDF format for free! Find your manual Mini 10030764 - Klarstein and take your electronic device back in hand. On this page are published all the documents necessary for the use of your device. Mini 10030764 by Klarstein.
USER MANUAL Mini 10030764 Klarstein
Congratulations on purchasing this equipment. Please read this manual carefully and take care of the following hints to avoid damages. Any failure caused by ignoring the mentioned items and cautions mentioned in the instruction manual are not covered by our warranty and any liability.
Contents
Technical Data 6
Safety Instructions 6
Product Description 7
Use and Operation 8
Cleaning and Care 9
Hints on Disposal 9
Declaration of Conformity 9
Technical Data
| Item number 10030864, 10030865 | |
| Power supply 220-240 V ~ 50-60 Hz | |
| Power consumption 800 W |
Safety Instructions
- Always use the Food Fork when inserting or removing the tray. Touching these will cause severe burns.
- When hot, do not apply water to the glass window. It may cause the glass to break.
- When unplugging the cord, always take hold of the plug itself. Never pull on the cord. Doing so could break the wires inside the cord.
- Do not position the unit close to a gas burner or other source of high temperature or do not direct an electric fan, etc, at the unit during USE. Doing so could prevent correct temperature control.
- Do not wet the power cord nor handle the unit with wet hands. Always unplug the cord after use, or whenever the unit is to be left unattended. A malfunction while the plug is inserted into the outlet could cause a fire.
- When cooking oil-splashing dishes such as roast chicken, it is recommended to put 2 sheets of aluminum foils on a tray in order to diminish oil splashing. Put one on a tray. Then oil will drip to a gap between foils.
Hints on Location
- If the oven is positioned too close to a wall, the wall will be burned or stained. Be sure the curtain, etc. are not in contact with the body. Do not put anything between the bottom of the body and the surface on which it is set. An object so placed could be burned.
-
Do not put anything on the oven while using it, the heat could cause deformation, cracking, etc.
-
Any bottled or tinned food can not be heated directly as the bottle or tin would be broken out and scald the person
- Be careful! Not to burn yourself during use or immediately after use. The metal parts and glass window of the door become extremely hot during use. Be careful not to touch them when opening and closing the door.
- AC power must be taken from a properly wired outlet. Insert the plug completely into the socket. If it is not, it could become abnormally hot. Do not use an electric light outlet. Never connect multiple plugs to the same outlet
- If the supply cord is damaged, the manufacturer or its service agent or a similarly qualified person in order to avoid a hazard must replace it.
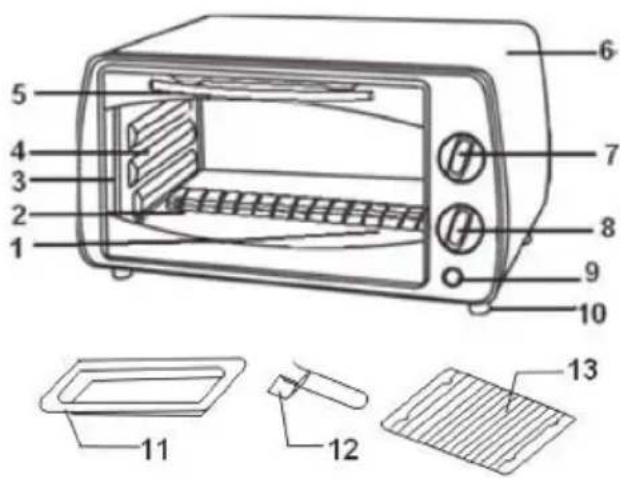
Product Description
1 Heating element
2 Glassdoor
3 Inner case
4 Rack support
5 Door handle
6 Cover
7 Thermostat
8 Timer knob
9 Indicator
10 Stand
11 Food tray
12 Tray handle
13 Wire rack
Use and Operation
How to use the Accessory
| Food tray: Roast Chicken, Hamburg steak, Gratin, Sponge cake, almost all other oven-cooked foods. |
| Wire rack: Baked potatoes, Dry food. |
| Food tray and wire rack: For food which will drip/boiled fish, etc. |
| You can adjust the Tray at 3 different positions according to the dishes you want to cook. For instance, when making macaroni gratin and you want to have the top part cooked the most, use the second or the second rack support. For roasting a chicken, use the fourth or the bottom rack support. |
Functional Controls
| Set the “Temperature Control” by turning clockwise to select the suitable temperature according to the dishes you are going to cook. | |
| Set the arrow on the “Timer” to the number which indicates the cooking time (minutes) according to the dishes you are going to cook. Set the “Timer” by turning it clockwise. The oven will turn off automatically at the end of the selected time and a bell will ring. When setting the Timer to less than 5 min, turn it to more than 6 min. and then back to the selected time. The oven can be turned off manually during cooking by turning the “Timer” anti-clockwise to the „OFF“ position. |
Operation
Before using the unit for the first time: (1) Insert the tray and baking net. (2) Heat the empty oven for about 10 minutes. Note: There may be some smoke and a burning smell at first, but this is not a malfunction.
- Set the arrow on the timer knob to the number which indicates the cooking time (minutes) according to the dishes you are going to cook.
- Set the Timer by turning it clockwise.
- The oven will turn off automatically at the end of the selected time and a bell will ring. When setting the Timer to less than 5 min, turn it to more than 6 min. and then back to the selected time. The oven can be turned off manually during cooking by turning the Timer counter-clockwise to the .OFF" position.
Note: If the inside of the oven is dirty, cooking may take slightly longer than usual. Clear all left over food residues in the oven before each use.
Baking Reference of Common Food
| Type of food Number | Thickness Timer | |
| Pizza 1 cm 3-4 minutes | ||
| Toast 2-3 pcs 2-3 minutes | ||
| Hamburger 2-3 pcs | 6-8 minutes | |
| Fish - 10-12 minutes | ||
| Ham 2 cm 5-10 minutes | ||
| Sausage 3-4 pcs 8-10 minutes | ||
| Steak 1-2 cm 10-12 minutes |
Cleaning and Care
- Take off the plug and cool down before cleaning.
- Use dry cloth to clean outer surface of oven and glass window.
- When cleaning inside of oven, mopping with cloth can be applied. Never wash it with water as it may cause current leakage when electric parts are wet.
- Food tray, wire rack and tray handle can wash with soft cotton (or sponge) and neutral cleaner. Then rinse thoroughly with clean water, then wipe dry. Do not use hard bruch that will scratch the interior surface of the oven, and to protect the tray, wire rack and tray handle.
- Do not use the toxic and abrasive cleaners such as gasoline, polishing powder, solvent.
Hints on Disposal
m = 311 ;
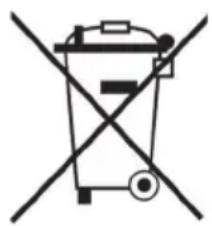
According to the European waste regulation 2012/19/EU this symbol on the product or on its packaging indicates that this product may not be treated as household waste. Instead it should be taken to the appropriate collection point for the recycling of electrical and electronic equipment. By ensuring this product is disposed of correctly, you will help prevent potential negative consequences for the environment and human health, which could otherwise be caused by inappropriate waste handling of this product. For more detailed information about recycling of this product, please contact your local council or your household waste disposal service.
Declaration of Conformity
Producer: Chal-Tec GmbH, Wallstraße 16, 10179 Berlin, Germany.

This product is conform to the following European Directives:
2014/30/EU (EMC)
2014/35/EU (LVD)
2011/65/EU (RoHS)
Estimado cliente,
m = 311 ;
Chere cliente, cher client,


Brand : Klarstein
Model : Mini 10030764
Category : Oven