AC417 - Baby monitors ANGELCARE - Free user manual and instructions
Find the device manual for free AC417 ANGELCARE in PDF.

| Features | Details |
|---|---|
| Product type | Baby monitor |
| Range | Up to 250 meters outdoors |
| Screen | 2.4-inch color LCD screen |
| Camera | Infrared night vision |
| Audio features | Two-way communication |
| Power supply | Operates on rechargeable battery or mains power |
| Temperature indicator | Room temperature display |
| Usage | Ideal for remotely monitoring baby\'s sleep |
| Maintenance | Regular cleaning of the device with a soft cloth |
| Security | Data encryption to ensure communication security |
| Warranty | One-year limited warranty |
Frequently Asked Questions - AC417 ANGELCARE
User questions about AC417 ANGELCARE
0 question about this device. Answer the ones you know or ask your own.
Ask a new question about this device
Download the instructions for your Baby monitors in PDF format for free! Find your manual AC417 - ANGELCARE and take your electronic device back in hand. On this page are published all the documents necessary for the use of your device. AC417 by ANGELCARE.
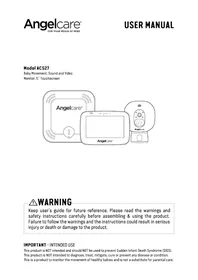
USER MANUAL AC417 ANGELCARE
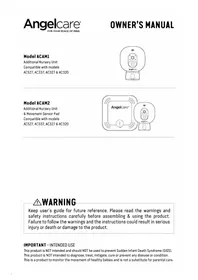
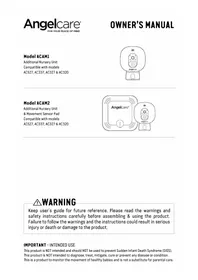
Model AC417 and AC517
Baby Breathing Monitor, with Video

TABLE OF CONTENTS

WARNING.
3
Charging the Parent Unit (9 hours) 4
Positioning the movement Sensor Pad. 5
Setting up the Camera 6
Turning on your monitor. 7
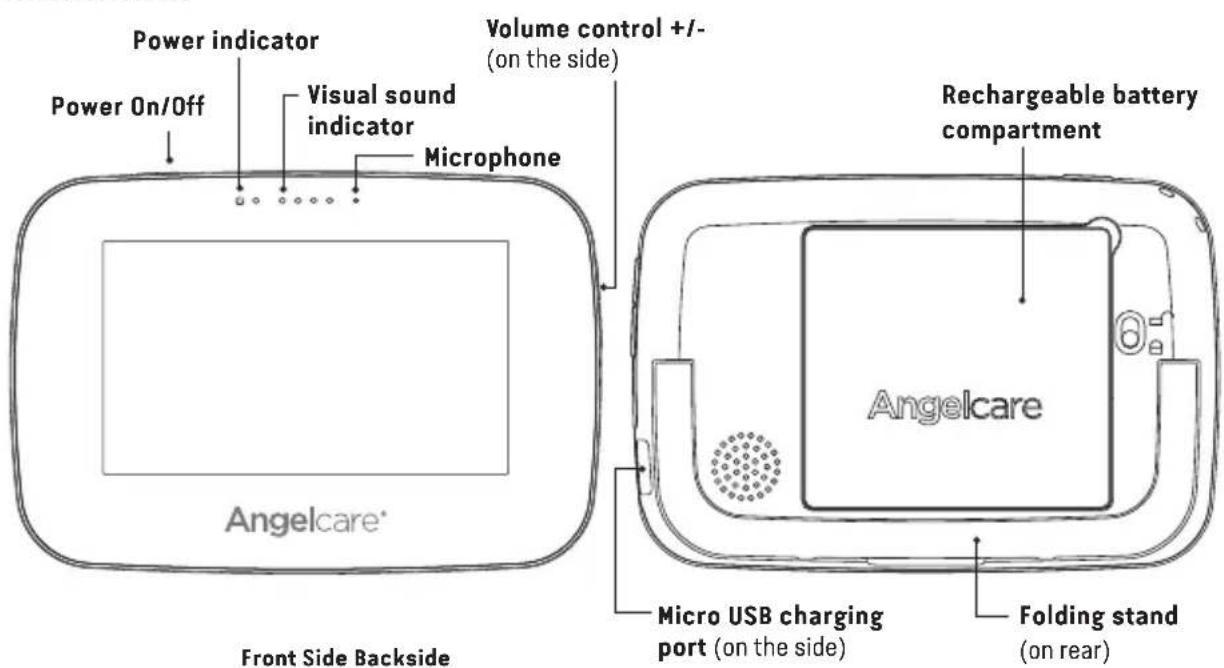
Getting to know your monitor. 8
Activating and deactivating additional functions 12
Adding accessories 16
Troubleshooting 16
Limited warranty. 18
Technical specifications 19
FRENCH 21
SPANISH 41
OWNER'S MANUAL
KEEP YOUR OWNER'S MANUAL FOR FUTURE REFERENCE. PLEASE READ THE WARNINGS AND INSTRUCTIONS CAREFULLY BEFORE ASSEMBLING & USING THE PRODUCT. FAILURE TO FOLLOW THE WARNINGS AND THE INSTRUCTIONS COULD RESULT IN SERIOUS INJURY OR DEATH OR DAMAGES TO THE PRODUCT. THE SENSOR PAD FEATURE IS NOT FOR USE WITH ADULTS, CHILDREN OR INFANTS OLDER THAN 24 MONTHS. THE SENSOR PAD IS NOT INTENDED TO BE USED TO DETERMINE IF A CHILD IS OUT OF THE CRIB.

WARNING
Adult assembly required.
Keep small parts away from children when assembling.
We, at Angelcare, stand behind all of our products.
If you are not completely satisfied or have any questions,
United States and Canada: Please contact us at:
info@angelcarebaby.com
Other countries: Please contact your local distributor: international.
angelcarebaby.com.
FCC AND IC REGULATIONS
RF radiation exposure statement
The Nursery Unit complies with FCC RF radiation exposure limits set forth for an uncontrolled environment.
Caution: To maintain the compliance with the FCC's and Industry Canada's RF exposure guideline, install the Nursery Unit at least 7.9" (20 cm) from ALL persons. The transmitter of this device must not be co-located or operating in conjunction with any other antenna or transmitter.
Industry Canada
This product meets the applicable Industry Canada technical specifications.
CANICES-3(B)/NMB-3(B)

WARNING
This baby monitor is compliant with all relevant standards regarding electromagnetic fields and is, when handled as described in the User's Guide, safe to use.
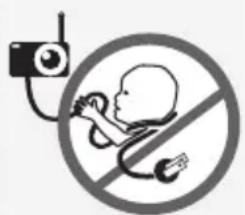
WARNING - Strangulation Hazard - Children have STRANGLED in cords.
- KEEP the Nursery Unit and adapter cords OUT of the reach of children more than 3 feet or 1 meter away.
- NEVER use extension cords with adaptors. ONLY use adaptors provided.
-
This product is NOT a Toy. NEVER allow children to play with it.
-
THIS PRODUCT CANNOT REPLACE RESPONSIBLE ADULT SUPERVISION. This product is designed to aid in the monitoring of your child. When using the monitor, you must still provide the supervision necessary for the continued safety of your child. Monitoring of premature babies, or those considered to be at risk, should always be carried out under the supervision of a health professional. This monitor SHOULD NOT be used as a medical device, nor as a device to prevent Sudden Infant Death Syndrome (SIDS).
- When an adapter is plugged into an electrical outlet, DO NOT touch the exposed end.
- ALWAYS be sure that both the transmitter and receiver are working properly and are within range of each other. Test the monitor before first use, periodically and when changing location of the Camera.
- ALWAYS be sure to immediately check on baby whenever an alarm sounds.
- DO NOT use monitor near water (such as bath tub, sink, etc.).
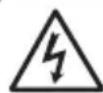
CAUTION
RISK OF ELECTRIC SHOCK
DO NOT OPEN

DO NOT EXPOSE TO RAIN OR MOISTURE
-
Keep monitor AWAY from heat sources (such as stoves, radiators, etc.).
-
ALWAYS place both the Camera and the Parent Unit on a flat surface in an upright position and allow for proper ventilation. DO NOT place on sofas, cushions, beds, etc. which may block ventilation.
-
This monitor uses public airwaves to transmit signals. The Parent Unit may pick up signals or interference from other nursery monitors in your area. Your monitor may even be picked up by other households. To protect your privacy, make sure both units are turned OFF when not in use.
-
This product contains small parts. Adult assembly required. Exercise care when unpacking and assembling the product and keep small parts away from children.
-
When using the monitor, the room temperature should be between 50^ and 104^ (10 °C and 40 °C).

BATTERY WARNING
- The Parent Unit battery is a replaceable Li-Ion battery. The Wireless Sensor Pad battery is a replaceable Button Cell Lithium battery. Only use the Angelcare recommended replacement battery. Danger of explosion if the wrong battery is used or if replaced incorrectly. Refer to your user manual for correct battery installation. D0 NOT short circuit supply terminals. Only use the Angelcare provided power adapter to charge the battery. Remove the battery from your Parent Unit if product is to be stored for an extended period of time. Dispose of batteries according to your local ordinances. The Button cell battery represents a small part and a choking hazard. ALWAYS keep all batteries away from children.
12. IMPORTANT SAFETY INSTRUCTIONS
12.1 Heed all warnings - All warnings on the product and in the operating instructions should be adhered to.
12.2 Follow all instructions - All operating and use instructions should be followed.
12.3 Water and moisture - DO NOT use this apparatus near water. For example, near a bath tub, wash bowl, kitchen sink, laundry tub, in a wet environment or near a swimming pool and the like. Care should be taken so that objects DO NOT fall onto units and that liquids are not spilled into either unit or Sensor Pad through its openings.
12.4 Cleaning - Disconnect all units before cleaning. DO NOT immerse in water any part of the monitor. Clean only with dry cloth.
12.5 Ventilation - DO NOT block any ventilation openings. Allow for proper ventilation when units are in use. DO NOT cover the Camera or the Parent Unit with any object such as a blanket. DO NOT place it in a drawer or in any location which would muffle the sound or interfere with the normal flow of air.
12.6 Heat sources - DO NOT install near any heat sources such as radiators, heat registers, stoves, TVs or other apparatus (including amplifiers) that produce heat. Heat can damage the case or electrical parts.
12.7 Power cord protection - Protect the Sensor Pad cord and adapter's power cord from being walked on or pinched by furniture or other items - Power supply cords should be routed so that they are not likely to be walked on or pinched by items upon or against them, paying particular attention to cords and plugs, convenience receptacle, and the point where they exit from the product. The socket outlet shall be installed near the equipment and shall be easily accessible. Make sure to plug the adapter to the socket outlet nearest to the equipment and that is easily accessible. To disconnect from mains, unplug the adapter.
12.8 Accessories - Only use attachments/accessories specified by the manufacturer. DO NOT place this product on an unstable cart, stand, tripod, bracket or table. The product may fall, causing serious injury to a child or adult and serious damage to the product. Use ONLY with a cart, stand, tripod, bracket or table recommended by the manufacturer or sold with the product. Any mounting of the product should follow the manufacturer's instructions.
12.9 Unplug this appliance during lightning storms or when not used for long periods of time.
12.10 Servicing - DO NOT attempt to service this product yourself as opening or removing covers (except battery door) may expose you to dangerous voltage or other hazards.
12.11 Replacement parts - When replacement parts are required, be sure the replacement parts specified by the manufacturer have the same characteristic as the original part. Unauthorized substitution may result in fire, electric shock or other hazards.
12.12 Usage - This baby monitor is intended as an aid. It is NOT a substitute for responsible and proper adult supervision and should not be used as such. Use this appliance ONLY for its intended use as described in this manual.
12.13 Power Sources - Operate this product only from the type of power source indicated on the type plate of the adaptor. If you are unsure of the type of power supply to your home, consult your dealer or local power company.
12.14 Overloading - DO NOT overload wall outlets, extension cords or integral convenience receptacles as this can result in a risk of fire or electric shock.
12.15 Object and Liquid Entry - NEVER push objects of any kind into this product through casing slots as they may touch dangerous voltage points or short out parts that could result in a risk of fire or electric shock. NEVER spill liquid of any kind on the product.
12.16 Antenna - The antenna used for this transmitter must be installed to provide a separation distance of at least 20cm from all persons and must not be collocated or operating in conjunction with any other antenna or transmitter.
12.17 Power Lines - An outside antenna system should NOT be located in the vicinity of overhead power lines or other electric light or power circuit, or where it can fall into such power lines or circuits as contact with them may be fatal.
12.18 Vibration Source - When the monitor is in use, DO NOT use a bedside crib, crib mobile or other crib accessories that may produce vibrations. Other sources of vibrations may include fans, washing machines, loud music, etc. These sources of vibration may interfere with the performance of your Angelcare monitor and the alarm will not sound if it continues to detect any movement other than your baby's. Be sure all vibration sources are eliminated before using the monitor.
12.19 You may experience false alarms for several reasons. The most common reason is the Camera has not been turned OFF after you have removed your baby from the crib. Another reason is the Sensor Pad has not been placed under the mattress properly. Be sure the Sensor Pad is on a flat, firm surface with the Angelcare logo side facing up. The sensitivity level may also need to be adjusted. Refer to Step 5.1. Always be sure to immediately check on baby whenever an alarm sounds.
12.20 Sensor Pad-Your Sensor Pad can be used in any crib that is stationary. If the crib has a spring or slat base, place a hard board between the crib base and the Sensor Pad measuring at least 33× 33cm and 6mm thick. Only use your Angelcare monitor in a stationary sleeping environment such as a crib where the Sensor Pad can rest on a completely flat, firm surface. The Sensor Pad is made of plastic and does not permit the air to circulate. Therefore, mildew build up could develop underneath the mattress in the Sensor Pad area. We suggest rotating the mattress regularly to prevent any mildew
13. IMPORTANT SAFETY INSTRUCTIONS RELATED TO USE OF BATTERIES
13.1 Use ONLY the type and size of battery specified in the owner's manual. There is a risk of explosion if battery is replaced with an incorrect type.
13.2 Charge the battery for 9 hours prior to first use. Be sure to have the monitor in the OFF position during this period. ONLY use the adapters included with your monitor.
13.3 DO NOT use these adapters with any other equipment.
13.4 When unplugging the adapter from the Camera, be sure it is switched to the OFF position.
13.5 DO NOT dispose of batteries in fire. They may explode. Check with local regulations for possible special disposal instructions.
13.6 Exercise care in handling batteries in order not to short out the batteries with conducting materials such as rings, brackets and keys. Overcharging, short circuiting, reverse charging, mutilation, or incineration of batteries must be avoided to prevent one or more of the following occurrences: release of toxic materials, release of hydrogen and/or oxygen,
gas and rise in surface temperature.
13.7 DO NOT attempt to rejuvenate the battery provided with or identified for use with this product by heating them. Sudden release of battery electrolyte may occur, causing burns or irritation to eyes or skin.
13.8 If and when necessary, the battery must be replaced with identical new ones or equivalent (volts and size).
13.9 Remove the battery from the Parent Unit if you store the product over 30 days because the battery could leak and damage the product.
13.10 Discard 'dead' batteries as soon as possible since 'dead' batteries are more likely to leak in a product. If a battery has leaked or vented, it should be replaced immediately using protective gloves.
13.11 DO NOT store this product, or the battery provided with or identified for use with this product, in high-temperature areas.
WARNING (North America Only)
- Modifications not authorized by the manufacturer may void users authority to operate this device.
14.1 NOTE: This equipment has been tested and found to comply with the limits for a Class B digital device, pursuant to Part 15 of the FCC Rules. These limits are designed to provide reasonable protection against harmful interference in a residential installation. This equipment generates, uses and can radiate radio frequency energy and, if not installed and used in accordance with the instructions, may cause harmful interference to radio communications.
14.2 However, there is no guarantee that interference will not occur in a particular installation. If this equipment does cause harmful interference to radio or television reception, which can be determined by turning the equipment OFF and ON, the user is encouraged to try to correct the interference by one or more of the following measures:
- Reorient or relocate the receiving antenna.
- Increase the separation between the equipment and receiver.
- Connect the equipment into an outlet on a circuit different from that to which the receiver is connected.
- Consult the dealer or an experienced radio/TV technician for help.
14.3 This device complies with the part 15 of the FCC Rules and the Industry Canada license - exempt RSS standards(s). Operation is subject to the following two conditions:
(1) This device may not cause harmful interference, and
(2) This device must accept any interference received, including interference that may cause undesired operation.
IC Warning :
- This device complies with industry Canada RSS standard(s). Operation is subject to the following two conditions:
(1) this device may not cause interference, and
(2) this device must accept any interference, including inferences that may cause undesired operation of the device.
15.1 Changes or modifications not expressly approved by the party responsible for compliance could void the user's authority to operate the equipment.
SETUP REQUIREMENTS
INCLUDED:
+

Touchscreen Parent Unit
Camera Unit
Model AC417 and AC517
Baby Breathing Monitor, with Video
Wireless movement Sensor Pad
- Always place Angelcare® logo side up *

2x AC adapter
(for Parent Unit and Camera Unit)
Tabletop stand with removable wall mount metal ball
(for Camera Unit)
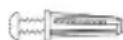
Hardware
(Screwdriver required for wall mounting)
Lithium ion battery pack
(for Parent Unit)

CR3032 battery
(for Sensor Pad)
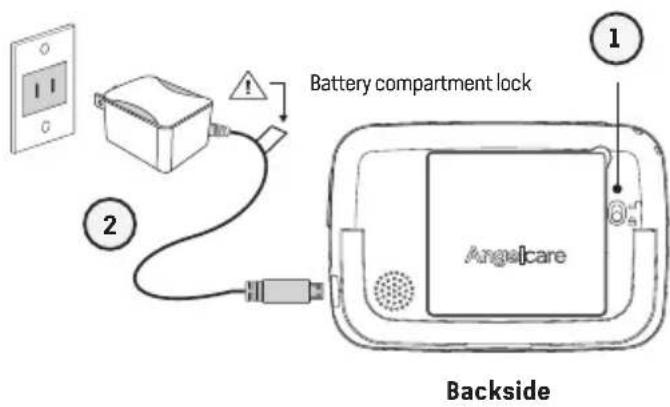
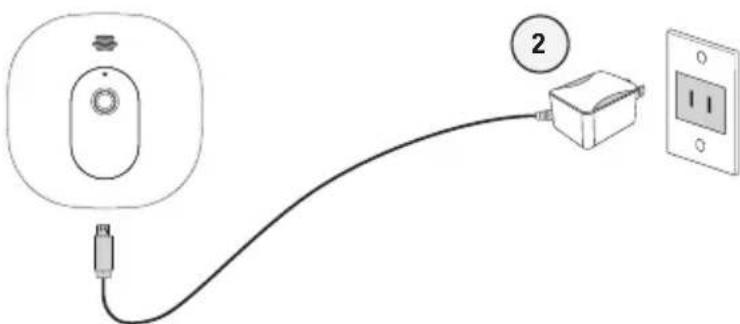
1) Unlock the battery compartment on the backside and remove the cover. Insert the provided rechargeable battery into the compartment. Contacts of the battery and the contacts in the compartment must be aligned.
2) Connect the USB plug to the Parent Unit and connect the power adapter with an electrical outlet.
3) Charge the unit for 9 continuous hours prior to first use.
PARENT UNIT:
WARNING - Strangulation Hazard - Children have STRANGLED in cords.
- KEEP the Nursery Unit and adapter cords OUT of the reach of children more than 3 feet or 1 meter away.
- NEVER use extension cords with adaptors. ONLY use adaptors provided.
- This product is NOT a Toy. NEVER allow children to play with it.
2.1 - POWERING THE MOVEMENT SENSOR PAD
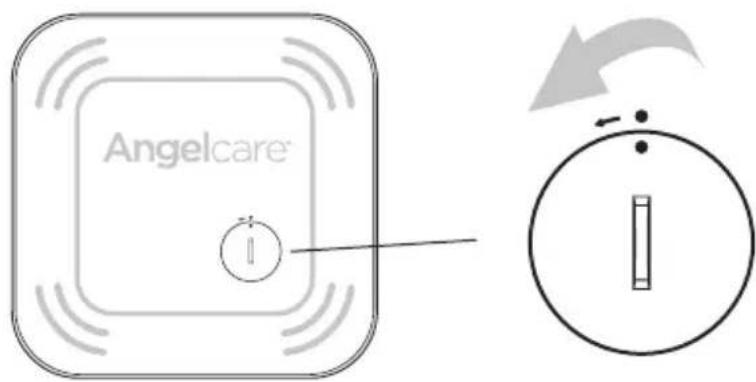
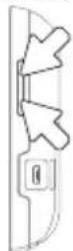
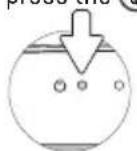
When using the Sensor Pad for the first time, you will need to insert the provided CR3032 battery.
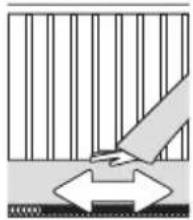
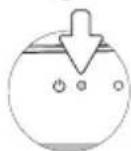
1) Remove the battery cover using a coin.
Turn in the direction of the arrow.
2) Place the included battery (CR3032) in the compartment. Note: The + symbol should be facing up.
3) Replace the battery cover (the two dots will line up). The Sensor Pad is now Activated.
IMPORTANT: To prevent false alarms we recommend that the CR3032 3V battery is replaced every 4 months.
2.2 - INSTALL THE SENSOR PAD ON THE MATTRESS SUPPORT
IMPORTANT
If your cot does not have a solid, stationary, completely flat, firm surface including a spring or slat base, place a hard board between the crib base and the Sensor Pad, to ensure correct operation.
The hardboard support must measure at least 33 × 33 cm ( 13'' × 13'' ) and 6 mm ( 1/4'' ) thick. This hardboard support must be larger than the Sensor Pad surface area.
The Sensor Pad functions with any size and type of mattress except memory-foam mattresses, hollow frame mattresses and water beds. The hardboard maintains a constant pressure on the Sensor Pad, enabling it to detect the baby's movements even when the baby is at the edges of the cot.

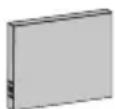
Hardboard
Sensor Pad
1) Remove the mattress from the crib.
2) Place the Sensor Pad - Angelcare ^ logo side up - in the center of the mattress. It should be centered on the hardboard if your crib requires a hardboard support.
3) Replace the mattress.
IMPORTANT!
- Ensure the Sensor Pad is in the center of the Cot - printed or Logo side up - on top of the hardboard. Check the position is central before each use.
BEFORE FIRST TIME USE: To test that the unit is ready for use, refer to instruction manual on how to test that the installation has been done correctly.
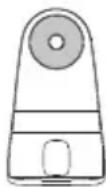
3.1 - SELECT A LOCATION FOR THE CAMERA
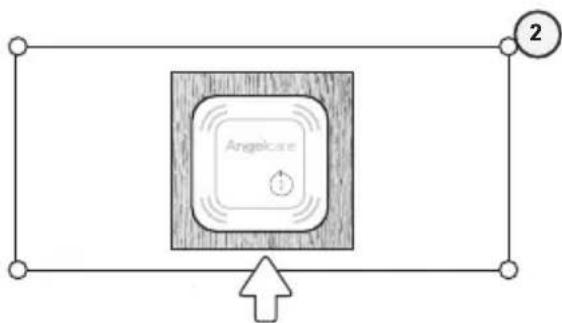
Camera can be installed on the wall (see included parts) or using the tabletop stand. Depending on the position you choose, you'll need to remove the metal ball from the stand to wall mount camera.
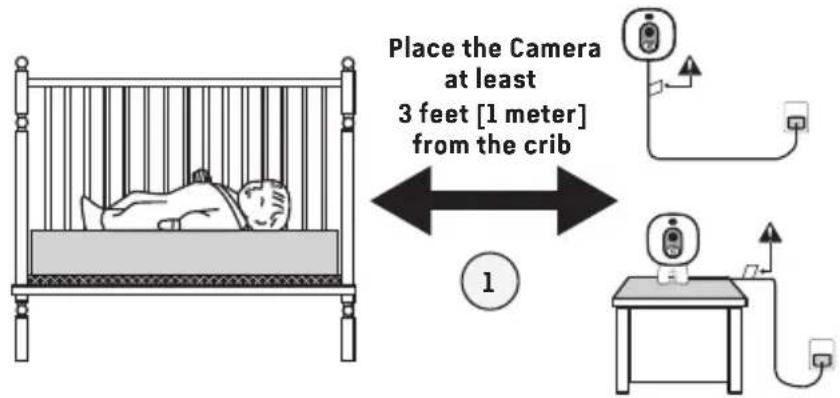
1) Place the Camera at a minimum of 3 feet [1 meter] away from the crib.
2) Connect the adaptor to the Camera and into an electrical outlet.
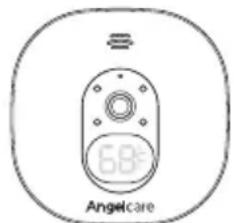
Note: Each time you power ON your Camera, the internal thermometer will need to calibrate to ensure accuracy. This automatic process will take approximately 30 minutes. The colour changing temperature display, by default, will be turned "OFF". You may turn this feature "ON" in the settings mode on your Parent Unit.
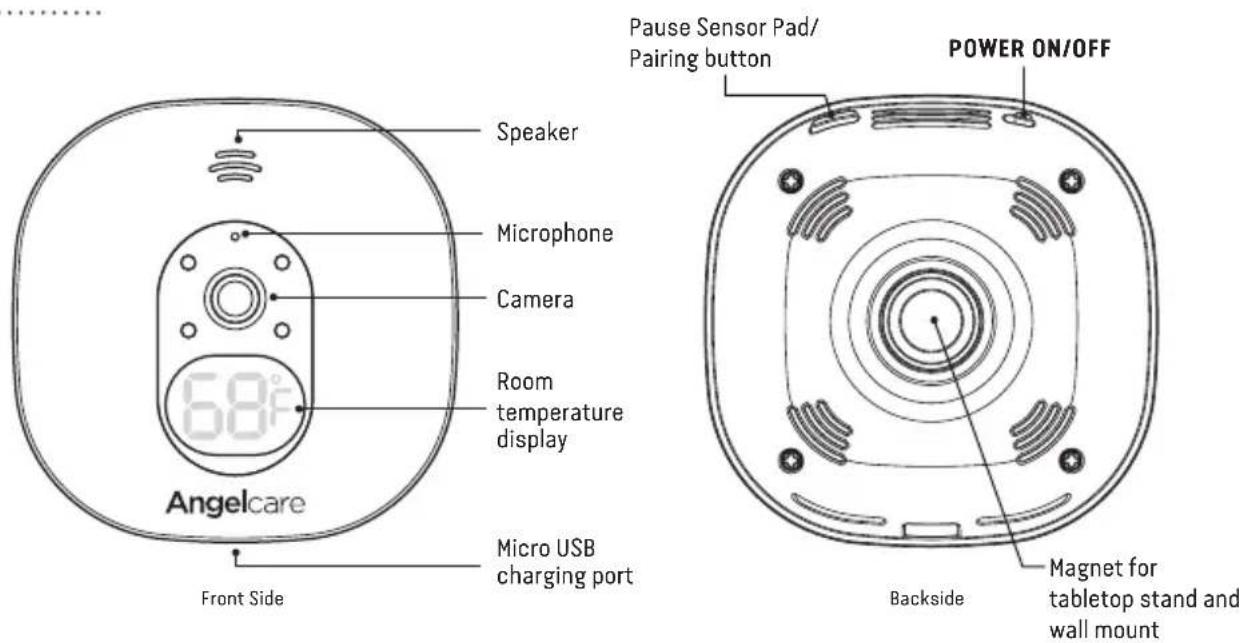
CAMERA
STEP 4 - TURNING ON YOUR MONITOR
4.1 TURNING ON YOUR CAMERA
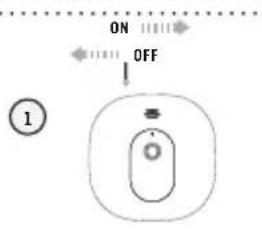
1) Slide the Camera ON/OFF switch to the ON position.
4.2 TURNING ON YOUR PARENT UNIT
Your Camera and Parent Unit come pre-paired.
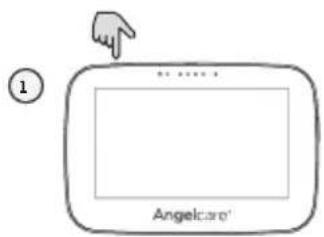
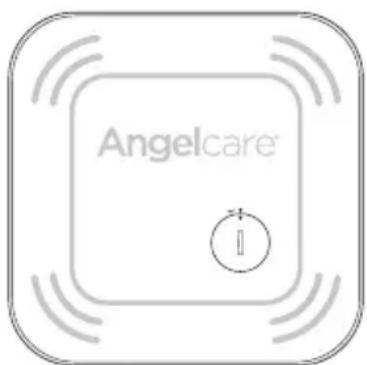
1) Press and hold the Parent Unit ON/OFF button for 2 seconds until LCD screen is turned ON. Angelcare's logo will be shown for 1 second.

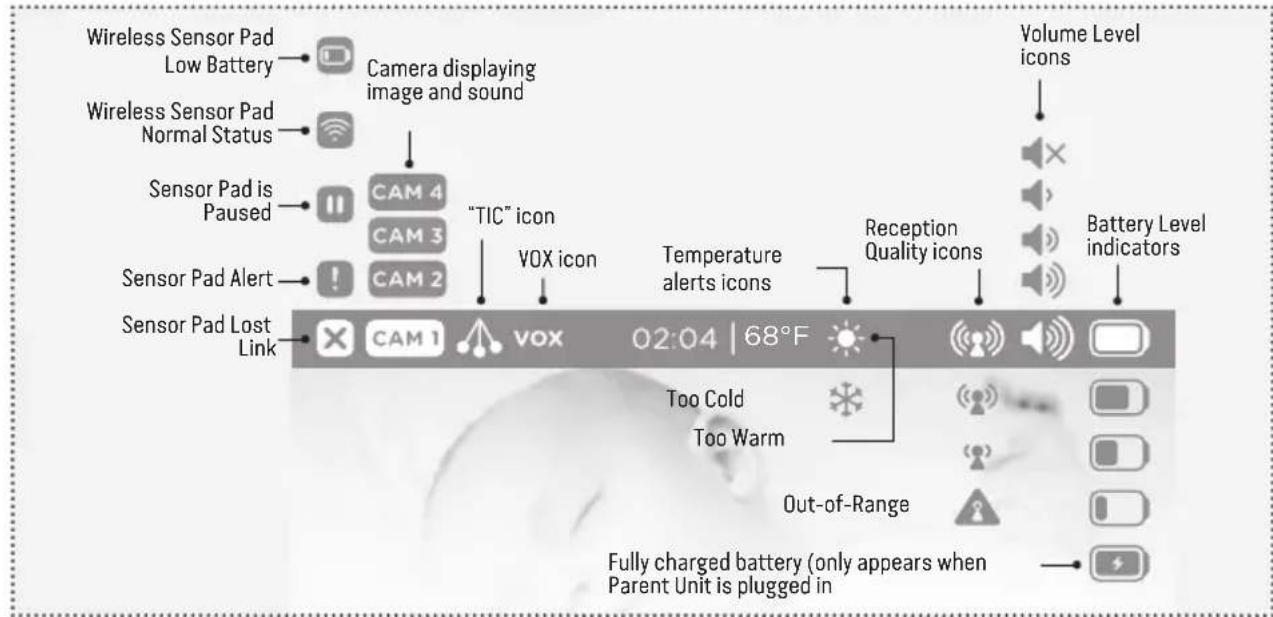
The Camera connection signal strength icon will appear in the status bar.

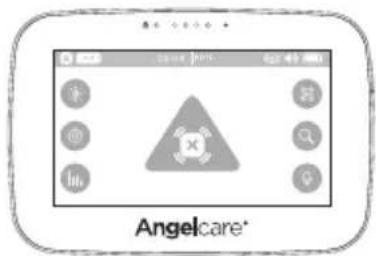
When Parent Unit is turned ON and Camera is OFF, Parent Unit will display Out-of-Range icon.
If there is a lost connection between the two units after 15 seconds, the Out-of-Range alarm will sound on the Parent Unit (refer to Troubleshooting section):
- The Out-of-Range icon will appear on the screen and on the info bar.
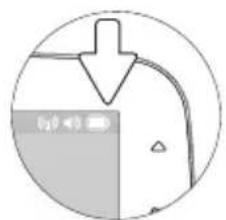
INFO BAR IMPORTANT ICONS
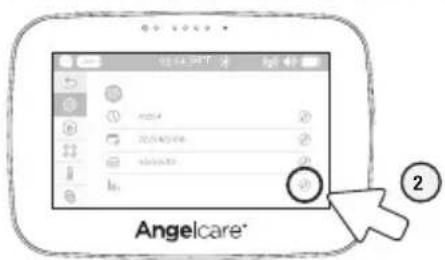
4.3 - HOW TO SET THE DATE
When activating the Parent Unit for the first time, you'll be asked to set the date and time in order to record data. If you choose to skip this step, you can always go back later by accessing the settings menu
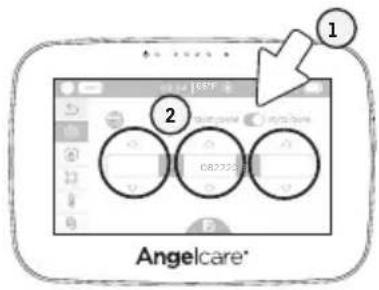
1) Tap the Date Mode toggle button to switch between Month/Day/Year and Day/Month/Year display.
2) Set the day, month and year using the up/down arrows . Then tap the Save button to confirm your settings.
4.4 - HOW TO SET THE TIME

1) Tap the Time Mode toggle button to switch between 12 h and 24 h mode.
2) Set the hours and minutes using the up/down arrows . Then tap the Save button to confirm your settings.
IMPORTANT
The Sensor Pad will be automatically ACTIVATED when the screen returns to video display view.
STEP 5 - GETTING TO KNOW YOUR MONITOR
Your Angelcare monitor can be used with the pre-programmed factory settings or you can customize the settings to your preference.
IMPORTANT
To confirm your settings, you'll always need to tap the Save icon at the bottom of the screen (icon will turn blue if modifications need to be saved).


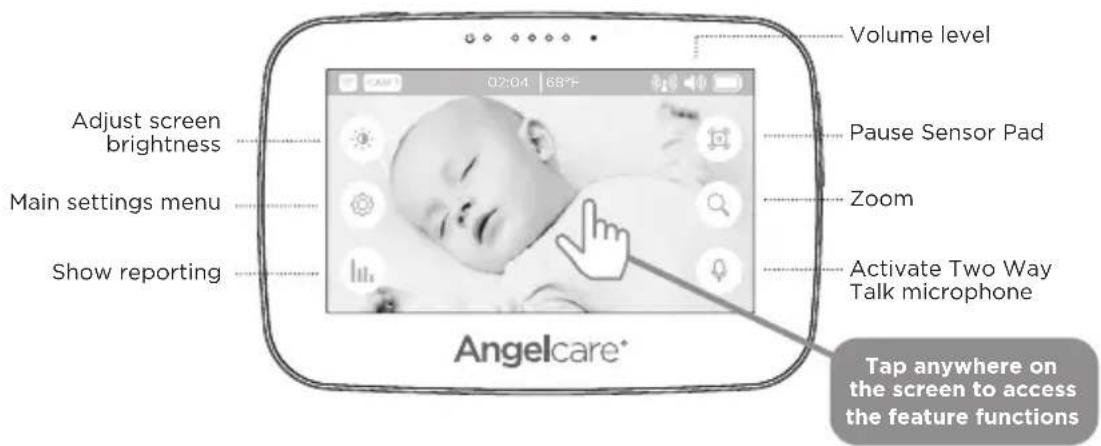
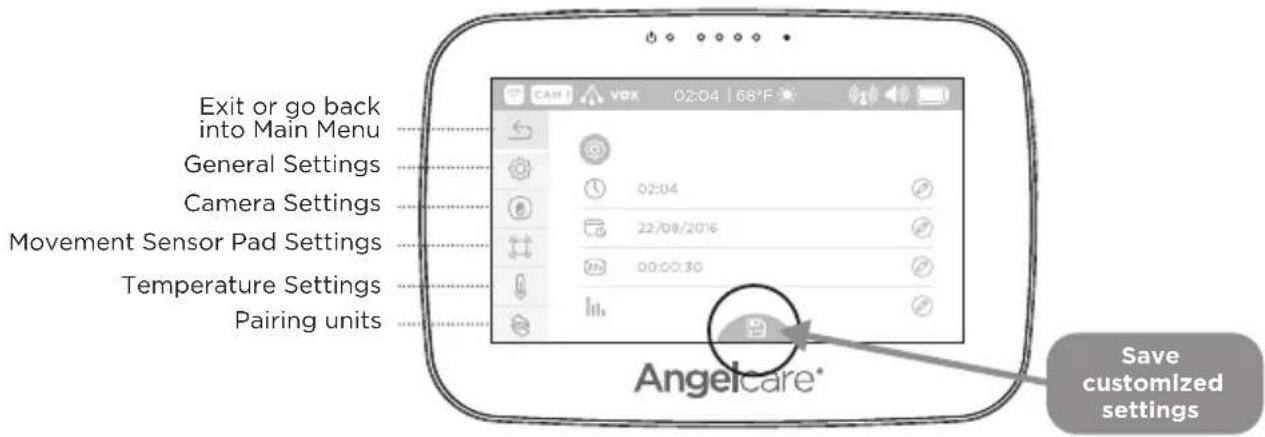
IMPORTANT
When in menu or sub-menu modes, sound transmission between the Parent Unit and the Camera will be temporarily deactivated. ONLY movement-detection alarm will remain active (if function is activated).
5.1 - SENSOR PAD
TO ACTIVATE/DEACTIVATE THE SENSOR PAD:

1) Tap the Settings icon in the video display view.
2) Tap the Sensor Pad icon.
3) Tap the Sensor Pad toggle button to activate/ deactivate the Sensor Pad (when activated the toggle will turn blue). Then tap the Save button to confirm your settings.
TO TEST THE SENSOR PAD:
IMPORTANT
Test your monitor before first use.
- Test your monitor regularly to ensure it is functioning correctly.
- Test your monitor every time you move the Sensor Pad to a different place.
1) After activating the Sensor Pad, the alarm will sound after 20 seconds.
2) Rub you hand over the mattress and confirm the alarm stops.
MOVEMENT ALARM
If NO movement is detected after 15 seconds you will hear a single TIC' pre-alarm sound from the Camera.
- If after a further 5 seconds there is still NO movement detected both the Parent Unit and Camera speakers will emit loud continuous beeps - this is the movement alarm.
- Movement Alarm icon will show on the LCD screen.
IF THE ALARM DOES NOT SOUND
- Avoid contact with the crib while Sensor Pad is in operation.
- Place the crib near a supporting wall to reduce vibrations.
- Adjust the Sensor Pad sensitivity level.
- Turn OFF crib mobile, fans, loud music or anything else that may cause vibration.
PAUSING AND RESTARTING THE SENSOR PAD:
Allows you to pause the Sensor Pad if you remove baby from the crib, e.g. for feeding or comforting.
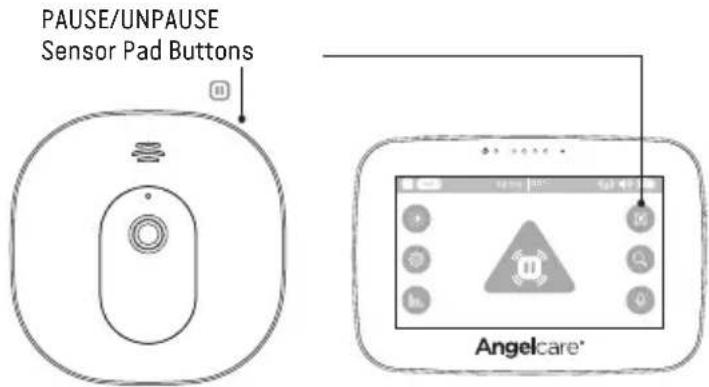
IMPORTANT
If you do not pause the Sensor Pad, the alarm will sound if there is no movement after 20 seconds.
- Ensure to unpause the Sensor Pad before putting baby in the crib.
TO ACTIVATE/DEACTIVATE TIC FUNCTION:
1) Tap the Settings icon in the video display view.
2) Tap the Sensor Pad icon.
3) Tap the Tic Toggle button to activate the function (the toggle button will turn blue). Then tap the Save button to confirm your settings.
TO ADJUST THE SENSOR PAD SENSITIVITY LEVEL:
To ensure adequate monitoring of your child's movements, you can adjust the sensitivity of the Sensor Pad in the main settings menu. Set a high sensitivity for a newborn and a lower sensitivity as the child grows and gains weight. A thicker mattress will also need a higher sensitivity.
1) Tap the Settings icon in the video display view.
2) Tap the Sensor Pad icon.
3) Tap or to adjust the Sensor Pad Sensitivity level. Then tap the Save button to confirm your settings.
5.2 - SOUND
TO ADJUST/MUTE SOUND:
Press the Volume up / Volume down button to adjust the sound level.
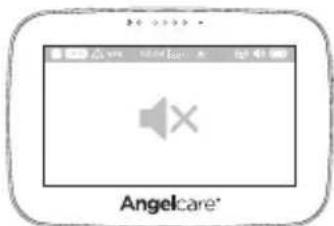
To mute the sound level press the Volume down button until the mute symbol is displayed.
IMPORTANT
To avoid feedback (whistling), keep both units at least 10 feet (3 meters) apart or reduce Parent Unit volume.
- Check that both units are powered ON.
- Check that Parent Unit is not on MUTE.
- Bring the Parent Unit closer to the Camera.
HOW TO CHECK THE BATTERY:
Unplug the adapter from the Parent Unit and check the battery level indicator.
1/4 full

1/2 full

3/4 full

full

HOW TO CHARGE THE BATTERY IN THE PARENT UNIT:
Leave the Parent Unit plugged in to fully charge the unit. Although the battery at 1/4 capacity works normally, we recommend that you fully recharge it.
PARENT UNIT BATTERY ALERT
Alert activates when the battery needs to be recharged.
- Parent Unit will emit a beep sound every 30 seconds.
Battery Alert icon will show on LCD screen.
YOU ARE NOW READY TO USE YOUR MONITOR
DEFAULT SETTINGS


Parent Unit Volume:
Camera Speaker Volume:
Movement Mode:
Sensor Pad Sensitivity:
"TIC" Function
Temperature Unit:
Temperature Alert:
Camera Temperature Indicator:
Camera Colour Changing Mode:
Movement and Temperature Monitoring:
Voice Activation (VOX):


Vox Sensitivity:
Screen Saver Timer:
LCD Brightness:
Level 3 (of 4)
Level 3 (of 4)
ON
Level 2 (of 4)
OFF
Fahrenheit (United States)
Celcius (Canada)
OFF
ON
OFF (White color)
ON
OFF (United States)
ON (Canada)
Level 2 (of 4)
30 seconds
Level 3 (of 5)
STEP 6 - ACTIVATING AND DEACTIVATING ADDITIONAL FUNCTIONS
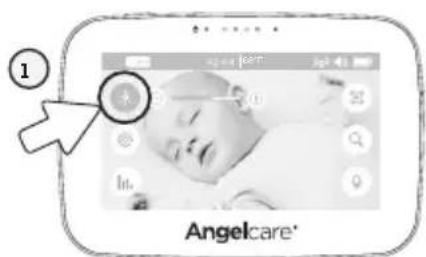
6.1 - TWO WAY TALK
Your Parent Unit is equipped with Two Way Talk to allow you to talk to baby without being in the nursery.
TO ACTIVATE TWO WAY TALK:
TO ADJUST THE CAMERA SPEAKER VOLUME:
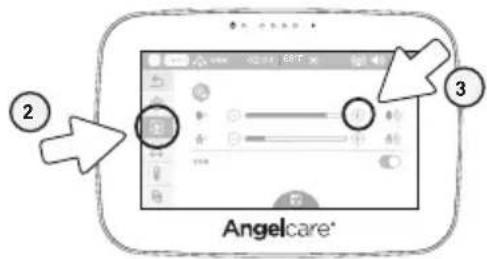
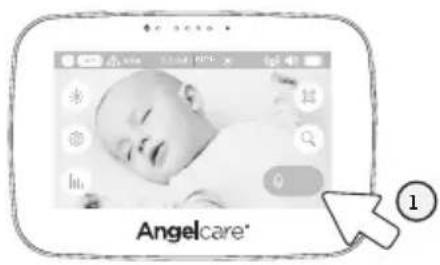
1) Tap and hold the Microphone icon to activate Two Way Talk (icon will expand and turn blue).
2) Release the Microphone icon to turn OFF the Two Way Talk function.
1) Tap the Settings icon in the video display view.
2) Tap the Camera icon to select the Camera settings menu.
3) Tap or to adjust the Two Way Talk volume level. Then tap the Save button to confirm your setting.
6.2 - VOICE ACTIVATION (VOX) OR CONTINUOUS SOUND MODE
Allows you to select your option on how you monitor sound:
'Continuous Sound'(VOX OFF)
Sound monitoring is continuously on, picking up all sounds.
'Sound Activated' (VOX ON)
Voice activation picks up sound based on the setting of the sensitivity level. The sound transmission will stop if no sound is detected. This setting allows to save power, after 10 seconds.
NOTE:
By deactivating VOX, Continuous Sound setting will turn ON.
TO ACTIVATE/DEACTIVATE VOX:
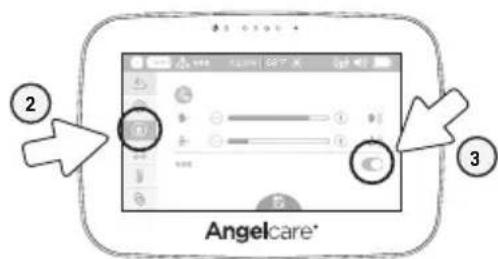
TO ADJUST THE SOUND SENSITIVITY (VOX):
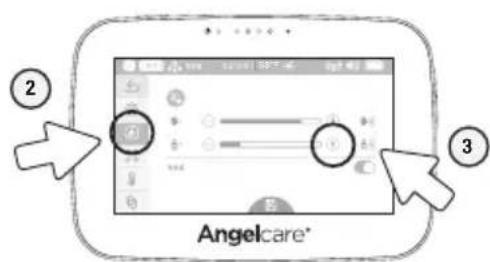
1) Tap the Settings icon in the video display view.
2) Tap the Camera icon to select the Camera settings menu.
3) Tap the VOX toggle button to activate/deactivate the VOX function. Then tap the Save button to confirm your settings.
1) Tap the Settings icon in the video display view.
2) Tap the Camera icon to select the Camera settings menu.
3) Tap or to adjust the VOX Sensitivity level. Then tap the Save button to confirm your settings.
6.3 - ROOM TEMPERATURE DISPLAY
1) Tap the Settings icon in the video display view.
2) Tap the Temperature icon to enter the temperature settings menu.
3) Tap the Edit icon to enter the temperature unit setting.
4) Tap the Temperature Unit toggle button to switch between ^ and ^ . Then tap the Save button to confirm your settings.


TEMPERATURE ALERT
- Alert activates when temperature reaches maximum or minimum set temperature.
- Parent Unit will emit 4 consecutive beeps, every 5 seconds.
- Temperature Alert icon will show on LCD screen.
TO ACTIVATE/DEACTIVATE THE ROOM TEMPERATURE ALERT:
1) Tap the Settings icon in the video display view.
2) Tap the Temperature icon to enter the temperature settings menu.
3) Tap the Edit icon to enter the temperature alarm setting menu.
4) Tap the Temperature Alarm toggle button to activate the alarm function (the toggle button will turn blue).
5) Set the lower and upper temperature limit tapping the up/down arrows . Then tap the Save button to confirm your settings.
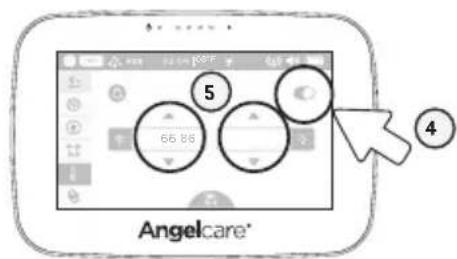
TO ACTIVATE/DEACTIVATE THE CAMERA TEMPERATURE DISPLAY AND COLOR CHANGING MODE:
Allows you to set the LCD display on your Camera. You can completely turn OFF the display, or set the color temperature color display on the Camera. With this option the Camera digits light up in colour when the temperature goes above or below your preferences. The Camera's LCD will turn to red if temperature is too hot, blue if too cold and white if correct.
1) Tap the Settings icon in the video display view.
2) Tap the Temperature icon to enter the temperature settings menu.
3) Tap the Edit icon enter the camera LCD display setting menu.
4) Tap the camera LCD display toggle button to activate/desactivate the LCD display on the camera.
5) Tap the Colour Changing Mode toggle button to activate the colour changing mode (the toggle button will turn blue). Then tap the Save button to confirm your settings.
6.4 - SCREEN Saver
Allows you to set the screen saver.
1) Tap the Settings icon in the video display view.
2) Tap the Edit icon to access the screen saver settings menu.
3) Tap the Screen Saver toggle button to switch the screen saver ON or OFF (the toggle button will turn blue).
4) Tap to select between 30 seconds to 3 minutes. Then tap the Save button to confirm your settings.
MANUAL SETTING:
To manually activate the Screen Saver Mode, quickly press & release the Parent Unit POWER ON/OFF button.
NOTE:
The touchscreen will turn black when video is in Screen Saver mode. Tap the screen anywhere to return to Video mode.
6.5 - MOVEMENT AND TEMPERATURE MONITORING
Activity analysis and room temperature tracking give you insight into your little one's activity level during sleep, helping you to better adapt routines and respond to their needs. The movement monitoring records data every ten seconds. Three times every hour the system compiles the collected data and a "movement activity report" can be viewed on the Parent Unit.
TO ACTIVATE/DEACTIVATE MOVEMENT AND TEMPERATURE MONITORING:
IMPORTANT
In order to record movement and temperature data, ensure you have set the date and time in STEPS 4.3 and 4.4.
The graphing function is not available during the first 20 minutes of use as the system is collecting the first set of data that will be displayed. During this time, the graphing icon will not be operational.
1) Tap the Settings icon in the video display view.
2) Tap the Edit icon access the monitoring settings.
3) Tap the Monitoring toggle button to switch the monitoring function ON/OFF (the toggle button will turn blue when ON).
4) Tap the Bin icon to delete previously saved graph data. If no data has been saved yet, this option will not be available (this option will not be available until 20 minutes from activation of this function).
5) Tap the Arrow Back to cancel deleting of previously saved graph data. You will return to the previous screen.
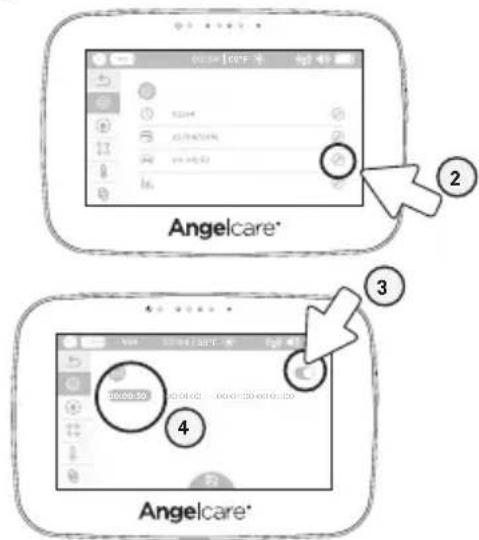
NAVIGATING MOVEMENT AND TEMPERATURE REPORTS:
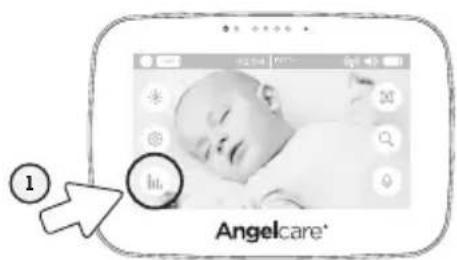
1) Tap the Graphing icon in the video display view.
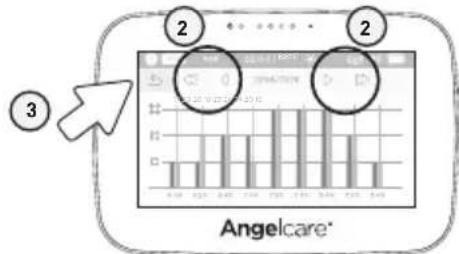
2) In the movement and temperature reports, tap the arrows to navigate hour by hour or day by day.
3) Tap the Arrow Back to go back to the video display view.
MONITORING IMPORTANT BUTTONS AND ICONS
Navigation Icons:
Go to previous page Go to next page Go to previous day Go to next day
Temperature indicator: The blue bar indicates the temperature in the room.
Sensor Pad Movement Levels: The red bar indicates the amount of movement from your Sensor Pad.
Low Movement
0-20 movements
Medium Movement
20-30 movements
High Movement
Over 30 movements
GraphingIcons:
Indicates an alert during the period Indicates the system was turned off during the period
Allows you to adjust the LCD screen brightness on the Parent Unit.
1) Tap to decrease/increase the brightness level.
2) Tap again the Brightness icon to return to the Main Menu.
6.7-DIGITAL PAN AND ZOOM
Allows you to zoom in to twice the normal view.

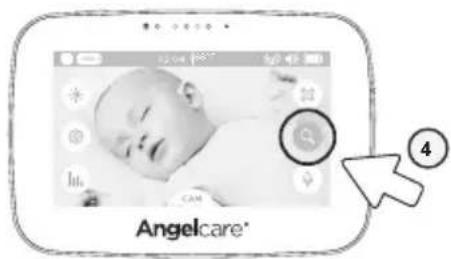
1) Tap the Magnifier icon to activate the zoom.
2) Use the arrow keys to zoom in on what you want to see more closely.
3) Tap anywhere on the screen, except on the arrows, to return to the Main Menu. The Camera will stay zoomed in. When zoomed in, the Magnifier icon will be blue.
4) Tap on the blue Magnifier icon to return to normal viewing mode. Zoom is deactivated.
STEP 7 - ADDING ACCESSORIES
Your Angelcare monitor allows you to add additional Cameras. Please contact your local distributor to see what is available in your country.
IMPORTANT
- If you have a Sensor Pad connected to your Angelcare Monitor, it can ONLY be paired with Camera 1. The alarm on the Parent Unit will only sound if Camera 1 is selected or in split view. If another camera is selected, only the Camera 1 will sound the alarm.
You will only be able to hear audio from one camera at a time. When in split screen, the sound transmitted from the Parent Unit will be from the Camera number highlighted in the info bar.
TROUBLESHOOTING
- Ensure that you fully charge your battery for 9 hours before its first use.
- To maintain maximum battery life it is recommended that you fully discharge your battery periodically. If your Parent Unit is not in use, please turn it OFF.
LOSS OF CONNECTIVITY BETWEEN THE CAMERA AND PARENT UNIT
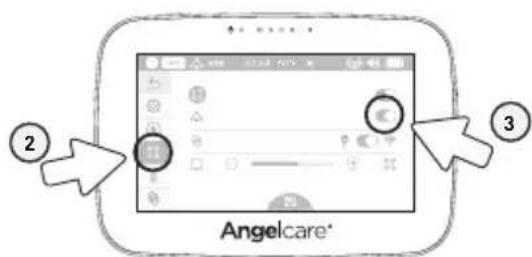
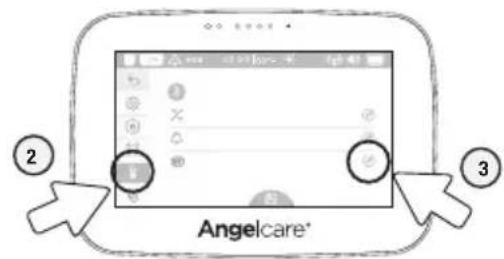
If your Camera becomes un-paired from your Parent Unit, please follow the steps below to re-pair them.
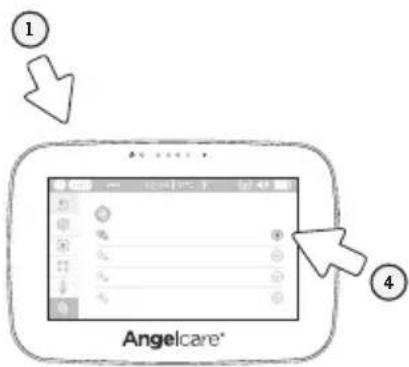
1) Turn OFF your Parent Unit & Camera Unit.
2) Turn ON your Parent Unit & Camera Unit.
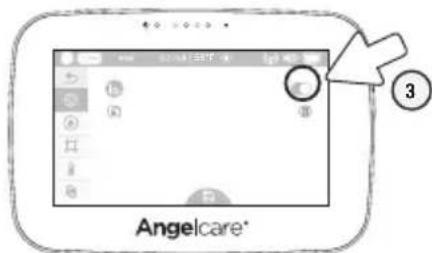
3) Tap the Settings icon to open the Pairing Screen
4) Press the Bin icon to see a tick appear next to this icon.
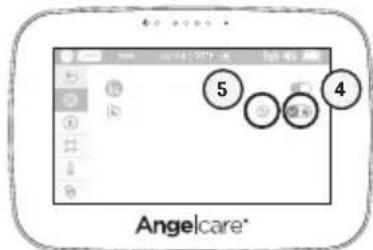
5) Press the tick/ Bin icon - this icon will disappear and press the ④ that will show in its place. If however there is no Bin icon, press the ⑥ the Parent Unit. It should turn blue.
The Parent Unit Power Indicator will flash to indicate it's in linking mode.
6) Press and hold the Pause / Pairing button on the top right of the Camera for 2-3 seconds.
7) When the Bin icon appears, the Camera is paired.
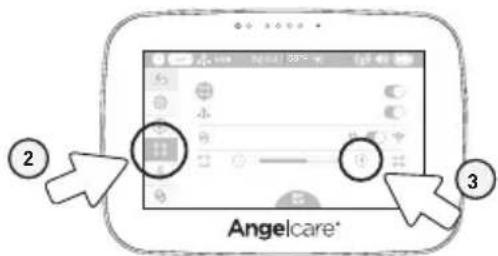
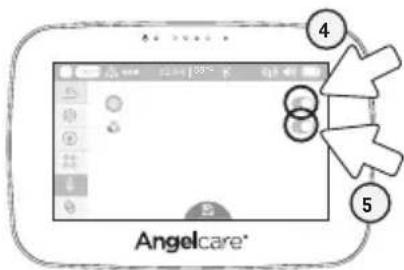
LOSS OF CONNECTIVITY BETWEEN THE SENSOR PAD AND THE CAMERA
If your Sensor Pad becomes un-paired from your Camera, please follow the steps below to re-pair them.
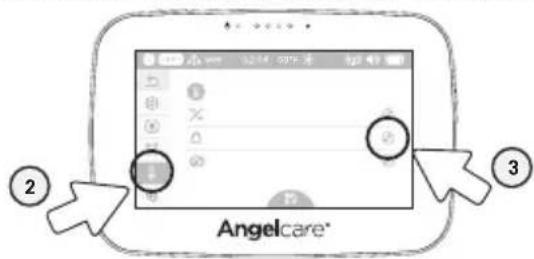
1) Tap the Settings icon in the video display view.
2) Tap the Pairing icon to enter the device pairing menu.
3) Tap Bin icon to delete the paired Sensor Pad and tap again on the tick tap the icon to pair the Sensor Pad. If however there is no Bin icon, press the the Parent Unit. It should turn blue.
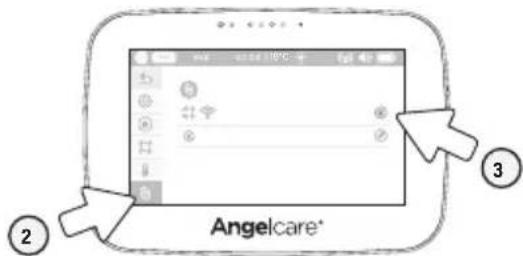
The Parent Unit Power Indicator will flash to indicate it's in linking mode.
4) When the Bin icon appears, the Sensor Pad is paired.
NO SOUND IS BEING TRANSMITTED
- Check the volume level on the Parent Unit and the Camera to ensure they are set to an appropriate level.
Try bringing the Parent Unit closer to the Camera to see if you get sound. - Charge the Parent Unit.
WEAK RECEPTION
- Bring units closer together.
- Change the position of one or both units.
- Place units on a flat surface away from baby's reach.
- Recharge the Parent Unit.
STATIC, DISTORTION, INTERFERENCES (FROM OTHER MONITORS, WIRELESS PHONES, WALKIE-TALKIES, ETC.)
- Rotate Parent Unit or move it away from source of interference.
FEEDBACK (LOUD NOISES EMITTED FROM THE PARENT UNIT)
- Move units farther apart (at least 10 foot [3 meters]).
- Decrease volume on Parent Unit.
THE PARENT UNIT SCREEN IS BLACK (PARENT UNIT IS OFF)
- Turn the Parent Unit back ON by pushing and holding the POWER ON/OFF button for 2 seconds.
- Recharge the Parent Unit.
FALSEARMS
- Replace the Sensor Pad battery CR3032 3V.
- Turn OFF the Camera.
- Make sure there is no bedding between the mattress and the Sensor Pad.
If the crib has a spring or slat base, place a hardboard between the crib base and the Sensor Pad measuring at least 1/4'' (6 mm) thick and should have minimum dimensions of 13'' × 13'' (33 x 33 cm). - Make sure the Sensor Pad is positioned as described under the setup requirements. Sensitivity may need to be adjusted. Refer to STEP 5.1 for more informations.
ALARM WILL NOT SOUND
- Avoid contact with the crib when the monitor is ON.
- Place crib near a solid supporting wall to avoid Sensor Pad from detecting movement from outside the crib.
- You may need to decrease the sensitivity. Refer to STEP 5.1 for more informations.
THE PARENT UNIT DOESN'T SHOW MOVEMENT AND TEMPERATURE REPORTS
Make sure the time and date is set up. Refers to STEP 4.3 & 4.4.
- Make sure the movement and temperature reports is activated. Refers to STEP 6.5.
LIMITED WARRANTY
Angelcare warrants to the original owner of this product that Angelcare monitor is free from any material and workmanship defects for the term of the warranty period (see warranty table below to determine the warranty for your country). If this monitoring system fails to function properly when used as directed under normal conditions and during the warranty period, Angelcare * will either repair or replace the product, at our discretion, free of charge. Please contact your local distributor to validate warranty and warranty period.
The product must be accompanied by a proof of purchase, either a bill of sale or other proof that the monitoring system is within the warranty period. Angelcare *will bear the cost of repairing or replacing the product and shipping it back to you.
This warranty does not apply to a product which has been damaged as a result of improper maintenance, an accident, improper voltage supply or any other form of misuse. The warranty is also void if the owner repairs or modifies the product in any way. Angelcare is not liable for any incidental or consequential damages with regard to this product. The warranty also excludes any liability other than what is stated above. No other warranty is given.
This warranty does not cover products and accessories which are not Angelcare - branded, or any problems that result from usage that is not in accordance with product instructions, failure to follow the product instructions, or problems caused by using accessories, parts or components not supplied by Angelcare.
LEGAL RIGHTS VARY FROM COUNTRY TO COUNTRY. SOME COUNTRIES DO NOT ALLOW THE EXCLUSION OR LIMITATION OF INCIDENTAL OR CONSEQUENTIAL DAMAGES, SO THE ABOVE LIMITATIONS MAY NOT APPLY TO YOU.
WE ARE NOT IN ANY WAY RESPONSIBLE FOR ANY OUTCOME RESULTING FROM THE USE OF THIS PRODUCT.
IMPORTANT! This Angelcare monitor is a personal care product. Please do not return this product to the store. If you have questions or need help, please call your distributor before returning this product: international. angelcarebaby.com
| WARRANTY TERM PER COUNTRY | |
| North America 1 year | |
TECHNICAL SPECIFICATIONS
Range:
Open field (Open area without obstructions):
up to 820 feet (250 meter).
Number of Channels:
USA/Canada:24 channels.
Europe: 24 channels.
Power Supply:
1 included Li-Ion battery (Parent Unit)
100 - 240 VAC / 5 VDC adapter for the Parent Unit
100 - 240 VAC / 5 VDC adapter for the Camera
1 included CR3032 3V battery (wireless Sensor Pad)
Caution: To reduce the risk of electric shock, do not expose this product to rain or moisture.
Danger of explosion if batteries are incorrectly replaced. The battery included for the Parent Unit is a user replaceable Li-ion rechargeable battery, manufactured by manufactured by Icon Energy System (Shenzhen) Co Ltd. Only use the Angelcare recommended replacement battery. To obtain information on replacement batteries please contact Angelcare customer service: www.angelcarebaby.com or contact your local distributor. Instructions will be included with the replacement battery. Keep all batteries away from children.


Batteries:
- CAUTION: RISK OF EXPLOSION IF BATTERY IS REPLACED BY AN INCORRECT TYPE.
Transmission:
Transmission between the Parent Unit and the Camera is made on 2.4 GHz Transmission between the Camera and the Sensor Pad is made on 2.4 GHz
Maximum RF Power Transmitted:
- 20dBm (100mW) between Camera and Parent Unit
- 20dBm (100mW) between Camera and Sensor Pad
PROTECT THE ENVIRONMENT
The wheelic bin symbols mean that according to local laws and regulations your product and/or its battery shall be disposed of separately from household waste. When the product/battery reaches its end of life take it to a collection point designated by local authorities. The separate disposal and recycling will help conserve natural resources and protect human health and the environment. Refer to User's Guide for removal of batteries.
SAR Information Statement
Your baby monitor Parent Unit is a radio transmitter and receiver. It is designed and manufactured not to exceed the emission limits for exposure to radiofrequency (RF) energy set by the Federal Communications Commission of the U.S. Government. These limits are part of comprehensive guidelines and establish permitted levels of RF energy for the general population. The guidelines are based on standards that were developed by independent scientific studies. The standards include a substantial safety margin designed to assure all persons, regardless of age and health. The exposure standard for the Parent Unit employs a unit of measurement known as the Specific Absorption Rate, or SAR. The SAR limit set by the FCC is 1.6W/kg. Test for SAR are conducted with the Parent Unit transmitting at its highest certified power level in all tested frequency bands.
Although the SAR is determined at the highest certified power level, the actual SAR level of the Parent Unit while operating can be well below the maximum value. This is because the Parent Unit is designed to operate at multiple power levels so as to use only the power required to reach the Nursery Unit. In general, the closer you are to Nursery Unit, the lower the power output. Before a baby monitor model is available for sale to the public, it must be tested and certified to the FCC that it does not exceed the limit established by the government adopted requirement for safe exposure. The tests are performed in positions and locations (e.g., in front of face and worn on the body) as required by the FCC for each model. The highest SAR value for the Parent Unit when tested for use in front of face is 0.043W / Kg and when worn on the body is 0.125W / Kg (Body-worn measurements differ among various models, depending upon available accessories and FCC requirements). While there may be differences between the SAR levels of various Parent Units and various positions, they all meet the government requirement for safe exposure. The FCC has granted an Equipment Authorization for this model Parent Unit with all reported SAR levels evaluated in compliacne with the FCC RFexposure guidelines. SAR information on this model Parent Unit is on file with the FCC and can be found under the Display Grant section of http://www.fcc.goc/oet/fccid after searching on FCC ID:N7TAC117R
In the United States and Canada, the SAR limit for the Parent Unit is 1.6 watts/kg (W/kg) averaged over one gram of tissue. The standard incorporates a substantial margin of safety to give additional protection for the public and to account for any variations in measurements.
IC STATEMENT
This device complies with Industry Canada licence-exempt RSS standard(s)
Operation is subject to the following two conditions:
(1) This device may not cause interference, and
(2) This device must accept any interference, including interference that may cause undesired operation of the device.
This equipment complies with IC radiation exposure limits set forth for satisfying RF exposure compliance. This transmitter must not be co-located or operation in conjunction with any other antenna or transmitter.
These requirements set a SAR limit of 1.6W / kg averaged over one gram of tissue.
The highest SAR value for this Parnet Unit when tested for use in front of face is 0.043W/Kg and when worn on the body is 0.125W/Kg. This device was tested for typical body-worn operations. To comply with RF exposure requirements, Omm testing separation distance was done between testing BODY and the Parent Unit, including antenna. Third-party belt-clips, holsters, and simialr accessories used by this device should not contain any metallic components. Body-worn accessories that do not meet these requirements may not comply with RF exposure requirements and should be avoided. Use only the supplied antenna.
MANUEL DE L'UTILISATEUR
Specifications techniques 39
ANGLAIS 2
ESPAGNOL 41
MANUEL DE L'UTILISATEUR
VEUILLEZ CONSERVER CE MANUEL POUR CONSULTATION ULTÉRIEURE.
LISEZ ATTENTIVEMENT LES MISES EN GARDE ET LES INSTRUCTIONS AVANT D'ASSEMBLER ET D'UTILISER CE PRODUIT.
LE NON-RESPECT DES INSTRUCTIONS OU DES MISES EN GARDE POURRAIT ENDOMMAGER CE PRODUIT OU ENTRainer DES BLESSURES GRAVES OU LA MORT.
LE DETECTEUR DE MOUVEMENTS N'EST PAS CONC U POUR LA SURVEILLANCE D'ADULTES OU D'ENFANTS AGÉS DE PLUS DE 24 MOIS.
LE DETECTEUR DE MOUVEMENT N'EST PAS DESTINÉ À ÉTRE UTILISÉ POUR SAVOIR SI L'ENFANT EST SORTI DE SON LIT.

MISE EN GARDE
Go to previous page Go to next page Go to previous day Go to next day
Temperature indicator: The blue bar indicates the temperature in the room.
Sensor Pad Movement Levels: The red bar indicates the amount of movement from your Sensor Pad.
Low Movement 0-20 movements
Medium Movement 20-30 movements
High Movement Over 30 movements
Graphing Icons:
Indicates an alert during the period Indicates the system was turned off during the period