
10030107 - Freezer Klarstein - Free user manual and instructions
Find the device manual for free 10030107 Klarstein in PDF.

| Brand | Klarstein |
| Model | 10030107 |
| Product Type | Freezer |
| Power Supply | 220-240 V ~ 50 Hz |
| Climate Class | SN, N, ST, T (from +10 °C to +43 °C) |
| Freezing Capacity | Indicated on the rating plate (not specified in the manual) |
| Temperature Setting | Digital display with MODE and SETTING buttons |
| Operating Modes | Super Freeze (Sup), Eco (Eco), Manual Setting (Setting) |
| Key Lock | Yes, by simultaneous pressing of MODE + SETTING |
| Alarms | Door open (after 5 min), high temperature (> -8 °C for 3 h) |
| Defrosting | Manual: unplug, leave door open, collect water |
| Cleaning | Warm water and dish soap, do not use abrasive products |
| Door Reversal | Possible, detailed instructions in the manual |
| Adjustable Feet | Yes, for leveling |
| Spacer Parts | Provided, to be screwed onto the back |
| Child Safety | Key lock available |
| Refrigerant Type | Not specified |
| Weight | Not specified |
| Dimensions (W x D x H) | Not specified |
Frequently Asked Questions - 10030107 Klarstein
User questions about 10030107 Klarstein
0 question about this device. Answer the ones you know or ask your own.
Ask a new question about this device
Download the instructions for your Freezer in PDF format for free! Find your manual 10030107 - Klarstein and take your electronic device back in hand. On this page are published all the documents necessary for the use of your device. 10030107 by Klarstein.
USER MANUAL 10030107 Klarstein
Congratulations on purchasing this equipment. Please read this manual carefully and take care of the following hints on installation and use to avoid technical damages. Any failure caused by ignoring the items and cautions mentioned in the operation and installation instructions are not covered by our warranty and any liability.
Contents
Safety Information. 18
Product Description 20
Installation. 21
Operation 26
Disposal Considerations 31
Declaration of Conformity 31
Safety Information
General safety information
- This product is not designed for use by persons (including children) who have reduced physical, sensory or mental capacities or persons with no experience or knowledge, unless they are instructed and supervised in the use of the appliance by a person responsible for their safety.
- Packaging material could be dangerous for children! For disposing of package and the appliance please go to a recycling centre. Cut off the power supply cable and make the door closing device unusable.
- Keep ventilation openings, in the appliance enclosure or in the built-in structure, clear of obstruction.
- Do not use mechanical devices or other means to accelerate the defrosting process, other than those recommended by the manufacturer. Do not damage the refrigerant circuit.
- Do not use other electrical appliances (such as ice cream makers) inside of refrigerating appliances, unless they are approved for this purpose by the manufacture.
- Do not store explosive substances such as aerosol cans with a flammable propellant in this appliance.
- During transportation and installation of the appliance, be certain that none of the components of the refrigerant circuit become damaged.
- Avoid open flames and sources of ignition and thoroughly ventilate the room in which the appliance is situated.
- It is dangerous to alter the specifications or modify this product in any way. Any damage to the cord may cause a short circuit, fire and/or electric shock.
- The appliance is not designed for commercial use. It is intended for use in domestic households and in similar working and residential environments.
- Power cord must not be lengthened.
- Make sure that the power plug is not squashed or damaged by the back of the appliance. A squashed or damaged power plug may overheat and cause a fire.
- Make sure that you can come to the mains plug of the appliance. Do not pull the mains cable.
- If the power plug socket is loose, do not insert the power plug. There is a risk of electric shock or fire.
- You must not operate the appliance without the lamp.
- Do not remove nor touch items from the freezer compartment if you hands are damp/wet, as this could cause skin abrasions or frost/freezer burns.
- Avoid prolonged exposure of the appliance to direct sunlight.
Daily Use
- Do not put hot on the plastic parts in the appliance.
- Do not place food products directly against the rear wall. Frozen food must not be re-frozen once it has been thawed out. Store pre-packed frozen food in accordance with the frozen food manufactures instructions.
- Do not place carbonated of fizzy drinks in the freezer compartment as it creates pressure on the container, which may cause it to explode, resulting in damage to the appliance.
Care and cleaning
- Before maintenance, switch off the appliance and disconnect the mains plug from the mains socket.
- Do not clean the appliance with metal objects.
- Do not use sharp objects to remove frost from the appliance. Use a plastic scraper.
- Regularly examine the drain in the refrigerator for defrosted water. If necessary, clean the drain. If the drain is blocked, water will collect in te bottom of the appliance.
Hints on Installation
- Unpack the appliance and check if there are damages on it. Do not connect the appliance if it is damaged.
- Report possible damages immediately to the place you bought it. In that case retain packing.
- It is advisable to wait at least four hours before connecting the appliance to allow the oil to flow back in the compressor.
- Adequate air circulation should be around the appliance, lacking this leads to overheating. To achieve sufficient ventilation follow the instructions relevant to installation.
- Wherever possible the spacers of the product should be against a wall to avoid touching or catching warm parts (compressor, condenser) to prevent possible burn.
- The appliance must not be located close to radiators or cookers.
- Make sure that the mains plug is accessible after the installation of the appliance.
Service
Any electrical work required to do the servicing of the appliance should be carried out by a qualified electrician or competent person. This product must be serviced by an authorized Service Center, and only genuine spare parts must be used.
Energy saving
- Do not put hot food in the appliance.
- Do not pack food close together as this prevents air circulating.
- Make sure food does not touch the back of the compartment.
- If electricity goes off, do not open the doors.
- Do not open the doors frequently.
- Do not keep the doors open for too long time.
- Do not set the thermostat on e ceeding cold temperatures.
- Some accessories, such as drawers, can be removed to get larger storage volume and lower energy consumption.
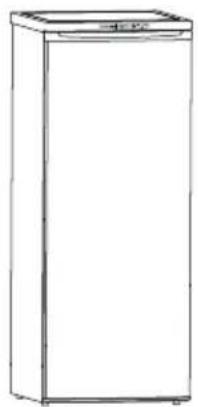
Product Description
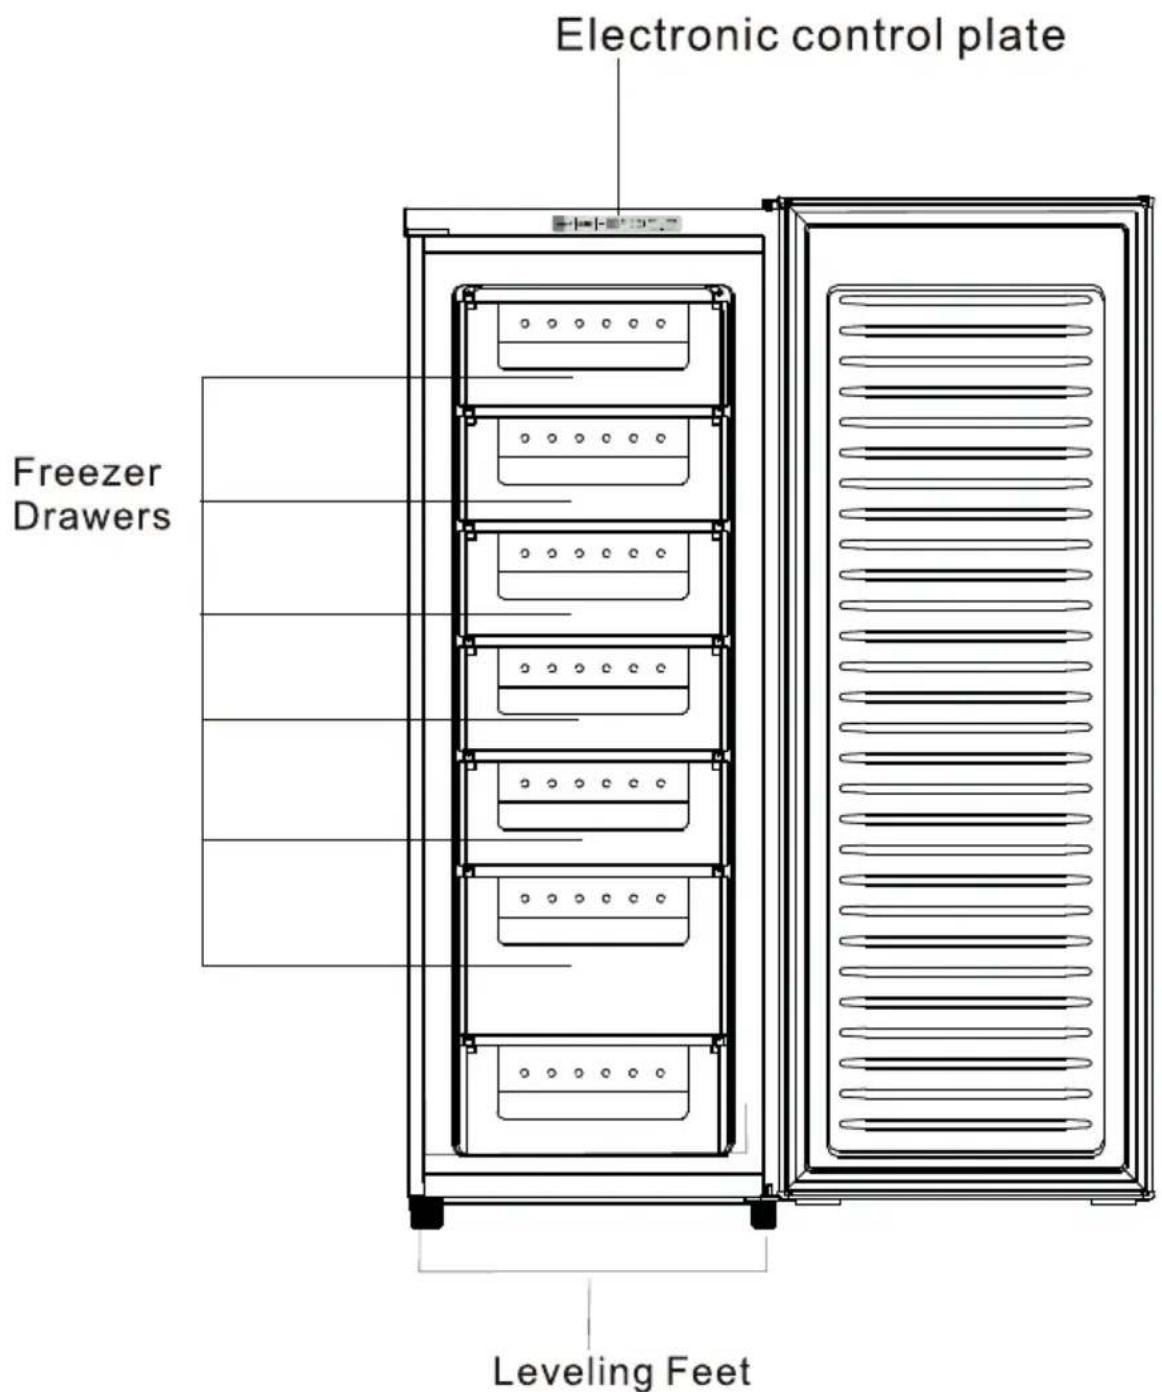
Installation
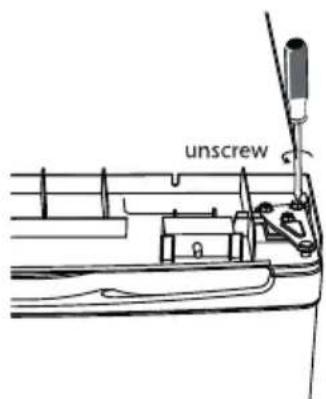
-
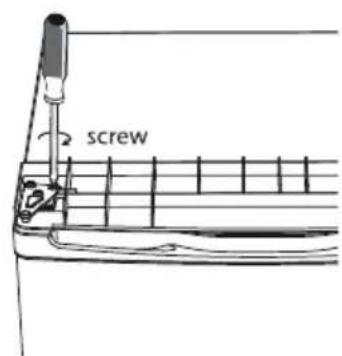
Remove the 2 screws on the back.
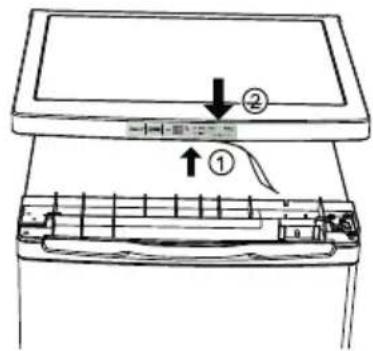
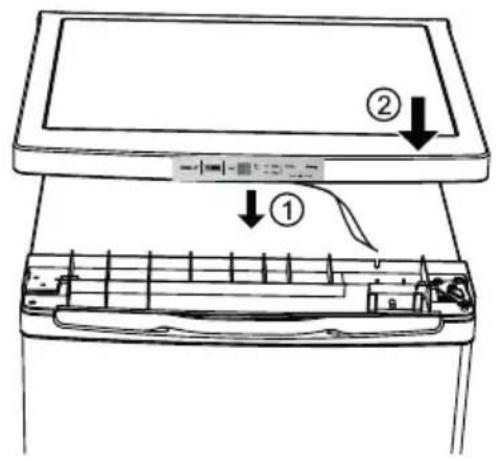
-
Carefully lift the top cover SCM away from the freezer, then pull out the terminal Then remove the top cover away.
- Remove the three screws, then remove the upper hinge that holds the door in place. Lift the door and place it on a padded surface to prevent it from scratching.
- Remove the screws and bottom hinge. Then remove the adjustable feet from both sides.

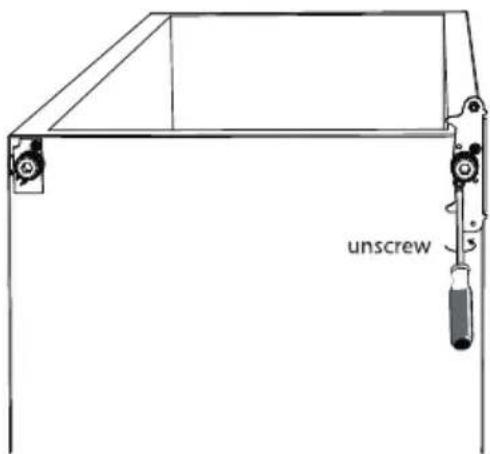
- Unscrew and remove the bottom hinge pin, turn the bracket over and replace it.
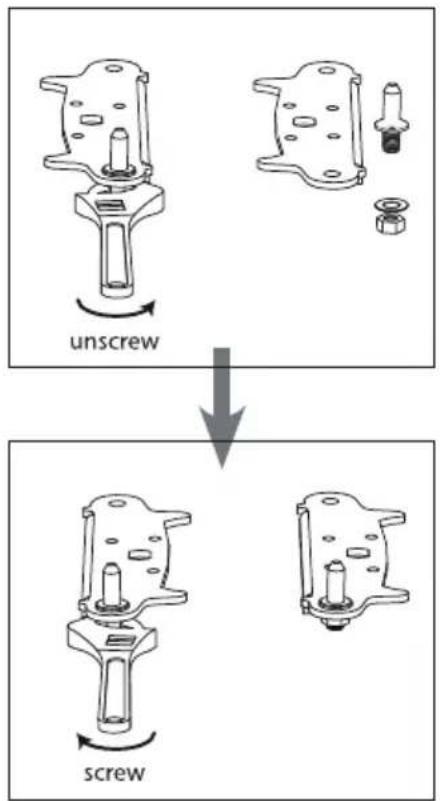
- Reset the bracket fitting the bottom hinge pin. Replace both adjustable feet.
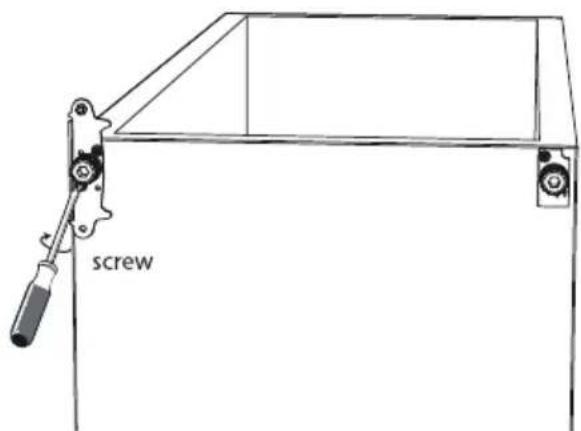
- Place the door back on, ensure the door is aligned horizontally and vertically, so that the seals are closed on all sides before finally tightening the top hinge.
- Connect the terminals onto the display board, then put top cover on
- Screw the 2 screws on the back.

- With the door closed, check that the door is aligned horizontally and vertically and that the seals are closed on all sides before finally tightening the bottom hinge. Readjust the levelling feet as needed.
Install door external handle
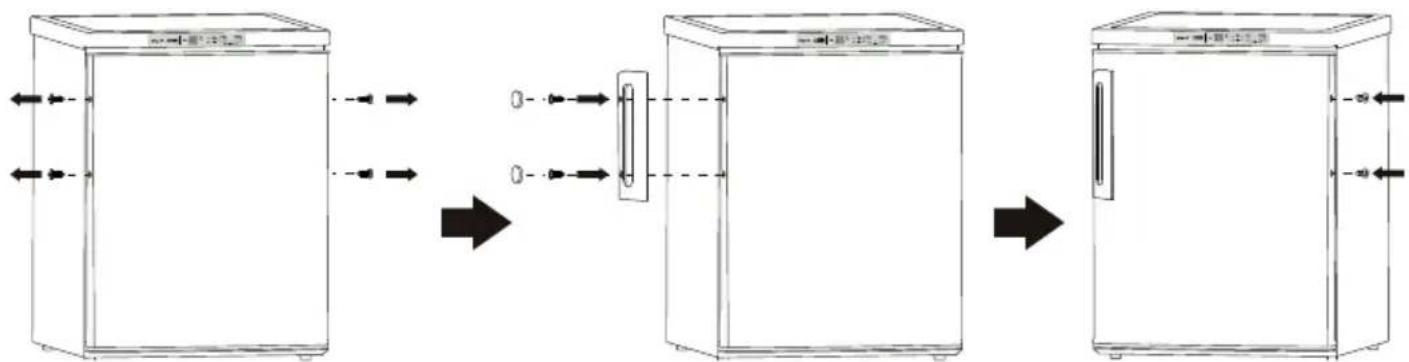
Rear spacer
Screw the rear spacers at the rear of the unit.

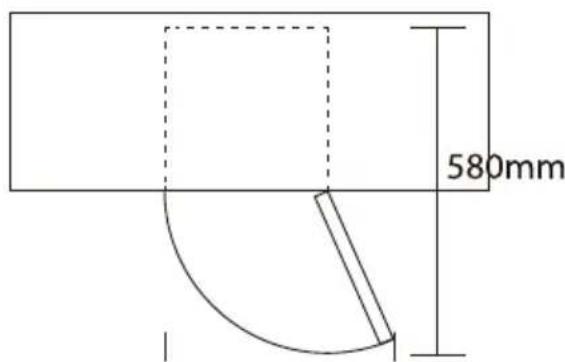
Space requirement
- Keep enough space of door open.
- Keep at least 50mm gap at two sides.
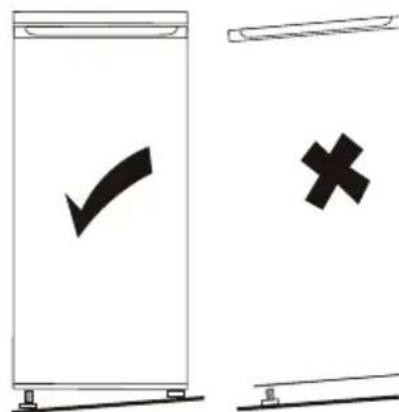
Levelling the unit
To do this adjust the two levelling feet at front of the unit.
If the unit is not level! the doors and magnetic seal alignments will not "e covered proper.
Positioning
Install this appliance at a location where the ambient temperature corresponds to the climate class indicated on the rating plate of the appliance.
| Climate class Room temperature | |
| SN +10 °C - +32 °C | |
| N +16 °C - +32 °C | |
| ST +16 °C - +38 °C | |
| T +16 °C - +43 °C | |
- The appliance should be installed well away from sources of heat such as radiators, boilers, direct sunlight.
- It must be possible to disconnect the appliance from the mains power supply.
- This appliance must be grounded. This oven is equipped with a cord having a grounding wire with a grounding plug. It must be plugged into a wall receptacle that is properly installed and grounded. In the event of an electrical short circuit, grounding reduces risk of electric shock by providing an escape wire for the electric current.
Operation
Before first Use
Before using the appliance for the first time, wash the interior and all internal accessories with lukewarm water and some neutral soap so as to remove the typical smell of a brand new product, then dry thoroughly. Do not use detergents or abrasive powders, as these will damage the finish.
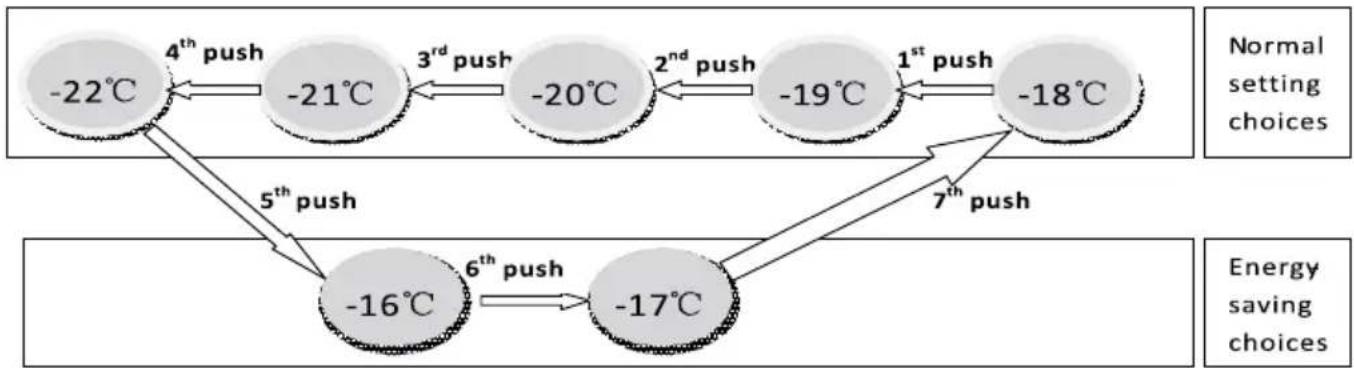
Temperature settings
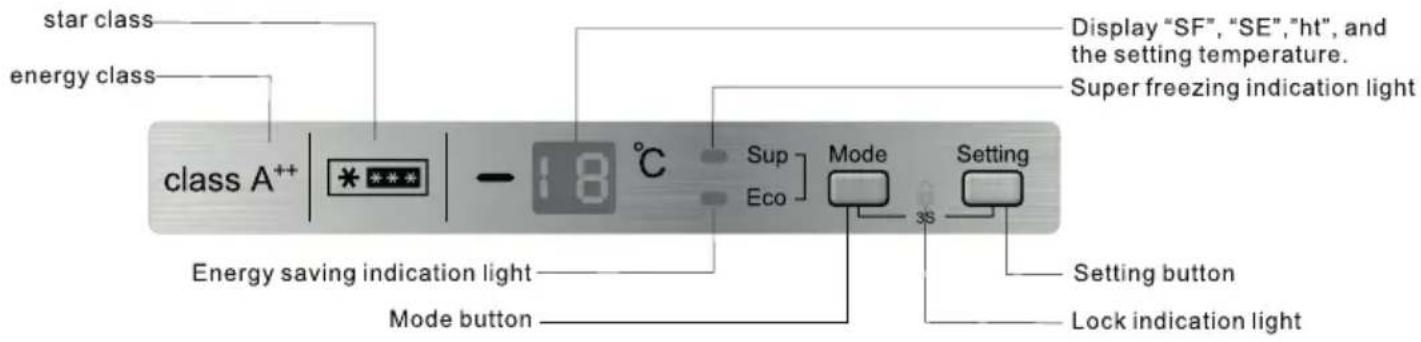
Press MODE 1x : the lamp of "sup" is lighted on, and the appliance would be fast freezing and the LED displays (super freezing).
Press MODE 2x:, the fasting freezing lamp!lack out, and the "Eco" lamp is lighted on, the appliance would go into "Eco" mode, the appliance will run with the setting at -16 °C and the LED will display "SE" (save energy).
Press MODE 3x: drucken: both of lamps of "sup" and "Eco" black out, the appliance would be back to setting mode by user.
The mode is cycling to change during „Sup“, „Eco“ und „Setting”.

Temperature setting
Lock
When push "mode" and "setting" buttons at the same time for 8 seconds, buttons will! be locked and the lamp of lock is lighted on. If you want to unlock the buttons, please push "mode" and "setting" buttons at the same time for 8 seconds again.
Turn off
Push and hold "setting" button for 5 seconds and switch off the machine. If you want to switch on the machine, please push and hold "setting" buttons for 5 seconds again.
Displayed temperature
Important! LED always displays the setting temperature, not real temperature.
Door open alarm
If miss to close door for five minutes, the door open alarm will give out alarm sound which will!e three times each 1 seconds and last 1 minutes and then stop 1 minutes and again give out alarm sound till you close door.
High temperature alarm
After running for 3 hours and it the temperature is more than -8^ , the LED will alternately display .ht" and the real temperature and give out a deep voiced alarm sound.
Freezing fresh food
- The freezer compartment is suitable for freezing fresh food and storing frozen and deep*frozen food for a long time.
- Place the fresh food to be frozen in the bottom compartment.
- The maximum amount of food that can be frozen in 14 hours is specified on the rating plate.
- The supper freezing process lasts 26 hours. During this period do not add other food to be frozen.
Storing frozen food
When first starting-up or after a period out of use. Before putting the product in the compartment let the appliance to be set in super freezing mode.
Note: In the event of accidental defrosting, for example the power has been off for longer than the value shown in the technical characteristics chart under "rising time", the defrosted food must be consumed quickly or cooked immediately and then refrozen (after cooked).
Thawing
Deep* frozen or frozen food, prior to be used, can be thawed in the freezer compartment or at room temperature, depending on the time available for this operation.
Small pieces ma even be cooked still frozen, directly from the freezer. In this case, cooking will take longer.
Ice cubes
This appliance my be equipped with one or more trays for the production in ice cubes..
Freezing fresh food
- Only freeze top quality, fresh and thoroughly cleaned, foodstuffs.
- Prepare food in small portions to enable it to be rapidly and completely frozen and to make it possible subsequently to thaw only the quantity required.
- Wrap up the food in aluminium foil or polythene and make sure that the packages are airtight.
- Do not allow fresh, unfrozen food to touch food which is already frozen, thus avoiding a rise in temperature of the latter.
- Lean foods store better and longer than fatty ones; salt reduces the storage life of food;
- Water ices, if consumed immediately after removal from the freezer compartment, can possibly cause the skin to be freeze burn.
- It is advisable to show the freezing in date on each individual pack to enable you removal from the freezer compartment, can possibly cause the skin to be freeze burnt.
It is advisable to show the freezing in date on each individual pack to enable you to keep tab of the storage time.
Hints for storage of frozen food
- Make sure that the commercially frozen foodstuffs were adequately stored by the retailer.
- Be sure that frozen foodstuffs are transferred from the food store to the freezer in the shortest possible time.
- Not open the door frequently or leave it open longer than absolutely necessary.
- Once defrosted, food deteriorates rapidly and cannot be refrozen.
- Do not exceed the storage period indicated by the food manufacture.
Cleaning and Maintenance
Cleaning
For hygienic reasons the appliance interior, including interior accessories, should be cleaned regularly.
Caution I The appliance may not be connected to the mains during cleaning. Danger of electrical shock! Before cleaning switch the appliance off and remove the plug from the mains, or switch off or turn out the circuit breaker or fuse. Never clean the appliance with a steam cleaner. Moisture could accumulate in electrical components, danger of electrical shock! Hot vapours can lead to the damage of plastic parts. The appliance must be dry before it is placed back into service.
Important! Ethereal oils and organic solvents can attack plastic parts, e.g. lemon juice or the juice form orange peel, butyric acid, cleanser that contain acetic acid.
- Do not allow such substances to come into contact the appliance parts.
- Do not use any abrasive cleaners.
- Remove the food from the freezer. Store them in a cool place, well covered.
- Switch the appliance off and remove the plug from the mains, or switch off or turn out the circuit breaker of fuse.
- Clean the appliance and the interior accessories with a cloth and lukewarm water. After cleaning wipe with fresh water and rub dry.
- Accumulation of dust at the condenser in creases energy consumption. For this reason carefully clean the condenser at the back of the appliance once a year with a soft brush or a vacuum cleaner.
- After everything is dry place appliance back into service.
Defrosting of the freezer
The freezer compartment, however, will become progressively covered with frost. This should be removed. Never use sharp metal tools to scrape off frost from the evaporator as you could damage it.
However, when the ice becomes very thick on the inner liner, complete defrosting should be carried out as:
- pull out the plug from the socket;
- remove all stored food, wrap it in several layers of newspaper and put it in a cool place;
- keep the door open, and placing a basin underneath of the appliance to collect the defrost water;
- when defrosting is completed, dry the interior thoroughly
- replace the plug in the power socket to run the appliance again.
Troubleshooting
| Problem Possible Cause Solution | ||
| Appliance does not work. | Temperature regulation knob is set at number “0”. | Set the knob at other number to switch on the appliance. |
| Mains plug is not plugged in or is loose. | Insert mains plug. | |
| Fuse has blown or is defective. Check fuse, replace if necessary. | ||
| Socket is defective. Mains malfunctions are to be corrected by an electrician. | ||
| The food is too warm. | Temperature is not properly adjusted. | Please look in the initial Temperature Setting section. |
| Door was open for an extended period. | Open the door only as long as necessary. | |
| A large quantity of warm food was placed in the appliance within the last 24 hours. | Turn the temperature regulation to a colder setting temporarily. | |
| The appliance is near a heat source. | Please look in the installation location section. | |
| Appliance cools too much. | Temperature is set too cold. Turn the temperature regulation knob to a warmer setting temporarily. | |
| Unusual noises. | Appliance is not level. Re-adjust the feet. | |
| The appliance is touching the wall or other objects. | Move the appliance slightly. | |
| A component, e.g. a pipe, on the rear of the appliance is touching another part of the appliance or the wall. | If necessary, carefully bend the component out of the way. | |
| Water on the floor. Water drain hole is blocked. See the Cleaning and Care section. | ||
Disposal Considerations
According to the European waste regulation 2002/96/EC this symbol on the product or on its packaging indicates that this product may not be treated as household waste. Instead it should be taken to the appropriate collection point for the recycling of electrical and electronic equipment. By ensuring this product is disposed of correctly, you will help prevent potential negative consequences for the environment and human health, which could otherwise be caused by inappropriate waste handling of this product. For more detailed information about recycling of this product, please contact your local council or your household waste disposal service.
Declaration of Conformity
CE
Producer: Chal-Tec GmbH, Wallstraße 16, 10179 Berlin, Germany
This product is conform to the following European Directives:
2014/30/EU (EMV)
2014/35/EU (LVD)
2009/125/EU (EVPG)
2010/30/EU (Energy efficiency labelling)
Chere cliente, cher client,

- Contents
- Safety Information
- General safety information
- Daily Use
- Care and cleaning
- Hints on Installation
- Service
- Energy saving
- Product Description
- Installation
- Space requirement
- Levelling the unit
- Positioning
- Operation
- Before first Use
- Temperature settings
- Temperature setting
- Lock
- Turn off
- Displayed temperature
- Door open alarm
- High temperature alarm
- Freezing fresh food
- Storing frozen food
- Thawing
- Ice cubes
- Hints for storage of frozen food
- Cleaning and Maintenance
- Cleaning
- Defrosting of the freezer
- Troubleshooting
- Disposal Considerations
- Declaration of Conformity
Brand : Klarstein
Model : 10030107
Category : Freezer