Lucia - Food Processor Klarstein - Free user manual and instructions
Find the device manual for free Lucia Klarstein in PDF.

| Product type | Food processor |
| Brand | Klarstein |
| Model | Lucia |
| Power | 2000 W |
| Power supply | 220-240 V ~ 50/60 Hz |
| Mixing bowl capacity | 5 L |
| Glass bowl capacity | 1.5 L |
| Speeds | 6 speeds + P position (pulse) |
| Main functions | Mixing, kneading, whisking, chopping, making sausages and noodles |
| Included accessories | Kneading hook, whisk, flat beater, blender, meat grinder, sausage and noodle attachments |
| Mixing bowl material | Stainless steel (dishwasher safe) |
| Glass bowl material | Glass |
| Safety features | Safety lid lock (machine does not start without the lid) |
| Cleaning | Mixing bowl dishwasher safe, other parts clean with hot water and dish soap |
| Maximum continuous use | 4 minutes |
| Warranty | Manufacturer's warranty (see manual) |
Frequently Asked Questions - Lucia Klarstein
User questions about Lucia Klarstein
0 question about this device. Answer the ones you know or ask your own.
Ask a new question about this device
Download the instructions for your Food Processor in PDF format for free! Find your manual Lucia - Klarstein and take your electronic device back in hand. On this page are published all the documents necessary for the use of your device. Lucia by Klarstein.
USER MANUAL Lucia Klarstein
Bella Food Processor
INHALTSVERZEICHNIS
natural_image
Symbol of a trash bin crossed with a diagonal line, representing no waste or discharge (no text or labels)Unit 6 Riverside Business Centre
Brighton Road
Shoreham-by-Sea
BN43 6RE
United Kingdom
Dear Customer,
Congratulations on purchasing this device. Please read the following instructions carefully and follow them to prevent possible damages. We assume no liability for damage caused by disregard of the instructions and improper use. Scan the QR code to get access to the latest user manual and more product information.

CONTENT
Safety Instructions 14
Product Overview 15
Before first Use 17
Use and Operation 17
Use of the Mincer 19
Cleaning and Care 22
Disposal Considerations 22
Manufacturer & Importer (UK) 22
TECHNICAL DATA
| Item number 10006254, 10006255, 10008235,10008236, 10008237, 10031674,10031675, 10035639, 10035640,10035641 | |
| Power supply 220-240 V ~ 50/60 Hz | |
| Power consumption 2000 W | |
| Capacity bowl 5 L | |
| Capacity jar 1,5 L |
SAFETY INSTRUCTIONS
- Read these instructions carefully.
- Read all instructions carefully and keep the manual for future reference.
- To protect yourself from electric shock, do not immerse the appliance, power cord or plug in water or other liquids.
- Do not leave the unit unattended in the presence of children.
- Turn the power off and unplug the appliance before assembling, disassembling, using, or cleaning.
- Do not allow body parts, jewelry, or loose clothing to come into contact with the moving parts of the product.
- Do not insert your fingers into the product while it is in use.
- If the power cord is damaged, have it repaired by the manufacturer or qualified service personnel.
- Make sure that the voltage of the device is the same as your home power supply. The motor should always be switched off when connecting the mixer to the mains.
- Only use accessories approved by the manufacturer, otherwise you could seriously injure yourself or damage the appliance. Only use the unit indoors.
- Do not leave the unit unattended.
- Do not let the power cord hang over the edge of the work surface.
- Keep hands and other kitchen utensils away from knives and moving parts during operation to prevent injury or damage to the appliance.
- Be careful not to injure yourself when cleaning the knives.
- Ensure that all parts are firmly connected before putting the appliance into operation.
- Do not use accessories that are not approved by the manufacturer.
- Be careful when lifting the unit - it is very heavy. Make sure that the mixer head is locked and all parts are tight when lifting the unit.
- Unplug the appliance from the wall outlet when leaving it unattended or when assembling or disassembling it.
- Be careful when pouring hot food into the mixer as unexpected hot steam may escape. Never use this appliance for cooking food.
- Children, physically and mentally handicapped persons should only use the appliance if they have been thoroughly familiarized with its functions and safety precautions by a supervisor.
- The appliance is not intended for commercial use, but only for household use and similar environments, such as staff kitchens, farms, hotels, motels or Bed & Breakfast accommodations.
- Misuse will void the warranty.
Cleaning Instructions
- Do not use volatile or corrosive liquids for cleaning, such as insect sprays. Excessive pressure when wiping may damage the surfaces. Rubber or plastic parts should not be in contact with the unit for long periods of time.
- Do not use abrasive or corrosive detergents as they may corrode the surface.
• Thoroughly clean all parts before first use.
PRODUCT OVERVIEW
| 1 Measuring cup2 Lid3 Glass Jar4 Jar base5 Sealing ring6 Blade base | 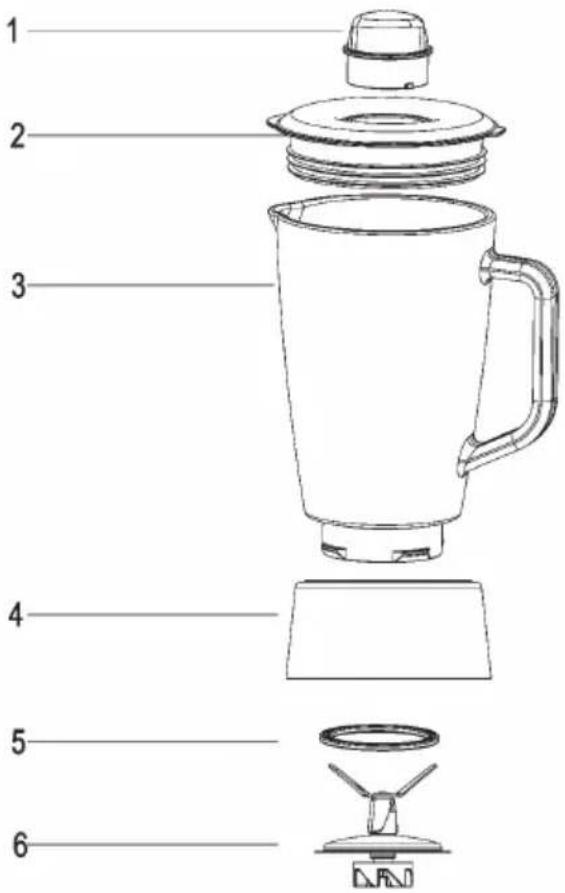 |
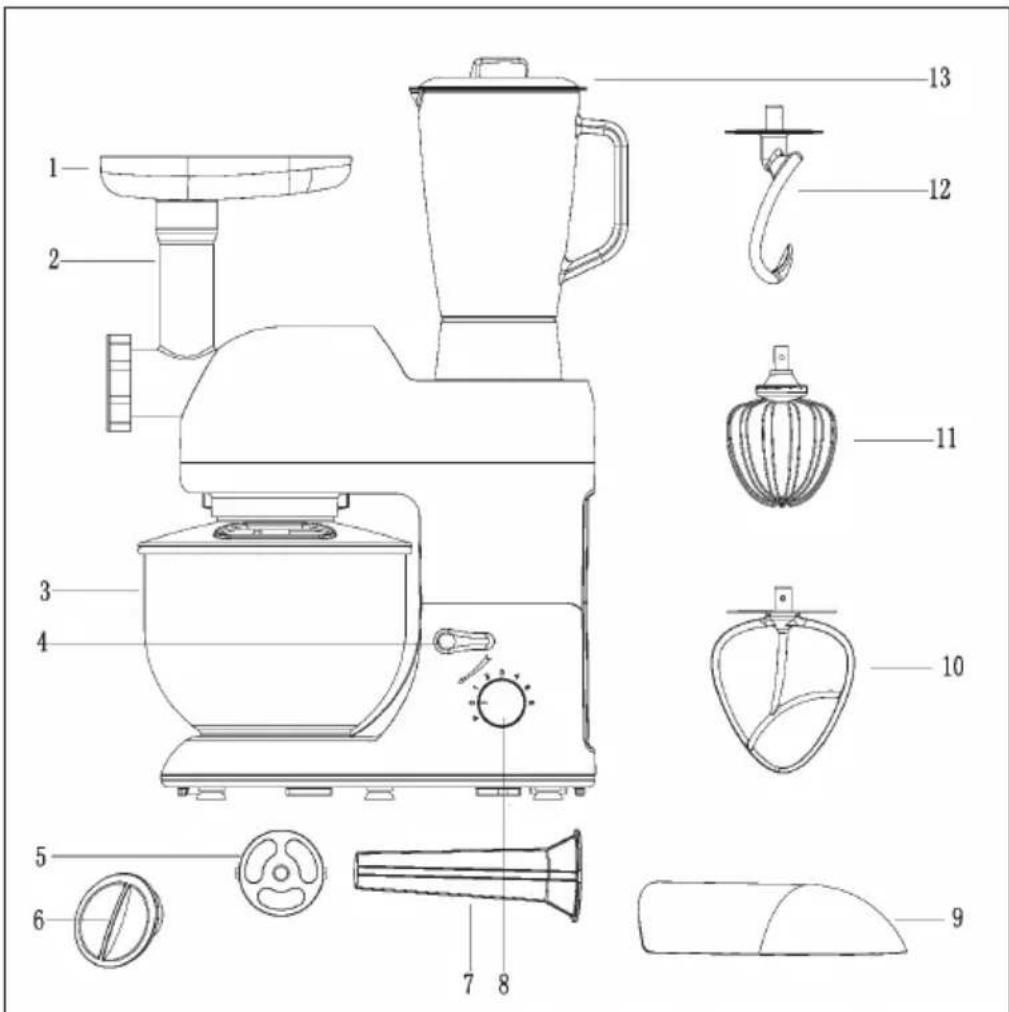
| 1 | Hopper | 8 | Rotary knob |
| 2 | Mincing tube Caudal cover | ||
| 3 | Mixing bowl | 10 | Mixing blade |
| 4 | Shaft knob | 11 | Egg beater |
| 5 | Sausage Holder | 12 | Dough blade |
| 6 | Front cover | 13 | Blender jar |
| 7 | Sausage tube |
BEFORE FIRST USE
- All parts of the food mixer are to be thoroughly cleaned before being used for the first time (see section: Cleaning).
- Take out the required length of cable from the cable tidy on the base of the food mixer and connect the device to the mains supply.
USE AND OPERATION
Note: For safety reasons, the lid or glass container must be fitted before the machine can be put into operation. Otherwise the machine may not start.
Assembly of the Glass Jar
- Mount the jar sealing ring onto the blade base, and Mount the blade base into the jar base, and the inside ring of jar base is tighten on jar base as far as fixed the blade base tight.
- After putting the ingredients in the jar, fix the lid onto the jar by pressing down.
- Insert the Measuring cup into the opening of the lid, and tune it in anticlockwise direction until it is locked.
- Mount the jar with jar unit onto the main base, and tune the jar in anticlockwise direction until the jar is locked.
Trial Use
- Revolve the Shaft knob, then lift the machine arm.
- Put the mixing bowl and mixing bowl cover onto the base, and lock it as the arrowhead denotes.
- Revolve the Shaft knob, then push the upper cover down and make the arm down. Make sure the arm is fixed together the base, then Revolve the Shaft knob up to lock the arm solidly.
- Plug-in the cord, and turn the switch to P, then try every speed for a few seconds.
- After the trial, turn the switch to Speed 0.
- Turn the Shaft knob and lift the arm, then take apart the mixing blade from the blade conector.
- Take off the back cover from the upper housing.
- Pure a cup of water into the blender jar, set the blender jar onto the machine, then repeat step 4, 5 and 6.
- Take off the blender jar, and set the Caudal cover to the machine.
To Mix or Knead Dough
- Mix flour and water in the ratio 5:3
- Mix the dough for 20 seconds at level 1, 20 seconds at level 2 and 3 minutes at level 3
- Observe the maximum filling quantity. For flour this is 1500 g.
- Use the dough hook.
- Do not use the dough hook continuously for more than 20 seconds at level 1 or 2 and for more than 4 minutes at level 3.
- Do not use the appliance continuously for more than 4 minutes
Whipping Egg Whites or Cream
- Switch on speed 4 to speed 6, whip the egg whites without stopping for about 5 minutes, according to the size of the eggs, until stiff.
- Maximum quantity 24 eggs.
- For whipped cream, whip 250 ml fresh cream at speed 4 to 6 for about 5 minutes.
- When filling the glass jar with fresh milk, cream or other ingredients, please ensure that the maximum quality is not exceeded.
- The egg beater should be used.
- Use No longer than 4 minutes continuously at a time.
Use Blender Function
- Place the foodstuff you wish to process into the glass jar.
- Put the lid on the glass jar and close securely. Place the measuring cup into the hole in the lid and turn clockwise to lock.
| Level 3-4 For light use (liquids) |
| Level 5-6 For firmer consistency (liquids, solid food) |
| Level P For crushing ice cream, or for short and powerful mixing |
- Set the switch to level 0 after use.
USE OF THE MINCER
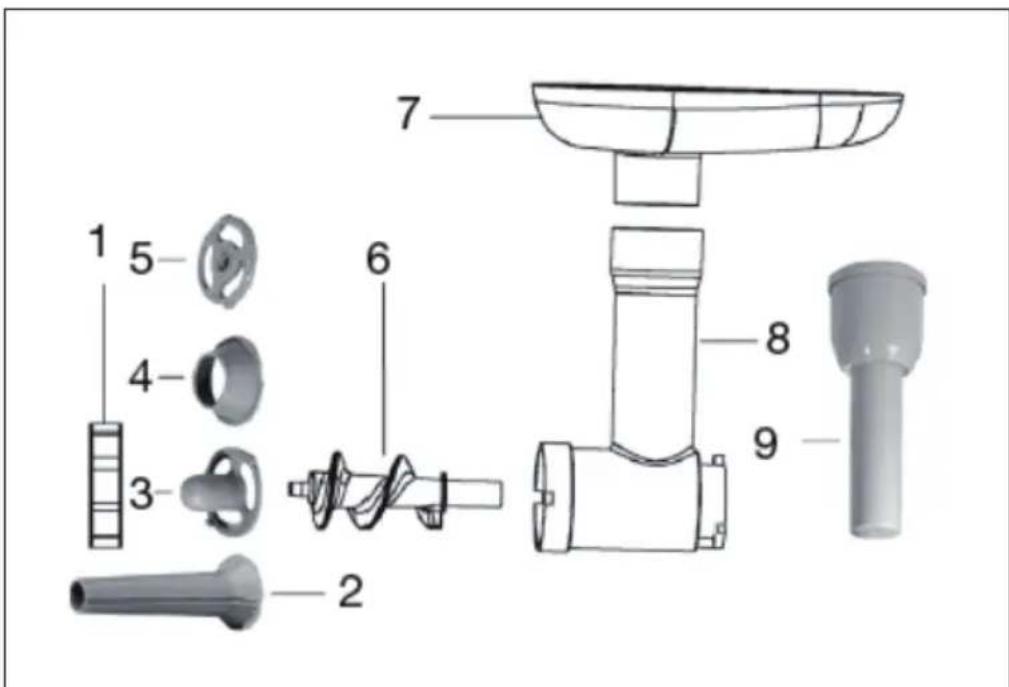
| 1 | Locking ring | 5 | Hopper |
| 2 | Perforated discs | 6 | Filler tube |
| 3 | Mincing knife | 7 | Stopper |
| 4 | Snail |
Mincing
Note: The fineness of the minced meat depends on the perforated disc used. The cover of the mixing attachment must be fitted.
- Cut the food into small pieces (meat without sinews and bones, approx. 2x2x6 cm) so that they fit easily into the funnel opening.
- Connect the device to the mains and switch to speed level 4-6.
- Place the food in the hopper. Only use the stopper to press the food down.
- Switch off the appliance after use and disconnect it from the mains.
Note: Do not use the appliance for more than 4 minutes at a time.
Production of Sausages and Kibbeh (Minced Meat Rolls)
| 1 | Locking ring | 6 | Snail |
| 2 | Sausage filling tube | 7 | Hopper |
| 3 | Adapter | 8 | Filler tube |
| 4 | Meat nozzle | 9 | Stopper |
| 5 | Biscuit top |
Note: The cover of the mixing attachment must be fitted. The sausage filling accessories can be found in the stopper.
Manufacture of Sausages
Place the adapter and the sausage filling tube on the screw and turn the locking ring onto the filling tube. Thread the sausage skin onto the sausage filling tube and knot the end. Make sure that the sausage casing is loosely filled, as the sausage expands during frying or cooking and the casing can tear open. Press the sausage together at the end with your fingers and turn it once or twice around its own axis.
Production of Kibbeh (Minced Meat Rolls)
Place the adapter and the meat nozzle on the screw and turn the locking ring onto the filling tube. The meat mass is pressed through the adapter and meat nozzle and formed into a hollow roll. Cut the roll into the desired shape.
Length. This can be filled with different ingredients.
Production of Noodles
Note: The cover of the mixing attachment must be fitted. The noodle accessories can be found in the tamper.
| 1 | Locking ring | 4 | Hopper |
| 2 | Noodle inserts | 5 | Filler tube |
| 3 | Snail | 6 | Stopper |
• Mix flour and water in a ratio of 2:3.
- To mix the ingredients, we recommend setting the speed control to level 1 for about 20 seconds and level 2 for a further 20 seconds. For stirring/kneading, set the speed control to level 3 for about 3 minutes.
- When filling the mixing bowl, make sure that the maximum filling quantity is not exceeded. The maximum quantity for flour is 1500 g.
Note: Do not use the appliance for more than 4 minutes at a time.
CLEANING AND CARE
- Before cleaning, please ensure that the Switch knob is at the "0" position and that the plug has been disconnected from the socket.
• After use, allow the device to cool down before you start to clean it.
• To clean the exterior of the device, use a moist cloth and a mild detergent. - When cleaning the interior and exterior do not use any abrasive detergents or alcohol.
• To clean the device, never submerge it in water. - The dough blade, mixing blade are not dishwasher safe. The accessories must be cleaned only in warm water and washing-up liquid.
- The plastic accessories, Mixing bowl, egg beater, blender jar and blades inside, can be cleaned with warm water and washing-up liquid or in dishwasher. Do not use any abrasive detergents.
DISPOSAL CONSIDERATIONS
natural_image
Symbol of a trash bin crossed with a diagonal line, no text or numbers presentIf there is a legal regulation for the disposal of electrical and electronic devices in your country, this symbol on the product or on the packaging indicates that this product must not be disposed of with household waste. Instead, it must be taken to a collection point for the recycling of electrical and electronic equipment. By disposing of it in accordance with the rules, you are protecting the environment and the health of your fellow human beings from negative consequences. For information about the recycling and disposal of this product, please contact your local authority or your household waste disposal service.
MANUFACTURER & IMPORTER (UK)
Manufacturer:
Chal-Tec GmbH, Wallstrasse 16, 10179 Berlin, Germany.
Importer for Great Britain:
Chal-Tec UK limited
Unit 6 Riverside Business Centre
Brighton Road
Shoreham-by-Sea
BN43 6RE
United Kingdom
Estimado cliente,
ÍNDICE
natural_image
Symbol of a trash bin crossed with a diagonal line, no text or numbers presentUnit 6 Riverside Business Centre
Brighton Road
Shoreham-by-Sea
BN43 6RE
United Kingdom
Chère cliente, cher client,
SOMMAIRE
natural_image
Symbol of a trash bin crossed with a diagonal line, no text or numbers presentUnit 6 Riverside Business Centre
Brighton Road
Shoreham-by-Sea
BN43 6RE
United Kingdom
Gentile cliente,
INDICE
natural_image
Symbol of a trash bin crossed with a diagonal line, no text or numbers presentPRODUTTORE E IMPORTATORE (UK)
Produttore:
Chal-Tec GmbH, Wallstraße 16, 10179 Berlino, Germania.
Unit 6 Riverside Business Centre
Brighton Road
Shoreham-by-Sea
BN43 6RE
United Kingdom

area
| Category | Value | |---|---| | 1 | 100 | | 2 | 100 | | 3 | 100 | | 4 | 100 | | 5 | 100 | | 6 | 100 | | 7 | 100 | | 8 | 100 | | 9 | 100 | | 10 | 100 | | 11 | 100 | | 12 | 100 | | 13 | 100 | | 14 | 100 | | 15 | 100 | | 16 | 100 | | 17 | 100 | | 18 | 100 | | 19 | 100 | | 20 | 100 | | 21 | 100 | | 22 | 100 | | 23 | 100 | | 24 | 100 | | 25 | 100 | | 26 | 100 | | 27 | 100 | | 28 | 100 | | 29 | 100 | | 30 | 100 | | 31 | 100 | | 32 | 100 | | 33 | 100 | | 34 | 100 | | 35 | 100 | | 36 | 100 | | 37 | 100 | | 38 | 100 | | 39 | 100 | | 40 | 100 | | 41 | 100 | | 42 | 100 | | 43 | 100 | | 44 | 100 | | 45 | 100 | | 46 | 100 | | 47 | 100 | | 48 | 100 | | 49 | 100 | | 50 | 100 | | 51 | 100 | | 52 | 100 | | 53 | 100 | | 54 | 100 | | 55 | 100 | | 56 | 100 | | 57 | 100 | | 58 | 100 | | 59 | 100 | | 60 | 100 | | 61 | 100 | | 62 | 100 | | 63 | 100 | | 64 | 100 | | 65 | 100 | | 66 | 100 | | 67 | 100 | | 68 | 100 | | 69 | 100 | | 70 | 100 | | 71 | 100 | | 72 | 100 | | 73 | 100 | | 74 | 100 | | 75 | 100 | | 76 | 100 | | 77 | 100 | | 78 | 100 | | 79 | 100 | | 80 | 100 | | 81 | 100 | | 82 | 100 | | 83 | 100 | | 84 | 100 | | 85 | 100 | | 86 | 100 | | 87 | 100 | | 88 | 100 | | 89 | 100 | | 90 | 100 | | 91 | 100 | | 92 | 100 | | 93 | 100 | | 94 | 100 | | 95 | 100 | | 96 | 100 | | 97 | 100 | | 98 | 100 | | 99 | 100 | | Note: The actual values in the 'Value' column are not provided in the code. I have used the label 'The Region' to represent the 'Region'. The values are estimated based on the provided code.