
10031578 - Pan Klarstein - Free user manual and instructions
Find the device manual for free 10031578 Klarstein in PDF.

| Product Type | Radiant heater / electric heater |
| Brand | Klarstein |
| Model | 10031578 (electronic version) |
| Power supply | 220-240 V ~ 50-60 Hz |
| Rated heating power | 2.2 kW |
| Minimum heating power | 1 kW |
| Temperature adjustment range | 5°C to 45°C |
| Power modes | Low (LOW), Medium (MID), High (HIGH) |
| Thermostat | Electronic, ambient temperature control |
| Timer | Timer ON and Timer OFF from 1 to 23 hours |
| Remote control | Yes, with included 3 V button cell battery |
| Air purifier (ionizer) | Yes, can be activated/deactivated |
| Fan | Integrated, operates in MID and HIGH modes, optional in LOW |
| Anti-frost mode | Yes, maintains a temperature of 10°C |
| Cooling function | The fan continues for 30 seconds after shutdown to dissipate heat |
| Overheating protection | Automatic shutdown if chassis temperature exceeds 60°C (code E1) |
| Tip-over protection | Automatic shutdown in case of excessive tilt |
| Cleaning | Grille: vacuum cleaner with brush; body: soft dry cloth |
| Prohibited cleaning products | Gasoline, solvent, abrasive product or alcohol |
| Storage | In a dry, cool, clean place, preferably in its original packaging |
| Standby consumption | 0.001 kW |
Frequently Asked Questions - 10031578 Klarstein
User questions about 10031578 Klarstein
0 question about this device. Answer the ones you know or ask your own.
Ask a new question about this device
Download the instructions for your Pan in PDF format for free! Find your manual 10031578 - Klarstein and take your electronic device back in hand. On this page are published all the documents necessary for the use of your device. 10031578 by Klarstein.
USER MANUAL 10031578 Klarstein
Congratulations on purchasing this equipment. Please read this manual carefully and take care of the following hints to avoid damages. Any failure caused by ignoring the mentioned items and cautions mentioned in the instruction manual are not covered by our warranty and any liability.
CONTENTS
Technical Data 14
Declaration of Conformity 14
Safety Instructions 15
Main Parts 16
Control Panel 17
Remote Control 19
Use and Operation 19
Care and Cleaning 22
Hints on Disposal 22
TECHNICAL DATA
| Item number 10031577, 10031578 | |
| Power supply 220-240 V ~ 50-60 Hz |
DECLARATION OF CONFORMITY
Producer:
Chal-Tec GmbH, Wallstraße 16, 10179 Berlin, Germany.

This product is conform to the following European
Directives:
2014/30/EU (EMC)
2014/35/EU (LVD)
2011/65/EU (RoHS)
2009/125/EC (ErP)
SAFETYINSTRUCTIONS
- Read all instructions carefully before using the Heater.
- This appliance can be used by children aged from 8 years and above and persons with reduced physical, sensory or mental capabilities or lack of experience and knowledge, if they have been given supervision or instruction concerning use of the appliance in a safe way and understand the hazards involved. Children shall
not play the appliance. Cleaning and user maintenance shall not be made by children unless they are older than 8 and supervised. - Keep the appliance and its cord out of reach of children less than 8 years.
- If the supply cord is damaged, it must be replaced by manufacturer, its service agent or similary qualified persons in order to avoid a hazard.
- The Heater is not intended to be operated by means of an external programmer, timer, separate remote-control system or any other device that switches the Heater on automatically, since a fire risk exists if Heater is covered
or positioned incorrectly.
In order to avoid over heating, do not cover the Heater. The Heater is hot when in use. To avoid burns, do not let bare skin touch hot surface.
- Remove the package and ensure that the Heater is undamaged. In case of doubt do not use the Heater and contact your supplier.
- Do not let children play parts of package.
- Heater is intended for household use ONLY, not for industrial or outdoor use.
- Before using the Heater, check if the voltage marked on the rating label
corresponds to the mains in your home. - Avoid using extension cord as the extension cord may overheat and cause fire.
- The Heater must not be located immediately below a socket outlet.
- Do not pull the power cord to disconnect with power source. Always grasp the plug to pull out.
- Do not insert any objects into the Heater as it may cause an electric shock or fire
- or damage to the Heater. Do not block or tamper with the Heater in any manner
- while it is in operation, To prevent a possible fire, do not block air inlet or
- outlet in any manner. Do not place on soft surfaces, like a bed, where opening
may become blocked. -
The Main Power Switch and the On/Off switch should not be used as the sole means of disconnecting power.
-
If the heater overheats, it will cut off the power automatically. Do not operate the heater and let it cool down completely before you start it again.

Risk of electric shock! To avoid electric shock, always unplug the appliance before cleaning and servicing the appliance.
- The Heater is not intended for use in the immediate surroundings of a basin, a
- bath, a shower, a swimming pool, a wet or damp locations.
MAINPARTS
Electronic Model
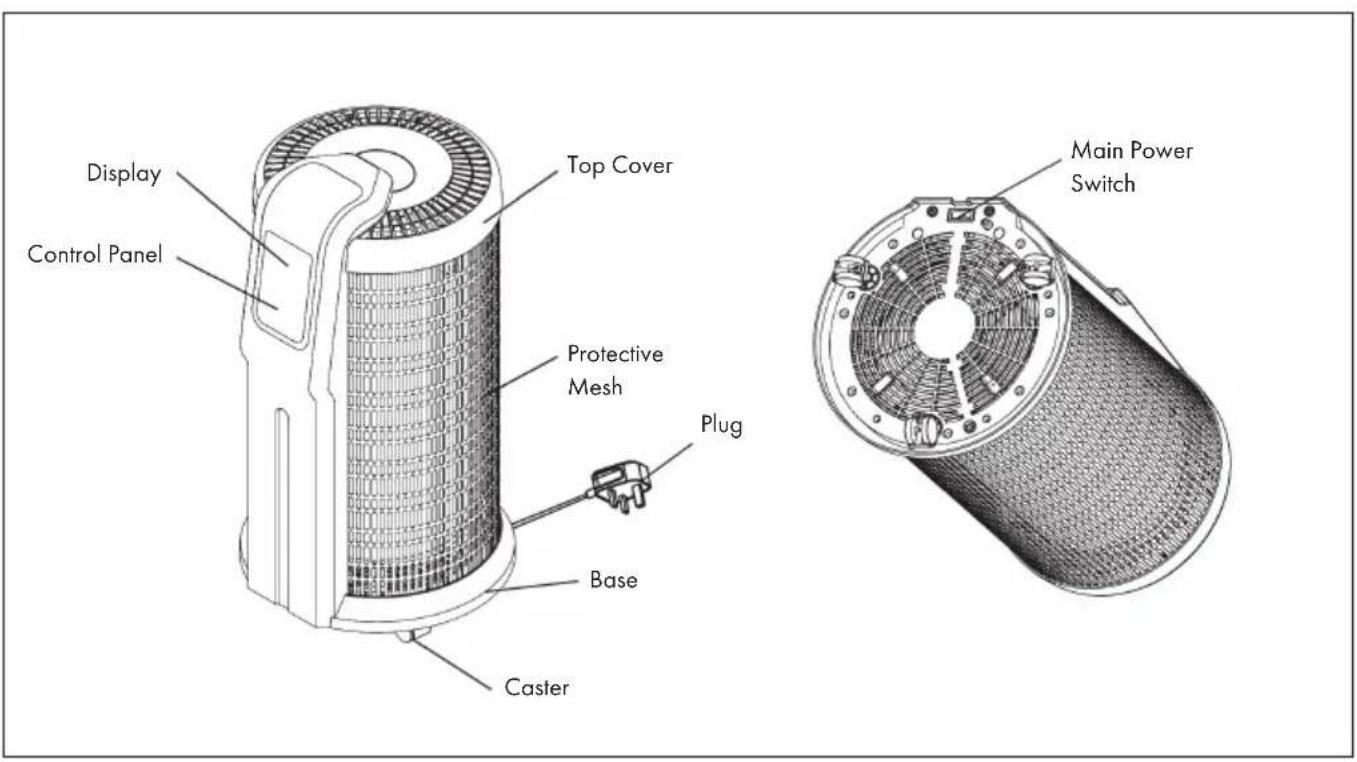
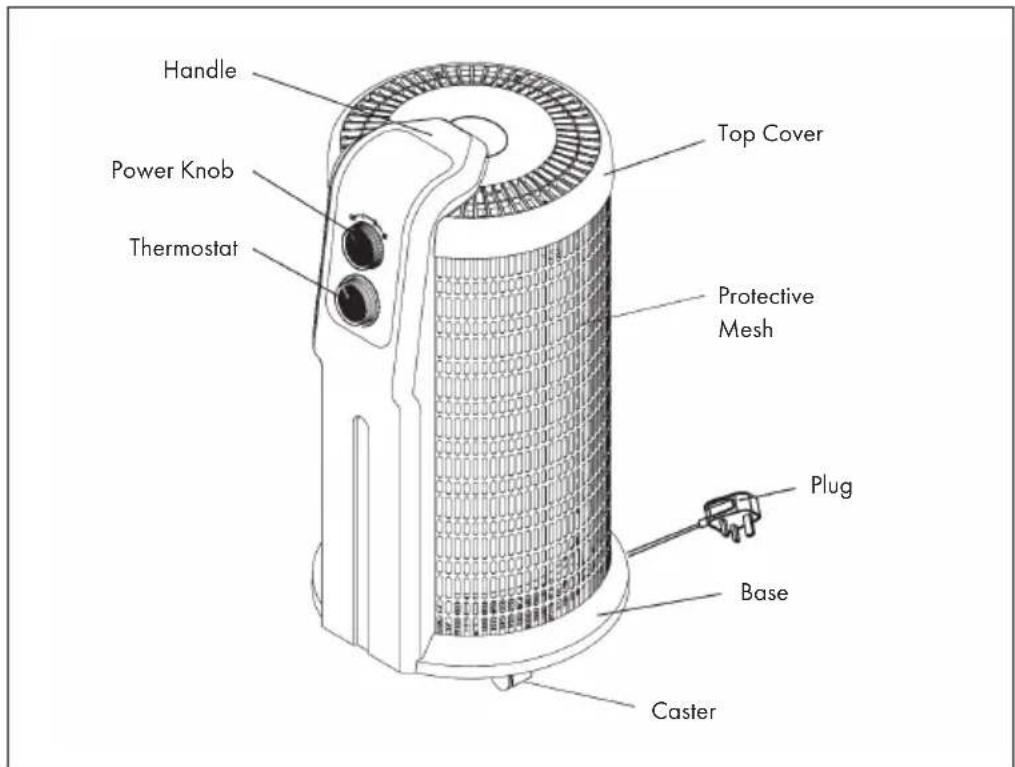
Mechanical Model
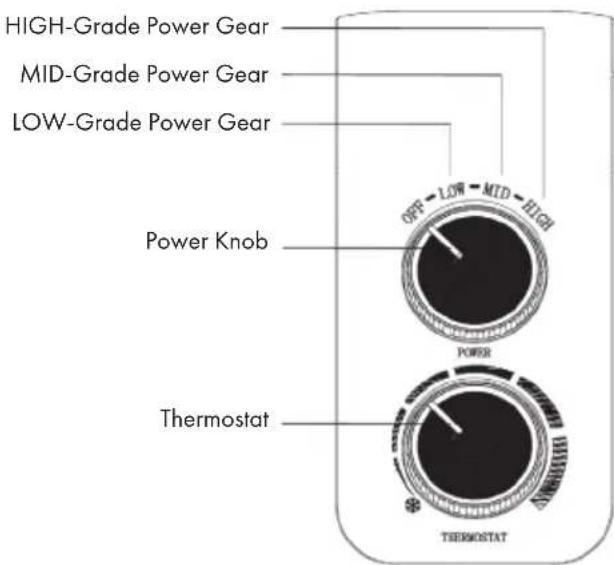
CONTROLPANEL
Electronic Model
Mechanical Model
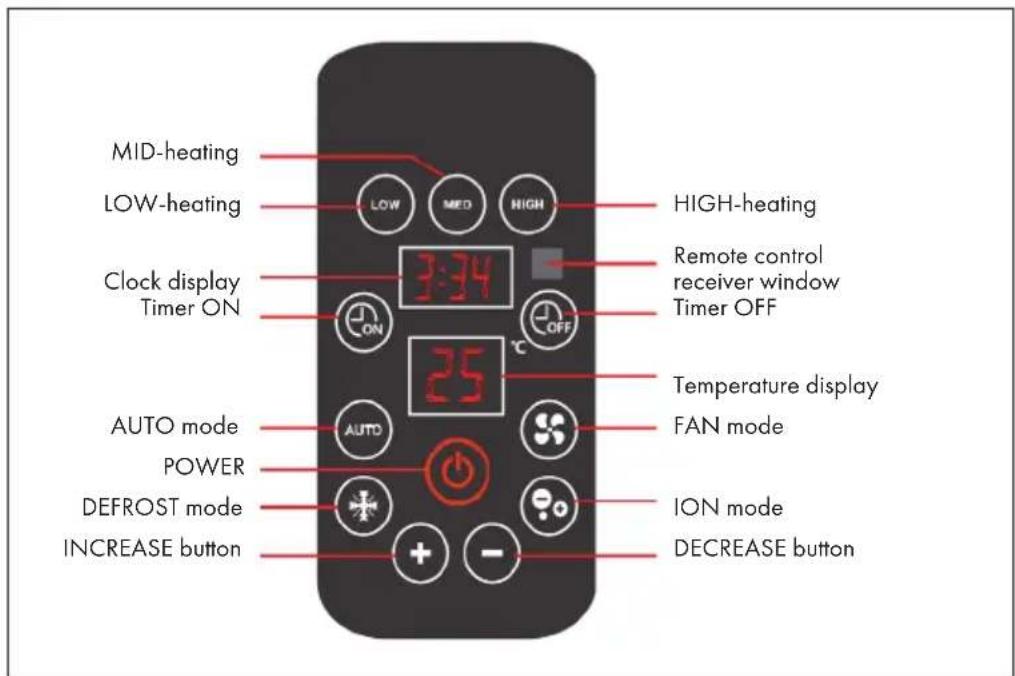
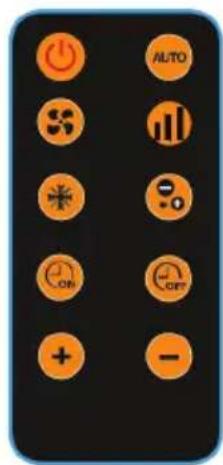
REMOTE CONTROL
Electronic Model
All functions performed by the Remote Control work are identical to the Manual Controls Panel.
Hints on the Battery
- Battery replacement: Install one 3V Lithium battery
- Keep batteries out of reach of children. Should a child swallow a battery, consult a doctor immediately.
- Do not recharge or dispose in fire.
- Keep in a dry and cool place
- Insert battery in right direction.
Your product contains batteries covered by the European Directive. 2006/66/EC, which cannot be disposed of with normal household waste. Please check local rules on separate collection of batteries. The correct disposal of batteries helps prevent potentially negative consequences on the environment and human health.
USE AND OPERATION
Electronic Model
NOTE: For first time operation, there will have some smell because this Heater have some protective oil on the surface of the heating element during production.
The Heater may be operated by the manual controls located on the front of Heater or by your remote control.
1 Carefully remove the Heater from the plastic bag and the carton.
2 Place the Heater on a stable flat surface.
3 Set the Main Power Switch to OFF position. Plug the Power Cord into an electrical outlet. turn the Main Power switch to ON position. A Beep, and the LED display will light on two seconds and the Heater is ready to use.
4 POWER button: turn on or off the heater, or cancel some functions settings (such as timer on/off, etc.).
(a) when standby, this key is to turn on the heater, heater will run according to the last shutdown mode.
(b) when heater operation, this key is to turn off the heater, make it into standby mode, display all closed.
(c) when heater in timer on/off status, this key is to cancel the timer setting.
(d) when the first time turn on, defaults to auto mode, the default setting temperature 18^
5 FAN button: the operation of this key, i s to start/ stop the fan.
(a) when standby, this key is to turn on the heater, heater will run according to the last shutdown mode.
(b) when heater operation, this key is to turn off the heater, make it into standby mode, display all closed.
(c) heater at low power operation, can be artificially set whether to enable the fan, the fan can run or stop when touch this button.
5 INCREASE button: When setting temperature operation, corresponding (1^) in ascending order, the temperature setting range 5^ - 45^ . When setting a timer operation is to adjust the number of hours corresponding to (1 hour) is incremented, cyclic variations in the timing set within 1 to 23 hours.
7 DECREASE button: When setting temperature operation, corresponding (1^) followed by decreasing the temperature setting range 5^ - 45^ . When setting a timer operation is to adjust the number of minutes, correspondence (1 minute) is incremented, cyclic variations in the timing set within O to 59 minutes.
8 By holding either the INCREASE key or DECREASE key on the heater control panel. you are able to fast scroll both temperature and timer digit selections. This option is not available via the remote control!
9 INCREASE button and DECREASE keys support key combination operation, namely three seconds while holding down two keys let go, you can enter the ambient temperature inquiry, the display screen when the temperature value of the current ambient temperature value, Show 4 seconds after the temperature of the display screen returns the set temperature value.
10 Timer OFF: Set timing shutdown mode and an appointment time, this feature is only effective in the operation of the heater, power shutdown is invalid.
11 Timer ON: Set regular boot mode and appointments, this feature is only valid when heater in standby mode, operation invalid in boot state.
12 LOW key: Set the heat to manual mode, low power operation.
13 MID key: Set the heater to manual mode, the heater mid-power operation, the fan runs at the same time.
14 HIGH key: Set the heater to manual mode, the heater high-end power operation, the fan runs at the same time.
15. Is this key only available on remote controller, set the heater operating power, operating low > mid > high power in order to cycle.
16 AUTO key: Set the heater to automatic operation mode.
17 DEFROST key: enable/disable the anti-frost function. Under frost mode, the set temperature is fixed at 10^ , turn on the heating < 7^ ambient temperature, while ambient temperature 10^ turn off the heating.
18 ION key: Select On or Off the anion.
Error Codes and Cooling Protection (Electronic Model)
| E1 W | When dumping heater body is greater than or equal to 60 ° or body overheat protect, it will display El, after put the heater in flat or the temperature is reduced, you need to reboot the heater, it will restore normal operation. |
| E2 T | The temperature sensor failure, check if the temperature sensor is off, break or adhesion. L after the removal of faults, you need to reboot the heater to return to normal operation. |
Cooling Protection: even you turn off the heater, the fan and indicator will delay 30 seconds before shutdown, serve to reduce the internal temperature to protect electronics.
Mechanical Model
NOTE: For first time operation, there will have some smell because this Heater have some protective oil on the surface of the heating element during production.
1 Carefully remove the Heater from the plastic bag and the carton.
2 Place the Heater on a stable flat surface.
3 Independent power supply socket will be inserted into the voltage according to rating label. Rotate power knob, from OFF gear, the clockwise rotation, the LOW dot for low power gear, fan and anion run automatically. MID dot for mid-range power gear, fan and anion run automatically. HIGH dot for high-grade power gear, fan and anion run automatically. When rotation to the power gears, the indicator will light. OFF gear for power off, when Heater not in use, rotate the knob to the OFF gear position, pull the plug out.
4 Thermostat control: The thermostat can control on and off of the Heater to keep the room temperature at a desired level. Turn the TEMP knob to the maiximun position. Once the desired room temperature has reached, turn the knob anti-clockwise until the power indicator turn off (the Heater is temporary cut off). When the room temperature has decreased, the Heater will turn on automatically, and will turn off again when the desired temperature has reached. It is normal for the Heater to cycle ON and OFF as it maintains the SET TEMP.
Safety Features (both Models)
- A thermal overload protector is built-in to prevent overheating. When the Heater is overheat, it will be shut off automatically. To RESET the Heater: Unplug the Heater and wait for 30 minutes to cool down. Turn ON the Heater again to resume operation.
- If the unit is tilted, a safety system will cut off the power automatically. Put the unit on a vertical position and it will operate again.
CARE AND CLEANING

Risk of electric shock! Always unplug the appliance from the wall outlet before cleaning the appliance and do not put it in water or other liquids. Allow the appliance to cool completely before cleaning.
- Clean the protective mesh with the vacuum brush attachment on your vacuum cleaner. Clean the body of the Heater with a soft cloth.
CAUTION: Do NOT use gasoline, benzene, thinner, harsh cleaners, etc., as they will damage the Heater. NEVER use ALCOHOL or any other SOLVENTS.
- Store the Heater with these instructions in the original box in a cool and dry place.
HINTS ON DISPOSAL
According to the European waste regulation 2012/19/EU this symbol on the product or on its packaging indicates that this product may not be treated as household waste. Instead it should be taken to the appropriate collection point for the recycling of electrical and electronic equipment. By ensuring this product is disposed of correctly, you will help prevent potential negative consequences for the environment and human health, which could otherwise be caused by inappropriate waste handling of this product. For more detailed information about recycling of this product, please contact your local council or your household waste disposal service.
TECHNICAL PARAMETERS
| Model identifier(s): 10031578 | ||||||
| Item Symbol Value Unit Item Unit | ||||||
| Heat output Type of heat input, for electric storage local space | heaters only | |||||
| Nominal heat output P | nom | 2.2 | kW manual | heat charge control, with integrated thermostat | no | |
| Minimum heat output (indicative) | Pmin | 1.0 | kW manual | heat charge control with room and/or outdoor temperature feedback | no | |
| Maximum continuous heat output | Pmax | 2.2 | kW electronic | heat charge control with room and/or outdoor temperature feedback | no | |
| Auxiliary electricity consumption | fan assisted heat output no | |||||
| At nominal heat output (fan motor) | elmax | 2.208 | kW | Type of heat output/room temperature control | ||
| At minimum heat output (fan motor) | elmin | 0.975 | kW single | stage heat output and no room temperature control | no | |
| In standby mode el | 58 | 0.001 | kW Two or more manual stages, no room temperature control | no | ||
| with mechanic thermostat room temperature control | no | |||||
| with electronic room temperature control | yes | |||||
| electronic room temperature control plus day timer | no | |||||
| electronic room temperature control plus week timer | no | |||||
| Other control options (multiple selections possible) | ||||||
| room temperature control, with presence detection | no | |||||
| room temperature control, with open window detection | no | |||||
| with distance control option | no | |||||
| with adaptive start control no | ||||||
| with working time limitation | no | |||||
| with black bulb sensor | no | |||||
| Contact details | Chal-Tec GmbH, Wallstraße 16, 10179, Berlin, Germany | |||||
TECHNICAL PARAMETERS
| Model identifier(s): 10031577 | ||||||
| Item Symbol Value Unit Item Unit | ||||||
| Heat output Type of heat input, for electric storage local space | heaters only | |||||
| Nominal heat output P | nom | 2 | kW manual | heat charge control, with integrated thermostat | no | |
| Minimum heat output (indicative) | Pmin | 1.0 | kW manual | heat charge control with room and/or outdoor temperature feedback | no | |
| Maximum continuous heat output | Pmax | 2 | kW electronic | heat charge control with room and/or outdoor temperature feedback | no | |
| Auxiliary electricity consumption | fan assisted heat output no | |||||
| At nominal heat output (fan motor) | eI max | 2.208 | kW | Type of heat output/room temperature control | ||
| At minimum heat output (fan motor) | eI min | 0.975 | kW single stage | heat output and no room temperature control | no | |
| In standby mode el | SB | 0.001 | kW Two or more manual stages, no room temperature control | no | ||
| with mechanic thermostat room temperature control | no | |||||
| with electronic room temperature control yes | ||||||
| electronic room temperature control plus day timer | no | |||||
| electronic room temperature control plus week timer | no | |||||
| Other control options (multiple selections possible) | ||||||
| room temperature control, with presence detection | no | |||||
| room temperature control, with open window detection | no | |||||
| with distance control option no | ||||||
| with adaptive start control no | ||||||
| with working time limitation | no | |||||
| with black bulb sensor | no | |||||
| Contact details | Chal-Tec GmbH, Wallstraße 16, 10179, Berlin, Germany | |||||
Estimado cliente:
FICHE DE DONNÉES PRODUIT
FICHE DE DONNÉES PRODUIT


- CONTENTS
- TECHNICAL DATA
- DECLARATION OF CONFORMITY
- SAFETYINSTRUCTIONS
- MAINPARTS
- CONTROLPANEL
- Mechanical Model
- REMOTE CONTROL
- Electronic Model
- USE AND OPERATION
- Error Codes and Cooling Protection (Electronic Model)
- Safety Features (both Models)
- CARE AND CLEANING
- HINTS ON DISPOSAL
- TECHNICAL PARAMETERS
- Estimado cliente:
Brand : Klarstein
Model : 10031578
Category : Pan