
10031667 - Mincer Klarstein - Free user manual and instructions
Find the device manual for free 10031667 Klarstein in PDF.

| Product Type | Multifunction Electric Meat Grinder |
| Brand | Klarstein |
| Model | 10031667 |
| Power Supply | 230 V ~ 50 Hz |
| Power | 600 W |
| Overheat Protection | Yes, automatic shutdown with thermostat |
| Reverse Function | Yes, reverse button (REV) for unclogging |
| Included Accessories | 3 grinding discs (fine, medium, coarse), knife, screw auger, sausage horn, kebab cone, cookie mold, vegetable cutter (coarse grater, fine grater, slicer), vegetable press |
| Knife Material | Stainless steel |
| Cable Storage | Yes, built-in compartment |
| Cleaning | Hand wash with warm soapy water, not dishwasher safe |
| Safety Instructions | Do not use frozen or hard foods (bones, nuts); use the pusher, never fingers |
| Unlock Button | Yes, for assembly/disassembly |
| Certifications | CE (compliant with directives 2014/30/EU, 2014/35/EU, 2011/65/EU) |
| Main Functions | Meat grinder, sausage press, kebab machine, cookie press, vegetable cutter, vegetable press |
Frequently Asked Questions - 10031667 Klarstein
User questions about 10031667 Klarstein
0 question about this device. Answer the ones you know or ask your own.
Ask a new question about this device
Download the instructions for your Mincer in PDF format for free! Find your manual 10031667 - Klarstein and take your electronic device back in hand. On this page are published all the documents necessary for the use of your device. 10031667 by Klarstein.
USER MANUAL 10031667 Klarstein
Congratulations on purchasing this equipment. Please read this manual carefully and take care of the following hints to avoid damages. Any failure caused by ignoring the mentioned items and cautions mentioned in the instruction manual are not covered by our warranty and any liability.
Contents
Technical Data 14
Safety Instructions 14
Product Description and Accessory 16
Mincer 17
Making Sausages 18
Making Kebab 19
Making Cookies 21
Slicer 22
Vegetable Press 23
Tips 24
Cleaning and Care 24
Hints on Disposal 25
Declaration of Conformity 25
Technical Data
| Item number 10031667 | |
| Power supply 230 V ~ 50 Hz | |
| Power consumption 600 W |
Safety Instructions
- Read these instructions for use carefully and look at the illustrations before using the appliance.
- Keep these instructions for use for future reference.
- Check if the voltage indicated on the appliance corresponds to the local mains voltage before you connect the appliance.
- Never use any accessories of parts from other manufactures. Your guarantee will become invalid if such accessories or parts have been used.
- Do not use the appliance if the mains cord, the plug or other parts are damaged.
- If the supply cord is damaged, it must be replaced by the manufacturer, its service agent or similarly qualified persons in order to avoid a hazard.
- Thoroughly clean the parts that will come into contact with food before you use the appliance for the first time (see chapter CLEANING AND CARE).
- Unplug the appliance immediately after use.

CAUTION
Risk of injury! Never use your finger or an object to push ingredients down the feed tube while the appliance is running. Only the pusher is to be used for this purpose.
- This appliance shall not be used by children. Keep the appliance and its cord out of reach of children.
- Never let the appliance run unattended.
- Switch the appliance off before detaching and install any accessory.
- Wait until moving parts have stopped running before you remove the parts of the appliance.
- Never immerse the motor unit in water or any other liquid, nor rinse it under the tap. Use only a moist cloth to clean the motor unit.
- Do not attempt to grind bones, nuts or other hard items.
- Never reach into the cutter housing. Always use the pusher.
- Unplug the appliance immediately after use.
- Never operation the appliance continuously for more than 3 minutes at 600W.
- Appliance can be used by persons with reduced physical, sensory or mental capabilities or lack of experience and knowledge if they have been given supervision or instruction concerning use of the appliance in a safe way and if they understand the hazards involved.
Children shall not play with the appliance. - Always disconnect the appliance from the supply if it is left unattended and before assembling, disassembling or cleaning.
- Do not misuse the product. It may cause injury if misuse.
- Switch off the appliance and disconnect from supply before changing accessories or approaching parts that move in use.
- Care shall be taken when handling the sharp cutting blades, emptying the bowl and during cleaning.
Hints on Thermostat System
This appliance is equipped with a thermostat system. This system will automatically cut off the power supply to the appliance in case of overheating. If your appliance suddenly stops running:
- Pull the mains plug out of the socket.
- Let the appliance cool down for 60 minutes.
- Put the mains plug in the socket.
- Press the switch button to turn off the appliance.
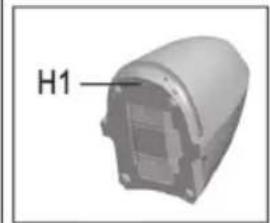
- Press the circuit breaker button (H1) at the bottom of the appliance to turn on the appliance.
- Switch the appliance on again.
Please contact you dealer of an authorized service center if the thermostat system is activated too often. If you plug in, the indicator light will be on.
IMPORTANT: In order to avoid a hazardous situation, this appliance must never be connected to a timer switch.
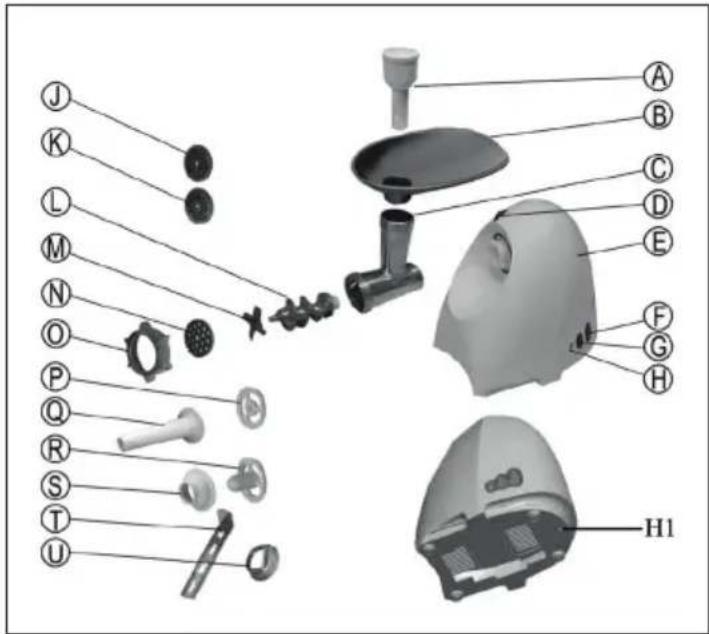
Product Description and Accessory
Product Description
A Pusher A
B Tray
C Cutter housing A
D Release button
E Motor unit
F Switch button
G Reversal button (REV)
H Indicator light
H1 Over-current protector button
J Fine grinding disc
K Medium grinding disc
L Worm shaft
M Cutter blade
N Coarse grinding disc
O Screw ring
P Separator
Q Sausage horn
R Former
S Cone
T Pasta shaper
U Shaper fixing
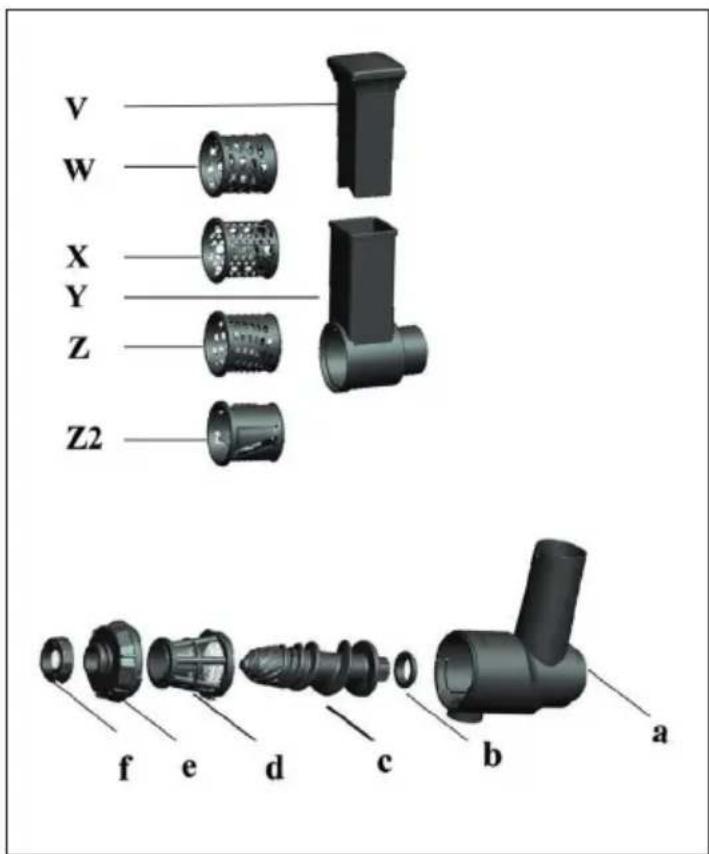
Slicer Parts
V Pusher B
W coarse bar cutter
X Mill mashed potatoes cutter
Y Cutter housing B
Z Fine bar cutter
Z2 Slice cutter
Vegetable Press Parts
a Cutter housing
b Airproof ring
c Worm shaft
d Cone
e Shaper
f Screw ring
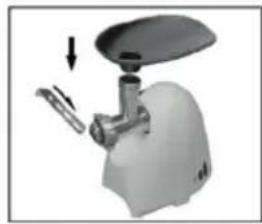
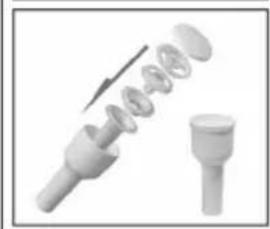
Mincer
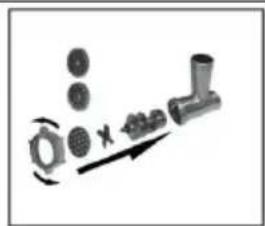
Assembly:
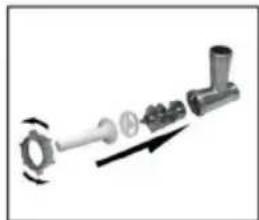
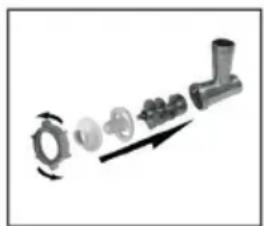
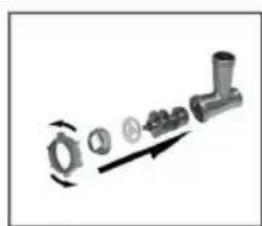
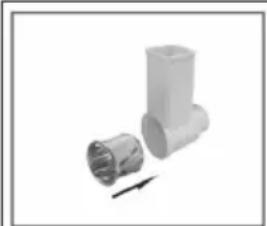
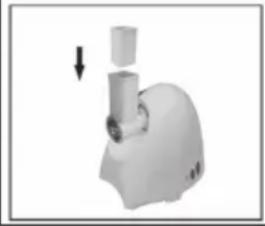
- Insert the worm shaft into the cutter housing, the plastic end first. Place the cutter unit onto the worm shaft. (The cutting edges should be at the front) Place the medium grinding disc or coarse grinding disc (depending on the consistency you prefer) onto the worm shaft. (Make sure the notch of the grinding disc fit onto the projections of the mincer head.) Turn the screw ring in the direction of the arrow on the cutter housing until it is properly fastened.
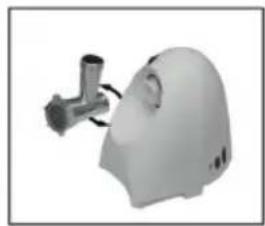
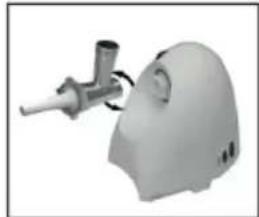
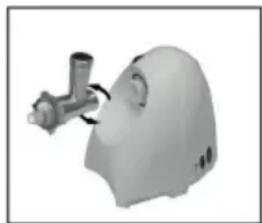
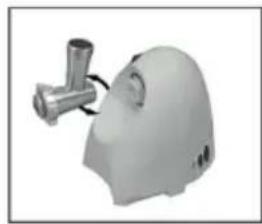
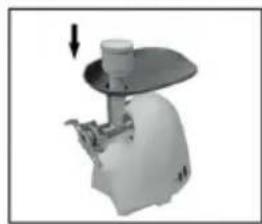
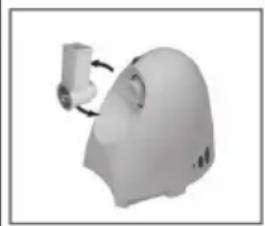
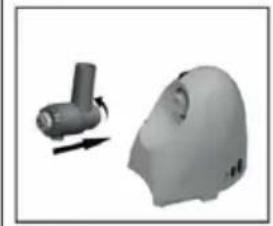
- Attach the cutter housing to the motor unit.
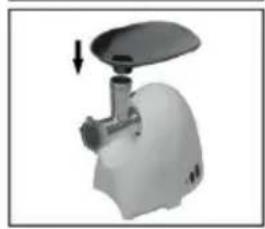
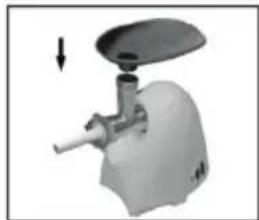
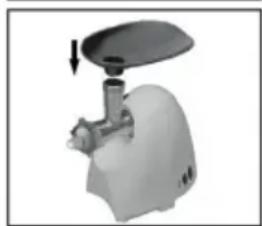
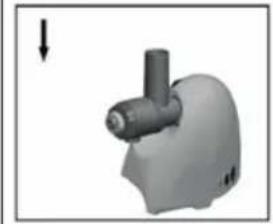
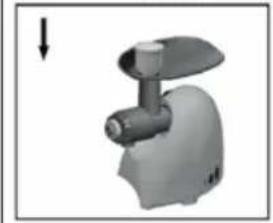
- Place the tray on the upright part of the cutter housing.
- Now the appliance is ready for mincing.
Procedure:
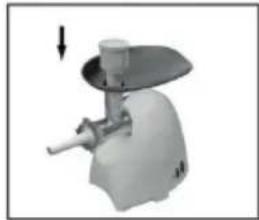
Cut the meat into 10cm-long, 2cm-thick strips. Remove bones, pieces of gristle and sinews as much as possible. Never use frozen meat!
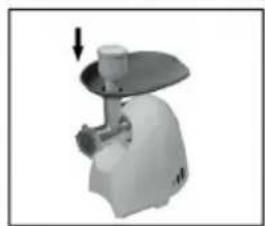
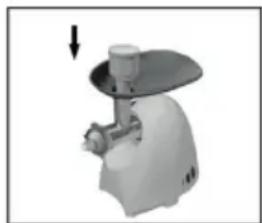
Put the meat in the tray. Use the pusher to gently push the meat into the cutter housing.
NOTE: For steak tartare, mince the meat with the medium grinding disc twice.
Making Sausages
Assembly:
Mince the meat first.
- Insert the worm shaft into the cutter housing, the plastic end first. Place the separator in the cutter housing. Place the sausage horn on the cutter housing and screw the ring on the cutter housing. (Make sure the notches of the separator fit onto the projections of the mincer head.)
- Attach the cutter housing to the motor unit.
- Place the tray on the upright part of the cutter housing.
- Now the appliance is ready for making sausages.
Procedure:
Put the sausage skin in lukewarm water for 10 minutes. Then slide the wet skin onto the sausage horn. Push the (seasoned) minced meat into the cutter housing. If the skin gets stuck onto the sausage horn, wet it with some water.
Making Kebab
Assembly:
- Insert the worm shaft into the cutter housing, the plastic end first. Place the cone in the cutter housing. Place the former on the cutter housing and screw the ring on the cutter housing. (Make sure the notches of the separator fit onto the projections of the mincer head.)
- Attach the cutter housing to the motor unit.
- Place the tray on the upright part of the cutter housing.
- Now the appliance is ready for making kebab.
Procedure:
Feed the prepared kebab mixture through the kebab maker. Cut the continuous hollow cylinder into the desired lengths and user as required.
NOTE: Kebab is a traditional Middle Eastern dish made primarily of lamb and bulgur wheat which are minced together to form a paste the mixture is extruded through the kebab maker and cut into short lengths. The tubes can then be stuffed with a minced meat mixture, the ends pinched together and then deep fried.
Guide of Stuffed Kebab
| 1 | Ingredients 500 g lamb, cut into strips 500 g washed and drained bulgur 1 small onion | Outer Casing Pass alternate batches of lamb and bulgur wheat through the mincer fitted with the fine screen, adding the onion before all the lamb and wheat are minced. Mix the minced lamb, onion and wheat together then pass back through the min-cer a second time. If an extra fine screen and mince the mix-ture for a third time, alternatively continue mincing using the fine screen. The mixture is now ready to extrude through the kebab maker attachment. |
| 2 | Ingredients 400 g lamb, cut into strips 1 tbsp oil 2 medium onions, finely chopped 1-2 tsp allspice 1 tbsp plain flour Salt and pepper | Filling To make the filling, mince the lamb using the fine screen, fry the onion in the oil until golden brown, add the lamb and allow to brown and cook through. Add the remaining ingredients and cook for 1-2 minutes. Drain off any excess fat if necessary and allow cooling. |
| 3 | Ingredients Outer casing mass Filling mass | Stuff the Kebab Extrude the casing mixture through the kebab maker and cut into approximately 7.5 cm lengths. Pinch one end of the tube together, end which can be pinched together, and then carefully fill with the stuffing mixture leaving a small gap at the open end which can be pinched together to seal. Deep fry the kebab in batches in hot oil 190°C for approxi-mately 6 minutes of until golden brown and the filling piping hot. |
Making Cookies
Assembly:
- Insert the worm shaft into the cutter housing, the plastic end first. Place the shaper fixing in the cutter housing. Place the former on the cutter housing and screw the ring on the cutter housing. (Make sure the notches of the separator fit onto the projections of the mincer head.)
- Attach the cutter housing to the motor unit.
- Place the tray on the upright part of the cutter housing, insert the shaper.
- Now the appliance is ready for making cookie.
Procedure:
Choice of four cookie styles.
Slicer
Assembly:
Insert the slice cutter (or the fine bar cutter and the coarse slice) into the cutter housing. Attach the cutter housing to the motor unit. Now the appliance is ready for slicing
Slicing:
- Cut the potato or other vegetable for processing it to pieces, which size is suitable for cutter housing.
- Choose the different kind of cutter as requested.
- Put the pieces into cutter housing and press slightly by pusher A.

CAUTION
Risk of injury! Never use your finger or an object to push ingredients down the feed tube while the appliance is running. Only the pusher is to be used for this purpose.
Vegetable Press

Assembly:
- Insert the worm shaft into the cutter housing, the plastic end first. Place the cone in the cutter housing. Place the former on the cutter housing and screw the ring on the cutter housing.
- Attach the cutter housing to the motor unit.
- Place the tray on the upright part of the cutter housing.
- Now the appliance is ready for making tomato mush.
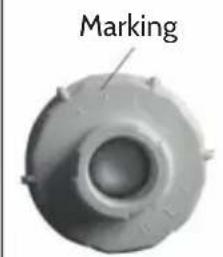
Tips:
Screw ring D is marking O,1,2,3 (see the picture). When you disassemble the accessory, you should put the screw ring D to marking O first. Then you can start extracting your vegetables.
If you want to extract the vegetables with more cellulose, you should rotate screw ring D to marking 1, rotate screw ring D to marking 2 for little cellulose, and rotate screw ring D to marking 3 for few cellulose.
Tips
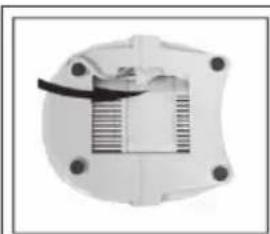
Power Cord
Lash down the power cord, then foist it into the place with arrow diagramming.
If your appliance suddenly stops running:
- Pull the mains plug out of the socket and press the switch button to turn off the appliance.
- Let the appliance cool down for 60 minutes.
- Put the mains plug in the socket.
- Press the circuit breaker button (H1) at the bottom of the appliance to turn on the appliance.
- Switch the appliance on again.
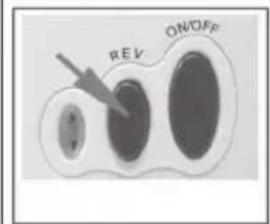
Reversal Button
If the appliance is locked, please press Reversal button (REV). The meat locked in cutter housing is untrodden, so the appliance can renew its usual condition.
Strorage
The parts of "P", "Q", "R", "S" can be stowed in the pusher.
Cleaning and Care
- Meat left behind in the cutter housing may be removed from the inside of the appliance by passing a slice of bread through the cutter housing.
- Before you clean the appliance, switch the appliance off and remove the plug from the socket.
- Press the release button and turn the whole cutter housing in the direction of the arrow. Remove the pusher and the tray.
- Unscrew the screw ring and remove all parts of the cutter housing.
IMORTANT: Do not clean the parts in the dishwasher!
- Wash all parts that have come into contact with meat in hot soapy water.
IMORTANT: Clean the parts immediately after use!
- Rinse them with clear hot water and dry them IMMEDIATELY.
- We advise you to lubricate the cutter unit and the grinding discs with some vegetable oil.
Hints on Disposal

According to the European waste regulation 2012/19/EU this symbol on the product or on its packaging indicates that this product may not be treated as household waste. Instead it should be taken to the appropriate collection point for the recycling of electrical and electronic equipment. By ensuring this product is disposed of correctly, you will help prevent potential negative consequences for the environment and human health, which could otherwise be caused by inappropriate waste handling of this product. For more detailed information about recycling of this product, please contact your local council or your household waste disposal service.
Declaration of Conformity

Producer: Chal-Tec GmbH, Wallstraße 16, 10179 Berlin, Germany.
This product is conform to the following European Directives:
2014/30/EU (EMC)
2014/35/EU (LVD)
2011/65/EU (RoHS)
Estimado cliente:
F Bouton marche/arret (ON/OFF)
G Touche retour (REV)
H Temoin de marche
H1 Touche d'arrêt
F Tasto on/off (ON/OFF)
G Tasto reverse (REV)


- Contents
- Technical Data
- Safety Instructions
- CAUTION
- Hints on Thermostat System
- Product Description and Accessory
- Product Description
- Slicer Parts
- Vegetable Press Parts
- Mincer
- Assembly:
- Procedure:
- Making Sausages
- Making Kebab
- Guide of Stuffed Kebab
- Making Cookies
- Slicer
- Slicing:
- Vegetable Press
- Tips:
- Tips
- Power Cord
- Reversal Button
- Strorage
- Cleaning and Care
- Hints on Disposal
- Declaration of Conformity
- Estimado cliente:
Brand : Klarstein
Model : 10031667
Category : Mincer