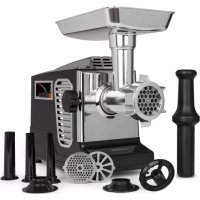
Powerhouse - Mincer Klarstein - Free user manual and instructions
Find the device manual for free Powerhouse Klarstein in PDF.


| Product Type | Electric Meat Grinder |
| Brand | Klarstein |
| Model | Powerhouse |
| Article Numbers | 10034215, 10035233 |
| Power Supply | 220-240 V ~ 50/60 Hz |
| Power | 1800 W |
| Dimensions (L x D x H) | 410 x 210 x 426 mm |
| Weight | Approximately 5 kg |
| Speeds | 2 speeds: Low and High |
| Reverse Function | Yes, REVERSE button to unclog |
| Grinding Capacity | Up to 2 kg/min (estimate) |
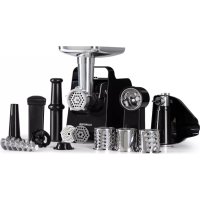
| Included Accessories | Pusher, 3 perforated discs (fine, medium, coarse), knife, sausage attachment, Kibbeh attachment, 3 feeding funnels |
| Blade Material | Stainless Steel |
| Housing Material | Robust Plastic |
| Accessory Cleaning | Hand wash with warm water and mild detergent |
| Housing Cleaning | Damp cloth, do not immerse |
| Dishwasher | Accessories not dishwasher safe |
| Maximum Usage Time | 10 minutes, then 10 minutes rest |
| Safety Device | STOP & RESET button, emergency stop |
| Usage | Household use only |
| Warranty | 2 years (standard) |
Frequently Asked Questions - Powerhouse Klarstein
User questions about Powerhouse Klarstein
0 question about this device. Answer the ones you know or ask your own.
Ask a new question about this device
Download the instructions for your Mincer in PDF format for free! Find your manual Powerhouse - Klarstein and take your electronic device back in hand. On this page are published all the documents necessary for the use of your device. Powerhouse by Klarstein.
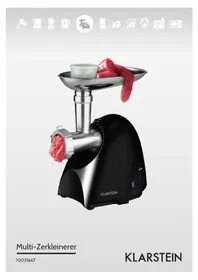
USER MANUAL Powerhouse Klarstein

KLARSTEIN
www.klarstein.com

area
| Category | Value | | -------- | ----- | | A | 100 | | B | 100 | | C | 100 | | D | 100 |INHALTSVERZEICHNIS
natural_image
Line drawing of a manual blender with a handle and control panel, no text or symbols present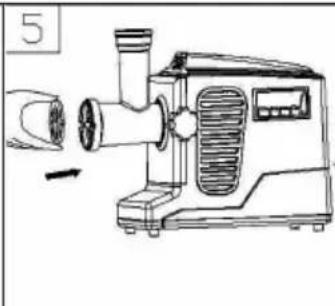
natural_image
Line drawing of a manual cutting tool with a cylindrical component and fan (no text or symbols)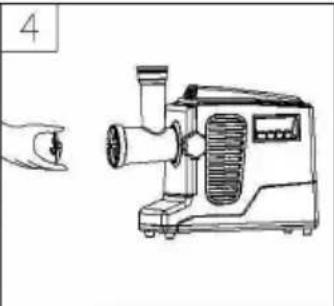
natural_image
Line drawing of a manual cutting tool with a hand pointing to it (no text or symbols)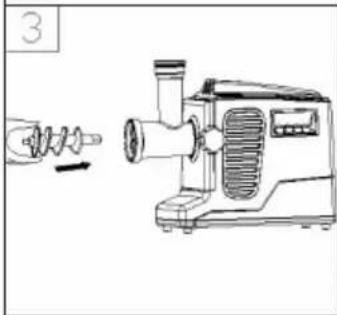
natural_image
Line drawing of a manual kitchen tool with a spring and handle (no text or symbols)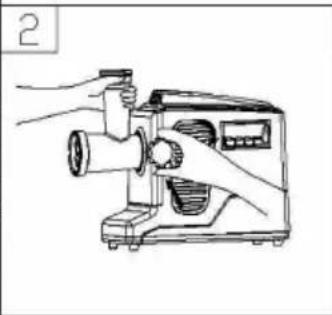
natural_image
Line drawing of a hand operating a manual pump device (no text or symbols)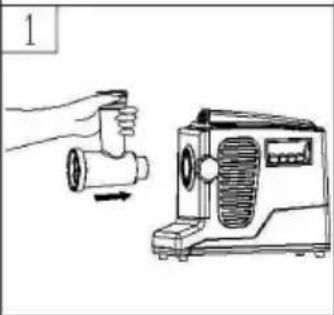
natural_image
Illustration of a hand holding a cylindrical device next to a portable radio unit (no text or symbols visible)natural_image
Symbol of a trash bin crossed with a diagonal line, no text or labels presentBerlin Brands Group UK Limited
PO Box 42
272 Kensington High Street
London, W8 6ND
United Kingdom
Dear Customer,
Congratulations on purchasing this device. Please read the following instructions carefully and follow them to prevent possible damages. We assume no liability for damage caused by disregard of the instructions and improper use. Scan the QR code to get access to the latest user manual and more product information.

CONTENTS
Safety Instructions 16
Before First Use 16
Product Overview 17
Assembly and Operation 18
Disassembly 22
Cleaning and Care 22
Disposal Considerations 23
Manufacturer & Importer (UK) 23
TECHNICAL DATA
| Item number 10034215, 10035233 | |
| Power supply 220-240 V ~ 50/60 Hz | |
| Power 1800 W | |
| Dimensions (WxDxH) 410x210x426 mm |
SAFETY INSTRUCTIONS
- This device may be only used by children 8 years old or older and persons with limited physical, sensory and mental capabilities and / or lack of experience and knowledge, provided that they have been instructed in use of the device by a responsible person who understands the associated risks.
- The device is not intended for commercial use, but only for household and similar environments. This includes kitchens in offices, farms, hotels, motels and Bed & Breakfasts.
- Disconnect the plug before assembling or disassembling the appliance.
- Only use the appliance under supervision when children are present.
- When moving the unit, hold it by the housing with both hands. Never hold it by the hopper plate or any other part of the unit.
- When using the Kibbeh attachment (for minced meat rolls), do not attach a cutter or perforated discs.
- Do not grind hard food such as bones or nuts in the mincer.
- Do not crush fibrous foods such as ginger in the mincer.
- Do not allow the mincer to run for more than 10 minutes at a time. Let it cool for 10 minutes before using it again.
- Wait 30 seconds after finishing the current process before using the reverse switch. Doing so may damage the unit.
• To avoid blockages, do not press the meat into the funnel under excessive pressure. - Never attempt to replace or repair permanently installed parts of the appliance yourself.

WARNING
Risk of injury! Never push the meat into the funnel by hand. Always use a food pusher.
BEFORE FIRST USE
- Before use, check the voltage on the device badge. Connect the device only to sockets which correspond to the voltage of the device.
- Wash all accessories with warm water and a little detergent.
- Before plugging the appliance into a wall outlet, make sure that the appliance is switched off.
PRODUCT OVERVIEW
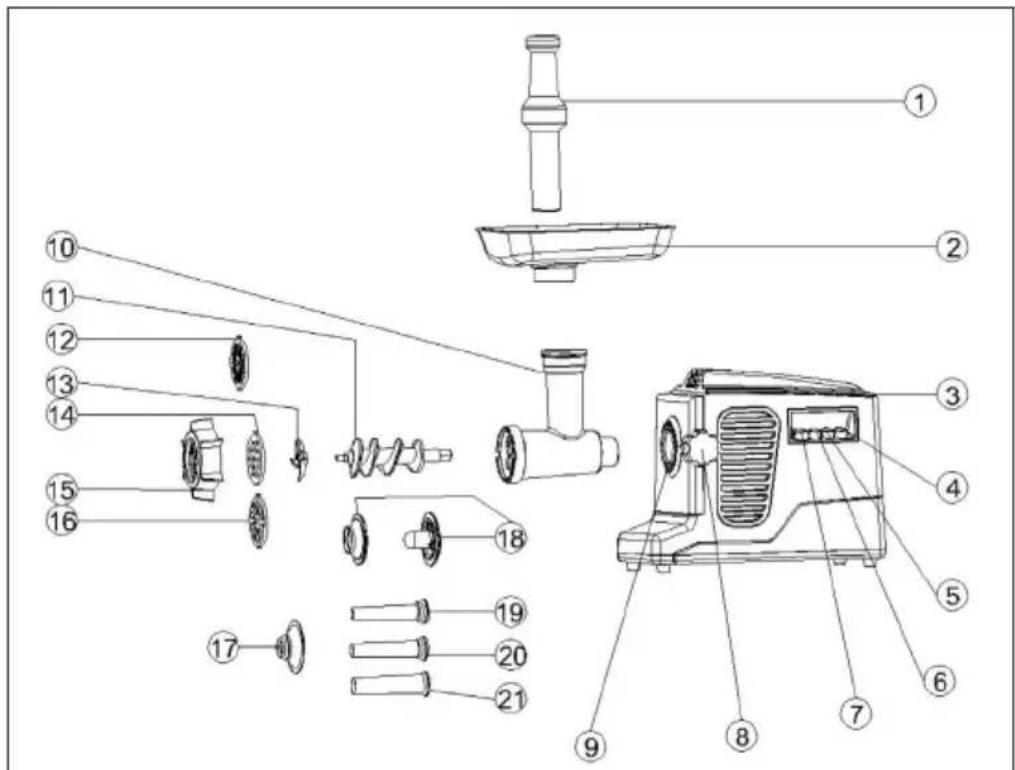
| 1 | Food pusher | 12 | Perforated disc (fine) |
| 2 | Hopper plate | 13 | Cutting blades |
| 3 | Case | 14 | Perforated disc (medium) |
| 4 | REVERSE button | 15 | Fixing ring |
| 5 | LOW button | 16 | Perforated disc (coarse) |
| 6 | HIGH button | 17 | Sausage attachment |
| 7 | STOP & RESET button | 18 | Kibbeh attachments |
| 8 | Fixing ring | 19 | Funnel (fine) |
| 9 | Head connection | 20 | Funnel (medium) |
| 10 | Head | 21 | Funnel (coarse) |
| 11 | Snail |
ASSEMBLY AND OPERATION
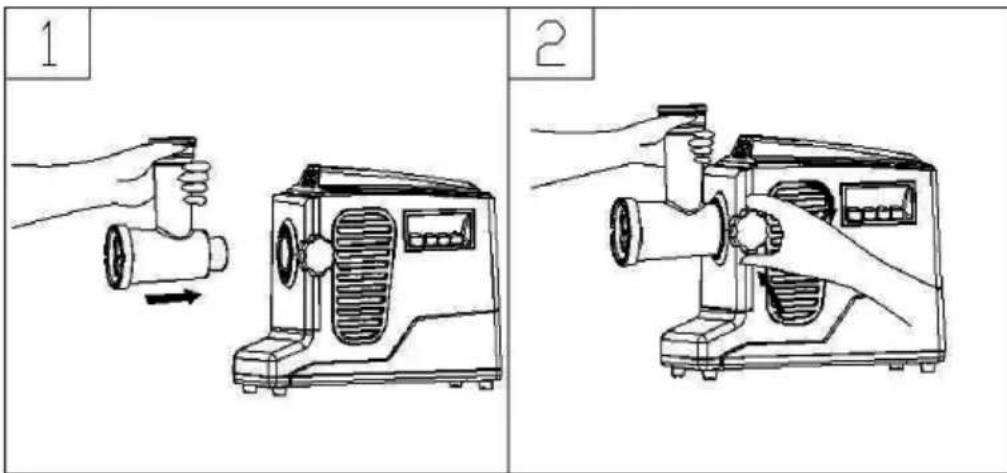
Hold the head and insert it into the connection. When inserting, make sure that the head is slightly inclined (see Figure 1). When you have inserted the head, turn it clockwise until it is firmly seated (see Figure 2).
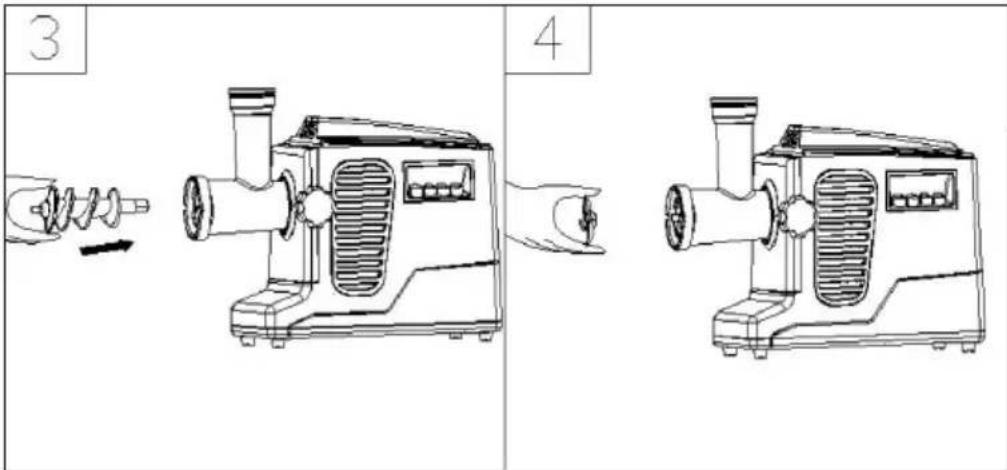
First insert the snail with the long end into the head and turn it slightly until it is seated in the motor housing (see Fig. 3). Place the cutter blade on the snail shaft as shown with the blade facing forward (see Figure 4). If the knife is not mounted correctly, the meat will not be minced.
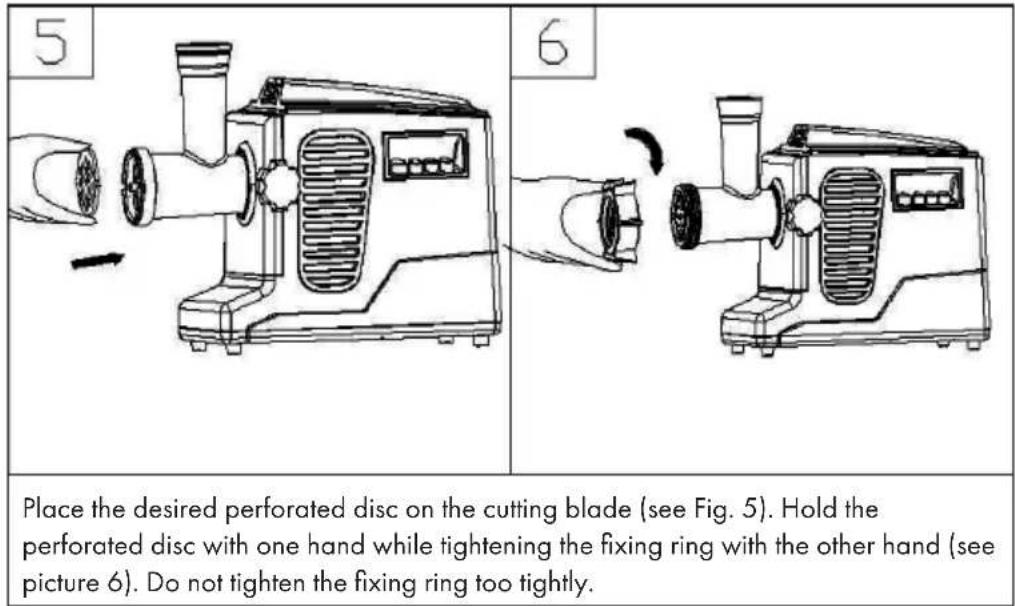
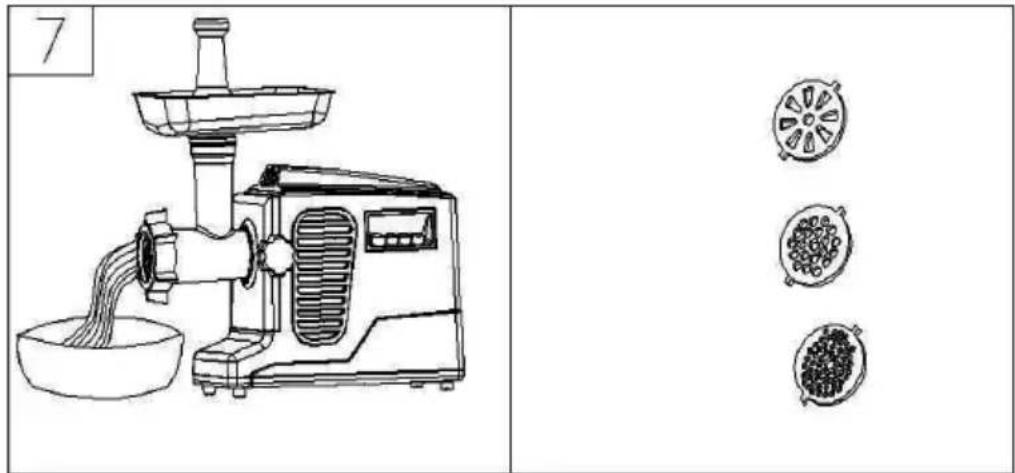
Mount the hopper plate on the head. Place the unit on a solid worktop. The air outlet on the floor and on the side of the motor housing should be kept free and not blocked.
Mincing meat

WARNING
Risk of injury! Never push the meat into the funnel by hand. Always use a food pusher.
Cut all food into pieces. We recommend that you use tendonless and boneless meat and cut it to a size of approximately 2 × 2 × 6 cm so that it fits easily into the funnel opening.
- Press the HIGH or LOW button to run the unit at high speed (HIGH) or low speed (LOW).
- Push the food into the funnel with the food pusher.
- After use, press STOP to stop the appliance. Remove meat residues by pressing the REVERSE button. Then pull the plug out of the socket.
Reverse function
If a blockage occurs, press and hold the REVERSE button for 3-6 seconds. Then release the button. Unplug the appliance and remove the food from the head of the appliance.
Making Kibbeh (minced meat rolls)
| Agredients | |
| Stuffing: | For the rolls: |
| Mutton 100 gOlive oil 1 1⁄2 tbspOnion 1 1⁄2 tbspFlour 1 1⁄2 tbspSpices to tasteSalt to taste | Lean meat 450 gFlour 150-200 gSpices to tasteNutmeg 1 tspPaprika to tastePepper to taste |
| Chop the meat three times for the filling and three times for the rolls and mix the minced meat with the remaining ingredients in a bowl. | |
| 8 | 9 | 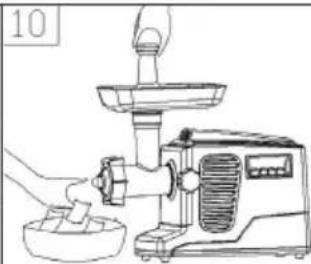 |
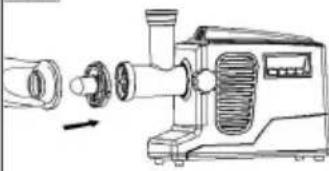 | 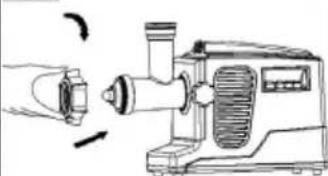 | |
| Before attaching the Kibbeh attachments, remove the perforated disc and the cutting blade. | Place the Kibbeh attachments together on the snail shaft. | Tighten the fastening ring. Do not overtighten it. Put the minced meat mixture for the rolls into the funnel and make minced meat rolls. |
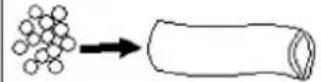
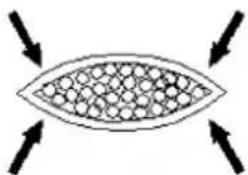
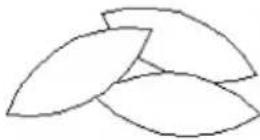
Fill the finished minced meat rolls with the minced meat filling as shown below and fry or deep-fry them.
 |  |  |
Making sausages
Place the cutting knife, one of the perforated discs (fine, medium, coarse) and the corresponding funnel (fine, medium, coarse) on the screw shaft and screw the fastening ring tight.
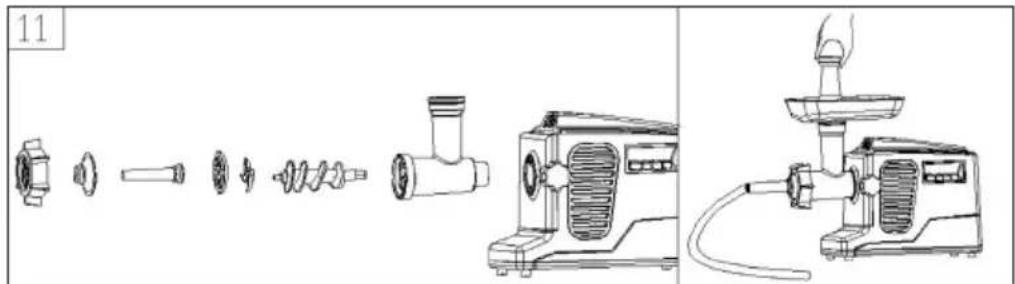
Thread the sausage skin onto the sausage filling tube and knot the end. Make sure that the sausage casing is loosely filled, as the sausage expands during frying or cooking and the casing can tear open. Press the sausage together at the end with your fingers and turn it once or twice around its own axis.
DISASSEMBLY
• Make sure that the engine is completely stopped.
- Disconnect the plug from the socket.
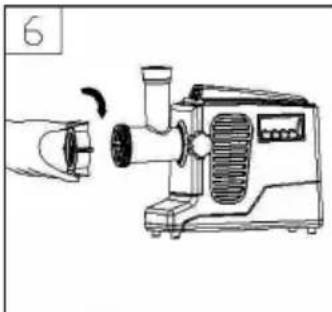
- Disassemble the parts by performing steps 1-6 in reverse order (see below).
natural_image
Line drawing of a manual manual shaver machine with a hand operating it (no text or symbols)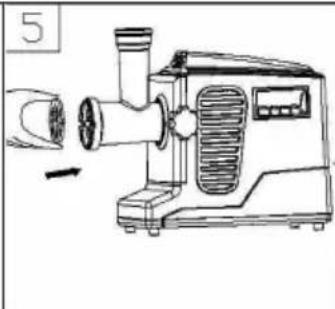
natural_image
Line drawing of a manual oil lamp with a cylindrical tube and control panel (no text or symbols)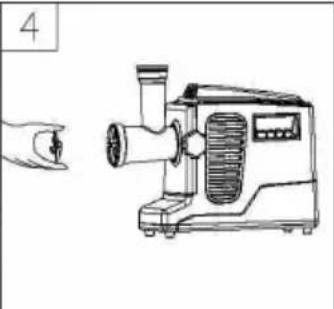
natural_image
Line drawing of a manual manual shaver with a hand pointing to it (no text or symbols)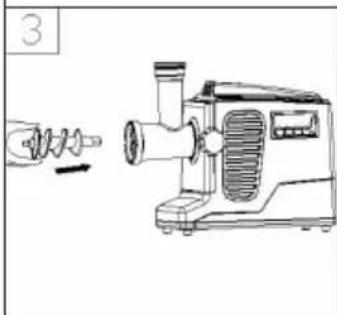
natural_image
Line drawing of a manual kitchen tool and a motor (no text or symbols)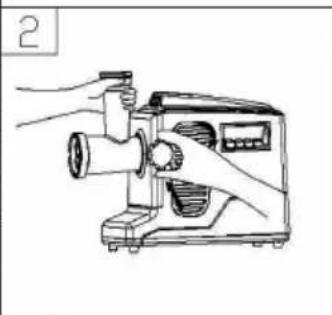
natural_image
Line drawing of a hand operating a sewing machine with a cylindrical tool (no text or symbols)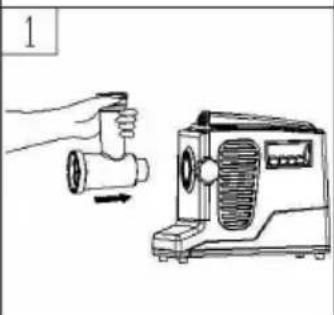
natural_image
Illustration of a hand holding a cylindrical device next to a portable radio unit (no text or symbols visible)Note: It is easier to remove the perforated disc by inserting a screwdriver between the cutting blade and the perforated disc to loosen it.
CLEANING AND CARE
- Switch off the device and unplug the plug from the socket.
- Allow the appliance to cool down completely.
- Clean the housing with a damp cloth using a mild detergent. Never clean the housing under running water and never put it in water.
- Do not clean the unit with caustic or abrasive cleaning agents.
- The attachments are not dishwasher safe. These parts should only be cleaned in warm water with a small amount of detergent.
- When you have finished cleaning, attach the cable to the cable holder on the back and store the unit in a dry, clean place where children have no access.
DISPOSAL CONSIDERATIONS
natural_image
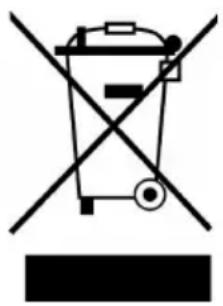
Symbol of a trash bin crossed with a diagonal line, no text or labels presentIf there is a legal regulation for the disposal of electrical and electronic devices in your country, this symbol on the product or on the packaging indicates that this product must not be disposed of with household waste. Instead, it must be taken to a collection point for the recycling of electrical and electronic equipment. By disposing of it in accordance with the rules, you are protecting the environment and the health of your fellow human beings from negative consequences. For information about the recycling and disposal of this product, please contact your local authority or your household waste disposal service.
MANUFACTURER & IMPORTER (UK)
Manufacturer:
Chal-Tec GmbH, Wallstrasse 16, 10179 Berlin, Germany.
Importer for Great Britain:
Berlin Brands Group UK Limited
PO Box 42
272 Kensington High Street
London, W8 6ND
United Kingdom
Estimado cliente,
ÍNDICE
natural_image
Line drawing of a manual cutting tool with a handle and spout, no text or symbols present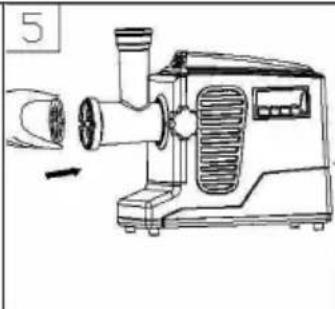
natural_image
Line drawing of a manual oil lamp with a cylindrical tube and control panel (no text or symbols)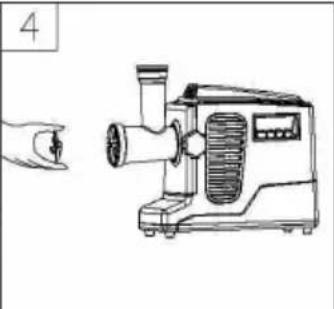
natural_image
Line drawing of a manual manual shaver with a hand pointing to it (no text or symbols)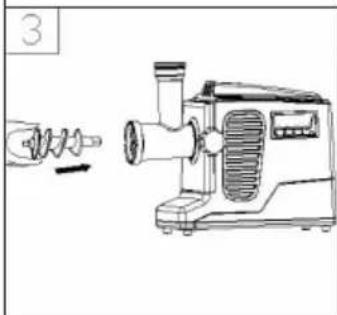
natural_image
Line drawing of a manual kitchen tool and a motor (no text or symbols)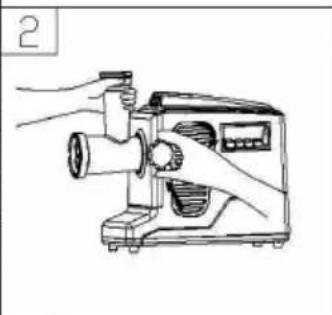
natural_image
Line drawing of a hand operating a sewing machine with a cylindrical tool (no text or symbols)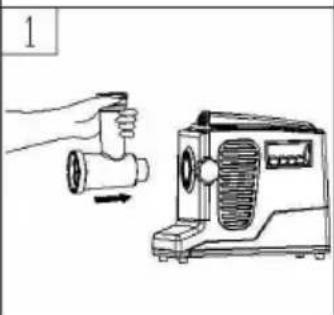
natural_image
Illustration of a hand holding a cylindrical device next to a portable radio unit (no text or symbols visible)natural_image
Symbol of a trash bin crossed with a diagonal line, no text or numbers presentBerlin Brands Group UK Limited
PO Box 42
272 Kensington High Street
London, W8 6ND
United Kingdom
Chère cliente, cher client,
SOMMAIRE
natural_image
Line drawing of a manual blender with a handle and control panel, no text or symbols present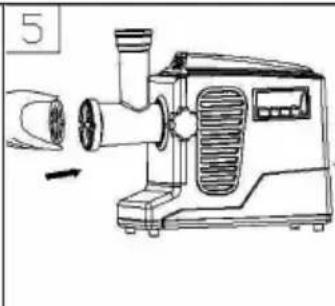
natural_image
Line drawing of a manual cutting tool with a cylindrical component and fan (no text or symbols)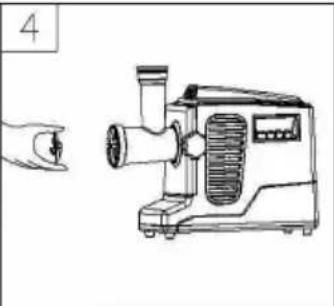
natural_image
Line drawing of a manual cutting tool with a hand pointing to it (no text or symbols)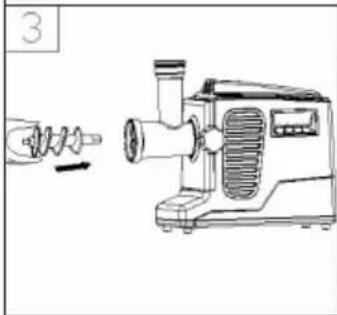
natural_image
Line drawing of a manual kitchen tool with a spring and handle (no text or symbols)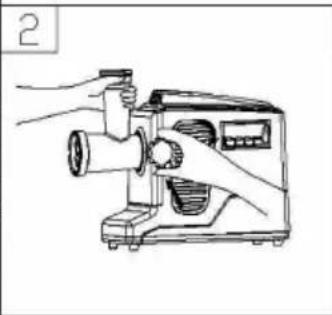
natural_image
Line drawing of a hand operating a manual pump device (no text or symbols)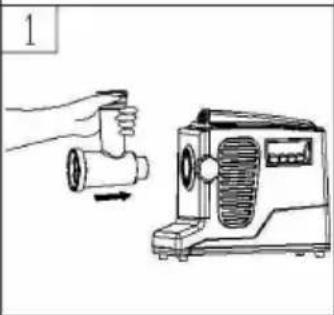
natural_image
Illustration of a hand holding a cylindrical device next to a portable radio unit (no text or symbols visible)natural_image
Symbol of a trash bin crossed with a diagonal line, no text or labels presentBerlin Brands Group UK Limited
PO Box 42
272 Kensington High Street
London, W8 6ND
United Kingdom
Gentile cliente,
INDICE
natural_image
Symbol of a trash bin crossed with a diagonal line, no text or labels presentPRODUTTORE E IMPORTATORE (UK)
Produttore:
Chal-Tec GmbH, Wallstraße 16, 10179 Berlino, Germania.
Berlin Brands Group UK Limited
PO Box 42
272 Kensington High Street
London, W8 6ND
United Kingdom

KLARSTEIN
- INHALTSVERZEICHNIS
- Dear Customer,
- CONTENTS
- SAFETY INSTRUCTIONS
- WARNING
- BEFORE FIRST USE
- PRODUCT OVERVIEW
- ASSEMBLY AND OPERATION
- Mincing meat
- Reverse function
- Making Kibbeh (minced meat rolls)
- Making sausages
- DISASSEMBLY
- CLEANING AND CARE
- DISPOSAL CONSIDERATIONS
- MANUFACTURER & IMPORTER (UK)
- Manufacturer:
- Importer for Great Britain:
- Estimado cliente,
- ÍNDICE
- SOMMAIRE
- Gentile cliente,
- INDICE
- PRODUTTORE E IMPORTATORE (UK)
- KLARSTEIN
Brand : Klarstein
Model : Powerhouse
Category : Mincer