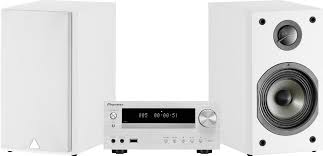
X-HM51-S - Audio System PIONEER - Free user manual and instructions
Find the device manual for free X-HM51-S PIONEER in PDF.


User questions about X-HM51-S PIONEER
0 question about this device. Answer the ones you know or ask your own.
Ask a new question about this device
Download the instructions for your Audio System in PDF format for free! Find your manual X-HM51-S - PIONEER and take your electronic device back in hand. On this page are published all the documents necessary for the use of your device. X-HM51-S by PIONEER.
USER MANUAL X-HM51-S PIONEER
CD Receiver | Micro châîne CD | CD-Receiver | Ricevitore CD | CD-Receiver | Receptor de CD | CD-PécunBep

ME06

Bluetooth
Operating Instructions
Mode d'emploi
Bedienungsanleitung
Istruzioni per l'uso
Handleiding
Manual de instrucciones
Инструкции по зацимуataczini
Made for
iPod
iPhone
iPad
CAUTION
TO PREVENT THE RISK OF ELECTRIC SHOCK, DO NOT REMOVE COVER (OR BACK). NO USER-SERVICEABLE PARTS INSIDE. REFER SERVICING TO QUALIFIED SERVICE PERSONNEL.
D3-4-2-1-1_B1_En
WARNING
This equipment is not waterproof. To prevent a fire or shock hazard, do not place any container filled with liquid near this equipment (such as a vase or flower pot) or expose it to dripping, splashing, rain or moisture.
D3-4-2-1-3_A1_En
WARNING
To prevent a fire hazard, do not place any naked flame sources (such as a lighted candle) on the equipment.
D3-4-2-1-7a_A1_En
VENTILATION CAUTION
When installing this unit, make sure to leave space around the unit for ventilation to improve heat radiation (at least 25cm at top, 10cm at rear, and 5cm at each side).
WARNING
Slots and openings in the cabinet are provided for ventilation to ensure reliable operation of the product, and to protect it from overheating. To prevent fire hazard, the openings should never be blocked or covered with items (such as newspapers, table-cloths, curtains) or by operating the equipment on thick carpet or a bed.
D3-4-2-1-7b*A1_En
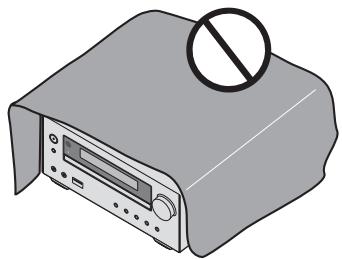
Operating Environment
Operating environment temperature and humidity: +5^ to +35^ (+41^ to +95^) less than 85% RH (cooling vents not blocked)
Do not install this unit in a poorly ventilated area, or in locations exposed to high humidity or direct sunlight (or strong artificial light)
D3-4-2-1-7c*A1En
WARNING
Store small parts out of the reach of children and infants. If accidentally swallowed, contact a doctor immediately.
D41-6-4_A1_En
This product is for general household purposes. Any failure due to use for other than household purposes (such as long-term use for business purposes in a restaurant or use in a car or ship) and which requires repair will be charged for even during the warranty period.
K041_A1_En
CAUTION
The oSTANDBY/ON switch on this unit will not completely shut off all power from the AC outlet. Since the power cord serves as the main disconnect device for the unit, you will need to unplug it from the AC outlet to shut down all power. Therefore, make sure the unit has been installed so that the power plug can be easily unplugged from the AC outlet in case of an accident. To avoid fire hazard, the power cord should also be unplugged from the AC outlet when left unused for a long period of time (for example, when on vacation).
D3-4-2-2-2a*A1_EN
CAUTION
This product is a class 1 laser product classified under the Safety of laser products, IEC 60825-1:2007.
CLASS 1 LASER PRODUCT
D58-5-2-2a_A1_En
POWER-CORD CAUTION
Handle the power cord by the plug. Do not pull out the plug by tugging the cord and never touch the power cord when your hands are wet as this could cause a short circuit or electric shock. Do not place the unit, a piece of furniture, etc., on the power cord, or pinch the cord. Never make a knot in the cord or tie it with other cords. The power cords should be routed such that they are not likely to be stepped on. A damaged power cord can cause a fire or give you an electrical shock. Check the power cord once in a while. When you find it damaged, ask your nearest PIONEER authorized service center or your dealer for a replacement.
S002*A1_EN
X-HM51 only
Do not install your speakers overhead on the ceiling or wall. The grill is designed to be detachable, and as such it may fall and cause damage or personal injury if installed overhead.
SGK004_A1_En
Information for users on collection and disposal of old equipment and used batteries
(Symbol for equipment)

Symbol examples for batteries


Pb
These symbols on the products, packaging, and/or accompanying documents mean that used electrical and electronic products and batteries should not be mixed with general household waste.
For proper treatment, recovery and recycling of old products and used batteries, please take them to applicable collection points in accordance with your national legislation.
By disposing of these products and batteries correctly, you will help to save valuable resources and prevent any potential negative effects on human health and the environment which could otherwise arise from inappropriate waste handling.
For more information about collection and recycling of old products and batteries, please contact your local municipality, your waste disposal service or the point of sale where you purchased the items.
These symbols are only valid in the European Union.
For countries outside the European Union:
If you wish to discard these items, please contact your local authorities or dealer and ask for the correct method of disposal.
K058a_A1_En
Radio wave caution
This unit uses a 2.4 GHz radio wave frequency, which is a band used by other wireless systems (Microwave ovens and Cordless phones, etc.). In this event noise appears in your television image, there is the possibility this unit (including products supported by this unit) is causing signal interference with the antenna input connector of your television, video, satellite tuner, etc. In this event, increase the distance between the antenna input connector and this unit (including products supported by this unit).
- Pioneer is not responsible for any malfunction of the compatible Pioneer product due to communication error/malfunctions associated with your network connection and/or your connected equipment. Please contact your Internet service provider or network device manufacturer.
- A separate contract with payment to an Internet service provider is required to use the Internet.
Discover the benefits of registering your product online at http://www.pioneer.co.uk (or http://www.pioneer.eu).
Thank you for buying this Pioneer product.
Please read through these operating instructions so that you will know how to operate your model properly. After you have finished reading the instructions, put them in a safe place for future reference.
Contents
01 Before you start
What's in the box 5
Loading the batteries in the remote control 5
Using the remote control 5
02 Part names and functions
Remote control 6
Detatching and replacing the front grille
(X-HM51 only) 7
Front panel 8
Display 9
03 Connections
Speaker connection (X-HM51 only) 10
Using other subwoofer 11
Connecting antennas 11
Using external antennas. 12
Plugging in 12
04 Getting started
To turn the power on 13
Setting the clock 13
General control 13
Input function. 13
Display brightness control 13
Volume auto setting. 13
Volume control. 13
Muting. 13
Sound controls 14
Equalizer. 14
P.BASS control 14
Bass/treble control 14
Setting the wake-up timer 14
Calling the wake-up timer 15
Cancelling the wake-up timer. 15
Using the wake-up timer. 15
Using the sleep timer 15
Using Headphones 15
05 iPod/iPhone/iPad playback
Confirming what iPod/iPhone/iPad models are
supported 16
Connecting your iPod/iPhone/iPad 16
Connecting iPod/iphone/iPad using supplied iPad stand 16
Playing iPod/Phone/IPad 17
06 Disc playback
Playing discs or files 18
Advanced CD or MP3/WMA disc playback 19
Direct track search 19
Repeat play. 19
Random play 19
Programmed play (CD or MP3/WMA) 20
About downloading MP3/WMA 20
About folder playback order 20
Specify the folder to play. 21
Switch the display contents 21
07 USB playback
Playing USB storage devices 22
Repeat play. 22
Random play 22
Specify the folder to play. 23
Switch the display contents 23
Playing in the desired order (Programmed Play) 23
08 Using the tuner
Listening to the radio broadcasts 24
Tuning. 24
Saving station presets. 24
To recall a memorised station 25
To scan the preset stations. 25
To erase entire preset memory. 25
Changing the noise cut mode 25
Using the Radio Data System (RDS) 25
An introduction to RDS. 25
Searching for RDS programs 25
Information provided by RDS 26
Using the Auto Station Program Memory (ASPM). 26
Notes for RDS operation. 26
09 Other connections
Connecting auxiliary components 27
10 Bluetooth® Audio playback
Music playback using Bluetooth wireless
technology 28
Pairing with the unit (Initial registration) 28
Listen to music on the unit from a Bluetooth capable
device 29
Radio wave caution 29
Scope of operation 29
Radio wave reflections 30
Precautions regarding connections to products
supported by this unit 30
11 Additional information
Troubleshooting 31
Playable discs and formats 34
Regarding copy protected CDs 34
Supported audio file formats 34
Cautions on use 34
When moving this unit 34
Place of installation. 34
Do not place objects on this unit. 35
About condensation 35
Cleaning the product. 35
Cleaning the lens. 35
Handling discs 35
Storing 35
Cleaning discs 35
About specially shaped discs 35
About iPod/iPhone/iPad 36
Restoring all the settings to the defaults 36
Specifications 37
Chapter 1: Before you start
What's in the box
Please confirm that the following accessories are in the box when you open it.
Remote control
Power cord
AM antenna cable
FM wire antenna
- AAA batteries (R03) × 2
- Speaker cord x 2 (X-HM51 only)
- iPad stand
Warranty card
- Operating instructions (this document)
Loading the batteries in the remote control
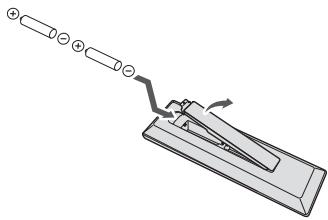
1 Open the rear lid and load the batteries as illustrated below.
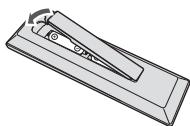
2 Close the rear lid.
CAUTION
- When inserting the batteries, make sure not to damage the springs on the battery's terminals. This can cause batteries to leak or over heat.
- Do not use any batteries other than the ones specified. Also, do not use a new battery together with an old one.
- When loading the batteries into the remote control, set them in the proper direction, as indicated by the polarity marks ( and ).
WARNING
- Do not heat batteries, disassemble them, or throw them into flames or water.
- Batteries may have different voltages, even if they are the same size and shape. Do not use different types of batteries together.
- To prevent leakage of battery fluid, remove the batteries if you do not plan to use the remote control for a long period of time (1 month or more). If the fluid should leak, wipe it carefully off the inside of the case, then insert new batteries. If a battery should leak and the fluid should get on your skin, flush it off with large quantities of water.
- When disposing of used batteries, please comply with governmental regulations or environmental public institution's rules that apply in your country/area.
Do not use or store batteries in direct sunlight or other excessively hot place, such as inside a car or near a heater. This can cause batteries to leak, overheat, explode or catch fire. It can also reduce the life or performance of batteries.
Using the remote control
The remote has a range of about 7m at an angle of about 30^ from the remote sensor.
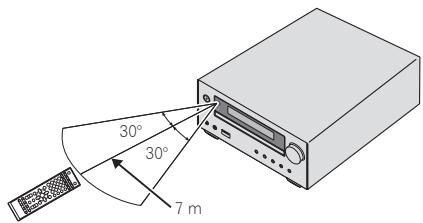
Keep in mind the following when using the remote control:
- Make sure that there are no obstacles between the remote and the remote sensor on the unit.
- Remote operation may become unreliable if strong sunlight or fluorescent light is shining on the unit's remote sensor.
Remote controllers for different devices can interfere with each other. Avoid using remotes for other equipment located close to this unit. - Replace the batteries when you notice a fall off in the operating range of the remote.
Chapter 2:
Part names and functions
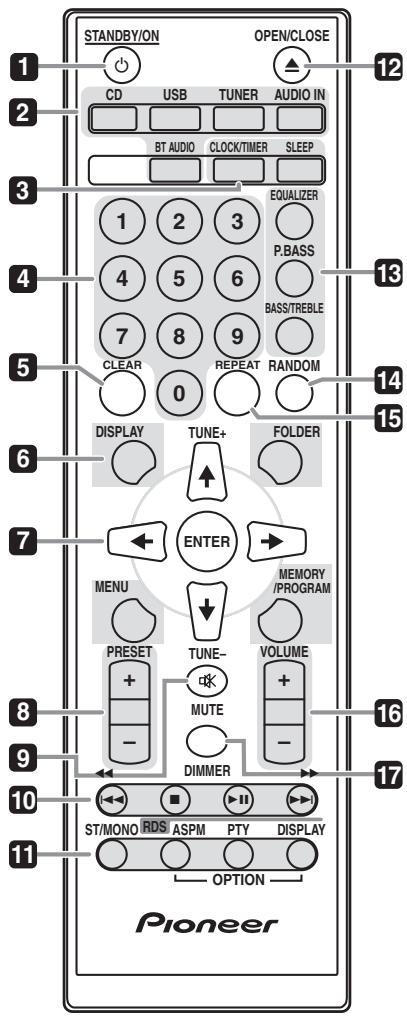
Remote control
1 STANDBY/ON
Switches the receiver between standby and on (page 13).
2 Input function buttons
Use to select the input source to this receiver (pages 17, 18, 22, 24, 27 and 28).
3 CD Receiver control buttons CLOCK/TIMER
Use for setting the clock, as well as for setting and checking the timers (page 13).
SLEEP
See Using the sleep timer on page 15.
4 Numeric buttons (0 to 9)
Use to enter the number (page 19).
5 CLEAR
Use to clear the programmed play (page 20).
6 CD Receiver control buttons DISPLAY
Press to change the display for songs playing back from CD or USB (page 21).
FOLDER
Use to select the folder of the MP3/WMA disc or USB mass storage device (page 20).
MENU
Use to access the menu.
MEMORY/PROGRAM
Use to memory or program the MP3/WMA disc (page 20).
7 / / / (TUNE + / - ), ENTER
Use to select/switch system settings and modes, and to confirm actions.
Use TUNE + / - can be used to find radio frequencies (page 24).
8 PRESET +/-
Use to select preset radio stations (page 25).
9 MUTE
Mutes/unmates the sound (page 13).
10Playback control buttons
Use to control each function after you have selected it using the input function buttons (page 18).
11 Tuner control buttons ST/MONO
Use to switch the sound mode between stereo and monaural. (page 24)
RDS ASPM
Use to search for RDS Auto station program memory (page 25).
RDS PTY
Use to search for RDS program types (page 25).
RDS DISPLAY
Press to change the RDS display for information mode (page 25).
12 OPEN/CLOSE
Use to open or close the disc tray (page 18).
13 Sound control buttons
Adjust the sound quality (page 14).
14 RANDOM
Randomize order of track playback from a CD, iPod or USB (page 19).
15 REPEAT
Press to change the repeat play setting from a CD, iPod or USB (page 19).
16 Volume control buttons
Use to set the listening volume (page 13).
17 DIMMER
Dims or brightens the display. The brightness can be controlled in four steps (page 13).

The OPTION buttons are not available for this unit.
Detatching and replacing the front grille (X-HM51 only)
The front grille of this speaker system is removable. Proceed as follows:
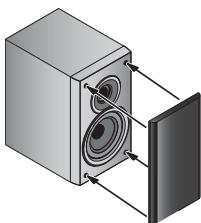
1 Grab the bottom of the grille, and gently pull it toward you to remove the bottom portion.
2 Next, grab the top part of the grille and gently pull it toward you to remove the top portion.
3 To install the grille, align the projections on the speaker with the receptacles on the top and at the base of the grille and push them into place.
Front panel
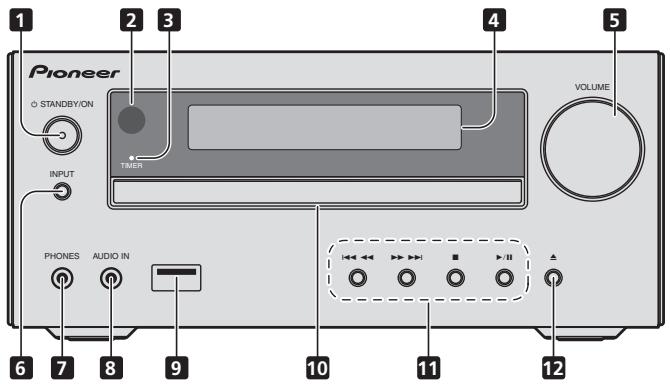
1 STANDBY/ON button
Switches the receiver between standby and on (page 13).
2 Remote sensor
Receives the signals from the remote control.
3 TIMER indicator
Lights when the unit power is off but when the timer setting is activated.
4 Character display
See Display on page 9.
5 Volume control
Use to set the listening volume (page 13).
6 INPUT button
Selects the input source.
7 Headphone socket
Use to connect headphones. When the headphones are connected, there is no sound output from the speakers (page 15).
8 AUDIO IN socket
Use to connect an auxiliary component using a stereo minijack cable (page 27).
9 USB terminal
Use to connect your USB mass storage device or Apple iPod/ iPhone/iPad as an audio source (pages 17 and 22).
10 Disc tray
Place the disc, label side up (page 18).
11Playback control buttons
Select the desired track or file to be played back. Stop current playback. Stop playback or resume playback from the point where it was paused.
12 Disc tray open/close button
Use to open or close the disc tray (page 18).
Display
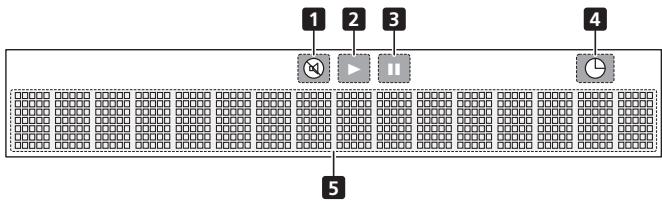
1 Lights when the sound is muted.

The mute icon will be displayed in red.
2 Start playback.
3 Pause playback.
4 Timer function is set.
5 Character display Displays various system information.
Chapter 3:
Connections

CAUTION
- Be sure to turn off the power and unplug the power cord from the power outlet whenever making or changing connections.
- Connect the power cord after all the connections between devices have been completed.
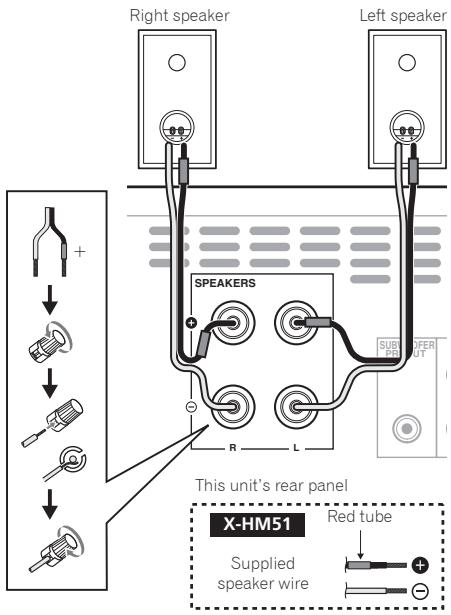
Speaker connection (X-HM51 only)
- The provided speaker wire with the red tube is for the (+) terminal. Connect the wire with red tube the (+) terminal, and other wire to the (-) terminal.

CAUTION
These speaker terminals carry HAZARDOUS LIVE voltage. To prevent the risk of electric shock when connecting or disconnecting the speaker cables, disconnect the power cord before touching any uninsulated parts.
- Make sure that the speaker cable cores do not become exposed and make contact with other cable cores. This may cause malfunction of the product.
- Do not allow the speaker cable core to come into contact with the receiver body.
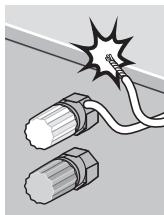
- If the speaker cable core comes into contact with any metal portion of the receiver's body, it may damage the speakers and cause smoke and fire.
Insert speaker cables securely into the terminals and check that the cable does not come out of easily.
X-HM51 only
- Do not connect any speakers other than those supplied to this system.
- Do not connect the supplied speakers to any amplifier other than the one supplied with this system.
Connection to any other amplifier may result in malfunction or fire.
- Do not attach these speakers to the wall or ceiling. They may fall off and cause injury.
- These speakers are magnetically shielded. However, depending on the installation location, color distortion may occur if the speaker system is installed extremely close to the screen of a television set. If this happens, turn off the television set, and then turn it on after 15 to 30 minutes. If the problem persists, move the speaker system away from the television set.
XC-HM51 only
- You can use speakers with a nominal impedance between 4 Ω and 16 Ω.

Note
There is no difference between L and R speakers.
Cleaning the glossy finish of the speaker (X-HM51 only)
- If you use a dusty or hard cloth or if you rub the screen hard, the finish of the product will be scratched.
- If you clean the surface of the speaker system with a wet cloth, water droplets on the surface may enter into the product, resulting in malfunction.
- When cleaning the finish of the speaker system, gently wipe it with a dry soft cloth.
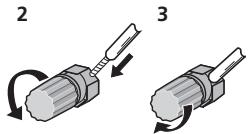
If not using the provided speaker wire
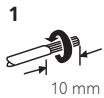
1 Twist exposed wire strands together.
2 Loosen terminal and insert exposed wire.
3 Tighten terminal.
X-HM51 only
- Do not install your speakers overhead on the ceiling or wall. The grill is designed to be detachable, and as such it may fall and cause damage or personal injury if installed overhead.
- Do not allow any objects to fall into or to be placed in the bass reflex ducts.
- Do not stand or sit on the speakers. You may be injured.
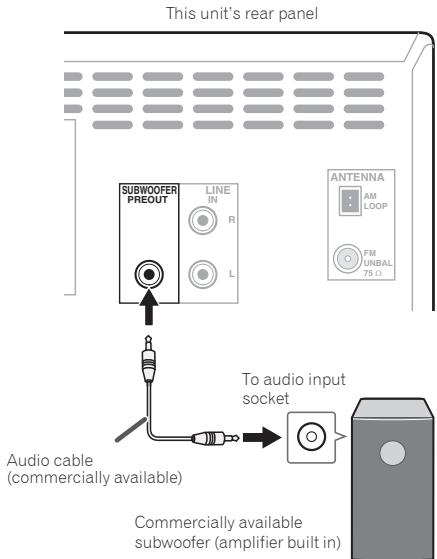
Using other subwoofer
You can connect a subwoofer with an amplifier to the SUBWOOFER PREOUT socket.

Note
- No sound is heard from the subwoofer without a built-in amplifier.
- Subwoofer Pre-out (audio signal): 350mV / 10k at 70 Hz.
Connecting antennas
Connect the AM loop antenna and the FM wire antenna as shown below. To improve reception and sound quality, connect external antennas (see Using external antennas on page 12).
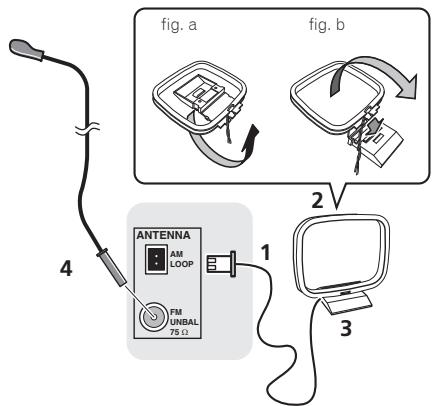
1 Connect the AM antenna wires.
Hold the terminal part of the wire when connecting.
2 Fix the AM loop antenna to the attached stand.
To fix the stand to the antenna, bend in the direction indicated by the arrow (fig. a) then clip the loop onto the stand (fig. b).
3 Place the AM antenna on a flat surface and in a direction giving the best reception.
4 Connect the FM wire antenna into the FM antenna socket.
For best results, extend the FM antenna fully and fix to a wall or door frame. Don't drape loosely or leave coiled up.
To customers in Norway and Sweden

CAUTION
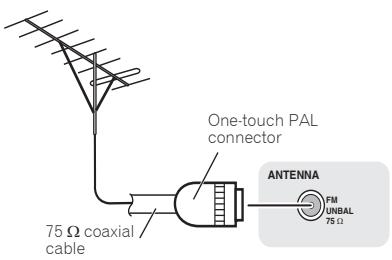
To improve FM reception
Use a PAL connector (not supplied) to connect an external FM antenna.
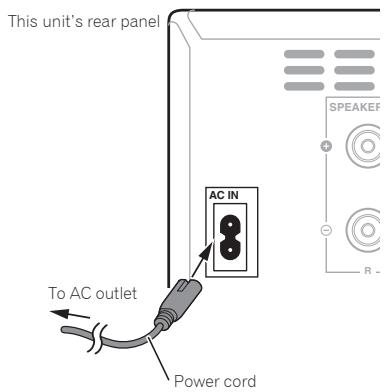
Plugging in
CAUTION
- Do not use any power cord other than the one supplied with this unit.
- Do not use the supplied power cord for any purpose other than that described below.
Before making or changing the connections, switch off the power and disconnect the power cord from the AC outlet.
After you've finished making all connections, plug the unit into an AC outlet.
Chapter 4:
Getting started
To turn the power on
Press the 品 STANDBY/ON to turn the power on.
After use:
Press the STANDBY/ON to enter the power stand-by mode.

- In standby mode, if iPod/iPhone/iPad is connected, the unit turns charge mode.
Setting the clock
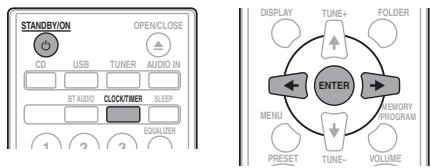
1 Press STANDBY/ON to turn the power on.
2 Press CLOCK/TIMER on the remote control.
"CLOCK" is shown on the main display.
3 Press ENTER.
4 Press to set the day, then press ENTER.
5 Press to set the hour, then press ENTER.
6 Press / to set the minute, then press ENTER to confirm.
7 Press ENTER.
To confirm the time display:
Press the CLOCK/TIMER. The time display will appear for about 10 seconds.
To readjust the clock:
Perform "Setting the clock" from step 1.

- When power supply is restored after unit is plugged in again or after a power failure, reset the clock.
General control
Input function
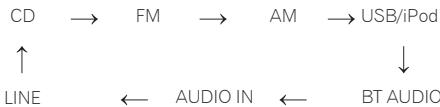
When the INPUT on main unit is pressed, the current function will change to different mode. Press the INPUT repeatedly to select desired function.
Display brightness control
Press DIMMER to dims the display brightness. The brightness can be controlled in four steps.
Volume auto setting
If you turn off and on the main unit with the volume set to 31 or higher, the volume starts at 30.
Volume control
Turn the VOLUME on the unit or press VOLUME + / - on the remote control to increase or decrease the volume.
CAUTION
- The sound level at a given volume setting depends on speaker efficiency, location, and various other factors. It is advisable to avoid exposure to high volume levels. Do not turn the volume on to full at switch on. Listen to music at moderate levels. Excessive sound pressure from earphones and headphones can cause hearing loss.
Muting
The volume is muted temporarily when pressing the MUTE on the remote control. Press again to restore the volume.
Sound controls
Equalizer
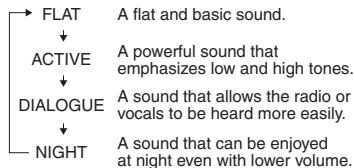
When the EQUALIZER is pressed, the current mode setting will be displayed. To change to a different mode, press the EQUALIZER repeatedly until the desired sound mode appears.
P.BASS control
When the power is first turned on, the unit will enter the P.BASS mode which emphasises the bass frequencies. To cancel the P.BASS mode, press the P.BASS on the remote control.
Bass/treble control
Press the BASS/TREBLE, then press / / / to adjust the bass or treble.

Note
- The EQUALIZER and P.BASS cannot operate simultaneously. The most recently selected of these two functions will be the one used.
- BASS/TREBLE can operate alongside either the EQUALIZER or P.BASS.
When one of the above two functions is selected, the function that is not selected will be displayed as follows.
1 When P.BASS setting (ON/OFF) is changed
- EQUALIZER:FLAT
2 When EQUALIZER setting is changed
P.BASS:OFF
Setting the wake-up timer
Used to change the existing timer setting, or to set a new timer.
1 Press STANDBY/ON to turn the power on.
2 Press and hold CLOCK/TIMER.
3 Press / to select "ONCE" or "DAILY", then press ENTER.
ONCE - Works once only at a preset time.
DAILY - Works at the preset time on a preset day.
4 Press / to select "TIMER SET", then press ENTER.
5 Press / to select the timer playback source, then press ENTER.
- CD, FM, AM, USB/iPod, BT AUDIO, AUDIO IN and LINE can be selected as the playback source.
6 Press / to select the timer day, then press ENTER.
7 Press / to set the hour, then press ENTER.
8 Press / to set the minute, then press ENTER.
- Set the time to finish as in steps 7 and 8 above.
9 Adjust the volume press VOLUME + / - , then press ENTER.
10 Press STANDBY/ON to enter the power standby mode.
- The TIMER indicator lights up.
Calling the wake-up timer
An existing timer setting can be reused.
1 Follow steps 1 to 3 in "Setting the wake-up timer".
2 Press / to select "TIMER ON", then press ENTER.
Cancelling the wake-up timer
Turn off the timer setting.
1 Follow steps 1 to 3 in "Setting the wake-up timer".
2 Press / to select "TIMER OFF", then press ENTER.
Using the wake-up timer
1 Press STANDBY/ON to turn the power off.
2 At the wake-up time, this unit will turn on automatically and play the selected input function.

Note
- If at the wake-up time an iPod/iPhone/iPad is not connected to the unit or a disc is not inserted, the unit will be turned on but will not play back the track.
Some discs may not be played automatically at the wake-up time. - When setting the timer set at least one minute between the start and end time.
Using the sleep timer
The sleep timer switches off the unit after a specified time so you can fall asleep without worrying about it.
1 Press SLEEP repeatedly to select a switch off time.
Choose between 10 min, 20 min, 30 min, 60 min, 90 min, 120 min, 150 min, 180 min or OFF. The newly set value displays for 3 seconds, and then the setting is completed.

Note
- The sleep timer can be set by pressing SLEEP while the remaining time is displayed.
Using Headphones
Connect the headphones plug to the PHONES terminal. When the headphones are connected, there is no sound output from the speakers.
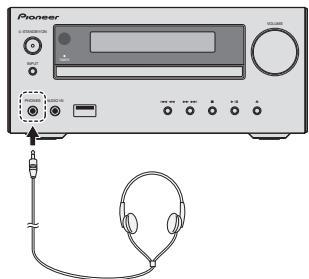
- Do not turn the volume on to full at switch on and listen to music at moderate levels. Excessive sound pressure from earphones and headphones can cause hearing loss.
- Before plugging in or unplugging the headphone, reduce the volume.
- Be sure your headphone has a 3.5 ~mm diameter plug and impedance between 16 and 50 . The recommended impedance is 32 .
Audio from the iPod/iPhone/iPad cannot be heard via the headphones connected to the unit. "HP MUTE" will be displayed if you connect the headphones when the iPod/iPhone/iPad function is selected.
Chapter 5:
iPod/iPhone/iPad playback
Merely by connecting your iPod/iPhone/iPad to this unit, you can enjoy high-quality sound from your iPod/iPhone/iPad. Playback setting for iPod/iPhone/iPad music can be performed from this unit or the iPod/iPhone/iPad itself.
Confirming what iPod/iPhone/iPad models are supported
The iPod/iPhone/iPad playable on this unit are shown below.
| iPod/iPhone/iPad | USB Terminal (Audio only) |
| iPod nano (3/4/5/6/7G) | ✓ |
| iPod touch (1/2/3/4/5G) | ✓ |
| iPhone 5 | ✓ |
| iPhone 4S | ✓ |
| iPhone 4 | ✓ |
| iPhone 3GS | ✓ |
| iPhone 3G | ✓ |
| iPhone | ✓ |
| iPad mini | ✓ |
| iPad (3/4G) | ✓ |
| iPad/iPad 2 | ✓ |

Note
- Pioneer does not guarantee that this unit plays iPod/ iPhone/iPad models other than the ones specified.
Some functions may be restricted depending on the model or software version. - iPod/iPhone/iPad is licensed for reproduction of noncopyrighted materials or materials the user is legally permitted to reproduce.
- Features such as the equalizer cannot be controlled using this system, and we recommend switching the equalizer off before connecting.
- Pioneer cannot under any circumstances accept responsibility for any direct or indirect loss arising from any inconvenience or loss of recorded material resulting from iPod/iPhone/iPad failure.
- For detailed instructions on using the iPod/iPhone/iPad, please refer to the manual supplied with the iPod/ iPhone/iPad.
- This system has been developed and tested for the software version of iPod/iPhone/iPad indicated on the website of Pioneer (http://pioneer.jp/homeav/support/ios/eu/).
-
Installing software versions other than indicated on the website of Pioneer to your iPod/iPhone/iPad may result in incompatibility with this system.
-
This unit cannot be used to record CD, tuner or other content on an iPod/iPhone/iPad.
Connecting your iPod/iPhone/iPad
Connecting iPod/iPhone/iPad using supplied iPad stand
1 Connect the iPod/iPhone/iPad cable to the unit.
2 Pass the iPod/iPhone/iPad cable through the bottom of the stand and connect it to the iPod/ iPhone/iPad.
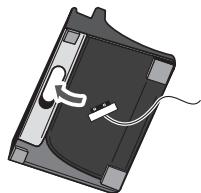
3 Set the iPod/iPhone/iPad on the stand.
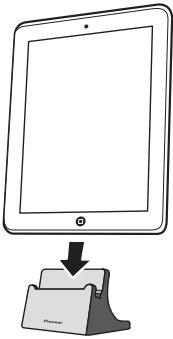
Playing iPod/Phone/iPad
1 Connect your iPod/iPhone/iPad.
- If an iPod/iPhone/iPad is connected while the unit is turned on, playback of the iPod/iPhone/iPad will not begin.
2 Press USB as the input source.
"USB/iPod" is shown on the main display.
3 When the recognition is completed, will begin playing automatically.
- The available iPod/iPhone/iPad playback controls from the unit are / , , .
-
In the following case, operate your iPod/iphone/iPad directly:
-
Searching a file by artist name or genre.
- Playing in the repeat or random mode.
CAUTION
- When your iPod/iPhone/iPad is connected to this unit and you wish to operate the iPod/iPhone/iPad directly, be sure to steady the iPod/iPhone/iPad with the other hand to prevent malfunctions due to faulty contacts.
Note
- For detailed instructions on using the iPod/iPhone/iPad, please refer to the manual supplied with the iPod/ iPhone/iPad.
- iPod/iPhone/iPad recharging occurs whenever an iPod/iPhone/iPad is connected to this unit. (This function is supported in standby mode as well.)
- When input is switched from USB/iPod to another function, iPod/iPhone/iPad playback is temporarily stopped.
Important
If this unit cannot play your iPod/iPhone/iPad, perform the following troubleshooting checks:
- Check whether the iPod/iPhone/iPad is supported by this unit.
- Reconnect the iPod/iPhone/iPad to the unit. If this doesn't seem to work, try resetting your iPod/iPhone/iPad.
- Check that iPod/iPhone/iPad software is supported by the unit.
If the iPod/iPhone/iPad cannot be operated, check the following items:
- Is the iPod/iPhone/iPad connected correctly? Reconnect the iPod/iPhone/iPad to the unit.
- Is the iPod/iPhone/iPad experiencing a hangup? Try resetting the iPod/iPhone/iPad, and reconnect it to the unit.
Chapter 6:
Disc playback
This system can play back a standard CD, CD-R/RW in the CD format and CD-R/RW with MP3 or WMA files, but cannot record on them. Some audio CD-R and CD-RW discs may not be playable due to the state of the disc or the device that was used for recording.
MP3:
MP3 is a form of compression. It is an acronym which stands for MPEG Audio Layer 3. MP3 is a type of audio code which is processed by significant compression from the original audio source with very little loss in sound quality.
- This system supports MPEG-1/2 Audio Layer 3 (Sampling rates: 8kHz to 48kHz ; Bit rates: 64 kbps to 384 kbps).
- During VBR file playback, time counter in the display may differ from its actual playback time.
WMA:
WMA (Windows Media Audio) files are Advanced System Format files that include audio files which are compressed with Windows Media Audio codec. WMA is developed by Microsoft as an audio format file for Windows Media Player.
- This system supports WMA (Sampling rates: 32 kHz/44.1 kHz/48 kHz; Bit rates: 64 kbps to 320 kbps).
- During VBR file playback, time counter in the display may differ from its actual playback time.
Playing discs or files
1 Press STANDBY/ON to turn the power on.
2 Press CD on the remote control or INPUT repeatedly on the main unit to select CD input.
3 Press OPEN/CLOSE to open the disc tray.
4 Place the disc on the disc tray, label side up.
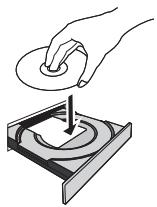
5 Press OPEN/CLOSE to close the disc tray.
6 Press /II to start playback.
After the last track is played, the unit will stop automatically.
CAUTION
- Do not place two discs in one disc tray.
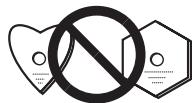
- Do not play discs of special shapes (heart, octagon, etc). It may cause malfunctions.
- Do not push the disc tray whilst it is moving.
- If the power fails whilst the tray is open, wait until the power is restored.
- Be sure to place 8cm disc in the middle of the disc tray.
Note
- Due to the structure of the disc information, it takes longer to read an MP3/WMA disc than a normal CD (approximately 20 to 90 seconds).
- When the beginning of the first track is reached during fast reverse, the unit will enter the playback mode (only for CD).
- Rewritable multi-session discs with unfinished writing, can still be played.
- If TV or radio interference occurs during CD operation, move the unit away from the TV or radio.
Tip
- When no operation has done in CD mode and the audio file is not played for more than 30 minutes, the power will automatically turn off.
Various disc functions
| Function | Main unit | Remote control | Operation |
| Play | →'' | →II | Press in the stop mode. |
| Stop | ■ | ■ | Press in the playback mode. |
| Pause | →'' | →II | Press in the playback mode. Press ➔/II to resume playback from the paused point. |
| Track up/down | ←←→ | ← | Press in the playback or stop mode. If you press the button in the stop mode, press ➔/II to start the desired track. |
| Fast forward/reverse | ←←→ | ← | Press and hold down in the playback mode. Release the button to resume playback. |
Advanced CD or MP3/WMA disc playback
Direct track search
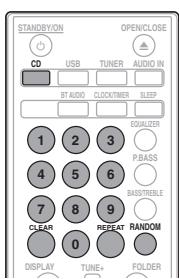
By using the numeric buttons, the desired tracks on the current disc can be played.
Use the numeric buttons on the remote control to select the desired track whilst playing the selected disc.
Note
- A track number higher than the number of tracks on the disc cannot be selected.
To stop playback:
Press ■.
Repeat play
Repeat play can play one track, all tracks or a programmed sequence continuously.
To repeat one track:
Press REPEAT repeatedly until "REPEAT ONE" appears. Press ENTER.
To repeat all tracks:
Press REPEAT repeatedly until "REPEAT ALL" appears. Press ENTER.
To repeat desired tracks:
Perform steps 1 to 5 in "Programmed play (CD or MP3/WMA)" section on next page and then press REPEAT repeatedly until "REPEAT ALL" appears. Press ENTER.
To cancel repeat play:
Press REPEAT repeatedly until "REPEAT OFF" appears. Press ENTER.

Note
After performing repeat play, be sure to press Otherwise, the disc will play continuously.
During repeat play, random play is not possible.
Random play
The tracks on the disc can be played in random order automatically.
To random play all tracks:
Press RANDOM repeatedly until "RANDOM ON" appears. Press ENTER.
To cancel random play:
Press RANDOM repeatedly until "RANDOM OFF" appears. Press ENTER.

Note
- If you press the during random play, you can move to the track selected next by the random operation. On the other hand, the does not allow you to move to the previous track. The beginning of the track being played will be located.
- In random play, the unit will select and play tracks automatically. (You cannot select the order of the tracks.)
During random play, repeat play is not possible.
Programmed play (CD or MP3/WMA)
You can choose up to 32 selections for playback in the order you like.
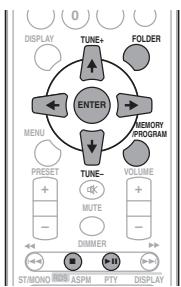
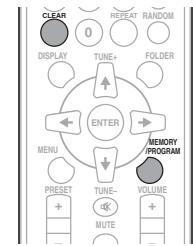
1 Whilst in the stop mode, press MEMORY/PROGRAM on the remote control to enter the programming save mode.
2 Press or the numeric buttons on the remote control to select the desired tracks.
3 Press ENTER to save folder and track number.
4 Repeat steps 2 to 3 for other folder/tracks. Up to 32 tracks can be programmed.
- If you want to check the programmed tracks, press MEMORY/PROGRAM.
- If you make a mistake, the last programmed tracks will be canceled by pressing CLEAR.
5 Press /II to start playback.
To cancel the programmed play mode:
To cancel the programmed play, press twice on the remote control. The display will show "PRG CLEAR" and all the programmed content will be cleared.
Adding tracks to the program:
Press the MEMORY/PROGRAM. Then follow steps 2 to 3 to add tracks.

Note
- When a disc is ejected anything programmed is cleared.
- If you press the STANDBY/ON to enter the standby mode or change the function from CD to another, the programmed selections will be cleared.
- During the program operation, random play is not possible.
About downloading MP3/WMA
There are many music sites on the internet that you can download MP3/WMA music files. Follow the instructions from the website on how to download the music files. You can then play back these downloaded music files by burning them to a CD-R/RW disc.
- Your downloaded song/files are for personal use only. Any other usage of the song without owner's permission, is against the law.
About folder playback order
If MP3/WMA files are recorded in several folders, a folder number will be set to each folder automatically.
These folders can be selected by the FOLDER on the remote control. If there is no supported file formats inside the selected folder, the folder is skipped and the next folder will be selected.
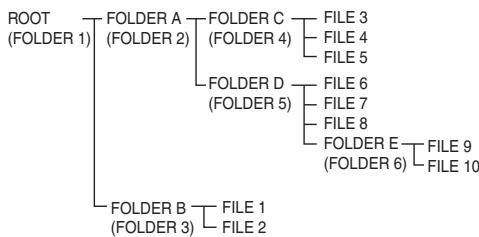
Example: How the folder numbers are assigned if MP3/WMA format files are recorded are as shown below.
1 ROOT folder is set as FOLDER 1.
2 As for folders inside ROOT folder (FOLDER A and FOLDER B), the folder which is recorded earlier on the disc will be set as FOLDER 2 and FOLDER 3.
3 As for folder inside FOLDER A (FOLDER C and FOLDER D), the folder which is recorded earlier on the disc will be set as FOLDER 4 and FOLDER 5.
4 FOLDER E that is inside FOLDER D will be set as FOLDER 6.
- The folder and file order information which is recorded on the disc depends on the writing software. There may be possibilities that this unit will playback the files not according to our expected playback order.
- From a disc with MP3/WMA files up to 255 folders and 999 files (including non playable files) can be read.
Specify the folder to play
To specify the folder to play, perform the following steps.
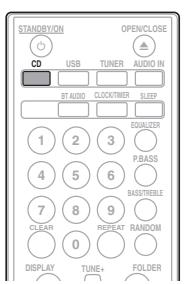
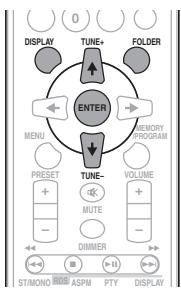
1 Press CD, and load an MP3/WMA disc.
2 Press FOLDER, and press / to select desired playback folder.
3 Press ENTER.
Playback will start from the first song of the selected folder.
Even if it is stopped, it is possible to press / , to select a folder.
Switch the display contents
1 Press DISPLAY.
If the title, artist and album name has been written to the file, that information will be displayed. (The unit can only display alphanumeric characters. Non-alphanumeric character are displayed as **.
Number of track, playback Title/Artist/Album display time display

File type display

Number of folder/track
display

Note
- "Copyright protected WMA files" or "Unsupported files" cannot be played back. In these case the files will be skipped automatically.
- There may be cases where no information can be displayed.
- Displaying title, artist and album name is only supported for MP3 files.
Chapter 7: USB playback
Playing USB storage devices
It is possible to listen to two-channel audio using the USB interface on the front of this receiver.
- Pioneer does not guarantee that any file recorded on a USB storage device will play or that power will be supplied to a USB storage device. Also note that Pioneer will accept no responsibility whatsoever for loss of files on USB storage devices caused by connection to this unit.
1 Press USB as the input source.
"USB/iPod" is shown on the main display.
2 Connect the USB storage device.
The number of folders or files stored on the connected USB storage device appear on the main display automatically.
- This receiver does not support a USB hub.
- If an iPod/iPhone/iPad is connected to the unit, the unit will automatically begin charging it.
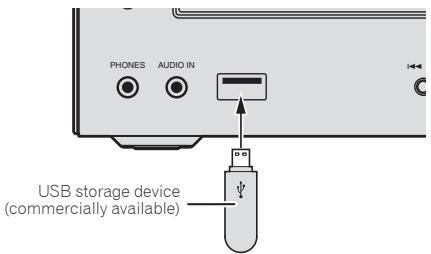
3 When the recognition is completed, press / to start playback.
- When changing to a different input source, stop the USB memory playback first before changing.
4 Disconnect USB storage device from the USB terminal.
Turn the power off before removing the USB storage device.

Note
- USB flash drive that supports USB 2.0 can be used.
- This unit may not recognize a USB storage device, play files or supply power to a USB storage device. For details, see When a USB storage device is connected on page 32.
- When a USB storage device is not playing and no operations have been performed for more than 30 minutes, the unit will automatically power off.
Repeat play
Repeat play can play one track, all tracks or a programmed sequence continuously.
To repeat one track:
Press REPEAT repeatedly until "REPEATONE" appears. Press ENTER.
To repeat all tracks:
Press REPEAT repeatedly until "REPEAT ALL" appears. Press ENTER.
To repeat desired tracks:
Perform steps 1 to 5 in "Programmed play (CD or MP3/WMA)" section on next page and then press REPEAT repeatedly until "REPEAT ALL" appears. Press ENTER.
To cancel repeat play:
Press REPEAT repeatedly until "REPEAT OFF" appears. Press ENTER.

Note
- After performing repeat play, be sure to press. Otherwise, the file of USB storage device will play continuously.
During repeat play, random play is not possible.
Random play
The file of USB storage device can be played in random order automatically.
To random play all tracks:
Press RANDOM repeatedly until "RANDOM ON" appears. Press ENTER.
To cancel random play:
Press RANDOM repeatedly until "RANDOM OFF" appears. Press ENTER.

Note
- If you press the during random play, you can move to the track selected next by the random operation. On the other hand, the does not allow you to move to the previous track. The beginning of the track being played will be located.
- In random play, the unit will select and play tracks automatically. (You cannot select the order of the tracks.)
- During random play, repeat play is not possible.
Specify the folder to play
To specify the folder to play, perform the following steps.
1 Press USB, and connect the USB storage device.
2 Press FOLDER, and press ↑/↓ to select desired playback folder.
3 Press ENTER.
Playback will start from the first song of the selected folder.
- Even if it is stopped, it is possible to press ↑/↓, to select a folder.
Switch the display contents
The unit can display the information recorded in the USB storage device. For details, see Switch the display contents on page 21.
Playing in the desired order (Programmed Play)
The unit can play folders stored on a USB storage device in the desired order. For details, see Programmed play (CD or MP3/WMA) on page 20.
Chapter 8:
Using the tuner
Listening to the radio broadcasts
The following steps show you how to tune in to FM and AM radio broadcasts using the automatic (search) and manual (step) tuning functions. Once you are tuned to a station you can memorize the frequency for recall later. See Saving station presets below for more on how to do this.
Tuning
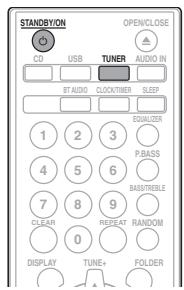
1 Press the STANDBY/ON to turn the power on.
2 Press TUNER repeatedly to select desired frequency band (FM or AM).
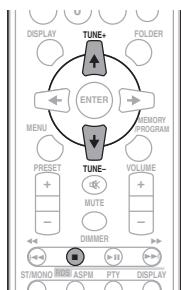
3 Press TUNE +/- on the remote control to tune in to the desired station.
Automatic tuning:
Press and hold TUNE +/- , scanning will start automatically and the tuner will stop at the first receivable broadcast station.
Manual tuning:
Press the TUNE +/- repeatedly to tune in to the desired station.

Note
- When radio interference occurs, automatic tuning may stop automatically at that point.
Automatic tuning will skip weak signal stations. - To stop the automatic tuning, press.
- When an RDS (Radio Data System) station is tuned in, the frequency will be displayed first. Finally, the station name will appear.
Full auto tuning can be achieved for RDS stations using Auto Station Program Memory (ASPM) mode, see page 26.
To receive an FM stereo transmission:
- Press ST/MONO to select stereo mode and "AUTO" will be displayed.
Improving poor FM reception:
1 Press ST/MONO repeatedly to select MONO.
This will change the tuner from stereo to mono and usually improve the reception.
Saving station presets
If you often listen to a particular radio station, it's convenient to have the receiver store the frequency for easy recall whenever you want to listen to that station (Preset tuning). This saves the effort of manually tuning in each time. This unit can memorize up to 45 stations.
(FM 30 stations/AM 15 stations)
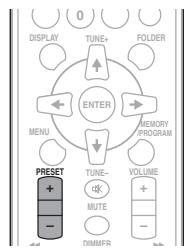
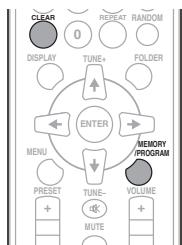
1 Tune to a station you want to memorize.
See Tuning above for more on this.
2 Press MEMORY/PROGRAM.
The preset number will flash.
3 Press PRESET + / - to select the preset channel number.
4 Press MEMORY/PROGRAM to store that station in memory.
If the preset number has changed from flashing to lighting, before the station is memorised, repeat the operation from step 2.
- Repeat steps 1 to 4 to set other stations, or to change a preset station. When a new station is stored in the memory, the station previously memorised for that preset channel number will be erased.

Note
- The backup function protects the memorised stations for a few hours should there be a power failure or the AC power cord become disconnected.
To recall a memorised station
1 Press PRESET + / - to select the desired station.
To scan the preset stations
The stations saved in the memory can be scanned automatically. (Preset memory scan)
1 Press and hold PRESET + / -
The preset number will appear and the programmed stations will be tuned in sequentially, for 5 seconds each.
2 Press PRESET + / - again when the desired station is located.
To erase entire preset memory
1 Press TUNER on the remote control.
2 Press CLEAR until "MEMORY CLEAR" appears.

Note
All stations will be erased.
Changing the noise cut mode
If you find that the AM sound quality is bad even after trying the above, you may be able to improve it using a different noise cut mode. Just choose the one that sounds best.
1 Press / to choose the Noise cut mode (1 or 2).
Using the Radio Data System (RDS)
An introduction to RDS
Radio Data System (RDS) is a system used by most FM radio stations to provide listeners with various kinds of information—the name of the station and the kind of show they're broadcasting, for example.
One feature of RDS is that you can search by type of program. For example, you can search for a station that's broadcasting a show with the program type, JAZZ.
You can search the following program types:
News - News
Current Affairs - Current Affairs
Information - General Information
Sport-Sport
Education-Educational
Drama - Radio plays, etc.
Cultures - National or regional culture, theater, etc.
Science - Science and technology
Varied Speech - Usually talk-based material, such as quiz shows or interviews.
Pop Music - Pop music
Rock Music - Rock music
Easy Listening - Easy listening
Light Classics M - Light' classical music
Serious Classics 'Serious' classical music
Other Music - Music not fitting above categories
Weather & Metr - Weather reports
Finance -Stock market reports, commerce, trading, etc.
Children's Progs - Programs for children
Social Affairs - Social affairs
Religion - Programs concerning religion
Phone In – Public expressing their views by Phone
Travel & Touring-Holiday-type travel rather than traffic announcements
Leisure & Hobby - Leisure interests and hobbies
Jazz Music-Jazz
Country Music - Country music
National Music - Popular music in a language other than English
Oldies Music - Popular music from the '50s and 60s
Folk Music - Folk music
Documentary - Documentary
Alarm Test - Broadcasting when testing emergency broadcast equipment or receivers.
Alarm-Alarm!
Searching for RDS programs
You can search a program type listed above.
1 Press TUNER on the remote control.
- RDS is only possible in the FM.
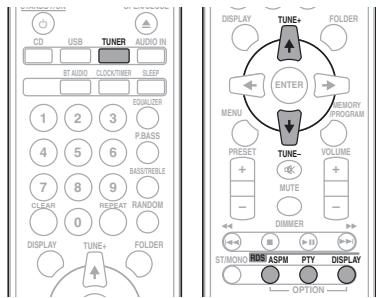
2 Press RDS PTY on the remote control.
"SELECT" will appear for about 6 seconds.
3 Press / to select the program type you want to hear.
Each time the button is pressed, the program type will appear. If the button is held down, the program type will appear continuously.
4 Whilst the selected program type is displayed (within 6 seconds), Press RDS PTY again.
After the selected program type has been lit for 2 seconds,
"SEARCH" will appear, and the search operation will start.

Note
-
If the display has stopped flashing, start again from step 2. If the unit finds a desired program type, the corresponding channel number will be lit for about 8 seconds, and then the station name will be displayed.
-
If you want to listen to the same program type of another station, press the RDS PTY whilst the channel number or station name is flashing. The unit will look for the next station.
- If no station can be found, "NOT FOUND" will appear for 4 seconds.
Information provided by RDS
Each time the RDS DISPLAY is pressed, the display will switch as follows:

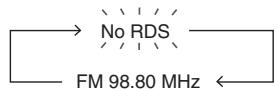
When tuning in to a station other than an RDS station or to an RDS station which sends weak signal, the display will change in the following order:
Using the Auto Station Program Memory (ASPM)
Whilst in the ASPM operation mode, the tuner will automatically search for new RDS stations. Up to 30 stations can be stored.
If you have already stored some stations in memory, the number of new stations you can store will be less.
1 Press TUNER on the remote control.
2 Press and hold down RDS ASPM on the remote control.
After "ASPM" has flashed for about 4 seconds, scanning will start (87.5 MHz to 108 MHz).
After scanning, the number of stations stored in memory will be displayed for 4 seconds, and then "END" will appear for 4 seconds.
To stop the ASPM operation before it is complete:
Press whilst it is scanning for stations. The stations which are already stored in memory will be kept there.

Note
- If the same station is broadcasting on different frequencies, the strongest frequency will be stored in memory.
- Any station which has the same frequency as the one stored in memory will not be stored.
- If 30 stations have already been stored in memory, the scan will be aborted. If you want to redo the ASPM operation, erase the preset memory.
- If no station have been stored in memory, "END" will appear for about 4 seconds.
- If the RDS signals are very weak, station names may not be stored in memory.
- The same station name can be stored in different channels.
- In a certain area or during certain time periods, the station names may temporarily be different.
Notes for RDS operation
If any of the following events occur, it does not mean that the unit is faulty:
- "PS", "NO PS" and a station name appear alternately, and properly.
- If a particular station is not broadcasting properly or a station is conducting tests, the RDS reception function may not work properly.
- When you receive an RDS station whose signal is too weak, information like the station name may not be displayed.
- "NO PS", "NO PTY" or "NO RT" will flash for about 5 seconds, and then the frequency will be displayed.
Notes for radio text:
- The first 16 characters of the radio text will appear and then they will scroll across the display.
If you tune in to an RDS station which is not broadcasting any radio text, "NO RT" will be displayed when you switch to the radio text position. - Whilst radio text data is received or when the text contents change, "RT" will be displayed.
Chapter 9:
Other connections
CAUTION
- Before making or changing the connections, switch off the power and disconnect the power cord from the AC outlet.
Connecting auxiliary components
Connect the front panel AUDIO IN mini-plug jack to your auxiliary playback component.
- This method can be used to play music on this unit from iPods/iPphones/iPads that do not support use of the USB terminal.
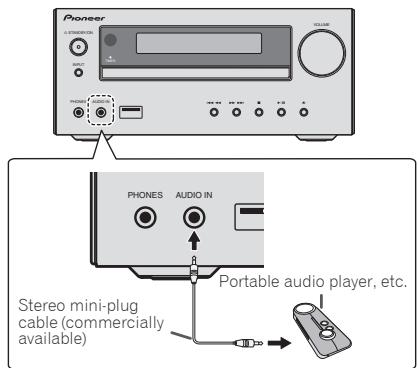
1 Switch input by pressing the INPUT on the main unit or the AUDIO IN on the remote control.
When INPUT is selected "AUDIO IN" will be displayed on the main display.
Note
- If the AUDIO IN miniplug jack is connected to auxiliary phones jack, the volume of the unit will be adjusted by the volume on the playback component. If the sound is distorted after you lower the volume of the unit, try lowering the volume on the auxiliary playback component.
Connect the rear panel LINE IN audio jacks to your auxiliary playback component.
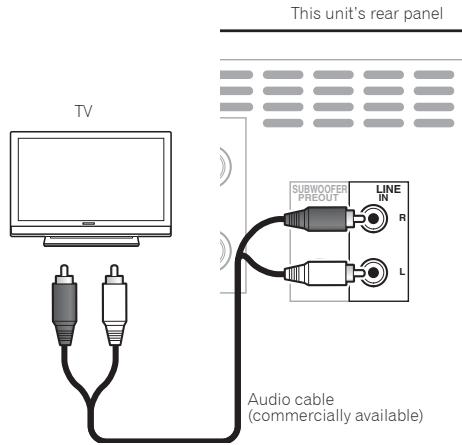
1 Press AUDIO IN twice as the input source. When LINE is selected "LINE" will be displayed on the main display.
Chapter 10:
Bluetooth® Audio playback
Music playback using Bluetooth wireless technology

Bluetooth wireless technology
enabled device:
Cell phone

Bluetooth wireless technology
enabled device:
Digital music player

Device not equipped with Bluetooth
wireless technology:
Digital music player

Bluetooth® audio transmitter
(commercially available)
Music data

The unit is capable of playing back music stored on Bluetooth capable devices (cell phones, digital music players etc.) wirelessly. You can also use a Bluetooth audio transmitter (sold separately) to enjoy music from devices that do not have Bluetooth functionality. Please refer to the user's manual for your Bluetooth capable device for more details.
The Bluetooth® word mark and logos are registered trademarks owned by Bluetooth SIG, Inc. and any use of such marks by PIONEER CORPORATION is under license. Other trademarks and trade names are those of their respective owners.
Pairing with the unit (Initial registration)
In order for the unit to playback music stored on a Bluetooth capable device, pairing must first be performed. Pairing should be performed when first using the unit with the Bluetooth capable device, or when the pairing data on the device has been erased for any reason.
Pairing is a step required to allow communication using Bluetooth wireless technology to be carried out.
- Pairing is only performed the first time that you use the unit and the Bluetooth capable device together.
- In order to allow communication using Bluetooth wireless technology to take place, pairing must be performed on both the unit and the Bluetooth capable device.
After pressing the BT AUDIO and switching to BT AUDIO input, perform the pairing procedure on the Bluetooth capable device. If pairing has been performed correctly, you will not need to perform the pairing procedures for the unit as shown below.
Please refer to the user's manual for your Bluetooth capable device for more details.
1 Press the STANDBY/ON and turn the power to the unit on.
2 Press the BT AUDIO.
The unit switches to BT AUDIO and PAIRING will be displayed.
3 Turn on the power to the Bluetooth capable device that you wish to pair with, and perform pairing procedure on it.

Note
- This unit will be displayed as "X-HM51" on all Bluetooth capable devices that you have.
Pairing will start.
- Place the Bluetooth capable device close to the unit.
Please refer to the user's manual for your Bluetooth capable device for details on when pairing can be performed and the procedures required for pairing. - When PIN code entry is requested, enter "0000." (This unit does not accept any PIN code setting other than "0000.")
4 Confirm on the Bluetooth capable device that pairing has been completed.
If pairing with the Bluetooth capable device has been completed correctly, the name of the Bluetooth capable device will be displayed on the front panel of the unit. (Only single-byte alphanumeric characters can be displayed. Any character that cannot be displayed will be indicated by a **
Listen to music on the unit from a Bluetooth capable device
1 Press the BT AUDIO.
The unit will switch to BT AUDIO input.
2 A Bluetooth connection will be created between the Bluetooth capable device and the unit.
Procedures for connecting to the unit should be performed from the Bluetooth capable device.
- Please refer to the user's manual for your Bluetooth capable device for details of the connection procedures.
3 Playback music from the Bluetooth capable device.
Radio wave caution
This unit uses a 2.4 GHz radio wave frequency, which is a band used by other wireless systems (see list below). To prevent noise or interrupted communication, do not use this unit nearby such devices, or make sure these devices are switched off during use.
- Cordless phones
- Cordless facsimiles
- Microwave ovens
- Wireless LAN devices (IEEE802.11b/g)
- Wireless AV equipment
- Wireless controllers for game systems
- Microwave-based health aids
Some baby monitors
Other, less common, equipment that may operate on the same frequency:
- Anti-theft systems
- Amateur radio stations (HAM)
- Warehouse logistic management systems
- Discrimination systems for train or emergency vehicles

Note
- In the event noise appears in your television image, there is the possibility that a Bluetooth wireless technology enabled device or this unit (including products supported by this unit) are causing signal interference with the antenna input connector of your television, video, satellite tuner, etc. In this event, increase the distance between the antenna input connector and the Bluetooth wireless technology enabled device or this unit (including products supported by this unit).
- If there is something obstructing the path between this unit (including devices supported by this unit) and the device equipped with Bluetooth wireless technology (such as a metal door, concrete wall, or insulation containing tinfoil), you may need to change the location of your system to prevent signal noise and interruptions.
Scope of operation
Use of this unit is limited to home use. (Transmission distances may be reduced depending on communication environment).
In the following locations, poor condition or inability to receive radio waves may cause the audio to be interrupted or stopped:
- In reinforced concrete buildings or steel framed or iron-framed buildings.
Near large metallic furniture.
In a crowd of people or near a building or obstacle. -
In a location exposed to the magnetic field, static electricity or radio wave interference from radio communication equipment using the same frequency band (2.4 GHz) as this unit, such as a 2.4 GHz wireless LAN device (IEEE802.11b/g) or microwave oven.
-
If you live in a heavily populated residential area (apartment, townhouse, etc.) and if your neighbor's microwave is placed near your system, you may experience radio wave interference. If this occurs, move your unit to a different place. When the microwave is not in use, there will be no radio wave interference.
Radio wave reflections
The radio waves received by this unit include the radio wave coming directly from the device equipped with Bluetooth wireless technology (direct wave) and waves coming from various directions due to reflections by walls, furniture and building (reflected waves). The reflected waves (due to obstacles and reflecting objects) further produce a variety of reflected waves as well as variation in reception condition depending on locations. If the audio cannot be received properly due to this phenomenon, try moving the location of the device equipped with Bluetooth wireless technology a little. Also note that audio may be interrupted due to the reflected waves when a person crosses or approaches the space between this unit and the device equipped with Bluetooth wireless technology.
Precautions regarding connections to products supported by this unit
- Complete connections for all devices supported by this unit, including all audio cords and power cables before connecting them to this unit.
After completing connections to this unit, check the audio and power cables to confirm that they not twisted together. - When disconnecting this unit, confirm that you have sufficient working space in the surrounding area.
- When changing connections of audio or other cables for products supported by this unit, confirm that you have sufficient working space in the surrounding area.
Chapter 11:
Additional information
Troubleshooting
Incorrect operations are often mistaken for trouble and malfunctions. If you think that there is something wrong with this component, check the points below. Sometimes the trouble may lie in another component. Investigate the other components and electrical appliances being used. If the trouble cannot be rectified even after exercising the checks listed below, ask your nearest Pioneer authorized service center or your dealer to carry out repair work.
- If the unit does not operate normally due to external effects such as static electricity disconnect the power plug from the outlet and insert again to return to normal operating conditions.
General problem
| Problem | Check | Remedy |
| Settings you have made have been cleared. | Was the power cord unplugged? | When power cord is unplugged, the settings you have made is cleared. Please set the clock again. If you do not want to clear the settings, do not unplug the power cord. |
| Difference in volume between CDs, MP3, WMA, iPod/iPhone/iPad, Tuner, AUDIO IN and LINE. | This is not a problem with this unit. | The volume may sound differently depending on the input source and recording format. |
| This unit cannot be operated with the remote control. | Are you operating from far away? | Operate within 7 m, 30° of the remote sensor on the front panel (page 5). |
| Is the remote control sensor exposed to direct sunlight or strong artificial light from a fluorescent bulb, etc.? | The remote control signals may not be received properly if the remote control sensor is exposed to direct sunlight or strong artificial light from a fluorescent bulb, etc. | |
| Are the batteries dead? | Replace the batteries (page 5). | |
| Disc cannot be played or disc is ejected automatically. | Is the disc scratched? | Scratched discs may not play. |
| Is the disc dirty? | Wipe the dirt off the disc (page 35). | |
| Is this unit placed in a humid location? | There could be condensation inside. Wait a while for the condensation to evaporate. Do not place this unit near an air-conditioner, etc. (page 35). | |
| Folder or file names are not recognized. (WMA, MP3). | Have you exceeded the maximum number of folder or file names this unit can recognize? | Up to 255 folders can be recognized on one disc. Up to 999 files can be recognized within one folder. Depending on the folder structure, however, this unit may not be able to recognize certain folders or files. |
| The unit turns off automatically. | If no play back and no operation has done for 30 minutes or more, the unit turns off automatically. | |
| Unable to connect to a Bluetooth capable device, no sound comes out at all or sound cuts out when connected. | Are there any devices nearby that emit electromagnetic waves in the 2.4 GHz band (microwaves, wireless LAN devices, other Bluetooth capable devices etc.)? | If so, either move these devices away from the unit, or stop using other devices that emit electromagnetic waves. |
| Is the Bluetooth capable device too far away from the unit, or is there something between them? | Place the Bluetooth capable device inside the same room, with no obstacles between them, and within a range of 10 m*. * Only a suggested range. The actual possible communication range may change depending upon the surrounding environment. | |
| Is the Bluetooth capable device set to a mode that allows for Bluetooth wireless communication? | Check the settings on the Bluetooth capable device. | |
| Has pairing not been completed successfully, or has either the unit or the Bluetooth capable device erased the previous pairing setting? | Perform the pairing operation again. | |
| Does the device you are trying to connect have a supported profile? | Please use a Bluetooth capable device that supports A2DP. |
When a USB storage device is connected
| Problem | Check | Remedy |
| USB storage device is not recognized. | Is the USB storage device properly connected? | Connect the device securely (all the way in). |
| Is the USB storage device connected via a USB hub? | This unit does not support USB hubs. Connect the USB storage device directly. | |
| Is the USB storage device supported by this unit? | This unit only supports USB mass storage class devices. | |
| This unit supports portable flash memory and digital audio playback devices. | ||
| Only the FAT16 and FAT32 file systems are supported. Other file systems (exFAT, NTFS, HFS etc.) are not supported. | ||
| USB flash drive that supports USB 2.0 can be used. | ||
| This device does not support the use of external hard disc drives. | ||
| This is not a problem with this unit. | Turn the power off then back on. | |
| Some USB storage devices may not be recognized properly. | ||
| File cannot be played. | Is the file copyright-protected (by DRM)? | Copyright-protected files cannot be played. |
| This is not a problem with this unit. | Files stored on a computer cannot be played. | |
| It may not be possible to play some files. | ||
| Folder or file names are not displayed or are not properly displayed. | Do the folder or file names contain more than 30 characters? | The maximum number of characters displayable for the folder and file names is 30. |
| Folder or file names are not displayed in alphabetical order. | This is not a problem with this unit. | The order in which the folder and file names are displayed depends on the order in which the folders or files were recorded on the USB storage device. |
| Much time is required to recognize the USB storage device. | What is the USB storage devices capacity? | Some time may be required to load the data when large capacity USB storage devices are connected (this could take several minutes). |
| Power is not supplied to the USB storage device. | Is AUTH ERROR displayed on the front panel display? No power is supplied if the power consumption is too high. | Turn the power off then back on. |
| Turn the power off, then disconnect and reconnect the USB storage device. | ||
| Press INPUT to switch to the other input, then switch again to the USB/iPod input. |
When an iPod/iPhone/iPad is connected
| Problem | Remedy |
| Can't operate the iPod/iPhone/iPad by the remote control. | Make sure the iPod/iPhone/iPad is connected correctly (refer to Connecting your iPod/iPhone/iPad on page 16). |
| Can't operate the iPod/iPhone/iPad. | Make sure the iPod/iPhone/iPad is connected correctly (refer to Connecting your iPod/iPhone/iPad on page 16).If the iPod/iPhone/iPad is experiencing a hangup, try resetting the iPod/iPhone/iPad, and reconnect it to the unit. |
Playable discs and formats
| Audio CD | • Commercially available audio CDs • CD-R/ -RW/ -ROM discs containing music recorded in the CD-DA format |
| WMA | WMA files recorded on CD-R/ -RW/ -ROM discs or USB storage devices |
| MP3 | MP3 files recorded on CD-R/ -RW/ -ROM discs or USB storage devices |
Only the discs that have been finalized can be played.
- Discs recorded in packet write mode (UDF format) are not compatible with this unit.
Corporation and product names mentioned herein are trademarks or registered trademarks of the respective corporations.
Only discs recorded in ISO9660 Level 1, Level 2 and Joliet can be played.
- Files protected by DRM (Digital Rights Management) cannot be played.

Note
- This unit does not support multisession discs or multiborder recording.
- Multisession/multiborder recording is a method in which data is recorded on a single disc in two or more sessions/borders. A "session" or "border" is one recording unit, consisting of a complete set of data from lead-in to lead-out.
Regarding copy protected CDs
This unit is designed to conform to the specifications of the audio CD format. This unit does not support the playback or function of discs that do not conform to these specifications.
Supported audio file formats
- This unit does not support lossless encoding.
Cautions on use
When moving this unit
When moving this unit, be sure to first check that there is no disc loaded and disconnect the iPod/iPhone/iPad. Then press STANDBY/ON, wait for "STAND BY" disappears on main display to turn off, then unplug the power cord. Damage may occur if the unit is transported or moved with a disc inserted, or when another device is connected to the USB terminal or AUDIO IN mini-plug jack.
Place of installation
- Choose a stable place near the TV or stereo system being used with this unit.
- Do not place this unit on top of a TV or color monitor. Also install it away from cassette decks and other devices easily affected by magnetic forces.
Avoid the following locations:
- Places exposed to direct sunlight
- Humid or poorly ventilated places
- Extremely hot places
- Places exposed to vibrations
- Places in which there is much dust or cigarette smoke
- Places exposed to soot, steam or heat (kitchens, etc.)
Do not place objects on this unit
Do not place any objects on top of this unit.
Do not obstruct the ventilation holes.
Do not use this unit on shaggy rugs, beds, sofas, etc., or wrapped in cloth, etc. Doing so will prevent the heat from dispersing, leading to damage.
Do not expose to heat.
Do not place this unit on top of an amplifier or other component that generates heat. When rack mounting it, to avoid the heat given off by the amplifier or other audio component, place it on a shelf below the amplifier.
- Turn off the unit's power when not using it.
- Depending on signal conditions, striped patterns may appear on a TV screen and noise may enter the sound of radio broadcasts when the unit's power is on. If this happens, turn the unit's power off.
About condensation
If this unit is moved suddenly from a cold place into a warm room (in winter, for example) or if the temperature in the room in which this unit is installed rises suddenly due to heater operation, etc., water droplets (condensation) may form inside (on operating parts and the lens). When condensation is present, this unit will not operate properly and playback is not possible. Let this unit stand at room temperature for 1 or 2 hours with the power turned on (the time depends on the extent of condensation). The water droplets will dissipate and playback will become possible. Condensation can also occur in the summer if this unit is directly exposed to the air flow from an air-conditioner. If this happens, move this unit to a different place.
Cleaning the product
- Unplug the power cord from the power outlet when cleaning this unit.
- Clean this unit using a soft cloth. For tough dirt, apply some neutral detergent diluted in 5 to 6 parts water to a soft cloth, wring out thoroughly, wipe off the dirt, then wipe again with a soft, dry cloth.
- Alcohol, thinner, benzene, insecticides, etc., could cause the print or paint to peel off. Also, leaving rubber or vinyl products in contact with this unit for long periods of time could mar the cabinet.
- When using chemical-impregnated wipes, etc., read the cautions included with the wipes carefully.
Cleaning the lens
- This unit's lens should not become dirty in normal use, but if for some reason it should malfunction due to dust or dirt, consult your nearest Pioneer authorized service center. Although lens cleaners for players are commercially available, we advise against using them since some may damage the lens.
Handling discs
Storing
Always place discs in their cases and store them vertically, avoiding hot, humid places, places exposed to direct sunlight and extremely cold places.
- Be sure to read the cautions included with the disc.
Cleaning discs
- Discs may not play if there are fingerprints or dust on them. In this case, use a cleaning cloth, etc., to gently wipe the disc from the inside towards the outside. Do not use dirty cleaning cloths.
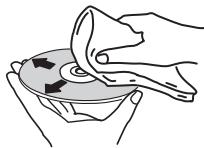
- Do not use benzene, thinner or other volatile chemicals. Also do not use record spray or antistatic agents.
- For tough dirt, apply some water to a soft cloth, wring out thoroughly, wipe off the dirt, then wipe off the moisture with a dry cloth.
- Do not use damaged (cracked or warped) discs.
- Do not let the signal surface of discs get scratched or dirty.
- Do not attach pieces of paper or stickers to discs. Doing so could warp discs, making it impossible to play them. Also note that rental discs often have labels attached to them, and the label's glue may have oozed out. Check that there is no glue around the edges of such labels before using rented discs.
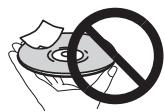
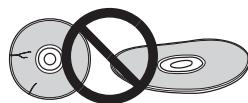
About specially shaped discs
Specially shaped discs (heart-shaped, hexagonal, etc.) cannot be played on this unit. Do not attempt to play such discs, as they could damage this unit.
About iPod/iPhone/iPad
Made for

iPod iPhone iPad
"Made for iPod," "Made for iPhone," and "Made for iPad" mean that an electronic accessory has been designed to connect specifically to iPod, iPhone, or iPad, respectively, and has been certified by the developer to meet Apple performance standards. Apple is not responsible for the operation of this device or its compliance with safety and regulatory standards. Please note that the use of this accessory with iPod, iPhone, or iPad may affect wireless performance.
iPad, iPhone, iPod, iPod nano and iPod touch are trademarks of Apple Inc., registered in the U.S. and other countries.
Restoring all the settings to the defaults
Use the steps below to restore the all settings to their defaults.
1 Press STANDBY/ON to turn the power on.
2 Press CD on the remote control or INPUT on the main unit repeatedly to select CD input.
3 Press OPEN/CLOSE to open the disc tray.
4 Press STANDBY/ON while pressing.
Use the buttons on this unit's top panel. "DEFAULT" is displayed while the settings are being restored. Power is turned off.
Specifications
- Amplifier section
RMS Power Output: 50 W + 50 W (1 kHz, 10 %, T.H.D., 4 Ω)
Tuner section
Frequency Range (FM) 87.5 MHz to 108 MHz Antenna Input (FM) .75Ω unbalanced Frequency Range (AM) 522 kHz to 1620 kHz Antenna (AM). Loop antenna
Miscellaneous
USB terminal .5V,2.1A
Power source AC 220 V to 240 V,50 Hz/60 Hz
Power consumption Power on .36 W Power stand-by. .0.5W or less
Dimensions. 215mm W × 100.5 mm (H) × 325 mm (D) Weight (without package) 2.3kg
- Speaker (X-HM51 only)
Magnetically shielded speaker system
Type
2-way type speaker system
2.5 cm dome Tweeter
12 cm cone Woofer
Maximum input power. 50 W
Impedance 4 Ω
Dimensions .156 mm (W) x 241.5 mm (H) x 243 mm (D)
Weight .3.4 kg/each
- Accessories
Remote control. 1
AM antenna cable . 1
FM wire antenna. 1
AAA batteries (R03) 2
Speaker cord (X-HM51 only) 2
iPad stand . 1
Power cord
Warranty card
Operating instructions (This document)

Note
- The specifications are applicable when the power supply is 230 V.
- Specifications and the design are subject to possible modifications without notice, due to improvements.
© 2013 PIONEER CORPORATION. All rights reserved.
ATTENTION
POUR EVITER TOUT RISQUE D'ÉLECTROCUTION, NE PAS ENLEVER LE COUVERCLE (NI LE PANNEAU ARRÊRIÈRE). AUCUNE PIECE REPARABLE PAR L'UTILISATEUR NE SE TROUVE À L'INTERIEUR. CONFIER TOUT ENTRETION À UN PERSONNEL QUALIFIÉ UNIQUÉMENT.
D3-4-2-1-B1_Fr
AVERTISSEMENT
(X-HM51 unquivalent) 10
(30 stations FM / 15 stations AM)
Education - Education
Drama - Pièces
(1 kHz, 10%, T.H.D., 4 Ω)
Sectiontuner
Uber iPod/iPhone/iPad 36
Uber iPod/iPhone/iPad
Made for
iPod iPhone iPad
© 2013 PIONEER CORPORATION.
Education-Programmieducativi
Varied Speech - Talk show, quali quiz o intervise.
Pop Music - Musica pop
Rock Music - Musica rock
(1 kHz, 10%, T.H.D., 4 Ω)
Antenna (AM) Antenna a telaio
- Generalità
Terminate USB .5V,2,1A
© 2013 PIONEER CORPORATION.
KLASSE 1 LASERPRODUCT
D58-5-2-2a A1_NI
WAARSCHUWING NETSNOER
(FM 30 stations/AM 15 stations)
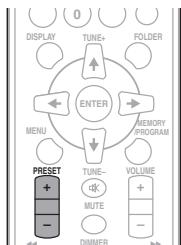
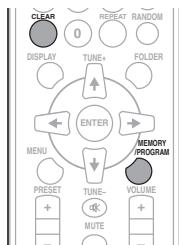
Children's Progs Kinderprogramma's
Social Affairs - 'Human interest', programma's over sociale aangelegenheden
Religion - Religieuze programme's
- RDS is alleen可能导致 in FM.
© 2013 PIONEER CORPORATION.
Education - Material educativo
Drama - Radionovelas, etc.
Cultures - Cultura nacional o regional, teatc, etc.
Se做不到 "SELECT" during 6 seconds.
- España en el 2018: la revolución de la law of the law of the European Union (LLE) in 2018, a law that aims to improve the quality of life for people living in Spain.
DaHnHe OobpyObaHne He RaJIeTcR
BoDOnHePOnHuaeMaBm. Bo36KaeHnne NoXapa NnI
POnApEHHaNeIeKTPuYeCKHM TOKOM He NOMeUaJIte
pYOM C OobpyOboAHnE EMKOCTN C KJNDKOTMn
(HanpIMep, B3aIb, 1BeToCHIbe rOpShK) n He
DoNYCkAte NopadaHna Ha Hero KaIeNb, 6pb3r, DoJxra
nIIbNArH.
D3-4-2-1-3_A1_Ru
PNEyPPEXDEHNE
Bo n36bexAHme noxapa He np6nNkjaTe K oobopyoBaHmIO nCTOCHNKo OTKpbITOrO orHra (hapmpem, zaxxehHeHbCbeu).
D3-4-2-1-7a A1 Ru
JIA3EPHBII PPODyKT KJIACC 1
D58-5-2-2a A1 Ru
MEPbI IPEIOCTOPOXHOCTN IPIN OBPAUENC CETEBIM UHYPOM
Держinte се te boi shyp 3a Bnky. He ByItackmBaite Bnky, B38Bbncs3 3a SHpy, ИнКоТа В КаСаNTeC6 ceTeBOI shHpya, ecIn Baun pykn BnaJXhIbe, Tak KaK 3TO MoKET npRBeCTN K KOPOTKOMY 3aMbKaHINU nI npOpaKeHInO 3NeKTPnuCeKIM TOKOM. He CTabte anappar,прEDMeTb MeBENI nT.d. Na cTeBOI shHyp, He 3aKImaIte erO. He 3aBz3bIbaIte y3IOB Na shHype I He CB3bIbaIte erO c DpyrNMI shUPaMn. CTeBHeI bShHybI dOnkHbI leXaTb TaK, YTObI ha NIX HEnb38 6blIO NaCTynTB. LOBpeJdeHbI cTeBOI shHyp MoKet cTaTb pNCHIOB O3NHKOHeHnia Noxapa I INI npOa3ntB Bac 3eKnTpnuCeKm TokOM. BpEmoT or BpEmenIpOBePraTe cTeBOI shHyp. B cnyuae 6ObapyHexnoi NobpeJednEoi o6paTIteCb 3a ZamHoN B 6blKnAUnI mbOpuMaIbNbI cepBcNChI ueHTp pfMpbl PIONEER nII K BaWseMy dnHepy.
S002*A1Ru
TOnbko X-HM51
He yctahabnBaIte rpoMkoROBOpTeHnHa ypOBHe BbIe rONoBbl Ha NOTOK INn Hc STEHy 3aunTHaRe peWETKa IPOeKtIPyeTcBcEMHOIN COOTBcTBeHHO, OHa MOKeY uNaCTb N HAeCTN uSepe b INn TpaBMy pNp YcTaHOBKe HAD rONOBo.
SGK004 A1 Ru
HOpMaunI nnb3oBateNe no c6opy u ytnn3aunn 6bIBwero B 3Kcnnyataunn o6opydoBaHn n Otpa6otabux 3neMeHTOB nHTAHN
06o3naeHne 1nra o6opydoBaHna
06o3HaueHnna 1nna 3neMeHTOB nTaHnra
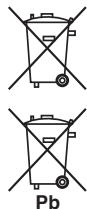
3THO603NaueHnHa IpoDyKuHn, ynaKOBke, H/IIIN cOpBOoHTeJIbHIX OOKymEtAX O3NaHIO, YTO bIBiBnA B KcIJIpyaTuaHH 3IEKTPOTeXHHueCKn A 3IEKTPOHHa PIOdyKIIH N OtpoBtAHHBe 3IeMeHTbI PyTAHnHE DIOJIHKHb BbIpaBcBAbTaBcBAMeCTe C ObIYHbIM 6bITOBbM MycOpOM.
IITTOYTO6bIaHnA 6bIbIaB yNtOpe6JIeHHINpOJyKIIHnO tpa6oTaHHbIeJIeMeHTbI IITAHnBbIIn COOTBeTCTBYIOIHM O6pa3OM o6paOToAHbI, yTHIN3HPOBAHbI N Ipepe6oTaHHbI, IOKaJIyCTa, IpeEJaTe Hx B COOTBeTCTBYIOIH N IyHK Tc6opa HCIOJIb3OBAHbIX 3JIeKTPOHHbIX IN3dJIIn B COOTBeTCTBHn C MeCTHbIM 3aKHOJaTeJIbCTBM.
YtINH3pyaAHHbE yctpoBCTBa HJIeMeHTbIITaHnIIpaBnBHo, BblIOmoraTe coXpAHHTbIeHHbEpeCpsCybH IN pPeIOTBparNTb BO3MOxHbHe HeATnHBHe IOcJIeCTBnI J3IOpOBbI IIOJeN OKpyKaHOJIe cpeBb, KOTObIe MOrT bO3HNKHyTb B pe3yIbTaTe HecooBTcTBUHOero YdaJIeHNOTXoHOB.
IJIIOJIyENHJIOJIINHTIEBHOH INHOpMaIIH N I PpaBbIbHbIX CnOco6ax c6opa H yTHJIN3AaIIIN OTAPoBADJIIOE O6OpYOBaAHIN H NCIOJIb3OBAHHBX 3JIeMeHTOB IIITAHNIAObaaIteCB B COOTBeCTByIOJIeMecTHbIe OprHaJIb CaOmyPpABLIeHN, B IEHTpbI yTHJIN3AaIIIN OTXIOJB HII IO MeCTy IOKyIKN DaHHOI H3JIeHN.
01 Pered nauanom pa6oTbI
KOMIIIEKTIOCTABKN 5
YcTaHOBka 6aTaapeek B IyJIbT IINCTaHIOHHORO
yipabJIeHn 5
IcnoIb3OBAHHe IyIbTa IINCTaIHIOHHORO yipabJIeHH... 5
02 Ha3BaHnuaCTeN uФyHKuIN
IyIbT IY 6
OToeINHeHne H3aMeHa IpeIHepeIeTKn
(TOJIbKO X-HM51) 7
IpeHnHaHeJIb 8
Iucnnie 9
03 Pooknouhen
IIOKJIIOUeHHe IpOMKOrOBOpHTeJIe (TOJbKO X-HM51). 10
HcnoJIb3OBAHHe npyroro ca6Byepa 11
IoiKJIIOUeHHe aHTeHH 11
HcIOJIb3OBAHHe BHeIIHHx aHTeHH 12
ПОДКЛЮЧЕНЕ 12
04 Haayano pa6oTbI
ДяВКЛIOUeHnIПИТAHNЯ 13
HacrpoiKa Yacob 13
O6iueyipaBJIeHHe 13
yHknHA BBOda 13
PeryIipOBaHHe IpkocTH IHCIIe 13
ABTomathuecka yctaHOBka rpmkocTH 13
PeryJInpOBAHHe rPOMKocTH 13
IIprHJIyIeHHe 3ByKa. 13
YIpaBJIeHHe 3ByKOM 14
KbJaIep. 14
PeryJInpOBAHHe Hn3KHX YAcTOr (peXHM P.BASS). 14
PeryIINpOBKa TeM6pa Hn3KHX/BbICOKHX qactOT 14
HacpoKa TaIMepa BKIOUeHEN 14
BbIOB TaIIMepa BKJIIOueHHN. 15
OTmeHa TaIMepa BKJIIOueHnra 15
HcIOJIb3OBAHHe TaIMepa BKJIOUeHHra 15
HcIOJIb3OBAHHe TaIMepa OTKIIHOeHHN 15
HcIOJIb3OBaHHeHayIIHHKOB 15
05 Bocnpoun3BedeHne iPod/iPhone/iPad
IIOITBvpeJKeHHe IIOJIepKKn MoJeJIe iPod/iPhone/
iPad 16
IoiKJIIOueHHe iPod/Phone/iPad 16
IIOJIKIOHHe IIP/IOne/IPaC d cIOJIb3OBAHMe IPIJHaEMOI NOCTABKNI dIiPd. 16
Bocipon3BeHne iPod/Phone/iPad 17
06 Bocnpo3BedeHne Dncka
BocpoH3BeJeHne HnCKOB HnH aJIOB 18
YcoBepHHeCTBOBaHHoe BOCIIPOH3BeDeHHe INCKOB CD HIN
MP3/WMA 19
IIpMaOIOHcK IOpOJKN 19
IIOBTOPHoe BOCIIPOH3BeJeHHe 19
Bocipno3bEbeHne B clyaHnO nocIeIOBaTeJIbHOCTH 19
3anporpammnoabaHnoeBocnpno3BeaHHe (CD HJN MP3/WMA). 20
O 3aŋpy3ke ΦaiJIOB MP3/WMA. 20
O npraKe BocnpOn3BeDeHnHaPiKn 20
Bb6op IaIKN DJI BOCIIPOH3BEeHn. 21
IpekeJIIOUeHHe coIepKHMOrO IHCIIeJ. 21
07 Bocnpo3BedeHne c USB
BocpoH3BeDHe 3aIOMHHaIOxuCTpoCTB USB .22
IIOBTOPHoe BOCIIPOH3BeJeHHe 22
Bocnpoh3BeHeHHe B cIyauHoi NocJeIOBaTeJbHOCTn. 23
Bb6op IaIKN IJI BOCIIPOH3BeDeHn 23
IpekeJIIOueHHe coeepKHMOrO IHCIIIEA 23
BocipnoR3BBeDene B HeJaeMaEMIOpRAJIe (3aIPOrPAMMPOBAHHOE BOCIPNO3BBeDene) 23
08 NcnoB3ObaHne TIOhepa
IpocJyHbAHne paHOppeJa.. 24
Hacroka 24
CoxpaHeHHe 3aIporpamMPOBaHHbIX paAnocTaHn..24
IIIBbI0Ba3aHeceHHoB IIaMaTbCTaHcHn 25
He pa3MeiAte IpeIMetbI Ha yctpoiCtBe. 34
OKoHdEHCaHH 35
UHCTKa H3JeJIa 35
UHCTKaJIHH3bI 35
Овразецни с диссaramи 35
Хашиени 35
UHCTKa IINCKOB. 35
O Dnckax cneuaJIbHOJ opMbI. 36
iPod/iPhone/iPad 36
C6poc Bcex Hactpoek Ha 3HaueHnI IO yMOJIuaHHIO .36
TexHHueckHe xapaKTepeHCTHKn 37
Pazelen1:
YcTaHOBka 6aTapeek B nylbT dNCTaHcNoHHoro ynpabJeHnA
1 OtkpoTe 3aHIOU KpbIuKy uYcTaHOBnTe 6bTapeiKn, KaN poka3aHo HnKe.
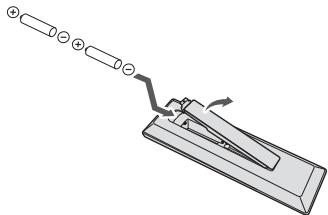
2 3akpoTe 3aHIOKpbIky.
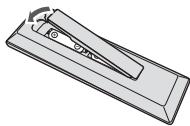
A PNEdyNJPEXDEHNE
BCTABJIa 6batapeKn, 6bIteBHIMATEJIbHbI, YTO6bI He NIOBPeITb IpyKINbI Ha 一 KOHTaKTax JIb 6batapeek.30 MoKET bIb3BaTb TeYb 6batapeek INI HnepeptBe.
He hcnol3yIte IIO6be IpyTBe TINbIb 6Batapeek, kporye 3a2aHnIbX 6aTaapeek. TaKae He hcnol3yIte HOByo 6BaPateykY BmecTe co tsaoi.
Ipiu yctahOBKe 6bataeep B IIybl HnCTAHUHOHOrO ynpabJIENHb BCTABJIte Hx B npabJIbHOIOpHEtAHINB COOTBTCTBnC O603AHueHNMIOJIPOHcNTH ( n)
He harpebaite 6atapereKHe pa36upaite Hne Knaite HX BOHOBN HIO BYOJ.
BatapekhMOTyHMeTbpa3JNUHHOe HnPPJxHeH,JaKe cEiOH OHoIaNKbByIO pa3mEpHy oepMe. HeHcNIOb3yIte ODHOBPeMHHO batapeKhpa3JNUHbIX TINOB.
Bo H36eKaHne IIOpeKaHnH 3EeKpIHOHa 6aTaapeek H3BKeHnTe 6aTaapeKn, c3Hn He co6bHpaeTeC hNcHb3ObaT bIyIbT NcHtAnHIOHO YuapBaHe T BteHeNe IPOdoJIKHTeBHO rEPnoJlA BpeMeHH (1 Me3nn II IN 6oOE). B Cnyue AIOpeKaHnHa 3EeKpIHOHa TIIaTeAIEbHO IpOtpRte C BHTyPeHH e CTOpOHbI OTdJIeHeNe IIOf 6aTeapeK, 3aTeM yCTAHOBITE HObIe 6aTaapeIKn. B Cnyue AIOpeKaHnHa 6aTaepiKN H NOIaDAHn 3EeKpIHOHa H KOky, cMOte E O6BJHM K0JIYHECTBOM BOJLY.
IpnH3BOiHTe yTHIN3AHHIO HcIOJIb3OBAHHIX 6batapeek B COOTBETCTBN CJeTCTBYOHIMN B BAIIeI cTpaHE/perHOHe YOcApCTBeHHbIMN IOCTaHOJIeHHMn HIN IpaBHJAMn IO oxpaeK OpykaHOJIeCpeJIs.
BHIMAHNE
He HcnoJIb3yIte H He xpaHITe 6aTaapeiKN IIOJ B03JeCTBHEm IIpIMbIX COJIHeYHbX JUey HIN B HOMeIIeHN C BbICOKO TMeIepaTpyoH,HaIPnEM, B ABTOMOBJIe HIN PdIOM C O6OrpeBaTeJEM.3To MOKeT Bb3BaTb IIPOTeKaHHe, IIpeRpeB, MHKpOB3pBb HIN BO3rOpAHne 6aTaapeK. KpOME TORO, 3To MOKeT IIpNBecTN K cokpaIeHHO cPoKa cIyKbH IN pOnI3BOJInTeJIbHOCTH 6batapeK.
NcNoJIb3OBAHHe NylbTa DnCTaHcUHOHORO ynpabJIeHnI
He 3a6b8aBte o cJeIyOuIHx MOMeHTax npH hCNOJIb3OBAHHH nyIbTa IV:
CNeJITe3aTEm,TO6bMyMeKJyIyIbTOMHCTAHIOHHORO ynpabJIENH HHXoDAIIHMcNHO CHOBHOM yCTPOICTBE PIPHEMHiM DATIKHCME heBLOH HNKAKXINPEIATCTBNI.
ДиctahIOHHoe ynpabJIeHHe moKet paOToTb HeytoCHYBO,ecJIHaNd tAaTHNK IcCTAHIOHHOro ynpabJIeHnHa y cTpoIcTBe PaJaET CJIbHb coJIHeHb CBET HJCBET OTIOMMHecuHTHO TOCBEIIHnE.
IyIbIbIy IY DIA pa3IINHbIx yctpoHCT MOryt co3IaBaTb NcIeHXIpyrI dpyra. He hCIOJIy3yIre IyIbTI bTnCTAHIOHOHorO ynpabIEHHI dyPyrTO o6OpBOaHHa, paCIOJIooHeHHo pAIOm c 3THM yctpoHCTOBm.
3aMeHHTe 6bAtepeHH, cJIb Hb 3aMeTHTe yMeHHIeHNHe dJIbHOCTHnEChTByIyIbTa IV.
TJaba2:
Ha3BaHnY qacteN n φyHKcN
NynbT dy
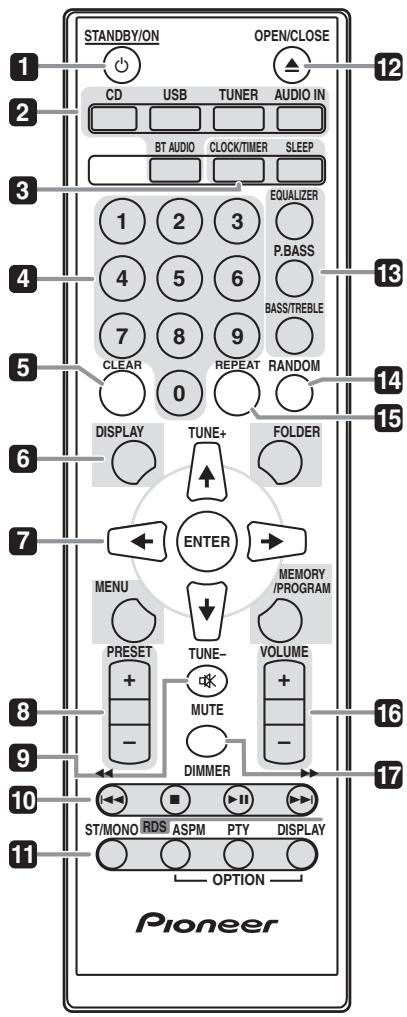
1 STANDBY/ON
HcnoJIb3yETcI JII BkJIIOueHHpecbHBepa HJI erO nepeKJIIOueHHnBpeKHM OKNJaHHA (ctp.13).
2 KhoNKn BbIbopa BXOda
HcnoJIb3yTeTcIaIYbIb6Op HCTOChNka BXoJa DaHHoro pecnBepa (ctp.17,18,22,24,27 n 28).
3 KhoPkn ynpaBneHnpeCnBepom CD CLOCK/TIMER
HcnoJIbIyETcRII yctAHOTKBYACOAB, a tAKeTJIa yctAHOTKBYN IPOBOPKBY TcAHOBOK TAIHEPA (ctp. 13).
SLEEP
Cm. HcnoIb3o6aue maIepe omKIOUeHua hCTp.15.
4 LInΦροBsIe KHOπKn (OTo 0 Do 9)
HcnoJIb3yIte IJI BBOJa HOMepa (ctp. 19).
5 CLEAR
HcNbIy3yIeTJe 4nOv3tKNe 3aNPOrpAMmPBOAHHORO BocIpOn3BdEeHH (ctp.20).
6 KhoPkn ynpaBneHnpeCnBepom CD DISPLAY
Hajmhte IJIpeKJIOUeHHI HcIJIeIe IIpH BocpnOH3BeJeHHI IeCeh c CD IJH USB (ctp. 21).
FOLDER
HcnoIb3yIe IJIa BbOpa IIaIKN IIuCKa MP3/WMA IIIN 3aIOMHaIOero yctpoIcTBa 6oJIbIOI eMKocTH USB (ctp.20).
MENU
HcIOJIb3yIte IJIA IOCTyIa K MeHIO.
MEMORY/PROGRAM
HcnoJIb3yIteJdIa3aIOMHHaHHN HINPiPOrpAMmHPOBaHHa HnCKa MP3/WMA (ctp.20).
7 ↑/↓/←/→ (TUNE +/−), ENTER
HcNIOIb3yIeI IaIb6pa/NEpeKIOUeHNHEA TcPoeK cTcTeMb IeKPMoH II aIIOITbpEkeJDNIEcTBN.
KHOIIKN TUNE +/- MORYT HCNIOJIb3OBaTBcA DIII IIOHcKa paIIOHocACTOT (ctp. 24).
8 PRESET + / -
HcnoJIb3yIte IJIa BbIb6opa 3aInporpaAMMHPoBAHHbIX paIHOCTaHI (ctp.25).
9 MUTE
OTKJIIOUeHHe/BCJIIOUeHHe 3ByKa (cTp.13).
10 Khonkn ynpaBHeHn BocpOn3BeHeHnEM
HcnoJIb3yIte IJIIyIpaJIeJIHnKaJdOyHKUHeNIOcIe ee BbIbOpa c NOMOIIbO KHOIIOK OyHKIIINBXOJa (ctp. 18).
11 Khonkn ynpaBneHn Tuner ST/MONO
HcnoJIb3yETcI,IIaIpeKIOUOHeHHpeKHMa 3BvayHHmEKMJy cTepeofoHHueckHM mHOofoHHueckHM peKHMamH. (ctp.24)
RDS ASPM
HcnoIb3yIte IJIIOhCKA BOtAMTHeCKoH Na HCTpOKn HA IIpeJbArpHTeJIbHO 3aIOMHeHHbIe IporpammB (paHIOCTaHH) IJIY cHcTeMbRDS (ctp.25).
RDS PTY
HcnoIb3yetyraI IIOKsKa TIIIOB IIPOrpaMM RDS (ctp. 25).
RDS DISPLAY
Hajkmhte DIII IpekeIIOueHHa HcIIJIe RDS dIa peKHMa HHΦopMaIH (ctp. 25).
12 OPEN/CLOSE
HcnoJIb3yIte IJIg OTKpbITHa HJIH 3aKpbITHa JOTKa IJIg DnCKOB (ctp.18).
13 Khonkn ynpablene 3BykOM
Peryinpyiot KauectBo 3Byka (ctp.14).
14 RANDOM
Bocipno3BeHnHeIopOkeBcIyuaHoiNIOscIeIOBaTeJIbHOCTNC CD,IPOHUSB(cTp.19).
15 REPEAT
Hajmte JIA H3MeHeHHaCTPOiKN HOBTOPHORO BOCIPHOH3BeJeHHc CD, iPod HIN USB (ctp. 19).
16 Khonkn ynpabJeHnra Volume
HcnoJIb3yIteIpepyIINpOBKNypOBNrgPOMKoCTH npocIyIHHBaHHa (ctp.13).
17 DIMMER
PeyIINPOBKA JRPKoCTH INCIIJIe. HMeETcR YeTbIpe yPOBHa N3MeHeHHa JRPKoCTH (ctp. 13).
Приимechаиме
KHOIIKN OPTION HeoctyHbI JIg 3TOO yCTpoCTBa.
OTcoeDInHeHne n 3aMeHa nepeDHe npEweTkn (ToJbKO X-HM51)
IpeHnne pHeTKeTAaDnHOrFO rPOMKOrOBOPHTeJI RAJIETcE CbHMN. BbIOnJIHTeCIE cIyIOUe:
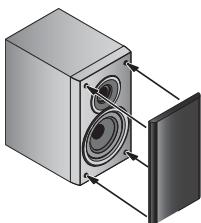
1 Bo3bMntecb 3a Hn3 peWetkn n octopoxHo NotHnTe erHa ce6y, YTO6bl CHrTb HxKHOU qACTb.
2 3aTeM Bo3bMntecb 3a Bepx peWetKn n OCTopoXHO NOTAHITE eRO Ha Ce6y, YTO6bI CHrTb BepxHIOU qAcTb.
3 4To6bI yCTaHOBnTb peWeTky, COBMeCTnTe BByCTynI Ha rPOMKOrOBOpNTe C rHE3dAmn BBepxY HBN3y peWeTkn BcTaBbTe IN Ha MECTO.
PepednnaheB
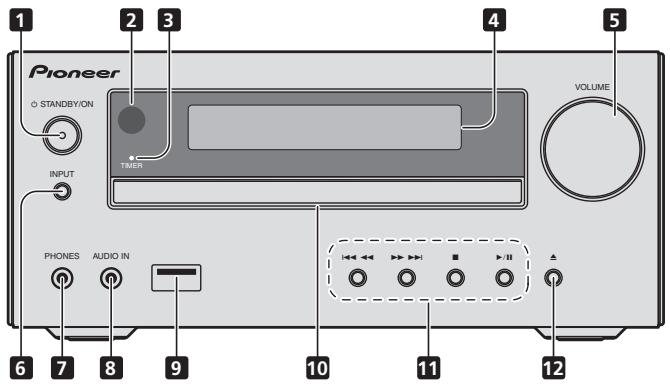
1 Khonka 品 STANDBY/ON
HcnoJIb3yETcI IaB BKJIOueHHpe cncBepa HJIero IpekeJIIOueHH BpeKHM OKNJaHHA (ctp.13).
2 DaTtHK DnCTaHtUOHHO ynpabHeHHA
PnHHMaet cHHaJIbIOT NJIbTa YV.
3 HndkaTop TIMER
3aropaetcya, KOrla INHTaHHe yctpoHCTBa bIKIOuaeTcya, HO aKTHBHPyETcya YCTAHOBKA TaHMepa.
4 CnMBOJbHbI ducJIneI
Cm. Iucnnei ha ctp. 9.
5 PerynipoBaanr pomkocTn
HcnoJIb3yIte IJIpepyJIINpOBKHN yPOBHn IprOMKoCTN IpoCJIYIIHHBAHH (ctp.13).
6 Khonka INPUT
HcnoIb3yetyraBbIbOpa HcToUHka BxoJa.
7 He3do dna HayuHnKOB
IcnoI53yIteI IIOIIOJIIOUOeHNI HauHHIKOB.IPiH IOJIIOUeHINH HauHHIKOB 3ByaunHe He 6JdET BOCIpOH3BOIDHTbcyape3 rpoMOKTOBOPRITEn (ctp.15).
8 The Audio IN (aydnoBxOJ)
HcnoJIb3yETcI JIOJIOJIKIOUeHHB BCINMOfATEJIbHOrO KOMIOHEHTa C NMOIIbIO KaBeJIa CMNHATIOHPHM CTpeo paBHeMoM (ctp. 27).
9 Pa3beM USB
HcnoIb3yetcTg ⅡIpoIckIOUeHNB KauCTBe ictOHTOnHKa aUYINO 3aONOMHaIooIe yctpoIctBa 6oIbIooIe EMKocTH USB HJN yctpoIctBa Apple iPod/iPhone/iPad (ctp. 17 n 22).
10 IToK dIa DnCKOB
3aynck Bocnpon3BedeHn.
3 II
Pay3a B BocnpOn3BcEJHnN.
4 ①
HaKMHTe KHOIIky O STANDBY/ON, YTO6bI BOITN B peKHM OKNJaHn.

Приимеанne
BpeKHM OEJHDAHH,ecHnPiJIKJIOHaTcE yCTPOICTBO iPod/iPhone/iPad, anHapat nepeKJIIOHaTcBpeKHM 3apJIKH.
HacrpoKa yacOB
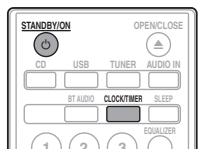
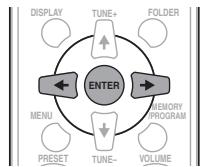
1 Haxmnte STANDBY/ON, yTo6bl BKJIouHtB nTuHne.
2 Haxmnte CLOCK/TIMER Ha nyIbTe DnCTaHcUNHOHorO ynpabJIeHn.
HaTJIABHOMIINCIIJIeOTO6paKaAetcRA'CLOCK
3 HaxmTe ENTER.
4 Haxmnte KhoNk / ,YTo6bI yCTaHOBnTb DeHb,3aTeM haxmnte ENTER.
5 HaxMNTe KhoNKn / ,YTo6bI yCTaHOBnTb Yacbl, 3aTeM HaxMNTe ENTER.
6 HaxmTe KhoNk / ,YTo6bIyCTaHOBtB MHyTb, 3aTeM HaxmTe ENTER nIPOITBePjKeHnI.
7 HaxmTe ENTER.
Длп IOДТВЕРЖDEHЯ OTOБрахаEMOROBpeMeHn:
HaKMITE KHOIIky CLOCK/TIMER. OTo6paKaemoe Bpema IIOBHTcI pImepno Ha 10 cekyni.
PeryJInpOBKa Tem6pa Hn3Knx/ BbICOKnx
yactOT
HaKMHTe BASS/TREBLE,3aTeM HaKMHTe / / / ,TTObIOTpeyHIpOBaTB Hn3KHe HINBbCOKHe qactOtBJ.
Приимechanicals
ΦyHKHII EQUALIZER H P.BASS He moYr pa6oTatb OIOOBpemehno. Pa6oTatb 6yEt IOcIeHnBa bIbpaHHaH N3 3TN XbX yFHyKHi.
BASS/TREBLE MOKET pa60TATb IIAPJIJIeJIbHO C yHIXIeH EQUALIZER HIN P.BASS.
PnBbIbOpe OndHn3Tnx FyHKuIN HeBbIbpaHHaFyHKuIN 6yDet OTobpaXaTbcr CJeDyUoIM 6pbzOM.
1 Korga n3meHa hAcTroika P.BASS (ON/ OFF).
- EQUALIZER:FLAT
2 Korda n3MeHeHa hAcToPa EQUALIZER.
P.BASS:OFF
HactpoJa TaMepa BkJIIOueHnA
HcnoJIb3yETcI IJI H3MeHENIe TeKUeIe yCTaHOBKn TAImepa HII IN IJIy YCTaHOBKN HOBOrTO TAImepa.
1 Haxmnte 品 STANDBY/ON, yTo6bl BKJIOHTb NtAHne.
2 HaxmTe u ydepxnBaTKe KhONky CLOCK/ TIMER.
3 Haxmnte KhoNk ,TTO6bI BbIbpaTb napamTp «ONCE» nIN «DAILY》,3aTe m Haxmnte KhoNky ENTER.
ONCE - Cpa6aTbIbAeT ToJIbKO OINH pa3 B 3aJAAHHoe BpeM.
DAILY - Cpa6aTbIbAeT B 3aIaHHoe BpeMg B 3aIaHHnI DeHb.
4 HaxmTe KhoNk / ,YTO6bI BblpaTb napameTp «TIMER SET》,3aTeM HaxmTe ENTER.
5 Haxmnte KhoNk ,TO6bl BbIpaTb HCTOuHnK BOCpON3BeHnC TaMepom, 3aTeM Haxmnte ENTER.
B Kauchete BHTOCHHINBAO BOCIOPOB3BEJENHMO KBOHMO B6pBAT CD,FM,AM,USB/iPod,BT AUDIO,AUDIO IN N LINE.
6 HaxMnte KhoNKn / ,yTo6bIyctaHOBnTb DeHb Ha TaHmepe, 3aTeM HaxMnte ENTER.
7 HaxMNTe KhoNk / ,yTo6bI yCTaHOBnTb Yacbl,3aTeM HaxMNTe ENTER.
8 HaxMNTe KhoNKn / ,YTo6bI yCTaHOBnTb MNHyTb,3aTEM HaxMNTe ENTER.
- YctaHOBHTE OOKOHATeJIbHO BpEMa, KAK OHcAHO BIIaIgAX 7 H 8 BIIHue.
9 Otperyu npuyte rpmokctb haxaTneM VOLUME + / - 3atem haxmTe ENTER.
10 Haxmte KhoNky STANDBY/ON, yTo6bl BOITN B peKIM OxuHaHn.
3aropaetcaHHdkaTop TIMER.
BbI3OB TaIMepa BkIIOUeHnA
Tekyuio yctahOBky TaHmepa MoKHO HcIOJIb3ObaTb MHOrOKpaTHO.
1 BbInonHnTe 7aun c 1 Do 3 B pa3dene «Setting the wake-up timer».
2 HaxmTe / BBbEpnte «TIMER ON» n HaxmTe ENTER.
OTmeHa TaMepa BKNIOueHnA
BbIKJIIOueHHe TaIMepa.
1 BbInonHnTe 7aun c 1 Do 3 B pa3dene «Setting the wake-up timer».
2 HaxmTe / = BbI6epnte «TIMER OFF» n HaxmTe ENTER.
NcnoJb3OBAHne TaMepa BkIuOyeHn
1 Haxmnte STANDBY/ON, yTo6bI BbIKJIOUHTb NITaHHe.
2 Pn HactynIeHn BpeMeH BKIOueHn DaHHoe yCTPOICTBO aBTOMaTHueCKN BKIOHTcN HaCHET BOCIPON3BeDeHne Ha BbIpaHHo FyHKuIN BXOJa.
IprimeyaneHne
Ecln BO BVPBRA BKIOUHEni IPOd/IPhone/ITPad He NIOKIIIOUeH KAnIAPATy, HIN HE BCTABJIENHCK, AnPiapAT BKIOUHTcR, HO He 6JbET BCIOPNIOB3DINTB DOPOKKy.
HeKOTOpbIe IINCKH He MOrTy BOCIIPOH3BOIDHTbcABTOMATNHeCckn IIpi HAcTUYJIeHHBpeMeHH BkJIIOUeHHa
Ipny cystahOBke TaJImepa 3aJaBaJIe He MeJeO hIOHO MNHUYt MEJdy BpeMeH NauHa I KOHNUHAn.
IcnojIb3OBAHne TaMepa
OTKJIIOUOHEHNA
TaiHempOTKIOUeHNbOTKIOUaey TcypoIcTBO Yepe3 3aIaHHbI IepHOBVPemEHN,IOBBOJIaCIOKOIIHO 3acblnATb,He6cIIIOKOBc b O He6xoIIOHMOTCN BbIKIOUeHNbYcypoITCbA.
1 Haxmnte SLEEP HeckoIbko pa3, YTo6bl BbIpaTb BpeM OTKJIoueHn.
Bb6epHTe MeKJy 3HaueHNMaM B MHHytax 10 min, 20 min, 30 min, 60 min, 90 min, 120 min, 150 min, 180 min HIN OFF (BbIK). BBohBa 3aJaHnOe 3aHyeNe OTObpaKaetcB TceYHe 3 cekyHd, NocJe CTeO BbIOJIENHe NaCTPOKn 3abePteHo.
Приимechаиме
TaiMePOTKJIIOUeHnMoJHOyCTaHOBHTbHaKaTHemSLEEP BO BpEmoTOO6paKeHHN OCTaIIIErOcR BpeMeHN.
NcnoJIb3OBAHnE HayuHnKOB
Пи рлкиончр паьем hayинков к themeу PHONES. BOCIPINHOBIDTcpe3rpoMOROBOPHTeIi.
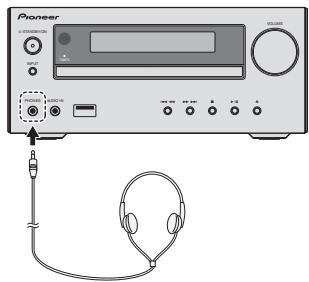
He BKIOHauIte rIpMOKoCTb HA POJIHyO MOIHOCTb IIpN BIKIOUeHHaIIAPATa H cIIyuaIe My3bIKY pI IN CpEIHHX yOBHIXrPOMKOCTb. H36bItoOHoe 3ByKOBoE daJIbeHne H3 HayIIHHKOB H IOJIOBbX TEleFOHOBJ MOKeT bI3BaTb NOTepHIO cIyxa.
IpeaIOKJIIOUeHHeM HINOTKJIIOUeHHeM HayIHIKOB yMeHBIIHTe rPOMKOCTb.
Y6dHTeCb, YTO BAIIH HAYIHHKIN HMeIOT IITeKEP INAMetpOM 3,5 MM N IMIEaHC oT 16 Do 50 OM. PekomeHJyEmB MIMJIaHc COCTaJIbET 32 OM.
3BykOT iPod/iPhone/iPad He cIbIeH epe3 hayuHHNK, nIOJIKnOHeHHeK KAnIpaTyr.EcII INr BbOpe fYHKnINi iPod/iPhone/iPad bI OIKNIOaYe rPOMKOOBOPHTeI, oTO6p3a3TcR HINikKaHNI «HP MUTE».
TJaba 5:
Воссанзveдени iPod/iPhone/iPad
Ipoctoe IIOcoeHHeHne iPod/iPhone/iPad K daHHOMy yctroBETIPO3BOJET npocJIuHbAT bBCOKOKaYcTeBHeHbI 3ByK c iPod/iPhone/iPad. HactroJI BOCnpoH3BeJeHHMy My3bIKn dIy iPod/iPhone/iPad MoKet BIIIOJIHTbc J daHHOrO aIIAPAata IIIN CaMORO yctroCTBa iPod/iPhone/iPad.
- Ecln iPod/iPhone/iPad NOJKJNHOaTcER, KOTJa DaHnHbI anIapat BkJIOueH, BOcPOn3BcEHeHne iPod/iPhone/iPad he HauHETcER.
2 Haxmnte USB nIy BbIbopa B KaueCTBe BXoHOrO NCTOCHNka.
Ha oCHOBHOM IINCIIIEE IIOKA3bIBAeTcH INIKaIINH «USB/iPod»
3 PocJIe 3aBepSeHn paCNo3HaBaHnA bTOMaTHueCKn HaHTcR BOCpON3BeDeHne.
- Μεmeοιηκενη ΜαληθΟ Απηρατe Οργαήν ηυπραβηηους BOCIPON3BεδηνεμiPod/iPhone/iPad - 30r >/II, |<><, >>I.
B CéIyUoiem cIyuae yIpaJIaIte iPod/iPhone/iPad HIOpcpeCTBeHNO: IONCKIqIaNo IMOHmNHCIOJIHTeJIgIJKAnpy. - Bocnpno3BedeHneB pckHmpeIOBtopa HnH cIyauHNOIPOC3OBOATEJEHOCHT.
PNEyPExKDEHNE
KoIa iPod/iPhone/iPad IIOCoEINHeN K DaHHOMy yctpoiCTBY,ecBb JBeJAEte YpuABJIaHTb HnOePeIcTeBHeHO iPod/iPhone/iPad,HaJeKeH YupeKbAitre iPod/iPhone/iPad npuyor pykO, TTO6bI IIpeOToBpATnTb 60B bPa6Ote, KOtOpBE MOYr BO3HNKHyb I3-3a IIOXOrO KOHTaKa.
Приимейане
Длл�иучениплрдбнIHNCTpyкIMOTHOCHTIELHOBHIOJIb3ObaHHI iPod/iPhone/iPad obpaiaaTeTcK ypkobOCTBy, npIIaemaOMy K iPod/iPhone/iPad.
-Плдзаряка iPod/iPhone/iPad Бьллгнэтс BCERДА, когдя iPod/iPhone/iPad пол decorиненК ДаннOMу CTpoRCTBY. (Даннан Фунншиполдржнваетс тakke В ржнме Oжндан.)
Ecln BxOJIpeKIOHaETc C USB/iPod HaIpyTuO ykuKIIIO,BOCIPON3BVEJeHHe iPOd/iPhone/iPad bpeMeHNO octahanIBJNAeTc.
BAXHO
Ecln DnaHoe UcTPOIcTBo He MoKet BoCnPOn3BcETn iPod/iPhone/ iPad, BbIOJIHnTe CJeDyUOHe IPoBepKn IJIN ONcKa n UctpaHEnHe HenoJaOK:
I-PnOpeBte,NOJepKbHAeTcBTHIO NOaCoeHNHeHHN iPod/ iPhone/iPad dHmBHm UyptOHeH
- Ipepeoioeoueipod/ipoine/iPadKycptobcy.
Ipepeaoyctteipod/IpOihapd,ecln3noepepaatbbaet.
IpoBepbte,IOJIeKpHBAeTeJIN IINporpamMHeO6ecneueHne iPod/iPhone/iPad dAnHHbIM AnPiapatoM.
EJHIN HET BO3MOKHOCTN ynpabJIbIy iPod/iPhone/iPad, IpoBepBeIe CJcEyIOHN paIneMertByo?
- IpaBnHbNO HIN POkDIOHcEN iPod/IPhone/IPaIpe
- IpeNPOIoEOeONHHte iPod/IPhone/IPK cyptOPIctBy.
- He 3aBnC IIN iPod/iPhone/iPad? PIIopno6yIte BbIIOJIHITb 6bpoc nactpoek iPod/iPhone/iPad H nepeioIoCoeIHHNITRE iPod/iPhone/iPad k yctpoiCTBy.
TJaba6:
Bocnpo3VeJeHne Dncka
B3toi cnCTeMe MOryT BocipnoH3BOuHtcbc TAndaptThIbe Jnckn CD,CD-R/RWbΦopmaté CD n CD-R/Rw cΦaIaAMn MP3 HJn WMA,Ho 3aIIncb Ha HxN Hebo3MoKHa. HeKOTOpBe IINCKH ayINO CD-Rn CD-RW MOryT He BocipnoH3BOuHtcbc H3-3a COtO8Hn IINcKa HInn yctPoHCTBa,HCNOJIb3EymOro Iain3HN
MP3:
MP3 JBJIaTc4 foPmATOM cKaTnH. 3To a6bpeBHaTpya, KOTopar o6o3haaer MPEG Audio Layer 3. MP3 IpeCTabIaTe TnH ayINO KOleKa, KOTOpB yOpaBaTbAeTc4 co 3NaHTeJIbHbM cKaTHem OT peBHOaHbHO ayDIOHCTOuHnHa kPiN OueHb MaIbIX IOTepx B KaueCTbe 3BuayHnH.
- ΜτΑ ΣΝΥ ΚΤΕ ΜΟΙΙρεχνΑΒει Φαιλίν MPEG-1/2 Audio Layer 3 (Частовы диссGPUгдддддддддддддддддддддддддддддддддддддддддддддддддддддддддддддддддддддддддддддддддддддддддддддддддддд徴чу
- ΜτΑ ΣΝΥ ΚΤΕ ΜΟΙΙρεχνΑΒει Φαιλίν MPEG-1/2 Audio Layer 3 (Частовы диссGPUгддддддддддддддддддд徴чу
- ΜτΑ ΣΝΥ ΚΤΕ ΜΟΙΙρεχνΑΒει Φαιλίν MPEG-1/2 Audio Layer 3 (Частовы диссGPUгдддд徴чу
- ΜτΑ ΣΝΥ ΚΤΕ ΜΟΙΙρεχνΑΒει Φαιλίν MPEG-1/2 Audio Layer 3 (Частовы диссGPUгбн
- ΜτΑ ΣΝΥ ΚΤΕ ΜΟΙΙρεχνΑΒει Φαιλίν MPEG-1/2 Audio Layer 3 (Частовы диссGPUгбн
- ΜτΑ ΣΝΥ ΚΤΕ ΜΟΙΙρεχνΑΒει Φαιλίν MPEG-1/2 Audio Layer 3 (Чaстовы диссGPUгбн
- ΜτΑ ΣΝΥ ΚΤΕ ΜΟΙΙρεχνΑΒει Φαιλίν MPEG-1/2 Audio Layer 3 (Частовы диссGPUгбн
- ΜτΑ ΣΝΥ ΚΤΕ ΜΟΙΙρεχνΑΒει Φαιλίν MPEG—1/2 Audio Layer 3 (Частовы диссGPUгбн
- ΜτΑ ΣΝΥ ΚΤΕ ΜΟΙΙρεχνΑΒει Φαιλίν MPEG—1/2 Audio Layer 3 (Частовы диссGPUгбн
- ΜτΑ ΣΝΥ ΚΤΕ ΜΟΙΙρεχνΑβει Φαιλίν MPEG—1/2 Audio Layer 3 (Частовы диссGPUгбн
- ΜτΑ ΣΝΥ ΚΤΕ ΜΟΙΙρεχνΑβει Φαιλίν MPEG—1/2 Audio Layer 3 (Частовы диссGPUгбн
- ΜτΑ ΣΝΥ ΚΤΕΩΜΕΩημας Φαιλίν MPEG—1/2 Audio Layer 3 (Частовы диссGPUгбн
- ΜτΑ ΣΝΥ ΚΤΕΩΜΕΩημας Φαιλίν MPEG—1/2 Audio Layer 3 (Частовы диссGPUgбн
- ΜτΑ ΣΝΥ ΚΤΕΩΜΕΩημας Φαιλίν MPEG—1/2 Audio Layer 3 (Частовы диссGPUgбн
- ΜτΑ ΣΝΥ ΚΤΕΩΜΕΩημας Φαιλίν MPEG—1/2 Audio Layer 3 (Частовы диссGPUгбн
- ΜτΑ ΣΝΥ ΚΤΕΩΜΕΩημας Φαιλίν MPEG—1/2 Audio Layer 3 (Частовы диссGPUгбн
- ΜτΑ ΣΝΥ ΚΤΕΩΜΕΩημα.
- ΜτΑ ΣΝΥ ΚΤΕΩΜΕΩημα.
- ΜτΑ ΣΝΥ ΚΤΕΩΜΕΩημα.
- ΜτΑ ΣΝΥ ΚΤΕΩΜΕΩημα.
- ΜτΑ ΣΝΥ ΚΤΕΩΜΕΩημα.
- ΜτΑ ΣΝΥ ΚΤΕΩΜΞΩημα.
- ΜτΑ ΣΝΥ ΚΤΕΩΜΞΩημα.
- ΜτΑ ΣΝΥ ΚΤΕΩΜΞΩημα.
- ΜτΑ ΣΝΥ ΚΤΕΩΜΞΩημα.
- ΜτΑ ΣΝΥ ΚΤΕΩΜΞΩημα.
- ΜτΑ ΣΝΥ ΨФДФФФФФФФФФФФФФФФФФФФФФФФФФФФФФФФФФФФФФФФФФФФФФФФФФФФФФФФФФФФФФФФФФФФФФФФΦΦΦΦΦΦΦΦΦΦΦΦΦΦΦΦΦΦΦΦΦΦΦΦΦΦΦΦΦΦΦΦΦΦΦΦΦΦΦΦΦΦΦΦΦΦΦΦΦΦΦΦΦΦΦΦΦΦΦΦΦΦΦΦΦΦΦΦΦΦΦΦΦΦΦΦΦΦΦΦΦΦΦΦΦΦΦΦΦΦΦΦΦΦΦΦΦΦΦΦPhi
BoBpMaBOcPiOn3BeDHeH qaiIa VBR cHTyHK BpEmHH Na HcJIeE MoKet OTInHauTbCt O pKaTHueCKoR BoPMeHH BOCPiOn3BeDHeH.
WMA:
O 3arpy3ke faHIOB MP3/WMA
B INHTepHete HMeetcM HORO MY3bkaJIbIbIX caITOB, Tge BbMOKeTe 3aRpy3Hb MY3bkaJIbIbHe faJIbIb B (oPmATE MP3/WMA.Дla 3aRpy3KMy3bkaJIbIbX faJIbON CJeYIe HNCTpyKIIHM HaBe6-caiTe.3aTeM bI cMOKeTe BOcIPOIN3BcTe 3TN 3aRpyKeHHbeMY3bkaJIbIbHe faJIbI, 3aHNcABHX Ha NcCK CD-R/RW.
3aIpyKeHHbIe KOMIO3HUN/phiIbI IIpeHa3NaYeHbToIbKo IJIaIHyOroIOJIb3OBAHnJIIO6oe HHOe HcIOJIb3OBAHne KOMIO3HUN63 pe3apeHHe BIAJElbIIa 3aIpeHHe 3AKOHOM.
O npjaKe BocnpOn3BedeHn naKn
EcnfaiIbMP3/WMA3aHncaHbBHeckoJIbKINPiIiKaX,TOJIA KaIKIOIAPIK6ydetABOMATNuecKn3aJaBaTbcHomepPiIKN.
3THI\PaIKN MOKHO BbIbHpTaB KHOIIKOI FOLDER Ha IIyIte IV. EcHIN BByTN BbIbpaHIOI PAIKN HET IOIepeKJbAeMbIX (ΦopMTOB aiIOB, TO Ipana IIpoIyUcKaetc, N bEyTe BbIbHpTaC cIeDyHuaI pAnia.
HAnpHmep: Hnke NOKa3aHO, Ka IIpHCbaHbAOTc HOMepaIIIOK, ecJIN 3aIHcBbAOTc aJIbIbO pOpMaTOB MP3/WMA.
1 KOPHEBAR nanka yka3aHa KaK PAnIKA 1.
2 2to kacaetcnaok, KOtOpbIe BINOxHeB B KOPHEBYIO nanky (PANKA A u PAnKA B), nannK, KOtOpbIe 6ydyT 3aNcaHbI paNbIe Ha dNck, 6ydyT 3aNcaHbI kaK PAnKA 2 u PAnKA 3.
3 Yto kacaetc nanok, KOtOpbIe BnOKeHbIB PAnKy A (PAnIKA C n PAnIKA D), panKn, KOTopbIe 6ydyT 3anicaHB paNbwe Ha nDcK, 6ydyT 3anicaHB Ka PAnIKA 4 n PAnIKA 5.
4 ПАПКА E, КOTOPА BLOJO经а В ПАПКУ D, 6удET yka3ана кak ПАПКА 6.
Панka Информади о подке кOTOPA 3ANHbIaEeTcHаДСК,3ABHCTNOTAHINbIbAUIOTe IPOrPAMMHORO OOBCEUENH.NHeMeTcBepoTHHOtB TTO YTO HA STOMIAPAPATE JAHJIbYbUdYT BOCIPNOBHTTcHBe HCOOTBE7CINCHOKNDAEMbIMPOKJDMOCIPNOH3EENH.
C INKCA c faiiAmu MP3/WMA MoXHO IpOHTaTB IIO 255 iAnok H994aiIIOB (BkHouAe HEOBCIIPOH3BOIDHMbIE faiJIbI).
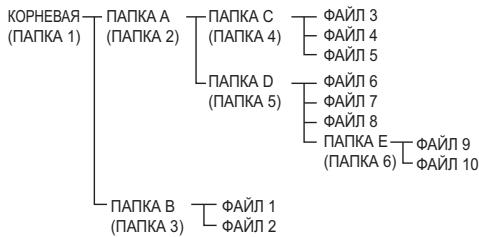
Bb6op panKn Dn BocnpOn3BeDeHn
Tb6bIyka3tBnAkyIyBcOIOPOIN3BeLEHInB, BbIOIOJIHTe CJIyDJOHNIE OEPaHHN.
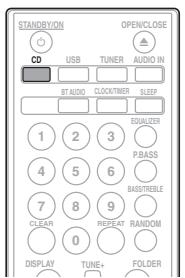
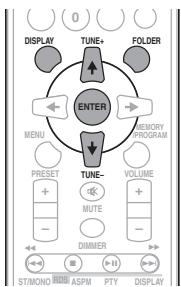
1 Haxmnte KhoNky CD 3aRpy3nTe Dnck c faJamn MP3/WMA.
2 HaxmTe KhONky FOLDER n 3aTe haxmTe KhONKn / ,YTO6bI Bb6paTb XeNaEMyIO npKy DnI BOCnpOn3BeDeHnR.
3 HaxmTe ENTER.
Bocnpo3BeJeHHe NaHcTc nepBoN neChn Bb6paHHo nnKn.
JaEe cJHn BOCP013BcHEHNE OCTAHJINBAETC,MOKHO HAKaHTb 1/4, YTO6b Bm6pTaBnIaNkY.
IpeeknoueHne codepxmoro dncnnner
1 Haxmnte DISPLAY.
EcIINBΦaII3aIIHcHaNA IHΦOpMaIIH O HA3BaHHN IeCNH, HMeHN HCIOJIHTEJI N HA3BaHHN AJb6OMA, To 37a IHΦOpMaIIH 6yET OTo6paKaTbC Ha DCIIJIeE. (JaHHbI aIIHAPAT MoKet OTo6paKaTb TOJIbKO 6yKBHeHO-IIIΦpOBBe CmBOJIb. He 6yKBHeHO-IIIΦpOBoB CmBOJOTo6paKaTeC, Ka ^**
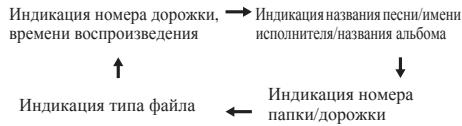
Приимechаиме
a_日 W M ,OxpaHnaembIaBTOpCKHM IpaBOM> HIN《HeIOJIePckHbAeMbIe(faiIbI》,BOcIpOn3BODIHTbHEo3MoJHO.BTHX CUYaYax faiJI 6yTeT aBTOMaTHueCKH npOnyuJeH.
BOMMOKH CJIyAH, KOrJa HE OTo6pKaaETcH HnKAKOHNHOPMAUHH.
- Oto6paJaeHHe Na3BaHnH IeChn, HmEHn HcIIOHInTeJe H na3BaHNa aIb60Ma IoIDepKHaBcETc TOnJIbKO dIg aIyIOB MP3.
Pa3dien 7:
Bocnpon3VeJeHne c USB
Bocnpoun3BeDene 3aONMnHaIoUx yctpoiCTB USB
C nOMoUHnHTpeHcua USB hnepeINHeI pAneHIn 3TOrO peCHeBa moKHO npocJyHbATb BByXKaHaJIbHbN 3ByK c USB -ycTpOCTB.
Pioneer He rapaHTnpyET, TTO bEyET BOCnpoIN3BOJNTbCJIIO60I qaiH, 3IaHHcHHNbaI HAOIMHaHOoE mYCTPOICTBEUSB, INH TTO bEyET IOJDArabTcB IITAHHe N3aONMHaHOoee yCTPOICTBO USB. TaKke o6paHTHeBHAMHHe, TTO KOMAnHIA Pioneer He Hecet HHAKoIOTBTCTBEHOCTn 3A JIo6yIO nOpTePOIqIIOB Ha3aONMHaHOoIHX yCTPOICTBx USB B CBAHcN pIOJKIIIOueHNEM K DAHHOMY yCTPOICTBY.
1 Haxmnte USB nIy BbIbopa BaKaueCTBe BXoHOrO NCTOChnka.
Ha oCHOBHOM HcHJIeI IOKa3bIbAetC HnIHkauH «USB/iPod».
2 Поdkлючп Te 3anOMnHaIoоe ycToiCtBO USB.
Homepa panok nii panob, coxaehenhhe ha noiKaHooeyHOM 3anomHHaohm cYtpoCTbe USB, noBraHOTcHa ochOBHom DnJIeae ATOmatuYeckn.
-Даннbi pechBep He IIOJIeprKHaBaET USB KOHcIeHTpaTOp.
-Пин полклioчeHHi iPod/iPhone/iPad annapat nauHet abTOMaTHUeCKN 3apjaKaTbCJ.
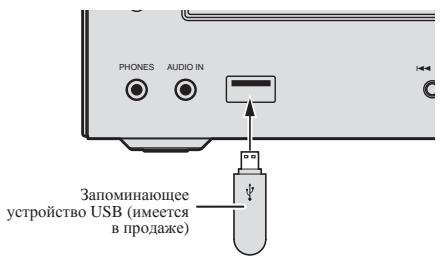
3 Pocne 3aBepseHn paCno3HaBaHnna HaxMNTe /II nIra 3anycka BocnpOn3BeHeHn.
-Пипескiiюченин На дутгь BXOДН Источни ссанда octановichte BOCIPONH3BEdeHHe c yctpoIcTba пam'th USB.
4 OToeHNHe 3aONMHaOooye yCTpoiCtBO USB ot pa3bema USB.
IpeJ3 HbJIeEHHeHcIaONMHaIOIoEToyCTPOIcTBA USB OTKJIOnUHTI INITAHNE.
Приимechаиме
- MoKHO HcIIOJIb3OBaTb IJII-HaKoINTEJB USB 2.0.
ДанhoeуctpoiCTBOMOKEThepacno3HaBaTb 3aONMHaIOoeeyctpoIcTBOSUB,HEBOcPOn3BOJITb faJIbHHeNoBaTaBtIITaHHe3aONMHaIOoee yctpoIcTBOSUB.IIpO6He,cm.KoZo4nokNoyo 3anoMHaIOoeeycmpoiCmEOUSBha ctp.32.
KorJa3aOHMOHHaIOoee yctpoiCTBO USB He BOCIOPOH3BOOJITcN, H TceHeHHe 60JIeue Yem 30 MmHyT He BbIOJIHJAreTcHnKACHX DeIcTBn, aIInapat ABTomaTHueckn BIKIOHHTCn.
IOBTOPHoe BOCnpon3BeDeHne
ПиОВТОРНOMBOСИПОнЗБЕДEHINМОЖНЕПЕРБИНBOBICIПОЗьДОЛТБОДИΝДОLOКPGK,СБЕДОLOPGKKHINДОLOPGKKB3ANIPORAMMIMOBAOHHIOSCJIEJOBADATEJIISHOCTN.
3HaKOMCTBO C CnCTeMoR RDS
CnCTema paJIOJADHbIX (RDS) -3TO cHCTema, KOtOpa HcNIOJIb3yeTcB 6OJIbIHHCTBOM paJIOoctAHIN B IuaIa3OHe FM IJIpeIOCTabJIeHH CJIyIaTeJIIM pa3JIHNoH INHΦOPMaIIH - HapIMeH, HA3BaHInna PaJIOCTaHIHH INI trpAICIpyEmoi IIpoPamMbI.
OJHOH 3H yHKUHN CnCTeMbR DRS ABJIeTcB 03MOKHOCTb ONCKA tCTAHIN, TpAChIINYIOE THEp6EBMTH TNI pORpAMMb. HAnpHMep, MOJHO OOCyIeCTBtBtIOHcK CTAHINH, KOTOPAR TpAHCNIPyET npORPAMMb B Jxahpe JAZZ (Jka3).
Mozho Bectn IIOHc IIporpamm CJeIyIOUHx TIIIOB:
News - HOBOCTH
Current Affairs - Tekyükraine co6bthyra
Information- HFOOPMAIIN
Sport - cnopt
Education - o6p3a08aTeIbHnaI HnDpOmaIu
Drama -paJInocIeKtAJIH N T.I.
Cultures - HAIHIOHAJIHLA H MECTHAA KJYIbTyHAA JKH3HB, TEATP H.T.I.
Science-Hayka INTexHHKa
Varied Speach -IpoPraMMbI, IocTPOeHNHbI He 6eCede HIN OHueHHN, HainHPMeB NKTHOPHHbI HIN HHTepBbIO.
Pop Music - IIII-MY3bIKA
Rock Music -poK-My3bka Easy Listening -IeTkaj My3bka
Light Classics M-JeKJAA KJIACCSUECKA MYBka
Serious Classics - cephe3HNAJI KALSSCHUECKA My3bKa
Other Music - MY3bKa, He COOTBETCTBYIOJIaI IpeuHcJIeHHJIbK TATEOPHIM
Weather & Metr - CBOKH INIPOGRHO3BIOILOI
Religion - npgrapmmbo o peJIHHI
Phone In - npgrpammmb, npjyucmatprhbaouhne
06cuydienheKaokJHIOE Tomi H oouhHeNo cIyIaTeJIaMn ITO TEJeDoyH
Travel & Touring IYIETIECTBTHN OHTDHX
Leisure & Hobby - Cbo60dHoeB PBMN, HINTEpcbI yXo66H
National Music - nonyIaHapnai Mytsbka na he anhIyckom KzIblya
Oldies Music - monyirnnay Mnyka 1950- x i n 1960- x rotod
Folk Music - HapoDIIaMy3bIka Documentary - Iy6IiHnCTUHeCKHe npOrpamMbI
Alarm Test - TpaHcJIaIII INP TceTnHOBANbAbaHINHOBEaTeJIbHOBOObOpDIOBAHHNII PHI pEmHbHX yCTpOHCTB.
Alarm - TpeBora!
POnsck nporpaMM cnCTembl paHnoHaHHbIX RDS
MoJxO OcUyIeCTBHTb IOnCK TTHOB IporpAMM, IpeYChJIeHbHX BByIIe.
1 Haxmnte TUNER ha nylbleTe duCTaHcUHOHHoro ynpabJeHna.
CnCTemaRDSIOCTYIIHATOJBKOINHAna3OHeFM.
2 Haxmnte RDS PTY Ha nyIbTe DnCTaHcNoHHOro ynpabHeHna.
HnDnKaun «SELECT» IOBHTcI pHmepHO Ha 6 cekyH.
3 HaxmTe / Дя Вьбopa Тида nporpaMmbI, KOTOPYIO XOTNe npocnywaTb.
Пи Каддм Ддм KAnHITK HKNKIN 6yIET NOKa3bBaTcB TII INPOrpamMb. EeN HKNKHa yDePKeHbAetC,TII INPOrpamMb6yIET NOKa3bBaTbE HeIIpePbBHO.
4 Bo Bpem OTo6paXeHnBbIbpaHHOro TnnporpaMbl (B TeueHne 6 cekyH), nobTOphHO haxmnte KhoNky RDS PTY.
KakIbI pa3, KOrIa NaKHaMaEtC8 KHOIIKa RDS DISPLAY, IHCIIeIb6yIeT NepeKJIIOuATbc8 CJIeDyUOIM 6oBa3OM:
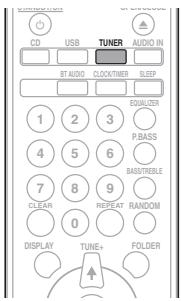
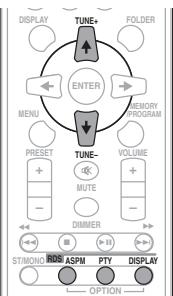

Пин hAstpoiteк RA StaTHHIO,OTJIHNUHO OT cTahHINRDS,HIIH Na CTaHINRO ROKOTOPAIEaTeJcIb6yIeNCHaI,IMCINJIe 6yIeT N3MeHHTb8cJIcJIyIOUeM NOJAPKe:
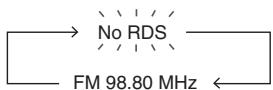
NcNoJIb3OBAHHe aBTOMaTnuecko HaCTPoiKn Ha npeDbapntelbHo 3aONMeHHbIe npOrpaMMbl (paInocTaHun) (ASPM)
BovBpepa06oerypeKHMAs ASPM TIOHep 6yET abTOMaTHueckn BbIIOJIHTb IOHcK HObXb CTAnuRDS.MoJHO COxPAHITB BVAMHTdo3OCTAnuR.
EcnHekotopRbcta cTahunu yue coxoaneHHBn bnaHTM, YcHIOHOBbX taChunu, KOTOpBe moKHO coxapAHTHb, 6yIed MeHHu.
1 HaxmTe TUNER Ha nyIbTe DnCTaHcNoHHoro ynpabJeHna.
2 HaxmTe n yapedxnbai Te KhoNky RDS ASPnHa npIbTe D.
Iocme MHraHHH HnDnKaaHHN [ A S P M ] B TceHHe IpnHmepHO 4 cekyH,3aHcyTHTcR cKaHnpOBaHHe (87,5MgTdo108MgT). Iocle cKaHnpOBaHHa,Ha nCtIeB TceHHe 4 cekyH6yTeT oTo6paKATb6hCIO CTaHHO, coxPhaHeHHIX BnAamrTH, H 3aTeM Ha 4 cekyHNDI IOBANTc HnDnKaaHH [ E N D ]
VCTPOICTBO C6EPCPOBIDHM BHTEPDEFCOM BLuTooth: HUFOPOBOI MBybKaIaHbIy IPOHrPBAtBeJIb

UctpoBCTBO,he OcaHHeHHoe 6eePboOBnIM HHTpeFcIeom BluTeoth: IIpOboBoy MybKaJIbHbI pOnpRpbBaTeBtE
ayIIOHnepeDatNkBluetooth (IMeOIOJIINCBA B IPOJAKE)
My3bIkaJIbHbIe DaHHbIe
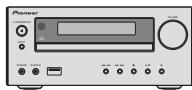
AIIIapat MoKet BOCINPOH3BOJNTb My3bKy Ha yCTpoIHCTBaC nIOJIepKoBn Bluetooth (cOTOBbIe TEJefOHH, INIΦpObIe ayHOJIeepbI h T.I.) Be c6cnpoBDHom pexHMe. Bb TaKke MoKete HcIOJIb3OBaT bayIOHepdATuHN Bluetooth (PIOJaTeAOTIOJIbHO), YTO6bI cIyIaTH My3bKy C yCTpoIHCTB, KOTOpbIe He IOJIepKraBIaOT Bluetooth. O3hAKOMHTbc a paOToI yCTpoIHCTBa CIOJIeKoKb Bluetooth MOxHO B COOTBTCTBYIOIe PMYKOJBCTBE NIOJI3OBaTEJIa.
Bluetooth® (CJOBO H JIOROTINbIy) BJIaTc3aapeHCTpHPOBaHHbIM TOBAPbHM 3HAKOM IN PIIHAnJIEKHT KOMIaHHb Bluetooth SIG, Inc.;HCIOJIbOBAHHe PIONEER CORPORATION 3THX TOBAPbHX 3HAKOB pa3peIeHOb COOTBeTCTByUeIeJIiueH3neI.PIpOHe TOBAPbHbIe 3HKn I TOpROBIE NaHMeHOBAHHI pPnHaJIeKAT COOTBeTCTByIOUHIM BJIaJIeJIbIaM.
CnapBaHne cannapaTOM (IepBnuHna perncptaun)
Длго TTO 06bIа anaparat MOG BOCIPNOIBOHTB MBy3kYCOxpaneHnyHO YA tpyoINCTBE C NOJIePekKoi Bluteoh, ChauaJIaCJyETy BIIPOINHTC cnapRbHHe. CnapRbHAne JIOJIKHO bSytB BIIPOINHEO INI PEPBOM HcNIOJI3OBaHHYN YCTPOINCTBA CNOJIePekKoi Bluteoh, HIn KOrJaHa aniapanate No KaKoi-JIb6PnUphuNE CTseTbI DAHNbHe cnapRbAHn.
CnapHBaHne-3TOIiAR,Heo6xoDmMbI DJIIO6eCneEHnC BcB3N C IHOOMbIbO 6ecPiPoBOHO TeXHOJOrHN Bluetooth.
YCTPOIcTBO IpeKJIOnuHaTeC Hb BT AUDIO, HnHaJINcIIeepIOBHTcHnIHnKaUH PAIRING.
3 BkIIOUHTe 3NeKTPoNITaHne TORO yCTPOINCTBa C NOIDepKkoB Bluetooth, c KOTOpbIM HUYKHO BbIIOJNHITb CnapNBaHne, N BbIIOJNHTE pOueDpy CnapNBaHn.
Приимейане
ДаннамMHKpOCHCTeMa6bIETOTOBpaKATbcaKaK«X-HM51»HaYcTpoIcbTxCIOJIaepKkoiBluTeoth,KTOpbYe bAc eBt.
HaHHeTcIcnapHBaHne.
- YctaHOBnTE yCTPOIcTBO c IIOJIePJKKoi Bluetooth pJOM c aIIIapAToM.
Kak bIIOJIHHeTcI CNAPBHaNE H KAKHe IPOUeUPbI TpeyOurCIIa CNAPBaHHN, CM. B yKOBoDCTBe IOJIb3OBATEJIe YcTOPCHTBc CIOJdEePKoBI Bluetooth.
-Пин NOЯБЕЛУМИЗ А平方СОа O ВВDE PIN-KOДA, ВБДЛТЕ «0000».(ANOустрийто He пинимает Ннakадо Дураюнскогий PIN-KOДA, крOME «0000»).
4ПодТВерДпerteHaустpoИстBE c поДдерЖкоI BluTeoth,чTo сnapиВане БылОЛнeo.
EcIIN cIapHbAHHe cYcTpoiCTbOM cIIOJIePJKoB Bluetooth bIIIOJIHcO INpApAIBJbIO, HmI yCToPcTBa CIOJIePJKoBBluetooth oTO6pa3HTcHa nIpeJIeH nIeJIH anIapata. (Moryt oTO6paKaTbCra TToJIbO OIOJIbOaITbOBe 6yKBEHNO-IIIΦpOBBe cHMBOJIbJIIO60I cHMBOJI, KOTOpBI He moKet 6blrTO6paKeH, 6blrTOKAK3bBAITbc c IIOMOIbU ※ ^ 求 )
Прocлшване My3bIKn Ha annapate c yctpoiCTBOM c noДержКоj Bluetooth
1 Haxmnte KhoNky BT AUDIO.
Annapat IpekeIIOuHTcHa BxOJ BT AUDIO.
2 MexkyucpoiCTBOM CnoDaeRkoj Bluetooth n annapaTOM 6ydt CO3dAno NoKnIoueHne Bluetooth.
PnueyIbI IIOJIKNOCHENI KAIINAPATY JOJIKHbI BNIHOJNHTBcI c yoptroTBa c NOIEpEKKo Bluetooth.
IpoDp6HocnO pOIOeUpyax POIKNoChenns CM.B pyKOBoCTBe NOJIb3OBAteJe yCtpoHCTBa CIOJdEpeKkoB Bluetooth.
3 Bocnpon3BeHHe My3bIKn c ycTpoiCTBa c noDepKoB Bluetooth.
PpeoocepexeHne no paNoBOJnham
Даимhoeусторсьpoаботаетн ha paiohoactote 2,4 TII, KOTOPaМожетн HeIOJIb3OBATbCSdpyTHMH6ecipnoBOHmNCHCTeMAMn (Cm.CINcOK NHIke).BoI6HeZKHEI HMaYI INI ppeBBAHNH CB3H, HeNIOJIb3yte ydaHnBI anIIaparT B03JIe TAKHXySTOPIcH, HJIy6eJIHTeCb, YTO TaKHe yCTPOITCBa OTKIIIOyeHb Bo BPemCNoIb3OBAHIN.
BecnpoBoHNbIe TeJIefoHbI
BecnpoBOdHbIe faKCHMnJIbHbIe aIIIapatbI
MnKpOBoJIHOBbIe NeuH
- BeecnpoBOdHbIe ycTpOoiCTBa (IEEE802.11b/g)
- BecnpoBoJHoe ayIHO-BNIO o6OpyIOBaHne
BecnpoBOHbIe KOHTpOJIIEpbI IINrHpOBbIX CHCTEM
MeINKAMeHTo3HbE cpeIcTBA,OCHOBaHHbIe Ha MHKpOBOJIHax
HeKOTOpBie paHNOHnH
Bocnpo3BoDnMbIe DnCKNΦOpMaTbI
He pa3MeuTe IpeMTe bHa yCTpOiCTBe
He pa3meiAte KaKHe-JIb6o IIpeImTe bHa yctpoHCTBe CBepxY. He 3aKpbIbAaTE BeHTUNLAIOHNBHe OTBepCTnY.
He hnoJIb3yIte daHHOe yctOIOCTBO Ha BOPcHCTbIX KObPax, KPOBaTAX, dIbHaNX I. T. N.II IN 3aBepHYtBM BTKAH N. T. I. 3TO MOKET IOMeIaB paCCeHNBAHHIO TEIIIA, YTO MOKET IIpHBecTHN IOJOMKE.
He noDBepraIte pecnBep Bo3JeIcTBIO TeIIa.
He pa3meiainy yctpoictbo cbepy Ha ycHInTeIe HIN dpYROM KOHIOHENTe, TerehpnyIOeM TeIIIO. IIIN yctahOBKe B CToiKy, YTO6b I36eKaTb BO3EiCTBnA TEIIa, OTBOIMGOr OT ycHInTEJIe HIN HHOo AyIOKOMIOHEnHa, YcTaHABINBaItepeCNBepHa NIOKY HNKe yCHINTEJIe.
KoJHa yctPoIcTbO He hCIOJIb3yETc, OTKIIHOaIteero IHTHAnHe.
B3aBHcHMOCTHOTyCIOBHNCHrHaJIa,HATeJIeBn3HOHHOM 3KpaHe MOrYTOtO6pKaTaCBNIOIOCbI,IMoKETIOIIaTb IyM B3UYaHHe PAJHOITpAHCJIuIN,KOIJa IIHTaHHe yCTPOICTBA BJKIOHNO.BoTAKOMCIyuaeOTKIOHHTe IITAHHe yCTPOICTBa.
OKondeHcaUN
Пин Быстор Ипелеменгду СУТСТВА H3 XOLOHORO MecTa B TEJIIOLO NOMEIIHNE (HANPIMEP, 3MHО) HIN ПИР pe3KOM NOBIIHUMI NOB3DECTBHEM POABTOI O6OgPBATEJIA H T. II.TEMIpepatbIy B NOMEUIHNN, B KOTOPOM yctAHOBJIeHO yUcTPOCTBO, BYHTPN UYcTPOCTCBTA (Ha pa6OuHX JETALIX HJINH3E) MOrUT σбра3OBbIbATcB KaIIIN BOIy (KOHdECAIIH). ПИР HAIJIHNQ KOHUNCAIIH DAHNOU YcTPOCTBO He 6yDET pAOBTaB HADJIeKAIIHM O6p3OM, H BOCIPON3BEDEHNE 6yDET HeBO3MOxH0. OCTABTe yUcTPOCTBO IPII KOMNATHI TEmInePATAype Ha IIN2 YacA c BKIIIOHEnHbIM HITAHHEm (BPEM 3ABHCHT O t CTeHENH KOHdECAIIH). KAIIIN BOIy hNcapAITcN, H BOCIPON3BEDEHNe CTAHET BO3MOxHbIM. KOHdECAIIH MoKET TAKKHe O6pa3OBbIbATbIey ToIeM, ECILY UcTPOCTBO OKTKbITo BO3DECTBINO IpyMAIbX TOTOKOB Bo3DyA xOt KOHdIIIOHepoBAO3DyA. Ecln 3TO IpoN3Oiet, IpeMeCTHT DeAHHOe UcTPOCTBO B ApyTOe MeTO.
UHCTKa H3dEINa
- IpeTe TEm KAK IIpHCTyIHTb KOuHCTKe DaHHOro yctPoIHCTBa, OTOeOHHTte Ka6JIb IIHTaHHa OT p03ETKH.
ДИМСТКДANHORO yCTPOIcTBa HcNIOJIb3yIte MRAKYO TKAHb.ДИ ПИнJINIIeI bIIIn CMOHTeM RAKYO TKAHb HEKOTOPHM KJOINCECTBOM HcYTpAJIbHORO MOHOJIeO CpeCTBa, p4a6BaJIENHORO 5 Do 6 ChTAMM BOJIu, TuaTeJIbHO BbIKMTE TKAHb, cOTpHTe IJIbIb N 3ATEm BbITPHe IIOBExPHoCTb MRAKOJ, cyXH TKAHbI.
CInHPT, pactBOpHTeJIb, 6eH3HH, HHeCKTHIIHbIb I T.II. MoryTbB3BaTb paccJAHBaHN HeuATn HJI KpACKn. TaKkeH3eGERaTe HTeJIbHOrO KOtHaTcpe3HHOBbX IINBHHIOBbIX H3JeIH C DaHbIM yCTpoHCTBOM, TAK KKTOMoKET HCIOPTNTb KOpNc. - Ipn HCIOJIbOBAHHH NCHCTIINX TKAHJI, CMOeHHbIX XHMpeAKTHBAMH I.T.I., BHNMaTeJIbHO IPOyHTHe HHCTpyKIIHH IOI Hx II pHmEHHNO.
YnCTka JInH3bl
- IPh HopMaJIbHbIx ycIbOBHX KcIITyataaIIHHn IIHH3a O6bIHyO He 3aqr3HaHEtC, Ho e cJOnI HaNo KaKoTo-IpoHe HauHTe PabotAtb, HnePABuHbHO H3-3a rp3N IHn IIHH, IbOpHITTeB C6IIHKaiIIH ABTOHP3OBAHbHc cepBHCbI CEHTP Pioneer. XOTa B pIOJaEKeHOTcpeCTBa OHCTKN IIHH3I JIPOHrPBbATEJIe, HcIOJIb3OBaTb IHx He peKOMeHJyETc, TAK KAK HEKOTOpBEpeCTBA MORYIPTBpEBIDHT IIHH3Y.
Оврацени с диckамn
XpaHeHne
BceTJHOMIOJIeHHNIOKOBOP6KN HxpaHHTeHX B BepTHKJIbHbOMIOJIeKHeHHNIO36eIaRTOpHcH,cbpIXMeCT, IOIbEpeKHeHHbX BO3dIECTBHIO pIbMbIX COJIHeYbHbX JUyEHI CJIINIIKOMHN3KHX TEmEPATyp.
IpoVHTaTE MepbI IpeIOCTOpOKHOCTN, BIOKeHHBe BMcTe CJINCKOM.
UHCTKA DUNCKOB
- IINCKH MOrYI HE BOCNPOH3BOIDHTBCJ, ECII HA HIX OCTAOTcR OTIEUATKHN PAJIbEIBIIN IIbI. B 3TOM cIyae, HcIOJIb3yIe TCHETIHyTO KAHB IN T.II, YTOb6bOCTOPOKHO BVITEpeTb NCKOT BNYtpeHHe CTOpBOH K HApkyHO. He IOJIb3yIteCtB rP3bHIuM NCTHITHMN TKAHMI.
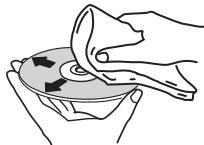
He hcnlo3yIte 6e3HH, pactbropntel nHn HnIe lyte yHHe xHMKATb. TaKae He hcnlo3yIte cpeCTBa Ia YHcTKBHNHa HnI aHTNCTATKNH.
ДлгшпшпспьлнсмчтmeМRTKYU TKHb BODIOI, TIIATeJIbHO BbIXMHTe ee, COtPHTe IIbJIb H 3aTeM BbITpHTe BJIary cyxOJ TKAHbIO.
He hCnoJIb3yIte NOBpeKdEHHbIe (TpeChyBIIHne HIN NOKopo6JIeHHbIe) DnCKN.
HeDiyuyskaIteIaapaHnHaNIIIN3aIpy3HeHHpa6OeHIOBepxHOCTHN DHCOB.
HePiHJIeIIIeKycoOHN6bMaTHN HINCTHKepbHaJINCKH. 3TO MoKetIOBpeIITb HINCK Ta,TOX HHEOBMOKHO 6yIDET BOCIPONIBECTN.TAKKeYuHTHe,TOH aB3BXtHex HAnPOKat DnCKaX qACTo KJIeT 3TNKETKN,a KJIeC 3TNKETKN MOKet IOPOCAIVHBATCBH NAPyK.YIpeH cHNOIb3OBAHHEM B3BXtHex HAnPOKat IINCKOBIOPEbTe, He BbCTyIaET JIN KJIeI IN KO pKaM TAKHX 3TNKETOK.
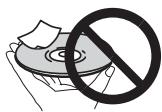
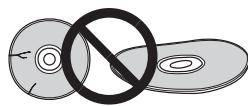
O Dnckkax CneuaJIbHOn foOpMbI
ДиснocoboiфopMb(ВВHIEcepeiua,IeCTHyTObHHKa nT.II. He myOTBcIOPN3BODHTCBaHa DAHNOM yCTPOIcTBe.He IbITaeCb BOCIPnB3BcETn TAKHe IINCKN,TAK KaK OHH MOrTy NOBpeIDtB DAHNHOyUCTPOIcTBo.
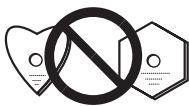
iPod/iPhone/iPad
Made for
iPod iPhone iPad
"Made for iPod," "Made for iPhone" "Made for iPad" 03nauaet, YTO 3eIekrPoHHN pIN6b6bip4pa6oTaN c CEJIbIO
PiDKJIOnHEnO ONpeJeENHO K iPod, iPOH INi IAP
coOTBCTBENHO, INMEETcERCEPTIHΦHNIKAIIHN pa3pa6oTNUKcA O COOTBCTBHN cTexHNUeCKHMn XapAKTREPHKTAMM Apple. Apple
He Hecet OTBCTBENHOCTN 3aPobOTy dANHOrO yCTPOrCTBA INI
eroCOOTBCTBNE cSTAHJAPTMn IO TNeHXeE 6eONaHOCHTN INI
perYJTHNBHMn HOpMAMn. IIOkaJyCTA, 6opATITE BHNMaHne, YTO HcNOIL3OBAHne DAnHOrO pIN6Opa c iPod, iPOH INi iPd
MOKET oTRHtAEJIbHO cKa3bIBaTBcRa HA KaueCTBe 6ecIpBOvIDHO CB3Hn.
iPad, iPhone, iPod, iPod nano u iPod touch éiaomc mopzobbmu Mapkamu komnauu Apple Inc., zapeucmpurobaaHbmu B CIIU a opyuxs cmpanax.
C6poc Bcex Hactpoek Ha 3HaueHnno yMOJUaHnIO
ДИВOCSTAHOBIELHNE BCEX HACTPOEK IO YMOJIYAHHO BIIIOJINHTE IeIbTHN, OIICHAHME HIXKE.
1 Haxmnte STANDBY/ON, yTo6bl BkIIOuHTb NtAHne.
2 Haxmnte CD ha nyIbTe Dy nn HeckoIbKO pa3 KhoNky INPUT Ha ochOBHOM 6nOKe, YTO6bl BbIbpaTb yHKnIO CD.
3 Haxmnte OPEN/CLOSE, yTo6bI OTKpbITb JIOTOK dIy DnCKOB.
4 HaxmTe 念 STANDBY/ON, Haxmma npn 3TOM
HcnoI3yIte KhoNkHa BeVxHn HnAeHn UyctPoICTBa. Ioka nIeT npioeecc BocCTAHOBJIeHn HACTpoE, OTObApkaetcra
Texnueckne xapaKTepeNCTNK
- ycnjnteJb
BbIXoHna cpeINHeKBaIpaTHuecka MoIIOHOCTb:
50BT+50BT
(1KΓI,KO3ΦΦHηHEHTrapMOHNK 10%,4OM)
Cekzna TIOhepa
YactotbI Hnana3OH (FM). 87,5 MgIO 108 Mg
BxoJ aHTeHHbI (FM) .75 OM He6aJaAHCnpoBaHHbI
CaCTOHTbI dHaHaaOH (AM) 522 KII IO 1620 KII
AHTeHHa (AM) . PamOchHa aHTeHHa
OctaJIbHoe
Pa3beM USB 5B,2,1A
HcToUHHK IITaHnI
MaKcHMaJIbHaBxOJHaMoIHCtB. 50BT
CoiipotHBJIeHHe. 4OM
Pa3mepbI 156 MM (III) x 241,5 MM (B) x 243 MM (Γ)
Bec. 3,4 Kr/KaJbI
- PpHaJaIeXHocTn
IyJIbT nHCTaHIOHHORO yIpaBJIeHHN 1
Ka6eJIb aHTeHHbI AM 1
IpoBoJIoUHa aHTeHHa FM. 1
BatapeiKNAA (R03) 2
Ka6eJIb rPOMKOrOBOpHTeJIa (ToJIbKO X-HM51) 2
Подставka дя iPad 1
Ka6eJIb IIITaHINr
TapaTHnHbI cepTHΦHKaT
Hhctpykunno 3KcnIyataunn (aHHbI JOKymeHT)
Птумецане
- TexHHueckHe xapaKtepeHCTKN yka3aHaBb Iyaan HapPrKeHHA 230 B.
B C83H C NOCTOHHM C oBpeIeHCTBOAHHE M I3EJIIN TEXHueCHeK H axpAteKTPhHK N KOHCTpyKIIH MOrYbTb IHMeHeHb63peIepBaHPteJIbHO ryeBOMJIeHN.
PIONEER CORPORATION, 2013.
Bce npaba 3auiuieHbI.
Declaration of Conformity with regard to the R&TTE Directive 1999/5/EC
Manufacturer:
PIONEER CORPORATION
1-1, Shin-ogura, Saiwai-ku, Kawasaki-shi, Kanagawa 212-0031, Japan
EU Representative's:
Pioneer Europe NV
Haven 1087, Keetberglaan 1, 9120 Melsele, Belgium
http://www.pioneer.eu
[*] X-HM51-K, X-HM51-S, XC-HM51-K, XC-HM51-S
C E
English:
Hereby, Pioneer, declares that this [ ] is in compliance with the essential requirements and other relevant provisions of Directive 1999/5/EC.
Suomi:
C hactoJSeTo, Pioneer DeKnapupa, Ye To3n [+] OTROBapHa OCHOBHnTe n3NCKBaHnI nDpyrN CbOTBeTHn NOCTaHOBJIeHnHa DnpEKTnBa 1999/5/EC.
Polski:
http://www.pioneer.co.uk
http://www.pioneer.fr
http://www.pioneer.de
http://www.pioneer.it
http://www.pioneer.nl
http://www.pioneer.be
http://www.pioneer.es
http://www.pioneer-rus.ru
http://www.pioneer.eu
© 2013 PIONEER CORPORATION.
All rights reserved.
© 2013 PIONEER CORPORATION.
PIONEER ELECTRONICS (USA) INC.
P.O. BOX 1540, Long Beach, California 90801-1540, U.S.A. TEL: (800) 421-1404
PIONEER ELECTRONICS OF CANADA, INC.
340 Ferrier Street, Unit 2, Markham, Ontario L3R 2Z5, Canada TEL: 1-877-283-5901, 905-479-4411
PIONEER EUROPE NV
Haven 1087, Keetberglaan 1, B-9120 Melsele, Belgium TEL: 03/570.05.11
PIONEER ELECTRONICS ASIACENTRE PTE. LTD.
253 Alexandra Road, #04-01, Singapore 159936 TEL: 65-6472-7555
PIONEER ELECTRONICS AUSTRALIA PTY. LTD.
5 Arco Lane, Heatherton, Victoria, 3202, Australia, TEL: (03) 9586-6300
PIONEER ELECTRONICS DE MEXICO S.A. DE C.V.
Blvd.Manuel Avila Camacho 138 10 piso Col.Lomas de Chapultepec, Mexico, D.F. 11000 TEL: 55-9178-4270
K002_B4_Ru