10032114 - Electric grill Klarstein - Free user manual and instructions
Find the device manual for free 10032114 Klarstein in PDF.
| Technical Features | Details not available |
|---|---|
| Usage | Details not available |
| Maintenance and Repair | Details not available |
| Safety | Details not available |
| General Information | Details not available |
Frequently Asked Questions - 10032114 Klarstein
User questions about 10032114 Klarstein
0 question about this device. Answer the ones you know or ask your own.
Ask a new question about this device
Download the instructions for your Electric grill in PDF format for free! Find your manual 10032114 - Klarstein and take your electronic device back in hand. On this page are published all the documents necessary for the use of your device. 10032114 by Klarstein.
USER MANUAL 10032114 Klarstein
Congratulations on purchasing this equipment. Please read this manual carefully and take care of the following hints to avoid damages. Any failure caused by ignoring the mentioned items and cautions mentioned in the instruction manual are not covered by our warranty and any liability.
CONTENT
Technical Data 14
Declaration of Conformity 14
Safety Instructions 15
Product description 16
Getting Started 17
Operation 18
Care and Cleaning 23
Error Codes and Troubleshooting 24
Hints on Disposal 24
TECHNICAL DATA
| Item number 10032113, 10032114 | |
| Power supply 220-240 V ~ 50-60 Hz | |
| Power consumption 2000 W |
DECLARATION OF CONFORMITY

Producer:
Chal-Tec GmbH, Wallstraße 16, 10179 Berlin, Germany.
This product is conform to the following European Directives:
2014/30/EU (EMC)
2014/35/EU (LVD)
2011/65/EU (RoHS)
SAFETY INSTRUCTIONS
- This appliance is not intended for use by persons (including children) with reduced physical, sensory or mental capabilities, or lack of experience and knowledge, unless they have been given supervision or instruction concerning use of the appliance by a person responsible for their safety.
Children should be supervised to ensure that they do not play with the appliance.
Always use the product on a flat, stable, heat-resistant surface. - The temperature of the accessible surfaces may be very high when the appliance is in use. Make sure not to touch these hot parts of the appliance.
- Use the product in a well-ventilated area. Keep at least 4-6 inches of space on all sides of the product to allow adequate air circulation.
- Do not place the product on or near a gas or electric burner, or inside or on top of a heated oven or other heat source.
- Do not allow the product to touch curtains, wall coverings, clothing, dishtowels, or other flammable materials during its use.
- Do not touch hot surfaces of the product. Do not move the product while it is plugged in. Allow the product to thoroughly cool before handling it.
- Do not use attachments not recommended for use with this product or sold by the product manufacturer.
- Do not use the product near water or other liquids.
- Do not place or drop the product into water or other liquids. If the product falls into water, immediately unplug it from the electrical outlet. Do not touch or reach into the water.
- Do not leave the product unattended while it is in use. The appliance is not intended to be operated by means of an external timer or separate remote-control system.
- Do not put any stress on the Power Cord where it connects to the product as the Power Cord could fray and break.
- Do not plug or unplug the product into/from an electrical outlet with a wet hand.
- Keep the product and its Power Cord away from heated surfaces.
- Refer all servicing to qualified personnel. Servicing is required when the apparatus has been damaged in any way, such as power supply cord or plug is damaged, liquid has been spilled or objects have fallen into the apparatus, the unit has been exposed to rain or moisture, does not operate normally, or has been dropped.
- If the supply cord is damaged, it must be replaced by the manufacturer or its service agent or a similarly qualified person in order to avoid a hazard
To reduce the Risk of Personal Injury or Damage
- This product is intended for indoor, non-industrial, non-commercial, household use only as a panini maker and healthy grill. Do not use the item outdoors or for any other purpose.
- Do not allow the Power Cord to hang where it may be tripped over or pulled (e.g., over the edge of a table or counter).
Special Instructions
- To avoid a circuit overload when using this product, do not operate another highwattage product on the same electrical circuit.
- A short power supply cord is provided with this product. An extension cord is not recommended for use with this product, but if one must be used: The marked electrical rating of the cord must be at least as great as that of the product. Arrange the extension cord so that it does not hang where it can be tripped over or pulled unintentionally.
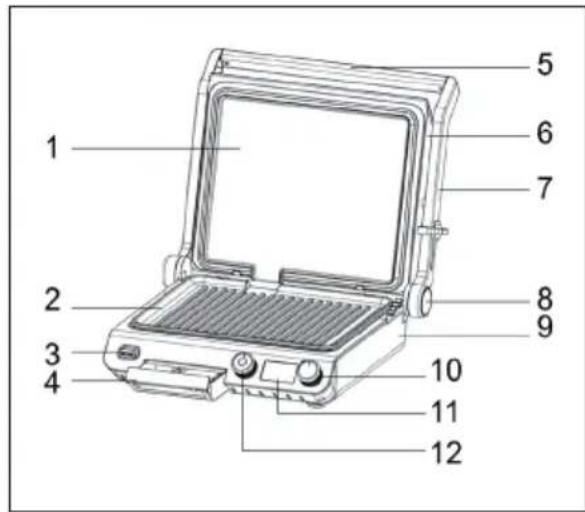
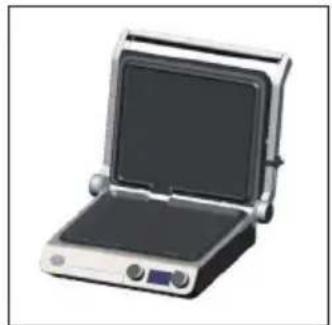
PRODUCT DESCRIPTION
1 aluminum handle
2 Upper cover
3 Handle right
4 Handle cover plate
5 Base
6 Thermostat knob
7 PCB windows
8 Time knob
9 Upper grill
10 Lower grill
11 Button
12 Oil plate
GETTING STARTED
Before first Use
Press the Upper Plate Release Button to remove the upper Grill Plate and then press the Lower Plate Release Button to remove the lower Grill Plate. Clean the Grill Plates, the Drip Cups, and the Scaper/Cleaning Tool in warm, soapy water; rinse and let dry. These parts may also be washed in an automatic dishwasher. NEVER IMMERSE THE BASE INTO OR EXPOSE IT TO WATER. Reinsert the upper and lower Grill Plates into their respective positions before use. See the "Inserting/Changing Plates" subsection below for detailed instructions.
NOTE: When using the Grill Plates for the first time, spray or apply a thin layer of cooking oil onto the nonstick surfaces of the Plates with a paper towel in order to season the nonstick surface. As necessary, reapply a thin layer of cooking oil throughout the life of the Plates to maintain best nonstick performance.
Place the product on a clean, flat, level, stable, heat-resistant surface with at least 4-6 inches (10-15 cm) of space on all sides to allow adequate air circulation.
1 Closed/Heating Position: The Upper Housing is closed and rests on the Base. Use this position when starting/heating the product and when grilling most foods.
2 Open Position: The Upper Housing is open. Place the Product in this position when starting to use the Grill function, and when grilling certain foods in which the upper Grill Plate is not appropriate, such as pizza or fish. Lift the Handle until the Upper Housing is at about a 90^ angle.
3 Flat Position: The Upper Housing is open and level with the Base, creating two cooking surfaces. Use the product in this position when grilling larger amounts of food. To flatten, pull up on the Hinge Release and push the Handle down.

CAUTION
Risk of burns! The Grill Plates and metal surfaces of the Upper Housing and Handle will become very hot during use. To avoid a burn hazard, wear protective oven mitts or heat-resistant gloves when using and touch only the black portion of the Handle.
Important Hints
- Use only heat-resistant wooden, plastic, or silicone utensils to add/remove food. Do not use a metal utensil as it may scratch the surface of the item.
- During the initial use this item may emit some light smoke. This is normal and will subside with further use.
Getting Startet
Use to cook burgers, boneless or thin pieces of meat and fish, and vegetables. In the "Closed" position, food will cook quickly since both sides cook at the same time.
1 First close the unit, unwind the power cord completely and insert the power plug into a grounded wall outlet. And to turn the Thermostat knob to the required shift low/ panini/sear, the respective temperature each shift as below:
Low: 160-180°C
Panini: 180-205°C
Sear: 205-230°C
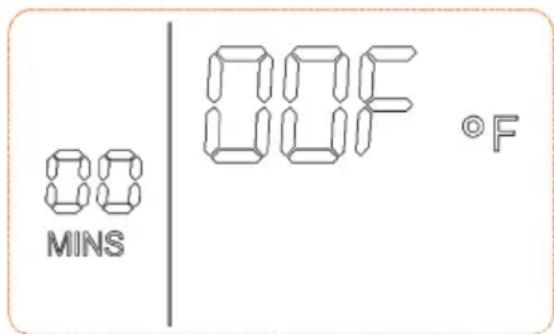
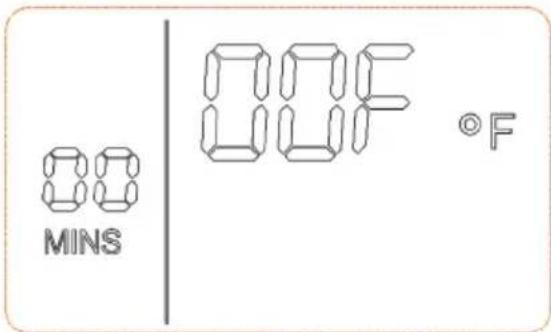
2 The grill alert will sound and the LCD screen will display OFF and the default 'O' zero time. The grill is now ready for the preheating cycle.
Use in Open Flat BBQ Mode
The ribbed cooking plate is perfect for searing meats while the flat cooking plate is ideal for eggs, pancakes and vegetables.
1 Ensure the drip tray is correctly inserted into the grill.
2. Ensure the cooking plates are correctly inserted and securely locked into position.
3 Place the grill on a flat, dry surface. Ensure there is a minimum distance of 8 inches (20cm) of space both sides of the appliance.
4 Unwind the power cord completely and insert the power plug into a grounded wall outlet.
5 The grill alert will sound and the LCD screen will display OFF and the default '0' zero time.
6 To preheat the grill: Ensure the top plate of the grill is closed. This will ensure faster, more efficient preheating. Turn the temperature dial to adjust the temperature. Rotate the dial (Low: 160-180°C, Panini: 180-205°C, Sear: 205-230°C) or select and alternative temperature. The grill will start to heat and the LCD screen will illuminate orange and display the selected temperature, HEATING and the default '0' zero time. Allow the grill to preheat.

Note: The grill features a temperature conversion button on the right side of the LCD screen. The temperature reading on the grill is preset to Fahrenheit. Pressing the temperature conversion button converts the Fahrenheit temperature reading into Celsius. The corresponding ^ C or ^ F symbol will be displayed on the LCD screen. If you have changed the default Fahrenheit temperature reading to Celsius, the setting will remain in the memory of the grill until the Temperature Conversion Button is pressed a second time or the grill is unplugged from the wall outlet. When the grill is plugged back into the wall outlet, the temperature reading will automatically return to the preset Fahrenheit setting.
7 Once the grill has preheated to the selected temperature, the grill alert will sound and HEATING will no longer flashes. The LCD screen will display the selected temperature and the default '0' zero time.
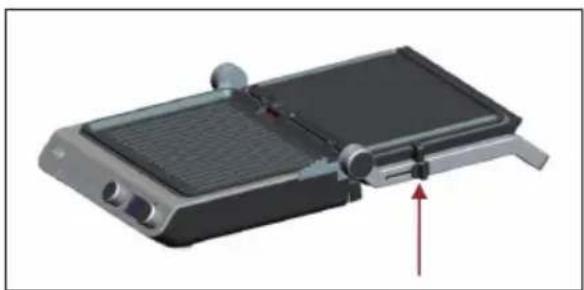
8 To open the grill into BBQ mode: Ensure the grill has completely preheated and the LCD screen displays HEATING no longer flashes. Ensure the top cooking plate is closed. The adjustable height control clip, located on the right side of the top plate, should be in the open position. With your left hand, grip the handle. With your right hand, pull the press button, into the BBQ mode position. Continue to pull the clip forward and simultaneously lift the handle to open, then gently lower the top plate into the horizontal BBQ mode position.
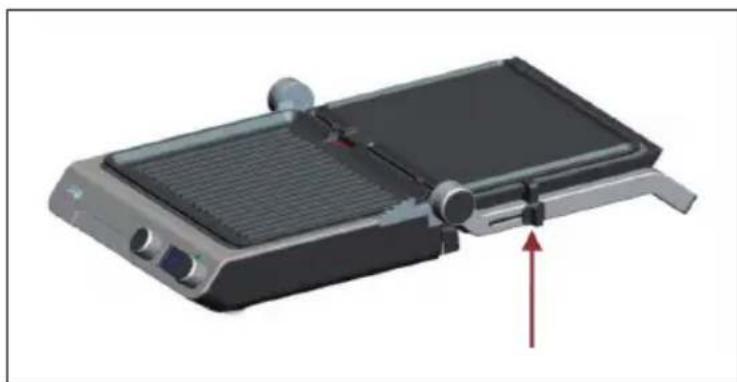
Note: When the top plate is closed, it will automatically return the top plate to the OPEN position. To unlock the top plate, pull the press button and into the OPEN position. When using the grill in BBQ mode, continue to pull the clip forward and simultaneously lift and lower the handle. When using the grill as a contact grill or sandwich press, release the clip and simultaneously lift the handle.
9 Place food on either or both of the cooking plates. Refer to grilling tips and recipes.
10 The grill features an optional countdown timer which monitors the time elapsed during cooking. To activate the count-down timer: Ensure the grill has completely preheated, the LCD screen on longer displays HEATING and food has been placed on the cooking plates. Turn the timer dial to adjust the time in one minute increments up to 30 minutes. Rotate the dial clockwise to increase the time, or counterclockwise to reduce the time. The LCD screen will display the selected time. Press the button within the timer dial once, to activate the setting. The LCD screen will display a countdown indicator and the time will begin to count down.
Note: The count-down timer can be stopped or paused at any time by pressing the button within the Timer Dial a second time. The LCD screen will no longer display the count-down indicator. However, the grill will not turn off, it will remain heating.
11 Once the selected time has elapsed, the grill alert will sound. The LCD screen will display a blinking '00' then the default '0' zero time. However, the grill will not turn off. It will remain heating, maintaining the selected temperature, ready for the next cooking cycle.
Note: The cooking and heating cycle can be stopped at any time by turning the Temperature Dial to the OFF position. The LCD screen will display OFF, the default '0' zero time and cease to illuminate after 3 minutes. Allow the grill to cool completely and disconnect from the wall outlet.
12 When the food is cooked, remove from the cooking plates using heat proof plastic or wooden utensils.
Note: Never use metal or sharp utensils as these can cause damage to the non-stick coating of the cooking plates.
Use as a Contact Grill or Panini Press
1 Ensure the drip tray is correctly inserted into the grill.
2 Ensure the cooking plates are correctly inserted and securely locked into position.
3 Place the grill on a flat, dry surface. Ensure there is a minimum distance of 8 inches (20cm) of space both sides of the appliance.
4 Unwind the power cord completely and insert the power plug into a grounded wall outlet.
5 The grill alert will sound and the LCD screen will display OFF and the default '0' zero time.
6 To preheat the grill: Ensure the top plate of the grill is closed. This will ensure faster, more efficient preheating. Turn the temperature dial to adjust the temperature. Rotate the dial (Low: 160 - 180^ , Panini: 180 - 205^ , Sear: 205 - 230^ ) or select and alternative temperature. The grill will start to heat and the LCD screen will illuminate orange and display the selected temperature, HEATING and the default '0' zero time. Allow the grill to preheat.

7 Once the grill has preheated to the selected temperature, the grill alert will sound and HEATING will no longer flashes. The LCD screen will display the selected temperature and the default '0' zero time.
8 To open the grill: Ensure the grill has completely preheated and the LCD screen no longer displays HEATING. Ensure the top cooking plate is closed. The Adjustable Height Control clip, located on the right side of the top plate, should be in the OPEN position. Use the handle to open the top plate to a 90 degree position.
9 Place food on the bottom cooking plate.
10 The grill features an optional countdown timer which monitors the time elapsed during cooking. To activate the count-down timer: Ensure the grill has completely preheated, the LCD screen on longer displays HEATING and food has been placed on the cooking plates. Turn the timer dial to adjust the time in one minute increments up to 30 minutes. Rotate the dial clockwise to increase the time, or count-clockwise to reduce the time. The LCD screen will display the selected time. Press the button within the timer dial once, to activate the setting. The LCD screen will display a countdown indicator and the time will begin to count down.
Note: The count-down timer can be stopped or paused at any time by pressing the button within the Timer Dial a second time. The LCD screen will no longer display the count-down indicator. However, the grill will not turn off, it will remain heating.
11 Once the selected time has elapsed, the grill alert will sound. The LCD screen will display a blinking '00' then the default '0' zero time. However, the grill will not turn off. It will remain heating, maintaining the selected temperature, ready for the next cooking cycle.
Note: The cooking and heating cycle can be stopped at any time by turning the Temperature Dial to the OFF position. The LCD screen will display OFF, the default '0' zero time and cease to illuminate after 3 minutes. Allow the grill to cool completely and disconnect from the wall outlet.
12 When the food is cooked, remove from the cooking plates using heat proof plastic or wooden utensils.
Note: Never use metal or sharp utensils as these can cause damage to the non-stick coating of the cooking plates.
CARE AND CLEANING
Ensure the grill is turned OFF by turning the Temperature dial to the OFF position. Remove the power plug from the wall outlet. Allow the grill to cool completely before disassembling and cleaning.
- Do not use harsh or abrasive cleaners or pads to clean the product.
After completely cooling, gently remove the Drip Cups and discard contents. - Remove any leftover food from the Grill Plates using the Scaper/Cleaning Tool.
- Clean the Grill Plates, Drip Cups, and Scraper/Cleaning Too in warm, soapy water; rinse and let dry. These parts may also be washed in an automatic dishwasher.
- WARNING: Do not immerse the Base into or expose it to water or other liquids. Wipe the Upper Housing and Base with a water-dampened sponge and dry with a soft cloth or paper towel.
- Store the product in a cool, dry location.
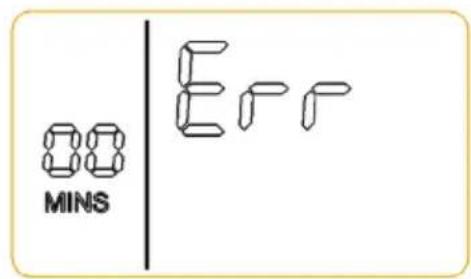
ERROR CODES AND TROUBLESHOOTING
When the LCD screen displays 'Err' (Error mode):
1 Unplug the grill from the wall outlet.
2 Ensure the grill is completely cool.
3 Ensure the cooking plates are correctly and securely inserted into position.
4 Re-insert the plug into the wall outlet.
5 The LCD screen should no longer display 'Err'.
HINTS ON DISPOSAL
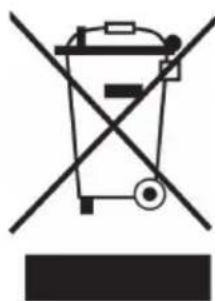
According to the European waste regulation 2012/19/EU this symbol on the product or on its packaging indicates that this product may not be treated as household waste. Instead it should be taken to the appropriate collection point for the recycling of electrical and electronic equipment. By ensuring this product is disposed of correctly, you will help prevent potential negative consequences for the environment and human health, which could otherwise be caused by inappropriate waste handling of this product. For more detailed information about recycling of this product, please contact your local council or your household waste disposal service.
Estimado cliente:
Low: 160 - 180^
Panini: 180 - 205^
Sear: 205-230°C