
ACW624MAT - Warming drawers and cabinets Pelgrim - Free user manual and instructions
Find the device manual for free ACW624MAT Pelgrim in PDF.
| Product type | Warming drawer |
| Brand | Pelgrim |
| Model | ACW624MAT |
| Supply voltage | 220-240 V ~ |
| Frequency | 50 Hz |
| Maximum capacity | 20 kg |
| Temperature range | 30 °C to 70 °C |
| Timer | Yes, minimum duration 10 minutes |
| Heating type | Fan-assisted hot air |
| Front material | Stainless steel |
| Use | Preheating dishes |
| Accessories supplied | 4 screws and 4 wall plugs |
| Maintenance | Clean with sponge, hot water and washing-up liquid; dry with a soft cloth |
| Power cable | H05RNF 3 × 1 mm² |
| Dish capacity (example) | 6 large plates Ø 28 cm, 6 soup plates Ø 22 cm, etc. |
| Installation | Built-in; electrical connection before installation; requires double-pole circuit breaker |
| Protection | Protective grille against contact with heating element and fan |
Frequently Asked Questions - ACW624MAT Pelgrim
User questions about ACW624MAT Pelgrim
0 question about this device. Answer the ones you know or ask your own.
Ask a new question about this device
Download the instructions for your Warming drawers and cabinets in PDF format for free! Find your manual ACW624MAT - Pelgrim and take your electronic device back in hand. On this page are published all the documents necessary for the use of your device. ACW624MAT by Pelgrim.
USER MANUAL ACW624MAT Pelgrim
Manual Warming drawer
Cleaning and maintenance 7
Installation 7
Built in 8
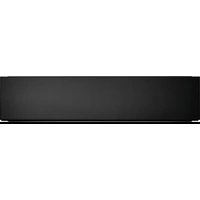
Description
- Timer, stop/start switch
- Signal light on the front showing that power is on
- Temperature control
- Drawer for dishes
Use
Information before use:
- The appliance should be used exclusively to preheat dishes.
- The appliance uses a hot air system to heat the dishes. A fan distributes the heat from the resistor in the drawer. The dishes are heated rapidly and uniformly by circulation of hot air.
- A protective grid prevents the dishes from coming into contact with the resistor or the fan.
Controls:
- The controls include a temperature knob and a Start/Stop switch. These are only visible when the drawer is open.
- When the drawer is closed, the signal light on the front of the drawer comes on when the appliance is running.
Setting the controls:
- Put the dishes in the drawer.
- Select the temperature.
- Set the timer (minimum 10 minutes).
The signal light shows that the power is on. - Close the drawer
- When the timer runs out, the hot air heating system stops and a bell rings.
- To turn the bell off, turn the knob to 0.
Selecting the temperature:
The temperature knob adjusts the temperature between 30 and 70^
The most appropriate temperatures for the types of dishes used are as follows:
- 40^ : for cups or glasses. Hot drinks stay hot long ger when poured into cups or glasses preheated to this temperature, without danger of burns when people drink from them.
- 60^ : for plates and dishes. Food served on prehea ted plates or dishes maintain their heat and the dishes can be touched without burning the hands.
Preheating time:
Preheating time depends on several factors:
- the thickness of the dishes and the material they are made from
the load - disposal of the load
temperature setting
Consequently, we cannot give times that will correspond systematically.
A few hints
For a temperature setting of 60^ , heated evenly:
- dishes for a meal for six take about 30min
- dishes for a meal for twelve take about 40 min.
After using the drawer a few times, you will know for yourself how long it takes to heat your dishes.
Capacity:
- Capacity depends on the height of the model and the weight and size of your dishes.
The model has maximum capacity of 20kg - The following examples are given as an indication only (quantities are determined by volume):
| Dishes for 6: | |
| 6 dinner plates Ø 28 cm | |
| 6 soup plates Ø 22 cm | |
| 1 serving bowl Ø 22 cm | |
| 1 serving bowl Ø 20 cm | |
| 1 serving bowl Ø 18 cm | |
| 2 serving platters 36 cm | |
| or 16 large plates Ø 28 cm | |
| + 8 bowls Ø 10 cm | |
| or 24 soup plates Ø 22 cm | |
| or 40 bowls Ø 10 cm | |
| or 60 cups Ø 8 cm | |
Cleaning and maintenance
- Before any maintenance, turn off the appliance and let it cool.
- Clean all surfaces with a sponge, dish washing soap and warm water. Then dry it off with a soft cloth.
- Do not steam clean the appliance.
- The use of scouring powders, alcohol or grease-cutting products is not recommended - they could damage the appliance.
- The stainless steel front can be scratched. Use a special non-abrasive cleanser for stainless steel.
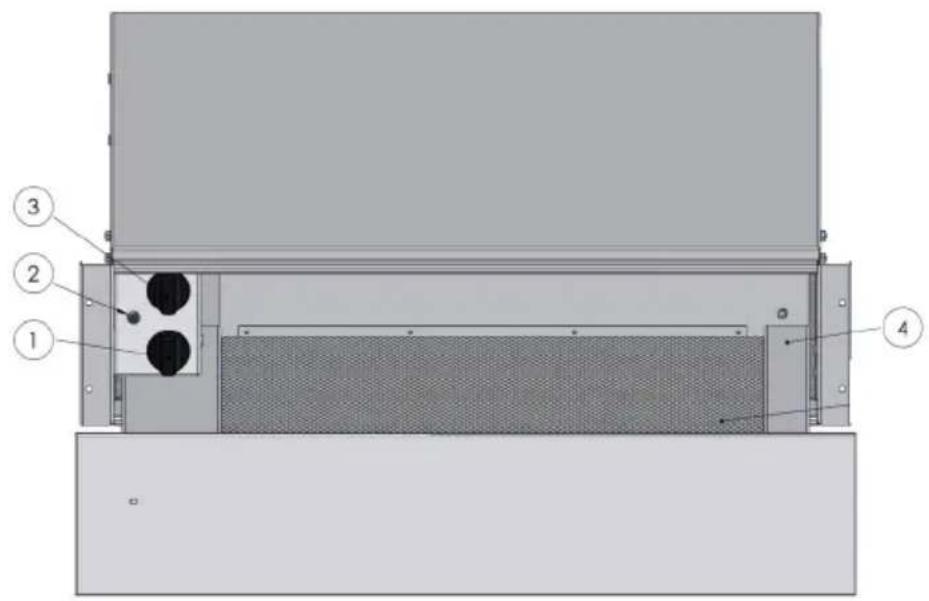
Installation

Before connecting the appliance to the power supply, check that the wires of your electric installation have sufficient diameter to supply power to the appliance during normal use. The fuse for the installation should be 10 amps.
- It is necessary to provide a bipolar cut-off device in the power supply circuit, with an open contact gap of more than 3mm .
- The electric connection should be done before the appliance is set in the cabinet.
- The drawer should be connected by a (standard) power cord with three 1mm^2 wires (1 single phase + 1 N + ground) to the 220-240 V single phase power supply via an electric circuit corresponding to the CEI 60083 standard or complying with the installation rules. The protective wire (green/yellow) corresponds to ground on the appliance and should be connected to the ground of the installation.
- In the case of a connection via an electric outlet, the outlet should be accessible even with the appliance installed. The neutral on the heating drawer (blue wire) should be connected to neutral on the power supply.
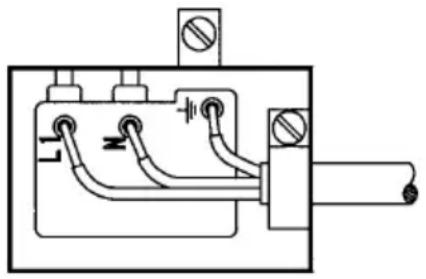
Built in
- Set the appliance into the niche in the cabinet. Make certain that the body of the appliance is positioned correctly.
- Open the drawer and fasten the appliance to the sides of the cabinet with 4 screws and the 4 spacers delivered with the appliance.


Brand : Pelgrim
Model : ACW624MAT
Category : Warming drawers and cabinets