
KA 4565 - Coffee maker SEVERIN - Free user manual and instructions
Find the device manual for free KA 4565 SEVERIN in PDF.

| Product type | Pod coffee maker with milk frother |
| Brand | Severin |
| Model | KA 4565 |
| Category | Coffee maker |
| Water tank capacity | 900 ml (max) |
| Coffee type | Soft round pods |
| Functions | Coffee, milk froth, hot milk, mixed drinks (cappuccino, café au lait, latte macchiato) |
| Quantity adjustment | Customizable for each drink |
| Display | LED for preparation, fault and descaling |
| Power supply voltage | 230 V ~ 50 Hz (estimated) |
| Manufacturer warranty | 2 years |
| Included accessories | Water tank, height-adjustable drip catcher, drip tray, pod filter holder, milk filter holder (nozzle, valve, tube) |
| Maintenance | Hand wash removable parts, regular descaling with suitable product |
| Safety | Shutdown in case of malfunction, burn protection, automatic stop at end of cycle |
| After-sales service | Severin contact details in the manual |
Frequently Asked Questions - KA 4565 SEVERIN
User questions about KA 4565 SEVERIN
0 question about this device. Answer the ones you know or ask your own.
Ask a new question about this device
Download the instructions for your Coffee maker in PDF format for free! Find your manual KA 4565 - SEVERIN and take your electronic device back in hand. On this page are published all the documents necessary for the use of your device. KA 4565 by SEVERIN.
USER MANUAL KA 4565 SEVERIN
natural_image
White SEVERIN coffee maker with open lid and white cup on base, no visible text or symbols on device bodyPadautomat mit
Milchschaum
Gebrauchsanweisung
Pad machine with
milk froth
Instructions for use
natural_image
3D rendered image of a mechanical component with a circular top and mesh grille (no text or symbols)natural_image
Illustration of a coffee machine with a cup and a box, no text or symbols present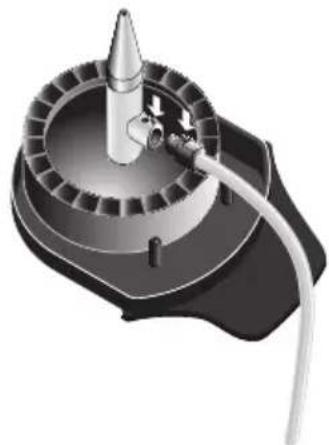
natural_image
3D rendering of a mechanical device with a conical tip and central shaft, no visible text or symbolsnatural_image
Illustration of a coffee maker using a cup and a carton (no text or symbols)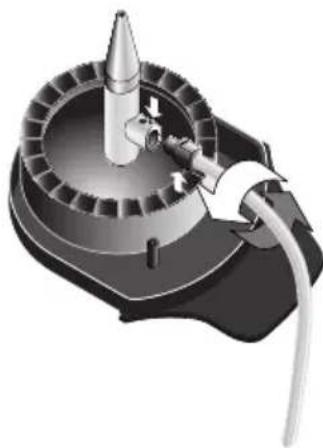
natural_image
3D rendering of a mechanical device with a conical tip and attached cable (no visible text or symbols)natural_image
Black control panel with icons for coffee cup, warning triangle, and circular button (no text or symbols)Zubereitung (H.1)
natural_image
Technical illustration of a mechanical component with two views and a tool inserted (no text or symbols)5.2 Entkalken
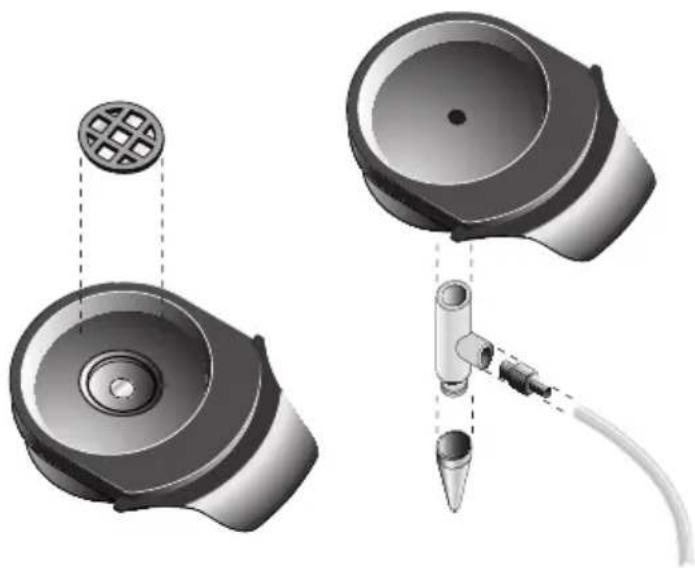
Overview (Delivery contents)
Before carrying on reading, please fold open the page at the beginning of these instructions for use that contains an image of the appliance.
A Brewing unit
B Bracket closure
Strainer support (removable)
C for coffee pads
D for milk or milk froth
D.1 Milk pipe
D.2 Valve
D.3 Tube
F Drip tray for height adjustment
G Drainage grille
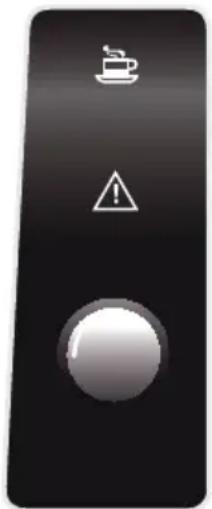
H Control and display elements
H.1 Preparation

H.2 Error

H.3 Start/Stop button

I Housing
K Connection cable with mains plug
L Water reservoir
Dear customer
Important: Please read carefully these instructions for use before starting your machine and keep this instruction.
Table of contents
- Safety information
- Initial start-up
- Preparation of beverages
3.1 Coffee pads
Adjusting the beverage quantity
3.2 Milk froth
Adjusting the milk froth quantity
3.3 Hot milk
Adjusting the milk quantity
3.4 Mix drinks
3.5 Beverage quantity overview - Display and control elements
- Cleaning, care and maintenance
5.1 Cleaning the strainer support
5.2 Descaling
5.3 Resetting to factory settings
5.4 Disposal - Fault ending and troubleshooting
- Guarantee
- Customer service
- Software license
1. Safety information
Risk of electric shock!
Before every start-up, the entire appliance including all accessories must be inspected for defects that might impair functional safety of the device. In the event that the appliance has, for instance, been dropped onto a hard surface, damage might have occurred that is not visible from the outside. In such a case the appliance must not be used.
- Inspect the connection line (K) for damage on a regular basis. In case of existing damage the appliance must not be used any longer.
Important: Please disconnect the appliance from the mains supply if it is not in use, in case of faults during operation and before every cleaning process.
- Do not disconnect the appliance from the mains supply by pulling the cable; but by grasping the plug.
- Please ensure that both the housing and the connection line are not placed in close proximity of a hot plate or open fire. The same is applicable for liquids and humidity.
- Repairs and maintenance operations at electric appliances must be carried out by qualified personnel in order to prevent any risks for health and safety and in order to comply with safety regulations. The same is applicable for replacement of the connection line. For this reason, in case of repair send the appliance to our customer service department. The address list is enclosed in the section "Customer service" on the last pages of this instructions document.
Danger of scalding!
Do not touch any hot parts during and after the brewing process or during the frothing of the milk. The brewing unit (A), the strainer support (C or D) and the coffee pads are hot. During the frothing of the milk hot steam comes out. Please note that the prepared beverages are also very hot.
- Do not open the bracket closure (B) as long as the pump is still in operation and the brewing process is not completed, since the appliance is under pressure. After the brewing process, please wait until the display elements (H.1 and H.2) stop flashing and an acoustic signal is generated.
-
For reasons of hygiene, completely remove the respective strainer support (C or D) with its contents after every brewing process. Leave the bracket closure (B) open.
-
This appliance is not intended for use by any person (including children) with reduced physical, sensory or mental capabilities, or lacking experience and knowledge, unless they have been given supervision or instruction concerning the use of the appliance by a person responsible for their safety.
- Children should be supervised to ensure that they do not play with the appliance.
- Keep packaging out of reach of children. There is danger of suffocation, among others!
Material damage!
- Position the appliance on an even, horizontal surface that is not water-sensitive.
- Only fill the water reservoir (L) with cold, clean water (without gas). Never fill with milk, coffee or hot water.
- Do not remove the water tank (L) during the brewing process in order to prevent malfunctions and defects.
Intended use
- In case of incorrect use or misuse of the appliance, responsibility shall not be assumed for any potential damage.
This appliance is intended for domestic use only, and not for commercial applications.
2. Initial start-up
Before initial use the following advice list must be observed:
– Rinse all strainer supports with running warm water.
- Plug in the connection line with mains plug (K) to the mains supply.
- Remove the water reservoir (L) and rinse thoroughly with water and fill with fresh, cold water up to the mark MAX (approx. 900 ml).
- Place the water reservoir (L) straight onto its support and press it downwards completely so that the valve in the bottom of the reservoir is opened.
- Place a cup with a minimum capacity of 150 ml onto the drainage grille (G).
- Open brewing unit (A). For this purpose, fully fold the bracket closure (B) upwards.
- Then take the strainer support for coffee pads (C) and place it into the brewing unit.
- Then close the brewing unit (A) by firmly pressing the bracket closure (B) downwards.
- Now press shortly the Start/Stop button (H.3) 📄. The display element 📋 (H.1) is flashing. After a short heat-up phase the cleaning process is started and the cup is filled with water.
Important: After the display element (H.1) has extinguished and an acoustic signal has been emitted the cup must be emptied and step 4 must be repeated. Then, the appliance is ready for operation.
3. Preparation of beverages
The appliance is ready for operation as soon as it is connected to the mains supply. All display elements are off.
Danger of scalding!
During the frothing of the milk hot steam comes out. After preparation of beverages remove the strainer support (C or D) from the brewing unit (A) by merely holding it at the handle, since the support itself and the coffee pad are hot.
Important: Please check if sufficient fresh, cold water (without gas) is in the water reservoir (L). Please change water on a daily basis. Insert the drainage grille (G) with or without drip tray (F), depending on the size of the cup. Do not remove the water reservoir (L) during the brewing process.
Important: The brewing process can be terminated any time by pressing again the Start/Stop button (H.3) 🔍.
Note: Please remember to empty and clean the strainer support (C or D) after use. Dispose biodegradable components with your organic waste.
3.1 Coffee pads

natural_image
3D rendered image of a mechanical component with a circular top and mesh grille (no text or symbols)- Place a coffee pad into the centre of the strainer support (C).
Note: Only use commercially available round soft coffee pads. If the coffee pad is slightly bulged on one side, place the pad into the strainer support with the bulged side facing downwards. Never fill coffee powder into the strainer support for coffee pads.
-
Now, open brewing unit (A). For this purpose, fully fold open the bracket closure (B) and insert the strainer support. When inserting the components into the brewing group (A), make sure the paper edge of the coffee pad is not placed below the gasket.
-
Close the brewing unit (A) by firmly pressing the bracket closure (B) downwards.
-
Place a suitable coffee cup onto the drainage grille (G).
-
Now press shortly the Start/Stop button (H.3) 📄. The preparation process is started (display element (H.1) 📋 flashing). After a short heat-up phase the cup is filled with coffee.
-
Please wait until your appliance has completed the follow-up time, i.e. the display element (H.1) 📋 stops flashing. A short acoustic signal is generated.
-
Then, remove your cup, fold the bracket closure upwards and remove the strainer support from the appliance for cleaning.
-
Ready! Enjoy your coffee.
Adjusting the beverage quantity
When the brewing process is started, press and hold the Start/Stop button until the desired beverage quantity is reached. The display element (H.1) 📄 is lit during this process. When you release the Start/Stop button (H.3) 🕒 the respective beverage quantity will be memorised.
Note: After having released the Start/Stop button (H.3) a little quantity of coffee will still come out.
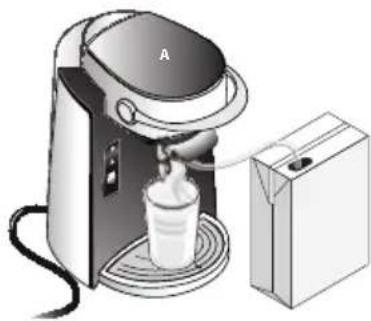
3.2 Milk froth
natural_image
Illustration of a coffee maker with a cup and a carton beside it (no text or symbols)
natural_image
3D rendering of a mechanical device with a conical tip and central shaft, no visible text or symbolsAdvice: The milk should be well cooled. Warm milk is not good for frothing. Use - as you like - milk with a fat content of up to 3.5%.
Important: Please clean the strainer support for the milk (D) carefully after every use in order to avoid the formation of milk bacteria and to ensure the function of the strainer support.
-
Assemble the strainer support for the milk (D).
-
Put the milk pipe (D.1) into the strainer support (D).
-
Put the valve (D.2) with the tube into the milk pipe (D.1).
-
☐ Note: To generate milk froth, the valve (D.2) must be open, see figure. The nose at the milk pipe (D.1) must fit with the nose at the valve (D.2).
- Now, open brewing unit (A). For this purpose, fully fold open the bracket closure (B) and insert the strainer support (D).
- Close the brewing unit (A) by firmly pressing the bracket closure (B) downwards.
- Put a high glass, a mug or another suitable container onto the drainage grille (G) and plunge the tube (D.3) into the milk container.
- Now press shortly the Start/Stop button (H.3). The preparation process is started (display element (H.1) is flashing). After a short heat-up phase the cup is filled with milk froth.
- Please wait until your appliance has completed the follow-up time, i.e. the display element (H.1) 📋 stops flashing. A short acoustic signal is generated.
- Then, remove your cup, fold the bracket closure upwards and remove the strainer support from the appliance for cleaning.
- Ready! Now enjoy your milk froth or use it to prepare different types of mix drinks.
■ Advice: For an easier cleaning submerge the tube (D.3) directly after preparation into a container with hot water. Put a suitable container under the outlet. Then start the operation by pressing the Start/Stop key (H.3) Thus, the strainer support for milk is cleaned quickly and simply.
Adjusting milk froth quantity
When the frothing process is started, please press and hold the Start/Stop button (H.3) 📋 until the desired quantity of milk froth is reached. The display element (H.1) 🌐 lit during this process. When you release the Start/Stop button (H.3) 🏠 the respective milk froth quantity will be memorised.
Note: After having released the Start/Stop button (H.3) there will still be coming out a little quantity of milk froth.
Note: If you change the milk froth quantity, the setting for the milk quantity with hot milk will change too, since the same strainer support is used.
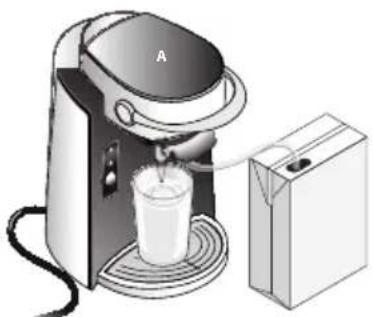
3.3 Hot milk
natural_image
Illustration of a coffee maker using a cup and a carton (no text or symbols)
natural_image
3D rendering of a mechanical device with a conical tip and attached cable (no visible text or symbols)■ Advice: Use – as you like – milk with a fat content of up to 3.5%.
Important: Please clean the strainer support for the milk (D) carefully after every use in order to avoid the formation of milk bacteria and to ensure the function of the strainer support.
- Assemble the strainer support for milk (D).
- Put the milk pipe (D.1) into the strainer support (D).
- Put the valve (D.2) with the tube into the milk pipe (D.1).
- Put the milk pipe (D.1) into the strainer support (D).
- Put the valve (D.2) with the tube into the milk pipe (D.1).
- ☐ Note: To heat up the milk, the valve (D.2) must be closed, see figure. The nose at the milk pipe (D.1) must be offset by 180^ with the nose at the valve (D.2).
- Now, open brewing unit (A). For this purpose, fully fold open the bracket closure (B) and insert the strainer support (D).
- Close the brewing unit (A) by firmly pressing the bracket closure (B) downwards.
- Put a high glass, a coffee mug or another suitable container onto the drainage grille (G) and plunge the tube (D.3) into the milk container.
- Now press shortly the Start/Stop button (H.3). The preparation process is started (display element (H.1) flashing). After a short heat-up phase the cup is filled with hot milk.
-
☐ Note: To heat up the milk, the valve (D.2) must be closed, see figure. The nose at the milk pipe (D.1) must be offset by 180^ with the nose at the valve (D.2).
-
Now, open brewing unit (A). For this purpose, fully fold open the bracket closure (B) and insert the strainer support (D).
-
Close the brewing unit (A) by firmly pressing the bracket closure (B) downwards.
-
Put a high glass, a coffee mug or another suitable container onto the drainage grille (G) and plunge the tube (D.3) into the milk container.
-
Now press shortly the Start/Stop button (H.3). The preparation process is started (display element (H.1) flashing). After a short heat-up phase the cup is filled with hot milk.
©
3.4 Mix drinks
■ Advice for preparing the most common mix drinks like cappuccino, coffee with milk and latte macchiato.
Cappuccino
Cappuccino is made from a little quantity of coffee filled up with milk and frothed milk. Usually, cappuccino is served in 150 to 180ml cups. Brew coffee in the cup and prepare the milk froth in another appropriate container (for ex. a jug). Then fill the coffee up with milk and milk froth. As you like, decorate the cappuccino with cocoa powder.
Coffee with milk
Milk coffee is made from coffee and hot milk in equal parts and is served in a milk coffee bowl. Therefore, coffee and milk can be prepared one after the other.
Latte Macchiato
Latte macchiato is a version of a coffee with milk and is made from hot milk, coffee and frothed milk. It is served in a high glass. First prepare the milk froth in the high glass. Then brew the desired quantity of coffee directly into the glass. Usually, you use a smaller quantity of coffee than for a normal cup of coffee. As you like, decorate the latte macchiato with cocoa powder.
3.5 Beverage quantity
| Min. Max. Factory settings | |||
| Coffee approx. 90ml approx. 225ml approx. 125ml | |||
| Milk froth approx. 100ml approx. 275ml approx. 200ml | |||
| Hot milk approx. 90ml approx. 225ml approx. 180ml | |||
Note: These values are indicative and can vary depending on the type of coffee pad, the protein proportion and the temperature of the milk and the ambient conditions. Particularly the quantity of milk froth can vary considerably.
4. Display and control elements
4.1 Display elements
natural_image
Black control panel with white icons for coffee cup, warning triangle, and circular button (no text or symbols)Preparation (H.1)
– Flashes during preparation process
- Flashes fast during the preparation process if the appliance needs to be descaled
– Flashes during descaling process
- Is lit during adjusting of the beverage quantity, see section "3. Preparation of beverages"
Error (H.2)
- Flashes in case of error/fault, see section "6. Fault finding and troubleshooting"
– Flashes during descaling process
4.2 Control element
Start/Stop button (H.3)
- Brewing process is started by pressing this button
- Brewing process is terminated by pressing the button again
- In case of an error/fault, troubleshooting function is activated by pressing the button
- By pressing permanently this button with the strainer support inserted you set the desired quantity of beverage/milk froth or milk during the preparation process, see section "3. Preparation of beverages"
- By pressing and holding without the strainer support inserted the "descaling" mode is activated, see section "5. Cleaning, care and maintenance"
Note: By means of the Start/Stop button 📄 you can also restore the factory settings, see section "5. Cleaning, care and maintenance"
5. Cleaning, care and maintenance
Important: Before cleaning the appliance disconnect from mains supply and leave it to cool.
⚠️ Please note: Do not clean the individual components in the dishwasher!
For reasons of electrical safety, the appliance must not be cleaned with nor immersed in liquids.
Do not use aggressive or abrasive cleaning agents.
The housing must only be wiped with a damp cloth and, if applicable, with washing-up liquid.
5.1 Cleaning the strainer support
Clean disassembled strainer supports (C or D), water reservoir (L), drainage grille (G) and drip tray (F) in dishwater. Then rinse with fresh water and dry.
Advice: For an easier cleaning submerge the tube (D.3) directly after preparation into a container with hot water. Put a suitable container under the outlet. Then start the operation by pressing the Start/Stop key (H.3) Thus, the strainer support for milk is cleaned quickly and simply.
natural_image
Technical illustration of a mechanical component with two views and a tool inserted (no text or symbols)5.2 Descaling
If the display element (H.1) crashes quickly during the preparation process, the appliance requires descaling.
Commercially available products for descaling of coffee makers are suitable for this purpose. Prepare a batch of 900ml of the descaling liquid in accordance with the instructions of the manufacturer of the descaling agent.
Important: Do not use vinegar or descaling agents on the basis of acetic acid as there is a risk of damaging the appliance, e.g. at the gaskets!
⚠️ Please note: The safety information of the manufacturer of the descaling agent must be observed. Do not pour the descaling agents into enamelled sinks.
- Fill the descaling liquid into the water reservoir (L) up to the mark MAX (approx. 900ml).
- Open brewing unit (A). For this purpose, fully fold the bracket closure (B) upwards.
- Remove the strainer support from the brewing unit.
- Use a tall container with a capacity of minimum 900ml (e.g. a measuring jug for 1l) and place it onto the drainage grille (G) without the drip tray (F).
- Press the Start/Stop button (H.3) Ⓞ until the display element (H.2) lights up. The descaling process is started and the display element (H.1) starts flashing. The container is filled in intervals until the water reservoir is empty. The appliance will stop between the individual intervals (for approx. 30 seconds).
-
When the water reservoir is empty the display element (H.2) ⚠️ starts flashing. The rinsing process can be started. For this purpose, remove the water reservoir (L), rinse it under running water and fill it up with fresh, cold water up to the mark MAX (approx. 900ml). Empty the used descaling liquid from the tall container and place the container back onto the drainage grille. Now, press the Start/Stop button (H.3) ⚠️The display element (H.2) ⚠️ lights up again and the appliance is rinsed with cold water until the water reservoir is empty.
-
Now the appliance is descaled and ready for operation.
5.3 Resetting to factory settings
Fold the bracket closure (B) of the brewing unit (A) downwards without the strainer support inserted. Press and hold the Start/Stop button (H.3) until both display elements light up. Now the factory settings for the beverage quantity are restored. The Start/Stop button can be released.
5.4 Disposal

Please dispose of unserviceable appliances at the provided public disposal sites.
6. Fault ending and troubleshooting
The table provided below will help you to solve potential problems occurring during operation. In the event that you cannot find a suitable solution for a problem, please contact our customer service department, see section "Customer service" on the last pages of this instructions document.
| Fault Cause Remedy | ||
| The appliance does not operate after pressing the Start/Stop button. | Maybe the appliance is not connected to a power supply. | Please check the connection line with mains plug (K) for correct connection to the mains supply. |
| The display element Error is flashing. | No strainer support inserted. Insert the required strainer support (C or D). Then, press the Start/Stop button. | |
| Bracket closure is open. Close the bracket closure (B). Press the Start/Stop button. | ||
| The water reservoir is empty or not assembled or the water fill level is below the mark MIN. | Please fill the water reservoir (L) appropriately and assemble. Press the Start/Stop button. | |
| The valve at the bottom of the water reservoir is clogged. | Clean the water reservoir, see section "5. Cleaning, care and maintenance". Unblock the valve by slightly pressing against it from underneath. Press the Start/Stop button. | |
| The float used for fill level measurement in the water reservoir is blocked. | Clean water reservoir, see section "5. Cleaning, care and maintenance". Unblock the float by lightly shaking the water reservoir. Press the Start/Stop button. | |
| Water is dripping from the brewing unit. | The bracket closure was not closed properly. | Danger of scalding! Immediately cancel the brewing process by pressing the Start/Stop button and wait until the display element extinguishes. Carefully fold the bracket closure (B) upwards, remove the relevant strainer support (C or D), check for faults/irregularities and reassemble. Close the brewing unit (A) by firmly pressing the bracket closure (B) downwards. |
| The appliance performs the brewing phase, but no beverage is poured. | The strainer support is clogged. Clean the strainer support, see section "5. Cleaning, care and maintenance". | |
| The water reservoir was not assembled properly. | Please check if the water reservoir (L) is assembled properly. | |
| The water reservoir was removed during the brewing process. | Reassemble the water reservoir (L) and continue or repeat brewing process. | |
| The brewing unit cannot be closed. | The strainer support was not closed correctly or was not appropriately assembled into the brewing unit and got entangled. | Fold the bracket closure (B) upwards, remove the strainer support (C or D), check for faults/irregularities and reassemble. |
| The display elementPreparation is flashing during preparation process. | Appliance requires descaling. Descale the appliance according to section "5. Cleaning, care and maintenance". | |
| The beverage quantity is too high or too low. | The beverage quantity was not set appropriately. | Set the desired beverage quantity according to section "3. Preparation of beverages". |
| The water reservoir does not contain sufficient water for preparation of a large beverage quantity. | Please fill the water reservoir (L) appropriately and assemble. | |
| The respective strainer support is clogged. | Clean the respective strainer support according to section "5. Cleaning, care and maintenance". | |
| The quality of the milk froth has deteriorated. | The strainer support for milk froth needs intensive cleaning. | Clean the strainer support according to section "5. Cleaning, care and maintenance". |
| The valve has not been opened appropriately. | The nose at the milk pipe (D.1) must fit with the nose at the valve (D.2), otherwise the valve (D.2) will not open. | |
| After the heat-up phase (cup is flashing) the appliance switches off without performing the brewing process. | The respective strainer support is clogged. | Clean the respective strainer support according to section "5. Cleaning, care and maintenance". |
| Technical fault Contact your competent customer support desk. | ||
| The heat-up phase takes very long. | The appliance has become very hot and must cool. | Please wait until the brewing process is started. If applicable, leave the appliance to cool for a few minutes. |
7. Guarantee
Severin grants a manufacturer's warrantee of 2 years starting with the date of purchase.
Within this period Severin undertakes to remedy and repair any defects in materials and workmanship that considerably impair the functionality of this appliance. Additional claims are excluded.
This guarantee is not applicable for:
Damage that has occurred as a consequence of non-observance of the instructions for use, of inappropriate use or of regular wear and tear; neither does the guarantee cover breakables, such as, glass and plastic items and light bulbs.
In case of interference by the customer or unauthorised third parties the guarantee becomes null and void. If the product fails to operate and needs to be returned, pack it carefully including all components enclosing the reason for return and proof of purchase, then send it directly to Severin-Service, see section "Customer service" on the last pages of this instructions document.
The legal warrantee rights to the seller or possible guarantees offered by the seller shall not be affected.
8. Customer service
You can select your competent customer service department on the last pages of this instructions document.
9. Software license
We at Severin support the development of free software.
We employ free software in development and as integral part of our products. Detailed information, including licence conditions and copyright, is available on our internet sites under http://www.severin.de.
natural_image
3D rendered image of a mechanical component with a circular top and mesh grille (no text or symbols)natural_image
Illustration of a coffee machine with a cup and a box, no text or symbols present
natural_image
Mechanical device with a conical tip and attached tubing (no visible text or symbols)natural_image
Illustration of a coffee maker using a cup and feeding into a box (no text or symbols visible)
natural_image
3D rendering of a mechanical device with a conical component and cable (no visible text or symbols)natural_image
Black rectangular button with white icons including a coffee cup, warning triangle, and circular button (no text or symbols)Préparation (H.1)
Bouton start/stop (H.3)
natural_image
Technical illustration of a mechanical component with two views and a close-up of a tool inserted into a cylindrical part (no text or symbols present)5.2 Détartrage
natural_image
3D rendered image of a mechanical device with a circular top and mesh grille (no text or symbols)natural_image
Illustration of a coffee maker with a cup and a carton beside it (no text or symbols)natural_image
Mechanical device with a conical tip and cylindrical housing, connected by a cable (no visible text or symbols)natural_image
Illustration of a coffee maker with a cup and a carton beside it (no text or symbols)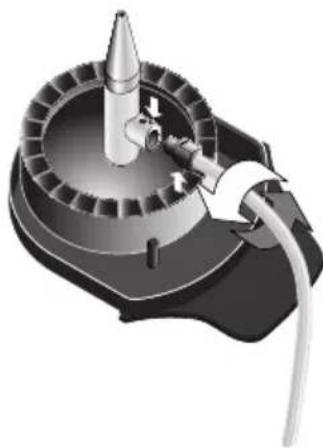
natural_image
3D rendering of a mechanical device with a conical tip and attached cable (no visible text or symbols)natural_image
Black control panel with white icons for coffee cup, warning triangle, and circular button (no text or symbols)Preparación (H.1)
natural_image
Technical illustration of a mechanical component with two views and a tool inserted (no text or symbols)natural_image
3D rendered image of a mechanical component with a circular top and mesh pattern on the side (no text or symbols)natural_image
Illustration of a coffee machine with a cup and a box, no text or symbols present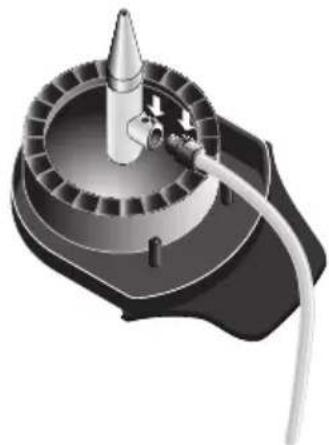
natural_image
Mechanical device with a conical tip and attached tubing (no visible text or symbols)natural_image
Illustration of a coffee maker with a cup and a box, no text or symbols present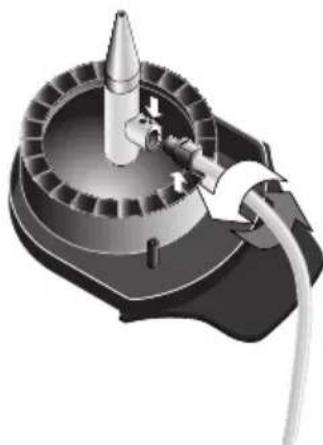
natural_image
3D rendering of a mechanical device with a conical tip and attached cable (no visible text or symbols)natural_image
Black control panel with white icons for coffee cup, warning triangle, and circular button (no text or symbols)Bereiding (H.1)
natural_image
Technical illustration of a mechanical component with two views and a tool inserted (no text or symbols)5.2 Ontkalken
natural_image
3D rendered mechanical component with a circular top and mesh grille (no text or symbols)natural_image
Illustration of a coffee maker with a cup and a carton beside it (no text or symbols)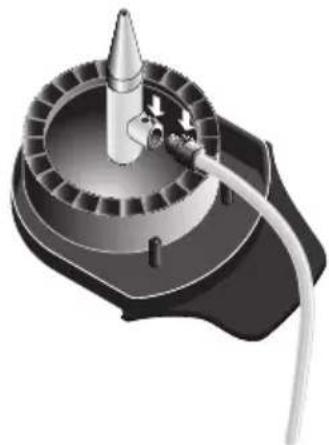
natural_image
Mechanical device with a conical tip and cylindrical housing, connected by a cable (no visible text or symbols)natural_image
Illustration of a coffee maker using a cup on a tray next to a milk cart (no text or symbols visible)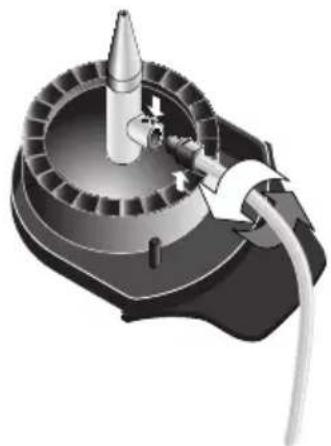
natural_image
3D rendering of a mechanical device with a conical component and cable (no visible text or symbols)natural_image
Black rectangular button with white icons including a coffee cup, warning triangle, and circular button (no text or symbols)Tilberedning (H.1)
natural_image
Technical illustration of a mechanical component with two views and a tool, no visible text or symbols5.2 Afkalkning
Narva: CENTRALSERVICE,
Tallinna 6A, tel: 35 60 708
Haapsalu: Teco KM OÜ, Jalaka 1A, tel: 47 56 900
Philippos Business Center
Agias Anastasias & Laertou, Pilea
Service Post of Thermi
570 01 Thessaloniki, Greece
Tel.: 0030-2310954020
Iran
IRAN-SEVERIN KISH CO. LTD.
No. 668, 7th. Floor
Bahar Tower
Ave. South Bahar
TEHRAN - IRAN
Tel.:009821-77616767
Fax:009821-77616534
Info@iranseverin.com
www.iranseverin.com
Israel
Eatay Agencies
109 Herzel St.
Haifa
Phone: 050-5358648
Email: service@severin.co.il
Italia
via Dino Col 52r-54r-56r,
I - 16149 Genova
Green Number: 800240279
Tel.: 010/6 45 11 02 - 01041 86 09
Fax: 010/6 42 50 09
e-mail: videoelettronica@panet.it
Jordan
F.A. Kettaneh
P.O. Box 485
Amman, 11118, Jordan
Tel: 00962-6-439 8642
e-mail: app@kettaneh.com.jo
Korea
Jung Shin Electronics co., Ltd.
501, Megaventuretower 77-9,
Moonrae-Dong 3ga, Yongdeungpo-Gu
Seoul, Korea
Tel: +82-22-637 3245\~7
Fax: +82-22-637 3244
Service Hotline: 080-001-0190
7th Floor, Cité Dora 3 Building, Dora
P.O.Box 70611
Antelias, Lebanon
Telephone 01 244200, Fax 01 253535
eMail: info@khouryhome.com
Internet: www.khouryhome.com
Luxembourg
Ser-Tec
Sc. 2 Et.1, Ap. 27, Sector 1
Bucuresti
Tel: +40 21 233 41 12,
+ 40 21 233 41 13,
+40 21 688 66 13
Fax: +40 21 233 41 03,
+40 21 688 66 13
E-mail: office@forbrands.ro
Web site: www.forbrands.ro
Schweiz
VB Handels Sàrl GmbH
Postfach 306
1040 Echallens
Tel: 021 881 60 45
Fax 021 881 60 46
mail: severin@helt.ch
Serbia
SMIL doo
Pasiceva 28, Novi Sad
Serbia and Montenegro
tel: +381-21-524-638
tel: +381-21-553-594
fax: +381-21-522-096
Slowak Republic
PREMT,s.r.o.
Skladová 1
917 01 Trnava
Tel: 033/544 7177
Finland
Oy Harry Marcell Ab
Rälssitie 6, PL 63
01511 Vantaa