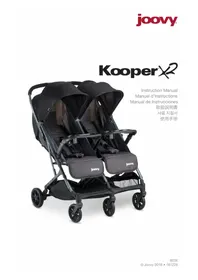
Caboose S - Stroller Joovy - Free user manual and instructions
Find the device manual for free Caboose S Joovy in PDF.
User questions about Caboose S Joovy
0 question about this device. Answer the ones you know or ask your own.
Ask a new question about this device
Download the instructions for your Stroller in PDF format for free! Find your manual Caboose S - Joovy and take your electronic device back in hand. On this page are published all the documents necessary for the use of your device. Caboose S by Joovy.
USER MANUAL Caboose S Joovy
natural_image
Black and white photo of a baby stroller with a canopy, no visible text or symbols on the main body.Caboose S
Instruction Manual
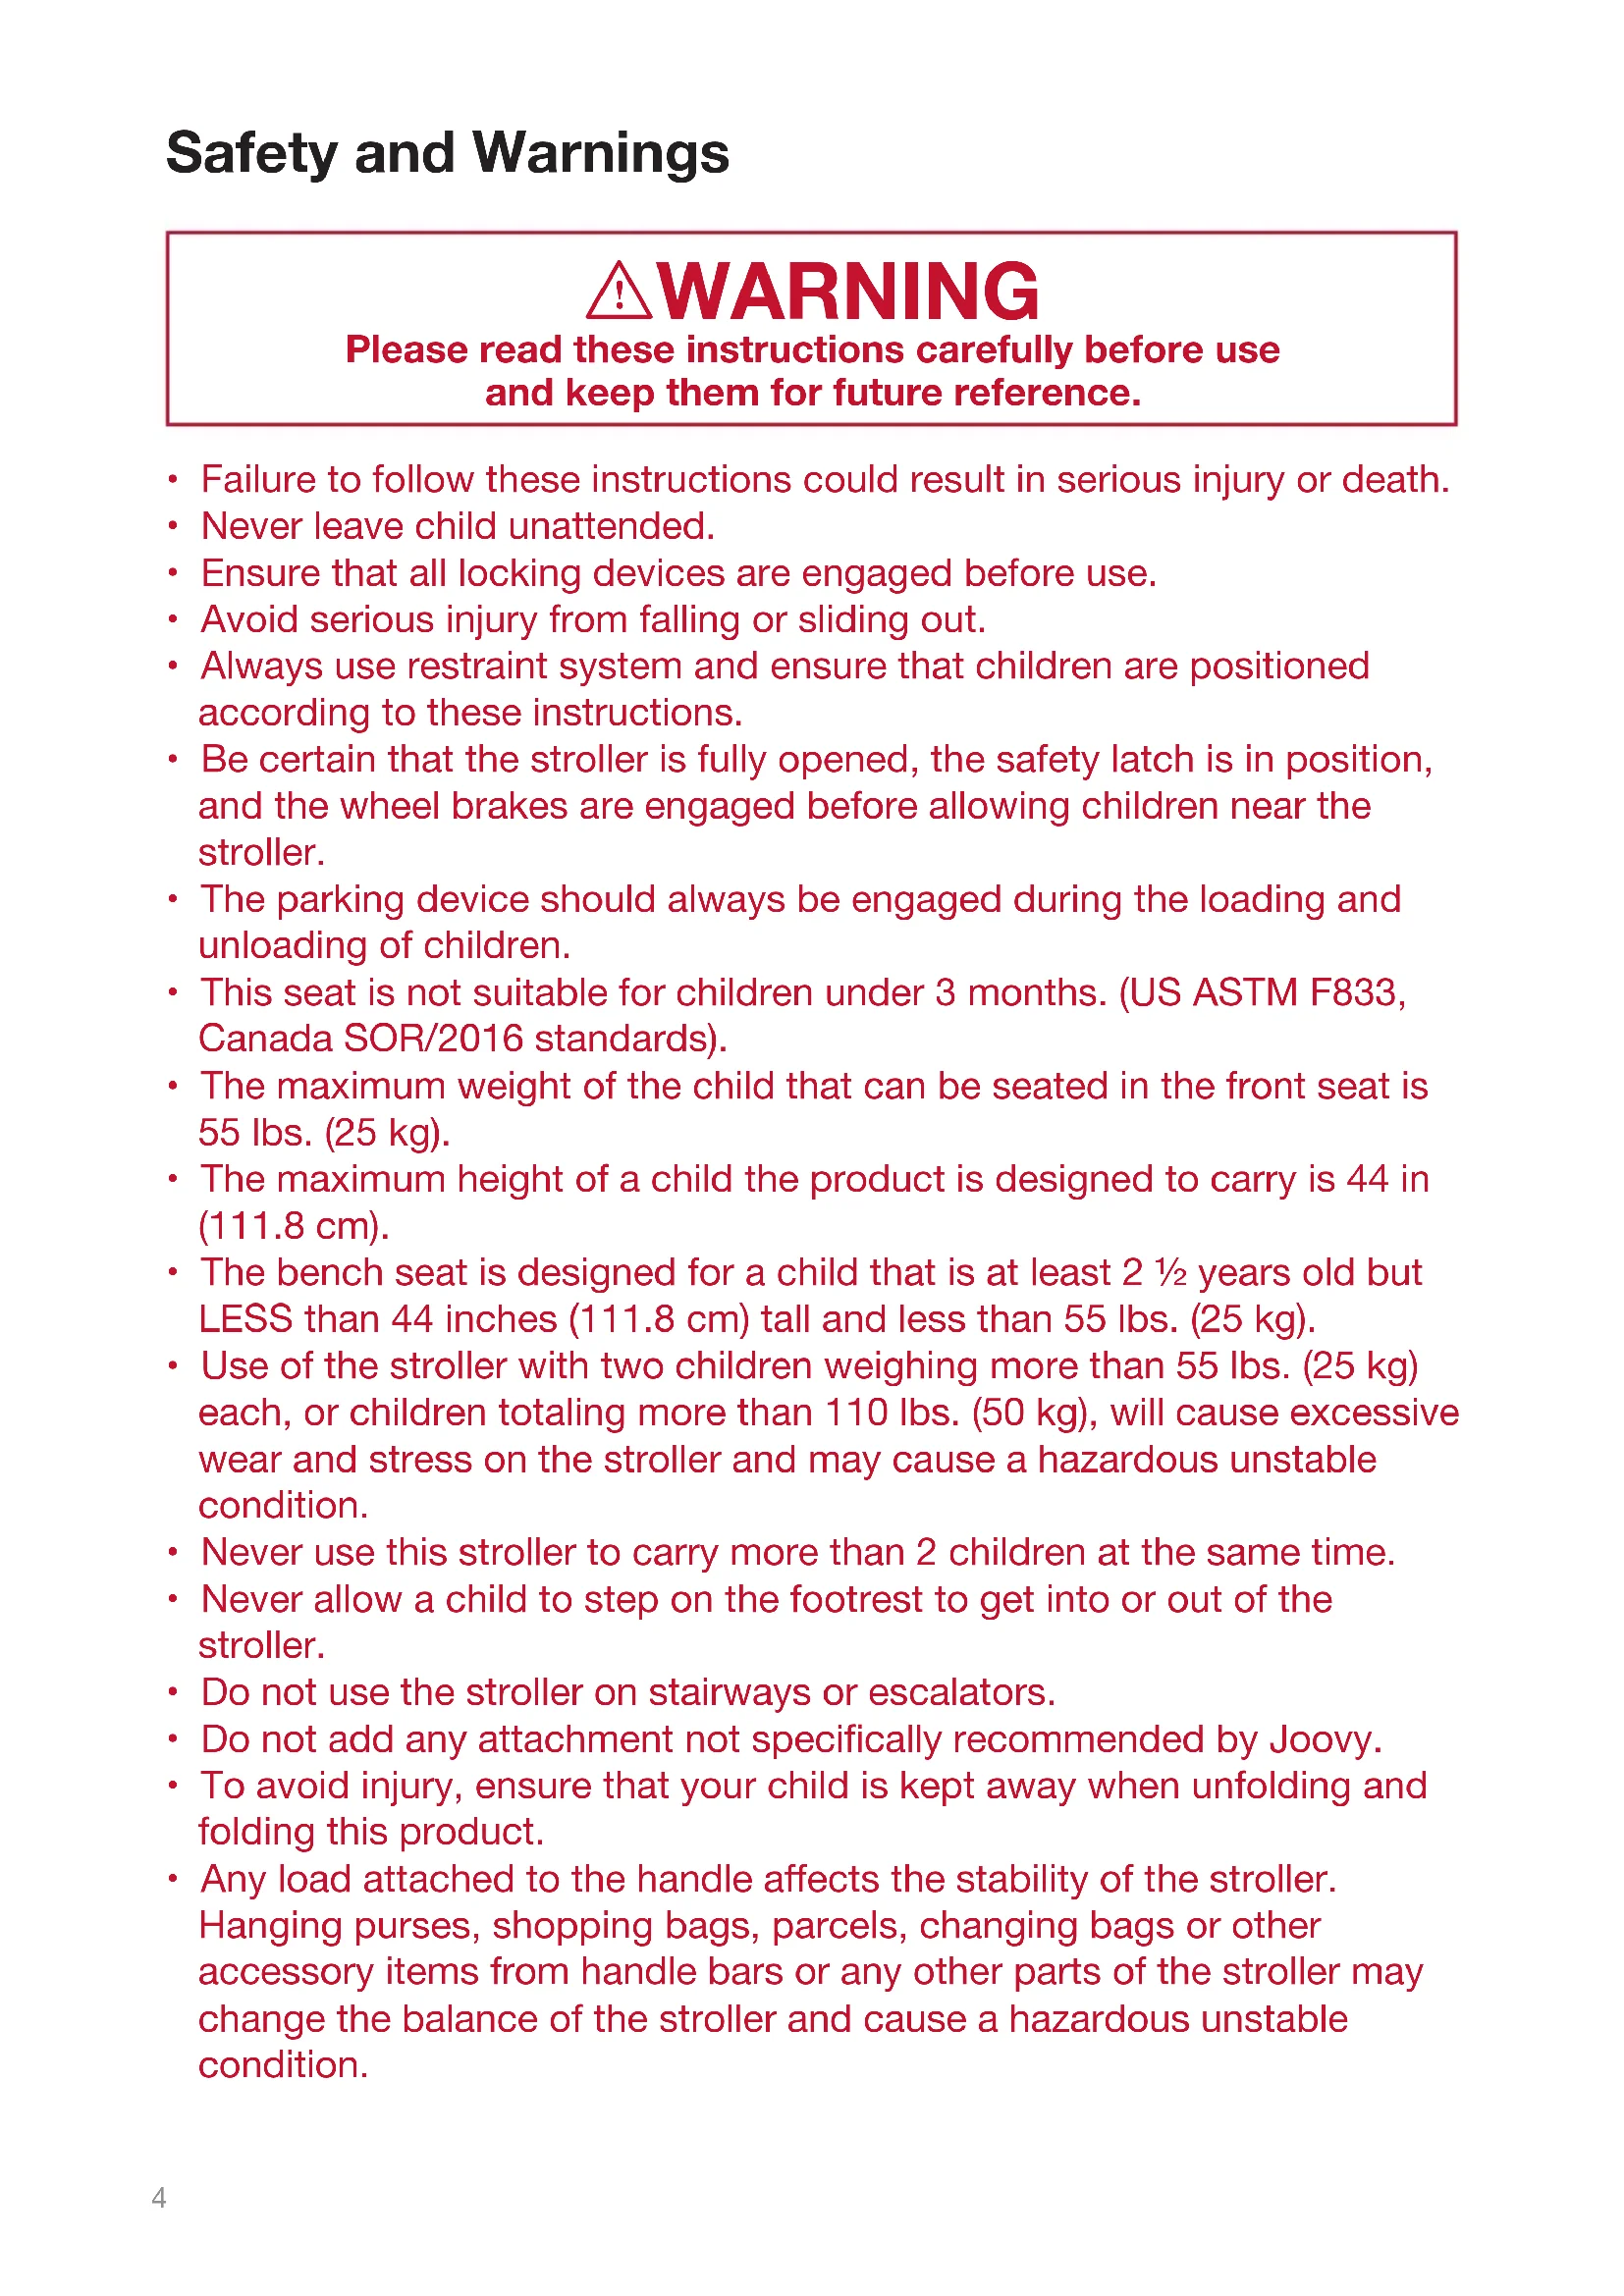
Safety and Warnings 4
Parts List 6
Stroller Assembly 8
Stroller Operation 14
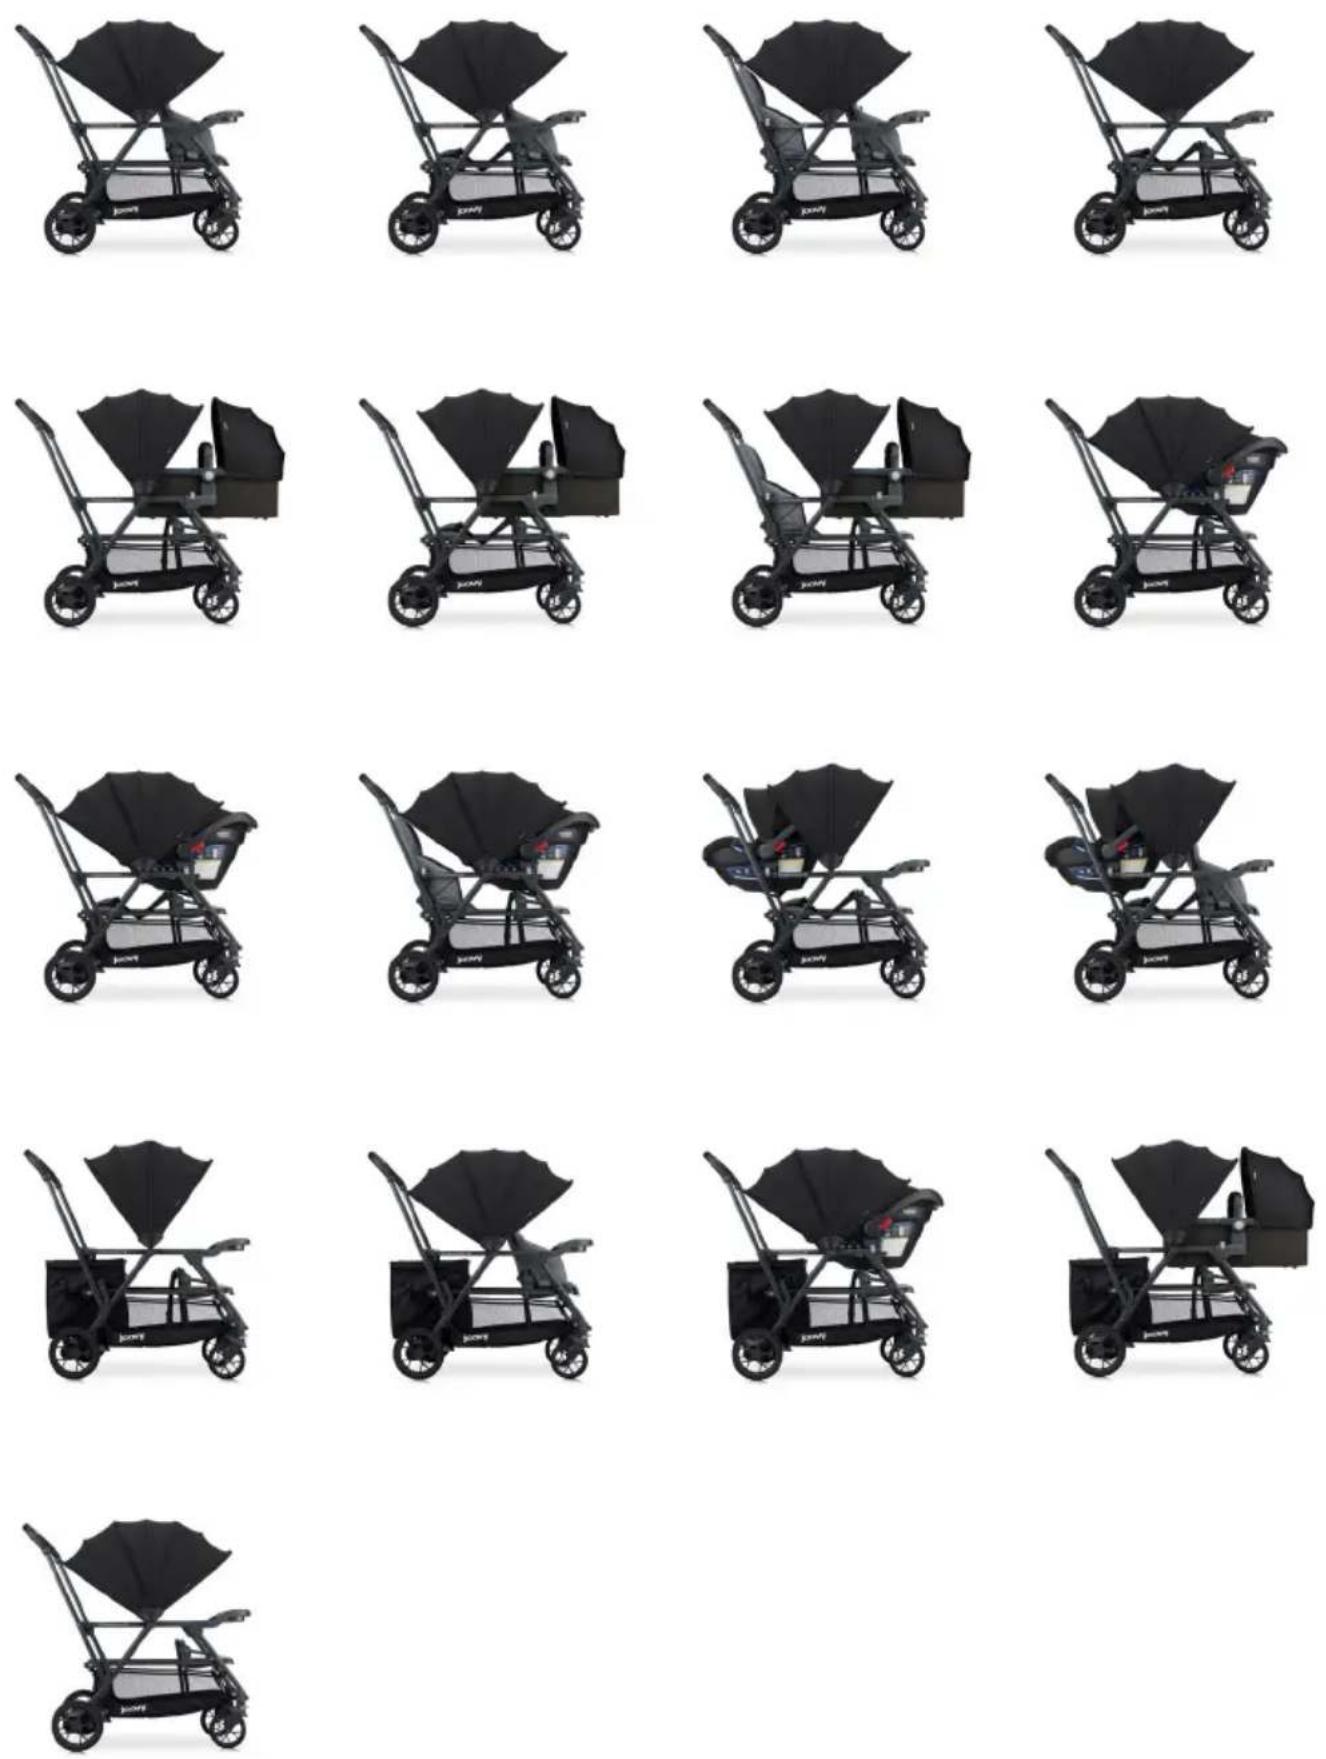
Configurations 25
Optional Accessories 26
Care and Maintenance 48
Customer Service 49
Francais
Please read these instructions carefully before use and keep them for future reference.
- Failure to follow these instructions could result in serious injury or death.
- Never leave child unattended.
- Ensure that all locking devices are engaged before use.
- Avoid serious injury from falling or sliding out.
- Always use restraint system and ensure that children are positioned according to these instructions.
- Be certain that the stroller is fully opened, the safety latch is in position, and the wheel brakes are engaged before allowing children near the stroller.
- The parking device should always be engaged during the loading and unloading of children.
- This seat is not suitable for children under 3 months. (US ASTM F833, Canada SOR/2016 standards).
- The maximum weight of the child that can be seated in the front seat is 55 lbs. (25 kg).
- The maximum height of a child the product is designed to carry is 44 in (111.8 cm).
- The bench seat is designed for a child that is at least 2 12 years old but LESS than 44 inches (111.8 cm) tall and less than 55 lbs. (25 kg).
- Use of the stroller with two children weighing more than 55 lbs. (25 kg) each, or children totaling more than 110 lbs. (50 kg), will cause excessive wear and stress on the stroller and may cause a hazardous unstable condition.
- Never use this stroller to carry more than 2 children at the same time.
- Never allow a child to step on the footrest to get into or out of the stroller.
- Do not use the stroller on stairways or escalators.
- Do not add any attachment not specifically recommended by Joovy.
- To avoid injury, ensure that your child is kept away when unfolding and folding this product.
-
Any load attached to the handle affects the stability of the stroller. Hanging purses, shopping bags, parcels, changing bags or other accessory items from handle bars or any other parts of the stroller may change the balance of the stroller and cause a hazardous unstable condition.
-
The maximum weight that can be carried in the storage basket is 25 lbs. (11.3 kg). Excessive weight may result in a hazardous unstable condition.
- The maximum weight that can be carried in the tray is 2 lbs. (0.9 kg).
- Never allow your stroller to be used as a toy. Do not let your child play with this product.
- Do not let your child play with this product.
- This product is not suitable for running or skating.
- Discard all packaging materials properly. Do not allow children to play with them.
- Check your stroller for loose rivets, snaps, worn parts, and torn material or stitching on a regular basis.
- Discontinue use of the stroller should it malfunction or become damaged.
- CAUTION: While unfolding the stroller, be careful to keep your fingers from being pinched by moving parts.
Please do not return this product to the store.
If you experience any of difficulty with the assembly or use of this product, or if you have a question regarding these instructions, please contact our Customer Service Department (page 49).
Please note: Styles and colors may vary.
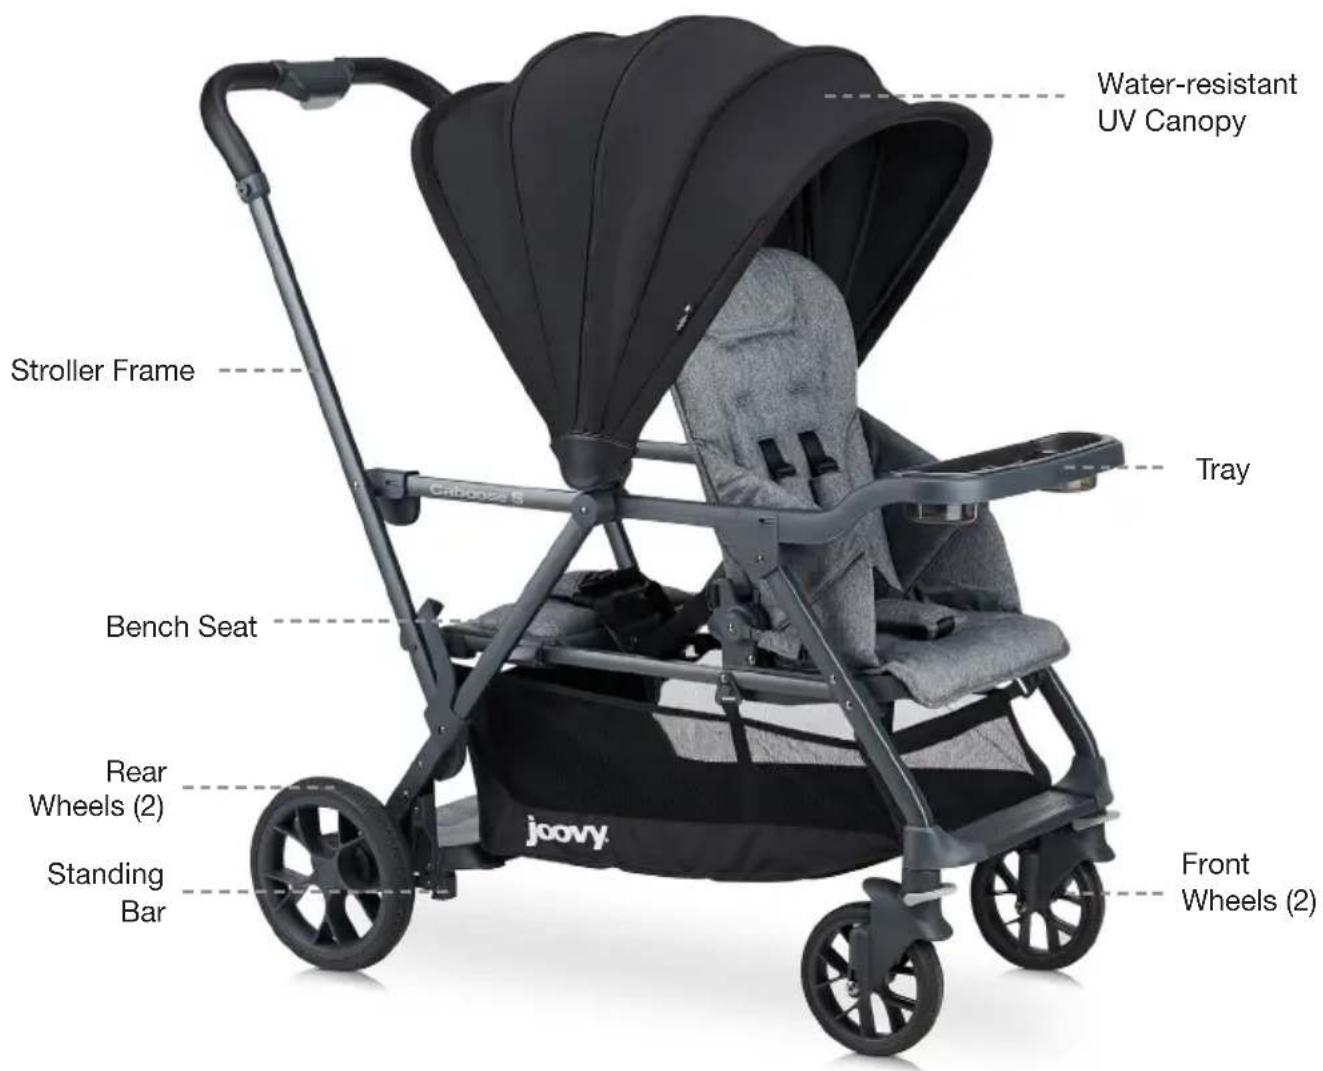
Parts List
text_image
Water-resistant UV Canopy Stroller Frame Tray Bench Seat Rear Wheels (2) Standing Bar Joovy Front Wheels (2)
natural_image
Product assembly of a smart car with visible wheels, seats, and camera module (no text or symbols)Additional Accessories (sold separately)
Customize your ride with a number of optional accessories for added functionality. All accessories are sold separately.
Rear Seat
- 3 recline position
- Removable/machine-washable seat fabric
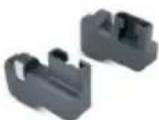
Cup Holder
- Includes clear inner cup
- Removable/dishwasher-safe
- Deep cup holder
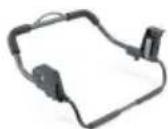
Car Seat Adapters
- Compatibility with 20+ car seats
- Rear-facing
- Click-in installation
- Front and rear positions
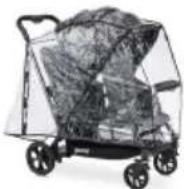
Rain Cover
- Custom fit
- Vented
- All-weather protection
- Easy to install
Parent Organizer
• Large neoprene organizer
• 7 individual compartments; one zippered pocket
- Two Insulated cup holders
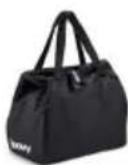
Tote
• Largest tote, 14" deep
- Rear position
- Carries up to 25 lbs.
- Easy click-in installation
- Four interior mesh pockets
- Easily removed and carried as an independent tote
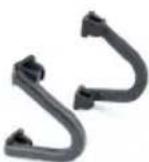
Handles
- Snap on handles
- Front and rear facing adjustment
- Large holding area
- Easy to install
Bassinet Adapters
- Required for bassinet use on front position
Bassinet
• For use in the front position
- Zippered cover
• Ultra-soft interior and mattress pad
• Machine-washable mattress pad cover
- Adjustable ventilated canopy
- Birth to 20 lbs.
• Bassinet Adapters required
Stroller Assembly
⚠ WARNING: Adult assembly is required for this product. No tools required. NOTE: Remove all packing foam from frame assembly to ensure stroller locks in the open position.
Unfolding the Stroller
- Put the stroller upside down with the handlebar on the ground.
- Stand opposite the handlebar facing the light gray brake pedals.
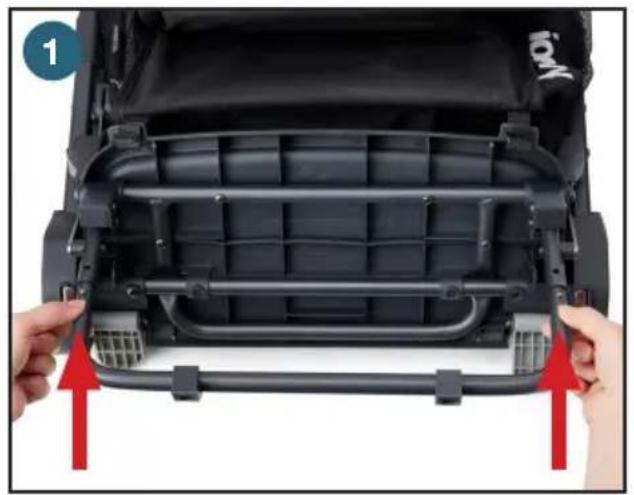
- Insert the standing bar (1) into the rear tubing by sliding both sides at the same time. Depress the spring pins until they click into place.
- Flip the stroller over with the handlebar on top.
- Release the safety latch (located on the right side) by pulling the lock lever away from the frame. (2)
- Pull the handlebar upward while putting one foot on top of the stand-on platform. (3) Keep pulling until the stroller is fully open and the latching mechanism on each side engages. Make sure to hear an audible click. (4)
- Visually check and gently push downward on the handle to ensure that the stroller is completely opened and locked before ANY use of the product.
⚠ WARNING: Keep children away from stroller while unfolding. ALWAYS ensure the folding mechanism on each side of bottom of the handlebar is fully engaged when the stroller is in the opened position. This action will prevent collapse of the stroller. Possible pinching hazard – Be careful when unfolding the stroller.
Installing/Removing the Rear Wheels
- Install a rear wheel by sliding the axle into the hole in the wheel hub until it clicks into place. (5) Repeat for the other wheel. Pull on the wheels to ensure they are installed properly. (6)
- To remove, pull down the metal release button on the rear wheel bracket and pull the wheels from the stroller. (7)
natural_image
Close-up of a car interior showing a black plastic tray and handle assembly, with red arrows indicating movement or adjustment points (no text or symbols visible)
natural_image
Close-up of a hand adjusting a black cable with a red arrow indicating rotation (no text or symbols visible)
natural_image
Person using a Jiovo mini-dot cart with a red arrow indicating motion (no text or symbols on the cart or background)
natural_image
Close-up of a black Joovia robotic platform with visible joints and control panels (no text or symbols)
natural_image
Close-up of a hand adjusting a tire component with a lock, showing the tire being inserted into a vehicle chassis (no text or symbols visible)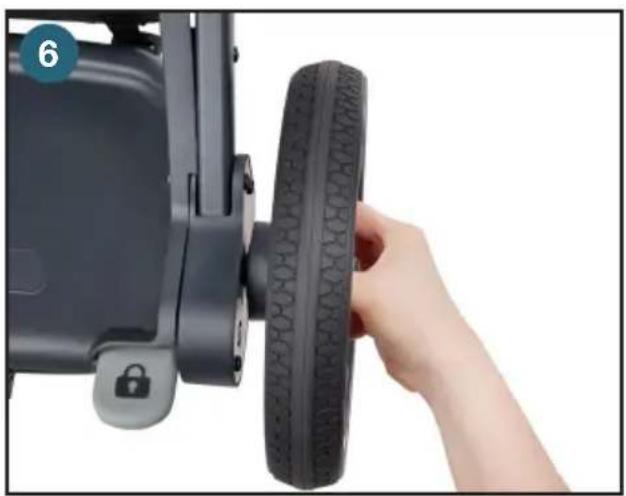
natural_image
Close-up of a hand adjusting a tire on a car chassis, with no visible text or symbols
natural_image
Close-up of hands adjusting a tire component with a red arrow indicating the motion (no text or symbols visible)Installing/Removing the Front Wheels
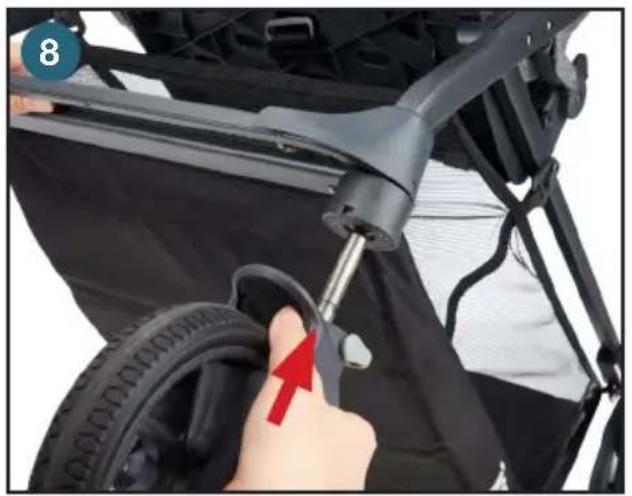
- Slide one front wheel into the front wheel housing until it clicks into place. (8) Repeat for the other wheel. Pull on the wheels to ensure they are installed properly.
• To remove, press the metal release button on the back of the front wheel housing and pull away from the stroller. (9)
natural_image
Close-up of a hand adjusting a tire component with a red arrow pointing to the wheel (no text or symbols visible)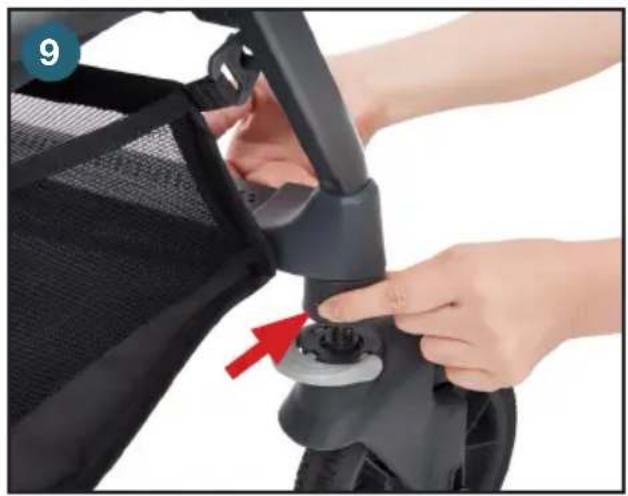
natural_image
Close-up of hands installing or adjusting a black office chair frame with a red arrow pointing to the button (no text or symbols visible)Installing the Canopy
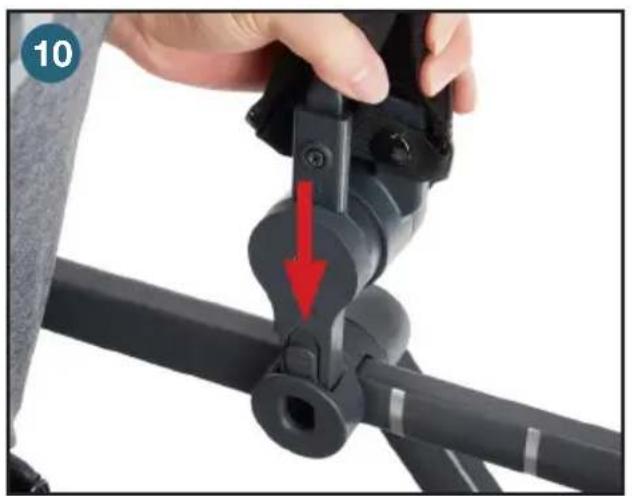
- Identify the arrows on the inside of the canopy clip.
- Insert the canopy clips (with the arrows facing forward) into the frame mounts on BOTH sides. Ensure they snap into place. (10)
- The canopy can be adjusted to be fully opened or closed.
- The canopy can be extended by unzipping the extension zipper and pulling the canopy open. (11) Rezip to close.
natural_image
Close-up of a hand adjusting a black mechanical clip assembly with a red arrow indicating the motion direction (no text or symbols visible)
natural_image
Close-up of a black baby stroller with a hand adjusting the seat area (no text or symbols visible)⚠ WARNING: Possible pinching hazard – Be careful of the side hinges when opening and closing the canopy.
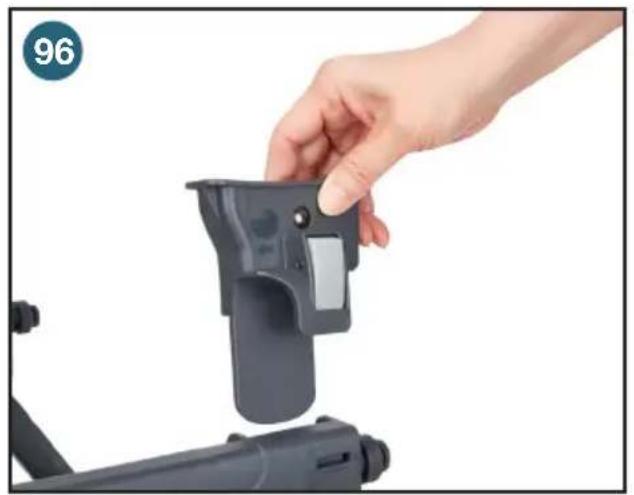
Installing/Removing the Tray
- Attach the tray by aligning the tray arms with the mounts. (12)
- Press the tray down onto the mount until it snaps into place. (13)
• To remove the tray, squeeze the release buttons located under the tray arms and pull the tray up. (14)

natural_image
Close-up of hands adjusting a black curved device with a gray textured base (no visible text or symbols)
natural_image
Close-up of hands adjusting a car seatbelt buckle with red arrows indicating adjustment (no text or symbols visible)
natural_image
Close-up of a hand adjusting a black seatbelt component with a red arrow indicating the adjustment (no text or symbols visible)Installing/Removing the Bench Seat
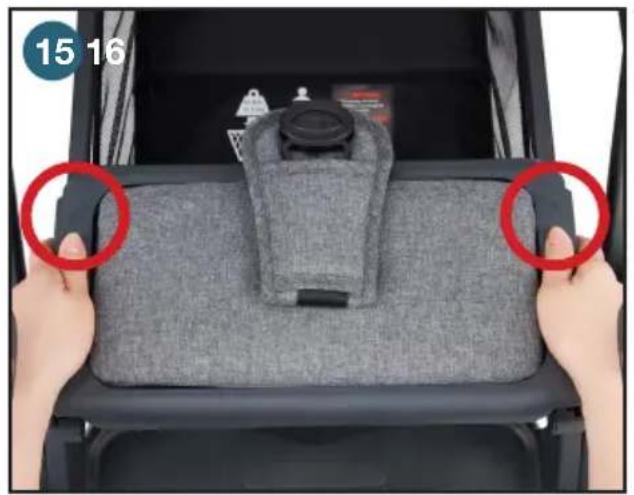
- The bench seat should be installed in the back of the stroller.
- Locate the arrows on top of the bench seat.
- Place the bench seat on the horizontal rails with the arrows facing forward. (15)
- Slide the seat backward to the end of the rails.
- Push down the bench seat onto the stroller frame.
- To lock the seat, pull the plastic clamps upward from EACH side of the bench seat and press up. (16) Ensure the seat is secured.
- Unzip the zipper on the front seat back.
• Take out the waist strap from the pocket on the seat back. (17) - Buckle the waist and crotch strap harness when using the stroller. (18)
- To unlatch the buckle, press the center button and remove both harness clips. (19)
- Store the waist strap in the pocket of the front seat back when not in use.
- To remove, release the clamps on each side of the bench seat and pull the bench from the stroller. (20)
natural_image
Close-up of hands adjusting a gray car seatbelt cover, showing two red circles highlighting the side (no text or symbols visible)
natural_image
Close-up of hands adjusting a car seatbelt buckle with a red arrow indicating the adjustment (no text or symbols visible)
natural_image
Close-up of a hand adjusting a black fabric seatbelt inside a vehicle cabin (no visible text or symbols)
natural_image
Close-up of hands adjusting a gray car seatbelt component with red arrows indicating fastening (no text or symbols visible)
natural_image
Hand placing a camera seatbelt on a car cab, with a red arrow indicating the handle (no text or symbols visible)
natural_image
Hand pressing a button on a black car seat cover, with a red arrow indicating the action (no text or symbols visible)Stroller Operation
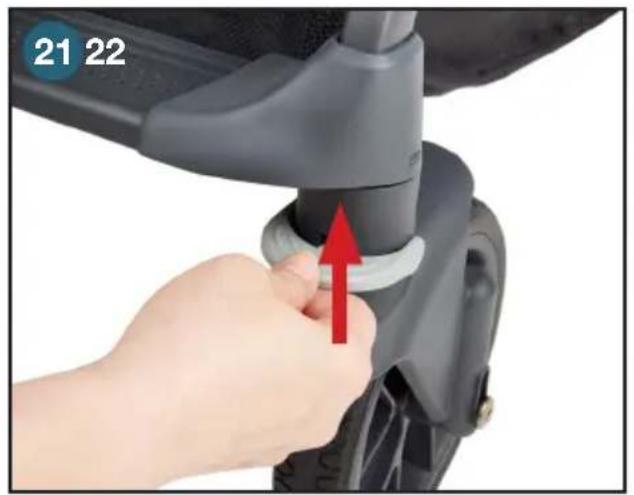
Front Wheel Swivel Locks
The front wheels can be set to lock by pulling up on the locking lever located on the front wheel. (21) Or, set to swivel by pushing down on the locking lever. (22)
Rear Wheel Brakes
• Always engage rear wheel brakes before placing a child in or removing a child from the stroller.
• To engage, push down on the RIGHT brake lever. (23)
• To release, push down on the LEFT brake lever. (24)
NOTE: Gently push the stroller back and forth to ensure the brake is fully engaged.
⚠ WARNING: ALWAYS set BOTH front wheels to the same mode before using stroller. Always make sure the wheel brakes are engaged when the stroller is not being pushed so that the stroller will not roll away. Never leave stroller unattended, especially on a hill or incline, as the stroller may tip over or slide.
Securing the Seated Child
- There are three height adjustment positions for the shoulder harness. Adjust the height to the closest height above your child's shoulders.
• To remove the shoulder harness, first unzip the fabric on the back of backrest. (25) - To turn the plastic ends sideways and push them through the slots in the backrest. (26) Reattach the harness at the proper height by reinserting the plastic ends through the slots. Ensure both straps are the same height.
• To unlatch the buckle, press the center button and remove the male ends of each side. (27) - Carefully place the child in the seat with the shoulder straps and pads over their shoulders and chest. Then place the crotch strap between the child's legs.
- Push the shoulder/waist buckles into the crotch buckle until all parts snap into place. (28)
- Tighten the waist belt to be snug around the child's waist.
- The shoulder, waist, and crotch straps may be adjusted using the sliding plastic rings.
- Push down the backrest and make sure it is in the same recline position. NEVER allow a child to step onto or sit on the leg support. This may cause the stroller to tip over.
⚠ WARNING: This seat is not suitable for children under 3 months (For US ASTM F833 and Canada SOR/2016 standards). The maximum height of a child the product is designed to carry is 44 in (111.8 cm). The maximum weight of a child the product is designed to carry is 55 lbs. (25 kg). When used for carrying 2 children at the same time, the total weight of all children must not exceed 110 lbs. (50 kg). Exceeding this total weight will cause excessive wear and stress on the stroller and may cause a hazardous unstable condition. Never leave child unattended. Avoid serious injury from falling or sliding out. Always use the restraint system.
natural_image
Close-up of a hand adjusting a mechanical component with a red arrow indicating the adjustment (no text or symbols visible)
natural_image
Close-up of a hand adjusting a black mechanical component with a red arrow indicating the adjustment (no text or symbols visible)
text_image
23 24
natural_image
Close-up of a car's wheel and foot assembly with a red arrow pointing to a small component (no text or symbols visible)
natural_image
Close-up of a gray baby car seat with a hand adjusting the seat, showing a red arrow pointing to the spine (no text or symbols visible)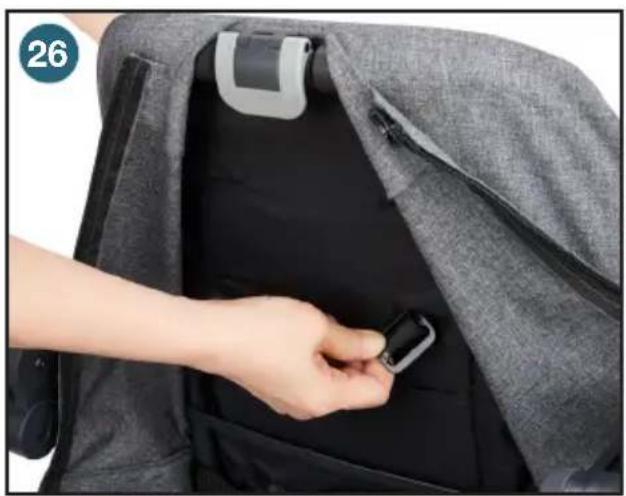
natural_image
Close-up of a person's hand inserting a small black plastic clip into a dark gray backpack (no text or symbols visible)
natural_image
Close-up of a hand adjusting a car seatbelt buckle, showing a red arrow pointing to the seat (no text or symbols visible)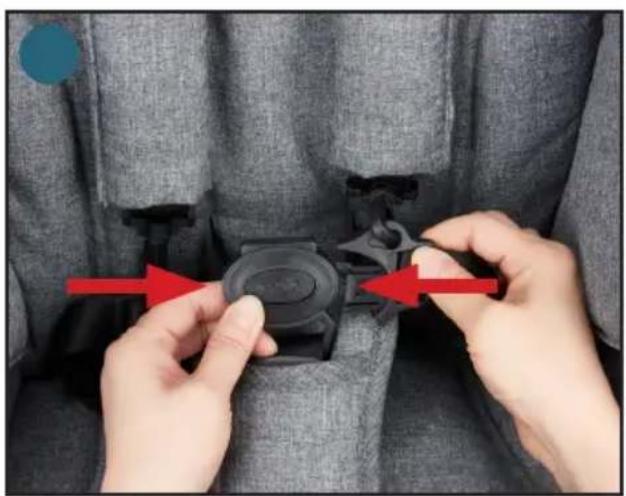
natural_image
Close-up of hands adjusting a black plastic buckle with red arrows indicating fastening (no text or symbols visible)Adjusting the Seat
• The front seat has 3 recline positions.
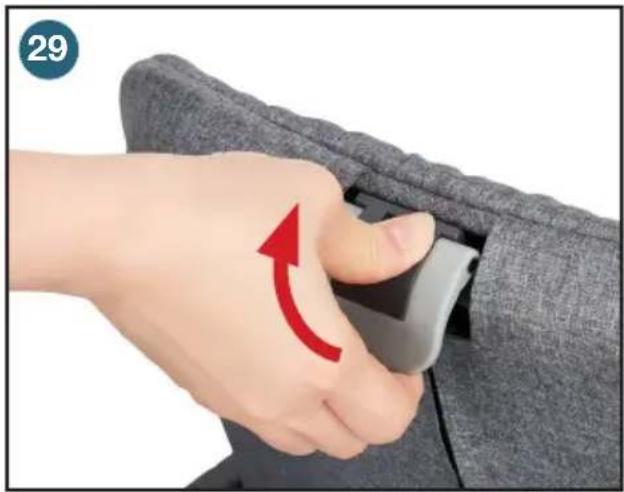
- To adjust, pull up on the recline mechanism on the top of the seatback and pull the seat to the desired position. (29) Ensure that the recline mechanism has engaged.
- For a more upright seat position, push the backrest forward.
WARNING: ALWAYS
make certain that the recline mechanism is engaged in the same position before placing the child in the seat, whether the seat is upright or reclined. Push down on the backrest to be sure it is secure.
natural_image
Close-up of a hand adjusting a gray car seatbelt buckle, with a red arrow indicating the motion (no text or symbols)Installing/Removing the Front Seat
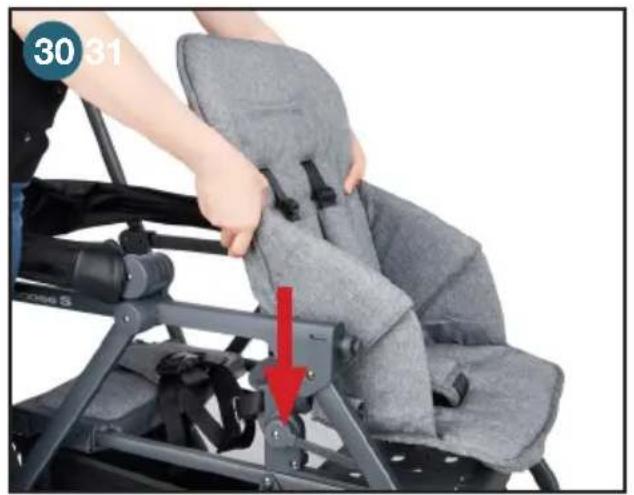
- Line up the male brackets and insert them into the female brackets on the stroller frame bottom. (30)
- Push the seat downward into the position.
- Thread the supporting fabric strap into the slot of the seat back base. (31)
- Pull the supporting fabric strap downward tightly (32) and attach the strap onto the knob on bottom of the seat frame. (33) Repeat for other side.
- Thread the crotch strap through the slot of the seat base. (34)
- Attach the Velcro® on both sides of the seat. (35)
- Attach the elastic loops underneath both sides of the seat base. (36)
- Attach the bottom panel of the seat fabric underneath the front of the seat base. (37)
NOTE: Removing the front seat is required for installing the car seat or bassinet in front position.
- Detach the bottom panel of the seat fabric underneath the front of the seat base.
- Detach the elastic loops underneath both sides of seat base.
- Detach the Velcro® from both sides of the seat.
- Thread the crotch strap through the slot of the seat base. (38)
- Detach the two supporting straps at the bottom of the seat back from the nubs on the backrest. (39)
- Push the lever inward on each side of the seat. (40)
• Pull the backrest with the fabric from the stroller. (41)
natural_image
Close-up of a baby stroller with hands adjusting the seatbelt, showing a red arrow indicating a specific movement (no text or symbols present)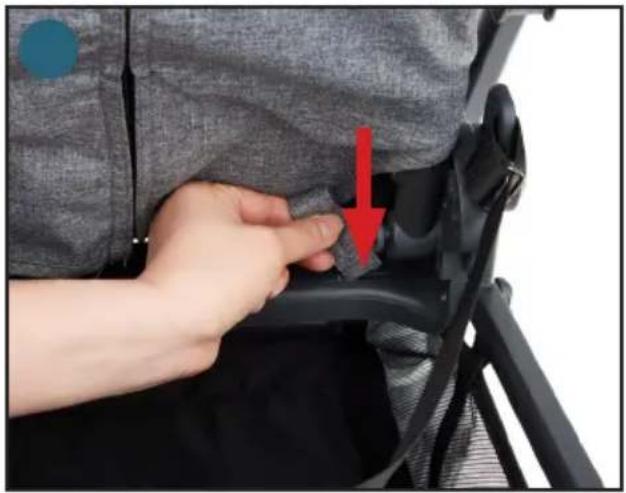
natural_image
Close-up of a hand adjusting a gray patterned sleeve with a red arrow pointing to the button (no text or symbols visible)
text_image
32 33
natural_image
Close-up of a hand adjusting a dark fabric seatbelt with a red arrow pointing to the button (no text or symbols visible)
natural_image
Close-up of a hand adjusting a black belt buckle with a red arrow pointing to the buckle detail (no text or symbols visible)
natural_image
Close-up of hands installing a black plastic clip on a dark fabric seat (no text or symbols visible)
natural_image
Close-up of a hand inserting a small component into a car seatbelt, with a red arrow indicating the insertion direction (no text or symbols visible)
natural_image
Close-up of a hand adjusting a gray fabric seatbelt with a red circle highlighting the finger area (no text or symbols visible)
natural_image
Close-up of a hand adjusting a black plastic bag with a textured cushion (no visible text or symbols)
natural_image
Close-up of a hand adjusting a black seatbelt buckle, with a red arrow indicating the motion (no text or symbols visible)
natural_image
Close-up of a person adjusting a firearm inside a gray vehicle seatbelt, with a red circle highlighting the button (no text or symbols visible)
natural_image
Close-up of a baby stroller with a hand adjusting the seat area, showing a red upward arrow (no text or symbols)Folding the Stroller
- Keep children away from the stroller while folding.
• Make sure the front wheels are in swivel mode. (42) - Adjust the front seat to the most upright position.
- Rear wheel brake lever MUST be engaged before folding the stroller. (43)
- Close the canopy and move it all the way forward.
• Under the center of the handlebar, flip open the release button, squeeze the button into the handlebar and push the handle fully forward. (44) - Ensure that the stroller is locked by pulling up on the handlebar.
- The locking latch on the right side of the stroller should automatically engage. If it is not engaged, gently push the stroller together until you hear an audible click. (45)
CAUTION: While folding the stroller, be careful to keep your fingers from being pinched by moving parts.
• The stroller can be stored in a standing position when folded. (46)
WARNING: Rear wheel brakes MUST be engaged before folding the stroller. Make sure the front wheels are in swivel mode and NOT locked. DO NOT force the stroller closed. ALWAYS keep children away from the stroller when folding. Possible pinching hazard – Be careful when folding the stroller.

natural_image
Close-up of a hand adjusting a mechanical component with a red arrow indicating the adjustment (no text or symbols visible)
natural_image
Close-up of a car's side panel with a red arrow pointing to a key inserted into the wheel (no text or symbols visible)
natural_image
Hand holding a black cable with a red arrow pointing to the cable end (no text or symbols)
natural_image
Black stroller with black frame and wheels, displayed against white background (no text or symbols)
natural_image
Black and white photo of a compact toy vehicle with wheels and a handle, no visible text or symbolsFront Seat Fabric
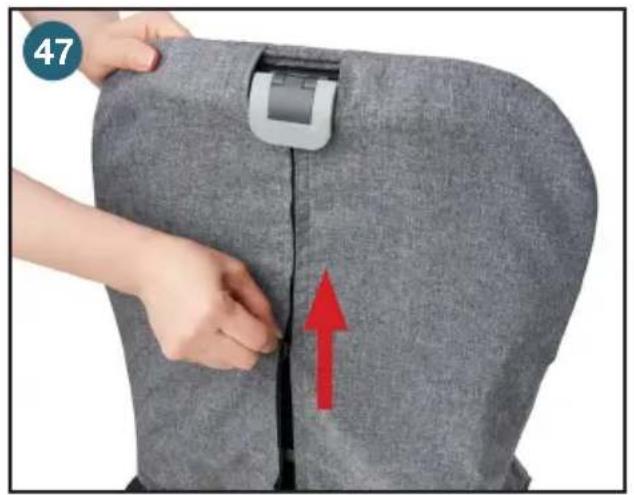
NOTE: The front seat fabric is removable for washing.
- Remove the seat.
• Unzip the fabric on the seat back. (47) - Release the Velcro® at the bottom of the seat back.
- Locate the two supporting straps wrapped around the base of the seat back.
• To remove, slip the strap through the gap of the rectangular metal ring. (48)
- Repeat on the other side.
- Remove the seat fabric from the frame. (49)
- Remove the shoulder straps, waist straps and crotch straps completely through the slots from front seat. (50)
- Open the Velcro® (below the pocket) (51) and take out the plastic seat board. (52)
- To reassemble the front seat, simply reverse the disassembly steps. Ensure all zippers and straps are securely closed.
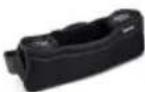
Basket
- The storage basket should not be removed.
• The back panel can be unzipped for access to the basket contents. (53, 54) - Zip up the back panel of the basket before the child stands or sits in the rear position.
⚠ WARNING: The maximum weight that can be carried in the storage basket is 25 lbs. (11.3 kg). Excessive weight may result in a hazardous unstable condition.
natural_image
Close-up of a sewing machine's back panel being adjusted with a hand, showing the needle and red arrow (no text or symbols)
natural_image
Close-up of hands adjusting a black fabric garment with a zipper, no visible text or symbols
natural_image
Close-up of a hand holding a black strap attached to a gray backpack (no text or symbols visible)
natural_image
Close-up of hands adjusting a gray fabric bag with a black clip, no visible text or symbols
natural_image
Close-up of hands adjusting a black fabric garment with a zipper, no visible text or symbols
natural_image
Close-up of hands installing a white card with black rectangular cutouts, showing a red arrow indicating the process (no text or symbols present)
natural_image
Close-up of a person's seatbelt being adjusted for a zipper, with a red arrow indicating the zipper (no text or symbols visible)
natural_image
Close-up of a baby stroller with black bedding and wheels, no visible text or symbolsBench Seat
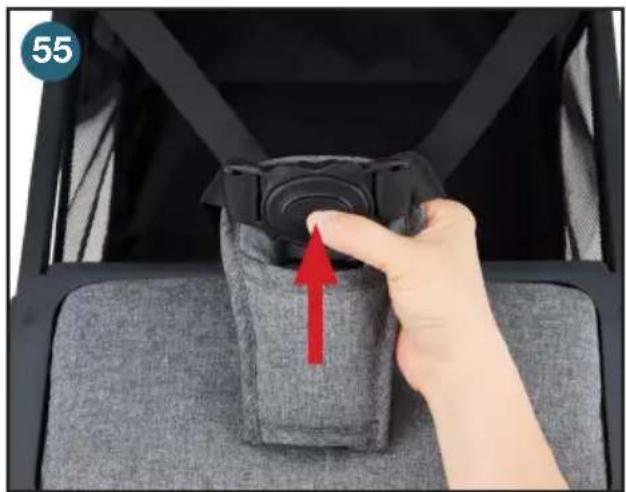
- Press the center button and remove both latch posts. (55)
• Have the child sit on the bench seat facing backward with their feet on the platform.
NOTE: You may need to adjust the recline position of the front seat to allow for more room for the child to sit.
- Place the crotch strap between the child's legs.
- Push the harness clips into the crotch buckle until all parts snap into place. (56)
- Adjust the seat belt to be snug around the child's waist.
- Be sure that BOTH of the child's feet are fully on the platform at all times.
- Be sure that BOTH of the child's hands are holding the stroller frame.
⚠ WARNING: NEVER allow a rear seated child to use the canopy as a hand hold. Always use the crotch strap in combination with the waist belt. Avoid serious injury from falling or sliding out. The rear bench seat is suitable ONLY for children at least 2 ½ years old, but LESS than 44 inches (111.8 cm) tall and less than 55 lbs (25 kg).
natural_image
Hand placing a camera seatbelt into a car seatbelt, with a red arrow indicating the handle (no text or symbols visible)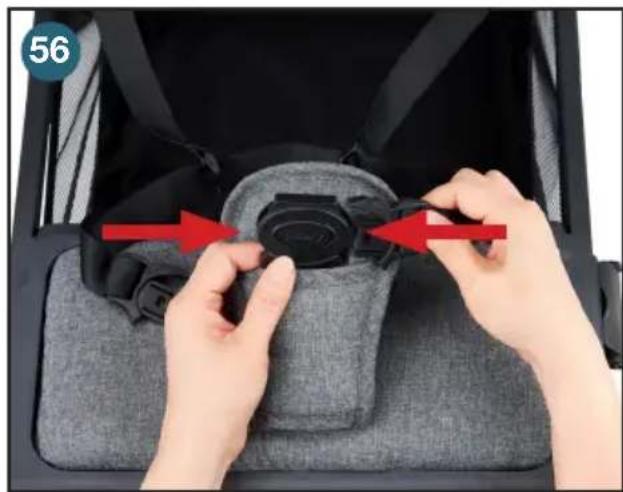
natural_image
Close-up of hands adjusting a gray seatbelt buckle with red arrows indicating fastening (no text or symbols visible)Bench Seat Pad
The bench seat pad is removable for washing.
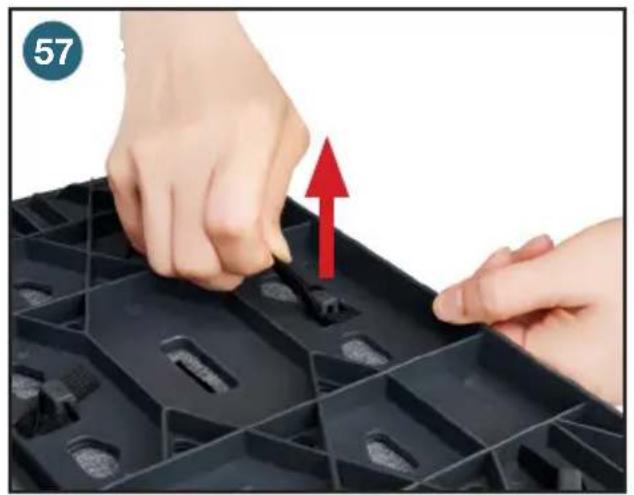
- Detach the 6 elastic loops underneath the bench seat. (57)
- Remove the crotch strap by turning the plastic anchor sideways and pushing through the slot on the seat bottom. (58)
- Open the Velcro® and take out the plastic board from inside the seat pad. (59, 60)
• To reassemble the bench seat pad, simply reverse the steps. - Pull the crotch strap to ensure it's secured.
Stand-on Platform
- Zip up the back panel of the basket before the child stands on the platform.
• The child should stand facing forward with BOTH hands holding the frame or optional handles. - Be sure that BOTH of the child's feet are fully on the stand-on platform at all times.
⚠ WARNING: The rear stand-on platform and the rear bench seat are designed for a child that is at least 2 ½ years old but LESS than 44 inches (111.8 cm) tall and less than 55 lbs (25 kg). Use of the stroller with 2 children totaling more than 110 lbs (50 kg), will cause excessive wear and stress on the stroller and may cause a hazardous, unstable condition. NEVER allow a standing child to use the canopy as a hand hold. NEVER use this stroller to carry more than 2 children at the same time.
natural_image
Close-up of hands assembling a black plastic tray with a red upward arrow (no text or symbols visible)
natural_image
Close-up of a hand placing a black plastic component into a black plastic housing with a red arrow indicating the component (no text or symbols visible)
natural_image
Close-up of hands folding a dark fabric piece on a gray textured surface (no text or symbols visible)
natural_image
Close-up of a hand pressing down on a gray fabric sleeve with a red arrow indicating the pressure point (no text or symbols)Tray
- Attach the tray, by aligning the tray arms with the tray mounts. (61)
- Press the tray down onto the mounts until it snaps into place. (62)
• To remove the tray, squeeze the release buttons located under the tray arms and pull the tray up. (63) - To use the tray's swing arm, release one side of the tray by squeezing the release button and rotate the tray upward. (64)
• The transparent insert tray is not removable.
⚠ WARNING: For use ONLY on the Joovy Caboose S Stroller. The tray is not a restraint device. ALWAYS secure your child with the restraint system. NEVER lift the stroller by the tray. Use caution when attaching the tray when there is a child seated in the stroller. The maximum weight that can be carried in the tray is 2 lbs. (0.9 kg). This product is not a toy. DO NOT allow children to play with it.
natural_image
Close-up of hands adjusting a black cable strap device on a gray patterned seat (no text or symbols visible)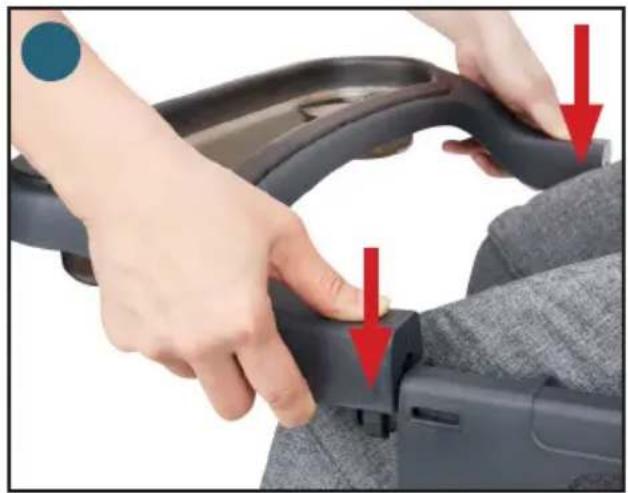
natural_image
Close-up of hands adjusting a car seatbelt buckle with red arrows indicating adjustment (no text or symbols visible)
natural_image
Close-up of a hand adjusting a black seatbelt buckle with a red arrow pointing to the buckle (no text or symbols visible)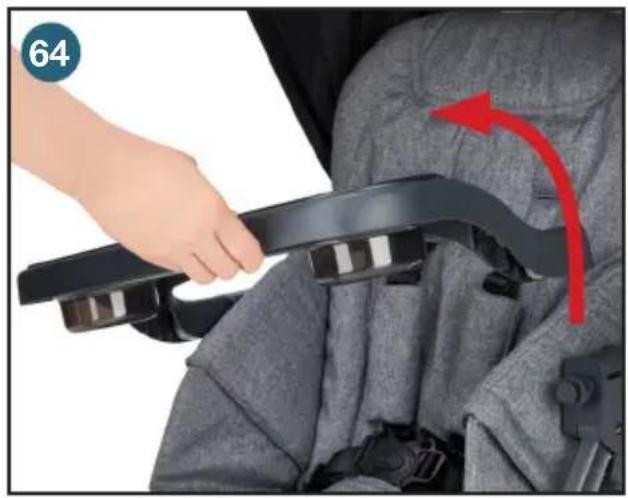
natural_image
Close-up of a hand adjusting a black seatbelt buckle, with a red arrow indicating motion (no text or symbols)Configurations

Optional Accessories
A number of optional accessories can be purchased for the Caboose S in order to expand its versatility.
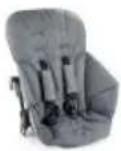
Rear Seat (Optional)
Installing/Removing
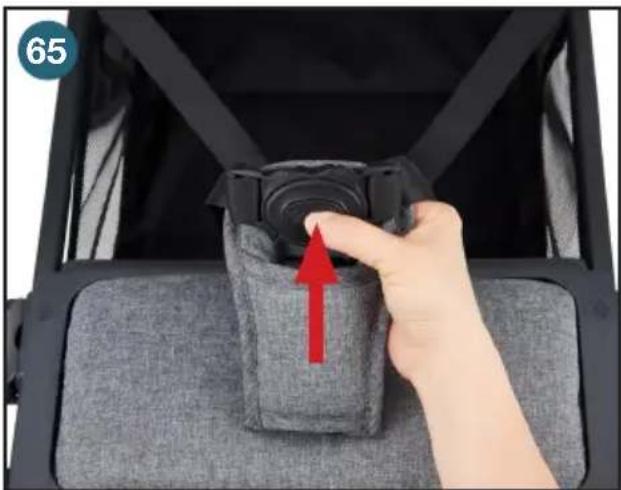
- Ensure the bench seat harness is unbuckled (65) and store the waist strap in the pocket on the front seat back. (66)
- Detach the bench seat by pushing down the plastic clamps on each side of the bench seat. (67)
- Move the bench seat forward (68) and remove the crotch strap by turning the crotch anchor sideways and push through the slot on the seat bottom.
- Line up the rear seat adapter and insert them into the female bracket on stroller frame bottom. These are right and left specific (standing behind the stroller). (69) Pull the seat up on both sides to ensure it is secure. (70)
- Insert the rear seat adapter into the top frame bracket. (71)
- Slide the bench seat backward until it touches the rear seat adapter. (72)
- To lock the bench seat, pull the plastic clamps upward from each side of the rear seat and press up. (73) Ensure the seat is secure.
- Insert the crotch strap into the slot in the rear seat (74) and bench seat. (75)
- Locate the elastic loops underneath the rear seat.
- Hook the 4 elastic loops under of bench seat base. (76)
• To remove the rear seat, simply reverse the disassembly steps.
natural_image
Hand placing a camera seatbelt into a gray car seatbelt, with a red arrow indicating the handle (no text or symbols visible)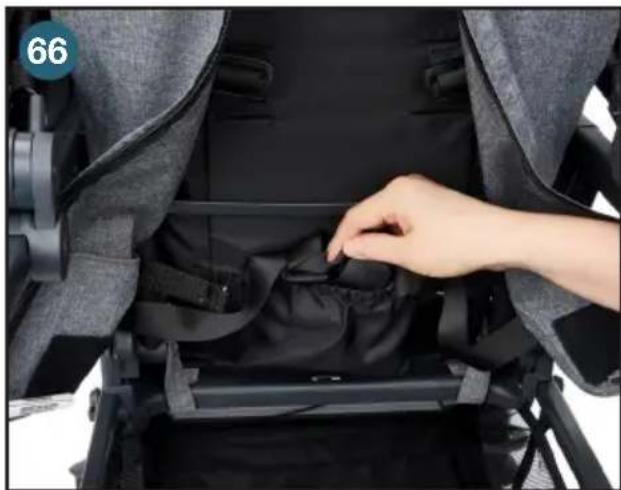
natural_image
Close-up of a hand adjusting a black fabric component inside a vehicle cabin (no visible text or symbols)
natural_image
Hand inserting a red arrow to a black car seat panel (no text or symbols visible)
natural_image
Close-up of a hand pressing down on a gray cushioned device component, with a red arrow indicating the motion direction (no text or symbols visible)
natural_image
Close-up of a car seatbelt buckle assembly with a red arrow indicating the mounting point (no text or symbols visible)
natural_image
Close-up of a baby car seat with hands adjusting the seat frame (no visible text or symbols)
text_image
7172
natural_image
Close-up of a car seatbelt buckle with a hand adjusting the seatbelt (no text or symbols visible)
natural_image
Close-up of hands installing a black cable component with red arrow indicating assembly (no text or symbols visible)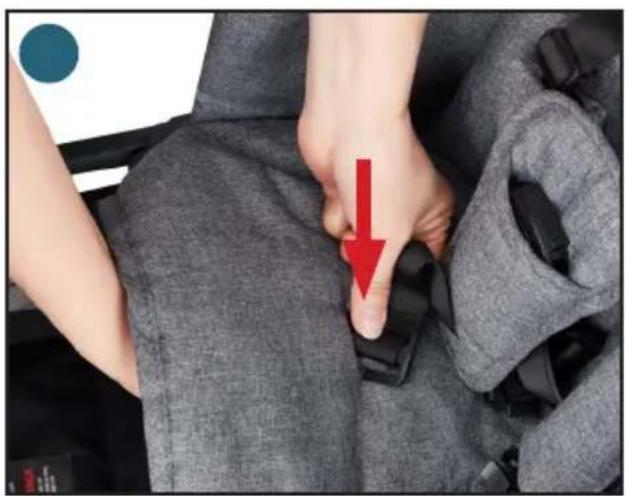
natural_image
Close-up of hands adjusting a gray fabric seatbelt with a red arrow pointing to the toe area (no text or symbols visible)
text_image
7516
natural_image
Close-up of a hand inserting a small black plastic component into a car intake compartment, with a red circle highlighting the component (no text or symbols visible)Securing the Seated Child
- There are three height adjustment positions for the shoulder harness. Adjust the height to the closest height above your child's shoulders.
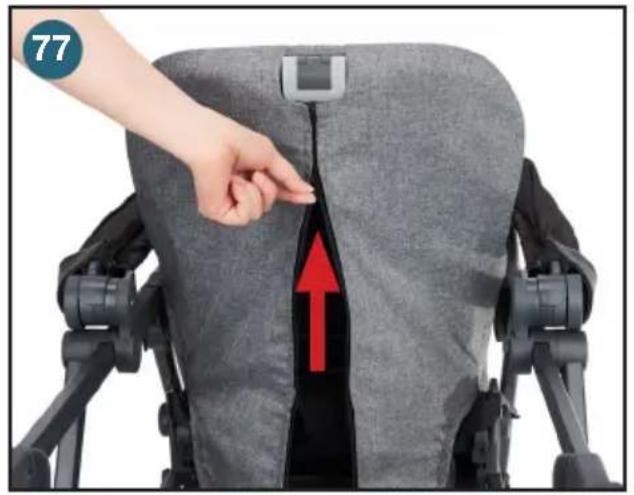
• To remove the shoulder harness, first unzip the fabric on the back of backrest. (77) - To turn the plastic ends sideways and push them through the slots in the backrest. (78) Reattach the harness at the proper height by reinserting the plastic ends through the slots. Ensure both straps are the same height.
• To unlatch the buckle, press the center button and remove the male ends of each side. (79) - Carefully place the child in the seat with the shoulder straps and pads over their shoulders and chest. Then place the crotch strap between the child's legs.
- Push the shoulder and waist latch posts into the crotch buckle until all parts snap into place. (80)
- Tighten the waist belt to be snug around the child's waist.
- The shoulder, waist, and crotch straps may be adjusted using the sliding plastic rings.
- Push down the backrest and make sure it is in the same recline position. NEVER allow a child to step onto or sit on the leg support. This may cause the stroller to tip over.
Adjusting the Rear Seat
- The rear seat has 3 recline positions.
- To adjust, pull up on the recline mechanism and pull the seat to the desired position. (81) Ensure that the recline mechanism has engaged.
- For a more upright seat position, push the backrest forward.
⚠ WARNING: ALWAYS make certain that the recline mechanism is engaged in the same position before placing the child in the seat, whether the seat is upright or reclined. Push down on the backrest to be sure it is secure.
WARNING: This seat is not suitable for children under 3 months (For US ASTM F833 and Canada SOR/2016 standards). The maximum height of a child the product is designed to carry is 44 in (111.8 cm). The maximum weight of a child the product is designed to carry is 55 lbs. (25 kg). When used for carrying 2 children at the same time, the total weight of all children must not exceed 110 lbs. (50 kg). Exceeding this total weight will cause excessive wear and stress on the stroller and may cause a hazardous unstable condition. Never leave child unattended. Avoid serious injury from falling or sliding out. Always use the restraint system.
natural_image
Close-up of a gray ergonomic seat with a hand adjusting the seat, showing a red upward arrow indicating movement or positioning (no text or symbols present)
natural_image
Close-up of a person inserting a small black plastic clip into a gray backpack (no text or symbols visible)
natural_image
Close-up of a hand adjusting a black seatbelt buckle with a red arrow pointing to the seat (no text or symbols visible)
natural_image
Close-up of hands adjusting a black plastic buckle component with red arrows indicating alignment (no text or symbols visible)
natural_image
Hand pressing a button on a gray fabric seatbelt, with a red arrow indicating clockwise motion (no text or symbols)Removing the Seat Fabric
- Remove the seat.
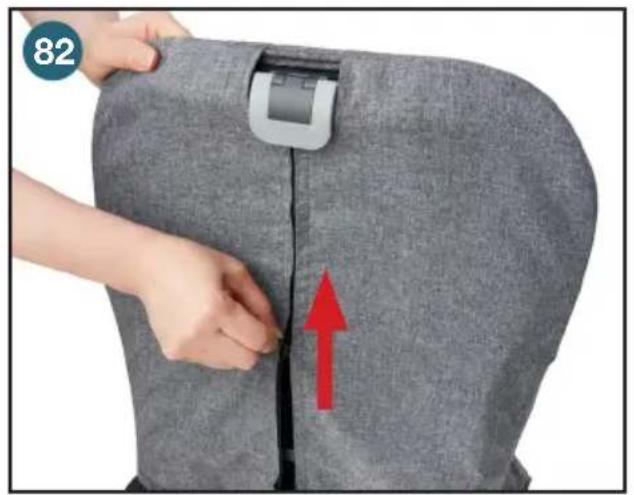
• Unzip the fabric on the seat back. (82) - Release the Velcro® at the bottom of the seat back.
- Locate the two supporting straps wrapped around the base of the seat back.
• To remove, slip the strap through the gap of the rectangular metal ring. (83) - Repeat on the other side.
- Remove the 2 fabric straps on the bottom sides of the seat back from the metal knobs. (84)
• Take out whole seat fabric from frame. - Remove the shoulder straps, waist straps and crotch straps completely through the slots from front seat fabric. (85)
- Open the Velcro® below the pocket (86) and take out the plastic seat board. (87)
- To reassemble the Rear Seat, simply reverse the disassembly steps. Ensure all zippers and straps are securely closed.
natural_image
Close-up of a gray fabric garment being adjusted with a zipper, showing a red upward arrow indicating the seam (no text or symbols)
natural_image
Close-up of hands adjusting a black fabric garment with a zipper, no visible text or symbols
natural_image
Close-up of a hand adjusting a black mechanical component with a textured patch, no visible text or symbols
natural_image
Close-up of a hand holding a black plastic clip attached to a gray patterned blanket (no text or symbols visible)
natural_image
Close-up of hands adjusting a black fabric garment with a zipper (no text or symbols visible)
natural_image
Close-up of hands installing a black garment with a white patch, showing a red arrow indicating the process (no text or symbols)Car Seat Adapter (Graco/Chicco) (Optional)
- To use the car seat adapter in the front position, first ensure the front seat is removed.
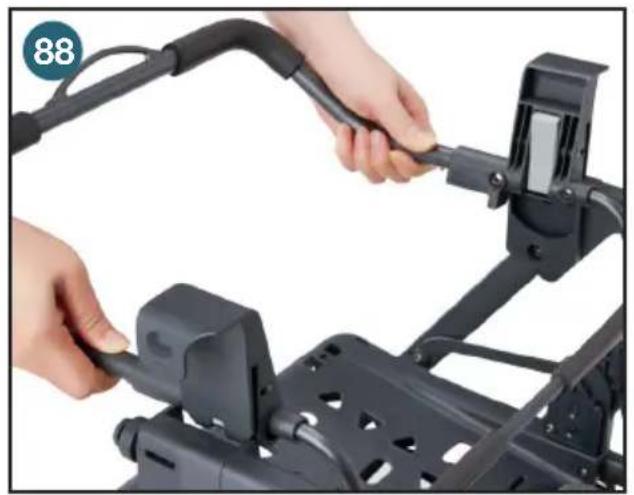
- Line up the male brackets on the bottom of the car seat adapter with the female brackets on the stroller frame. (88)
- Push down on both sides of the car seat adapter until both brackets click into place. (89) Pull up the car seat adapter on both sides to ensure it is secured.
• The car seat can only face backward. - Hold the car seat by the carry handle and lower the car seat onto the stroller so that the hook on the rear of the car seat latches onto the car seat adapter. Pull up on car seat to ensure it is secure.
- To remove the car seat, pull the release lever (the same lever used to release the car seat from its base) and lift up. (90)
- To remove the car seat adapter from the stroller, push the trigger on both side and pull it up off the stroller. (91)
- To use the car seat adapter in the rear position, ensure the front seat is fully upright.
- Line up the male brackets on the bottom of the car seat adapter with the female brackets on the stroller frame. (92)
- Push down on both sides of the infant car seat adapter until both brackets click into place. Pull up on the infant car seat adapter on both sides to ensure it is secured. (93)
• The car seat can only face backward. - Hold the car seat by the carry handle and lower the car seat onto the stroller so that the hook on the rear of the car seat latches onto the car seat adapter. (94) Pull up on car seat to ensure it is secure.
- To remove the car seat, pull the release lever (the same lever used to release the car seat from its base) and lift up.
• To remove the adapter from the stroller, press the trigger on both sides. Pull up and remove. (95)
NOTE: The stroller can be folded with the car seat adapter installed in front position or rear position when bench seat is not installed.
⚠ WARNING: For use ONLY on the Joovy Caboose S™ stroller. ALWAYS install the infant car seat so that the child is facing toward the rear (handlebar) of the stroller. ALWAYS position the infant car seat so that it securely snaps into the infant car seat adapters. The infant car seat adapter is for use ONLY with specific infant car seats. DO NOT use other infant car seat models that are not in the Car Seat Compatibility List (page 36). This product is not a toy. DO NOT allow children to play with it.
natural_image
Close-up of hands installing or adjusting a black mechanical frame with cable and bracket (no visible text or symbols)
natural_image
Close-up of hands installing a black mechanical component with red arrows indicating assembly or installation (no text or symbols visible)
natural_image
Person adjusting a baby car seat with a red arrow pointing to the seat area (no text or symbols visible)
natural_image
Close-up of hands using a mechanical device to adjust a component, with a red arrow indicating the motion direction (no text or symbols visible)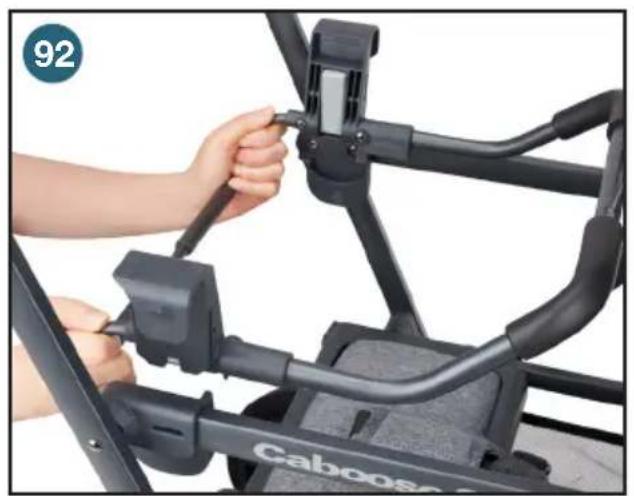
natural_image
Person using a Caboos bicycle leg rest frame, no visible text or symbols on the device itself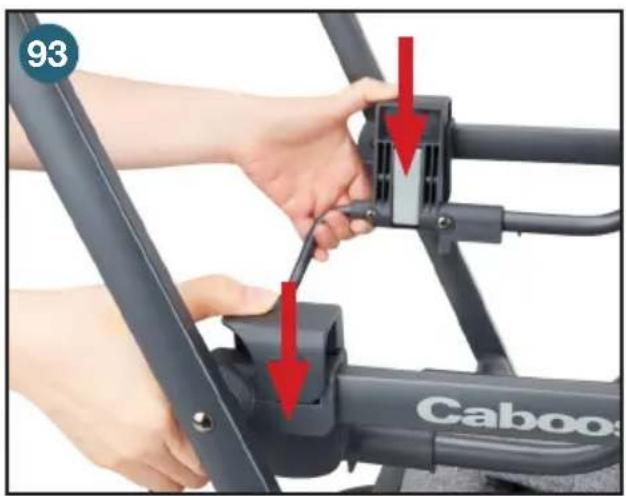
text_image
93 Caboo
natural_image
Close-up of a baby stroller with a red arrow pointing to the seat area, no visible text or symbols on the device itself.
natural_image
Close-up of a hand adjusting a black bicycle seatbelt with a red arrow pointing to the component (no text or symbols visible)Car Seat Adapter (Britax/B.O.B. B-Safe) (Optional)
- To use the car seat adapter in the front position, first ensure the front seat is removed.
- Line up the male brackets on the bottom of the car seat adapter with the female brackets on the stroller frame. (96) Make sure the arrow mark on the adapter faces backward.
- Push down on each side of the car seat adapter until both brackets click into place. (97) Pull up the car seat adapter on both sides to ensure it is secured.
• The car seat can only face backward.
- Hold the car seat by the carry handle and lower the car seat onto the stroller so that the bracket on the car seat latches onto the car seat adapter. Pull up on car seat to ensure it is secure.
- To remove the car seat, pull the release lever (the same lever used to release the car seat from its base) and lift up. (98)
- To remove the car seat adapter from the stroller, push the trigger on each adapter and pull it up off the stroller. (99)
- To use the car seat adapter in the rear position, ensure the front seat is fully upright.
- Line up the male brackets on the bottom of the car seat adapter with the female brackets on the stroller frame. (100) Make sure the arrow mark on the adapter faces backward.
- Push down on each side of the infant car seat adapter until both brackets click into place. (101) Pull up on the infant car seat adapter on both sides to ensure it is secured.
• The car seat can only face backward.
- Hold the car seat by the carry handle and lower the car seat onto the stroller so that the hook on the rear of the car seat latches onto the car seat adapter. Pull up on car seat to ensure it is secure.
- To remove the car seat, pull the release lever (the same lever used to release the car seat from its base) and lift up. (98)
- To remove the adapter from the stroller, press the trigger on the adapter and pull it up off the stroller. (99)
NOTE: The stroller can be folded with the car seat adapters when it's installed in the front or rear position.
⚠ WARNING: For use ONLY on the Joovy Caboose S™ stroller. ALWAYS install the infant car seat so that the child is facing toward the rear (handlebar) of the stroller. ALWAYS position the infant car seat so that it securely snaps into the infant car seat adapters. The infant car seat adapter is for use ONLY with specific infant car seats. DO NOT use other infant car seat models that are not in the Car Seat Compatibility List (page 36). This product is not a toy. DO NOT allow children to play with it.
natural_image
Hand holding a black device with a lock, mounted on a wheeled vehicle (no visible text or symbols)
natural_image
Close-up of a hand adjusting a black mechanical component with a red arrow indicating the adjustment (no text or symbols visible)
natural_image
Person assembling a Britax baby car seat with a red arrow indicating the seat area (no text or symbols on the device itself)
text_image
99 Baoose S
natural_image
Close-up of a hand adjusting a Caboose S bicycle seat bracket (no text or symbols visible)
natural_image
Close-up of a hand adjusting a Caboos bicycle seat bracket with a red arrow indicating the adjustment (no text or symbols on the diagram itself)Car Seat Adapter (Maxi-Cosi/Cybex/Nuna) (Optional)
- To use the car seat adapter in the front position, first ensure the front seat is removed.
- Line up the male brackets on the bottom of the car seat adapter with the female brackets on the stroller frame. (102) Make sure the arrow mark on the adapter faces backward.
- Push down on each side of the car seat adapter until both brackets click into place. (103) Pull up the car seat adapter on both sides to ensure it is secured.
• The car seat can only face backward. - Hold the car seat by the carry handle and lower the car seat onto the stroller so that the bracket on car seat latches onto the car seat adapter. Pull up on car seat to ensure it is secure.
- To remove the car seat, press the release buttons on each side of the car seat and lift up.
• To remove the adapters from the stroller, press each side trigger and pull it up off the stroller. (104) - To use the car seat adapter in the rear position, ensure the front seat is fully upright.
- Line up the male brackets on the bottom of the car seat adapter with the female brackets on the stroller frame. (105) Make sure the arrow mark on the adapter faces backward.
- Push down on each side of the infant car seat adapter until both brackets click into place. (106) Pull up on the infant car seat adapter on both sides to ensure it is secured.
• The car seat can only face backward. - Hold the car seat by the carry handle and lower the car seat onto the stroller so that the hook on the rear of the car seat latches onto the car seat adapter. Pull up on car seat to ensure it is secure.
• To remove the car seat, press the release buttons on each side of the car seat and lift up. (107) - To remove the adapter from the stroller, press the trigger on adapter and pull it up off the stroller. NOTE: The stroller can be folded with the infant car seat adapters when it's installed in the front or rear position.
⚠ WARNING: For use ONLY on the Joovy Caboose S™ stroller. ALWAYS install the infant car seat so that the child is facing toward the rear (handlebar) of the stroller. ALWAYS position the infant car seat so that it securely snaps into the infant car seat adapters. The infant car seat adapter is for use ONLY with specific infant car seats. DO NOT use other infant car seat models that are not in the Car Seat Compatibility List (see below). This product is not a toy. DO NOT allow children to play with it.
IMPORTANT NOTE
When using your stroller with an infant car seat, the following are the compatible infant car seat models that the Caboose S will accommodate:
Graco® SnugRide Click Connect 30
Cybex® Aton 2
Graco® SnugRide Click Connect 35
Cybex® Aton Q
Graco® SnugRide Click Connect 35 LX
Cybex® Cloud Q
Graco® SnugRide SnugLock 35 DLX
Maxi-Cosi® Mico
Graco® SnugRide Click Connect 40
Maxi-Cosi® Mico 30
Chicco® KeyFit
Maxi-Cosi® Mico Max 30
Chicco® KeyFit 30
Maxi-Cosi® Mico AP
Chicco® KeyFit 30 Magic
Maxi-Cosi® Mico NXT
Chicco® KeyFit 30 Zip
Maxi-Cosi® Pebble
Chicco® KeyFit 30 Zip Air
Nuna® Pipa
Chicco® Fit2 2-Year
Britax®/BOB® B-Safe
Britax® B-Safe 35
Britax® B-Safe 35 Elite
For the most updated list of compatible infant car seats, please check our website at www.joovy.com.

natural_image
Hand holding a black mechanical device with a handle, mounted on a wheeled platform (no visible text or symbols)
natural_image
Hand placing a black mechanical component with a red arrow indicating downward motion (no text or symbols)
natural_image
Close-up of hands assembling a black mechanical component with a red arrow indicating the handle (no text or symbols visible)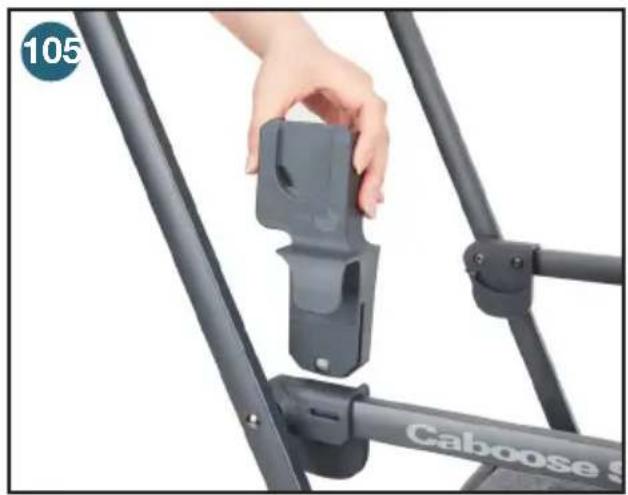
natural_image
Close-up of a hand holding a black bicycle seat bracket with 'Caboose' branding, no visible text or symbols on the main subject.
text_image
106 10. Caboos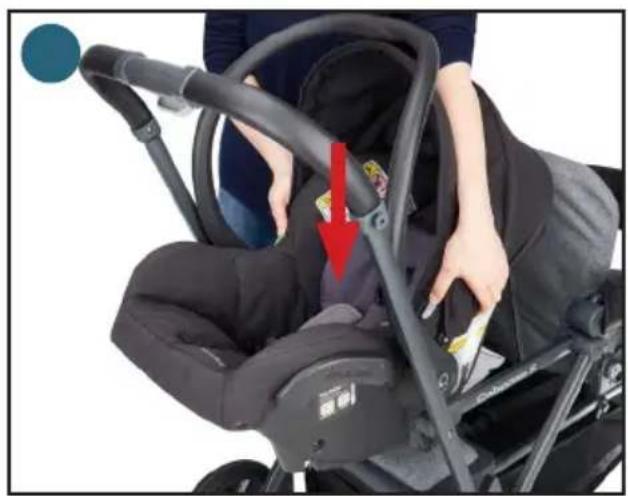
natural_image
Person wearing a stroller with a red arrow indicating a cable or cable being inserted (no text or symbols visible)Rain Cover (Optional)
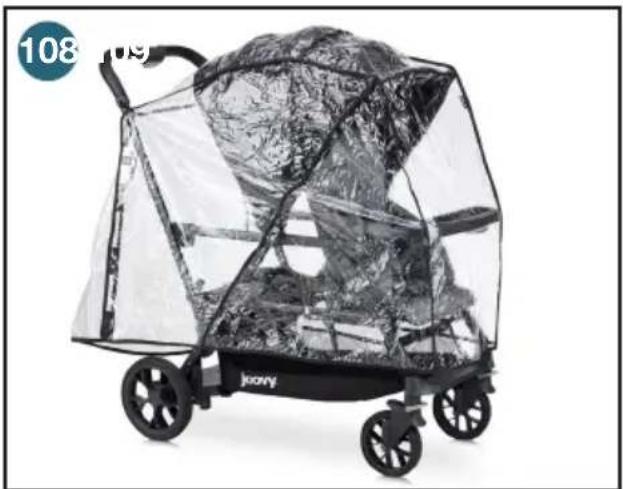
NOTE: The rain cover should only be used with the canopy attached.
- Make sure the canopy is in the fully extended (open) position. Carefully open the rain cover to its fullest.
- Place the rain cover over the stroller. Make sure the front seam is over the front edge of the canopy. (Joovy tag is towards the front with the long flap towards the rear of the stroller) (108)
- Release the Velcro® and pull the long flap through the rear handlebars just above the cup holder mounts on both sides of the stroller. Pull each of the rear sides of the rain cover around the outside of the handlebars.
- Attach elastic loop onto the cup holder mounts on both sides of the handlebar. (109)
- Pull the long flap down and attach the 4 Velcro® attachments together around the vertical frame to secure this long flap in place. (110) Do this for both sides.
- Pull the rain cover down toward the front wheels and attach the Velcro® straps around the frame corner. (111) Do this for both sides.
• Unzip the side zipper for easy access. (112) - Locate the Velcro® at the bottom corner and attach at the seam near the Joovy logo. (113)
⚠ WARNING: For use ONLY on the Joovy Caboose S™ stroller. Never leave this cover in place with child in stroller when exposed to direct sun or high temperature, as temperature inside may be excessive. This product is not a toy. DO NOT allow children to play with it.
natural_image
Black and white photo of a children's stroller with transparent cover and metal mesh, no visible text or symbols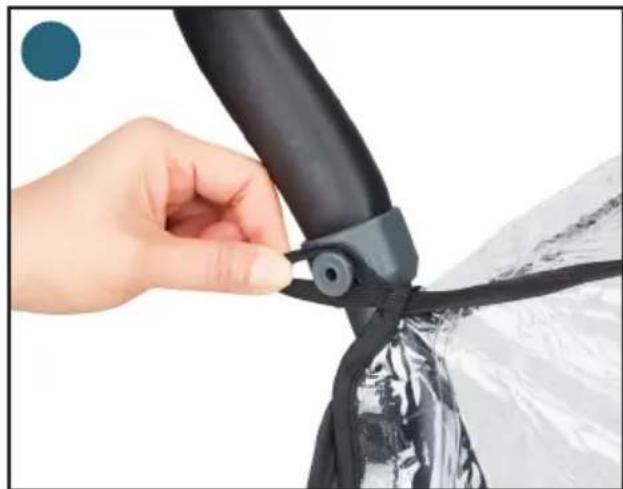
natural_image
Close-up of a hand adjusting a black cable or cable connector with a transparent cover (no text or symbols visible)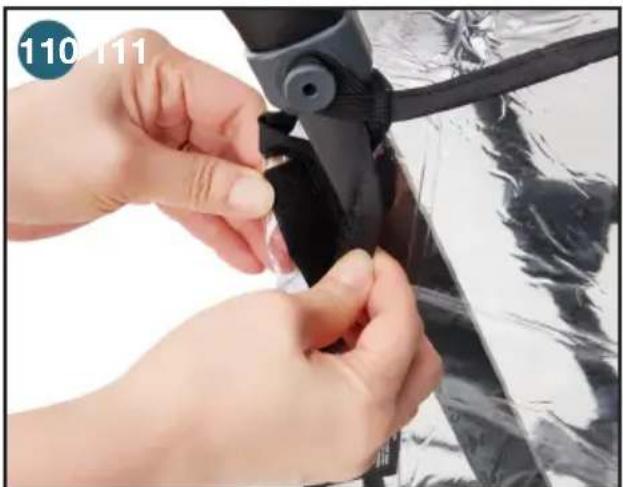
natural_image
Close-up of hands adjusting a black plastic component with a cable, no visible text or symbols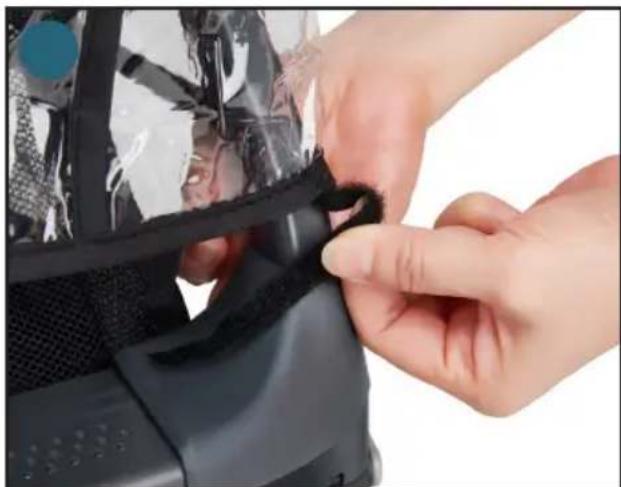
natural_image
Close-up of hands adjusting a black plastic bag on a bicycle (no visible text or symbols)
text_image
112 113 joay
natural_image
Close-up of a hand adjusting black plastic film strips, no visible text or symbolsParent Organizer (Optional)
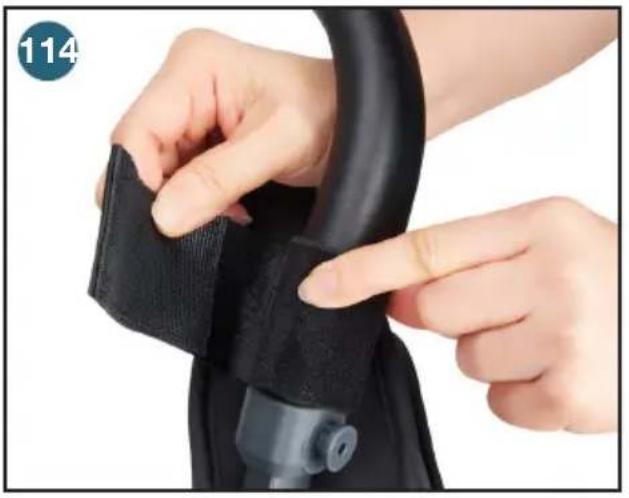
- Loop one strap of the parent organizer around one side of the handlebar. (114)
- Loop the rest of the strap back around the handlebar to attach the Velcro®. (115)
- Repeat for the other side. Ensure the parent organizer is secure.
- Unzip and zipped zipper on the pocket of Parent Organizer for storage. (116)
⚠ WARNING: For use ONLY on the Joovy Caboose S™ Stroller. NEVER carry hot beverages or open containers in this product. The maximum weight that can be carried in the parent organizer is 5 lbs. (2.3 kg). This product is not a toy. DO NOT allow children to play with it.
natural_image
Close-up of hands adjusting a black resistance band with a cable, no visible text or symbols
natural_image
Close-up of hands adjusting a black Jenny charging device (no text or symbols visible)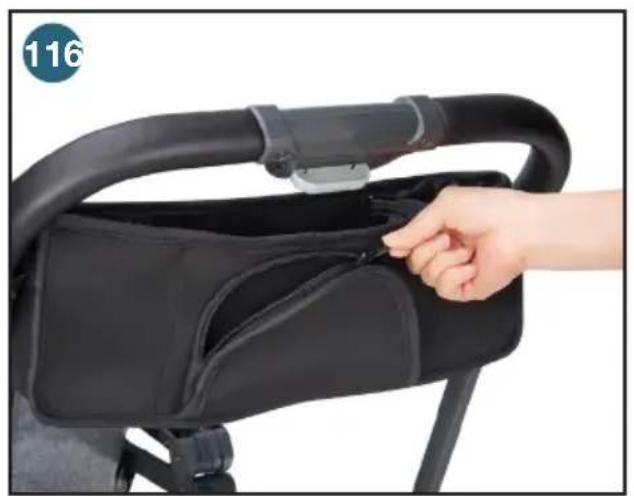
natural_image
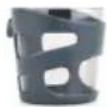
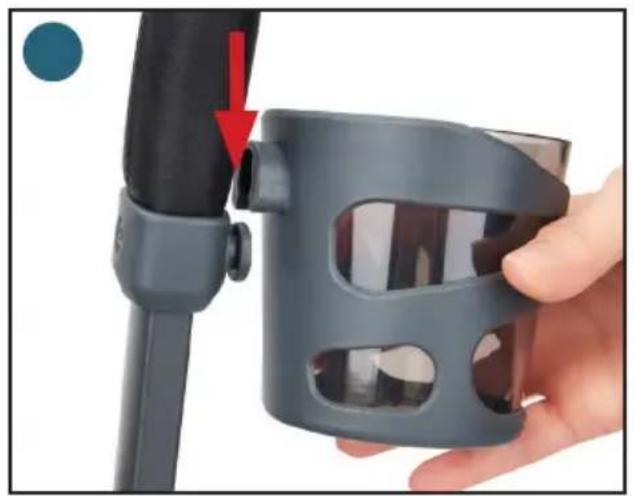
Hand placing a black plastic bag into a stroller (no text or symbols visible)Cup Holder (Optional)
• To attach a cup holder on each side of the handlebar, line up the back of the cup holder clamp to the post on the cup holder mount. (117)
- Push the cup holder down onto the mount until it snaps into place.
NOTE: The cup holders can be attached on the front of the stroller instead the tray.
- First remove the tray if attached.
• To attach a cup holder, line up the back of the cup holder clamp to the post on the tray mount. (118) - Push the cup holder down onto the mount until it snaps into place. (119)
- Slide the cup holder up to remove.
⚠ WARNING: For use ONLY on the Joovy Caboose S™ stroller. The total weight that can be placed in the cup holder should be less than 1 lbs. (0.45 kg). NEVER carry hot beverages or open containers in this product.
natural_image
Close-up of a hand holding a gray plastic device with a red arrow pointing to a small component (no text or symbols visible)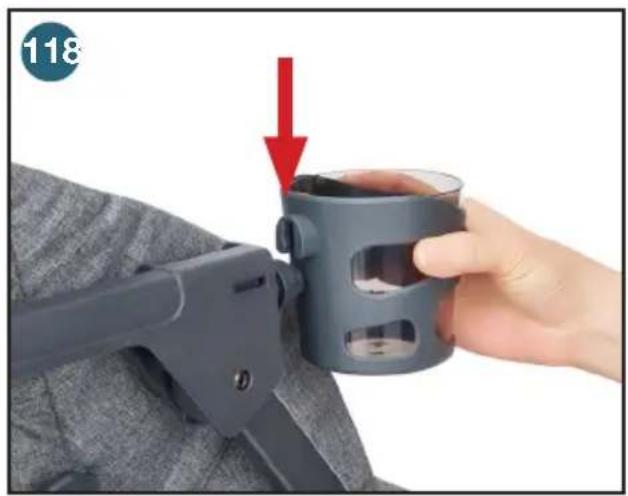
natural_image
Hand holding a gray plastic cup with a red arrow pointing to the cup (no text or symbols visible)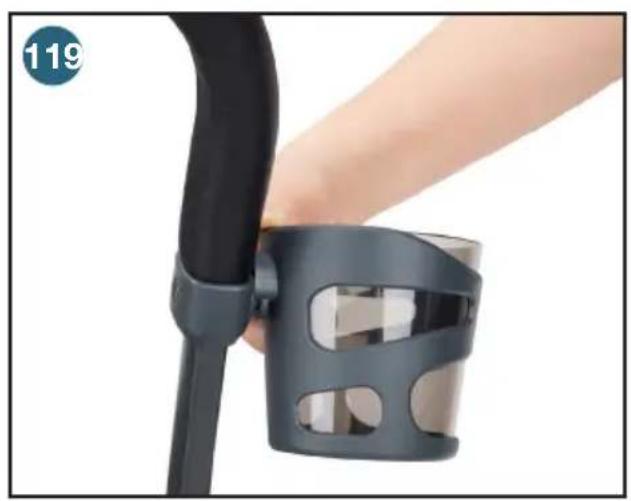
natural_image
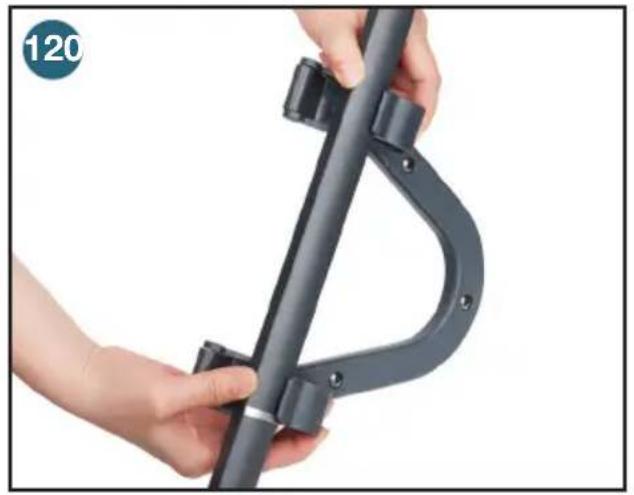
Close-up of a hand holding a black wrist strap and a black plastic clamp (no text or symbols visible)Handles (Optional)
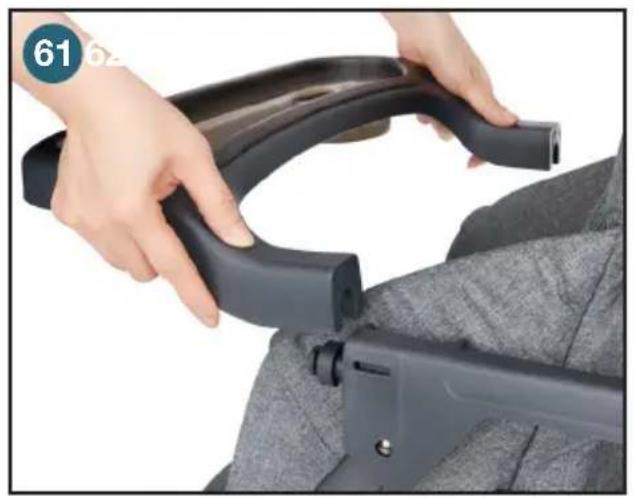
- The handles can be attached on the vertical rear frame of the stroller in two directions forward or backward. (120, 121)
• The attachment location is above the line marked on the inside of the handlebar. (122)
• Line up the handle and push both clamps on the stroller frame.
• To lock the handles, turn both side tabs (123) and press them until they snap into place. (124) Repeat on the other side.
• Pull up on the handles on both sides to ensure they are secured. (125)
natural_image
Close-up of hands holding a black metal bracket with mounting holes, no visible text or symbols
natural_image
Close-up of hands holding a black metal clamp or bracket (no text or symbols visible)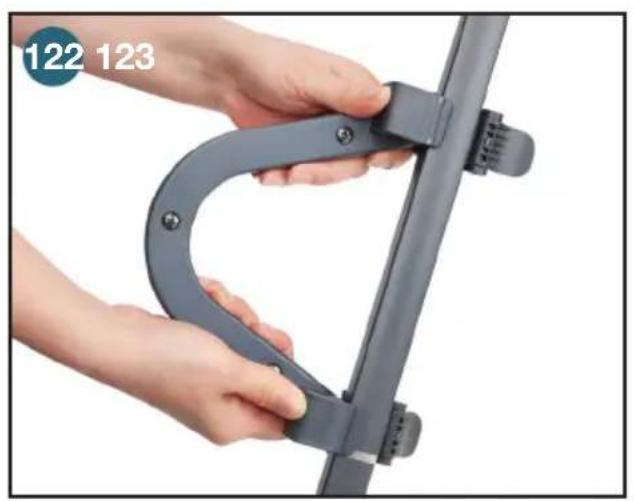
natural_image
Close-up of hands holding a metal clamp or clip against a plain background (no text or symbols visible)
natural_image
Close-up of a hand adjusting a black tripod-mounted device with a blue circular icon in the corner (no text or symbols visible)
natural_image
Close-up of a hand holding a black mechanical device with a red arrow indicating rotation (no text or symbols visible)
natural_image
Close-up of a black bicycle seatbelt frame with curved straps and a blue circular badge showing '125' (no text or symbols on the main subject)Tote (Optional)
- The tote can only be used in the rear position.
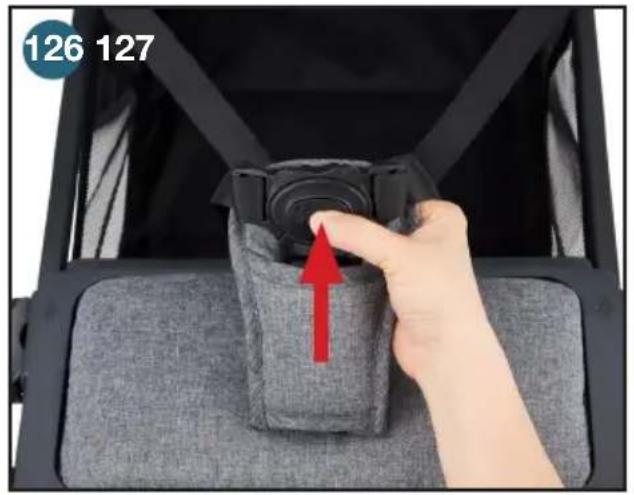
• To unlatch the buckle, press the center button and remove both latch posts. (126) - Store the waist strap in the pocket of the seat back.
- Push down the plastic hooks on each side of the bench and pull the bench from the stroller. (127)
- Unzip zipper of basket (128) and make basket flat in the rear position. (129)
- To install, place the tote on the stroller so that the male brackets line up with the female brackets on the stroller frame.
- Push down on both sides of the tote brackets until both sides snap into place. (130) Pull up on the Tote on both sides to ensure it is secure.
• To remove the tote, squeeze inward on both triggers and pull it off the stroller. (131)
• See the Configurations section for examples of applicable configurations. - The stroller can be folded with the tote installed.
⚠ WARNING: For use ONLY on the Joovy Caboose S stroller. NEVER lift the stroller by the tote. Use caution when attaching the tote when there is a child seated in the stroller. The maximum weight that can be carried in the tote is 33 lbs. (15 kg). This product is not a toy. DO NOT allow children to play with it.
natural_image
Close-up of a hand adjusting a gray fabric seatbelt with a red arrow pointing to the button (no text or symbols visible)
natural_image
Close-up of a hand adjusting a black bicycle seatbelt with a red arrow indicating the adjustment (no text or symbols visible)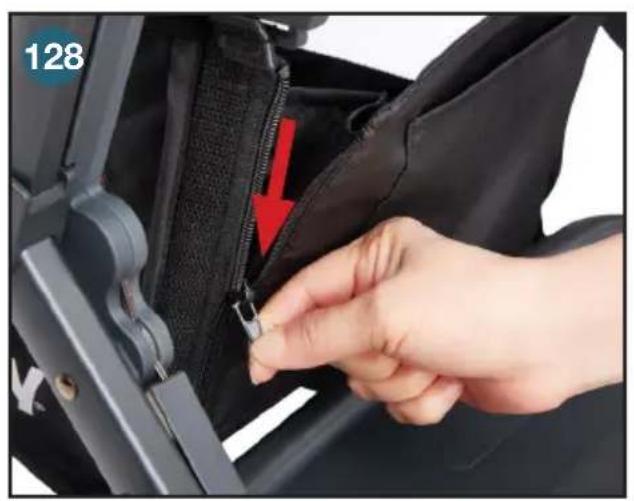
natural_image
Close-up of a hand adjusting a black zipper on a car seat, with a red arrow indicating the zipper's direction (no text or symbols visible)
natural_image
Close-up of a black JooW stroller with wheels and seat cover (no visible text or symbols)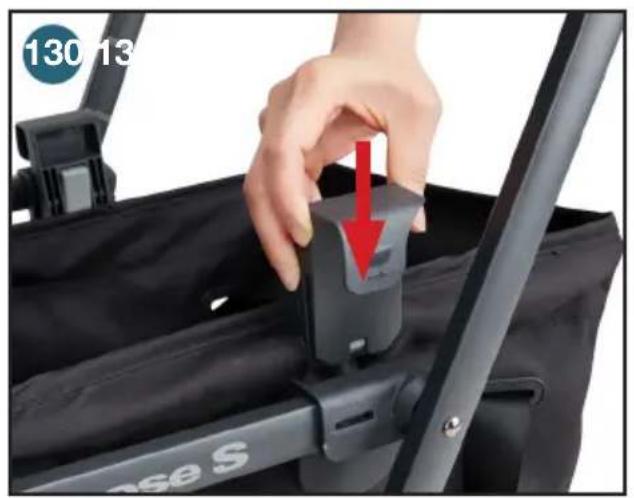
natural_image
Close-up of a hand adjusting a black device component with a red arrow indicating the change (no text or symbols visible)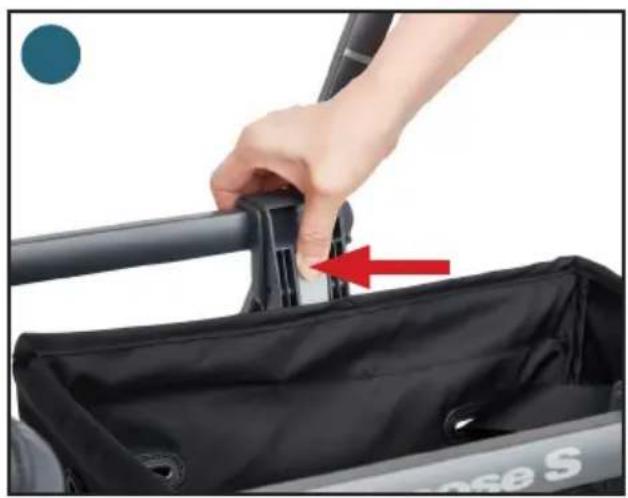
natural_image
Close-up of a hand adjusting a black athletic bag with a red arrow pointing to the handle (no text or symbols visible)Bassinet Adapters (Optional)
- To install the bassinet adapters in the front position, first ensure the front seat and tray are removed.
- Place the bassinet adapters onto both sides of the stroller frame. Line up the male brackets on the bottom of the bassinet adapter with the female brackets on the stroller frame. (132)
- Push down on both sides of the bassinet adapter until both brackets snap into place. Pull up the bassinet adapter on both sides to ensure they are secured.
- Hold the bassinet by the carry handle and lower the bassinet onto the stroller so that the male bracket on the bassinet latches onto the bassinet adapters. (133) Pull up on the bassinet handle to ensure it is secure.
- To remove the bassinet, push both round buttons on both sides of the bassinet and pull away from the stroller. (134)
- To remove the bassinet adapters from the stroller, press the adapter trigger and pull it up off the stroller. (135)
NOTE: The stroller folds with the bassinet adapters installed on the front of the stroller.
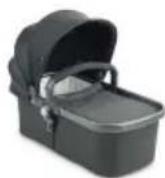
Bassinet (Optional)
- To assemble the bassinet, remove the mattress and unfasten the Velcro® within. (136)
- With one hand braced against the bottom of the bassinet, use your free hand to firmly pull the loop on the bassinet bracket until the bracket fits into the grooves at the bottom of the bassinet. (137) Repeat on the other side. The bassinet should now hold its shape.
NOTE: You may need to unzip the bassinet cover for easier access to the other side. - Replace the mattress. Rezip the bassinet cover if you have unzipped it.
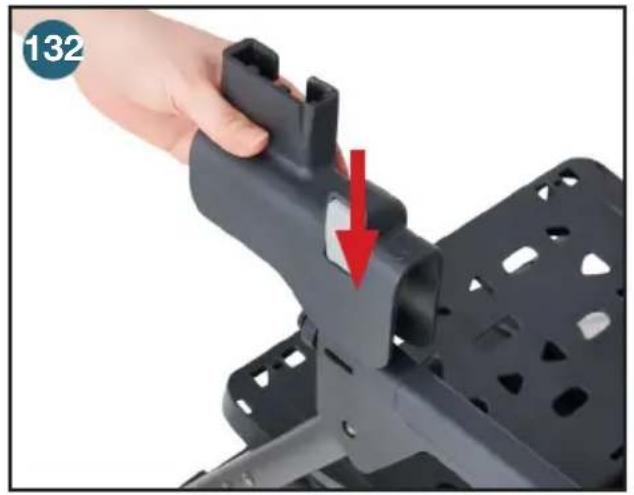
- Attach the bassinet handle by sliding both posts into the mounts on the bassinet. (138)
- Attach the canopy's brackets to the sides of the bassinet frame by hooking them into place. (139)
- Locate the side zipper and zip the canopy to the bassinet fabric. (140)
- Zip up the bassinet cover. (141) Attach the Velcro® of the bassinet cover to the bassinet frame. (142)
- To install the Bassinet Adapters in the front position, first ensure the front seat is removed.
- Place the Bassinet Adapters onto both female brackets of the stroller frame, the arrow diagrams are facing backward, the male brackets of the Bassinet Adapters line up with the female brackets on the stroller frame. (143)
- Push down on both sides of the bassinet until both brackets snap into place. Pull up on the bassinet on both sides to ensure it is secure.
- To remove the bassinet, push both round buttons on both sides of the bassinet and pull away from the stroller. (144)
- To remove the bassinet adapters from the stroller, press outward on both adapter triggers and pull it up off the stroller. (145)
- To disassemble the bassinet, remove the mattress, and unfasten the Velcro® at the bottom of the bassinet. With one hand braced against the bottom of the bassinet, use your free hand to firmly pull on the loops attached to the brackets until it disconnects from the grooves and lies down flat. (146) Repeat for the other side. The bassinet should now lie flat for storage.
- The mattress fabric is washable. Remove the fabric from the foam pad and place the fabric into a mesh washing bag when washing.
• Before folding, remove the bassinet
natural_image
Close-up of a hand holding a black plastic mechanical component with a red arrow indicating a process or adjustment (no text or symbols visible)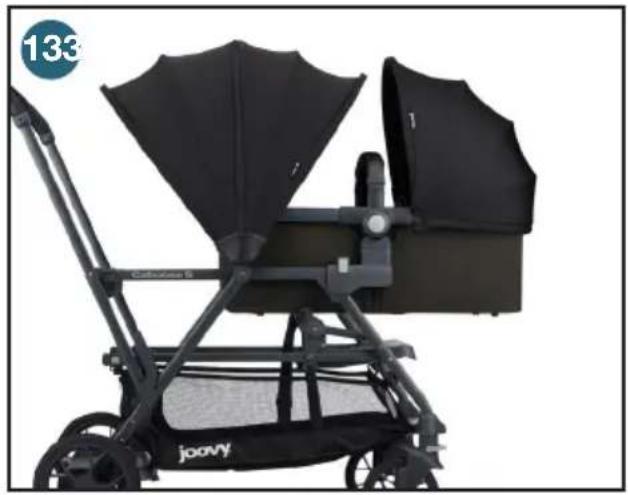
natural_image
Black baby stroller with two umbrellas and a logo (no text or symbols on the device itself)
natural_image
Close-up of a person's seatbelt buckle being adjusted, with a red arrow pointing to the button (no text or symbols visible)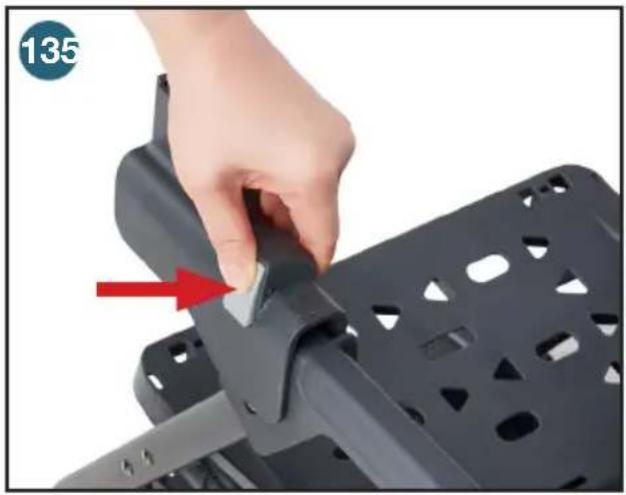
natural_image
Close-up of a hand adjusting a black metal bracket with a red arrow indicating the step (no text or symbols visible)
natural_image
Close-up of a mechanical component with white fabric and red directional arrows indicating movement or force (no text or symbols)
natural_image
Person performing a medical or therapeutic procedure on a patient's abdomen, with hands and a red arrow indicating direction (no text or symbols present)
natural_image
Close-up of hands assembling a black ergonomic device with a red arrow indicating the process (no text or symbols visible)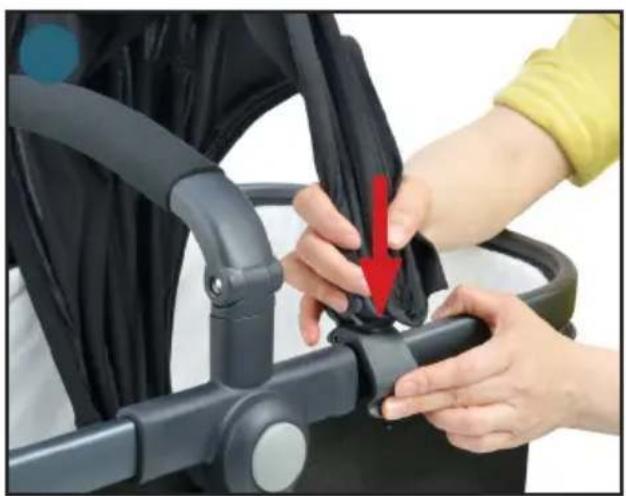
natural_image
Person adjusting a black stroller with a red arrow indicating the cable being inserted (no text or symbols visible)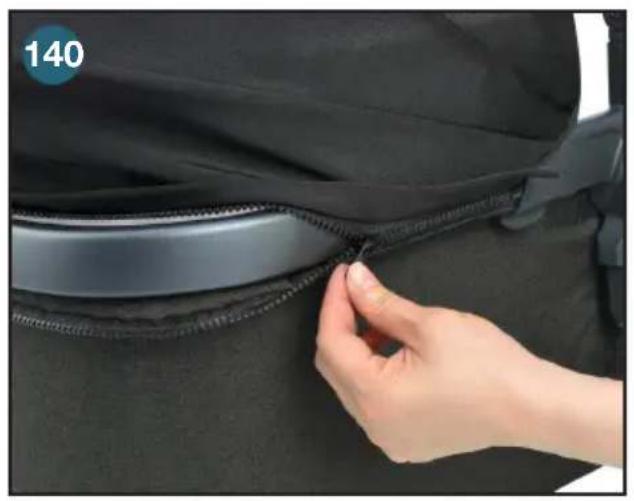
natural_image
Close-up of a hand adjusting a zipper on a dark fabric garment (no text or symbols visible)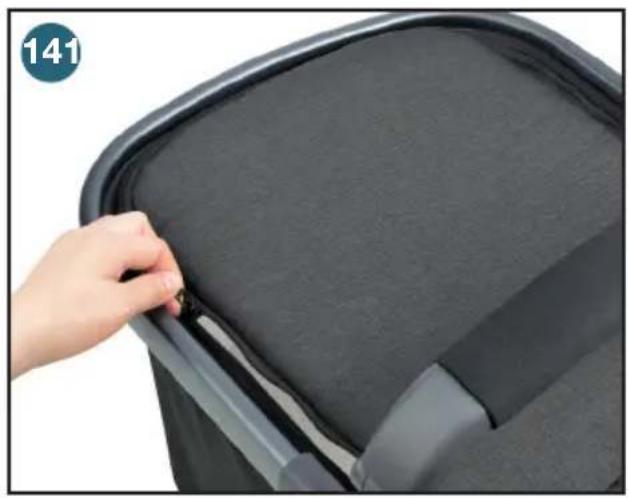
natural_image
Close-up of a hand adjusting a dark gray car seat cover, no text or symbols visible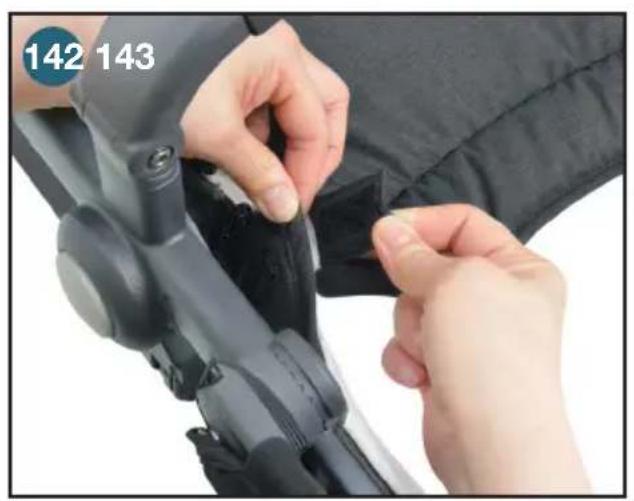
natural_image
Close-up of hands adjusting a black athletic jacket with a blue circular badge showing '142 143' (no text or symbols on the jacket itself)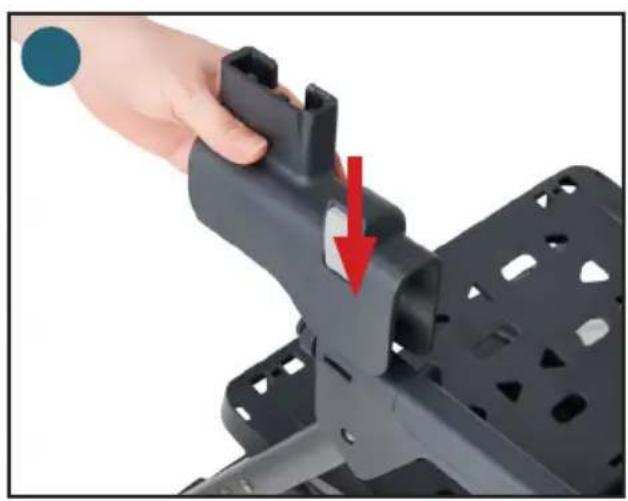
natural_image
Close-up of a hand holding a black mechanical component with a red arrow indicating a downward motion (no text or symbols visible)
natural_image
Close-up of a person's seatbelt buckle being adjusted for a button, with a red arrow pointing to the button (no text or symbols visible)
natural_image
Close-up of a hand holding a black metal bracket with a red arrow pointing to a small component, no visible text or symbols.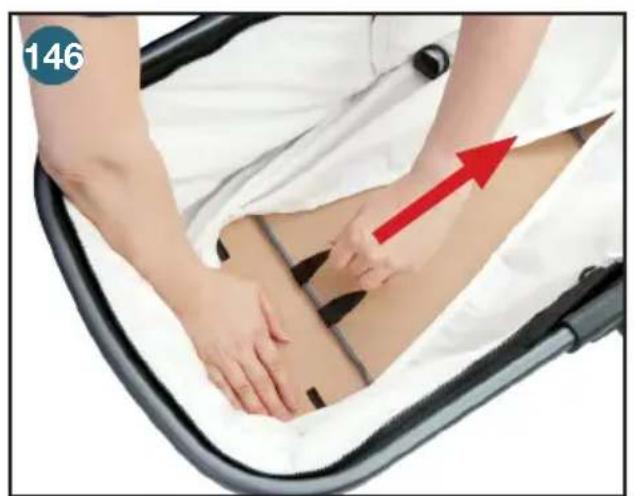
natural_image
Person performing a massage or physical therapy technique on a patient's leg, with a red arrow indicating direction (no text or symbols)WARNING
Failure to follow these warnings and the instructions could result in serious injury or death. Read all the instructions before use of the bassinet. Keep instructions for future use.
- The bassinet is designed for use ONLY on the Joovy Qool and Caboose S strollers. DO NOT use on any other product.
- The bassinet must be fully assembled per Joovy's instructions before using. Do not modify the bassinet or add any attachments not specifically recommended by Joovy.
- Do not use the bassinet if it is damaged or broken.
- To help prevent falls, do not use this product when the infant begins to roll over, push up on hands and knees or has reached over 20 lbs. (9.1 kg), whichever comes first.
- Use bassinet with only one child at a time.
- Use ONLY the pad provided by Joovy.
- To reduce the risk of SIDS, pediatricians recommend healthy infants be placed on their backs to sleep, unless otherwise advised by your physician.
- Only use the mattress cover provided by Joovy.
- Suffocation Hazard: Bassinet can roll over on soft surfaces and suffocate child. NEVER place bassinet on beds, sofas or other soft surfaces.
- Fall Hazard: Child's activity can move bassinet. NEVER place bassinet on counter tops, tables or any other elevated surface.
- NEVER use this bassinet as a means to transport an infant in a motor vehicle.
- Do not place any cord, strap or similar item in or near this bassinet that could become wrapped around a child's neck.
- Do not place this bassinet near a window or patio door where a child could reach the cord of a blind or curtain and be strangled.
- Check this bassinet regularly before using it and do not use it if any parts are loose or missing or if there are any signs of damage. Do not substitute parts. Contact the manufacturer if replacement parts or additional instructions are needed.
- Use a bassinet mattress that is no thicker than 3.8 cm and is of such a size that, when it is pushed firmly against any side of the bassinet, it does not leave a gap of more than 3 cm between the mattress and any part of the sides of the bassinet.
- Children can suffocate on soft bedding. Do not place pillows, comforters or soft mattresses in this bassinet.
Care & Maintenance
Maintenance
All of the fittings, snaps, locks, rivets, and other hardware and plastic parts on the stroller should be inspected periodically to ensure that they are secured properly and not damaged or malfunctioning. The safety harness, as well as all other straps and fabric items and their stitching should also be inspected periodically to ensure that they are secured properly and not loose, torn or otherwise damaged. All moving parts, such as wheels, brakes, and hinges should also be checked periodically to ensure they are operating properly.
Any missing, broken, or worn components should be replaced immediately, and the stroller should not be used until they are replaced. Only original manufacturer's components should be used. If needed, please contact Joovy at our toll-free phone number.
Cleaning
The fabric material on this stroller can be cleaned using mild household soap or detergent and warm water on a sponge or clean cloth. Seat fabric is machine-washable. Remove the metal frame and PE boards from the seat before washing. Do not use solvents, caustic or abrasive cleaning materials. To minimize shrinkage, simply reattach the seat to the frame to dry. Do not press, iron, dry clean, tumble dry or wring the fabric. Always allow the fabric to completely air dry before using the stroller.
The frame and wheels should always be kept clean and free of dirt and foreign matter, especially after operating the stroller in rain, snow, or other harsh environments. Use a sponge or cloth dampened with warm water and a mild detergent cleaner to clean the wheels after such use.
See the Seat Fabric section for information on removing the seat fabric for washing (page 20).
Storage
Direct sunlight may fade fabric and dry out wheels. Store stroller indoors to prolong its appearance. DO NOT store outdoors. Ensure that the stroller is dry before storing for prolonged periods. Always store the stroller in a dry environment. Store the stroller in a safe place when not in use (i.e. away from children). DO NOT place heavy objects on top of the stroller. DO NOT store the stroller near a direct heat source such as a radiator or open fire.
Customer Service
Please do not return this product to the store.
If you experience any of difficulty with the assembly or use of this product, or if you have a question regarding these instructions, please contact our Customer Service Department:
United States
Joovy
(877) 456-5049, 8:30 am – 5:00 pm Central Time
joovy.com LiveChat, 8:30 am – 9:00 pm Central Time
customerservice@joovy.com


@joovy
Canada
Elfe Juvenile Products
(800) 667-8184, 8:30 am - 5:00 pm Eastern Time
service@elfe.ca
Korea
Joy Partners Limited Korea
(822) 2248-3384, 9:00 am - 6:00 pm GMT+9
⚠ MISE EN GARDE
natural_image
Exploded view of a smart car chassis with visible components including wheels, seats, and camera (no text or symbols)natural_image
Close-up of a car interior showing a black plastic tray and handle assembly, with red arrows indicating movement or adjustment points (no text or symbols visible)
natural_image
Close-up of a hand adjusting a black cable with a red arrow indicating rotation (no text or symbols visible)
natural_image
Person using a Jiovo mini scooter to lift a seat, with a red arrow indicating motion (no text or symbols on the device itself)
natural_image
Close-up of a black Joovia robotic platform with visible joints and control panels (no text or symbols)
natural_image
Close-up of a hand adjusting a tire component with a lock, showing the tire being inserted into a vehicle chassis (no text or symbols visible)
natural_image
Close-up of a hand adjusting a tire component with a lock, no visible text or symbols
natural_image
Close-up of hands adjusting a tire component with a red arrow indicating the motion (no text or symbols visible)natural_image
Close-up of a hand adjusting a tire component on a stroller, with a red arrow pointing to the tire (no text or symbols visible)
natural_image
Close-up of hands installing a black mechanical component with a red arrow pointing to the part (no text or symbols visible)natural_image
Close-up of a hand adjusting a black mechanical component with a red arrow indicating the adjustment (no text or symbols visible)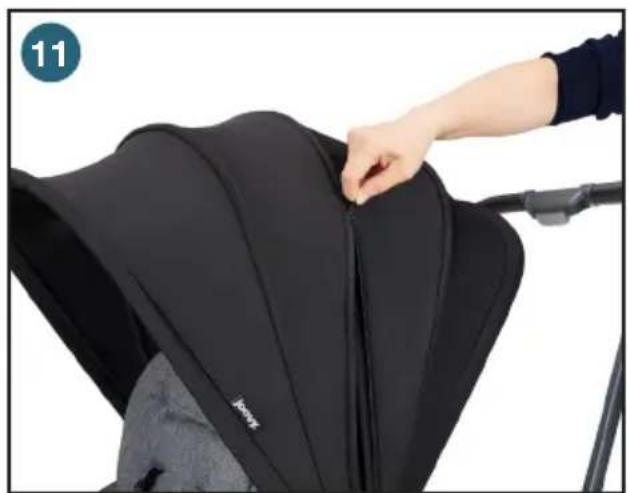
natural_image
Close-up of a black baby stroller with a hand adjusting the seat area (no text or symbols visible)natural_image
Close-up of hands adjusting a black cable strap device on a gray fabric surface (no text or symbols visible)
natural_image
Close-up of hands adjusting a car seatbelt buckle with red arrows indicating adjustment (no text or symbols visible)
natural_image
Close-up of a hand adjusting a black seatbelt component with a red arrow indicating the adjustment (no text or symbols visible)natural_image
Close-up of hands adjusting a gray car seatbelt cover, showing two red circles highlighting the side (no text or symbols visible)
natural_image
Close-up of hands adjusting a car seatbelt component with a red arrow indicating the adjustment (no text or symbols visible)
natural_image
Close-up of a hand adjusting a black fabric seatbelt inside a vehicle cabin (no visible text or symbols)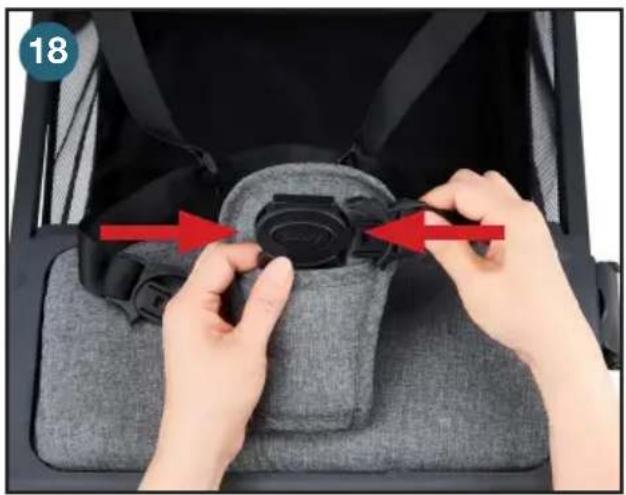
natural_image
Close-up of hands adjusting a gray car seatbelt component with red arrows indicating fastening (no text or symbols visible)
natural_image
Hand placing a camera seatbelt on a car cab, with a red arrow indicating the handle (no text or symbols visible)
natural_image
Hand pressing a button on a car seat panel, showing a red arrow indicating the action (no text or symbols visible)natural_image
Close-up of a hand adjusting a mechanical component with a red arrow indicating the adjustment (no text or symbols visible)
natural_image
Close-up of a hand adjusting a black mechanical component with a red arrow indicating the adjustment (no text or symbols visible)
text_image
23 24
natural_image
Close-up of a car wheel and foot assembly with a red arrow pointing to a small component (no text or symbols visible)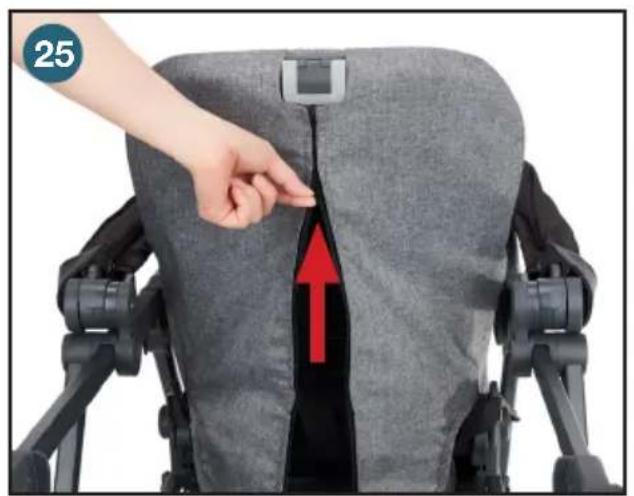
natural_image
Close-up of a gray baby car seat with a hand adjusting the seat, showing a red arrow pointing to the spine (no text or symbols visible)
natural_image
Close-up of a person's hand inserting a small black plastic clip into a dark gray backpack (no text or symbols visible)
natural_image
Close-up of a hand adjusting a car seatbelt buckle, showing a red arrow pointing to the buckle (no text or symbols visible)
natural_image
Close-up of hands adjusting a black plastic buckle with red arrows indicating fastening (no text or symbols visible)Réglage du siège
natural_image
Close-up of a hand adjusting a gray car seatbelt with a red arrow indicating rotation (no text or symbols)natural_image
Close-up of a baby stroller with hands adjusting the seatbelt, showing a red arrow indicating a specific movement (no text or symbols present)
natural_image
Close-up of a hand adjusting a gray patterned sleeve with a red arrow pointing to the button (no text or symbols visible)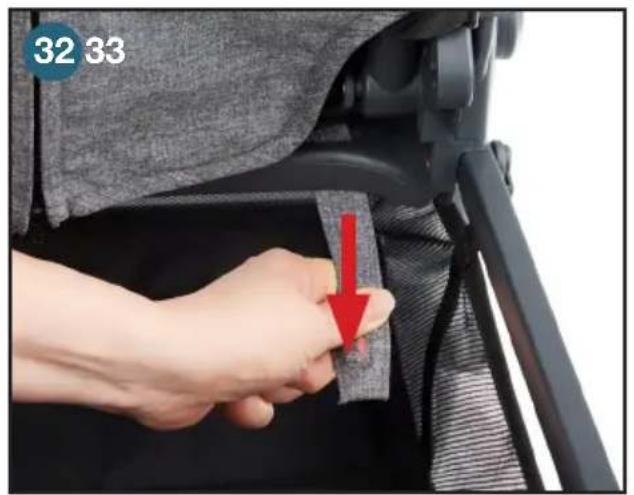
text_image
32 33
natural_image
Close-up of a hand adjusting a dark fabric seatbelt with a red arrow pointing to the button (no text or symbols visible)
natural_image
Close-up of a hand adjusting a black belt buckle with a red arrow pointing to the buckle detail (no text or symbols visible)
natural_image
Close-up of hands installing a black plastic clip on a dark fabric seat (no text or symbols visible)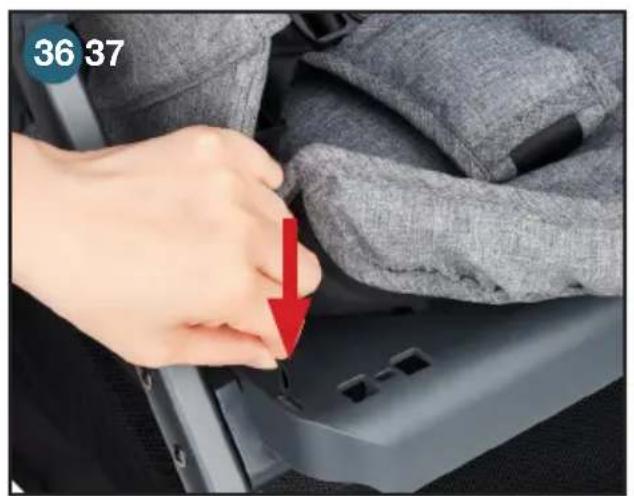
natural_image
Close-up of a hand inserting a small component into a car seatbelt, with a red arrow indicating the insertion direction (no text or symbols visible)
natural_image
Close-up of a hand adjusting a gray fabric seatbelt with a red circle highlighting the finger area (no text or symbols visible)
natural_image
Close-up of a hand adjusting a black plastic seat cover with a textured cushion (no text or symbols visible)
natural_image
Close-up of a hand adjusting a black seatbelt buckle, with a red arrow indicating the motion (no text or symbols visible)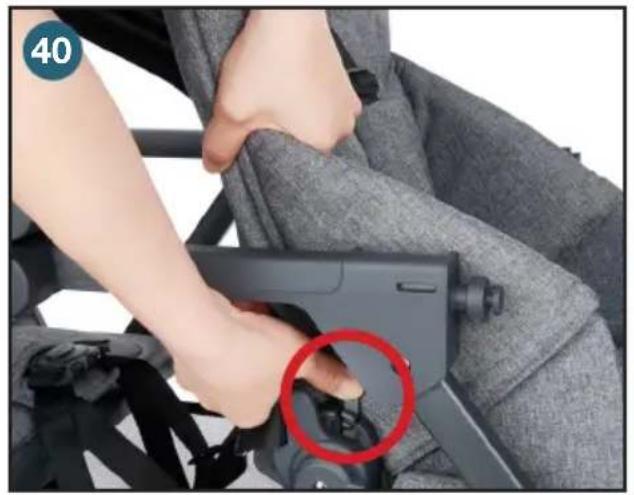
natural_image
Close-up of a person adjusting a firearm inside a gray vehicle seatbelt, with a red circle highlighting the button (no text or symbols visible)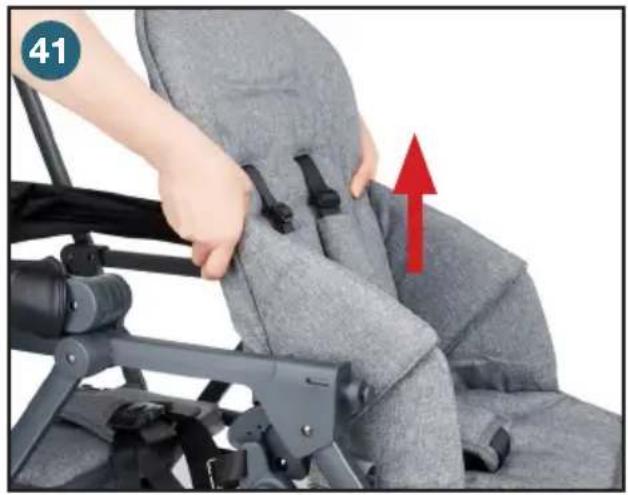
natural_image
Close-up of a baby stroller with a hand adjusting the seat area, showing a red upward arrow (no text or symbols visible)natural_image
Close-up of a hand adjusting a mechanical component with a red arrow indicating the step (no text or symbols visible)
natural_image
Close-up of a car's side panel with a red arrow pointing to a key inserted into the wheel (no text or symbols visible)
natural_image
Hand holding a black cable with a red arrow pointing to the cable end (no text or symbols)
natural_image
Black stroller with black frame and wheels, displayed against white background (no text or symbols)
natural_image
Black and white photo of a compact toy vehicle with wheels and a handle, no visible text or symbolsnatural_image
Close-up of a sewing machine's back panel being adjusted with a hand, showing the needle and red arrow (no text or symbols)
natural_image
Close-up of hands adjusting a black fabric garment with a zipper, no visible text or symbols
natural_image
Close-up of a hand holding a black strap attached to a gray backpack (no text or symbols visible)
natural_image
Close-up of hands adjusting a gray fabric bag with a black clip, no visible text or symbols
natural_image
Close-up of hands adjusting a black fabric garment with a zipper, no visible text or symbols
natural_image
Close-up of hands installing a white card with black rectangular cutouts, showing a red arrow indicating the process (no text or symbols present)
natural_image
Close-up of a person's seatbelt being adjusted for a zipper, with a red arrow indicating the zipper (no text or symbols visible)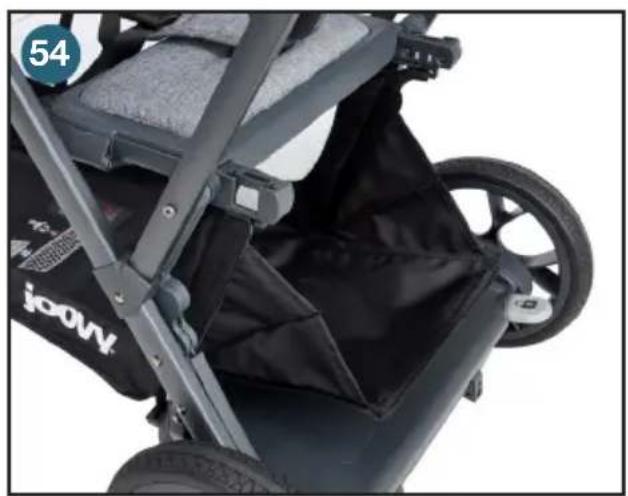
natural_image
Close-up of a baby stroller with black bedding and wheels, no visible text or symbolsBanquette
natural_image
Hand placing a car seatbelt buckle into a gray box, with a red arrow indicating the buckle's direction (no text or symbols on the suit itself)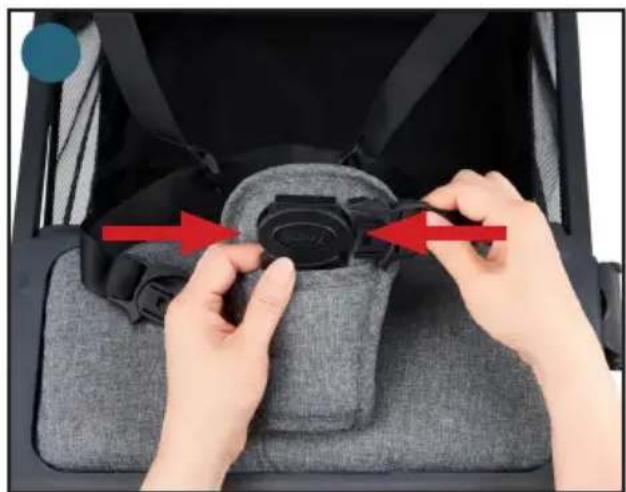
natural_image
Close-up of hands adjusting a seatbelt component inside a car seatbelt (no text or symbols visible)natural_image
Close-up of hands assembling a black plastic tray with a red upward arrow (no text or symbols visible)
natural_image
Close-up of a hand placing a black plastic component into a black plastic housing with a red arrow indicating the process (no text or symbols visible)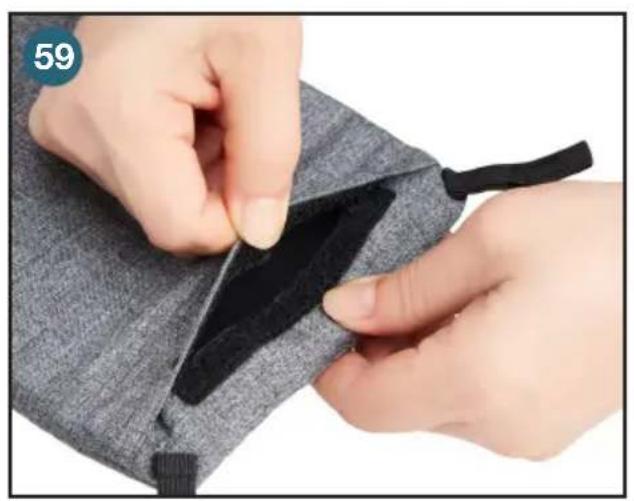
natural_image
Close-up of hands installing a black fabric patch on a gray textured garment (no text or symbols visible)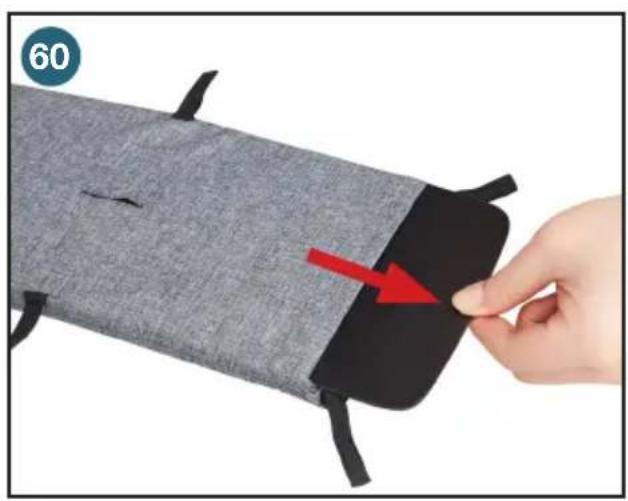
natural_image
Hand holding a gray fabric sleeve with black straps and a red arrow pointing to the interior (no text or symbols)Plateforme d'appui
natural_image
Close-up of hands adjusting a black curved object on a gray textured surface (no text or symbols visible)
natural_image
Close-up of hands adjusting a car seatbelt component with red arrows indicating adjustment (no text or symbols visible)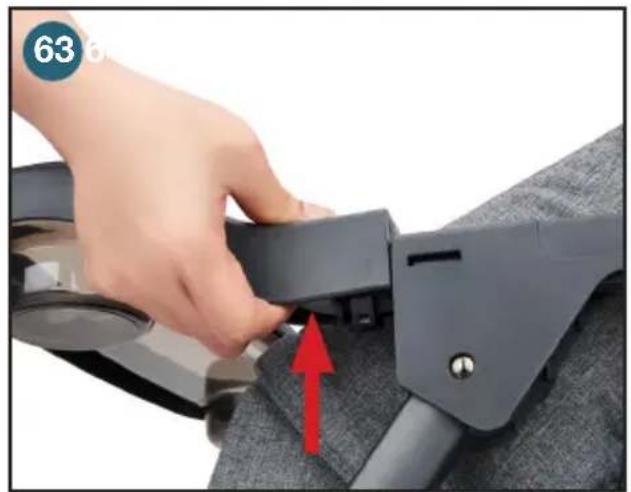
natural_image
Close-up of a hand adjusting a black seatbelt buckle with a red arrow indicating the adjustment (no text or symbols visible)
natural_image
Close-up of a hand adjusting a black seatbelt device on a gray car seat, with a red curved arrow indicating motion (no text or symbols visible)Configurations
natural_image
Hand placing a camera seatbelt into a gray car seatbelt, with a red arrow indicating the handle (no text or symbols visible)
natural_image
Close-up of a hand adjusting a black fabric seat component inside a vehicle cabin (no visible text or symbols)
natural_image
Hand inserting a red arrow to a black car seat panel (no text or symbols visible)
natural_image
Close-up of a hand adjusting a gray cushioned device with a red arrow pointing to it, no visible text or symbols.
natural_image
Close-up of a car seatbelt buckle assembly with a red arrow indicating the mounting point (no text or symbols visible)
natural_image
Close-up of a baby car seat with hands adjusting the seat frame (no visible text or symbols)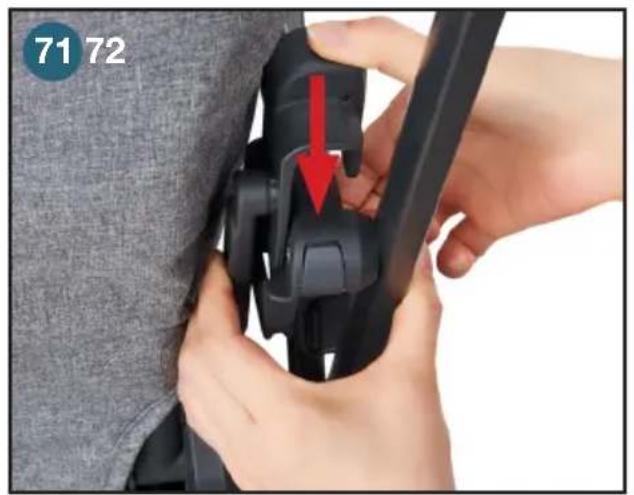
text_image
71 72
natural_image
Close-up of a car seatbelt buckle with a hand adjusting the seatbelt (no text or symbols visible)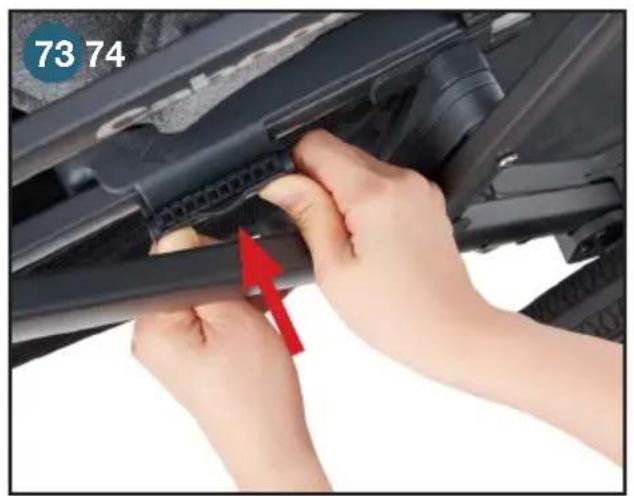
natural_image
Close-up of hands installing a black cable component with red arrow indicating assembly (no text or symbols visible)
natural_image
Close-up of hands adjusting a gray fabric seatbelt with a red arrow pointing to the toe area (no text or symbols visible)
text_image
7516
natural_image
Close-up of a hand inserting a small black plastic component into a car's side panel, with a red circle highlighting the component (no text or symbols visible)natural_image
Close-up of a gray ergonomic seat with a hand adjusting the seat, showing a red upward arrow indicating movement or positioning (no text or symbols present)
natural_image
Close-up of a hand inserting a small black plastic clip into a gray backpack (no text or symbols visible)
natural_image
Close-up of a hand adjusting a black seatbelt buckle with a red arrow pointing to the seat (no text or symbols visible)
natural_image
Close-up of hands adjusting a black plastic buckle component with red arrows indicating alignment (no text or symbols visible)
natural_image
Hand pressing a button on a gray fabric seatbelt, with a red arrow indicating clockwise motion (no text or symbols)natural_image
Close-up of a gray fabric garment being adjusted with a zipper, showing a red upward arrow indicating the seam (no text or symbols)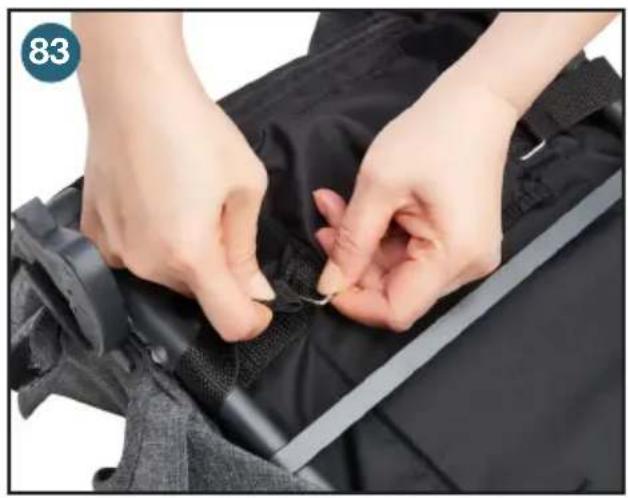
natural_image
Close-up of hands adjusting a black fabric garment with a zipper, no visible text or symbols
natural_image
Close-up of a hand adjusting a black mechanical component with a textured patch, no visible text or symbols
natural_image
Close-up of a hand holding a black plastic clip attached to a gray patterned blanket (no text or symbols visible)
natural_image
Close-up of hands adjusting a black fabric garment with a zipper, no visible text or symbols
natural_image
Close-up of hands installing a black garment with a white fabric patch, showing a red arrow indicating the process (no text or symbols)natural_image
Close-up of hands installing or adjusting a black mechanical frame with cable and bracket (no visible text or symbols)
natural_image
Close-up of hands installing a black mechanical component with red arrows indicating assembly or installation (no text or symbols visible)
natural_image
Person adjusting a baby car seat with a red arrow pointing to the seat area (no text or symbols visible)
natural_image
Close-up of hands using a mechanical device to adjust a component, with a red arrow indicating the motion direction (no text or symbols visible)
natural_image
Person using a Caboos bicycle leg rest frame, no visible text or symbols on the device itself
text_image
93 Caboo
natural_image
Close-up of a baby stroller with a red arrow pointing to the seat area, no visible text or symbols on the device itself.
natural_image
Close-up of a hand adjusting a black bicycle seatbelt with a red arrow pointing to the component (no text or symbols visible)natural_image
Hand holding a black device with a lock, mounted on a wheeled vehicle (no visible text or symbols)
natural_image
Close-up of a hand adjusting a black mechanical component with a red arrow indicating the adjustment (no text or symbols visible)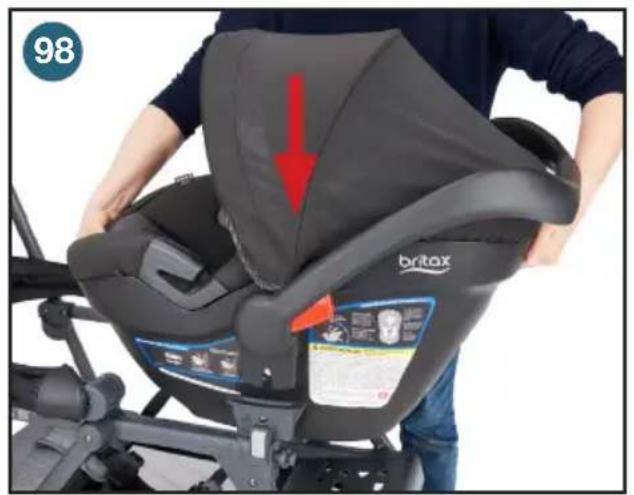
natural_image
Person assembling a Britax baby car seat with a red arrow indicating the seat area (no text or symbols on the device itself)
text_image
99 Baoose S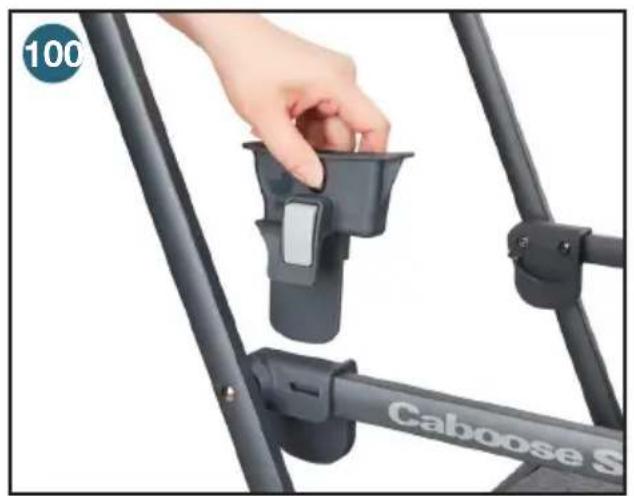
natural_image
Close-up of a hand adjusting a Caboose S bicycle seat bracket (no text or symbols visible)
natural_image
Close-up of a hand adjusting a Caboos bicycle seat bracket with a red arrow indicating the adjustment (no text or symbols on the diagram itself)natural_image
Hand holding a black mechanical device with a handle, mounted on a wheeled platform (no visible text or symbols)
natural_image
Hand placing a black mechanical component with a red arrow indicating downward motion (no text or symbols)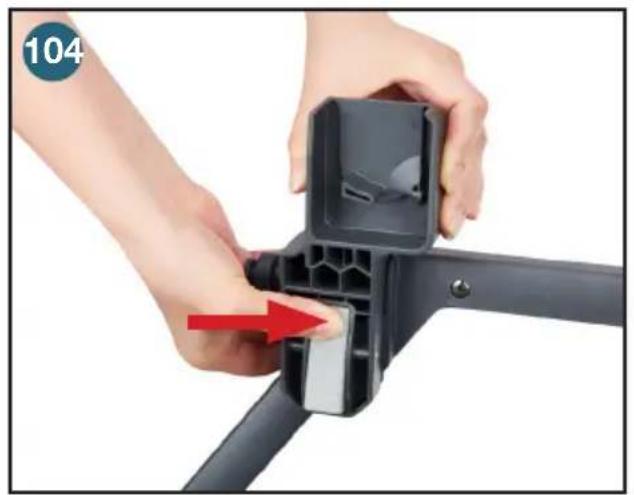
natural_image
Close-up of hands assembling a black mechanical component with a red arrow indicating the handle (no text or symbols visible)
natural_image
Close-up of a hand holding a black bicycle seat bracket with 'Caboose' branding, no visible text or symbols on the main subject.
text_image
106 10. Caboos
natural_image
Person wearing a stroller with a red arrow indicating a cable or cable being inserted (no text or symbols visible)NOTE IMPORTANTE
natural_image
Black and white photo of a children's stroller with transparent cover and metal mesh, no visible text or symbols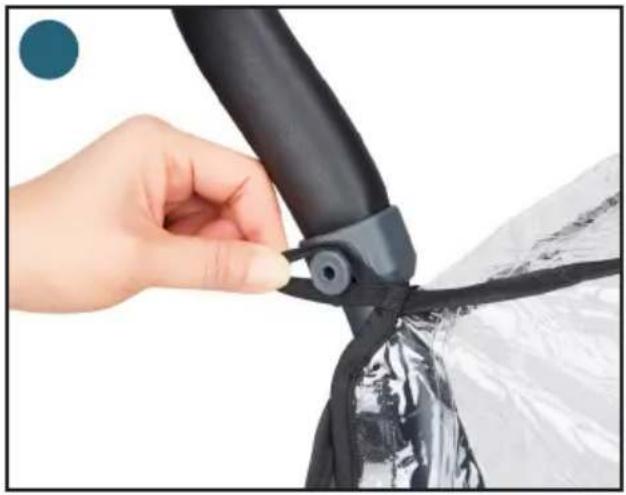
natural_image
Close-up of a hand adjusting a black cable or cable with a plastic wrap, against a white background (no text or symbols visible)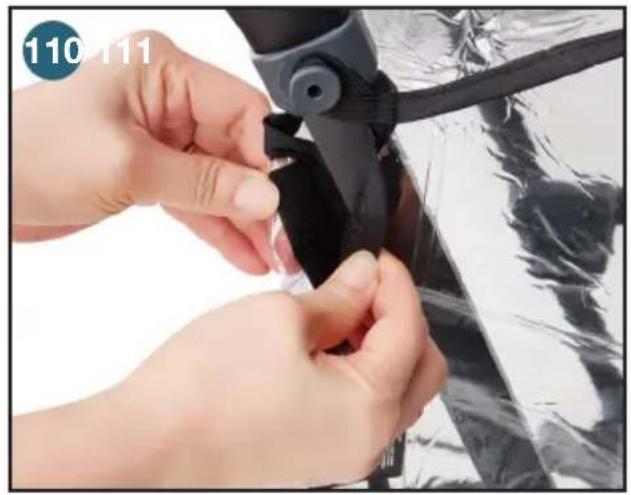
natural_image
Close-up of hands adjusting a black plastic component with a blue circular icon labeled '110 111' in the corner (no text on main subject)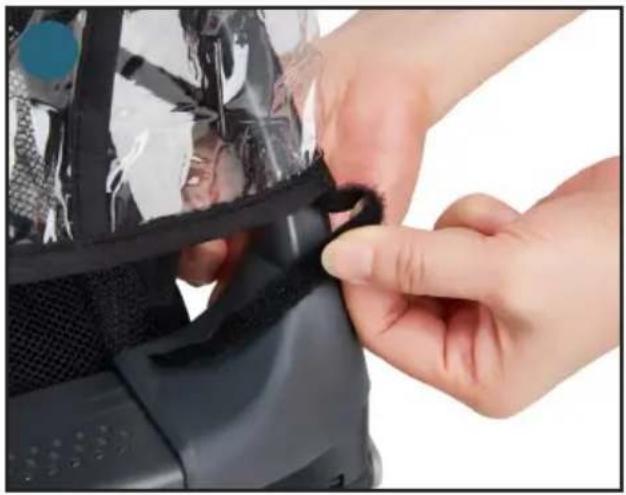
natural_image
Close-up of hands adjusting a black plastic bag with a blue circular object on top (no visible text or symbols)
natural_image
Close-up of a hand adjusting a black jacket with a zipper, partially covered by reflective foil (no text or symbols visible)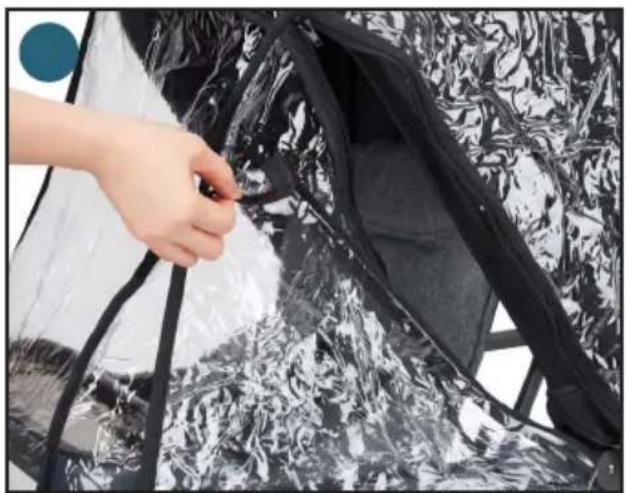
natural_image
Close-up of a hand adjusting black plastic film strips with a blue circular icon (no text or symbols visible)natural_image
Close-up of hands adjusting a black wrist strap and cable (no text or symbols visible)
natural_image
Close-up of hands installing a black backpack cover on a wheeled scooter (no text or symbols visible)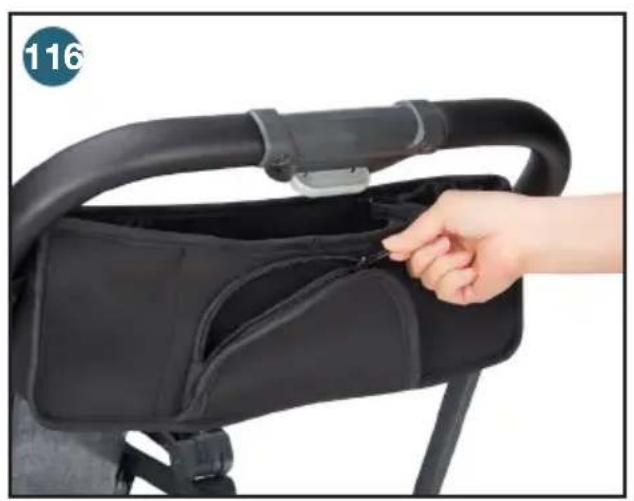
natural_image
Hand placing a black plastic bag into a black stroller (no text or symbols visible)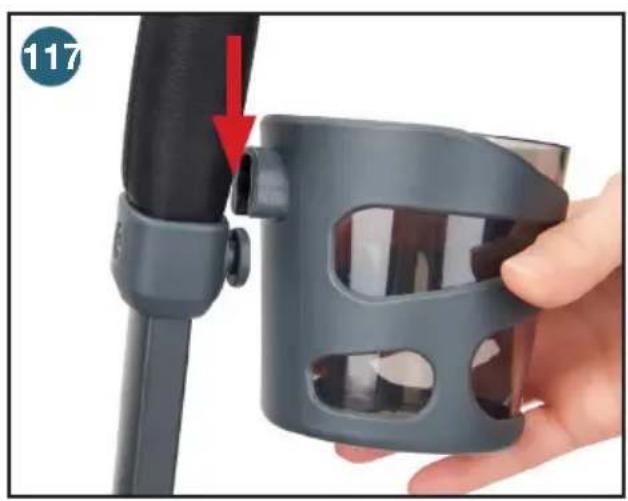
natural_image
Close-up of a hand holding a gray plastic car seat with a red arrow pointing to the handle (no text or symbols visible)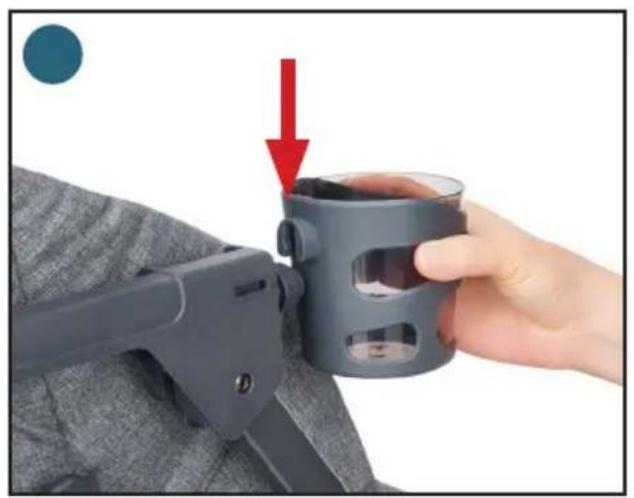
natural_image
Hand holding a gray plastic mug with a red arrow pointing to it, against a textured gray shirt (no text or symbols visible)
natural_image
Close-up of a hand holding a black wristband device with a circular badge showing the number 119 (no text or symbols on the device itself)natural_image
Close-up of hands holding a black metal bracket with mounting holes, no text or symbols visible
natural_image
Close-up of hands holding a black metal clamp or bracket (no text or symbols visible)
natural_image
Close-up of hands holding a metal clamp or clip against a plain background (no text or symbols visible)
natural_image
Close-up of a hand adjusting a black tripod-mounted device with a blue circular icon in the corner (no text or symbols visible)
natural_image
Close-up of a hand holding a black mechanical device with a red arrow indicating rotation (no text or symbols visible)
natural_image
Close-up of a black bicycle seatbelt frame with curved straps and a blue circular badge showing '125' in the corner (no text or symbols on the main subject)Sac de magasinage (en option)
natural_image
Close-up of a hand adjusting a gray fabric seatbelt with a red arrow pointing to the button (no text or symbols visible)
natural_image
Close-up of a hand adjusting a black mechanical component with a red arrow indicating rotation (no visible text or symbols)
natural_image
Close-up of a hand inserting a zipper into a black leather seat (no text or symbols visible)
natural_image
Close-up of a black and silver stroller with wheels and a visible cover (no text or symbols)
natural_image
Close-up of a hand adjusting a black device component with a red arrow indicating the change (no text or symbols visible)
natural_image
Close-up of a hand adjusting a black athletic bag with a red arrow pointing to the handle (no text or symbols visible)natural_image
Close-up of a hand holding a black plastic mechanical component with a red arrow indicating a detail (no text or symbols visible)
natural_image
Black baby stroller with two canopy blades, no visible text or symbols on the device itself.
natural_image
Close-up of a person's seatbelt buckle being adjusted, with a red arrow pointing to the button (no text or symbols visible)
natural_image
Close-up of a hand adjusting a black metal bracket with a red arrow indicating the step (no text or symbols visible)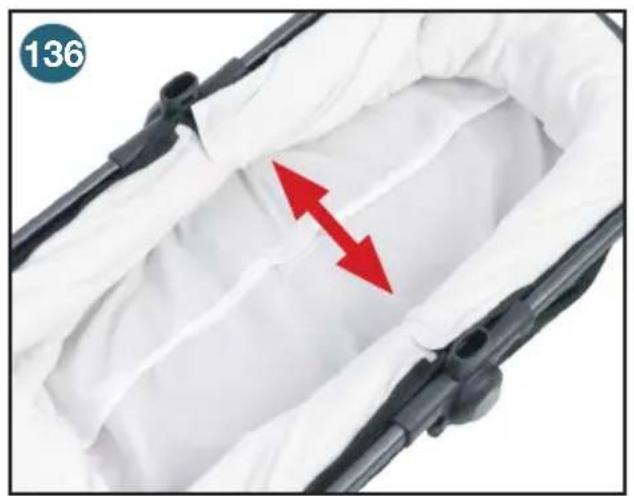
natural_image
Close-up of a white fabric or material sample with two red arrows indicating direction, no text or symbols present.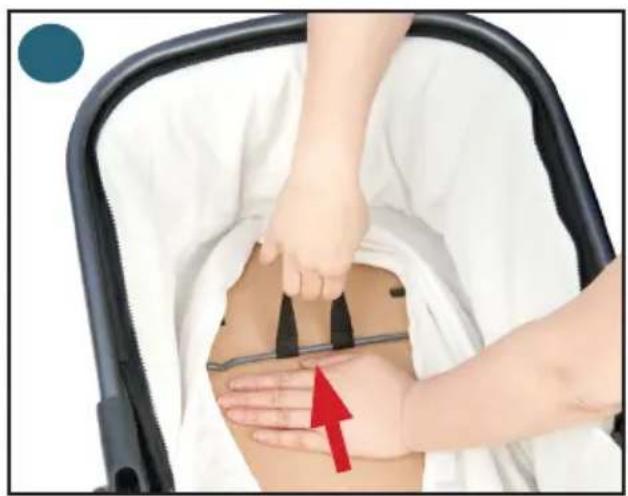
natural_image
Person performing a medical or therapeutic procedure on a patient in a stroller, with a red arrow indicating the point of care (no text or symbols present)
natural_image
Close-up of hands assembling a black ergonomic device with a red arrow indicating the process (no text or symbols visible)
natural_image
Close-up of hands adjusting a black stroller seatbelt with a red arrow indicating the adjustment (no text or symbols visible)
natural_image
Close-up of a hand adjusting a zipper on a car seat (no text or symbols visible)
natural_image
Close-up of a hand adjusting a dark gray car seat cover, no text or symbols visible
natural_image
Close-up of hands adjusting a black athletic jacket with a blue circular badge showing '142 143' (no text or symbols on the jacket itself)
natural_image
Close-up of a hand adjusting a black mechanical component with a red arrow indicating a downward motion (no text or symbols visible)
natural_image
Person adjusting a seatbelt device with a red arrow pointing to the circular component (no text or symbols visible)
natural_image
Close-up of a hand adjusting a black metal bracket with a red arrow pointing to a small component (no text or symbols visible)
natural_image
Person performing a massage or physical therapy technique on a patient's leg, with a red arrow indicating direction (no text or symbols)⚠️ MISE EN GARDE
Elfe Juvenile Products
Joy Partners Limited Korea
(822) 2248-3384, 9h00 - 18h00 GMT+9
ADVERTENCIA
natural_image
Product assembly of a smart car with visible wheels, seats, and camera module (no text or symbols)natural_image
Close-up of a car interior showing a black plastic seat with red arrows indicating fastening or adjustment points (no text or symbols visible)
natural_image
Close-up of a hand adjusting a black cable with a red arrow indicating rotation (no text or symbols visible)
natural_image
Person using a Jiovo mini scooter to lift a seat, with a red arrow indicating motion (no text or symbols on the device itself)
natural_image
Close-up of a black Joovia robotic platform with visible joints and control panels (no text or symbols)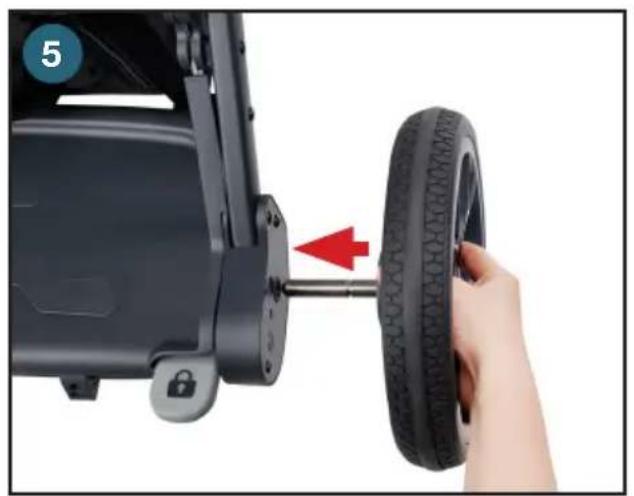
natural_image
Close-up of a hand adjusting a tire component with a lock, showing the tire being inserted into a mechanical housing (no text or symbols visible)
natural_image
Close-up of a hand adjusting a tire component with a lock, no visible text or symbols
natural_image
Close-up of hands adjusting a tire component with a red arrow indicating the motion (no text or symbols visible)natural_image
Close-up of a hand adjusting a tire component with a red arrow pointing to the tire (no text or symbols visible)
natural_image
Close-up of hands installing a black seatbelt component with a red arrow indicating the adjustment (no text or symbols visible)natural_image
Close-up of a hand adjusting a black mechanical component with a red arrow indicating the adjustment (no text or symbols visible)
natural_image
Close-up of a hand adjusting a black children's seatbelt, no text or symbols visiblenatural_image
Close-up of hands adjusting a black curved device with a gray textured base (no visible text or symbols)
natural_image
Close-up of hands adjusting a car seatbelt with red arrows indicating adjustment (no text or symbols visible)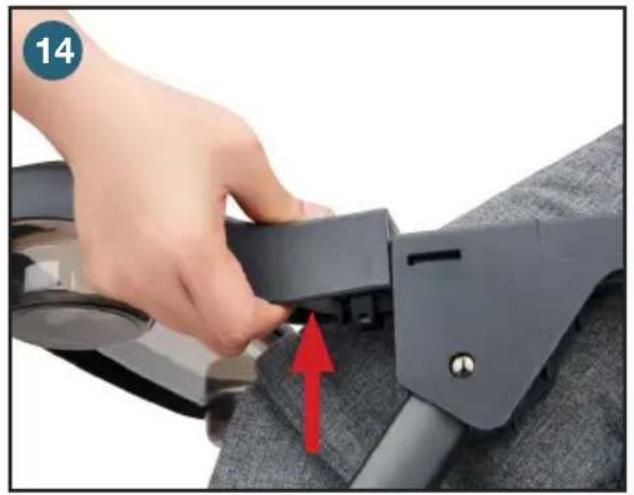
natural_image
Close-up of a hand adjusting a black seatbelt component with a red arrow indicating the adjustment (no text or symbols visible)natural_image
Close-up of hands adjusting a gray car seatbelt cover, showing two red circles highlighting the side (no text or symbols visible)
natural_image
Close-up of hands adjusting a car seatbelt component with a red arrow indicating the adjustment (no text or symbols visible)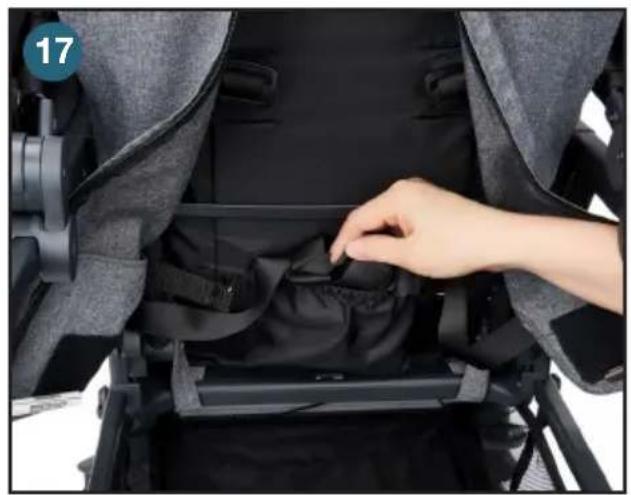
natural_image
Close-up of a hand adjusting a black fabric seatbelt inside a vehicle cabin (no visible text or symbols)
natural_image
Close-up of hands adjusting a gray car seatbelt component with red arrows indicating fastening (no text or symbols visible)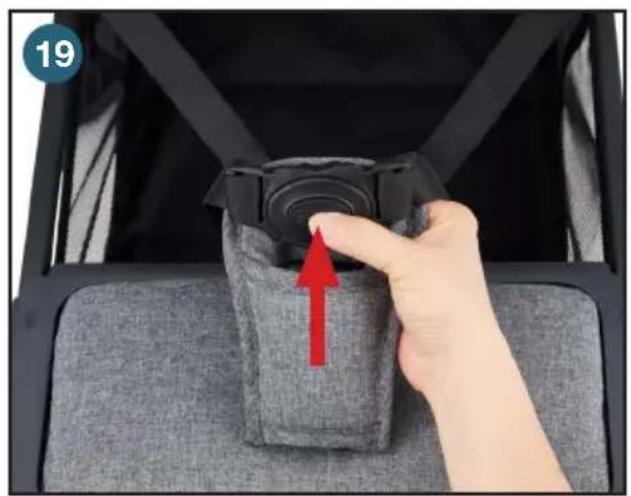
natural_image
Hand placing a camera seatbelt on a gray cushion, with a red arrow indicating the handle (no text or symbols visible)
natural_image
Hand pressing a button on a car seat panel, showing a red arrow indicating the action (no text or symbols visible)Uso del cochecito
natural_image
Close-up of a hand adjusting a mechanical component with a red arrow indicating the adjustment (no text or symbols visible)
natural_image
Close-up of a hand adjusting a black mechanical component with a red arrow indicating the adjustment (no text or symbols visible)
text_image
23 24
natural_image
Close-up of a car's wheel and foot assembly with a red arrow indicating a specific component (no text or symbols visible)
natural_image
Close-up of a gray baby car seat with a hand adjusting the seat, showing a red arrow pointing to the spine (no text or symbols visible)
natural_image
Close-up of a person's hand inserting a small black plastic clip into a dark gray backpack (no text or symbols visible)
natural_image
Close-up of a hand adjusting a car seatbelt buckle, showing a red arrow pointing to the buckle (no text or symbols visible)
natural_image
Close-up of hands adjusting a black plastic buckle with red arrows indicating fastening (no text or symbols visible)Ajuste del asiento
natural_image
Close-up of a hand adjusting a gray car seatbelt with a red arrow indicating rotation (no text or symbols)natural_image
Close-up of a baby stroller with hands adjusting the seatbelt, showing a red arrow indicating a specific movement (no text or symbols present)
natural_image
Close-up of a hand adjusting a black seatbelt buckle with a red arrow pointing to the buckle (no text or symbols visible)
text_image
32 33
natural_image
Close-up of a hand adjusting a dark fabric seatbelt with a red arrow pointing to the button (no text or symbols visible)
natural_image
Close-up of a hand adjusting a black belt buckle with a red arrow pointing to the buckle detail (no text or symbols visible)
natural_image
Close-up of hands installing a black plastic clip on a dark gray seat (no text or symbols visible)
natural_image
Close-up of a hand inserting a small component into a car seatbelt, with a red arrow indicating the insertion direction (no text or symbols visible)
natural_image
Close-up of a hand adjusting a gray fabric seatbelt with a red circle highlighting the finger area (no text or symbols visible)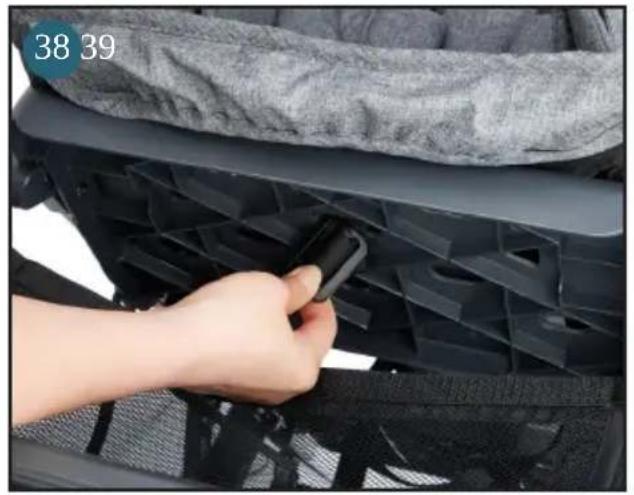
natural_image
Close-up of a hand adjusting a black plastic bag with a textured cushion (no visible text or symbols)
natural_image
Close-up of a hand adjusting a black seatbelt buckle, with a red arrow indicating the buckle's adjustment (no text or symbols visible)
natural_image
Close-up of a person adjusting a firearm in a car seatbelt, with a red circle highlighting the finger area (no text or symbols visible)
natural_image
Close-up of a baby stroller with hand adjusting seatbelt, showing red upward arrow (no text or symbols)natural_image
Close-up of a hand adjusting a mechanical component with a red arrow indicating the adjustment (no text or symbols visible)
natural_image
Close-up of a car's side panel with a red arrow pointing to a key inserted into the wheel (no text or symbols visible)
natural_image
Hand holding a black cable with a red arrow pointing to the cable end (no text or symbols)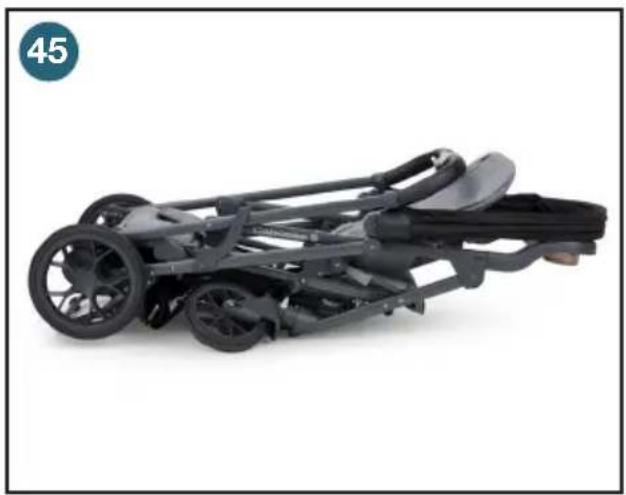
natural_image
Black stroller with black frame and wheels, displayed against white background (no text or symbols)
natural_image
Black and white photo of a compact toy vehicle with wheels and a handle, no visible text or symbolsnatural_image
Close-up of a sewing machine's back panel being adjusted with a hand, showing the needle and red arrow (no text or symbols)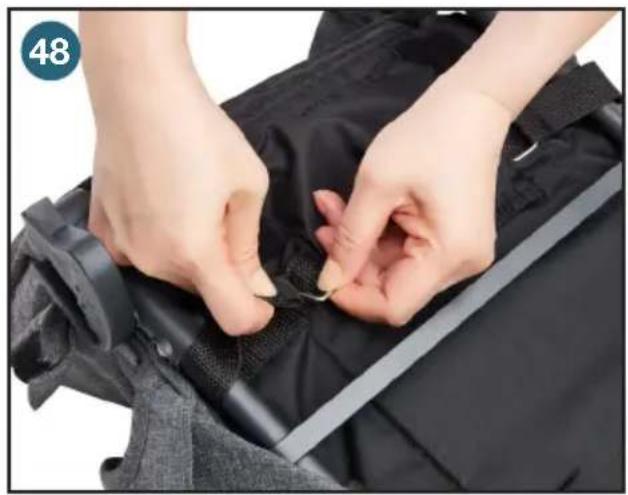
natural_image
Close-up of hands adjusting a black fabric garment with a zipper, no visible text or symbols
natural_image
Close-up of a hand holding a black strap attached to a gray backpack (no text or symbols visible)
natural_image
Close-up of hands adjusting a gray fabric bag with a black clip, no visible text or symbols
natural_image
Close-up of hands adjusting a black fabric garment with a zipper, no visible text or symbols
natural_image
Close-up of hands installing a white card with black rectangular cutouts, showing a red arrow indicating the process (no text or symbols present)
natural_image
Close-up of a person's hand inserting a zipper into a black seatbelt, with a red arrow indicating the zipper (no text or symbols visible)
natural_image
Close-up of a baby stroller with black bedding and wheels, no visible text or symbolsAsiento trasero
natural_image
Close-up of hands adjusting a gray seatbelt buckle with red arrows indicating fastening (no text or symbols visible)natural_image
Close-up of hands assembling a black plastic tray with a red upward arrow (no text or symbols visible)
natural_image
Close-up of a hand placing a black plastic component into a black plastic housing with a red arrow indicating the process (no text or symbols visible)
natural_image
Close-up of hands installing a black fabric patch on a gray textured garment (no text or symbols visible)
natural_image
Close-up of a hand pressing down on a gray fabric sleeve with a red arrow indicating the pressure point (no text or symbols)natural_image
Close-up of hands adjusting a black curved object on a gray textured surface (no text or symbols visible)
natural_image
Close-up of hands adjusting a car seatbelt component with red arrows indicating adjustment (no text or symbols visible)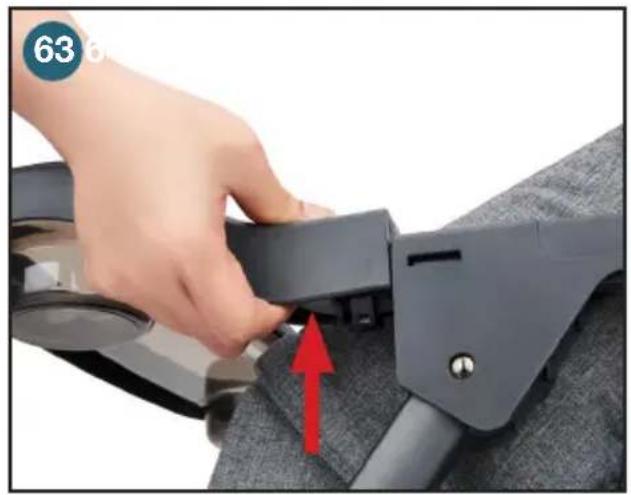
natural_image
Close-up of a hand adjusting a black seatbelt buckle with a red arrow pointing to the buckle (no text or symbols visible)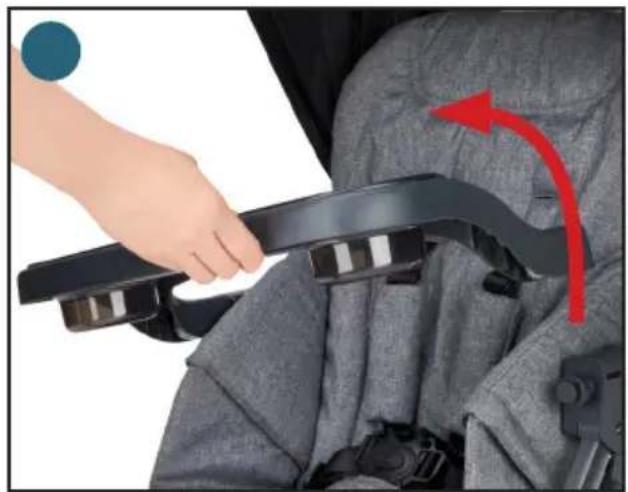
natural_image
Close-up of a hand adjusting a black seatbelt device on a gray car seat, with a red curved arrow indicating motion (no text or symbols visible)Configuraciones

natural_image
Hand placing a camera seatbelt into a gray car seatbelt, with a red arrow indicating the handle (no text or symbols visible)
natural_image
Close-up of a hand adjusting a black fabric seat component inside a vehicle cabin (no visible text or symbols)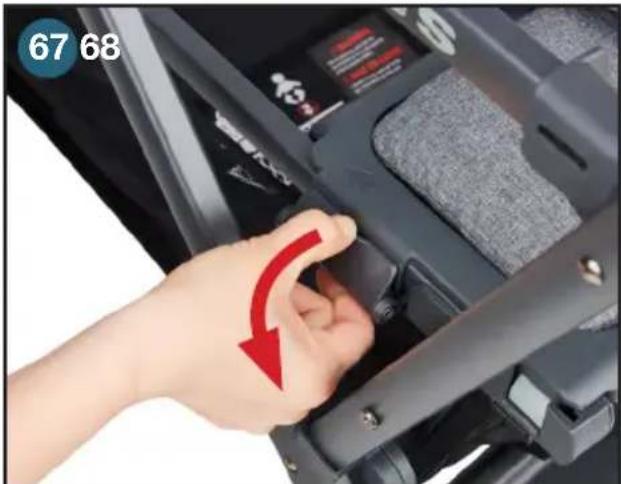
natural_image
Hand inserting a red arrow to a black car seat panel (no text or symbols visible)
natural_image
Close-up of a hand adjusting a gray cushioned device with a red arrow pointing to it, no visible text or symbols.
natural_image
Close-up of a car seatbelt buckle assembly with a red arrow indicating the mechanism (no text or symbols visible)
natural_image
Close-up of a person adjusting a gray baby seat with hands, labeled 'Caboose S' (no additional text or symbols visible)
text_image
71 72
natural_image
Close-up of a car seatbelt buckle with a hand adjusting the seatbelt (no text or symbols visible)
natural_image
Close-up of hands installing a black cable component with red arrow indicating assembly (no text or symbols visible)
natural_image
Close-up of hands adjusting a gray fabric seatbelt with a red arrow pointing to the toe area (no text or symbols visible)
text_image
7516
natural_image
Close-up of a hand inserting a small black plastic component into a car's side panel, with a red circle highlighting the component (no text or symbols visible)natural_image
Close-up of a gray ergonomic seat with a hand adjusting the seat, showing a red upward arrow indicating movement or positioning (no text or symbols present)
natural_image
Close-up of a hand inserting a small black plastic clip into a gray backpack (no text or symbols visible)
natural_image
Close-up of a hand adjusting a black seatbelt buckle with a red arrow pointing to the seat (no text or symbols visible)
natural_image
Close-up of hands adjusting a black plastic buckle component with red arrows indicating alignment (no text or symbols visible)
natural_image
Hand pressing a button on a gray fabric seatbelt, with a red arrow indicating clockwise motion (no text or symbols)natural_image
Close-up of a gray fabric garment being adjusted with a zipper, showing a red upward arrow indicating the seam (no text or symbols)
natural_image
Close-up of hands adjusting a black fabric garment with a zipper, no visible text or symbols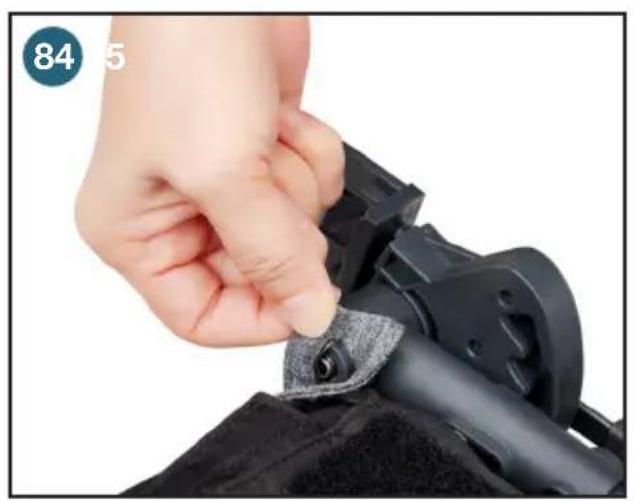
natural_image
Close-up of a hand adjusting a black mechanical component with a textured patch, no visible text or symbols
natural_image
Close-up of a hand holding a black plastic clip attached to a gray patterned blanket (no text or symbols visible)
natural_image
Close-up of hands adjusting a black fabric garment with a zipper, no visible text or symbols
natural_image
Close-up of hands installing a black garment with a white patch, showing a red arrow indicating the process (no text or symbols)natural_image
Close-up of hands installing or adjusting a black mechanical frame with cable and bracket (no visible text or symbols)
natural_image
Close-up of hands installing a black mechanical component with red arrows indicating assembly or installation (no text or symbols visible)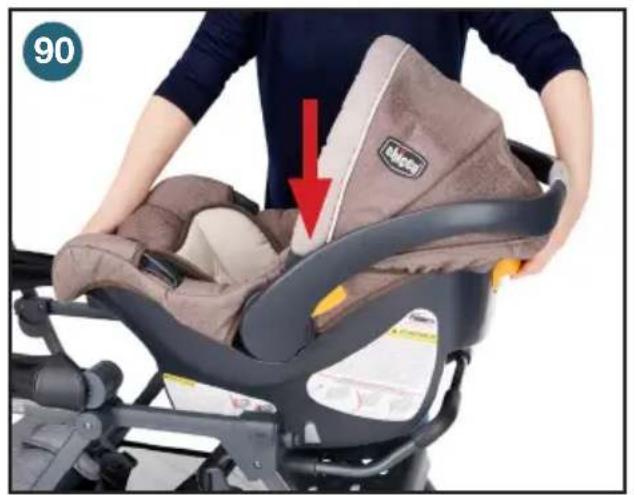
natural_image
Person adjusting a baby car seat with a red arrow pointing to the seat area (no text or symbols visible)
natural_image
Close-up of hands using a mechanical device to adjust a component, with a red arrow indicating the motion direction (no text or symbols visible)
natural_image
Person using a Caboos bicycle leg rest frame, no visible text or symbols on the device itself
text_image
93 Caboo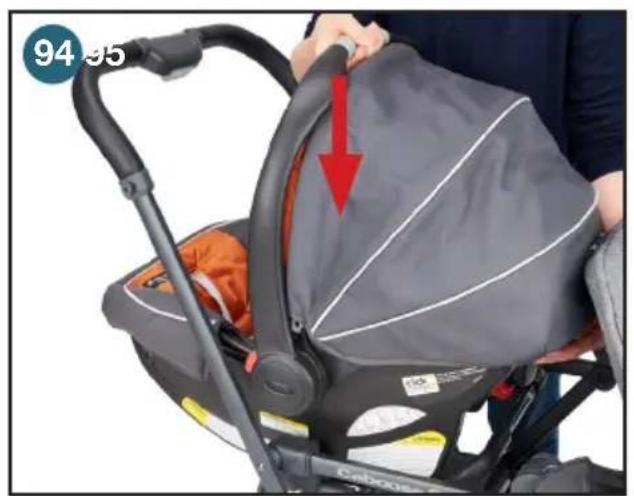
natural_image
Close-up of a baby stroller with a red arrow pointing to the seat area, no visible text or symbols on the device itself.
natural_image
Close-up of a hand adjusting a black bicycle seatbelt with a red arrow pointing to the component (no text or symbols visible)natural_image
Hand holding a black device with a lock, mounted on a wheeled vehicle (no visible text or symbols)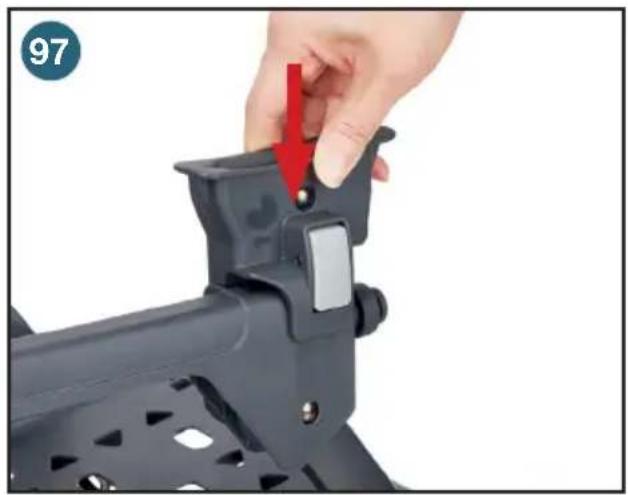
natural_image
Close-up of a hand adjusting a black mechanical component with a red arrow indicating the adjustment (no text or symbols visible)
natural_image
Person assembling a Britax baby car seat with a red arrow indicating the seat area (no text or symbols on the device itself)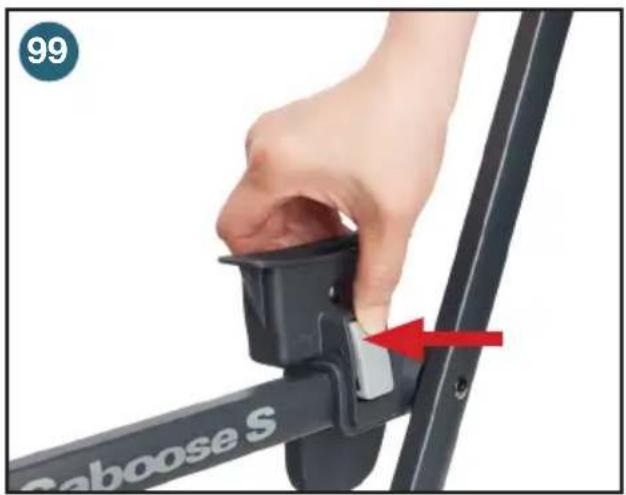
text_image
99 Baoose S
natural_image
Close-up of a hand adjusting a Caboose S bicycle seat bracket (no text or symbols visible)
natural_image
Close-up of a hand adjusting a Caboos bicycle seat bracket with a red arrow indicating the adjustment (no text or symbols on the diagram itself)natural_image
Hand holding a black mechanical device with a handle, mounted on a wheeled platform (no visible text or symbols)
natural_image
Hand placing a black mechanical component with a red arrow indicating downward motion (no text or symbols)
natural_image
Close-up of hands assembling a black mechanical component with a red arrow indicating the handle (no text or symbols visible)
natural_image
Close-up of a hand holding a black bicycle seat bracket with 'Caboose' branding, no visible text or symbols on the main subject.
text_image
106 10. Caboos
natural_image
Person wearing a stroller with hands adjusting the seatbelt, showing a red arrow indicating a specific seatbelt (no text or symbols visible)NOTA IMPORTANTE
natural_image
Black and white photo of a children's stroller with transparent cover and metal mesh, no visible text or symbols
natural_image
Close-up of a hand adjusting a black cable or cable buckle with a transparent cover, against a white background (no text or symbols visible)
natural_image
Close-up of hands adjusting a black plastic component with a blue circular icon labeled '110 111' in the corner (no text on main subject)
natural_image
Close-up of hands adjusting a black plastic bag with a blue circular object on top (no visible text or symbols)
natural_image
Close-up of a hand adjusting a black zipper with metallic foil, no visible text or symbols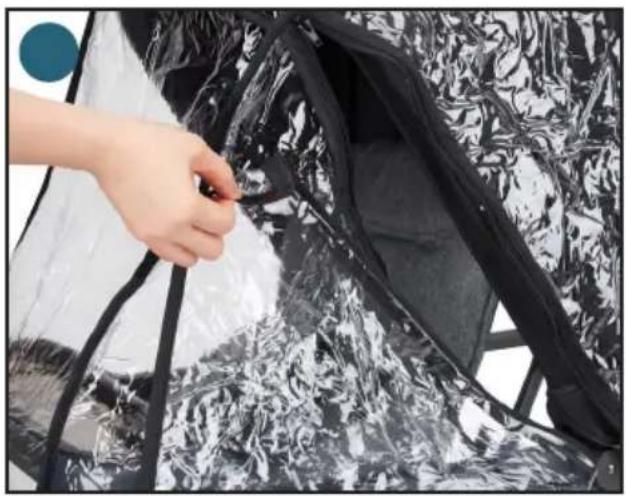
natural_image
Close-up of a hand adjusting black plastic film strips with a blue circular icon (no text or symbols visible)natural_image
Close-up of hands adjusting a black wrist strap and cable (no text or symbols visible)
natural_image
Close-up of hands installing a black backpack cover on a wheeled scooter (no text or symbols visible)
natural_image
Hand placing a black plastic bag into a black stroller seat (no text or symbols visible)
natural_image
Close-up of a hand holding a gray plastic car seat with a red arrow pointing to the handle (no text or symbols visible)
natural_image
Hand holding a gray plastic mug with a red arrow pointing to it, against a textured gray shirt (no text or symbols visible)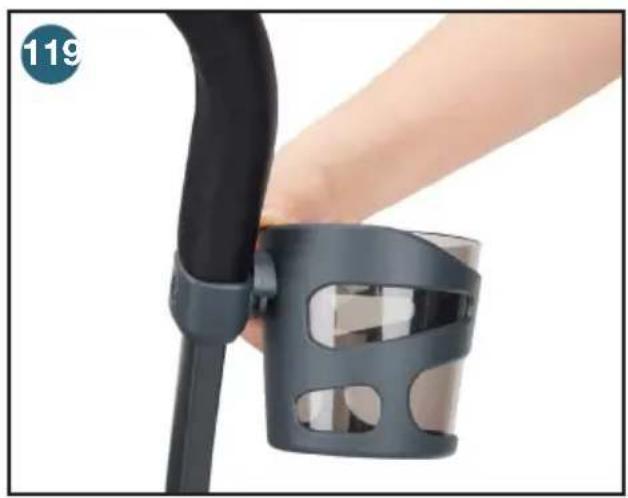
natural_image
Close-up of a hand holding a black wristband device with a circular badge showing the number 119 (no text or symbols on the device itself)Manijas (Opcional)
natural_image
Close-up of hands holding a black metal bracket with mounting holes, no visible text or symbols
natural_image
Close-up of hands holding a black metal clamp or bracket (no text or symbols visible)
natural_image
Close-up of hands holding a metal clamp or clip against a plain background (no text or symbols visible)
natural_image
Close-up of a hand adjusting a black tripod-mounted device with a blue circular icon in the corner (no text or symbols visible)
natural_image
Close-up of a hand holding a black mechanical device with a red arrow indicating rotation (no text or symbols visible)
natural_image
Close-up of a black bicycle seatbelt frame with curved straps and mounting brackets (no text or symbols visible)Bolso (Opcional)
natural_image
Close-up of a hand adjusting a gray fabric seatbelt with a red arrow pointing to the button (no text or symbols visible)
natural_image
Close-up of a hand adjusting a black mechanical component with a red arrow indicating rotation (no visible text or symbols)
natural_image
Close-up of a hand inserting a zipper into a black leather seat (no text or symbols visible)
natural_image
Close-up of a black and silver stroller with wheels and a visible cover (no text or symbols)
natural_image
Close-up of a hand adjusting a black device component with a red arrow indicating the change (no text or symbols visible)
natural_image
Close-up of a hand adjusting a black athletic bag with a red arrow pointing to the handle (no text or symbols visible)natural_image
Close-up of a hand holding a black plastic mechanical component with a red arrow indicating a detail (no text or symbols visible)
natural_image
Black baby stroller with two canopy blades, no visible text or symbols on the device itself.
natural_image
Close-up of a person's seatbelt buckle being adjusted, with a red arrow pointing to the button (no text or symbols visible)
natural_image
Close-up of a hand adjusting a black metal bracket with a red arrow indicating the step (no text or symbols visible)
natural_image
Close-up of a mechanical component with white fabric and red directional arrows indicating movement or force (no text or symbols)
natural_image
Person performing a medical or therapeutic procedure on a patient's abdomen, with hands and a red arrow indicating direction (no text or symbols present)
natural_image
Close-up of hands assembling a black ergonomic device with a red arrow indicating the process (no text or symbols visible)
natural_image
Person adjusting a black stroller with a red arrow indicating the cable being inserted (no text or symbols visible)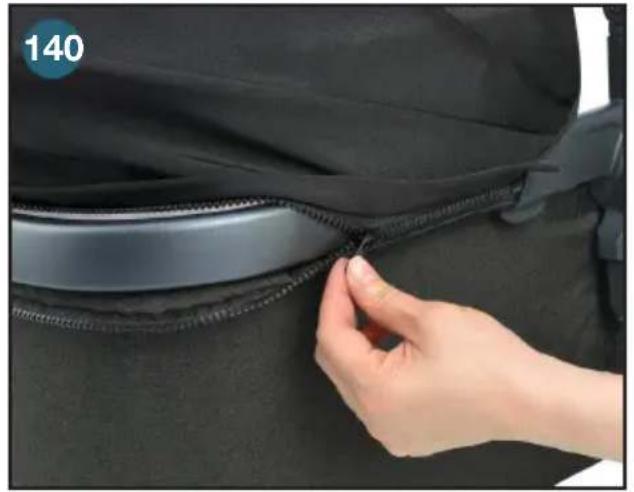
natural_image
Close-up of a hand adjusting a zipper on a car seat (no text or symbols visible)
natural_image
Close-up of a hand adjusting a dark gray car seat cover, no text or symbols visible
natural_image
Close-up of hands adjusting a black athletic jacket with a blue circular badge showing '142 143' (no text or symbols on the jacket itself)
natural_image
Close-up of a hand adjusting a black mechanical component with a red arrow indicating a downward motion (no text or symbols visible)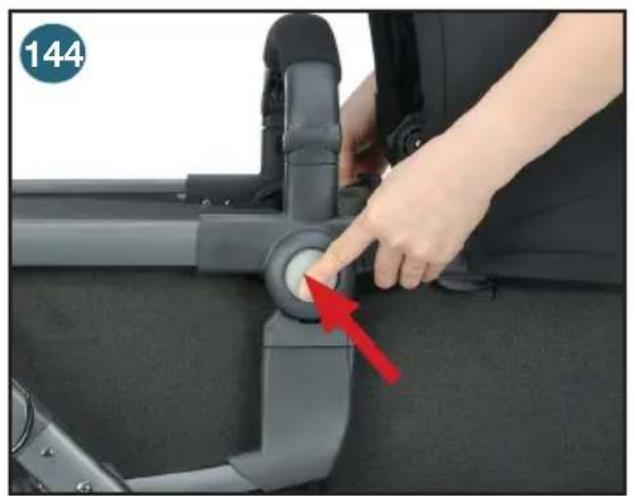
natural_image
Person adjusting a seatbelt device with a red arrow pointing to the circular component (no text or symbols visible)
natural_image
Close-up of a hand adjusting a black metal bracket with a red arrow pointing to a small component (no text or symbols visible)
natural_image
Person performing a massage or physical therapy technique on a patient's leg, with a red arrow indicating direction (no text or symbols)ADVERTENCIA
Elfe Juvenile Products
(800) 667-8184, 8:30 am – 5:00 pm Hora del Este
Corea
Joy Partners Limited Korea
(822) 2248-3384, 9:00 am - 6:00 pm GMT+9
警告
natural_image
Product assembly of a smart car with visible wheels, seats, and camera module (no text or symbols)追加アクセサリ(別売)
natural_image
Close-up of a car interior showing a black plastic seat frame with red arrows indicating fastening or adjustment points (no text or symbols visible)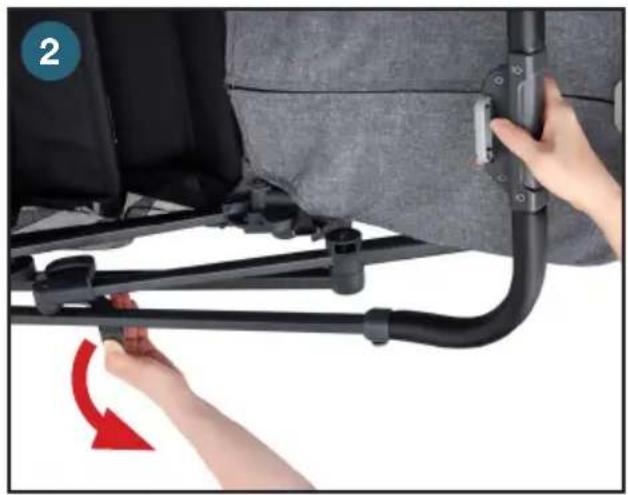
natural_image
Close-up of a hand adjusting a black cable with a red arrow indicating rotation (no text or symbols visible)
natural_image
Person using a Jiovo mini scooter to lift a seat, with a red arrow indicating motion (no text or symbols on the device itself)
natural_image
Close-up of a black Joovia robotic platform with visible joints and control panels (no text or symbols)
natural_image
Close-up of a hand adjusting a tire component with a lock, showing the tire being inserted into a vehicle chassis (no text or symbols visible)
natural_image
Close-up of a hand adjusting a tire component with a lock, no visible text or symbols
natural_image
Close-up of hands adjusting a tire component with a red arrow indicating the motion direction (no text or symbols visible)ホイールの取り付け/取り外し
natural_image
Close-up of a hand adjusting a tire component with a red arrow pointing to the wheel (no text or symbols visible)
natural_image
Close-up of hands installing a black mechanical component with a red arrow indicating the step (no text or symbols visible)キャノピーの取り付け
natural_image
Close-up of a hand adjusting a black mechanical component with a red arrow indicating the adjustment (no text or symbols visible)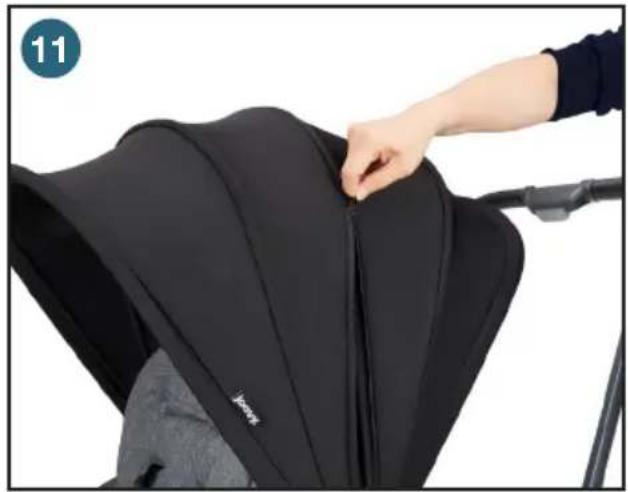
natural_image
Close-up of a black baby stroller with a hand adjusting the seat area (no text or symbols visible)トレイの取り付け/取り外し
natural_image
Close-up of hands adjusting a black curved device with a gray textured base (no visible text or symbols)
natural_image
Close-up of hands adjusting a car seatbelt with red arrows indicating adjustment (no text or symbols visible)
natural_image
Close-up of a hand adjusting a black seatbelt component with a red arrow indicating the adjustment (no text or symbols visible)ベンチ・シートの取り付け取り外し
natural_image
Close-up of hands adjusting a gray car seatbelt cover, showing two red circles highlighting the side (no text or symbols visible)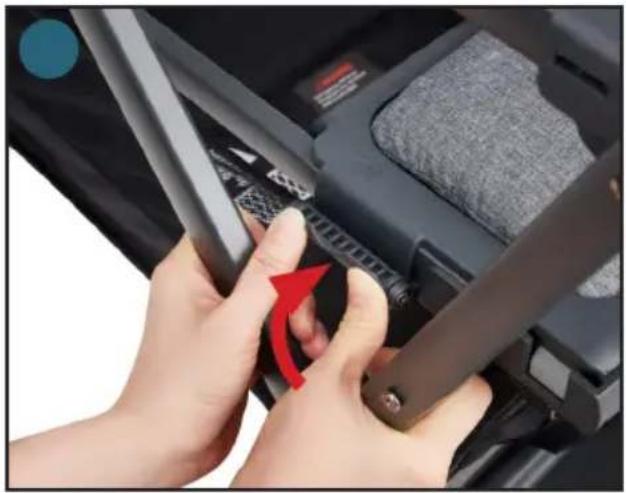
natural_image
Close-up of hands adjusting a car seatbelt component with a red arrow indicating the adjustment (no text or symbols visible)
natural_image
Close-up of a hand adjusting a black fabric seatbelt inside a vehicle cabin (no visible text or symbols)
natural_image
Close-up of hands adjusting a gray car seatbelt component with red arrows indicating fastening (no text or symbols visible)
natural_image
Hand placing a camera seatbelt on a gray cushion, with a red arrow indicating the handle (no text or symbols visible)
natural_image
Hand pressing a button on a car seat panel, showing a red arrow indicating the action (no text or symbols visible)ベビーカーの操作
フロント・ホイール・スイベル・ロック
natural_image
Close-up of a hand adjusting a mechanical component with a red arrow indicating the adjustment (no text or symbols visible)
natural_image
Close-up of a hand adjusting a black mechanical component with a red arrow indicating the adjustment (no text or symbols visible)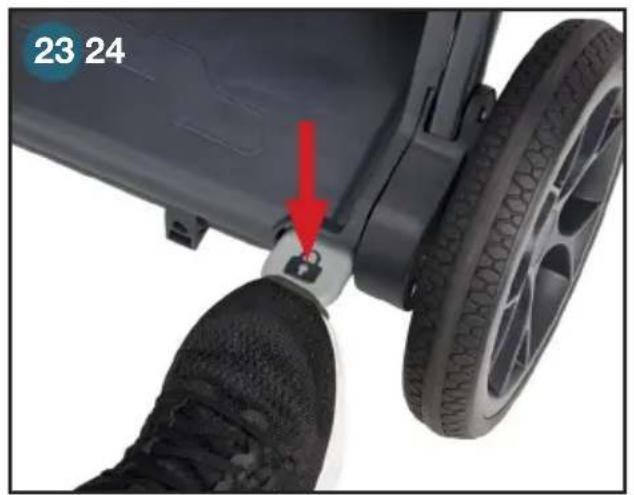
text_image
23 24
natural_image
Close-up of a car wheel and foot assembly with a red arrow pointing to a small component (no text or symbols visible)
natural_image
Close-up of a gray baby car seat with a hand adjusting the seat, showing a red arrow pointing to the spine (no text or symbols visible)
natural_image
Close-up of a person's hand inserting a small black plastic clip into a dark gray backpack (no text or symbols visible)
natural_image
Close-up of a hand adjusting a car seatbelt buckle, showing a red arrow pointing to the buckle (no text or symbols visible)
natural_image
Close-up of hands adjusting a black plastic buckle with red arrows indicating fastening (no text or symbols visible)シートの調整
natural_image
Close-up of a baby stroller with hands adjusting the seatbelt, showing a red arrow indicating the adjustment (no text or symbols present)
natural_image
Close-up of a hand adjusting a black seatbelt buckle with a red arrow pointing to the buckle (no text or symbols visible)
text_image
32 33
natural_image
Close-up of a hand adjusting a dark fabric seatbelt with a red arrow pointing to the button (no text or symbols visible)
natural_image
Close-up of a hand adjusting a black belt buckle with a red arrow pointing to the buckle detail (no text or symbols visible)
natural_image
Close-up of hands installing a black plastic clip on a dark gray seat (no text or symbols visible)
natural_image
Close-up of a hand inserting a small component into a car seatbelt, with a red arrow indicating the insertion direction (no text or symbols visible)
natural_image
Close-up of a hand adjusting a gray fabric seatbelt with a red circle highlighting the finger area (no text or symbols visible)
natural_image
Close-up of a hand adjusting a black plastic bag with a textured cloth (no visible text or symbols)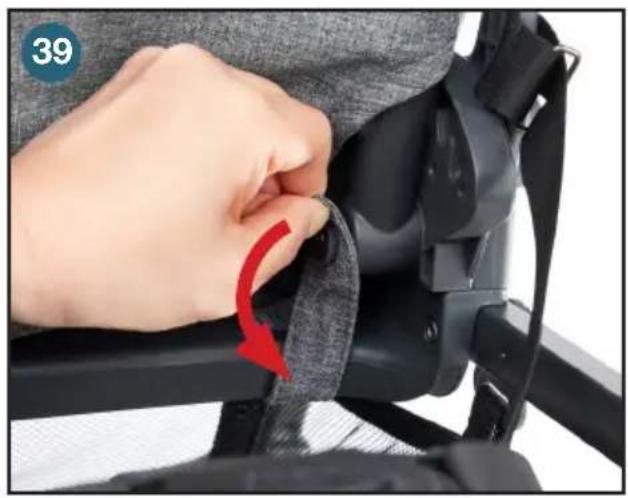
natural_image
Close-up of a hand adjusting a black seatbelt with a red arrow indicating the cable (no text or symbols visible)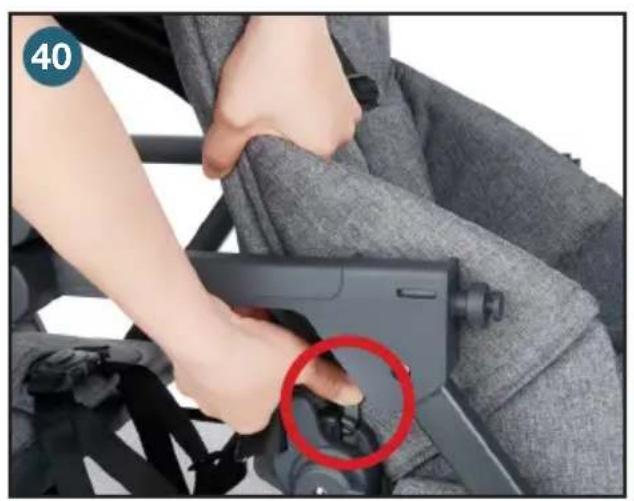
natural_image
Close-up of a person adjusting a firearm in a car seatbelt, with a red circle highlighting the finger area (no text or symbols visible)
natural_image
Close-up of a baby stroller with hand adjusting seatbelt, showing red upward arrow (no text or symbols)ベビーカーの折り畳み
natural_image
Close-up of a hand adjusting a mechanical component with a red arrow indicating the adjustment (no text or symbols visible)
natural_image
Close-up of a car's side panel with a red arrow pointing to a key inserted into the wheel (no text or symbols visible)
natural_image
Hand holding a black cable with a red arrow pointing to the cable end (no text or symbols)
natural_image
Black stroller with black frame and wheels, displayed against white background (no text or symbols)
natural_image
Black and white photo of a compact toy vehicle with wheels and a handle, no visible text or symbolsフロント・シート布
natural_image
Close-up of a sewing machine's back panel being adjusted with a hand, showing the needle and red arrow (no text or symbols)
natural_image
Close-up of hands adjusting a black fabric garment with a zipper, no visible text or symbols
natural_image
Close-up of a hand holding a black strap attached to a gray backpack with visible straps and straps (no text or symbols)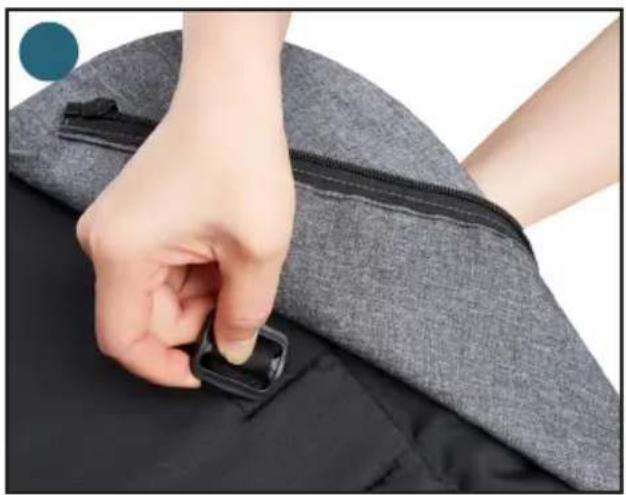
natural_image
Close-up of hands adjusting a gray fabric pocket with a black zipper (no text or symbols visible)
natural_image
Close-up of hands adjusting a black fabric garment with a zipper (no text or symbols visible)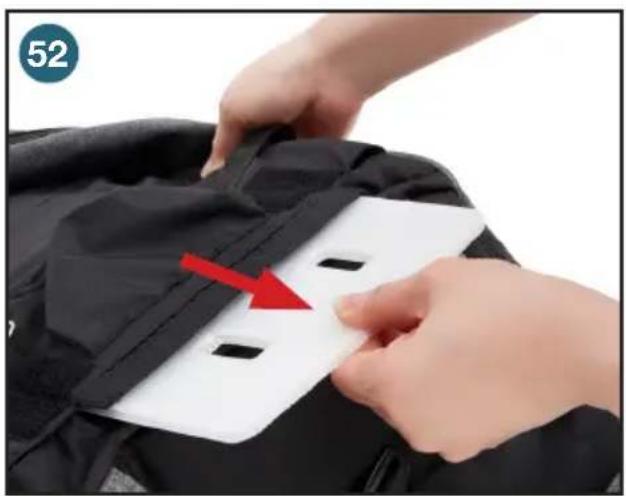
natural_image
Close-up of hands installing a white card with black rectangular cutouts, showing a red arrow indicating the process (no text or symbols present)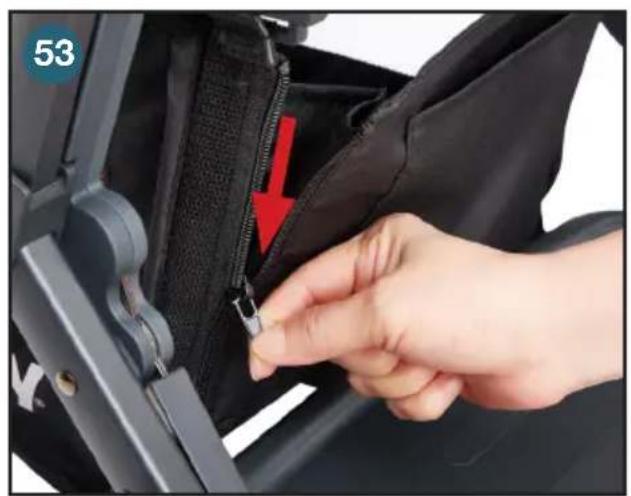
natural_image
Close-up of a hand adjusting a black zipper on a vehicle seat, with a red arrow indicating the zipper location (no text or symbols visible)
natural_image
Close-up of a baby stroller with black bedding and wheels, no visible text or symbolsベンチ・シート
natural_image
Hand placing a gray fabric seatbelt into a car compartment, with a red arrow indicating the handle (no text or symbols visible)
natural_image
Close-up of hands adjusting a gray car seatbelt component with red arrows indicating fastening (no text or symbols visible)ベンチ・シート・パッド
natural_image
Close-up of hands assembling a black plastic tray with a red upward arrow (no text or symbols visible)
natural_image
Close-up of a hand placing a black plastic component into a black plastic housing with a red arrow indicating the component (no text or symbols visible)
natural_image
Close-up of hands folding a dark fabric piece on a gray textured surface (no text or symbols visible)
natural_image
Close-up of a hand pressing down on a gray fabric sleeve with a red arrow indicating the process (no text or symbols)トレイ
natural_image
Close-up of hands adjusting a black cable strap device on a gray patterned seat (no text or symbols visible)
natural_image
Close-up of hands adjusting a car seatbelt buckle with red arrows indicating adjustment (no text or symbols)
natural_image
Close-up of a hand adjusting a black mechanical component with a red arrow indicating the adjustment (no text or symbols visible)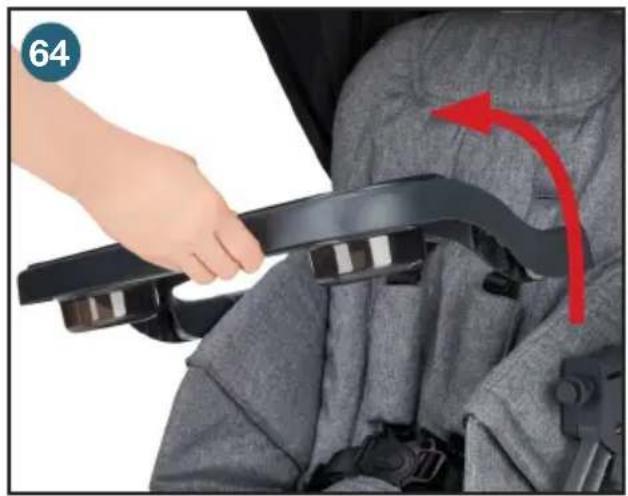
natural_image
Close-up of a hand adjusting a car seatbelt with a red arrow indicating motion (no text or symbols)構成
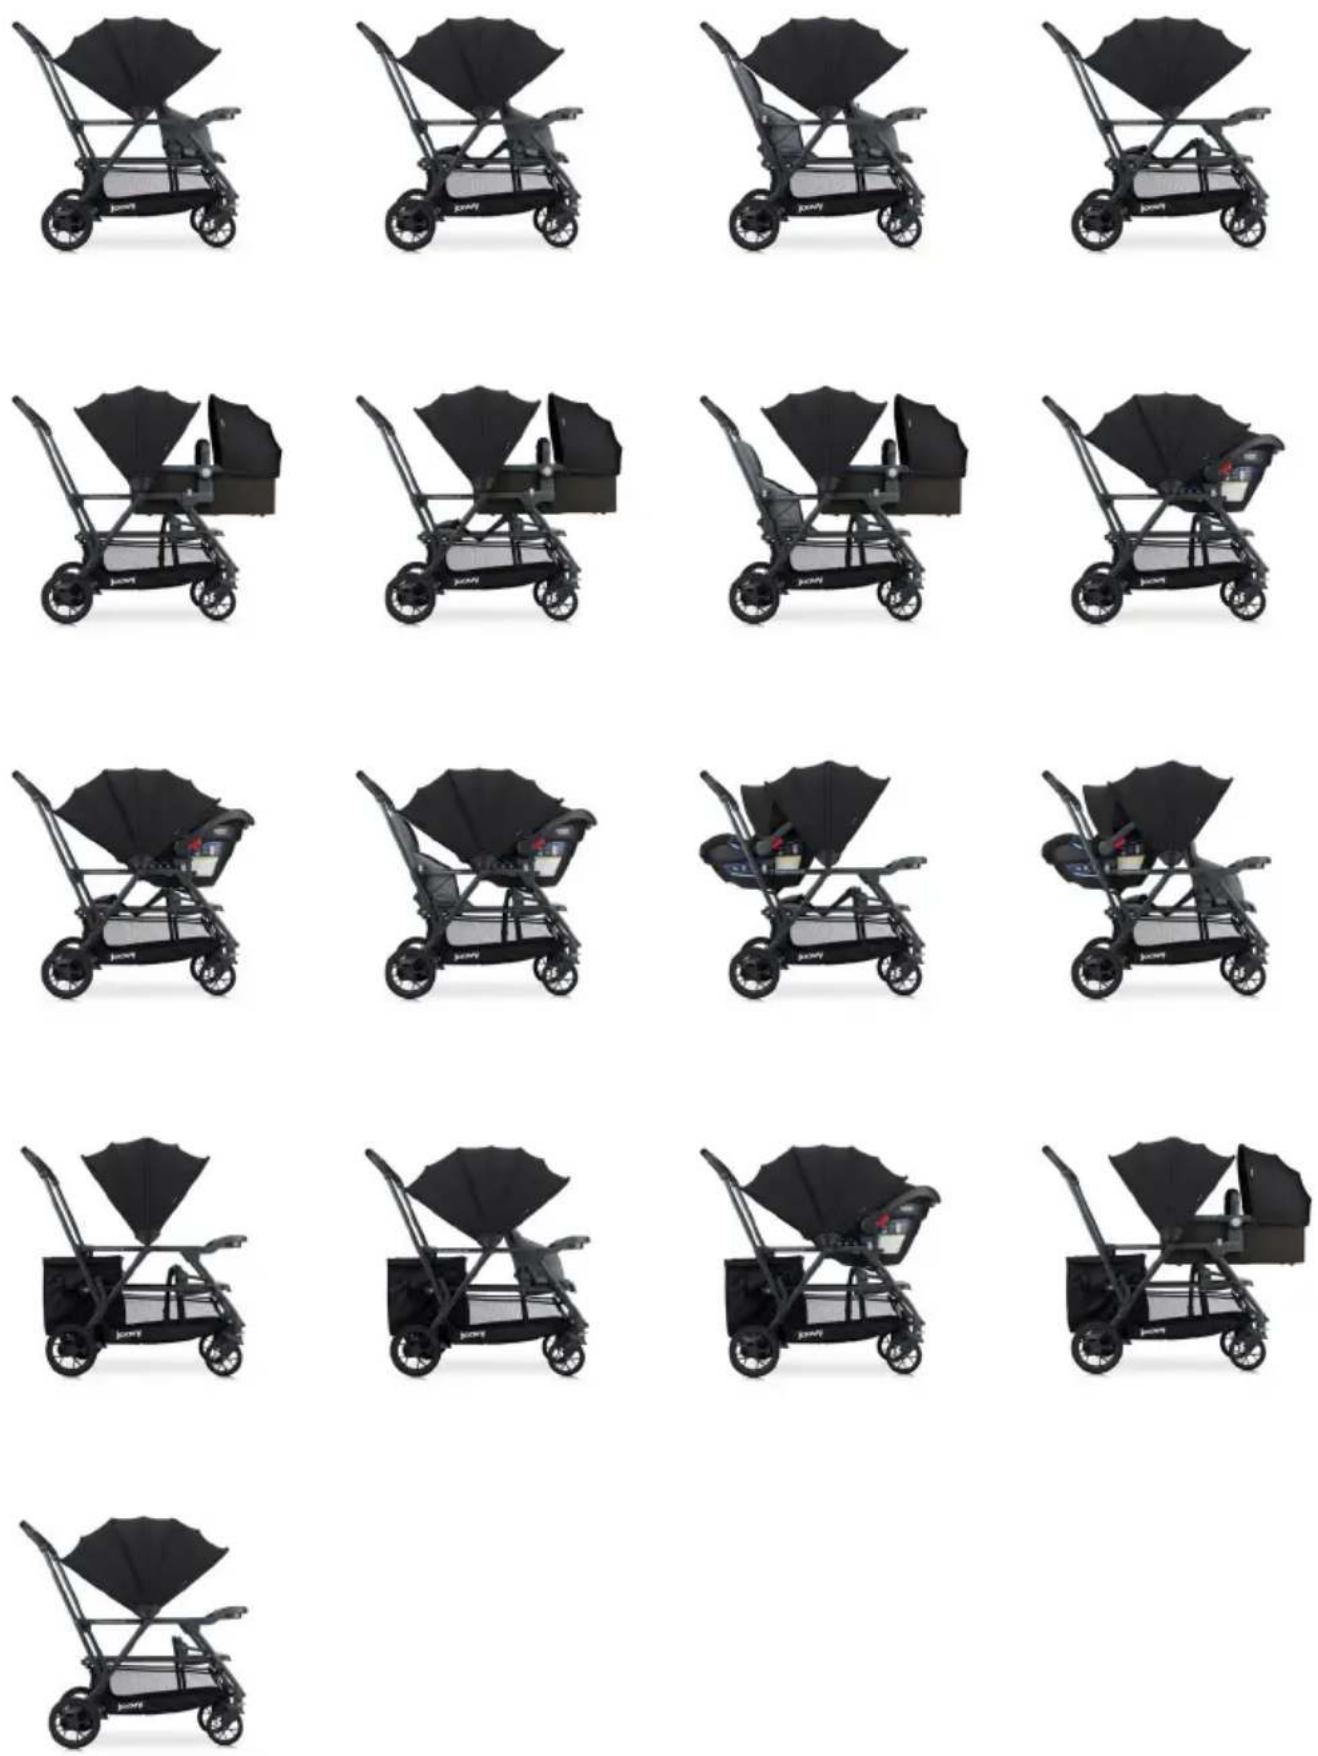
オプションのアクセサリ
natural_image
Hand pressing a button on a gray car seatbelt, with a red arrow indicating the action (no text or symbols visible)
natural_image
Close-up of a hand adjusting a black seatbelt inside a vehicle cabin (no visible text or symbols)
natural_image
Hand inserting a red arrow to a black mechanical component (no visible text or symbols)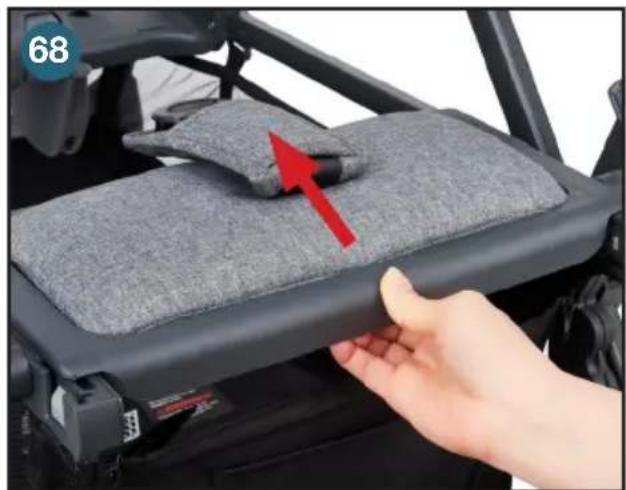
natural_image
Close-up of a hand pressing down on a gray cushioned vehicle seat, with a red arrow indicating the motion direction (no text or symbols visible)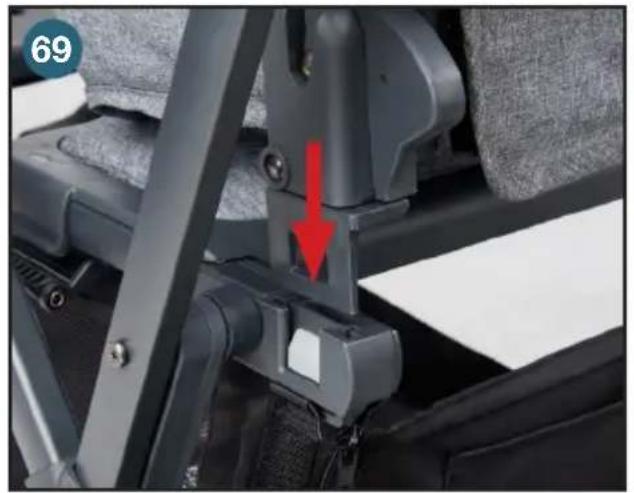
natural_image
Close-up of a car seatbelt buckle assembly with a red arrow indicating the mechanism (no text or symbols visible)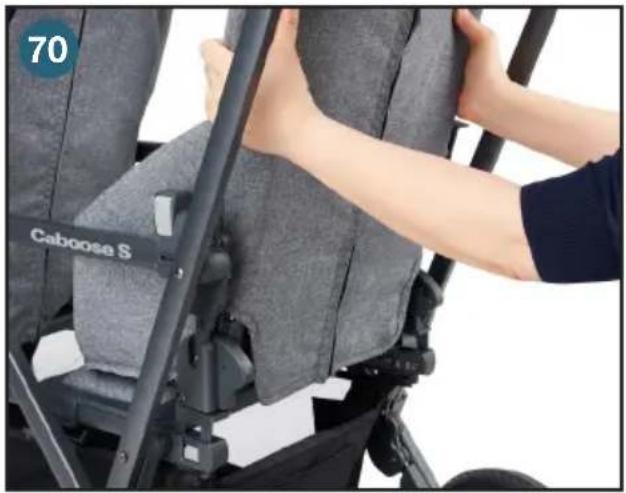
natural_image
Close-up of a person using a Caboose S seatbelt device, no visible text or symbols on the device itself
text_image
71 72
natural_image
Close-up of a car seatbelt buckle with a hand adjusting the seatbelt (no text or symbols visible)
natural_image
Close-up of hands installing a black cable component with red arrow indicating assembly (no text or symbols visible)
natural_image
Close-up of hands adjusting a gray fabric seatbelt with a red arrow pointing to the toe area (no text or symbols visible)
text_image
7516
natural_image
Close-up of a hand inserting a small black plastic component into a car intake compartment, with a red circle highlighting the component (no text or symbols visible)座っている子供の固定
natural_image
Close-up of a gray ergonomic seat with a hand adjusting the seat, showing a red upward arrow indicating movement or positioning (no text or symbols present)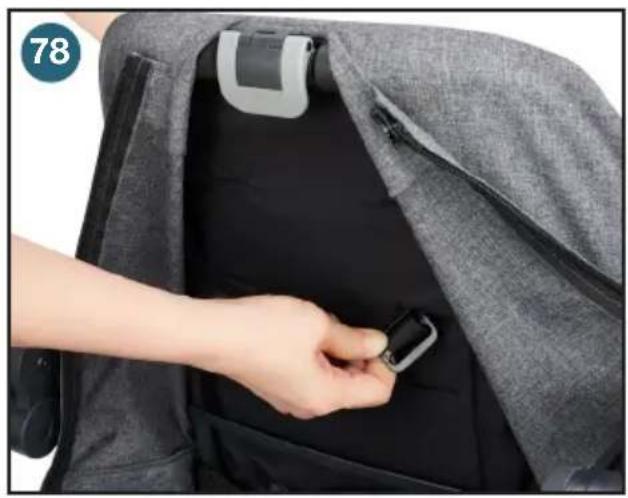
natural_image
Close-up of a hand inserting a small black plastic clip into a dark gray backpack (no text or symbols visible)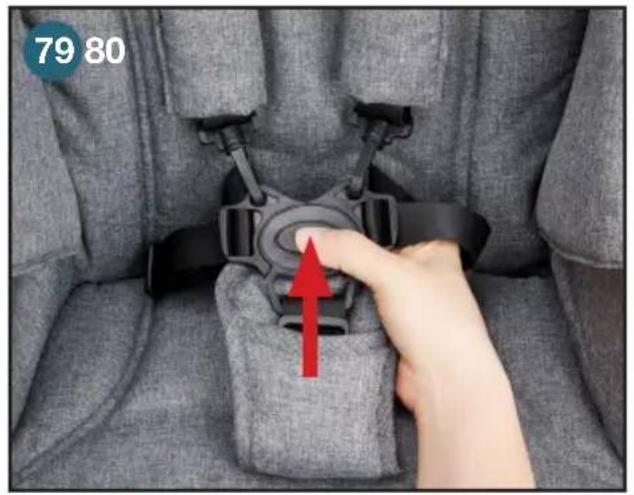
natural_image
Close-up of a hand adjusting a black seatbelt buckle with a red arrow pointing to the seat (no text or symbols visible)
natural_image
Close-up of hands adjusting a black plastic buckle component with red arrows indicating alignment (no text or symbols visible)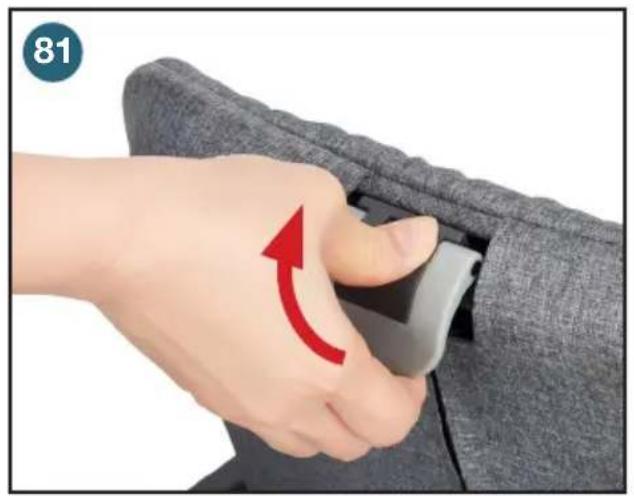
natural_image
Hand pressing a button on a gray fabric seatbelt, with a red arrow indicating clockwise motion (no text or symbols)シート布の取り外し
natural_image
Close-up of a gray fabric garment being adjusted with a zipper, showing a red upward arrow indicating the seam (no text or symbols)
natural_image
Close-up of hands adjusting a black fabric garment with a zipper, no visible text or symbols
natural_image
Close-up of a hand adjusting a black mechanical component with a textured patch, no visible text or symbols
natural_image
Close-up of a hand holding a black plastic clip attached to a gray patterned blanket (no text or symbols visible)
natural_image
Close-up of hands adjusting a black fabric garment with a zipper (no text or symbols visible)
natural_image
Close-up of hands installing a white fabric patch with black rectangular cutouts, showing a red arrow indicating the process (no text or symbols)natural_image
Close-up of hands installing or adjusting a black mechanical frame with cable and bracket (no visible text or symbols)
natural_image
Close-up of hands installing a black mechanical component with red arrows indicating assembly or installation (no text or symbols visible)
natural_image
Person adjusting a baby car seat with a red arrow indicating the seat area (no text or symbols visible)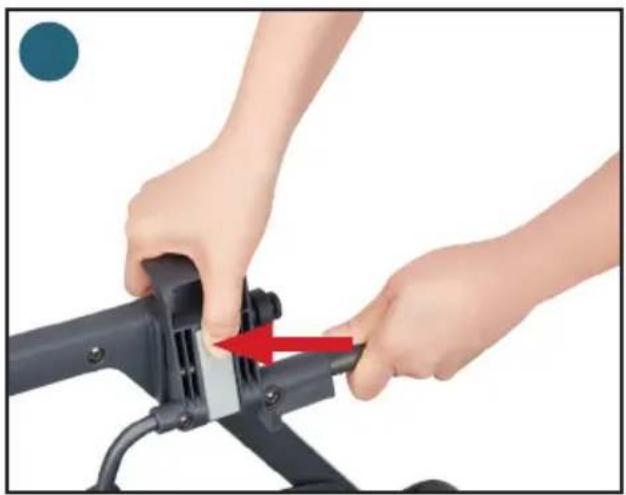
natural_image
Close-up of hands using a mechanical device to adjust a component, with a red arrow indicating the motion direction (no text or symbols visible)
natural_image
Person using a Caboos bicycle leg rest frame, no visible text or symbols on the device itself
text_image
93 Caboo
natural_image
Close-up of a baby stroller with a red arrow pointing to the seat area, no visible text or symbols on the device itself.
natural_image
Close-up of a hand adjusting a black bicycle seatbelt with a red arrow pointing to the component (no text or symbols visible)natural_image
Hand holding a black device with a lock, mounted on a wheeled vehicle (no visible text or symbols)
natural_image
Close-up of a hand adjusting a black mechanical component with a red arrow indicating the adjustment (no text or symbols visible)
natural_image
Person assembling a Britax baby car seat with a red arrow indicating the seat area (no text or symbols on the device itself)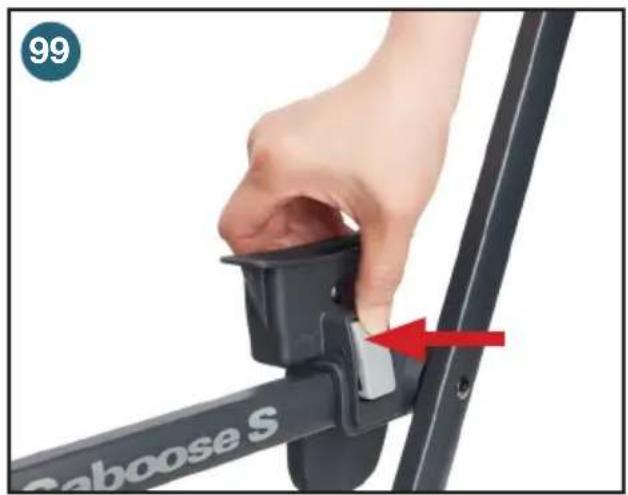
text_image
99 Baoose S
natural_image
Close-up of a hand adjusting a Caboose S bicycle seat bracket (no text or symbols visible)
natural_image
Close-up of a hand adjusting a Caboos bicycle seat bracket with a red arrow indicating the adjustment (no text or symbols on the diagram itself)natural_image
Hand holding a black mechanical device with a handle, mounted on a wheeled platform (no visible text or symbols)
natural_image
Hand placing a black mechanical component with a red arrow indicating downward motion (no text or symbols)
natural_image
Close-up of hands assembling a black mechanical component with a red arrow indicating the handle (no text or symbols visible)
natural_image
Close-up of a hand holding a black bicycle seat bracket with 'Caboose' branding, no visible text or symbols on the main subject.
text_image
106 10. Caboos
natural_image
Person wearing a stroller with a red arrow indicating a cable or cable being inserted (no text or symbols visible)レイン・カバー(オプション)
natural_image
Black and white photo of a baby stroller with transparent cover and metal mesh, no visible text or symbols
natural_image
Close-up of a hand adjusting a black plastic seatbelt on a reflective surface (no text or symbols visible)
natural_image
Close-up of hands adjusting a black plastic clip on a reflective surface (no text or symbols visible)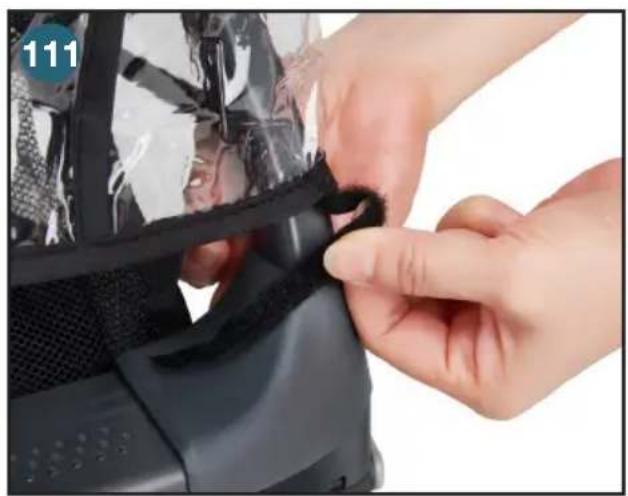
natural_image
Close-up of hands adjusting a black plastic bag attached to a helmet (no visible text or symbols)
text_image
112 113 joay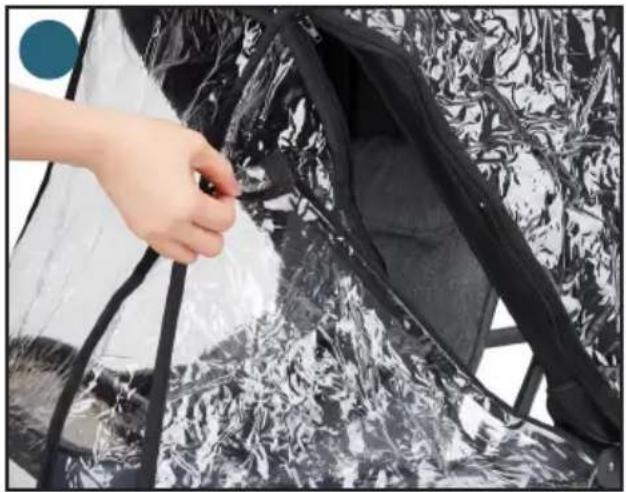
natural_image
Close-up of a hand adjusting black plastic film strips, no visible text or symbols親用オーガナイザー(オプション)
natural_image
Close-up of hands adjusting a black resistance band with a ring, no visible text or symbols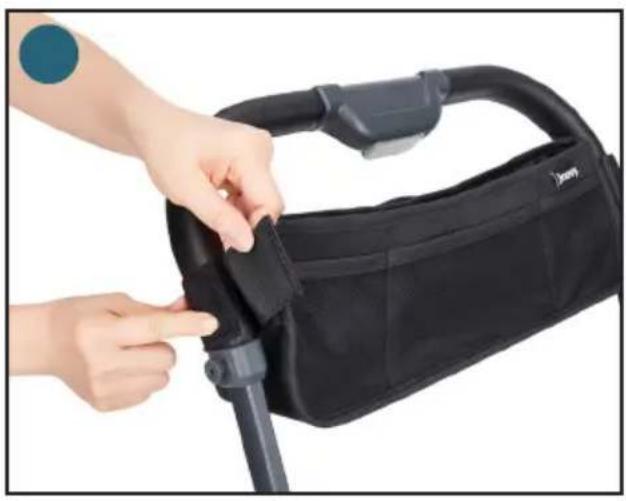
natural_image
Close-up of hands adjusting a black Jenny car seatbelt device (no text or symbols visible)
natural_image
Hand placing a black plastic bag into a stroller (no text or symbols visible)カップ・ホルダー(オプション)
natural_image
Close-up of a hand holding a gray plastic device with a red arrow pointing to a handle (no text or symbols visible)
natural_image
Hand holding a blue plastic mug with a red arrow pointing to it, against a textured gray background (no text or symbols)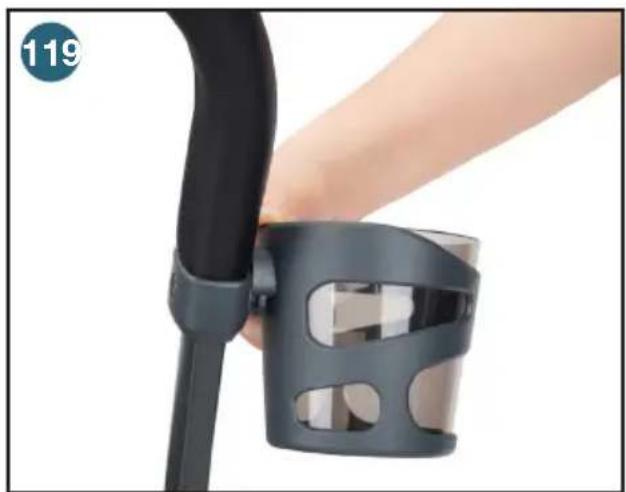
natural_image
Close-up of a hand holding a black wrist strap device with a circular badge showing number 119 (no text or symbols on the device itself)ハンドル(オプション)
natural_image
Close-up of hands holding a black metal bracket with mounting holes, no visible text or symbols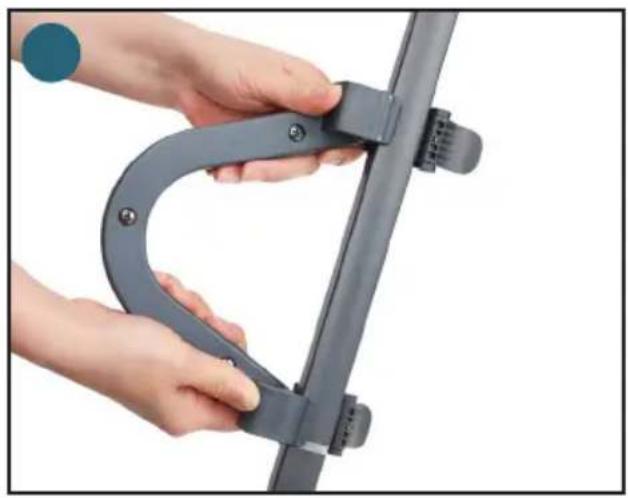
natural_image
Close-up of hands holding a black metal clamp or bracket (no text or symbols visible)
natural_image
Close-up of hands holding a metal clamp or clip against a plain background (no text or symbols visible)
natural_image
Close-up of a hand adjusting a black tripod-mounted device with a blue circular icon in the corner (no text or symbols visible)
natural_image
Close-up of a hand holding a black mechanical device with a red arrow indicating rotation (no text or symbols visible)
natural_image
Close-up of a black bicycle seatbelt frame with curved straps and a blue circular badge showing '125' (no text or symbols on the main subject)トート(オプション)
natural_image
Close-up of a hand adjusting a gray fabric seatbelt with a red arrow pointing to the button (no text or symbols visible)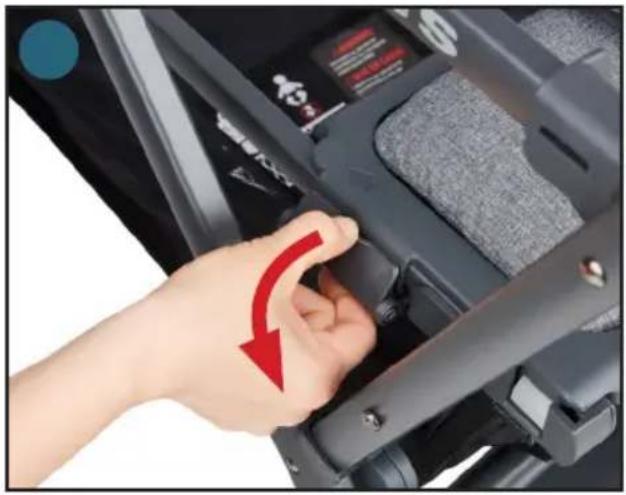
natural_image
Close-up of a hand adjusting a black mechanical component with a red arrow indicating rotation (no visible text or symbols)
natural_image
Close-up of a hand inserting a zipper into a black leather seat (no text or symbols visible)
natural_image
Close-up of a black and silver stroller with wheels and a visible cover (no text or symbols)
natural_image
Close-up of a hand adjusting a black device component with a red arrow indicating the change (no text or symbols visible)
natural_image
Close-up of a hand adjusting a black athletic bag with a red arrow pointing to the handle (no text or symbols visible)バシネット・アダプタ(オプション)
natural_image
Close-up of a hand holding a black plastic mechanical component with a red arrow indicating a detail (no text or symbols visible)
natural_image
Black baby stroller with two canopy blades, no visible text or symbols on the device itself
natural_image
Person adjusting a car seatbelt buckle with a red arrow pointing to the button (no text or symbols visible)
natural_image
Close-up of a hand adjusting a black metal bracket with a red arrow indicating the step (no text or symbols visible)
natural_image
Close-up of a mechanical component with white fabric and red directional arrows indicating movement or force (no text or symbols)
natural_image
Person performing a medical or therapeutic procedure on a patient in a stroller, with a red arrow indicating the point of care (no text or symbols present)
natural_image
Close-up of hands assembling a black ergonomic device with a red arrow indicating the process (no text or symbols visible)
natural_image
Close-up of hands adjusting a black stroller seatbelt with a red arrow indicating the cable (no text or symbols visible)
natural_image
Close-up of a hand adjusting a zipper on a dark fabric car seat (no text or symbols visible)
natural_image
Close-up of a hand adjusting a dark gray car seat cover, no text or symbols visible
natural_image
Close-up of hands adjusting a black athletic jacket with a blue circular badge showing '142 143' (no text or symbols on the jacket itself)
natural_image
Close-up of a hand adjusting a black mechanical component with a red arrow indicating a downward motion (no text or symbols visible)
natural_image
Person adjusting a seatbelt device with a red arrow pointing to the circular component (no text or symbols visible)
natural_image
Close-up of a hand adjusting a black metal bracket with a red arrow pointing to a small component (no text or symbols visible)
natural_image
Person performing a massage or physical therapy technique on a patient's leg, with red arrow indicating direction (no text or symbols)警告
Elfe Juvenile Products
Joy Partners Limited Korea
natural_image
Exploded view of a smart car chassis with visible components including wheels, seats, and camera (no text or symbols)추가 악세사리 (별도 판매)
natural_image
Close-up of a car interior showing a black plastic tray and handle assembly, with red arrows indicating movement or adjustment points (no text or symbols visible)
natural_image
Close-up of a hand adjusting a black cable with a red arrow indicating rotation (no text or symbols visible)
natural_image
Person using a Jiovo mini scooter to lift a seat, with a red arrow indicating motion (no text or symbols on the device itself)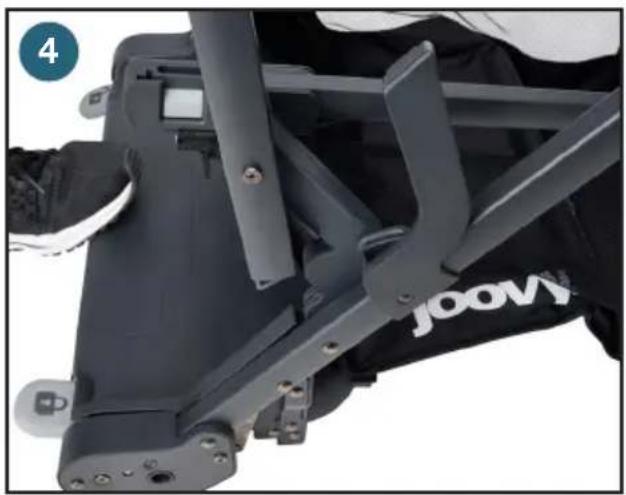
natural_image
Close-up of a black Joovia robotic platform with visible joints and control panels (no text or symbols)
natural_image
Close-up of a hand adjusting a tire component with a lock, showing the tire being inserted into a vehicle chassis (no text or symbols visible)
natural_image
Close-up of a hand adjusting a tire component with a lock, no visible text or symbols
natural_image
Close-up of hands adjusting a tire component with a red arrow indicating the motion direction (no text or symbols visible)전방 바퀴 설치/분리
natural_image
Close-up of a hand adjusting a tire component with a red arrow pointing to the wheel (no text or symbols visible)
natural_image
Close-up of hands adjusting a black office chair seat with a red arrow pointing to the button (no text or symbols visible)덮개(캐노피)설치
natural_image
Close-up of a hand adjusting a black mechanical clip assembly with a red arrow indicating the motion direction (no text or symbols visible)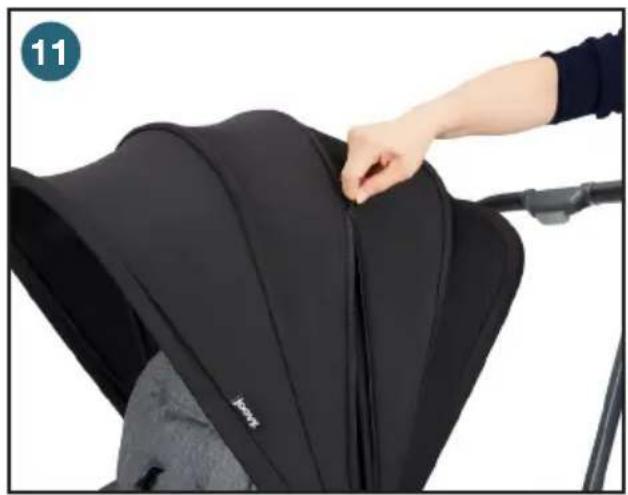
natural_image
Close-up of a black baby stroller with a hand adjusting the seat area (no text or symbols visible)트레이 설치/분리
natural_image
Close-up of hands adjusting a black cable strap device on a gray fabric surface (no text or symbols visible)
natural_image
Close-up of hands adjusting a car seatbelt with red arrows indicating adjustment (no text or symbols visible)
natural_image
Close-up of a hand adjusting a black seatbelt buckle with a red arrow indicating the adjustment point (no text or symbols visible)벤치 시트 설치/분리
natural_image
Close-up of hands adjusting a gray car seatbelt cover, showing two red circles highlighting the side (no text or symbols visible)
natural_image
Close-up of hands adjusting a car seatbelt component with a red arrow indicating the adjustment (no text or symbols visible)
natural_image
Close-up of a hand adjusting a black fabric seatbelt inside a vehicle cabin (no visible text or symbols)
natural_image
Close-up of hands adjusting a gray car seatbelt component with red arrows indicating fastening (no text or symbols visible)
natural_image
Hand placing a camera seatbelt on a car cab, with a red arrow indicating the handle (no text or symbols visible)
natural_image
Hand pressing a button on a black car seat cover, with a red arrow indicating the action (no text or symbols visible)유모차 운전
앞바퀴 회전 고리 잠금
natural_image
Close-up of a hand adjusting a mechanical component with a red arrow indicating the adjustment (no text or symbols visible)
natural_image
Close-up of a hand adjusting a black mechanical component with a red arrow indicating the adjustment (no text or symbols visible)
text_image
23 24
natural_image
Close-up of a car wheel and foot assembly with a red arrow pointing to a small component (no text or symbols visible)
natural_image
Close-up of a gray baby car seat with a hand adjusting the seat, showing a red arrow pointing to the spine (no text or symbols visible)
natural_image
Close-up of a person's hand inserting a small black plastic clip into a dark gray backpack (no text or symbols visible)
natural_image
Close-up of a hand adjusting a car seatbelt buckle, showing a red arrow pointing to the seat (no text or symbols visible)
natural_image
Close-up of hands adjusting a black plastic buckle component on a gray fabric background (no text or symbols visible)시트 조정
natural_image
Close-up of a hand adjusting a gray car seatbelt buckle, with a red arrow indicating the motion (no text or symbols)전방 시트 설치/분리
natural_image
Close-up of a baby stroller with hands adjusting the seatbelt, showing a red arrow indicating a specific movement (no text or symbols present)
natural_image
Close-up of a hand adjusting a black seatbelt buckle with a red arrow pointing to the buckle (no text or symbols visible)
text_image
32 33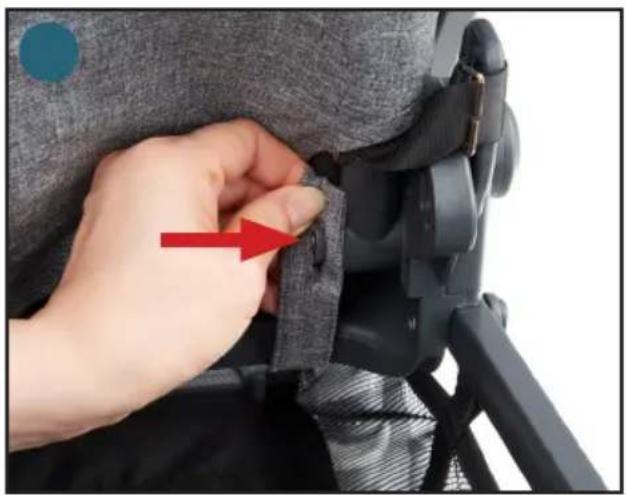
natural_image
Close-up of a hand adjusting a dark fabric seatbelt with a red arrow pointing to the button (no text or symbols visible)
natural_image
Close-up of a hand adjusting a black belt buckle with a red arrow pointing to the buckle detail (no text or symbols visible)
natural_image
Close-up of hands installing a black plastic clip on a dark gray seat (no text or symbols visible)
natural_image
Close-up of a hand inserting a small component into a car seatbelt, with a red arrow indicating the insertion direction (no text or symbols visible)
natural_image
Close-up of a hand adjusting a gray fabric seatbelt with a red circle highlighting the finger area (no text or symbols visible)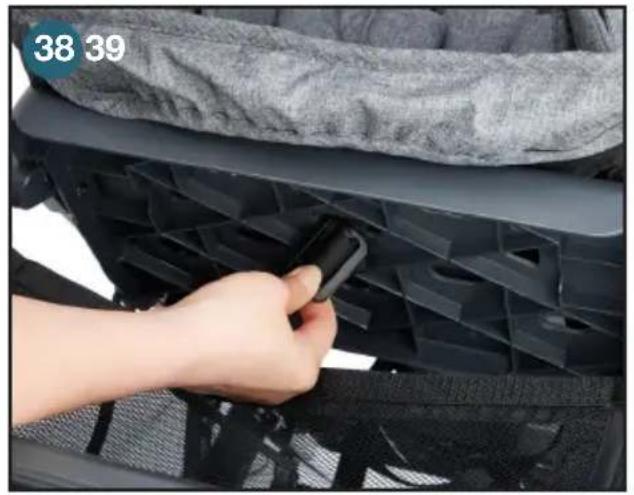
natural_image
Close-up of a hand adjusting a black plastic seat cover with a textured cushion (no text or symbols visible)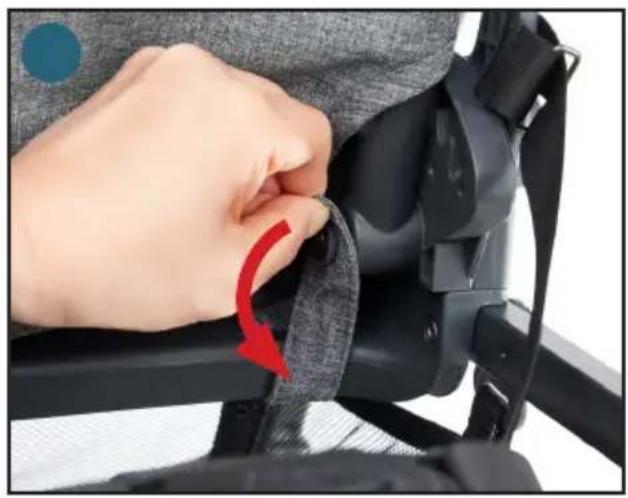
natural_image
Close-up of a hand adjusting a black seatbelt buckle, with a red arrow indicating the buckle's adjustment (no text or symbols visible)
natural_image
Close-up of a person adjusting a firearm in a car seatbelt, with a red circle highlighting the finger area (no text or symbols visible)
natural_image
Close-up of a baby stroller with hand adjusting seatbelt, showing red upward arrow (no text or symbols)유모차 접기
natural_image
Close-up of a hand adjusting a mechanical component with a red arrow indicating the adjustment (no text or symbols visible)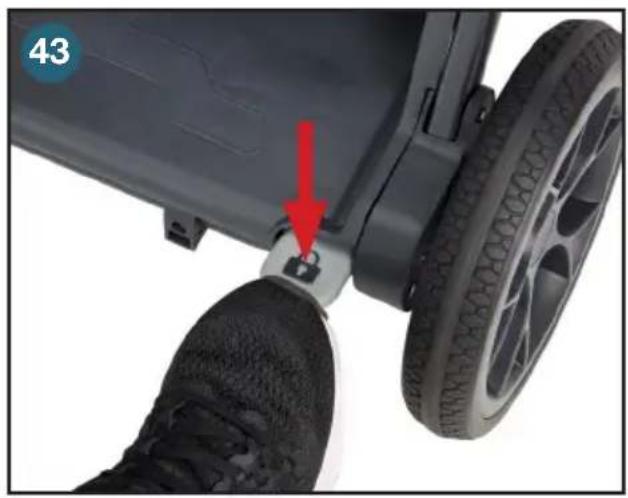
natural_image
Close-up of a car's side panel with a red arrow pointing to a key inserted into the wheel (no text or symbols visible)
natural_image
Hand holding a black cable with a red arrow pointing to the cable end (no text or symbols)
natural_image
Black stroller with black frame and wheels, displayed against white background (no text or symbols)
natural_image
Black and white photo of a compact toy vehicle with wheels and a handle, no visible text or symbols전방 시트 원단
natural_image
Close-up of a sewing machine's back panel being adjusted with a hand, showing the needle and red arrow (no text or symbols)
natural_image
Close-up of hands adjusting a black fabric garment with a zipper, no visible text or symbols
natural_image
Close-up of a hand holding a black strap attached to a gray backpack (no text or symbols visible)
natural_image
Close-up of hands adjusting a gray fabric bag with a black clip, no visible text or symbols
natural_image
Close-up of hands adjusting a black fabric garment with a zipper, no visible text or symbols
natural_image
Close-up of hands installing a white card with black rectangular cutouts, showing a red arrow indicating the process (no text or symbols present)
natural_image
Close-up of a person's seatbelt being adjusted for a zipper, with a red arrow indicating the zipper (no text or symbols visible)
natural_image
Close-up of a baby stroller with black bedding and wheels, no visible text or symbols벤치 시트
natural_image
Hand placing a camera seatbelt into a car seatbelt, with a red upward arrow indicating the motion (no text or symbols visible)
natural_image
Close-up of hands adjusting a gray seatbelt buckle with red arrows indicating fastening (no text or symbols visible)벤치 시트 패드
natural_image
Close-up of hands assembling a black plastic tray with a red upward arrow (no text or symbols visible)
natural_image
Close-up of a hand placing a black plastic component into a black plastic housing with a red arrow indicating the component (no text or symbols visible)
natural_image
Close-up of hands folding a dark fabric piece on a gray textured surface (no text or symbols visible)
natural_image
Close-up of a hand pressing down on a gray fabric sleeve with a red arrow indicating the process (no text or symbols)트레이
natural_image
Close-up of hands adjusting a black ergonomic chair handle (no text or symbols visible)
natural_image
Close-up of hands adjusting a car seatbelt buckle with red arrows indicating adjustment (no text or symbols visible)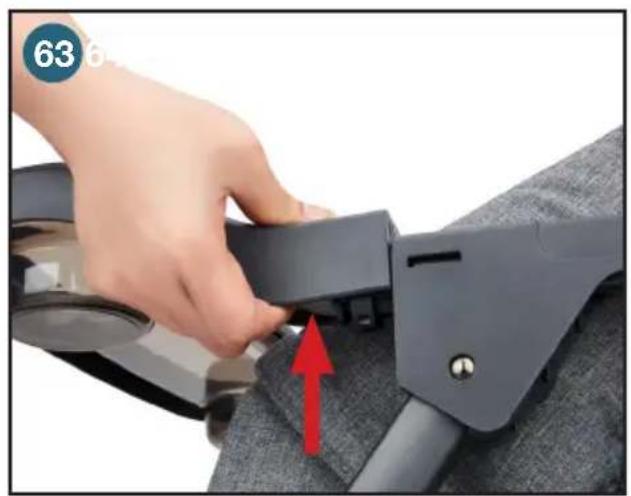
natural_image
Close-up of a hand adjusting a black seatbelt buckle with a red arrow indicating the adjustment (no text or symbols visible)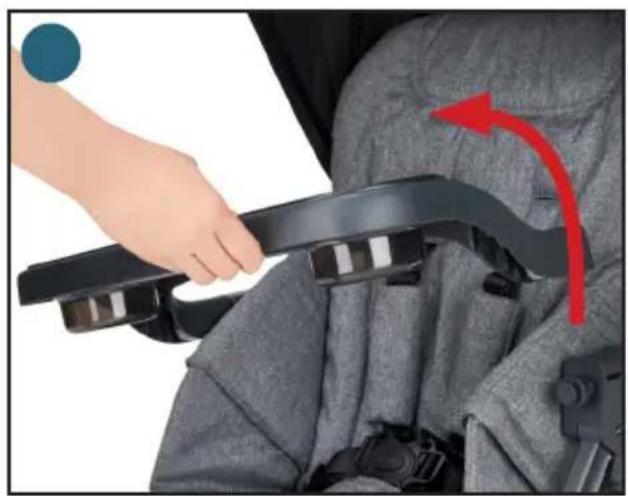
natural_image
Close-up of a hand adjusting a black seatbelt with a red arrow indicating motion (no text or symbols visible)배치

옵션 액세서리
natural_image
Hand pressing a button on a gray comfort seat cover, with a red arrow indicating the motion (no text or symbols)
natural_image
Close-up of a hand adjusting a black athletic bag inside a vehicle cabin (no visible text or symbols)
text_image
67 68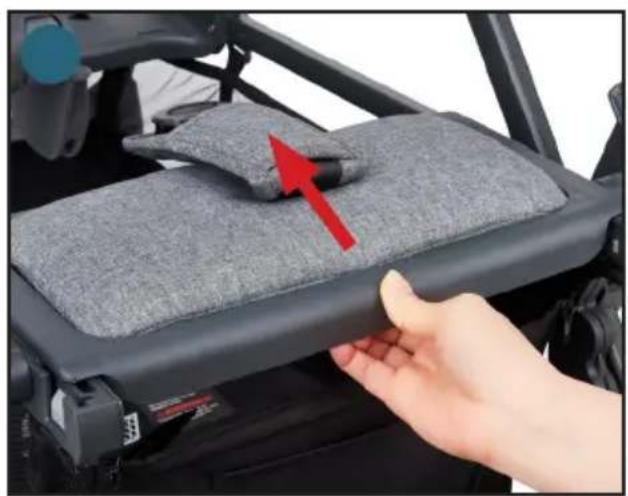
natural_image
Close-up of a hand adjusting a gray cushioned seat with a red arrow pointing to it, next to a vehicle chassis (no text or symbols visible)
natural_image
Close-up of a car seatbelt buckle assembly with a red arrow indicating the mounting point (no text or symbols visible)
natural_image
Close-up of a baby car seat with hands adjusting the seat frame (no visible text or symbols)
text_image
7172
natural_image
Close-up of a car seatbelt buckle with a hand adjusting the seatbelt (no text or symbols visible)
natural_image
Close-up of hands installing a black cable component with red arrow indicating assembly (no text or symbols visible)
natural_image
Close-up of hands adjusting a gray fabric seatbelt with a red arrow pointing to the toe area (no text or symbols visible)
text_image
7516
natural_image
Close-up of a hand inserting a small black plastic component into a car's side panel, with a red circle highlighting the component (no text or symbols visible)시트에 아동을 앉혀서 고정시키기
natural_image
Close-up of a gray ergonomic seat with a hand adjusting the seat, showing a red upward arrow indicating movement or positioning (no text or symbols present)
natural_image
Close-up of a hand inserting a small black plastic clip into a gray backpack (no text or symbols visible)
natural_image
Close-up of a hand adjusting a black seatbelt buckle with a red arrow pointing to the seat (no text or symbols visible)
natural_image
Close-up of hands adjusting a black plastic buckle buckle on a gray fabric background (no text or symbols visible)
natural_image
Hand pressing a button on a gray fabric seatbelt, with a red arrow indicating clockwise motion (no text or symbols)시트 원단 분리
natural_image
Close-up of a gray fabric garment being adjusted with a zipper, showing a red upward arrow indicating the seam (no text or symbols)
natural_image
Close-up of hands adjusting a black fabric garment with a zipper, no visible text or symbols
natural_image
Close-up of a hand adjusting a black mechanical component with a textured patch, no visible text or symbols
natural_image
Close-up of a hand holding a black plastic clip attached to a gray patterned blanket (no text or symbols visible)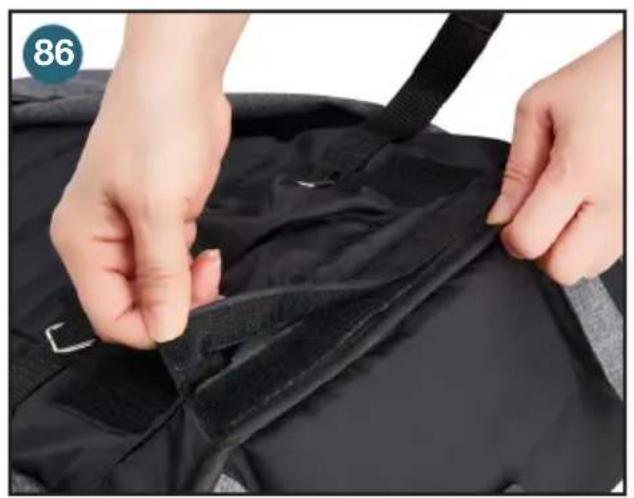
natural_image
Close-up of hands adjusting a black fabric garment with a zipper (no text or symbols visible)
natural_image
Close-up of hands installing a black garment with a white fabric patch, showing a red arrow indicating the process (no text or symbols)natural_image
Close-up of hands installing or adjusting a black mechanical frame with cable and bracket (no visible text or symbols)
natural_image
Close-up of hands installing a black mechanical component with red arrows indicating assembly or installation (no text or symbols visible)
natural_image
Person adjusting a baby car seat with a red arrow pointing to the seat area (no text or symbols visible)
natural_image
Close-up of hands using a mechanical device to adjust a component, with a red arrow indicating the motion direction (no text or symbols visible)
natural_image
Person using a Caboos bicycle leg rest frame, no visible text or symbols on the device itself
text_image
93 Caboo
natural_image
Close-up of a baby stroller with a red arrow pointing to the seat area, no visible text or symbols on the device itself.
natural_image
Close-up of a hand adjusting a black bicycle seatbelt with a red arrow pointing to the component (no text or symbols visible)natural_image
Hand holding a black device with a lock, mounted on a wheeled vehicle (no visible text or symbols)
natural_image
Close-up of a hand adjusting a black mechanical component with a red arrow indicating the adjustment (no text or symbols visible)
natural_image
Person assembling a Britax baby car seat with a red arrow indicating the seat area (no text or symbols on the device itself)
text_image
99 Baoose S
natural_image
Close-up of a hand adjusting a Caboose S bicycle seat bracket (no text or symbols visible)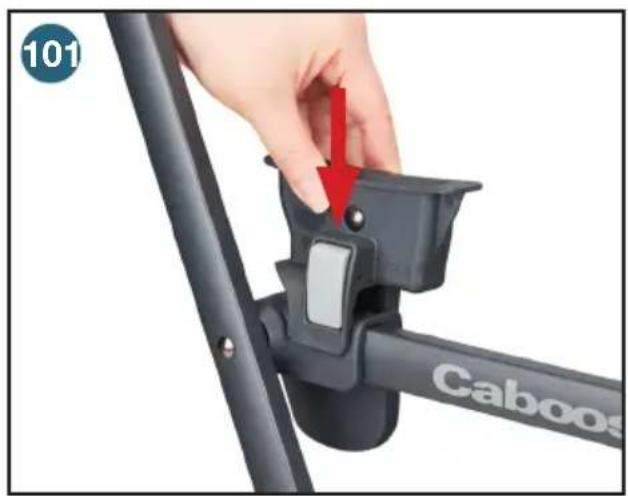
natural_image
Close-up of a hand adjusting a Caboos bicycle seat bracket with a red arrow indicating the adjustment (no text or symbols on the diagram itself)natural_image
Hand holding a black mechanical device with a handle, mounted on a wheeled platform (no visible text or symbols)
natural_image
Hand placing a black mechanical component with a red arrow indicating downward motion (no text or symbols)
natural_image
Close-up of hands assembling a black mechanical component with a red arrow indicating the handle (no text or symbols visible)
natural_image
Close-up of a hand holding a black bicycle seat bracket with 'Caboose' branding, no visible text or symbols on the main subject.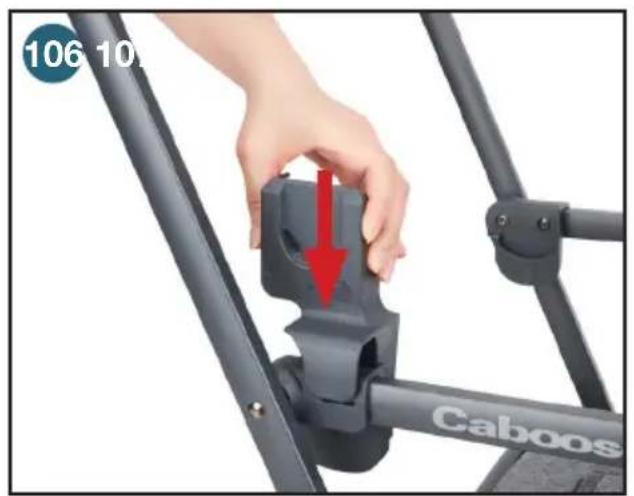
text_image
106 10. Caboos
natural_image
Person wearing a stroller with hands adjusting the seatbelt, showing a red arrow indicating a specific seatbelt (no text or symbols visible)유모차 방수 덮개(선택 옵션)
natural_image
Black and white photo of a baby stroller with transparent cover and metal mesh, no visible text or symbols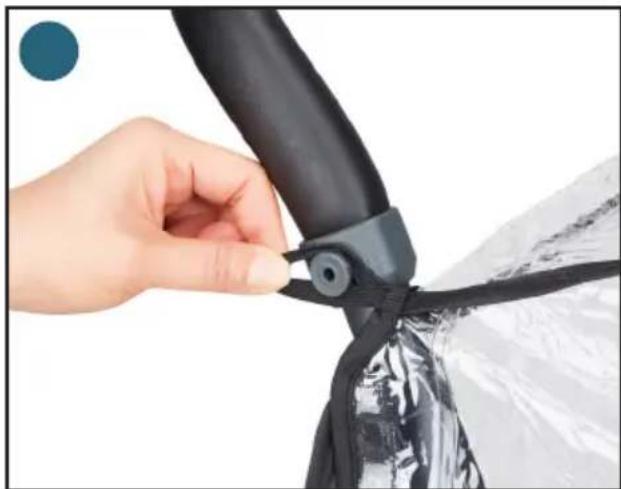
natural_image
Close-up of a hand adjusting a black propeller blade with a metallic cover (no text or symbols visible)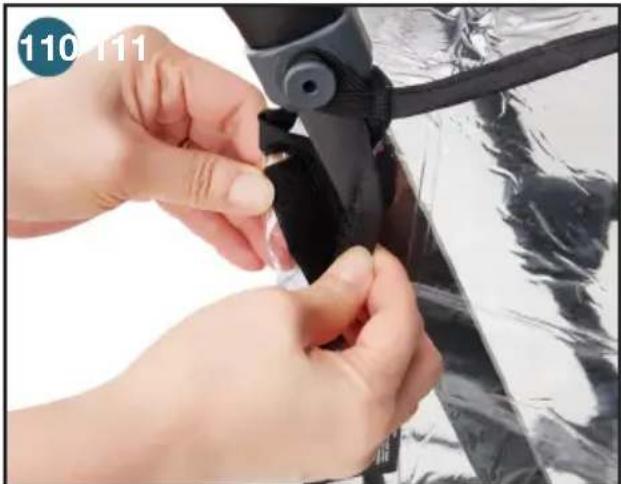
natural_image
Close-up of hands adjusting a black plastic component with a metallic foil cover (no text or symbols visible)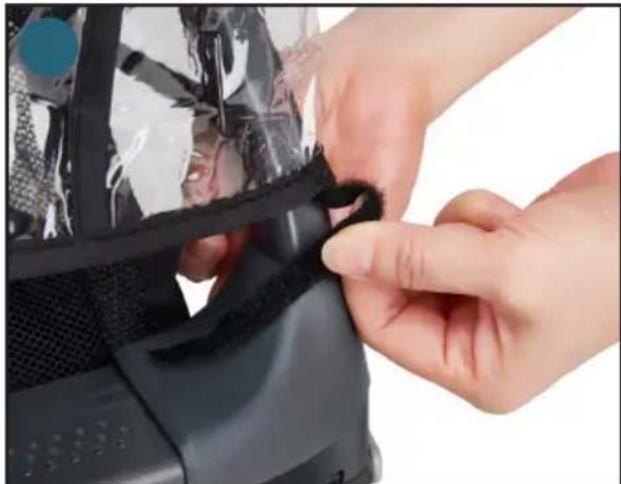
natural_image
Close-up of hands adjusting a black plastic bag attached to a device (no visible text or symbols)
text_image
112 113 joay
natural_image
Close-up of a hand adjusting black plastic film strips with a blue circular icon (no text or symbols visible)부모용 정리 주머니(선택 옵션)
natural_image
Close-up of hands adjusting a black resistance band with a ring, no visible text or symbols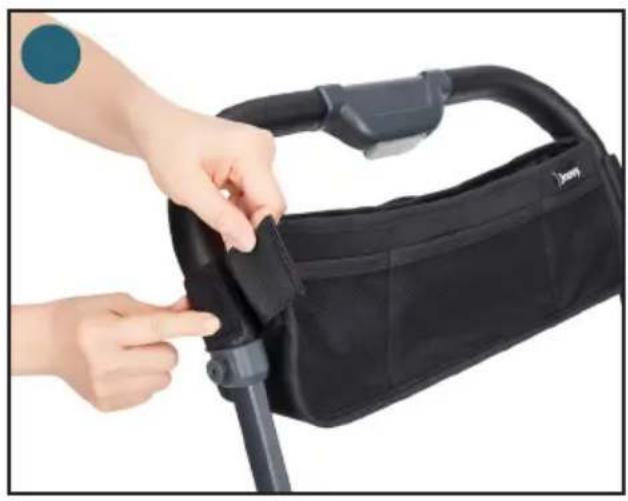
natural_image
Close-up of hands adjusting a black Jenny charging device (no text or symbols visible)
natural_image
Hand placing a black plastic bag into a stroller (no text or symbols visible)컵홀더(선택 옵션)
natural_image
Close-up of a hand holding a gray plastic device with a red arrow pointing to a small component (no text or symbols visible)
natural_image
Hand holding a gray plastic cup with a red arrow pointing to it, against a textured gray background (no text or symbols)
natural_image
Close-up of a hand holding a black cable with a black strap (no text or symbols visible)손잡이(선택 옵션)
natural_image
Close-up of hands holding a black metal bracket with mounting holes, no visible text or symbols
natural_image
Close-up of hands holding a black metal clamp or bracket (no text or symbols visible)
natural_image
Close-up of hands holding a metal clamp or clip against a plain background (no text or symbols visible)
natural_image
Close-up of a hand adjusting a black tripod-mounted device with a blue circular icon in the corner (no text or symbols visible)
natural_image
Close-up of a hand holding a black mechanical device with a red arrow indicating rotation (no text or symbols visible)
natural_image
Close-up of a black bicycle seatbelt frame with curved straps and mounting brackets (no text or symbols visible)토트백(선택 옵션)
natural_image
Close-up of a hand adjusting a black mechanical component with a red arrow indicating rotation (no visible text or symbols)
natural_image
Close-up of a hand inserting a zipper into a black leather seat (no text or symbols visible)
natural_image
Close-up of a black and silver stroller with wheels and a visible cover (no text or symbols)
natural_image
Close-up of a hand adjusting a black device component with a red arrow indicating the change (no text or symbols visible)
natural_image
Close-up of a hand adjusting a black athletic bag with a red arrow pointing to the handle (no text or symbols visible)요람 어댑터(선택 옵션)
natural_image
Close-up of a hand holding a black plastic mechanical component with a red arrow indicating a detail (no text or symbols visible)
natural_image
Black baby stroller with two umbrellas and a logo (no text or symbols on the device itself)
natural_image
Close-up of a person's seatbelt buckle being adjusted, with a red arrow pointing to the button (no text or symbols visible)
natural_image
Close-up of a hand adjusting a black metal bracket with a red arrow indicating the step (no text or symbols visible)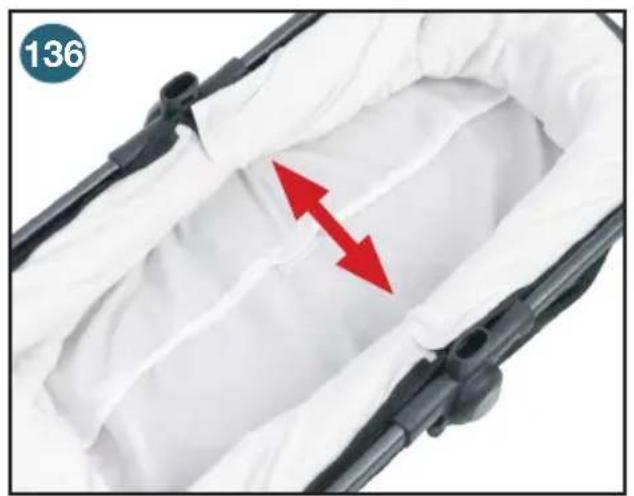
natural_image
Close-up of a mechanical component with white fabric and red directional arrows indicating movement or force (no text or symbols)
natural_image
Person performing a medical or therapeutic procedure on a patient's abdomen, with hands and a red arrow indicating direction (no text or symbols present)
natural_image
Close-up of hands assembling a black ergonomic device with a red arrow indicating the process (no text or symbols visible)
natural_image
Person adjusting a black stroller with a red arrow indicating the cable being inserted (no text or symbols visible)
natural_image
Close-up of a hand adjusting a zipper on a dark fabric car seat (no text or symbols visible)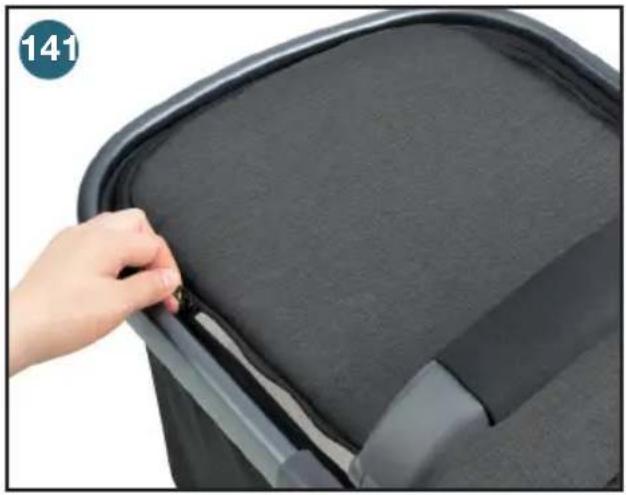
natural_image
Close-up of a hand adjusting a dark gray car seat cover, no text or symbols visible
natural_image
Close-up of hands adjusting a black athletic jacket with a blue circular badge showing '142 143' (no text or symbols on the jacket itself)
natural_image
Close-up of a hand adjusting a black mechanical component with a red arrow indicating a downward motion (no text or symbols visible)
natural_image
Person adjusting a seatbelt device with a red arrow pointing to the circular component (no text or symbols visible)
natural_image
Close-up of a hand adjusting a black metal bracket with a red arrow pointing to a small component (no text or symbols visible)
natural_image
Person performing a massage or physical therapy technique on a patient's leg, with red arrow indicating direction (no text or symbols)⚠경고
Elfe Juvenile Products
Joy Partners Limited Korea
natural_image
Exploded view of a smart car chassis with visible components including wheels, seats, and camera (no text or symbols)附加配件(另售)
natural_image
Close-up of a car interior showing a black plastic tray and handle assembly, with red arrows indicating movement or adjustment points (no text or symbols visible)
natural_image
Close-up of a hand adjusting a black cable with a red arrow indicating rotation (no text or symbols visible)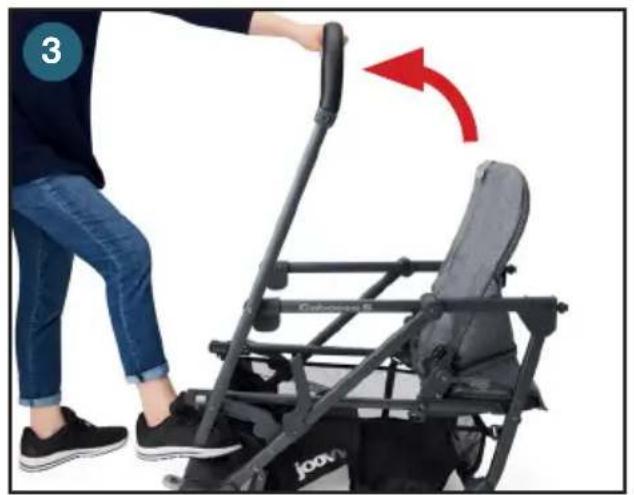
natural_image
Person using a Jiovo mini scooter to lift a seat, with a red arrow indicating motion (no text or symbols on the device itself)
natural_image
Close-up of a black Joovia robotic platform with visible joints and control panels (no text or symbols)
natural_image
Close-up of a hand adjusting a tire component with a lock, showing the tire being inserted into a vehicle chassis (no text or symbols visible)
natural_image
Close-up of a hand adjusting a tire component with a lock, no visible text or symbols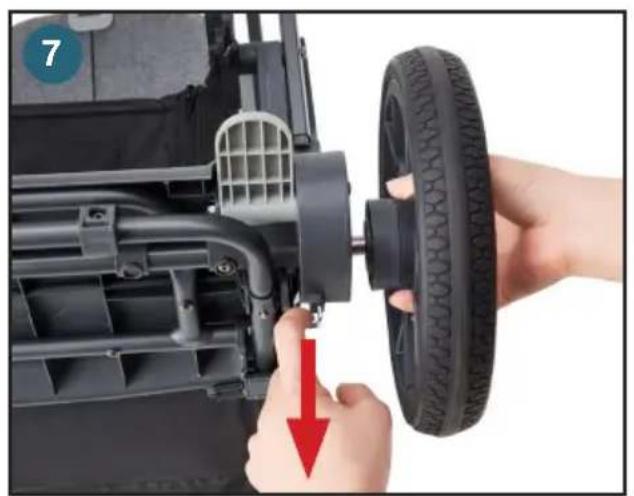
natural_image
Close-up of hands adjusting a tire component with a red arrow indicating the motion direction (no text or symbols visible)安装/拆卸前轮
natural_image
Close-up of a hand adjusting a tire component with a red arrow pointing to the wheel (no text or symbols visible)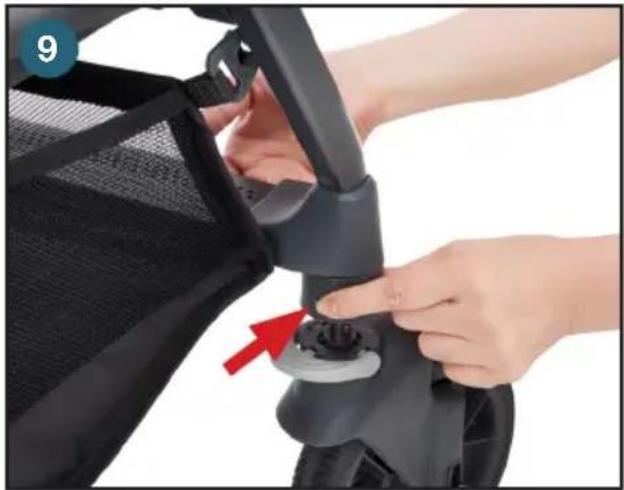
natural_image
Close-up of hands installing a black mechanical component with a red arrow pointing to the part (no text or symbols visible)安装车篷
natural_image
Close-up of a hand adjusting a black tripod-mounted device with a red arrow indicating the adjustment (no text or symbols visible)
natural_image
Close-up of a black baby stroller with a hand adjusting the seat area (no text or symbols visible)安装/取出垫座
natural_image
Close-up of hands adjusting a black cable strap device on a gray fabric background (no text or symbols visible)
natural_image
Close-up of hands adjusting a car seatbelt with red arrows indicating adjustment (no text or symbols visible)
natural_image
Close-up of a hand adjusting a black seatbelt buckle with a red arrow indicating the adjustment point (no text or symbols visible)安装/拆卸统座座椅
natural_image
Close-up of hands adjusting a gray car seatbelt cover, showing two red circles highlighting the side (no text or symbols visible)
natural_image
Close-up of hands adjusting a car seatbelt component with a red arrow indicating the adjustment (no text or symbols visible)
natural_image
Close-up of a hand adjusting a black fabric seatbelt inside a vehicle cabin (no visible text or symbols)
natural_image
Close-up of hands adjusting a gray car seatbelt component with red arrows indicating fastening (no text or symbols visible)
natural_image
Hand placing a camera seatbelt on a car cab, with a red arrow indicating the handle (no text or symbols visible)
natural_image
Hand pressing a button on a car seat panel, showing a red arrow indicating the action (no text or symbols visible)婴儿车操作
前轮旋转锁
natural_image
Close-up of a hand adjusting a mechanical component with a red arrow indicating the adjustment (no text or symbols visible)
natural_image
Close-up of a hand adjusting a black mechanical component with a red arrow indicating the adjustment (no text or symbols visible)
text_image
23 24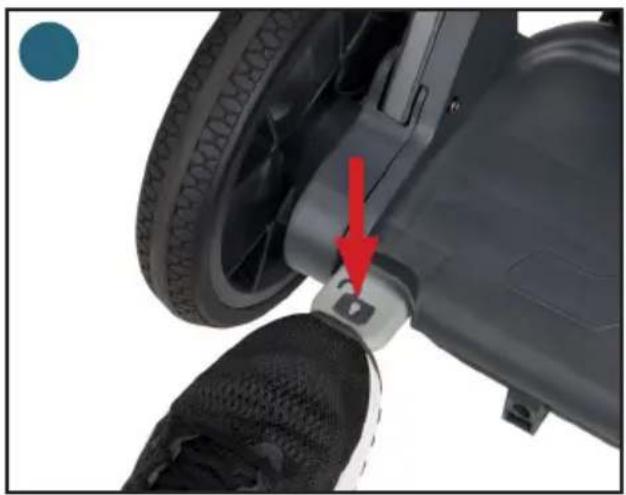
natural_image
Close-up of a car wheel and foot assembly with a red arrow pointing to a small component (no text or symbols visible)
natural_image
Close-up of a gray baby car seat with a hand adjusting the seat, showing a red arrow pointing to the spine (no text or symbols visible)
natural_image
Close-up of a person's hand inserting a small black plastic clip into a dark gray backpack (no text or symbols visible)
natural_image
Close-up of a hand adjusting a car seatbelt buckle, showing a red arrow pointing to the buckle (no text or symbols visible)
natural_image
Close-up of hands adjusting a black plastic buckle component on a gray fabric background (no text or symbols visible)调整座椅
natural_image
Close-up of a hand adjusting a gray car seatbelt buckle, with a red arrow indicating the motion (no text or symbols)安装/拆卸前座
natural_image
Close-up of a baby stroller with hands adjusting the seatbelt, showing a red arrow indicating a specific movement (no text or symbols present)
natural_image
Close-up of a hand adjusting a gray patterned sleeve with a red arrow pointing to the button (no text or symbols visible)
text_image
32 33
natural_image
Close-up of a hand adjusting a dark fabric seatbelt with a red arrow pointing to the button (no text or symbols visible)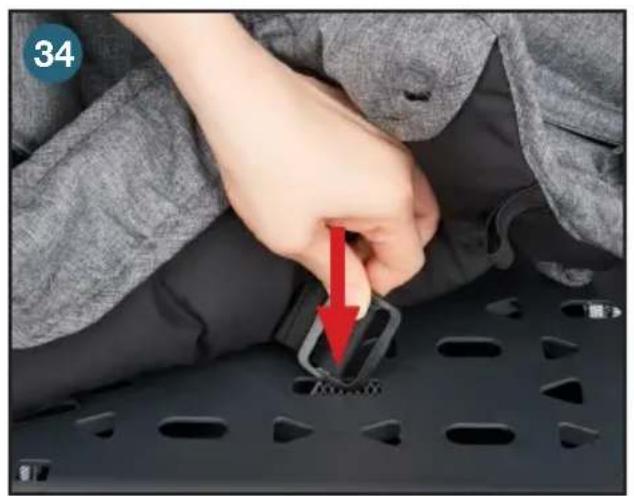
natural_image
Close-up of a hand adjusting a black belt buckle with a red arrow pointing to the buckle detail (no text or symbols visible)
natural_image
Close-up of hands installing a black plastic clip on a dark gray seat (no text or symbols visible)
natural_image
Close-up of a hand inserting a small component into a car seatbelt, with a red arrow indicating the insertion direction (no text or symbols visible)
natural_image
Close-up of a hand adjusting a gray fabric seatbelt with a red circle highlighting the finger area (no text or symbols visible)
natural_image
Close-up of a hand adjusting a black plastic seat cover with a textured cushion (no text or symbols visible)
natural_image
Close-up of a hand adjusting a black seatbelt buckle, with a red arrow indicating the buckle's adjustment (no text or symbols visible)
natural_image
Close-up of a person adjusting a firearm in a car seatbelt, with a red circle highlighting the finger area (no text or symbols visible)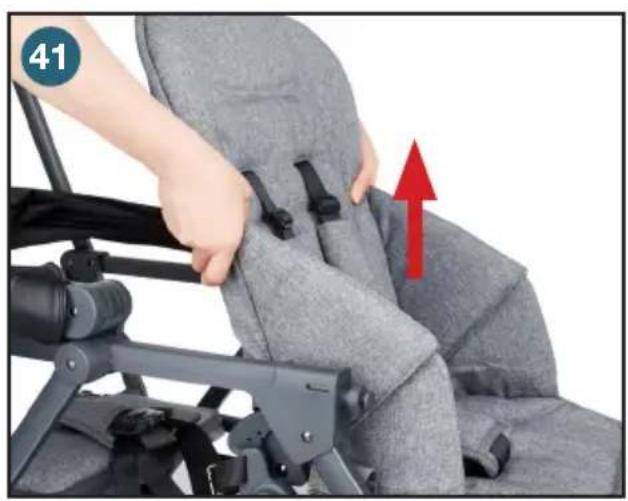
natural_image
Close-up of a baby stroller with hand adjusting seatbelt, showing red upward arrow (no text or symbols)折叠童车
natural_image
Close-up of a hand adjusting a mechanical component with a red arrow indicating the adjustment (no text or symbols visible)
natural_image
Close-up of a car's side panel with a red arrow pointing to a key inserted into the wheel (no text or symbols visible)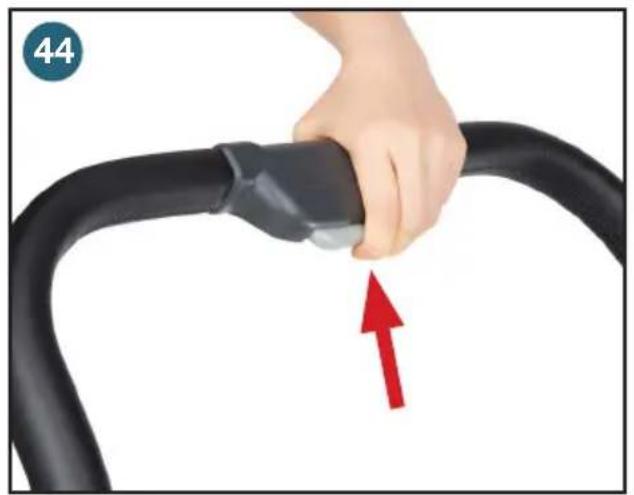
natural_image
Hand holding a black cable with a red arrow pointing to the cable end (no text or symbols)
natural_image
Black stroller with black frame and wheels, displayed against white background (no text or symbols)
natural_image
Black and white photo of a compact toy vehicle with wheels and a handle, no visible text or symbols前座面料
natural_image
Close-up of a sewing machine's back panel being adjusted with a red arrow, showing the seam and fabric (no text or symbols visible)
natural_image
Close-up of hands adjusting a black fabric garment with a zipper, no visible text or symbols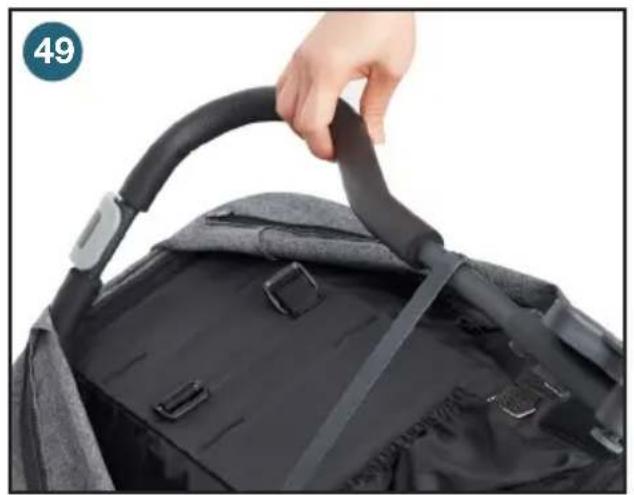
natural_image
Close-up of a hand holding a black strap attached to a gray backpack (no text or symbols visible)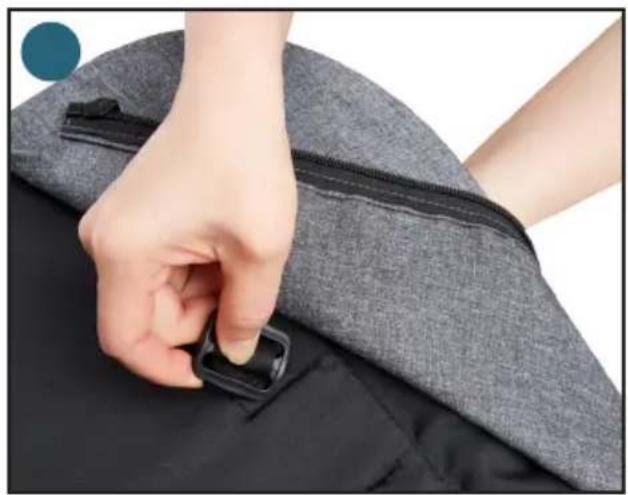
natural_image
Close-up of hands adjusting a gray fabric bag with a black clip, no visible text or symbols
natural_image
Close-up of hands adjusting a black fabric garment with a zipper, no visible text or symbols
natural_image
Close-up of hands installing a white card with black rectangular cutouts, showing a red arrow indicating the process (no text or symbols present)
natural_image
Close-up of a person's seatbelt being adjusted for a zipper, with a red arrow indicating the zipper (no text or symbols visible)
natural_image
Close-up of a baby stroller with black bedding and wheels, no visible text or symbols统座
natural_image
Hand placing a camera seatbelt into a car seat, with a red arrow indicating the handle (no text or symbols visible)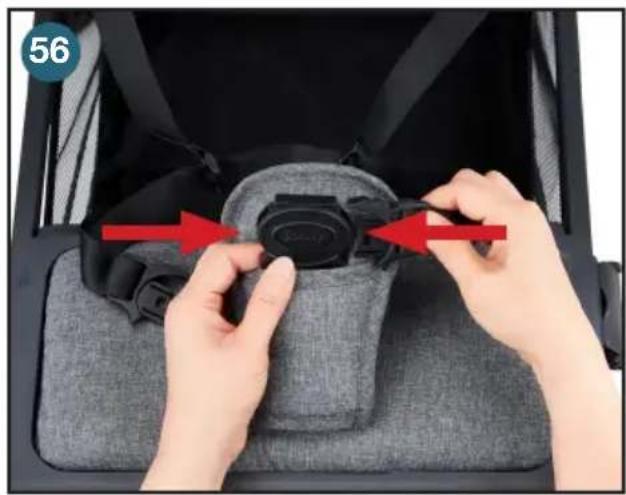
natural_image
Close-up of hands adjusting a gray car seatbelt buckle with red arrows indicating fastening (no text or symbols visible)统座座垫
natural_image
Close-up of hands assembling a black plastic tray with a red upward arrow (no text or symbols visible)
natural_image
Close-up of a hand placing a black plastic component into a black plastic housing with a red arrow indicating the component (no text or symbols visible)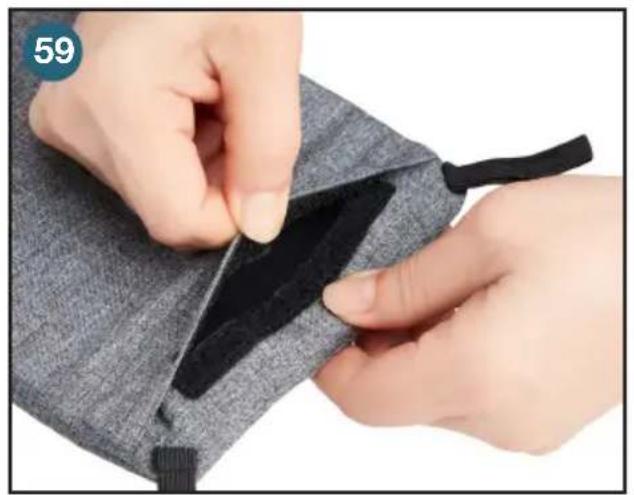
natural_image
Close-up of hands folding a dark fabric piece on a gray textured surface (no text or symbols visible)
natural_image
Close-up of a hand pressing down on a gray fabric sleeve with a red arrow indicating the process (no text or symbols)垫座
natural_image
Close-up of hands adjusting a black curved device handle on a gray patterned garment (no text or symbols visible)
natural_image
Close-up of hands adjusting a car seatbelt with red arrows indicating adjustment (no text or symbols visible)
natural_image
Close-up of a hand adjusting a black seatbelt buckle with a red arrow pointing to the buckle (no text or symbols visible)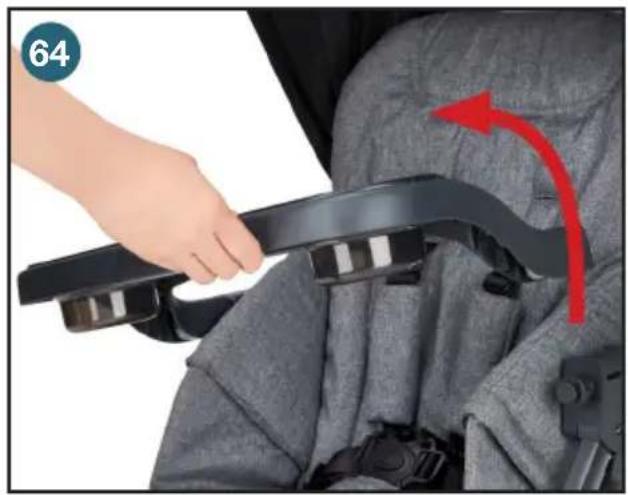
natural_image
Close-up of a hand adjusting a black car seatbelt buckle, with a red arrow indicating the motion direction (no text or symbols visible)配置

选购附件
natural_image
Hand placing a camera seatbelt into a car seatbelt (no text or symbols visible)
natural_image
Close-up of a hand adjusting a black fabric component inside a vehicle cabin (no visible text or symbols)
text_image
67 68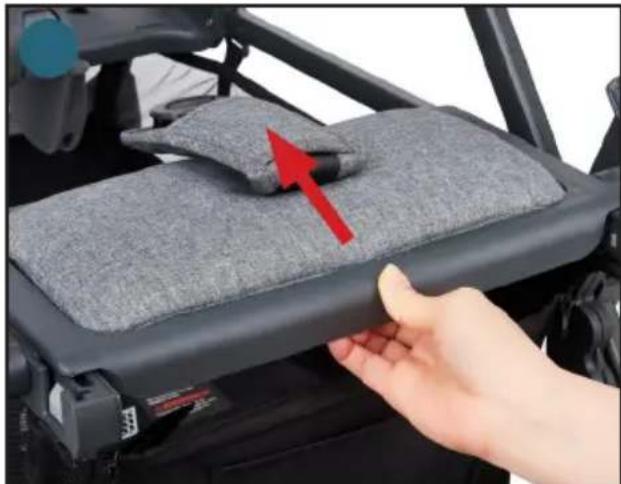
natural_image
Close-up of a hand pressing down on a gray cushioned device component, with a red arrow indicating the motion direction (no text or symbols visible)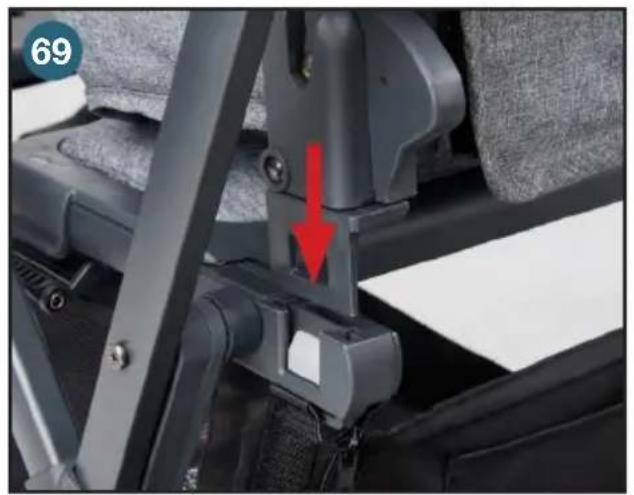
natural_image
Close-up of a car seatbelt buckle assembly with a red arrow indicating the mounting point (no text or symbols visible)
natural_image
Close-up of a baby car seat with hands adjusting the seat frame (no visible text or symbols)
text_image
71 72
natural_image
Close-up of a car seatbelt buckle with a hand adjusting the seatbelt (no text or symbols visible)
natural_image
Close-up of hands installing a black cable component with red arrow indicating assembly (no text or symbols visible)
natural_image
Close-up of hands adjusting a gray fabric seatbelt with a red arrow pointing to the toe area (no text or symbols visible)
text_image
7516
natural_image
Close-up of a hand inserting a small black plastic component into a car's side panel, with a red circle highlighting the component (no text or symbols visible)固定坐车儿童
natural_image
Close-up of a gray ergonomic seat with a hand adjusting the seat, showing a red upward arrow indicating movement or positioning (no text or symbols present)
natural_image
Close-up of a hand inserting a small black plastic clip into a gray backpack (no text or symbols visible)
natural_image
Close-up of a hand adjusting a black seatbelt buckle with a red arrow pointing to the seat (no text or symbols visible)
natural_image
Close-up of hands adjusting a black plastic buckle component with red arrows indicating alignment (no text or symbols visible)
natural_image
Hand pressing a button on a gray fabric seatbelt, with a red arrow indicating clockwise motion (no text or symbols)卸下座椅面料
natural_image
Close-up of a gray fabric bag with a zipper and red arrow indicating a seam or fold, being adjusted by hand (no text or symbols)
natural_image
Close-up of hands adjusting a black fabric garment with a zipper, no visible text or symbols
natural_image
Close-up of a hand adjusting a black mechanical component with a textured patch, no visible text or symbols
natural_image
Close-up of a hand holding a black plastic clip attached to a gray patterned blanket (no text or symbols visible)
natural_image
Close-up of hands adjusting a black fabric garment with a zipper, no visible text or symbols
natural_image
Close-up of hands installing a black garment with a white patch, showing a red arrow indicating the process (no text or symbols)natural_image
Close-up of hands installing or adjusting a black mechanical frame with cable and bracket (no visible text or symbols)
natural_image
Close-up of hands installing a black mechanical component with red arrows indicating assembly or installation (no text or symbols visible)
natural_image
Person adjusting a baby car seat with a red arrow pointing to the seat area (no text or symbols visible)
natural_image
Close-up of hands using a mechanical device to adjust a component, with a red arrow indicating the motion direction (no text or symbols visible)
natural_image
Person using a Caboos bicycle leg rest frame, no visible text or symbols on the device itself
text_image
93 Caboo
natural_image
Close-up of a baby stroller with a red arrow pointing to the seat area, no visible text or symbols on the device itself.
natural_image
Close-up of a hand adjusting a black bicycle seatbelt with a red arrow pointing to the component (no text or symbols visible)natural_image
Hand holding a black device with a lock, mounted on a wheeled vehicle (no visible text or symbols)
natural_image
Close-up of a hand adjusting a black mechanical component with a red arrow indicating the adjustment (no text or symbols visible)
natural_image
Person assembling a Britax baby car seat with a red arrow indicating the seat area (no text or symbols on the device itself)
text_image
99 Baoose S
natural_image
Close-up of a hand adjusting a Caboose S bicycle seat bracket (no text or symbols visible)
natural_image
Close-up of a hand adjusting a Caboos bicycle seat bracket with a red arrow indicating the adjustment (no text or symbols on the diagram itself)natural_image
Hand holding a black mechanical device with a handle, mounted on a wheeled platform (no visible text or symbols)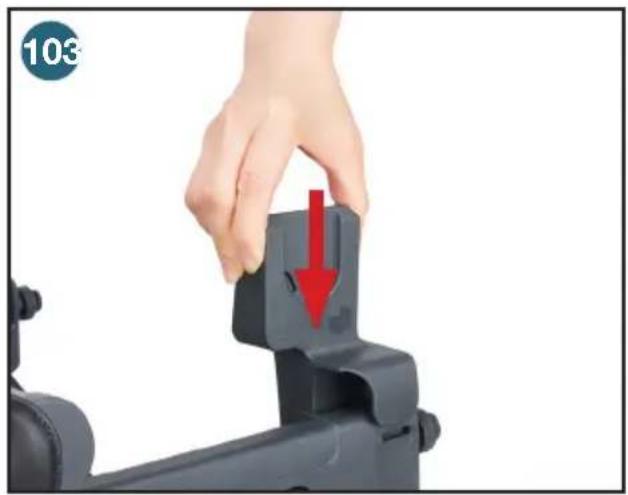
natural_image
Hand placing a black mechanical component with a red arrow indicating downward motion (no text or symbols)
natural_image
Close-up of hands assembling a black mechanical component with a red arrow indicating the handle (no text or symbols visible)
natural_image
Close-up of a hand holding a black bicycle seat bracket with 'Caboose' branding, no visible text or symbols on the main subject.
text_image
106 10. Caboos
natural_image
Person wearing a stroller with a red arrow indicating a cable or cable being inserted (no text or symbols visible)雨罩(可选)
natural_image
Black and white photo of a children's stroller with transparent cover, no visible text or symbols on the device itself.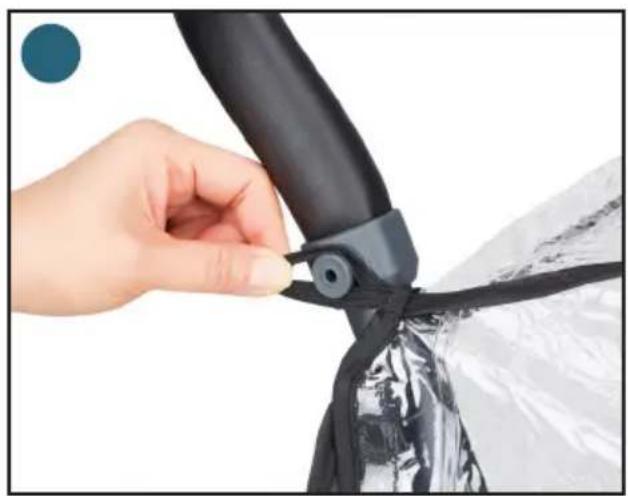
natural_image
Close-up of a hand adjusting a black propeller seatbelt on a reflective surface (no text or symbols visible)
natural_image
Close-up of hands adjusting a black plastic component with reflective material (no text or symbols visible)
natural_image
Close-up of hands adjusting a black plastic bag attached to a car helmet (no visible text or symbols)
natural_image
Close-up of a hand adjusting a black jacket with reflective foil, no visible text or symbols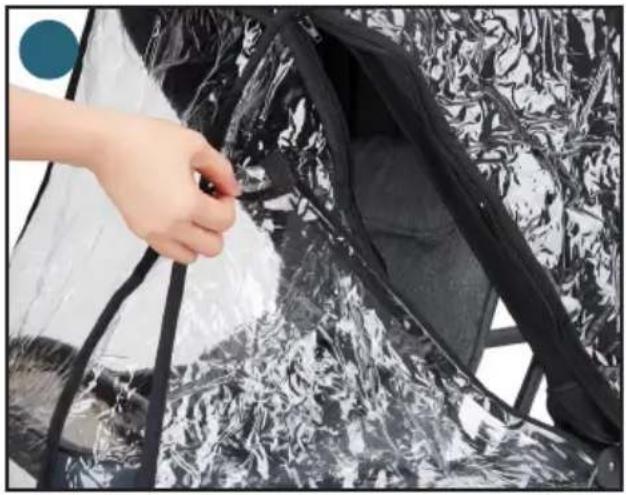
natural_image
Close-up of a hand adjusting black plastic film strips with a transparent cover (no text or symbols visible)家长收纳箱(可选)
natural_image
Close-up of hands adjusting a black resistance band with a blue cap (no text or symbols visible)
natural_image
Close-up of hands adjusting a black fitness device with a handle (no visible text or symbols)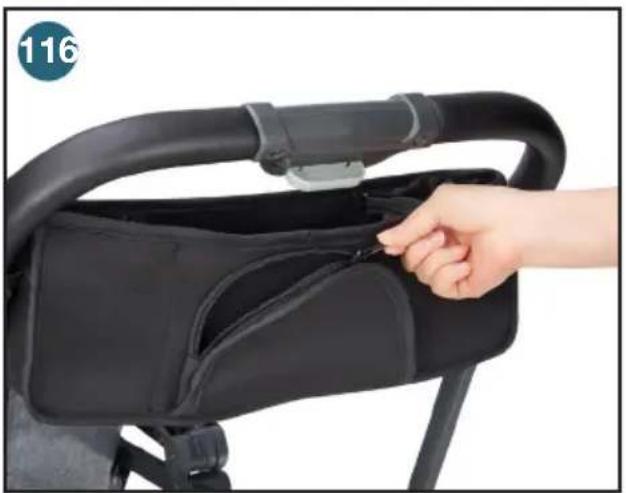
natural_image
Hand placing a black plastic bag into a black stroller seat (no text or symbols visible)杯架(可选)
natural_image
Close-up of a hand holding a gray plastic car seat with a red arrow pointing to the handle (no text or symbols visible)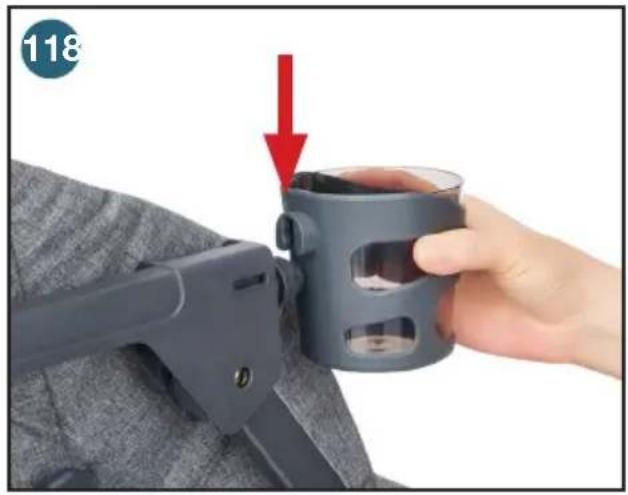
natural_image
Hand holding a blue plastic mug with a red arrow pointing to the cup (no text or symbols visible)
natural_image
Close-up of a hand holding a black wrist strap device with a circular badge showing number 119 (no text or symbols on the device itself)手柄(可选)
natural_image
Close-up of hands holding a black metal bracket with mounting holes, no visible text or symbols
natural_image
Close-up of hands holding a black metal clamp or bracket (no text or symbols visible)
natural_image
Close-up of hands holding a metal clamp or clip against a plain background (no text or symbols visible)
natural_image
Close-up of a hand adjusting a black tripod-mounted device with a blue circular icon in the corner (no text or symbols visible)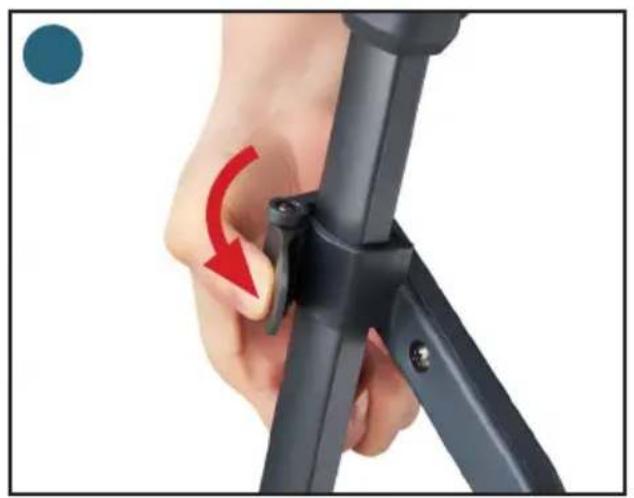
natural_image
Close-up of a hand holding a black mechanical device with a red arrow indicating rotation (no text or symbols visible)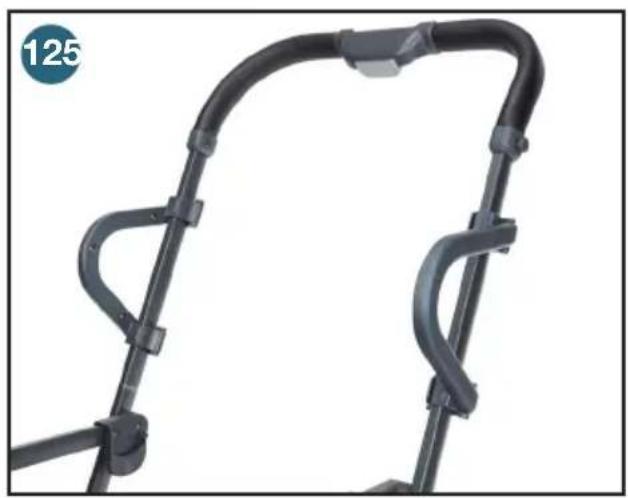
natural_image
Close-up of a black bicycle seatbelt frame with curved straps and mounting brackets (no text or symbols visible)手提袋(可选)
natural_image
Close-up of a hand adjusting a gray fabric seatbelt with a red arrow pointing to the button (no text or symbols visible)
natural_image
Close-up of a hand adjusting a black mechanical component with a red arrow indicating rotation (no visible text or symbols)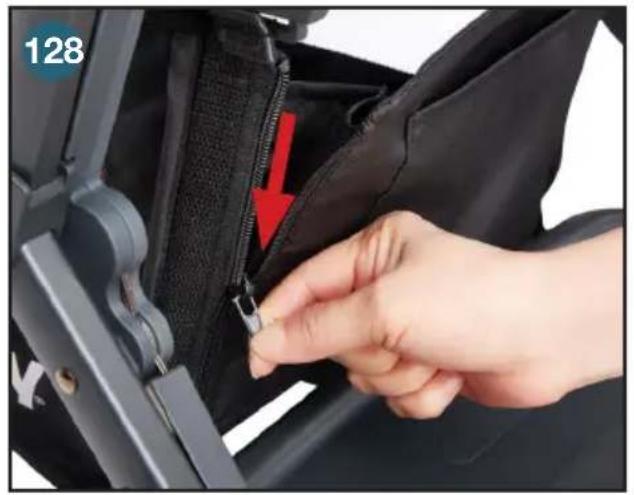
natural_image
Close-up of a hand inserting a zipper into a black leather seat (no text or symbols visible)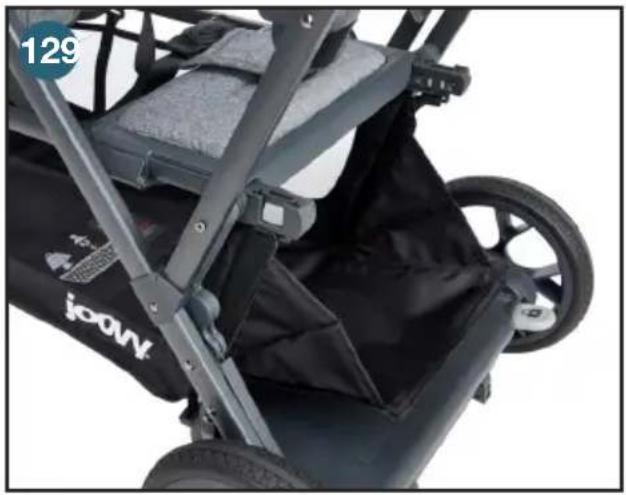
natural_image
Close-up of a black and silver stroller with wheels and a visible cover (no text or symbols)
natural_image
Close-up of a hand adjusting a black SES seatbelt device with a red arrow indicating the adjustment (no text or symbols visible)
natural_image
Close-up of a hand adjusting a black athletic bag with a red arrow pointing to the handle (no text or symbols visible)摇篮接合器(可选)
natural_image
Close-up of a hand holding a black plastic mechanical component with a red arrow indicating a detail (no text or symbols visible)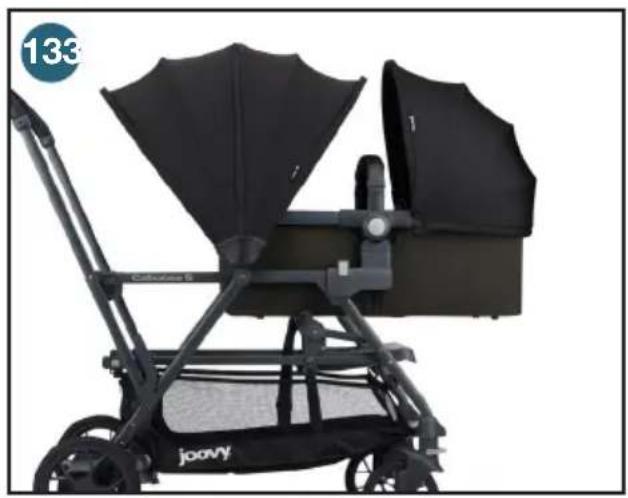
natural_image
Black baby stroller with two canopy blades, no visible text or symbols on the device itself.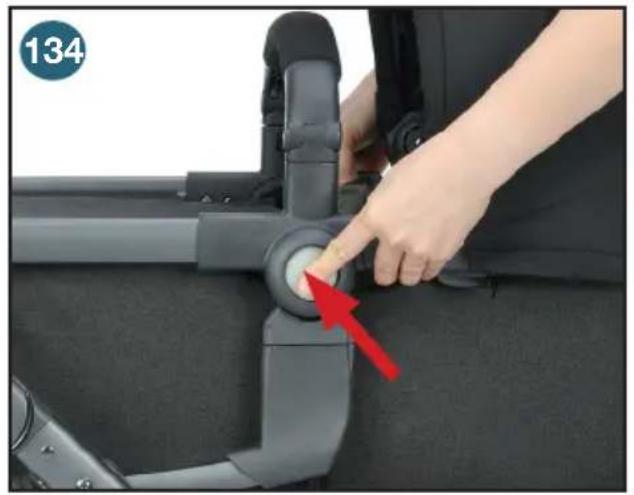
natural_image
Close-up of a person's seatbelt buckle being adjusted, with a red arrow pointing to the button (no text or symbols visible)
natural_image
Close-up of a hand adjusting a black metal bracket with a red arrow pointing to a small component (no text or symbols visible)
natural_image
Close-up of a mechanical component with white fabric and red directional arrows indicating movement or force (no text or symbols)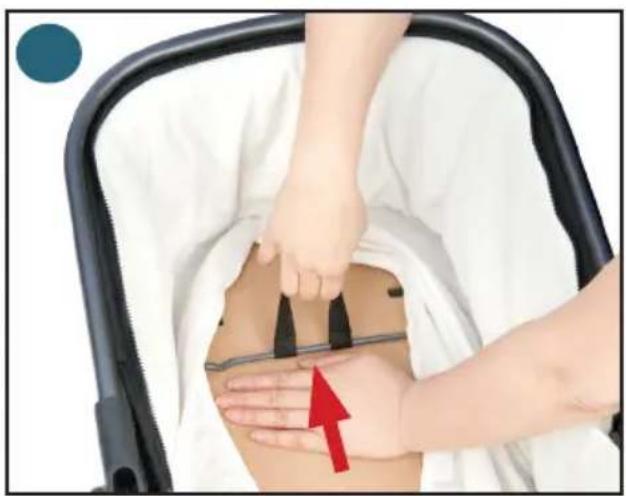
natural_image
Person performing a medical or therapeutic procedure on a patient's abdomen, with hands and a red arrow indicating direction (no text or symbols present)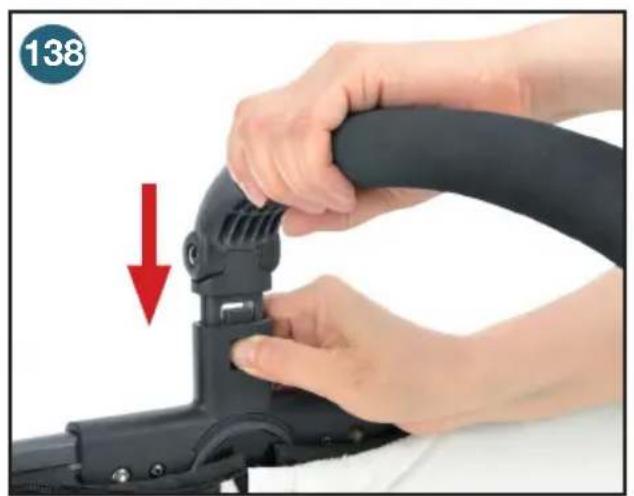
natural_image
Close-up of hands assembling a black ergonomic device with a red arrow indicating the process (no text or symbols visible)
natural_image
Person adjusting a black stroller with a red arrow indicating the cable being inserted (no text or symbols visible)
natural_image
Close-up of a hand adjusting a zipper on a dark fabric car seat (no text or symbols visible)
natural_image
Close-up of a hand adjusting a dark gray car seat cover, no text or symbols visible
natural_image
Close-up of hands adjusting a black athletic jacket with a blue circular badge showing '142 143' (no text or symbols on the jacket itself)
natural_image
Close-up of a hand adjusting a black mechanical component with a red arrow indicating a downward motion (no text or symbols visible)
natural_image
Person adjusting a seatbelt device with a red arrow pointing to the circular component (no text or symbols visible)
natural_image
Close-up of a hand adjusting a black metal bracket with a red arrow pointing to a small component (no text or symbols visible)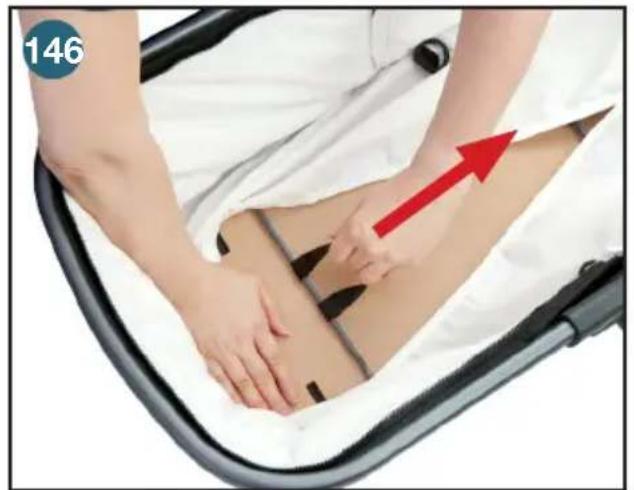
natural_image
Person performing a massage or physical therapy technique on a patient's leg, with a red arrow indicating direction (no text or symbols)警告
Elfe Juvenile Products
Joy Partners Limited Korea