
RBCP 31832 - Fridge ROSIERES - Free user manual and instructions
Find the device manual for free RBCP 31832 ROSIERES in PDF.
| Product type | Built-in refrigerator-freezer |
| Brand | Rosieres |
| Model | RBCP 31832 |
| Dimensions (H x W x D) | Approximately 1776 x 540 x 650 mm (depending on version) |
| Energy class | Not specified (manual not available) |
| Power supply | 230 V / 50 Hz (estimated) |
| Number of compressors | 1 or 2 (depending on version) |
| Freezer control panel | ON/OFF buttons, temperature setting, LED indicators, SUPER function |
| Refrigerator control panel | Rotary thermostat (positions 0-7, recommended 2-3) |
| SUPER function | Rapid freezing for max 50 hours, activated by temperature buttons |
| Temperature alarm | Red indicator lights up at -7°C, turns off below -8°C |
| Refrigerator defrosting | Automatic during compressor stop |
| Freezer defrosting | Manual recommended when frost > 3 mm |
| Defrost water drainage | System with lever and tray (not supplied) |
| Door reversal | Possible by moving hinges and pins |
| Built-in installation | Requires column with rear ventilation and front grille |
| Door coupling | Pull-out slides for column doors |
| Maximum freezing capacity | Indicated on rating plate (not specified) |
| Maintenance | Clean with soft cloth, avoid abrasive products |
| Climate class | Not specified (manual not available) |
| Repairability | Spare parts available via technical support |
Frequently Asked Questions - RBCP 31832 ROSIERES
User questions about RBCP 31832 ROSIERES
0 question about this device. Answer the ones you know or ask your own.
Ask a new question about this device
Download the instructions for your Fridge in PDF format for free! Find your manual RBCP 31832 - ROSIERES and take your electronic device back in hand. On this page are published all the documents necessary for the use of your device. RBCP 31832 by ROSIERES.
USER MANUAL RBCP 31832 ROSIERES
MATERIALS IN COMPLIANCE WITH REQUIREMENTS OF EU DIRECTIVE 2002/95/CE + AMENDMENTS
ALL RIGHTS RESERVED, THE REPRODUCTION OF ANY PART WITHOUT OUR WRITTEN CONSENT IS FORBIDDEN
| RELEASE LEVEL | ||||||||
| VALIDO PER PRODUZIONE | ||||||||
| (E) | ||||||||
| (D) | ||||||||
| (C) | ||||||||
| (B) | ||||||||
| 37627 | (A) | 26-11-13 | Insert I33 dimension | |||||
| CL N° REV. DATE | MODIFY DESCRIPTION | MODIFIED BY | ||||||
| SPECIFICATION | DATE SIGNATURE | PROPERTY OF CANDY·HOOVER GROUP | ||||||
| GENERAL TOLERANCEISO 2768 - m | DRAWN TAGLIABUE16-05-2009 Z STUDIO | |||||||
| CHECKED26-11-2013 L.Carioni | NAMEMANUAL INSTRUCTION COMBI BUILT INONE/DOUBLE COMPRESSOR - 14 LANGUAGES | |||||||
| BASE CODE | FORCOMBI INCAS.MONO/BICOMP. - Y54 | (LOCAL LANGUAGE)SCHEDA TECNICA COMBI INCASSO MONO/BICOMPRESS. - 14L | ||||||
| - | ||||||||
| WEIGHT SCALE | PART CODE | SHEET | ||||||
| TREATMENT | Kg. | 1:1 | 4 1 0 2 8 5 6 | 8 | ||||
| - | ||||||||
| MATERIAL | SIZE | REPLACE No ORIGIN CL No Class Specification | ||||||
| - | A4 | FR | - - - - - - - - - - - - - - - - - - - - - - - - - - - - - - - - - - - - - - - - - - - - - - - - - - - - - - - - - - - - - - - - - - - - - - - - - - - - - - - - - - - - - - - - - - - - - - - - - - - - - | |||||
| 35 | ||||||||
BULT-IN FRIDGE FREEZER...... page 5 to page 8 EN
COMBINÉ ENCASTRABLE de page 9 à page 12 FR
natural_image
Line drawing of a double refrigerator with two doors, no text or symbols presentCOMBINATO INCASSO
QUADRO COMANDI VANO FREEZER DEL FRIGORIFERO BICOMPRESSORE
natural_image
Line drawing of a kitchen appliance with handle, ventilation slots, and a knob (no text or symbols)SBRINAMENTO
(Figura 2)
natural_image
Line drawing of a refrigerator with shelves and doors (no text or symbols)natural_image
Technical line drawing of a mechanical device with no visible text or symbolsnatural_image
Technical line drawing of a mechanical component with an arrow indicating direction (no text or symbols)Smontare la cerniera centrale e le relative rondelle.
3
natural_image
Line drawing of a window with a scroll wheel and control panel (no text or symbols)natural_image
Simple line drawing of a door with a handle and lid, no text or symbols presentnatural_image
Technical line drawing of a mechanical component with no visible text or symbolsnatural_image
Line drawing of a refrigerator with two doors and a side door, showing internal flow arrows (no text or symbols)natural_image
Line drawing of a refrigerator with two doors and an arrow indicating upward motion (no text or symbols)natural_image
Technical line drawing of a mechanical component with a fastener inserted (no text or symbols)natural_image
Technical line drawing of a mechanical assembly with a rod inserted into a bracket (no text or symbols)natural_image
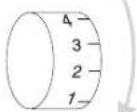
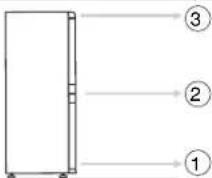
Technical line drawing of a mechanical component with screws inserted (no text or symbols)Open the top door of the fridge-freezer to access the control panel.
Press button (1) to turn the freezer compartment on/off.
The manufacturer normally supplies the appliance with the temperature on an intermediate setting, so you simply have to connect the appliance.
NOTE: if no temperature is displayed when you connect the appliance, press button (1) to turn on the freezer compartment.
The appliance's electronic memory stores the control panel settings when you turn off the appliance, so you simply have to press button (1) to turn the freezer compartment on again.
If the appliances stops because the electricity goes off, press button (1) to start up the fridge-freezer when the electricity comes back on.
NOTE: When you press the button and the freezer compartment is turned off, the compressor takes 15 seconds before it stops. If you press in the button again this time, the appliance will keep working. This prevents the appliance being accidentally turned off, when cleaning it for example.
Use these buttons to set the freezer compartment temperature.
Press button (2) to lower the temperature and button (3) to raise the temperature.
These LEDs show whether the temperature increases or decreases in the freezer compartment.
More LEDs come on and the lights get brighter as the temperature decreases.
The freezer compartment is off when all the LEDs are off. Each LED has two display modes. A dull light means the freezer is set to an intermediate temperature, while a bright light means the freezer is set to a colder temperature.
(Figure 1)
2

-25
-22
-18
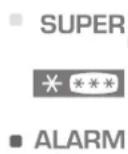
1

3

-18
■ ALARM
The red alarm light comes on if the freezer compartment temperature is -7^ . If the temperature goes below -8^ the light will automatically turn off.
NOTE: If the appliance is turned off for a long time or is switched on for the first time, the red light will come on until the freezer temperature decreases.
The orange light comes on when SUPER mode is working. To select this mode keep pressing button (2) so that all LEDs come on with a bright light and press the button again until the orange light comes on.
This mode powers the compressor of the freezer compartment continually for a maximum of 50 hours, for quick freezing. Press button (3) to stop Super mode, before the end of the 50-hour period.
NOTE: If the compressor is not operating when you select SUPER mode, the system will wait for the compressor to work before starling SUPER mode.
FREEZING OF THE DUAL COMPRESSOR FRIDGE
If you want considerably faster freezing times, you can also remove the *box. Set the freezer control panel to SUPER and the orange light will come on (see figure 1). After 24 hours, put foods directly on the metal rack. Freezing takes 24 hours and you can then put the box back and arrange the foods in the freezer. After 50 hours the electronic memory board will automatically reset the temperature to the previous intermediate setting.
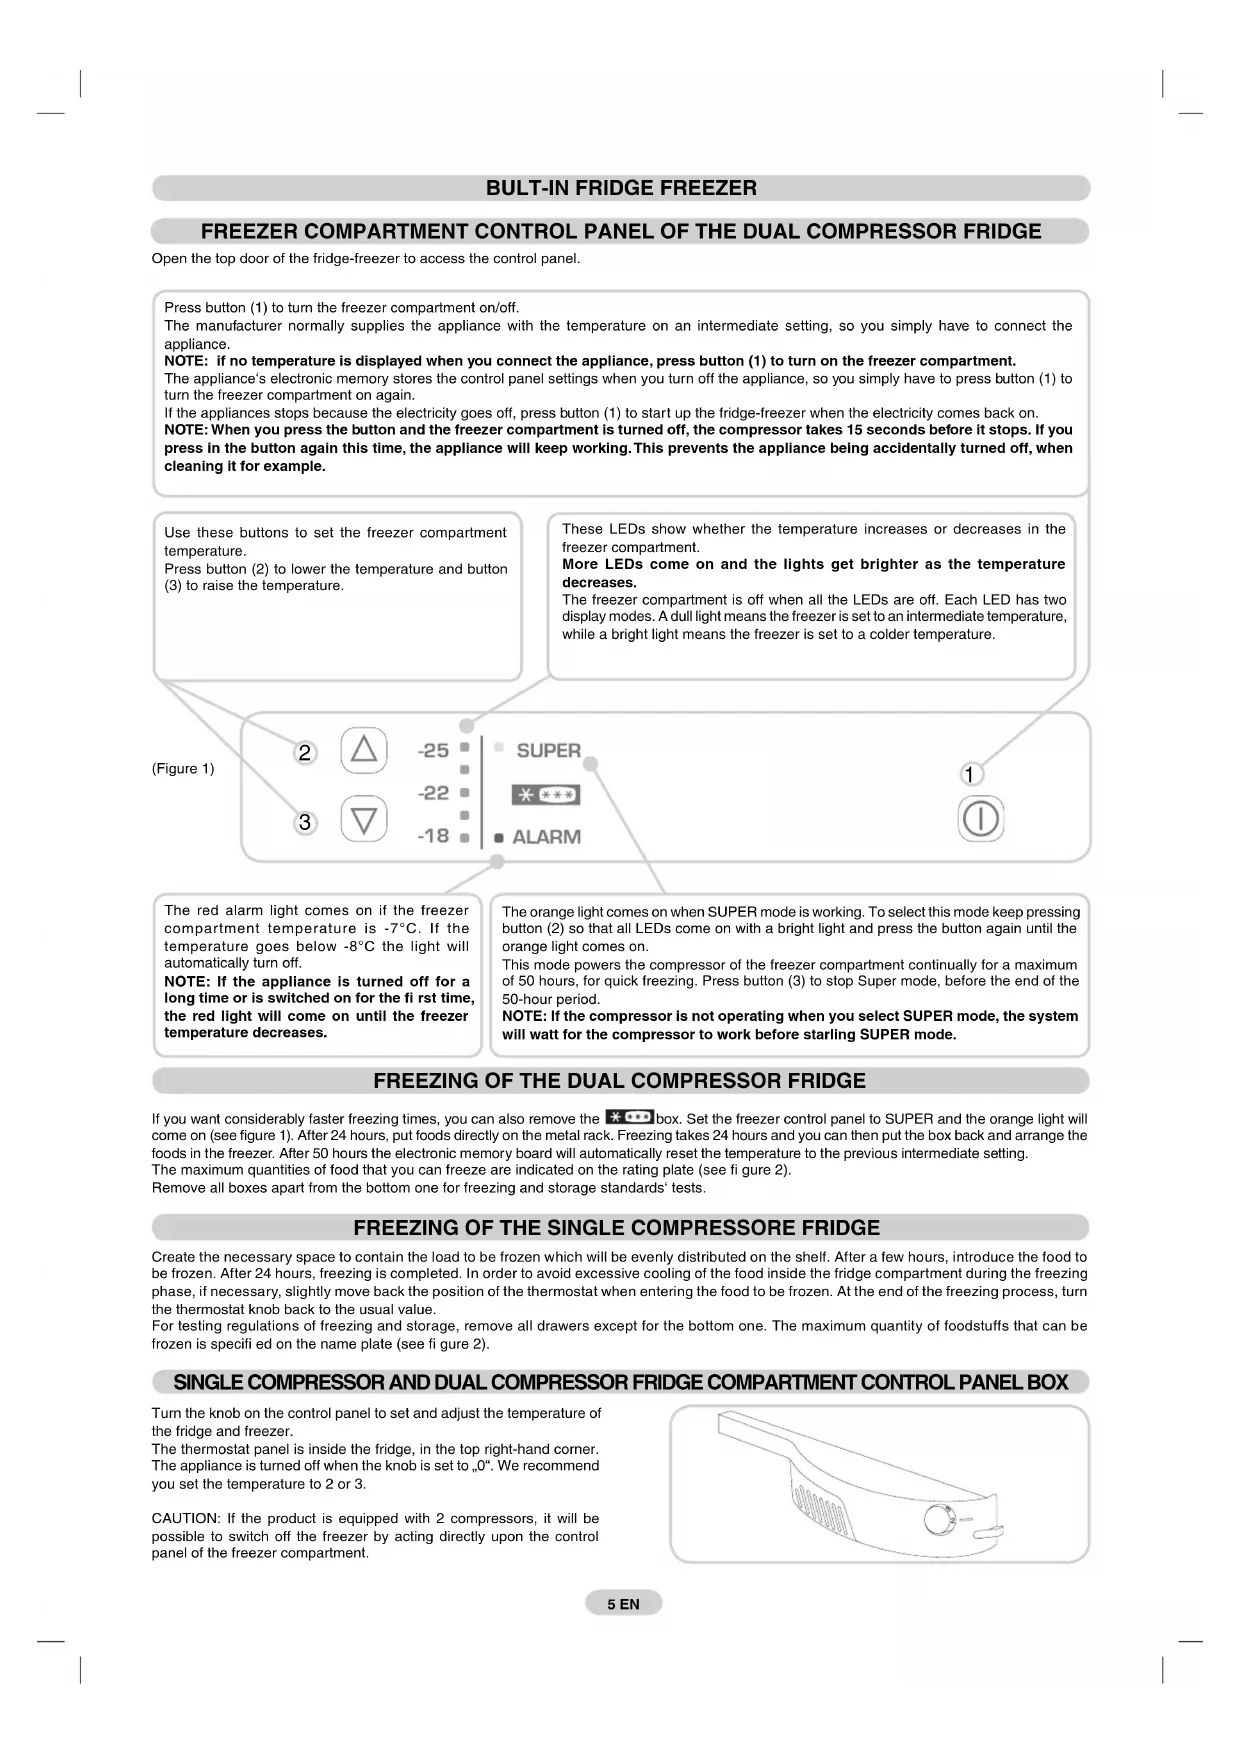
The maximum quantities of food that you can freeze are indicated on the rating plate (see figure 2).
Remove all boxes apart from the bottom one for freezing and storage standards' tests.
FREEZING OF THE SINGLE COMPRESSORE FRIDGE
Create the necessary space to contain the load to be frozen which will be evenly distributed on the shelf. After a few hours, introduce the food to be frozen. After 24 hours, freezing is completed. In order to avoid excessive cooling of the food inside the fridge compartment during the freezing phase, if necessary, slightly move back the position of the thermostat when entering the food to be frozen. At the end of the freezing process, turn the thermostat knob back to the usual value.
For testing regulations of freezing and storage, remove all drawers except for the bottom one. The maximum quantity of foodstuffs that can be frozen is specified on the name plate (see figure 2).
SINGLE COMPRESSOR AND DUAL COMPRESSOR FRIDGE COMPARTMENT CONTROL PANEL BOX
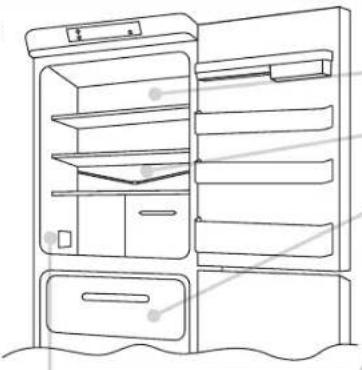
Turn the knob on the control panel to set and adjust the temperature of the fridge and freezer.
The thermostat panel is inside the fridge, in the top right-hand corner. The appliance is turned off when the knob is set to „0“. We recommend you set the temperature to 2 or 3.
CAUTION: If the product is equipped with 2 compressors, it will be possible to switch off the freezer by acting directly upon the control panel of the freezer compartment.

natural_image
Line drawing of a kitchen tool handle with ventilation slots and a circular button (no text or symbols)DEFROSTING
(Figure 2)

natural_image
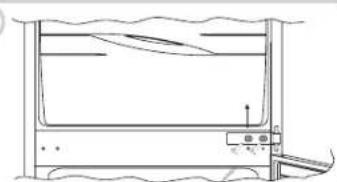
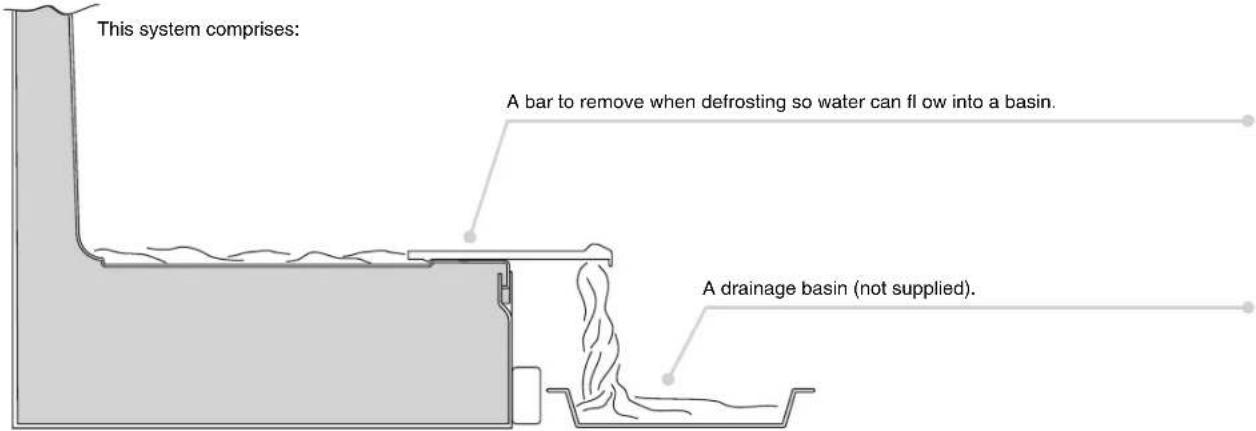
Line drawing of a refrigerator with shelves and doors (no text or symbols)The fridge compartment is automatically defrosted when the compressor is not working.
A small amount of frost or drops of water on the back of the fridge compartment when the fridge is working is normal.
Make sure the water outlet is always clean. Make sure foods do not touch the back or sides of the fridge.
We recommend you defrost the freezer compartment when the frost is more than 3 mm thick.
N.B. This is the rating plate. If you need to contact our Service Department in the event of faults, remember to give them the information on the plate.
Note: If the room temperature is very warm, the appliance may work continuously and a layer of frost will deposit on the back of the fridge compartment. In this case, turn the knob to lower settings (1-2).
DRAINING WATER
The appliance has a system for draining water from defrosting.
REVERSING THE FRIDGE-FREEZER DOORS
Remove the pin and bushing from the toppanel.
1
natural_image
Technical line drawing of a mechanical device with no visible text or symbolsRemove the top door.
2

natural_image
Technical line drawing of a mechanical component with an arrow indicating direction (no text or symbols)Remove the middle hinge and washers.
3

natural_image
Line drawing of a window with a scroll wheel and a small object inside (no text or symbols)Remove the bottom door.
4
natural_image
Line drawing of a door with a slanted door and handle, no text or symbols presentRemove the pin of the bottom right-hand hinge and refi t it on the bottom left-hand hinge.
5
natural_image
Technical line drawing of a mechanical component with no visible text or symbolsReverse the bracket cover snap, which is snap-fi tted on the bracket.
6
Fit the hinge and doors, working from top to bottom 1 → 2 → 3
7
SIZE OF THE APPLIANCE AND UNIT
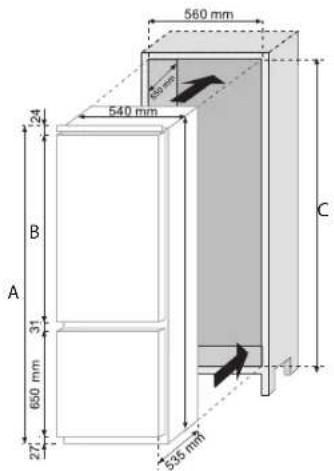
A
B
C
| 1040 mm | 7277241776 mm | |
| 1120 mm | 185285241856 mm |
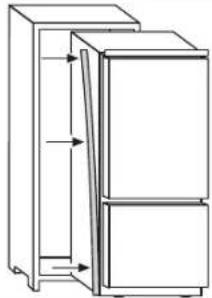
INSTALLING THE APPLIANCE IN A UNIT
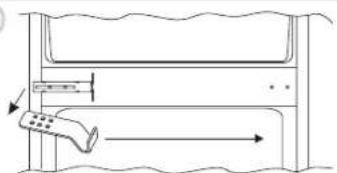
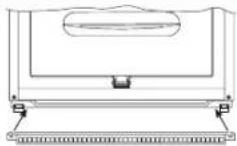
Secure the seal (supplied) to the appliance, on the opposite side from the hinges.
1
natural_image
Line drawing of a refrigerator with two doors and a side door, showing internal structure and arrows indicating movement (no text or symbols)Install the appliance in the unit, Aligning it on the opposite side from the hinges.
2

natural_image
Line drawing of a refrigerator with two doors and an arrow indicating upward motion (no text or symbols)Make sure the top bracket of the appliance is against the unit.
3
Secure the top of the appliance to the unit with the screws provided.
4
Secure the bottom of the appliance with the screws provided.
5
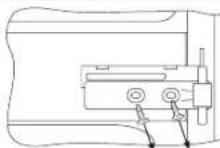
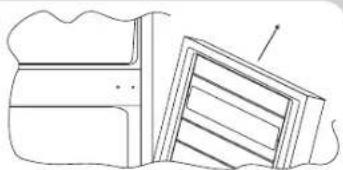
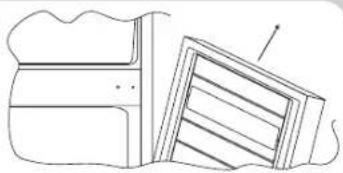
Fit the ventilation grid. Loosen the screws on the middle right-hand hinge.
6
7
Position the plate close to the column.
8
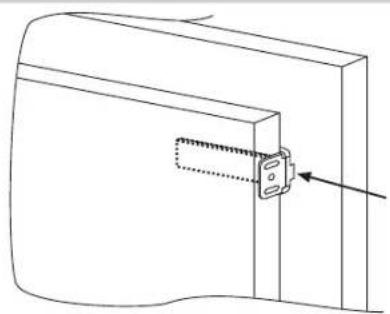
Fit the bracket to the unit with the screws provided.
9
Tighten the screws in the middle right-hand hinge.
10
Repeat the same steps for the middle left-hand hinge.
11
ALIGNING UNIT DOORS WITH THE FRIDGE-FREEZER DOORS
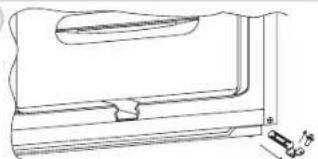
The appliance is supplied with fi ttings (slides and slide brackets) to align the fridge-freezer doors with the doors of the unit.
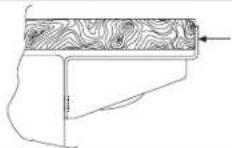
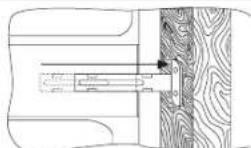
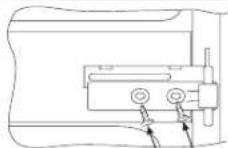
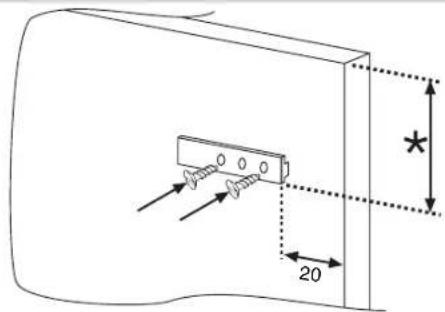
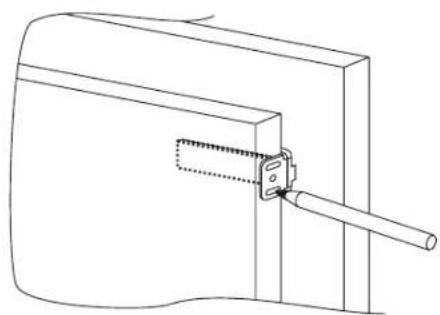
Fix the slide on the inside of the unit door, at the height you want. Make sure it is approximately 20 mm from the outside edge door.
Open the doors of the unit and fridge. Position the slide bracket around the slide and secure to the appliance door.
natural_image
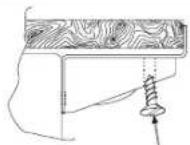
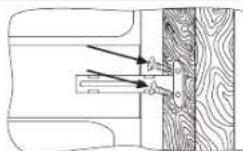
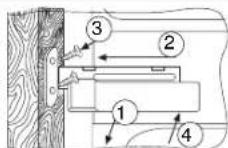
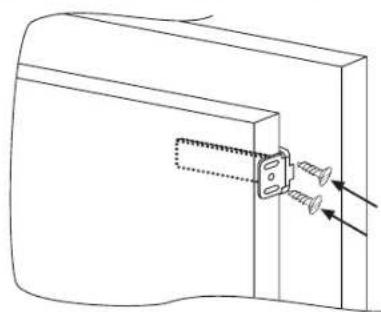
Technical line drawing of a mechanical component with a fastener inserted (no text or symbols)Mark the holes for the screws and drill with a 2.5 mm diameter bit.
natural_image
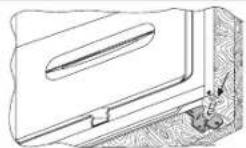
Technical line drawing of a mechanical assembly with a rod inserted into a housing (no text or symbols)Fit the appliance door to the door of the unit, using the slots on the slide bracket as a guide.
natural_image
Technical line drawing of a mechanical assembly with screws and a fastener (no text or symbols)ENSURING YOUR FRIDGE-FREEZER WORKS PROPERLY
After fi tting the appliance, place the rear of the unit against the wall to prevent access to the compressor unit.
To make sure the fridge-freezer works properly, air must circulate to cool the condenser which is situated at the bottom of the appliance.
The unit must have a rear outlet with top opening that is not obstructed and a front opening which is covered by the ventilation grid.
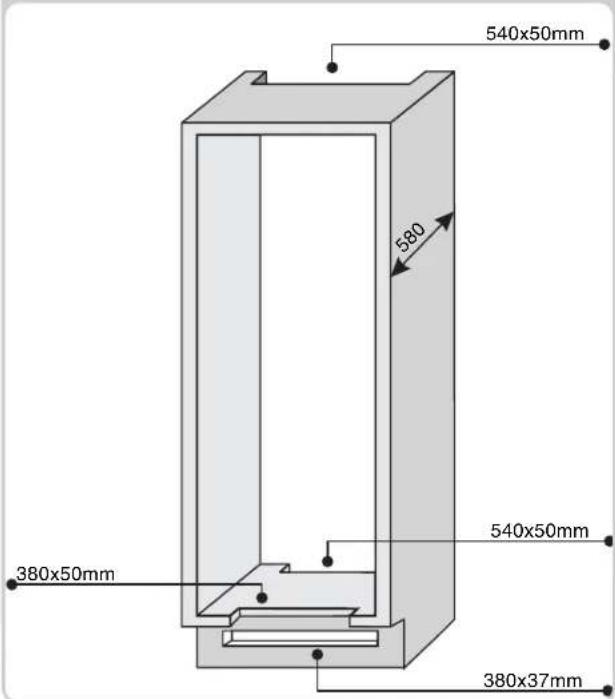
Size of the unit cut outs.
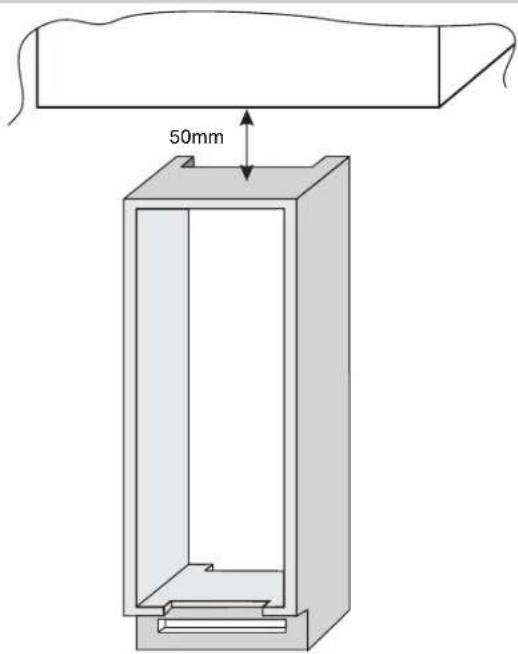
Room to leave between the unit and ceiling.
COMBINÉ ENCASTRABLE
PANNEAU DE COMMANDE DU COMPARTIMENT CONGELATEUR DU REFRIGERATEUR A DOUBLE COMPRESSEUR
natural_image
Line drawing of a refrigerator with shelves and doors (no text or symbols)natural_image
Technical line drawing of a mechanical device with no visible text or symbolsnatural_image
Technical line drawing of a mechanical component with an arrow indicating direction (no text or symbols)natural_image
Pure technical line drawing of a mechanical component without any text, numbers, or symbolsnatural_image
Line drawing of a door with a handle and lid, showing structural details (no text or symbols)natural_image
Technical line drawing of a mechanical component with no visible text or symbolsnatural_image
Diagram of a door handle mechanism with directional arrows indicating movement (no text or symbols)natural_image
Line drawing of a refrigerator with two doors and a side door, showing airflow direction (no text or symbols)natural_image
Line drawing of a refrigerator with two doors and an arrow indicating upward motion (no text or symbols)natural_image
Technical line drawing of a mechanical component with a fastener inserted (no text or symbols)natural_image
Technical line drawing of a mechanical assembly with a rod inserted into a bracket (no text or symbols)natural_image
Technical line drawing of a mechanical component with screws and fasteners (no text or symbols)PRÉCAUTIONS À PRENDRE POUR ASSURER LE BON FONCTIONNEMENT DE L'APPAREIL
natural_image
Line drawing of a mechanical component with a handle and circular knob (no text or symbols)DAS ABTAUEN
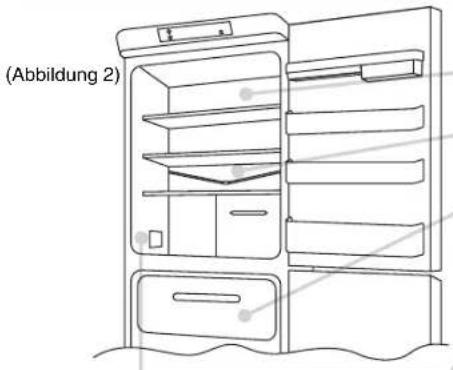
natural_image
Line drawing of an open refrigerator with shelves and doors, labeled (Abbildung 2) (no text or symbols on the diagram itself)natural_image
Technical line drawing of a mechanical device with no visible text or symbolsnatural_image
Technical line drawing of a mechanical component with an arrow indicating direction (no text or symbols)natural_image
Line drawing of a water tank with inlet and outlet pipes (no text or symbols)natural_image
Diagram of a vehicle showing front and side views of a vehicle (no text or symbols)natural_image
Technical line drawing of a mechanical component with no visible text or symbolsnatural_image
Line drawing of a refrigerator with door and side panels, showing internal structure and arrows indicating movement (no text or symbols)natural_image
Line drawing of a double refrigerator with an arrow indicating upward motion (no text or symbols)natural_image
Technical line drawing of a mechanical component with a fastener inserted into a housing (no text or symbols)natural_image
Technical line drawing of a mechanical assembly with a rod inserted into a bracket (no text or symbols)natural_image
Technical line drawing of a mechanical assembly with screws and a fastener (no text or symbols)natural_image
Line drawing of a mechanical component with a handle and circular knob (no text or symbols)DESCONGELACIÓN
(Figura 2)

natural_image
Line drawing of a refrigerator with shelves and doors (no text or symbols)natural_image
Technical line drawing of a mechanical setup with no visible text or symbolsnatural_image
Technical line drawing of a mechanical component with an arrow indicating direction (no text or symbols)natural_image
Line drawing of a water tank with inlet and outlet pipes (no text or symbols)natural_image
Diagram of a door frame with an open lid and internal striped pattern (no text or symbols)natural_image
Technical line drawing of a mechanical component with no visible text or symbolsnatural_image
Line drawing of a refrigerator with door and side panels, showing internal structure and arrows indicating movement (no text or symbols)natural_image
Line drawing of a refrigerator with two doors and an arrow indicating upward motion (no text or symbols)natural_image
Technical line drawing of a mechanical component with a fastener inserted (no text or symbols)natural_image
Technical line drawing of a mechanical assembly with a rod inserted into a housing (no text or symbols)natural_image
Technical line drawing of a mechanical assembly with screws and a fastener (no text or symbols)natural_image
Line drawing of a refrigerator with shelves and doors (no text or symbols)natural_image
Technical line drawing of a mechanical device with no visible text or symbolsRetire a porta superior.
2

natural_image
Technical line drawing of a mechanical component with an arrow indicating direction (no text or symbols)natural_image
Pure technical line drawing of a mechanical component without any text, numbers, or symbolsRetire a porta inferior.
4
natural_image
Simple line drawing of a door with a handle and lid, no text or symbols presentnatural_image
Technical line drawing of a mechanical component with no visible text or symbolsnatural_image
Line drawing of a refrigerator with two doors and a side door, showing internal structure and arrows indicating movement (no text or symbols)natural_image
Line drawing of a refrigerator with two doors and an arrow indicating upward motion (no text or symbols)natural_image
Technical line drawing of a mechanical component with a fastener inserted (no text or symbols)natural_image
Technical line drawing of a mechanical assembly with a rod inserted into a bracket (no text or symbols)natural_image
Technical line drawing of a mechanical assembly with screws and a fastener (no text or symbols)natural_image
Line drawing of a kitchen appliance with handle, ventilation slots, and a knob (no text or symbols)ΑΠΟΨΥΞΗ
(Figura 2)

natural_image
Line drawing of a refrigerator with shelves and doors (no text or symbols)natural_image
Technical line drawing of a mechanical device with no visible text or symbolsnatural_image
Technical line drawing of a mechanical component with an arrow indicating direction (no text or symbols)natural_image
Line drawing of a window with a handle and ventilation duct (no text or symbols)natural_image
Simple line drawing of a door with a handle and lid, no text or symbols presentnatural_image
Technical line drawing of a mechanical component with no visible text or symbolsnatural_image
Line drawing of a refrigerator with two doors and a side door, showing airflow direction (no text or symbols)natural_image
Line drawing of a refrigerator with two doors and an arrow indicating upward motion (no text or symbols)natural_image
Technical line drawing of a mechanical component with a fastener inserted (no text or symbols)natural_image
Technical line drawing of a mechanical assembly with a rod inserted into a bracket (no text or symbols)natural_image
Technical line drawing of a mechanical component with screws inserted (no text or symbols)natural_image
Line drawing of a kitchen handle with ventilation slots and a knob (no text or symbols)ROZMRAŻANIE
(rysunek 2)

natural_image
Line drawing of a refrigerator with shelves and doors (no text or symbols)natural_image
Technical line drawing of a mechanical device with no visible text or symbolsnatural_image
Technical line drawing of a mechanical component with an arrow indicating direction (no text or symbols)natural_image
Pure technical line drawing of a mechanical component without any text, numbers, or symbolsnatural_image
Line drawing of a door with a handle and lid, no text or symbols presentnatural_image
Technical line drawing of a mechanical component with no visible text or symbolsnatural_image
Diagram of a mechanical device with a handle and directional arrow, no text or symbols presentnatural_image
Line drawing of a refrigerator with door and side panels, showing internal structure and arrows indicating movement (no text or symbols)natural_image
Line drawing of a refrigerator with two doors and an arrow indicating upward motion (no text or symbols)natural_image
Technical line drawing of a mechanical component with a fastener inserted into a housing (no text or symbols)natural_image
Technical line drawing of a mechanical assembly with a rod inserted into a bracket (no text or symbols)natural_image
Technical line drawing of a mechanical component with screws inserted (no text or symbols)JAK ZAPEWNIĆ PRAWIDŁOWĄ PRACĘ URZĄDZENIA
natural_image
Line drawing of a refrigerator with shelves and doors, labeled (Obrázek. 2) (no text or symbols on the diagram itself)natural_image
Technical line drawing of a mechanical setup with no visible text or symbolsnatural_image
Technical line drawing of a mechanical component with an arrow indicating direction (no text or symbols)natural_image
Technical line drawing of a mechanical component with no visible text or symbolsnatural_image
Diagram of a door mechanism with an arrow indicating direction (no text or symbols present)natural_image
Technical line drawing of a mechanical component with no visible text or symbolsnatural_image
Line drawing of a refrigerator with door and side panels, showing internal structure and directional arrows (no text or symbols)natural_image
Line drawing of a double refrigerator with an arrow indicating upward motion (no text or symbols)natural_image
Technical line drawing of a mechanical component with a fastener inserted (no text or symbols)natural_image
Technical line drawing of a mechanical assembly with a rod inserted into a housing (no text or symbols)natural_image
Technical line drawing of a mechanical assembly with screws and a fastener (no text or symbols)UJISTĚTE SE, ŽE VAŠE CHLADNIČKA S MRAZNIČKOU FUNGUJE SPRÁVNĚ
INBOUW KOEL/VRIESCOMBINATIE
BEDIENINGSPANEEEL DIEPVRIESCOMPARTIMENT VAN KOEL/VRIESCOMBINATIE MET TWEE COMPRESSORS
natural_image
Line drawing of a kitchen handle with ventilation slots and a knob (no text or symbols)ONTDOOIEN
(Figuur 2)

natural_image
Line drawing of a refrigerator with shelves and doors (no text or symbols)natural_image
Technical line drawing of a mechanical device with no visible text or symbolsnatural_image
Technical line drawing of a mechanical component with an arrow indicating direction (no text or symbols)natural_image
Technical line drawing of a mechanical component with no visible text or symbolsnatural_image
Diagram of a door frame with a handle and panel, showing structural details without any text or symbols.natural_image
Technical line drawing of a mechanical component with no visible text or symbolsnatural_image
Line drawing of a refrigerator with two doors and a door, showing internal structure and arrows indicating direction (no text or symbols)natural_image
Line drawing of a refrigerator with two doors and an arrow indicating upward motion (no text or symbols)natural_image
Technical line drawing of a mechanical component with a fastener inserted (no text or symbols)natural_image
Technical line drawing of a mechanical assembly with a rod inserted into a housing (no text or symbols)natural_image
Technical line drawing of a mechanical assembly with screws and fasteners (no text or symbols)ZORG ERVOOR DAT UW KOEL-VRIESCOMBINATIE GOED FUNCTIONEERT
natural_image
Line drawing of a kitchen tool handle with ventilation slots and a knob (no text or symbols)SULATTAMINEN
(Kuva 2)

natural_image
Line drawing of a refrigerator cabinet with shelves and doors (no text or symbols)natural_image
Technical line drawing of a mechanical device with no visible text or symbolsIrrota yläovi.
2

natural_image
Technical line drawing of a mechanical component with an arrow indicating direction (no text or symbols)natural_image
Technical line drawing of a mechanical component or enclosure with no visible text or symbolsIrrota alaovi.
4
natural_image
Simple line drawing of a door frame with a slanted door and handle (no text or symbols)natural_image
Technical line drawing of a mechanical component with no visible text or symbolsnatural_image
Line drawing of a refrigerator with door and side panels, showing internal structure and arrows indicating movement (no text or symbols)natural_image
Line drawing of a refrigerator with two doors and an arrow indicating upward motion (no text or symbols)natural_image
Technical line drawing of a mechanical component with a fastener inserted (no text or symbols)natural_image
Technical line drawing of a mechanical assembly with a rod inserted into a bracket (no text or symbols)natural_image
Technical line drawing of a mechanical assembly with screws and a fastener (no text or symbols)JÄÄKAAPPI-PAKASTIMESI OIKEAN TOIMINNAN VARMISTAMINEN
FRYSING I KJ∅LESKAPET MED TO KOMPRESSORER
FRYSING I KJÖLESKAP MED ÉN KOMPRESSOR
natural_image
Line drawing of a mechanical component with a handle and circular opening (no text or symbols)AVRIMING
(Figur 2)

natural_image
Line drawing of a refrigerator with doors, shelves, and drawer (no text or symbols)natural_image
Technical line drawing of a mechanical device with no visible text or symbolsnatural_image
Technical line drawing of a mechanical component with an arrow indicating direction (no text or symbols)natural_image
Line drawing of a window with a scroll and control panel (no text or symbols)natural_image
Simple line drawing of a door with a handle and lid, no text or symbols presentnatural_image
Technical line drawing of a mechanical component with no visible text or symbolsST∅RRELSE PÅ APPARAT OG INNBYGGINGSSKAP

A
B
C
| 1040 mm177277211776 mm | |
| 1120 mm185285211856 mm |
INNBYGGING AV APPARATET
natural_image
Line drawing of a refrigerator with door and side panels, showing internal structure and arrows indicating movement (no text or symbols)natural_image
Line drawing of a refrigerator with two doors and an arrow indicating upward motion (no text or symbols)natural_image
Technical line drawing of a mechanical component with a fastener inserted (no text or symbols)Marker skruehullene og bor hull med en diameter på 2,5mm.

natural_image
Technical line drawing of a mechanical assembly with a rod inserted into a housing (no text or symbols)natural_image
Technical line drawing of a mechanical assembly with screws and a fastener (no text or symbols)KONTROLLER AT KJ∅LE-/FRYSESKAPET DITT VIRKER SOM DET SKAL
INBYGGD KYL OCH FRYS
KONTROLLPANEL FÖR FRYSDELEN, KYLSKÅP MED DUBBEL KOMPRESSOR
natural_image
Line drawing of a mechanical component with a handle and circular knob (no text or symbols)AVFROSTNING
(Figur 2)

natural_image
Line drawing of a refrigerator cabinet with shelves and doors (no text or symbols)natural_image
Technical line drawing of a mechanical device with no visible text or symbolsnatural_image
Technical line drawing of a mechanical component with an arrow indicating direction (no text or symbols)natural_image
Line drawing of a window with a handle and ventilation duct (no text or symbols)natural_image
Simple line drawing of a door with a handle and lid, no text or symbols presentnatural_image
Technical line drawing of a mechanical component with no visible text or symbolsnatural_image
Line drawing of a refrigerator with door and side panels, showing internal structure and arrows indicating movement (no text or symbols)natural_image
Line drawing of a refrigerator with two doors and an arrow indicating direction (no text or symbols)natural_image
Technical line drawing of a mechanical component with a fastener inserted (no text or symbols)natural_image
Technical line drawing of a mechanical assembly with a rod inserted into a housing (no text or symbols)natural_image
Technical line drawing of a mechanical assembly with screws and a fastener (no text or symbols)SÄKERSTÄLL ATT DIN KYL OCH FRYS FUNGERAR RIKTIGT
natural_image
Line drawing of a mechanical component with a handle and circular opening (no text or symbols)AFRIMNING
(Figur 2)
natural_image
Line drawing of a refrigerator cabinet with shelves and doors (no text or symbols)natural_image
Technical line drawing of a mechanical device with no visible text or symbolsnatural_image
Technical line drawing of a mechanical component with an arrow indicating direction (no text or symbols)natural_image
Line drawing of a window with a scroll and control panel (no text or symbols)natural_image
Simple line drawing of a door with a handle and lid, no text or symbols presentnatural_image
Technical line drawing of a mechanical component with no visible text or symbolsnatural_image
Line drawing of a refrigerator with door and side panels, showing internal structure and arrows indicating movement (no text or symbols)natural_image
Line drawing of a refrigerator with two doors and an arrow indicating direction (no text or symbols)natural_image
Technical line drawing of a mechanical component with a fastener inserted (no text or symbols)natural_image
Technical line drawing of a mechanical assembly with a rod inserted into a bracket (no text or symbols)natural_image
Technical line drawing of a mechanical assembly with screws and a fastener (no text or symbols)KONTROLLER, AT KÖLESKAB-FRYSER FUNGERER KORREKT

- COMBINATO INCASSO
- QUADRO COMANDI VANO FREEZER DEL FRIGORIFERO BICOMPRESSORE
- SBRINAMENTO
- FREEZING OF THE DUAL COMPRESSOR FRIDGE
- FREEZING OF THE SINGLE COMPRESSORE FRIDGE
- SINGLE COMPRESSOR AND DUAL COMPRESSOR FRIDGE COMPARTMENT CONTROL PANEL BOX
- DEFROSTING
- DRAINING WATER
- REVERSING THE FRIDGE-FREEZER DOORS
- SIZE OF THE APPLIANCE AND UNIT
- INSTALLING THE APPLIANCE IN A UNIT
- ALIGNING UNIT DOORS WITH THE FRIDGE-FREEZER DOORS
- ENSURING YOUR FRIDGE-FREEZER WORKS PROPERLY
- COMBINÉ ENCASTRABLE
- PANNEAU DE COMMANDE DU COMPARTIMENT CONGELATEUR DU REFRIGERATEUR A DOUBLE COMPRESSEUR
- PRÉCAUTIONS À PRENDRE POUR ASSURER LE BON FONCTIONNEMENT DE L'APPAREIL
- DAS ABTAUEN
- DESCONGELACIÓN
- ΑΠΟΨΥΞΗ
- ROZMRAŻANIE
- JAK ZAPEWNIĆ PRAWIDŁOWĄ PRACĘ URZĄDZENIA
- UJISTĚTE SE, ŽE VAŠE CHLADNIČKA S MRAZNIČKOU FUNGUJE SPRÁVNĚ
- INBOUW KOEL/VRIESCOMBINATIE
- BEDIENINGSPANEEEL DIEPVRIESCOMPARTIMENT VAN KOEL/VRIESCOMBINATIE MET TWEE COMPRESSORS
- ONTDOOIEN
- ZORG ERVOOR DAT UW KOEL-VRIESCOMBINATIE GOED FUNCTIONEERT
- SULATTAMINEN
- JÄÄKAAPPI-PAKASTIMESI OIKEAN TOIMINNAN VARMISTAMINEN
- FRYSING I KJ∅LESKAPET MED TO KOMPRESSORER
- FRYSING I KJÖLESKAP MED ÉN KOMPRESSOR
- AVRIMING
- ST∅RRELSE PÅ APPARAT OG INNBYGGINGSSKAP
- INNBYGGING AV APPARATET
- KONTROLLER AT KJ∅LE-/FRYSESKAPET DITT VIRKER SOM DET SKAL
- INBYGGD KYL OCH FRYS
- KONTROLLPANEL FÖR FRYSDELEN, KYLSKÅP MED DUBBEL KOMPRESSOR
- AVFROSTNING
- SÄKERSTÄLL ATT DIN KYL OCH FRYS FUNGERAR RIKTIGT
- AFRIMNING
- KONTROLLER, AT KÖLESKAB-FRYSER FUNGERER KORREKT
Brand : ROSIERES
Model : RBCP 31832
Category : Fridge