
KS 9884 - Wine cellar SEVERIN - Free user manual and instructions
Find the device manual for free KS 9884 SEVERIN in PDF.
User questions about KS 9884 SEVERIN
0 question about this device. Answer the ones you know or ask your own.
Ask a new question about this device
Download the instructions for your Wine cellar in PDF format for free! Find your manual KS 9884 - SEVERIN and take your electronic device back in hand. On this page are published all the documents necessary for the use of your device. KS 9884 by SEVERIN.
USER MANUAL KS 9884 SEVERIN
natural_image
Warning symbol of a flame inside a triangle (no text or numbers)text_image
Technical diagram of a refrigerator with numbered components for identification and assembly reference.Vor Inbetriebnahme
natural_image
Line drawing of a refrigerator with labeled parts A and B, showing internal shelves and door (no text or symbols beyond labels)text_image
Technical diagram of a mechanical assembly with labeled components and cross-sectional view
natural_image
Line drawing of a cabinet with doors and mounting feet (no text or symbols)text_image
Technical diagram of an electronic component with numbered parts labeled ①, ②, and ③.Lagerung von Wein
natural_image
Technical line drawing of a mechanical assembly or enclosure with no visible text or symbolsBefore using the appliance, the user should read the following instructions carefully.
Connection to the mains supply
The appliance should only be connected to an earthed socket installed in accordance with the regulations. Make sure that the supply voltage corresponds with the voltage marked on the rating label. This product complies with all binding CE labelling directives.
- Do not operate this unit by means of a transformer or, together with other electrical appliances, by means of an extension cable.
- To prevent noise vibration, ensure that the power cord does not touch any part of the rear of the unit (e.g. the heat-exchanger).
General information
This appliance is a compressor refrigerator designed for cooling and storing wine.
The unit is classified as ‘Climate Class N’ (normal) and designed for domestic use. It complies with all relevant norms for domestic refrigeration appliances.
Important safety instructions
- To prevent the risk of personal injury or damage to the freezer, the unit must only be transported while in its original packaging. For unpacking and installation, two persons are needed.
- The cooling circuit in this appliance contains the refrigerant isobutane (R600a), a natural gas with a high level of environmental compatibility, which is nevertheless flammable. Ensure, therefore, that none of the components of the refrigerant circuit become damaged during transportation and installation of the appliance. If damage to the cooling circuit does occur, do not switch on or connect
natural_image
Warning symbol of a flame inside a triangle (no text or numbers)the appliance to the mains power. In the case that there is an open fire or any other sources of ignition in the vicinity of the refrigerant gas, make sure it is removed immediately from this area and that the room is then thoroughly ventilated.
- Warning: Do not damage the cooling circuit. Any escaping refrigerant causes damage to the eyes.
● Warning: Keep ventilation openings, in the appliance enclosure or in the built-in structure, clear of obstruction. Sufficient ventilation must be ensured at all times.
- Warning: Do not use any external device (e.g.; heaters or heating fans) to accelerate defrosting.
- Warning: Do not operate any electrical appliances (e.g. ice makers) inside the compartment.
- Before it is connected to the mains power, the unit must be thoroughly checked for transport damage, including its power cord.
- The power cord should be regularly examined for any signs of damage. In the event of such damage being found, the appliance must no longer be used.
- To avoid the risk of fire, do not place any thermo-electric appliances on top of the unit. Do not operate electric water kettles on top of the unit, in order to avoid liquid boiling
over and damaging the electrical insulation.
● This appliance is designed for storing wine only.
- Do not lean or put undue weight on the shelves, door etc.
- Protect the inside of the unit at all times from open flames and any other sources of ignition.
● Warning: Do not store the key to the lock near the unit, or within easy reach of children; there is a risk that they might lock themselves inside when playing.
- Remove the plug from the wall socket
- in case of any malfunction, - before de-frosting - during cleaning.
- This appliance is not intended for use by any person (including children) with reduced physical, sensory or mental capabilities, or lacking experience and knowledge, unless they have been given supervision or instruction concerning the use of the appliance by a person responsible for their safety.
● Children should be supervised to ensure that they do not play with the appliance.
- In order to comply with safety regulations and to avoid hazards, any repairs or modifications to this unit must be carried out by our authorised service personnel, including the replacement of the power cord.
● We reserve the right to introduce technical modifications.
- If the unit is not going to be used for an extended period of time, we recommend keeping the door open.
- If the unit is sold, handed over to a third party or disposed of at a suitable recycling facility, attention must be drawn to the presence of the insulation agent ‘cyclopentane’ C 5 H 10 as well as the refrigerant R 600.
Familiarisation
-
Control panel with temperature display
-
Condenser
-
Adjustable feet
-
Interior lighting
-
Chrome-plated shelves
-
Door handle (fitted)
-
Shelving
-
Door
-
Screw
-
Upper mounting for door handle
-
Screw cover
-
Door handle/bar
-
Lower mounting for door handle
-
Lock

text_image
Technical diagram of an oven with numbered components and internal structure annotationsBefore using for the first time
- Remove any exterior and interior packaging materials completely.
- Before it is connected to the mains, the unit must be thoroughly checked for transport damage, including its power cord.
– Clean the unit according to the instructions given in the De-frosting and cleaning section
below.
- Fit the upper (10) and lower door mountings (13) to the door handle/bar (12). Use the screws (9) to mount the handle on the door. Ensure that the handle is properly and securely attached. Place the screw covers (11) over the screw heads.
Installation
The appliance should be set up in a well-ventilated, dry room. It should be operated in an ambient temperature of 16 to 32 °C and a relative humidity of max. 70 %. Do not expose the appliance to direct sunlight, and do not position it next to any heat sources (radiators, cookers etc). If this cannot be avoided, however, a suitable insulation must be installed between the heat source and the unit.
To ensure sufficient air circulation, maintain a minimum distance of 50 mm between the rear of the unit and the wall. The clearance at the sides and top must be at least 15 mm.
If the floor is uneven, the adjustable feet on the unit can be used to compensate and ensure optimum stability. The whole unit should be installed at a slight angle in such a way that it leans to the rear: this will ensure that the door closes automatically. However, both front feet must be set to the same height.
Ventilation
The heated air around the rear of the unit must be able to circulate freely. Therefore, ensure that the air circulation behind the unit is not obstructed.
Reversible door
The design provides for the door to be reversed, i.e. for right-hinged (default installation) to become left-hinged.
- Take off the door handle by first removing the screw covers and then taking out the two screws.
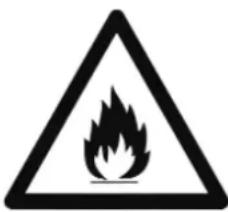
- Remove the two screw covers (A) on the top of the unit.
- Take out the two screws and then slightly lift the top cover (B) of the unit, slide it forward and carefully take it off.
- Tilt the unit backwards and secure it in this position (e.g. using suitable wedges).
- Remove the three screws on the upper hinge and take it off.
- Replace the two upper-hinge screws in the housing in the same way as they appear on the left.
- Open the door a little way and take off the lower hinge after removing the two screws.
- Unscrew the adjustable foot on the left-hand side and re-fit it on the right.
- Fit the lower hinge on the left side of the unit using the two screws. Place the door on to the lower hinge pin and close it.
- Remove the two screws on the new, upper-hinge position and fit the upper hinge on the left-hand side, using the three screws to secure it. Make sure that the hinge pin sits properly in the corresponding hole in the door frame.
- Replace the top cover (B) of the unit in such a way, that it extends slightly forwards, and then slide it back. Note that the front edge goes under the edge of the housing below the
natural_image
Line drawing of a refrigerator with labeled parts A and B, showing internal shelves and door (no text or symbols beyond labels)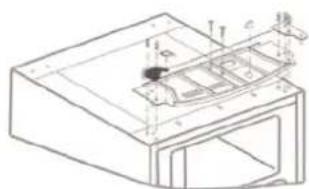
text_image
Technical diagram of a cabinet with labeled components and cross-sectional view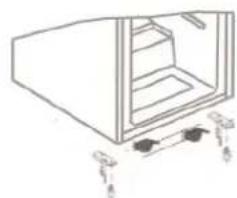
natural_image
Line drawing of a cabinet with doors and legs, showing internal structure and mounting points (no text or symbols)control panel. Secure the top cover (B) with the two screws and put the two hinge covers (A) back on.
- Remove the covers for the door handle mounting-holes on the right side of the door. Use the screws to mount the door handle, ensuring that it is properly and securely attached. Place the screw covers over the screw heads, and replace the covers on the handle mounting-holes on the left.
Control panel and interior light
- Before the unit is connected to the mains power after installation, it should be left standing in position for about 24 hours.
The unit is activated by connecting it to the mains. It is only switched off completely when the plug is removed from the wall socket. The actual temperature inside the cabinet is shown in the temperature display.
The setting can be changed by pressing the buttons ▲ and ▼. During this adjustment phase, the display blinks. With the ▲ button, the temperature can be increased by 1°C or 1°F; pressing the ▼ button decreases the temperature in the same way.
The indicator lamps next to the temperature levels for RED, WHITE or SPARKLING show the temperature setting suitable for that particular wine: RED for red wine, WHITE for white wine, and SPARKLING for sparkling wine or champagne.
The temperature display format can be changed by pressing ^ F/ ^ C. The selected format is indicated by the active light next to the appropriate temperature symbol.
The interior light is switched on and off by pressing the button 🎨.
Changing the interior light bulb
- Switch off the interior light.
- Remove the plug from the wall socket.
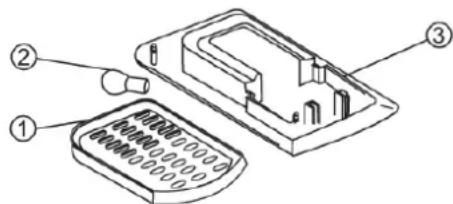
- Use a suitable screwdriver to remove the screw from the lamp cover (1).
- Take off the lamp cover (1) by slightly pulling down its lower end.
- Remove the defective bulb (2) from its housing (3) and fit a new 10W-bulb (max. 15 W) of the same size and shape.
- Slide the cover (1) back into position, replace the screw and tighten it.
text_image
Technical diagram of an electronic device with labeled parts including a keypad and internal componentsStoring wine
- The temperature in the cabinet largely depends on factors such as the ambient temperature, the setting and the number of wine bottles stored. If the ambient temperature is not between 20 and 25^ , the temperature range for wine bottles ( 7^ min. - 18^ max.) in the interior of the cabinet can vary accordingly.
– The following temperatures are suitable for various wines:
Red: 15-18°C / 60-65°F
Dry/white: 10-15°C / 50-59°F
Sparkling/champagne: 7-9°C / 45-49°F
Rose: 9-10°C / 49-51°F
- The specified temperature range may vary up or down as a result of outside factors such as the weather, the interior light being switched on, or the position of the bottles stored in the cabinet (top, bottom or middle)..
- Because of the way the air circulates, different areas of the refrigerator cabinet are affected differently. The difference in temperature between the top and bottom shelves
can be as much as 3-4°C or 6-8°F.
- To store red as well as white wines, we recommend that you select a temperature setting of 15^ or 60^ , storing the red wine in the top shelves, and the white wines in the bottom shelves.
- The vertical space between the shelves can be modified to accommodate different-sized bottles by selecting the appropriate guide rails for each shelf.
- Always ensure that the door is properly closed and that the seal is not obstructed by bottles stored inside the cabinet.
Door lock
The door lock can be used to protect the cabinet against unauthorised use.
We recommend that you remove the second key from the holder and store it in a safe place. This will also protect the housing against scratching caused by the second key dangling from the key holder.
De-frosting and cleaning
The integral vapouriser is sealed in foam in the rear wall; you may therefore notice a build-up of frost around the rear area. This layer of frost will start melting when the compressor is not working. Through a system of hoses, the melt-water drains into the collection tray below the compressor, where it will be absorbed into the surrounding air. The unit does not therefore require de-frosting, but only proper cleaning instead.
- To enable the melt-water to drain freely, always ensure that the channel and discharge opening in the cabinet are free of any blockage.
Cleaning the unit / periods of non-use
- remove the plug from the wall socket
– remove the bottles from the cabinet - leave the door open
To prevent any unpleasant odour within the cabinet, it should be cleaned about once every two months. The interior and exterior surfaces and the drain channel may be cleaned with a wet cloth. If necessary, a mild, neutral detergent may be used. Wipe dry thoroughly with a clean cloth after cleaning.
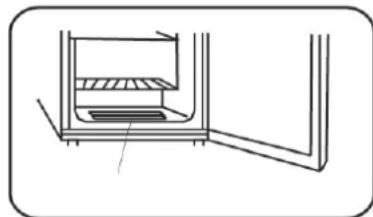
The marked area (see diagram on the right) is designed to collect any fluid that may accumulate inside the cabinet. The interior must be kept dry to prevent any damage to the door seals. Any fluid found in the tray can be removed by wiping it dry.
Take care not to remove or damage the rating plate inside the cabinet during cleaning.
natural_image
Line drawing of a cabinet or storage unit with an open door, showing internal shelves and a base (no text or symbols)Any dust deposits around the ventilation slots on the outside of the unit should be regularly removed using a suitable brush or a vacuum cleaner. The build-up of dust will cause an increase in energy consumption.
The rear of the appliance should be thoroughly cleaned with a soft brush or a vacuum cleaner at least once a year.
Remark: Do not use abrasive tools or materials containing alcohol or harsh cleaning solutions. Do not use any electrical appliances, such as steam cleaners etc., for de-frosting or cleaning.
Trouble-shooting
Certain typical sounds can be heard when the appliance is switched on. These sounds are:
- caused by the electrical motor within the compressor assembly; during compressor start-up the sound level will be slightly higher for a limited period of time.
– caused by the cooling agent flowing through the circuit.
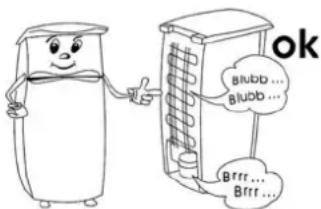
text_image
ok Blubb ... Blubb ... Brrr ... Brrr ...In addition, the side of the housing may become warm. This heat is caused by dissipation of the heat generated inside the cabinet.
The following table lists the possible malfunctions, their probable causes and solutions. In the event of operational problems, check first whether a solution can be found using this table. If the problem persists, disconnect the appliance from the mains power and contact our Customer Service Department.
| Problem | Possible cause and solution |
| The appliance does not operate. | - Unit is not connected to the mains power.- A circuit breaker or fuse has been triggered. |
| Abnormal noise can be heard during operation. | Either the unit has been improperly set up (e.g. on an uneven floor) or there is contact between the rear-mounted cooling circuit and the power cord, the wall or other object or surface. Verify that all installation instructions in this manual have been correctly complied with. |
| When opening the door, the rubber seal pops out. | The seal must be re-fitted properly, by pressing in the inner part of the seal. If the seal shows signs of a greasy residue, the seal and the door must be properly cleaned with water and a mild detergent, and then thoroughly dried before the seal is replaced in the door. |
| Water accumulates on the interior floor. | The melt-water drain system is blocked. Remove blockage and clean drain system. |
| The temperature inside the cabinet compartment is too cold. | Check the temperature setting: it may be too low. |
| The temperature inside the cabinet compartment is not low enough. | - Check the temperature setting.- The ambient temperature requires a higher temperature setting.- The door has been opened too often, or was left open.- The door is not closed properly.- The rubber seals in the door are not positioned correctly.- Insufficient space between the rear of the unit and the wall. |
| Condensation is accumulating on the exterior housing. | - A high level of humidity in the ambient air causes condensation. It can be simply wiped off. |
Transporting the appliance
The unit must be transported only in its vertical position.
Do not tilt it any more than 30^ . During transport, ensure that the unit is properly secured and protected against shock, vibration and shifting.
Disposal

This appliance has been manufactured from recyclable materials. After removing the plug from the wall socket, the unit should be rendered unusable by cutting off the power cord before being disposed of through special waste collection points in accordance with local regulations. The refrigerant and the chemical agent in the insulation foam must be disposed of through a competent agency. Take special care not to damage the cooling circuit before the unit is handed over for competent disposal.
Guarantee
This product is guaranteed against defects in materials and workmanship for a period of two years from the date of purchase. Under this guarantee the manufacturer undertakes to repair or replace any parts found to be defective, providing the product is returned to one of our authorised service centres. This guarantee is only valid if the appliance has been used in accordance with the instructions, and provided that it has not been modified, repaired or interfered with by any unauthorised person, or damaged through misuse.
This guarantee naturally does not cover wear and tear, nor breakables such as glass and ceramic items, bulbs etc. If the product fails to operate and needs to be returned, pack it carefully, enclosing your name and address and the reason for return. If within the guarantee period, please also provide the guarantee card and proof of purchase.
Information needed by the Customer Service
Should repairs to the appliance become necessary, please contact our Customer Service, providing a detailed fault description and quoting the article number KS ... on the rating plate of the appliance (see picture). This information will help us to handle your request efficiently.
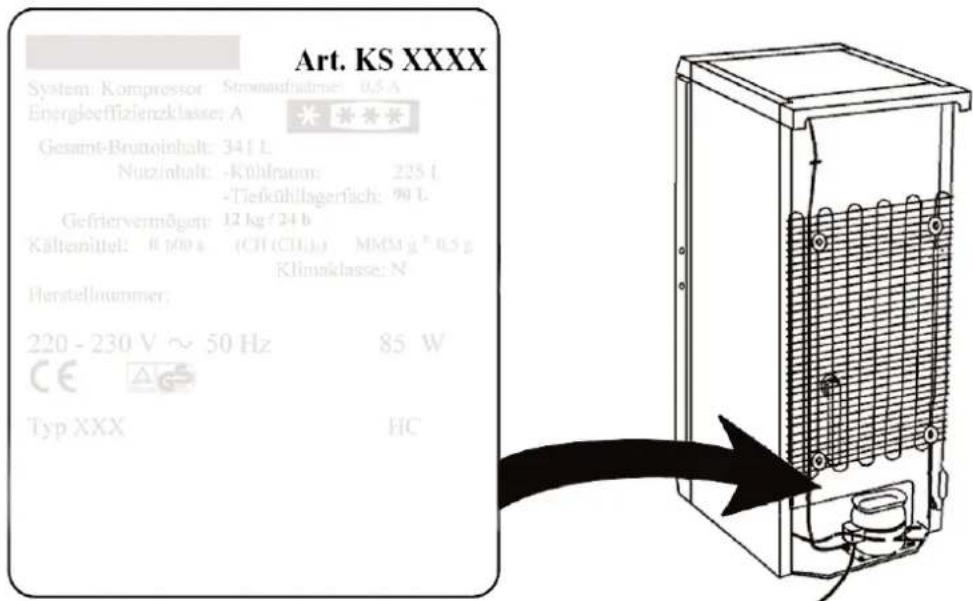
In case of any malfunction or other problem, please contact our Customer Services Department. The address can be found in the appendix to this manual.
Technical specifications
| Art. no. KS 9884 | |
| Type of appliance Refrigerator | |
| Energy consumption: kWh/24 h (temperature setting: 13°C; ambient temperature: 25°C) kWh/year (temperature setting: 13°C; ambient temperature: 25°C) | 0.80292 |
| The actual consumption depends on the pattern of use and the location of the appliance | |
| Total gross volume (litres) 270 | |
| Usable cabinet capacity (litres) 210 | |
| Climate classification N | |
| Ambient temperature range, (°C) 20 – 25 | |
| Dimensions, (mm) 1250 x 544 x 572 | |
| Weight, (kg) 64.5 | |
| Electrical specifications see rating plate | |
| Insulation foam C | _5H_10 |
Chère cliente, Cher client,
natural_image
Warning symbol of a flame inside a triangle (no text or numbers)text_image
Technical diagram of an oven with numbered components and internal structure labelsnatural_image
Line drawing of a refrigerator with labeled parts A and B, showing internal shelves and top opening (no text or symbols beyond labels)natural_image
Technical line drawing of a mechanical housing with internal components and mounting holes (no text or symbols)text_image
Technical diagram showing three labeled components of an electronic device with visible internal structure and terminal labels.Conservation du vin
natural_image
Technical line drawing of a mechanical assembly or enclosure with no visible text or symbolsnatural_image
Warning symbol of a flame inside a triangle (no text or numbers)text_image
Technical diagram of an oven with numbered components and internal structure annotationsPuesta en marcha
natural_image
Line drawing of a refrigerator with labeled parts A and B, showing internal shelves and door (no text or symbols beyond labels)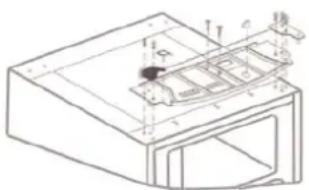
text_image
Technical diagram of a device with labeled components and internal structure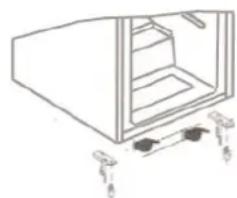
natural_image
Line drawing of a cabinet with doors and mounting feet (no text or symbols)text_image
Technical diagram of an electronic component with numbered parts labeled ①, ②, and ③.natural_image
Technical line drawing of a mechanical assembly or enclosure with no visible text or symbolsnatural_image
Warning symbol of a flame inside a triangle (no text or numbers)text_image
Technical diagram of a refrigerator with numbered parts for identification and assembly reference.natural_image
Line drawing of a refrigerator with labeled parts A and B, showing internal shelves and door (no text or symbols beyond labels)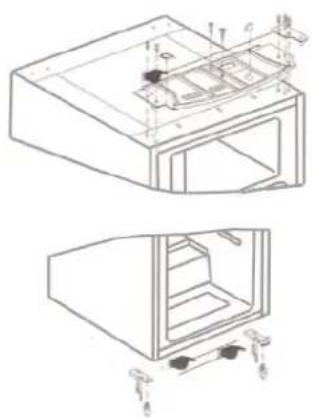
natural_image
Technical line drawing of a mechanical device with two views: top shows internal components, bottom shows exterior view with mounting feet (no text or symbols)text_image
Technical diagram of an electronic component with numbered parts labeled ①, ②, and ③.Förvara viner
natural_image
Technical line drawing of a mechanical assembly or enclosure with no visible text or symbolsCzech Republic / Slowak Republic
ARGO spol. s r.o.
Žihobce 137
CZ 342 01 Sušice
Tel.: +376 597 197
Fax: +376 597 197
Kuressaare: Toomas Teder FTE, Pikk 1B, tel:
45 55 978
Bahar Administration and Commercial
Center
No. 668, 7th Floor, Ave.
South Bahar
TEHRAN-IRAN
Tel.: 009821-7516483
e-mail: info@iranseverin.com
Internet: www.iranseverin.com
Italia
via Dino Col 52r-54r-56r,
1 - 16149 Genova
Green Number: 800240279
Tel.: 010/6 45 11 02 - 01041 86 09
Fax: 010/6 42 50 09
e-mail: videoelettronica@panet.it
Jordan
F.A. Kettaneh
P.O. Box 485
Amman, 11118, Jordan
Tel: 00962-6-439 8642
e-mail: app@kettaneh.com.jo
Korea
Euko Trading
Namho B/D 3F, 194-6, Neungpyeong-Ri
Opo.Eup, Gwangju-Si,
Kyunggi-do
Korea 464 892
Tel: +82-31-714 5394
Fax: +82-31-714 8394
Service Hotline: 080-001-0190
Latvia
SERVO Ltd.
Mr. Janis Pivovarenoks
Tel: +371 7279892
servo@apollo.lv
Lebanon
The Right Angle S.A.L.
Boulos Building
Hazmieh- Damascus Highway
P.O. Box 1656-09
BEIRUT, Lebanon
Tel.: 05-952 162 and 3
Fax: 05-950 190
e-mail: rightangle@inco.com.lb
Luxembourg
Ser-Tec
Serbia and Montenegro
tel: +381-21-524-638
tel: +381-21-553-594
fax: +381-21-522-096
Finland
Oy Harry Marcell Ab
Rälssitie 6, PL 63
01511 Vantaa
Tel.: 0035/89870870
Fax: 0035/8987087803
Svenska
Rakspecialisten HS
Möllevångsgatan 34
214 20 Malmö
Fax: 040/6 11 03 35
Slovenia
SEVTIS d.o.o.
Smartinska 130
1000 Ljubljana
Tel: 00386 1 542 1927
Fax: 00386 1 542 1926
Slovenská Republika
Ambos
Ambos Slovakia s.r.o.
Surianska cesta 62
94001 Nove Zamky
Tel: 00421 35 6424 280
Fax: 00421 903 747 227
e-mail: ambosslovakia@stonline.sk
Stand: 04.2007 (special edition)