
MFP200 - Food Processor BLACK & DECKER - Free user manual and instructions
Find the device manual for free MFP200 BLACK & DECKER in PDF.
| Product type | Food processor (mini chopper) |
| Brand | Black & Decker |
| Model | MFP200 |
| Bowl capacity | 480 ml (2 cups) |
| Bowl material | Plastic |
| Blades | Stainless steel |
| Included accessories | Knife, reversible slicing/shredding disc, discharge disc, chopping lid, lid with continuous feed chute, pusher |
| Main functions | Chop, slice, shred, mix, grind, puree |
| Power supply | 120 V, 60 Hz |
| Power | Approximately 300 W |
| Controls | High/low speed, off, pulse cycle |
| Dimensions (approx.) | Height: 25 cm, Width: 20 cm, Depth: 20 cm |
| Weight (approx.) | 2 kg |
| Safety | Lid locking device, polarized plug, very sharp knife |
| Care | Removable parts dishwasher safe (top rack) or hand wash; base wipe with damp cloth |
| Warranty | 1 year against defects in materials and workmanship |
| Use | Household use only (not for ice, coffee, oily spices, raw meat, marshmallows, soft cheeses) |
Frequently Asked Questions - MFP200 BLACK & DECKER
User questions about MFP200 BLACK & DECKER
0 question about this device. Answer the ones you know or ask your own.
Ask a new question about this device
Download the instructions for your Food Processor in PDF format for free! Find your manual MFP200 - BLACK & DECKER and take your electronic device back in hand. On this page are published all the documents necessary for the use of your device. MFP200 by BLACK & DECKER.
USER MANUAL MFP200 BLACK & DECKER
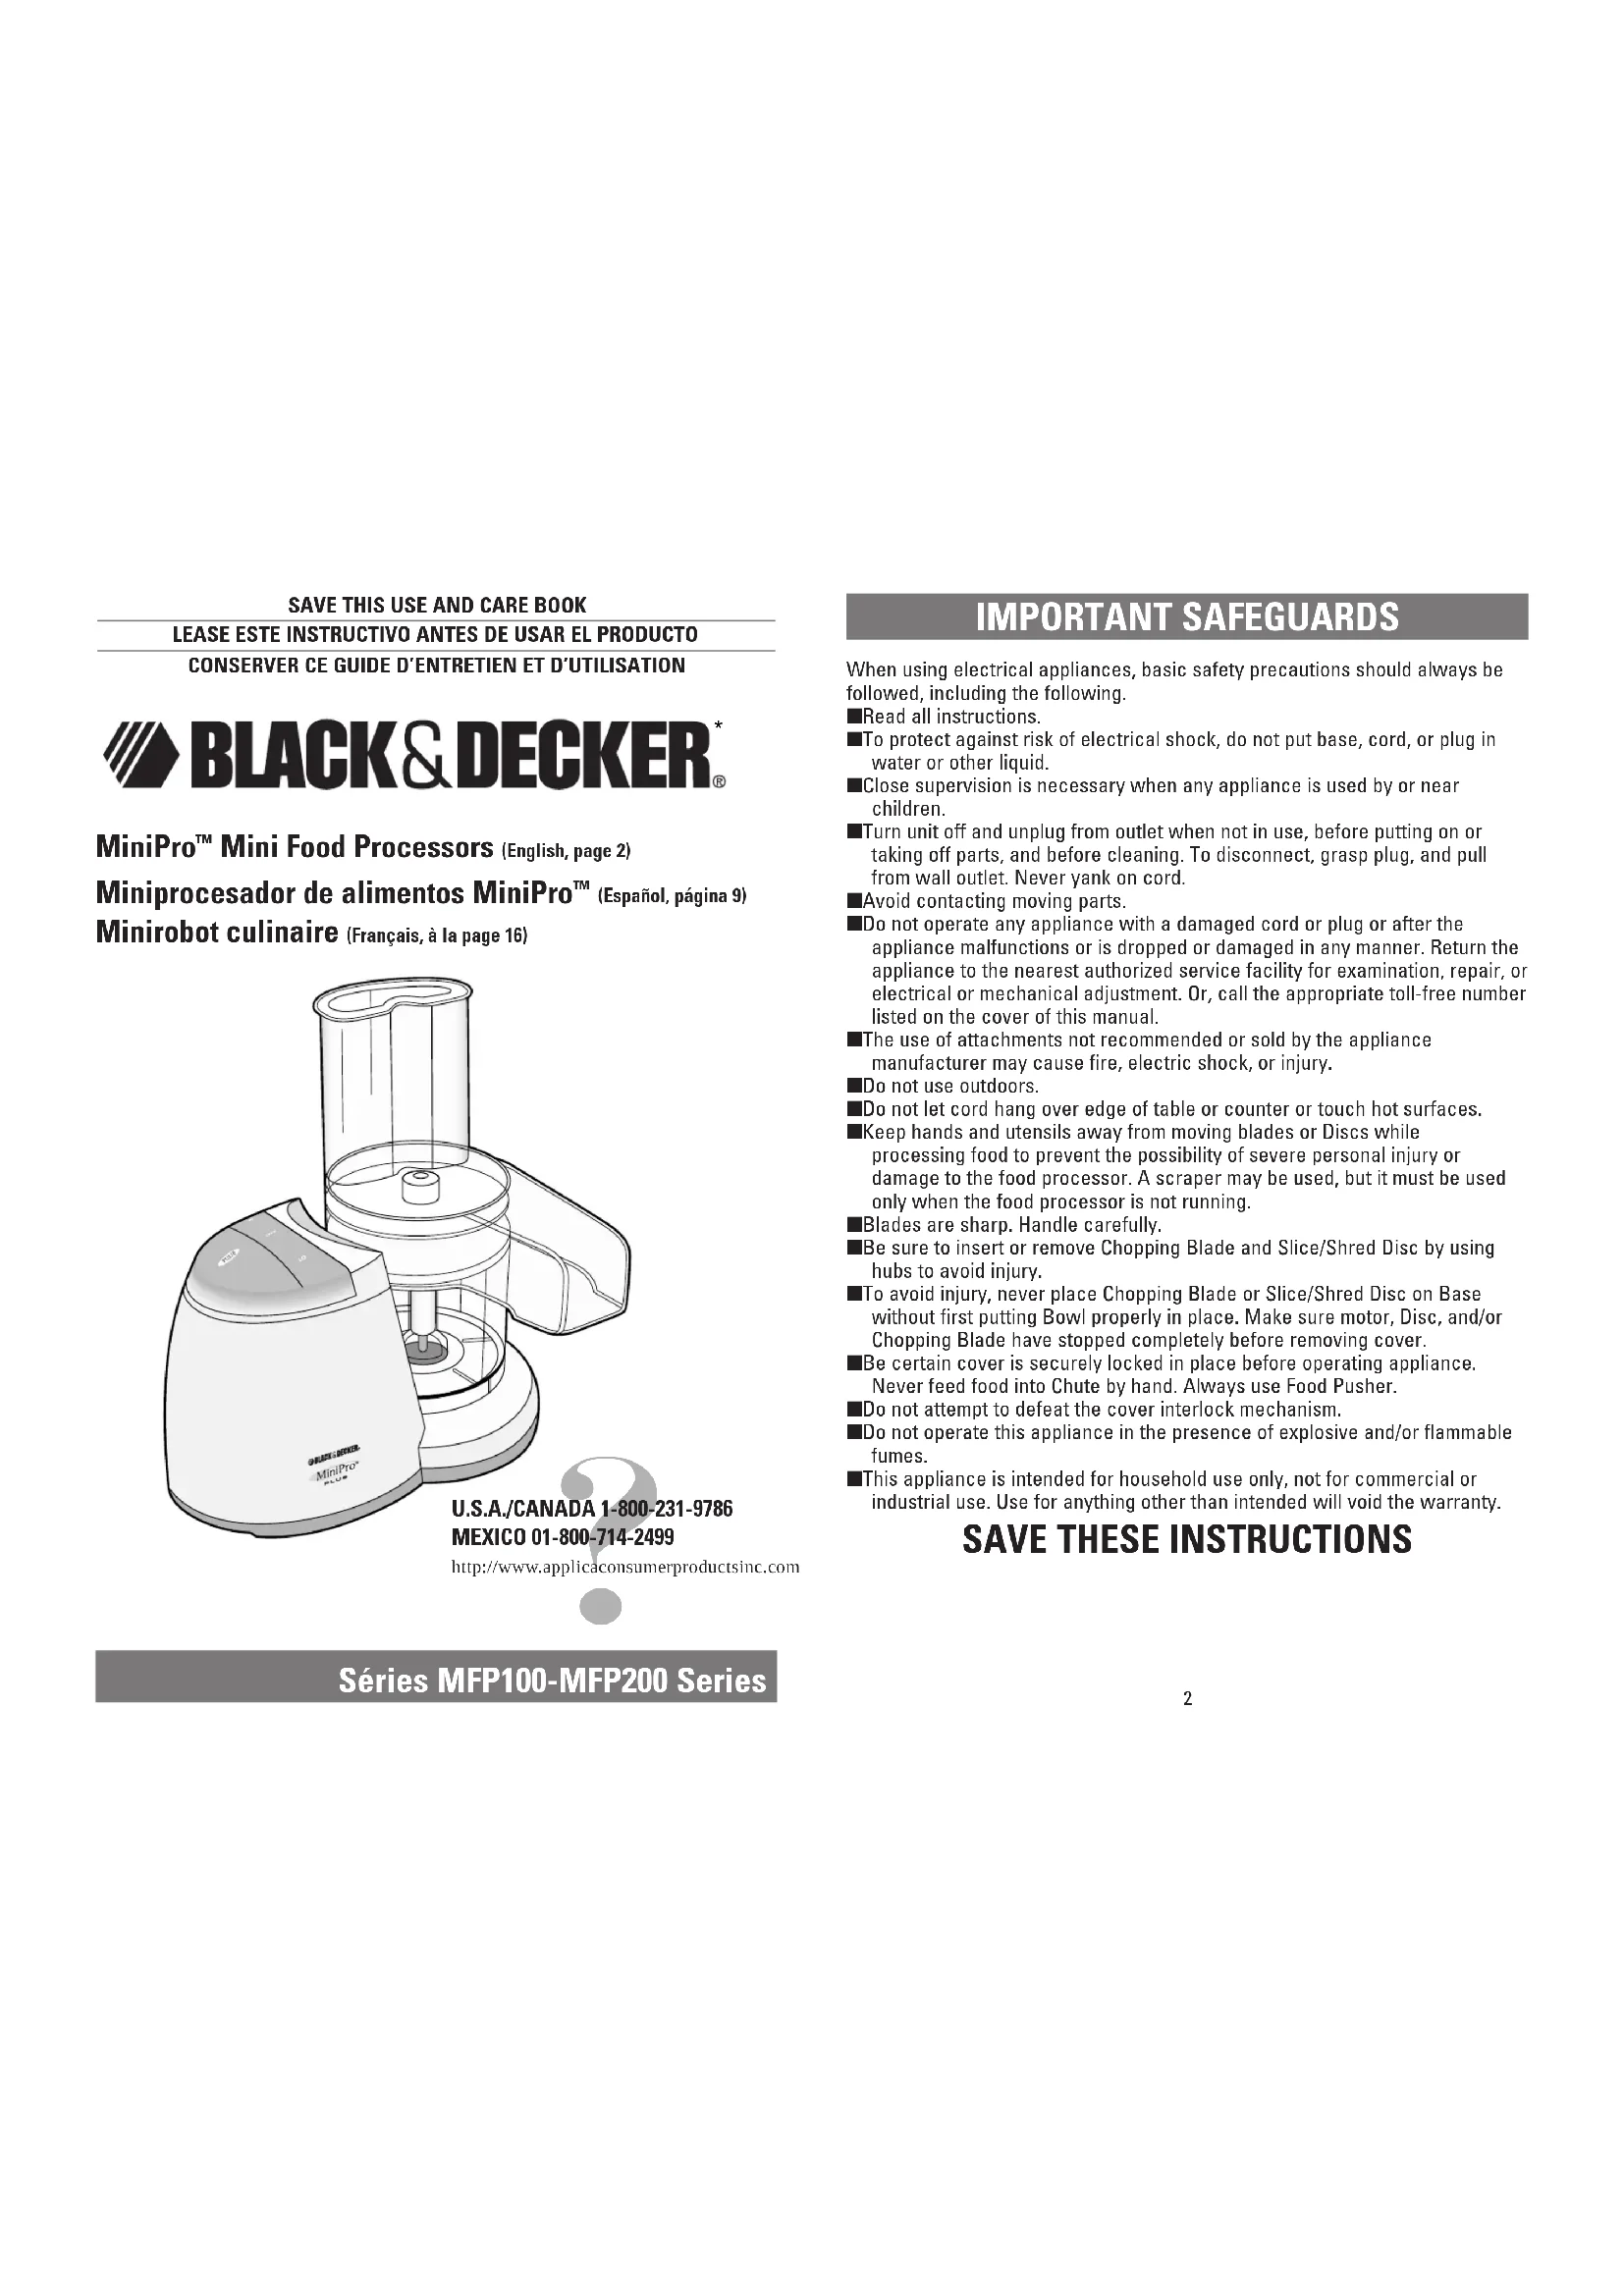
MiniPro™ Mini Food Processors (English, page 2)
When using electrical appliances, basic safety precautions should always be followed, including the following.
■Read all instructions.
To protect against risk of electrical shock, do not put base, cord, or plug in water or other liquid.
Close supervision is necessary when any appliance is used by or near children.
■Turn unit off and unplug from outlet when not in use, before putting on or taking off parts, and before cleaning. To disconnect, grasp plug, and pull from wall outlet. Never yank on cord.
Avoid contacting moving parts.
■Do not operate any appliance with a damaged cord or plug or after the appliance malfunctions or is dropped or damaged in any manner. Return the appliance to the nearest authorized service facility for examination, repair, or electrical or mechanical adjustment. Or, call the appropriate toll-free number listed on the cover of this manual.
The use of attachments not recommended or sold by the appliance manufacturer may cause fire, electric shock, or injury.
Do not use outdoors.
■Do not let cord hang over edge of table or counter or touch hot surfaces.
■Keep hands and utensils away from moving blades or Discs while processing food to prevent the possibility of severe personal injury or damage to the food processor. A scraper may be used, but it must be used only when the food processor is not running.
Blades are sharp. Handle carefully.
■Be sure to insert or remove Chopping Blade and Slice/Shred Disc by using hubs to avoid injury.
To avoid injury, never place Chopping Blade or Slice/Shredd Disc on Base without first putting Bowl properly in place. Make sure motor, Disc, and/or Chopping Blade have stopped completely before removing cover.
■Be certain cover is securely locked in place before operating appliance. Never feed food into Chute by hand. Always use Food Pusher.
■Do not attempt to defeat the cover interlock mechanism.
■Do not operate this appliance in the presence of explosive and/or flammable fumes.
This appliance is intended for household use only, not for commercial or industrial use. Use for anything other than intended will void the warranty.
SAVE THESE INSTRUCTIONS
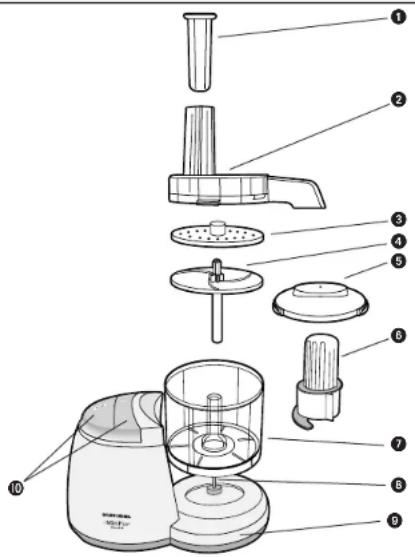
Food Pusher
Cover with Continuous Flow Chute
Slice/Shred Disc with Hub
Discharge Disc
Chopping Lid
Chopping Blade
2-Cup (480 ml) Bowl (MFP200) 1'-Cup (360 ml) Bowl (MFP100)
Post
9Base
High/Low/Off/Pulse Control (MFP200) Off/On/Pulse Control (MFP100)
Using The Food Processor
POLARIZED PLUG
This appliance has a polarized plug - one blade is wider than the other. To reduce the risk of electric shock, this plug will fit into a polarized outlet only one way. If the plug does not fit fully into the outlet, reverse it. If it still does not fit, contact an electrician.
Do not attempt to defeat this safety feature by modifying the plug in any way.
ELECTRICAL CORD
The cord length of this appliance was selected to reduce hazards that may occur with a longer cord. If more cord length is needed, an extension cord with a polarized plug may be used. It should be rated not less than 10 amperes, 120 Volts, and have Underwriters Laboratories or appropriate agency-approved listing. When using a longer cord, be sure it does not drape over a working area or dangle where it could be pulled on or tripped over. Handle cord carefully for longer life; avoid jerking or straining it at outlet and appliance connections.
Before First Use
When unpacking the product and removing packing material, handle the Chopping Blade and Slice/Shredd Disc carefully; they are very sharp. Wash all parts except the Base before first use.
NOTE ABOUT USAGE: Do not attempt to chop ice in this food processor; it will damage the Bowl and dull the Chopping Blade. This unit will not whip cream, beat egg whites to a desirable volume, grind coffee beans or spices with a high oil content, or slice/shredd raw meat, marshmallows or soft cheeses.
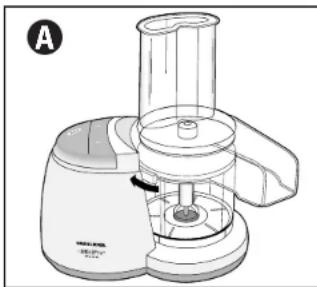
IMPORTANT: For your protection this unit has an Interlock System. When you slip the Bowl over the post, turn it towards the Base so that it locks into place. Be sure to turn the Cover (or Chopping Lid, depending on use) towards the Lock position so that the Tab locks into the slot on the Base (A). This unit will not operate unless the Cover (or Chopping Lid) is locked into place.
How To Slice Or Shred
- Slip the Bowl over the center Post and twist it toward the Base so that the Bowl locks into place.
- Carefully grasp the Slice/Shred Disc by the Hub or its edges with the desired side (Slice or Shred) up, and push it down onto the top of the Discharge Disc. Slip the Discharge Disc (with Slice/Shred Disc) over the center Post.
- Place the Cover with Continuous Flow Chute onto the Bowl and twist it toward the Base (you hear it click into place A). Position a large, low serving/preparation bowl under the Continuous Flow Chute to catch food and spatter. Rimless bowls work better than bowls with a lip.
- Plug the cord into an electrical outlet.
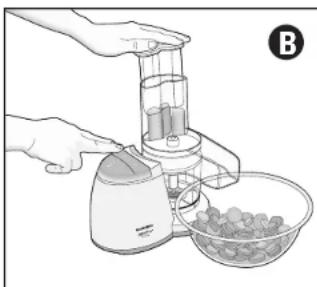
- Use the Food Guide to help you prepare food for slicing or shredding. Fill the Food Chute and position the Food Pusher over the food.
- Push down with a light but steady pressure on the Food Pusher while pressing the desired speed: Hi, Low (MFP200) or On (MFP100) (B), depending on your model. Press and hold the Pulse position for short processing tasks, such as slicing a cucumber. The unit will stop when you release the Pulse button. Use the Hi, Low, (MFP200) or On (MFP100) position for continuous, longer processing tasks, such as shredding cabbage or carrots.
NOTE: Let the Processor do the work.
Heavy pressure will not speed up operation. Do not use the Processor continuously for more than 3 minutes at a time. Occasionally, turn the serving bowl during processing to p-Flow Chute that could fall out of the bowl. Be enough back on the counter to prevent bits to - After processing food, turn the unit "off" by pressing on the elevated end of the rocker "lever" so that it will be even with the top of the unit in the "Off" position or release the Pulse button. Allow the Disc to stop spinning completely before you remove the Cover with Continuous Flow Chute by turning it toward the (UNLOCK▶ position and lifting it off.
Chopping Blade
The Chopping Blade speeds up many everyday tasks and is designed to chop, crumb, grind, mince and mix quickly.
-
Slip the Bowl over the center Post and twist it toward the Base to be sure the Bowl locks into place.
-
Grasp the Chopping Blade by its center hub and slide it down onto the Post (C).
- Use the Food Guide to help you prepare food for chopping/mincing/mixing and crumbing, then place the food into the Bowl. Place the Chopping Lid onto the Bowl and twist it toward the Base until you hear it click into place.
- Plug the cord into an electrical outlet.
- Use the continuous On (MFP100), Hi or Low (MFP200) for longer processing tasks to make salad dressing, dips, or baby food. Use the Pulse position for short processing like chopping nuts or crumbing bread. Hold the
Pulse position for about 2-3 seconds: check results; repeat for desired consistency. It is better to use several short pulses rather than a single long one unless mixing ingredients that require longer processing times.
- After processing food, turn the unit "off" by pressing on the elevated end of the rocker "lever" so that it will be even with the top of the unit in the "Off" position or release the Pulse button. Let the Chopping Blade stop spinning before you twist the Chopping Lid off.
- Grasp the Chopping Blade by its hub and remove. Unlock the Bowl by twisting it off the Base. Empty the processed food.
Care and Cleaning
NOTE: Do not attempt to sharpen the cutting edges of the Chopping Blade or the Reversible Slice/Shred Disc. They are permanently sharpened at the factory and will be ruined by attempted sharpening.
Cleaning
- Before cleaning, be sure the unit is Off and unplugged.
- Rinse parts immediately after processing for easy cleanup. Removable parts can be washed by hand or in a dishwasher, top rack.
If washing by hand, use warm soapy water, rinse, and dry thoroughly. If necessary, use a small bristle brush to thoroughly clean the Bowl, Cover with Continuous Flow Chute, Chopping Blade, and Slice/Shred Disc.
In a dishwasher, place removable parts on the top rack only — not in or near the utensil basket. - Wipe the Base with a damp sponge or cloth and dry thoroughly. Remove stubborn spots with a damp cloth and a mild, non-abrasive cleaner. Do not immerse the Base in liquid.
- Do not use rough scouring pads, abrasives, or cleansers on any parts.
- Do not fill the Bowl with boiling water or place any parts in boiling water. Some foods, such as carrots, may temporarily stain the Bowl. To remove stains, make a paste of 1 tablespoon baking soda and two tablespoons warm water. Apply the paste to the stains and rub with a cloth. Rinse in sudsy water and dry.
Food Guide
| FOOD ATTACHMENT COMMENTS | ||
| APPLES Disc, Slicing Side Stack 2 quarters horizontally in chute. Use moderate pressure. | ||
| BANANAS Disc, Slicing Side Peel and cut in half; use light pressure. | ||
| CABBAGE Disc, Shredding Side Cut to fit chute; shred into bowl. Add slaw ingredients (mayo, vinegar, salt, etc.) | ||
| CARROTS Disc, Slicing Side Cut into 4" (10.2 cm) lengths and pack in chute, (Sliced, shredded) alternating thick and thin ends. Shredding Side Position in chute & shred. | ||
| CELERY, CHOPPED Chopping Blade Up to 1 cup cut into ¼" (1.27 cm) lengths. Pulse to Chopping Lid desired texture. | ||
| CUCUMBER Disc, Slicing Side Cut to fit chute; use light pressure. | ||
| CHEESE, PARMESAN | Chopping Blade Cut into ¼" (1.27 cm) cubes and pulse up to ½ cup Chopping Lid at a time. | |
| CHEESE, CHEDDAR | Disc, Shredding Side Cut chilled cheese to fit chute/shredd. | |
| EGGS (HARD COoked) | Chopping Blade Quarter up to 3 eggs and pulse to desired texture. Add Chopping Lid mayo, salt, and seasoning for egg salad. | |
| NUTS, CHOPPED | Chopping Blade Add up to 1 cup; pulse to desired fineness. Chopping Lid | |
| ONIONS | Chopping Blade Quarter or cut large onions into 8 pieces. Add to bowl. Chopping Lid Pulse. For even, coarse results, only chop 2 quarters at a time. | |
| BREAD | Chopping Blade Use up to 2 slices/broken into pieces. Pulse speed. Chopping Lid | |
| PARSLEY, OTHER HERBS | Chopping Blade Chopping Lid | Add up to 1 cup; pulse to desired fineness. |
| PEPPERONI | Disc, Slicing Side | Cut into 4" (10 cm) lengths. Slice 1 piece at a time using firm pressure. |
| POTATOES | Disc, Shredding Side Cut to fit chute. After shredding, place in cold water to prevent darkening before frying. | |
| SQUASH (SHredded) | Disc, Shredding Side | Cut to fit chute; shred, salt and drain. Fries well in butter or oil. |
Need Help?
For service, repair, or any questions regarding your appliance, call the appropriate "800" number on the cover of this book. Do NOT return the product to the place of purchase. Do NOT mail the product back to the manufacturer nor bring it to a service center. You may also want to consult the website listed on the cover of this manual.
Recipes
Tomato Arugula Salad with Parsley Oregano Vinaigrette
1 package (10 ounce/296 g) arugula
2 ripe, medium tomatoes, quartered
1 English cucumber, halved crosswise and lengthwise
Dressing:
Xcun olive oil
3 tablespoons red wine vinegar
12 cup fresh parsley leaves, stems removed
1/4cup fresh oregano, stems removed
Salt and pepper
- Add arugula to large, low salad bowl.
- With slicing side of Slice/Shred Disc facing up, add tomato wedges, 2 at a time, to Food Chute of Food Processor.
- Slice directly into salad bowl, making sure that bowl is as close as possible to Exit Chute to prevent any spillage.
- Repeat process with cucumber pieces, slicing them directly into salad bowl
- Remove Slicing/Shredding Lid and Disc. Position Chopping Blade in Bowl. Add dressing ingredients and process until herbs are finely chopped and dressing is well blended.
- Pour over salad and toss
Makes: 6 (1/ cup) servings.
Tangy Cucumber and Radish Salad
1 cucumber, about × (340g) pound total
6 ounces radishes, trimmed
1 tablespoon Balsamic vinegar
1 tablespoon sugar
1 teaspoon sesame oil
teaspoon soy sauce
Teaspoon hot pepper sauce
- Run times of fork lengthwise down all sides of cucumber, piercing skin. Cut cucumber in half crosswise, and then in half lengthwise.
- Using the slicing side of the Slice/Shredd Disc of the Food Processor, position cucumber sections in Food Chute, one at a time. Position salad bowl under Exit Chute. Slice cucumbers.
- Slice radishes in similar manner
-
Combine remaining ingredients in Food Processor Bowl with Chopping Blade in place. Process to mix. Pour over cucumber mixture and toss.
-
Gamish with red leaf lettuce, if desired.
Makes: 6 1% cupl servings
Cream Cheese and Walnut Dip
cup frozen whole kernel corn
small onion, quartered 2 tablespoons lime juice
cup walnuts 2 teaspoons cumin
1 package (8 ounces/227g) cream cheese.
softened
2 tablespoons milk
1 teaspoon dried crushed pepper
1/teaspoon salt
-
Place corn in medium mixing bowl and allow to thaw.
-
Position Chopping Blade in Bowl of Food Processor. Add onion and walnuts; Cover with Chopping Lid Pulse until finely chopped. Transfer to mixing bowl with corn.
- Re-position Chopping Blade. Add all the remaining ingredients to Food Processor Bowl. Process until mixture is well blended. It may be necessary to stop and stir mixture once or twice.
- Add to corn mixture and stir together by hand. Store in covered container
- Use as a dip for tortilla chips, pita bread, raw vegetable sticks, or as a filling for sandwiches.
Makes: 1% cups
cup fresh cilantro (leaves only)
medium tomato, cut in 8 pieces
cup walnuts 1 small avocado, cut in 1^ [2.54 cm] pieces
1 small onion, quartered 2 tablespoons lemon juice
1 jalapeno pepper, seeds/membranes removed
and each quartered
- Position Chopping Blade in Bowl of Food Processor. Add cilantro, walnuts and onion. Process until nuts are finely chopped, about 5 seconds. Transfer to medium-size serving bowl.
- Add pepper to Bowl, and process to finely chop. Remove Cover, and add tomato. Process to coarsely chop tomato. Add to cilantro mixture.
-
Add avocado to Bowl and process to coarsely chop. Add to cilantro mixture. Stir in remaining ingredients.
-
Serve with chips or as an accompaniment with chicken.
Makes: 1% cups salsa.
Tasty Hot Crab Appetizer
1 package ( 8 ounces / 227 g ) cream cheese , 1 tablespoon milksoftened 2 teaspoons horseradish
1 can (6 ounces/170 g) crab meat, drained and
flaked Dash pepper
1 small onion, quartered 2 ounces Cheddar cheese
2 green onions, cut in 1-inch (2.54 cm) lengths Paprika
1.Preheat oven at 350^ 177°C.
2. In medium mixing bowl, combine cream cheese and crab meat. Mix to blend well.
3. Position Chopping Blade in Bowl of Food Processor. Add onion and green onions. Cover with Chopping Lid. Process to finely chop. Transfer to cream cheese mixture.
4. Add milk, horseradish, salt and pepper to cream cheese mixture. Blend well. Transfer to decorative baking dish.
5. Position decorative dish under Exit Chute of Food Processor. Using shredding side of Slice/Shredd Disc, shred Cheddar cheese over top of cream cheese mixture. Spread shredded cheese evenly over top and sprinkle with paprika.
6. Bake for 20 minutes, or until bubbly.
7. Serve warm with crackers
Makes: 2 cups dip
Pepper and Basil Pasta Salad
1 pound fusilli pasta 2 large yellow bell peppers, halved, seeded, and
1 package (5.3 ounce/150 g) goat cheese with herbs cut lengthwise into ½-inch (1.27 cm) strips
2 cups fresh basil leaves
2 cloves garlic
2 large red bell peppers, halved, seeded, and cut
lengthwise into 12 -inch (1.27 cm) strips
%cup balsamic vinegar
%cup white wine vinegar
12 cup pine nuts, toasted
- Prepare pasta as per package instructions. Drain and transfer to large mixing bowl. Add goat cheese to hot pasta and stir gently until cheese is melted.
- With Chopping Blade in place, add basil and garlic to the Bowl of Food Processor. Position Chopping Ltd. Process until finely chopped. Add basil mixture to pasta.
- Position Slice/Shredd Disc, with slicing side up, in Bowl of Food Processor. Position mixing bowl with pasta under Exit Chute. Pack Food Chute of Slicing/Shredding Lid with pepper strips. Slice peppers directly into pasta. Repeat with remaining pepper strips.
- Combine balsamic and white wine vinegar, add to pasta mixture, along with the pine nuts.
- Stir gently to thoroughly blend ingredients; serve at room temperature.
Makes: 14 (1-cup) servings.
IMPORTANT MISES EN GARDE
FULL ONE-YEAR WARRANTY
Applica warrants this product against any defects that are due to faulty material or workmanship for a one-year period after the original date of consumer purchase. This warranty does not include damage to the product resulting from accident, misuse, or repairs performed by unauthorized personnel. If the product should become defective within the warranty period, or you have questions regarding warranty or service, call Consumer Assistance and Information toll free at: 1-800-231-9786. This warranty gives you specific legal rights and you may also have other rights which vary from state to state or province to province.
UN ANO COMPLETO DE GARANTIA
Product may vary slightly from what is illustrated.
- BLACK & DECKER is a trademark of The Black & Decker Corporation, Towson, Maryland, USA.
*Marca registrada de The Black & Decker Corporation, Towson, Maryland, E.U.
Copyright © 2000-2001 Applica Consumer Products, Inc.
Pub.No.177094-00-RV02
Product made in People's Republic of China
Printed in People's Republic of China

- SAVE THESE INSTRUCTIONS
- Food Pusher
- POLARIZED PLUG
- Do not attempt to defeat this safety feature by modifying the plug in any way.
- ELECTRICAL CORD
- Before First Use
- How To Slice Or Shred
- Chopping Blade
- Care and Cleaning
- Cleaning
- Food Guide
- Need Help?
- Recipes
- Tomato Arugula Salad with Parsley Oregano Vinaigrette
- Tangy Cucumber and Radish Salad
- Cream Cheese and Walnut Dip
- Tasty Hot Crab Appetizer
- Pepper and Basil Pasta Salad
- IMPORTANT MISES EN GARDE
- FULL ONE-YEAR WARRANTY
- UN ANO COMPLETO DE GARANTIA
Brand : BLACK & DECKER
Model : MFP200
Category : Food Processor