
10032064 - Air purifier Klarstein - Free user manual and instructions
Find the device manual for free 10032064 Klarstein in PDF.

| Product type | Air purifier with humidification function |
| Brand | Klarstein |
| Model | 10032064 |
| Power supply | 220-240 V, 50 Hz |
| Power | 15 W |
| Filter type | Activated carbon (washable) |
| Fan speeds | Hi (high), Mi (medium), Lo (low) |
| Humidity setting | 40% to 70% in 10% increments, continuous mode (CO) |
| Timer | 1 to 12 hours |
| Night mode | Yes, fan at low speed, reduced display |
| Auto shut-off | Protection against dry running (display "NO!") |
| Tank capacity | Not specified |
| Noise level | Not specified |
| Dimensions (W × D × H) | Not specified |
| Weight | Not specified |
| Housing material | Plastic |
| Maintenance | Clean the carbon filter every month with a brush or vacuum cleaner; clean the tank and the disc with water and dish soap |
| Safety | Unplug before cleaning; do not immerse the appliance; use only fresh water; do not use flammable sprays nearby |
| Spare parts | Not specified |
| Warranty | Not specified |
Frequently Asked Questions - 10032064 Klarstein
User questions about 10032064 Klarstein
0 question about this device. Answer the ones you know or ask your own.
Ask a new question about this device
Download the instructions for your Air purifier in PDF format for free! Find your manual 10032064 - Klarstein and take your electronic device back in hand. On this page are published all the documents necessary for the use of your device. 10032064 by Klarstein.
USER MANUAL 10032064 Klarstein

natural_image
Diagram showing a server rack with internal components and a red arrow indicating direction (no text or symbols)natural_image
Technical illustration of a mechanical component with internal gear-like structure and external circular assembly (no text or symbols)Gehäuse reinigen
natural_image
Symbol of a trash bin crossed with a diagonal line, no text or numbers presentCongratulations on purchasing this equipment. Please read this manual carefully and take care of the following hints to avoid damages. Any failure caused by ignoring the mentioned items and cautions mentioned in the instruction manual are not covered by our warranty and any liability.
CONTENT
Technical Data 11
Declaration of Conformity 11
Safety Instructions 12
Product Description and Keys 13
Use and Operation 14
Care and Cleaning 16
Hints on Disposal 18
TECHNICAL DATA
| Item number 10032064 | |
| Power supply 220-240 V ~ 50 Hz | |
| Power consumption 15 W |
DECLARATION OF CONFORMITY

Producer:
Chal-Tec GmbH, Wallstraße 16, 10179 Berlin, Germany.
This product is conform to the following European Directives:
2014/30/EU (EMC)
2014/35/EU (LVD)
2011/65/EU (RoHS)
206/2012/EU (ErP)
SAFETY INSTRUCTIONS
- This appliance can be used by children aged from 8 years and above and persons with reduced physical, sensory or mental capabilities or lack of experience and knowledge if they have been given supervision or instruction concerning use of the appliance in a safe way and understand the hazards involved. Children shall not play with the appliance.
• Children of less than 3 years should be kept away unless continuously supervised. - If the supply cord is damaged, it must be replaced by the manufacturer, its service agent or similarly qualified persons in order to avoid a hazard.
- With any indication of malfunction, contact service center repairs. Do not attempt to disassemble the product or replace faulty parts with unauthorized components because it will damage the unit.
- Do not hand the plug or product with wet hands. Or it may cause electric shock.
- Do not stick sticks, metal or other object into the outlet, because it will cause creepage or short circuit or even damage the device.
- Do not use pesticide or other flammable spray around the product. Because it will damage the device.
- Do not face the wind outlet to baby directly for long. Or it will be bad to baby's health.
- Do not pull the wires when unplug the power cord plug, because it will damage the wire or make creepage.
- Make sure there is no abnormal items in the wire, and the plug is absolutely plug in. Otherwise it will cause creepage.
- When there is unusual smell or unusual sound from the device, then stop operating the device, and unplug the plug.
- Do not fold power cord or place heavy object on it, because it can cause creepage.
Special Instructions
- Water in the water tank should not higher than highest water level and should not lower than lowest water level when using humidifying function.
- Unplug once product tip over and there is water in side and turn on after dry in the air for 24 hours.
• Power off the device and unplug the power cord when not using for a long time. - Check the voltage on the equipment label before use. Only connect the device to sockets that correspond to the voltage of the device. If you are unsure whether your connections meet the requirements, consult an electrician or your electricity supplier.
- Do not lift the machine when water tank was full of water, or it will be overflow. Only after take our water tank or confirm there is no or little water in the water tank you can lift the machine.
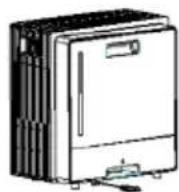
PRODUCT DESCRIPTION AND KEYS
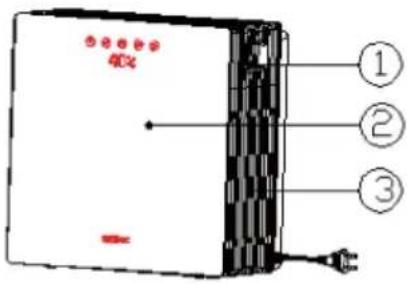
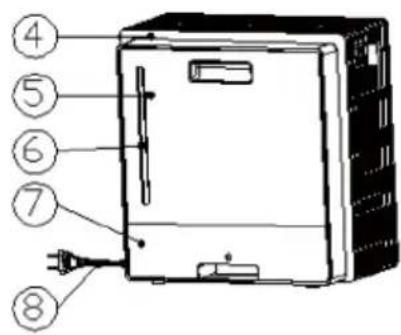
| 1 Body 5 Tank lid | |
| 2 Display panel 6 Water tank | |
| 3 Air inlet 7 Sump tank | |
| 4 Tear cabinet 8 Power cord |
Key Overview

POWER

GEARS

HUMIDITY

TIMER

SLEEP MODE
Display (orange LED matrix)

USE AND OPERATION
Plug in, LED matrix display bright for 2 seconds and make bibi sound, the machine stand by. All the pressing are invalid except POWER.
1 Touch POWER key to turn on machine in stand by condition; After turn on machine, all LED light on for 1 second and off for 0.5 second, LED matrix display show "Hi!" for 2 seconds and into normal display. First time turn on the machine it default medium wind speed, and turn to low wind speed after 3 seconds. Humidity setting continue. Touch POWER again, it will stand by and make bibi sound. LED matrix display show "OFF" and turn off all device in 2 seconds.
2 Gears: First time turn on the machine it default medium wind speed. Touch GEARS can shift between weak, low, medium and high wind speed. LED matrix display show: SL > LO > MI > HI.
3 Humidity: Touch HUMIDITY key to into humidity setting and first time turn on the machine it default humidity continue mode. Setting range: 40%-70%-CO, every time touch the key it increase 10%. After humidity setting, it turn to high speed until it meet the setting then stop humidity. Once lower than the setting, it will humidity again. Press the button to adjust the humidity in the following order: 40% > 50% > 60% > 70% > CO.
4 Timer: First time turn on machine there is no timer After into timer setting, it will increase one hour every time you touch the key. From 1h-2h-3h-4h-5h-6h-7h-8h-9h-10h-11h-12h-00h cycle. 00h is no timer setting. After timer setting, it will start to calculate time and turn of in time.(There is no bibi sound when turn off.)
5 Sleep mode:
(a) First time touch sleep mode key, it turn into sleep mode and shows ZZZ for 5 seconds. Gear set low speed and keep other function. There will be no bibi sound and will show in LED matrix display when lack of water. In sleep mode, all pressing are invalid except sleep mode key and turn on/off key.
(b) Second time touch sleep mode key, it will out of sleep mode and shows for 1 second, twinkle for 2 seconds, at the same time make bibi sound. Then into normal display.
(c) Third time touch sleep mode key it will cycle.
6 Water scarcity protection function: After turn on the machine it will check in 1 second and will be in protection condition if lack off water. It will turn into protection condition in 6 seconds when working. In water scarcity protection condition: Unidirectional synchronous motor stop working (stop humidity) main motor stop working. LED matrix display shows NO! and alternately, alternate one time per second. It will stand by after 1 minute when it test no water. It will make BI-BI-BI sound when test no water and BI-BI-BI 30 seconds later and BI-BI-BI 1 minute later and stand by. In water scarcity protection condition, all pressing invalid except turn on/off key. Adding water:
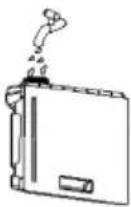
NOTE: Please add water to water tank before use humidity function. Before adding water please take our water tank like picture 1. After take out water tank please rotate the lip to add water like picture 2. After adding water please rotate back the lip and put in the water tank like picture 3 & 4.
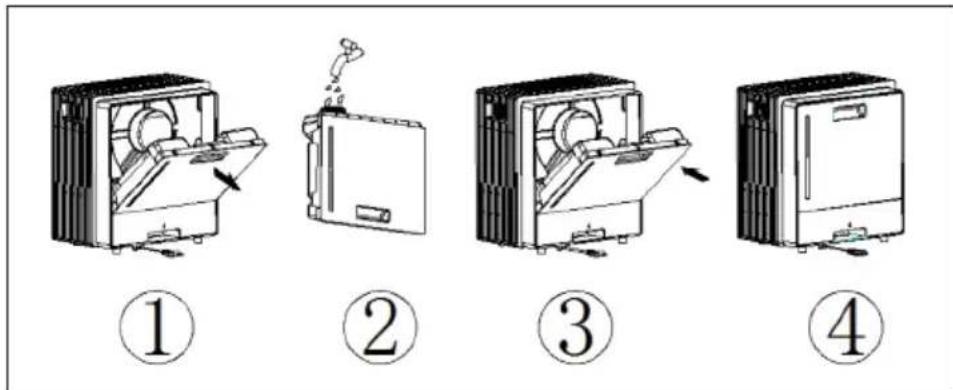
NOTE: Pull out the plug when filling Water! lease add full water in water tank. Must use clean tap water. It will have slight smell and the water in the water tank and have a slight discoloration when first time use. It is normal phenomenon and no harmful. It will not influence your health.
CARE AND CLEANING
NOTE: Turn off the unit, and unplug it from the wall outlet before maintenance or cleaning to avoid electric shock.
- Please use soft cloth to wipe the dust on the heater's surface; If the surface is too dirty, it is better to wipe it with the water lower than 50 C mixed with neutral detergent.
- Don't use the gasoline, Thinner and any others which is easy to damage surface.
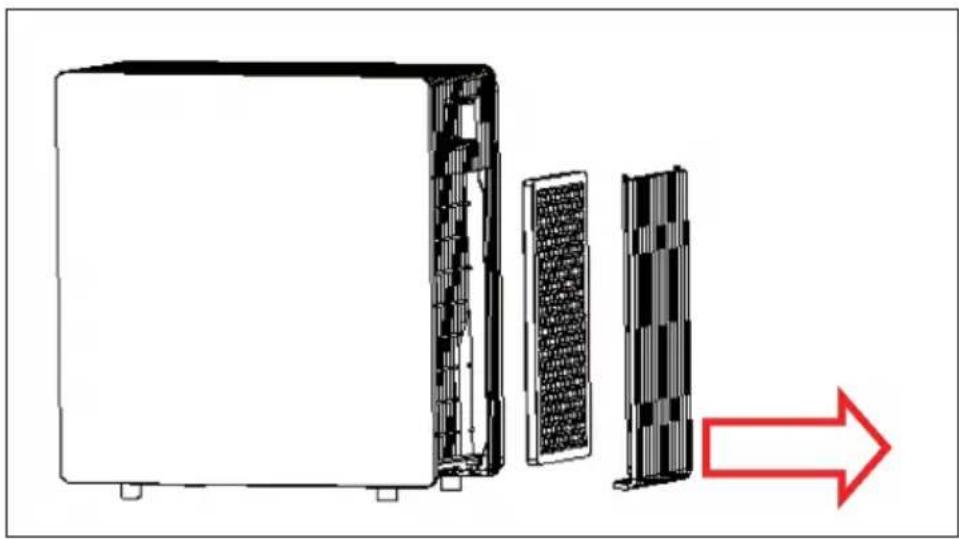
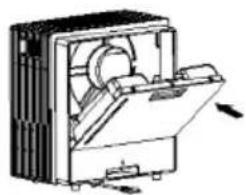
Carbon filter cleaning
If there is too much dust and other things on the carbon filter, it will influence the air washer efficient. It will be better to clean each month.
1 First, take out air inlet net and take our carbon filter like below picture.
natural_image
Diagram showing a server rack with internal components and a red arrow indicating direction (no text or symbols)2 Use banister brush or vacuum cleaner to clean carbon filter, do not use liquid cleaner or water to clean it!
Water tank/Sump tank clean
Pull out the plug and take our water tank and sump tank. Use cloth to touch little liquid clean to wipe the dirt and use water to clean.
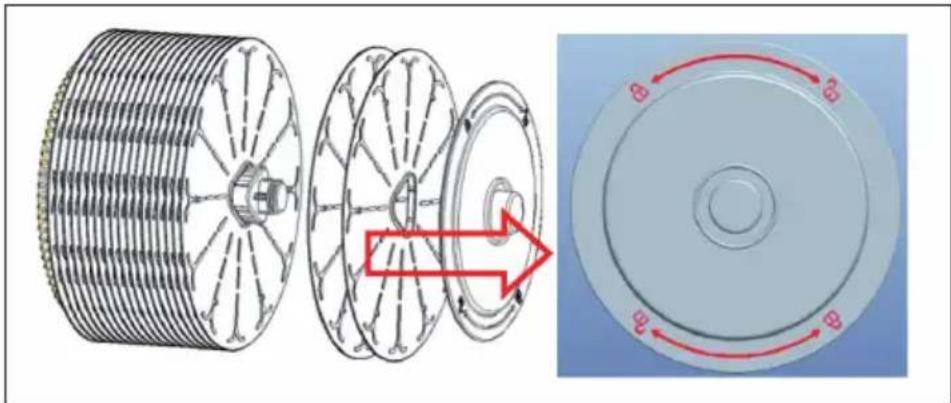
Disk clean
1 Pull out the plug and take our water tank and sump tank.
2 Take out the disk assembly and unscrew out the disk one by one like below picture. Total 20 disks.
3 Use brush to touch little liquid clean to clean the dirt and dry in the air.
natural_image
Technical illustration of a mechanical component with internal gear-like structure and circular cross-section showing rotational motion (no text or symbols)The body surface clean
Use wet cloth to wipe, forbid to use water. Do not use the gasoline, Thinner and any others which is easy to damage surface. You have to turn off the machine and pull out the plug when clean, or it may get electric shock.
Installation after cleaning
Put the carbon filter, air inlet net, sump tank, disk, water tank one by one and make sure in correct installation. Confirm the machine working normal.
Maintaining
Please pull out plug and pack the machine to avoid dust if do not use it in a long time. Before packing please make sure the carbon filter is dry and no water in water tank. Place it in dry and ventilate place after packing.
HINTS ON DISPOSAL
natural_image
Symbol of a trash bin crossed with a diagonal line, no text or numbers presentAccording to the European waste regulation 2012/19/EU this symbol on the product or on its packaging indicates that this product may not be treated as household waste. Instead it should be taken to the appropriate collection point for the recycling of electrical and electronic equipment. By ensuring this product is disposed of correctly, you will help prevent potential negative consequences for the environment and human health, which could otherwise be caused by inappropriate waste handling of this product. For more detailed information about recycling of this product, please contact your local council or your household waste disposal service.
Estimado cliente,
natural_image
Technical line drawing of a mechanical device with internal components and directional arrows (no text or symbols)①
②
natural_image
Technical line drawing of an open refrigerator with internal components and mounting holes (no text or symbols)③
④
natural_image
Diagram showing a server rack with internal components and a red arrow indicating direction (no text or symbols)natural_image
Technical illustration of a mechanical component with internal gear-like structure and external circular assembly (no text or symbols)Limpiar la carcasa
natural_image
Symbol of a trash bin crossed with a diagonal line, no text or numbers presentDÉCLARATION DE CONFORMITÉ

Fabricant :
Chal-Tec GmbH, Wallstraße 16, 10179 Berlin, Allemagne.

natural_image
Diagram showing a server rack with internal components and a red arrow indicating direction (no text or symbols present)natural_image
Technical illustration of a mechanical component with internal gear-like structure and circular cross-section showing rotational motion (no text or symbols)natural_image
Symbol of a trash bin crossed with a diagonal line, no text or numbers presentnatural_image
Diagram showing a server rack with internal components and a red arrow indicating direction (no text or symbols)natural_image
Technical illustration of a mechanical component with internal gear-like structure and external circular assembly (no text or symbols)natural_image
Symbol of a trash bin crossed with a diagonal line, no text or numbers present

- Gehäuse reinigen
- CONTENT
- TECHNICAL DATA
- DECLARATION OF CONFORMITY
- SAFETY INSTRUCTIONS
- Special Instructions
- PRODUCT DESCRIPTION AND KEYS
- Key Overview
- Display (orange LED matrix)
- USE AND OPERATION
- Sleep mode:
- CARE AND CLEANING
- Carbon filter cleaning
- Water tank/Sump tank clean
- Disk clean
- The body surface clean
- Installation after cleaning
- Maintaining
- HINTS ON DISPOSAL
- Estimado cliente,
- Limpiar la carcasa
- DÉCLARATION DE CONFORMITÉ
Brand : Klarstein
Model : 10032064
Category : Air purifier