
10021651 - Humidifier Klarstein - Free user manual and instructions
Find the device manual for free 10021651 Klarstein in PDF.

| Product type | Air humidifier |
| Brand | Klarstein |
| Model | 10021651 |
| Tank capacity | 6 liters |
| Power supply | 220-240 V ~ 50-60 Hz |
| Dimensions (approx.) | 25 × 25 × 40 cm |
| Weight (approx.) | 2.5 kg |
| Control type | Digital display + remote control |
| Main functions | Ionizer, timer (1-12 hours), auto mode, night light, humidity setting (45-90%) |
| Mist output | 3 levels (low, medium, high) |
| Filter | Reusable dust and microbe filter (plastic and ceramic beads) |
| Cleaning and maintenance | Clean the transducer, tank and basin once a week; filter to be cleaned every month or 1000 hours |
| Safety | Automatic shut-off when tank is empty; overheat protection |
| Included accessories | Tank, filter, remote control (CR2025 battery included) |
| Warranty | 2 years (subject to terms and conditions) |
Frequently Asked Questions - 10021651 Klarstein
User questions about 10021651 Klarstein
0 question about this device. Answer the ones you know or ask your own.
Ask a new question about this device
Download the instructions for your Humidifier in PDF format for free! Find your manual 10021651 - Klarstein and take your electronic device back in hand. On this page are published all the documents necessary for the use of your device. 10021651 by Klarstein.
USER MANUAL 10021651 Klarstein
natural_image
Row of white icons representing kitchen appliances including blender, toaster, refrigerator, washing machine, lamp, refrigerator, fan, and microwave (no text or symbols)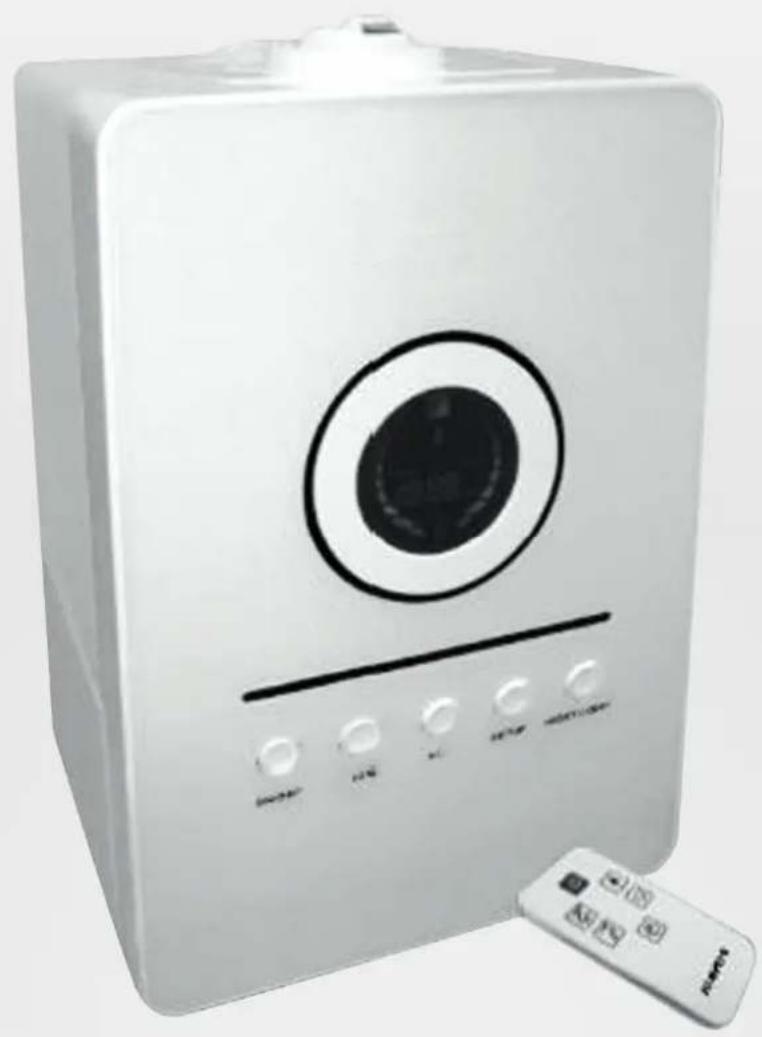
natural_image
White portable water heater with circular vent and control buttons, next to a remote control (no visible text or symbols)Bedienfeld
natural_image
Close-up of a hand using a tool to adjust or install a mechanical component, no visible text or symbolsDen Wassertank reinigen
natural_image
Close-up of a mechanical device with a hand holding a tool, showing internal components and no visible text or symbols.natural_image
Two black-and-white photos showing a hand holding a cylindrical container with a lid, and a close-up of a plastic jar with a lid (no text or symbols visible)natural_image
Three-panel black-and-white photo showing a hand adjusting a battery casing, with no visible text or symbols.natural_image
Three-panel black-and-white photo showing hands installing or adjusting a mechanical component, no visible text or symbolsnatural_image
Two black-and-white photos showing hands operating a black circular button on a square device, no text or symbols visible.natural_image
Close-up of a black plastic mechanical component with ridged surface and flange (no text or symbols visible)natural_image
Symbol of a trash bin crossed with a diagonal line, no text or numbers presentThe inner ultrasonic transducer is highly sensitive. Do not touch it with bare fingers or scrape it with metal tools, or it will reduce mist output. When cleaning this area, please use a small cleaning brush, cotton swab or tooth brush. Do not use hot water as it may damage the misting parts.
Use proper voltage - AC 100-240 V 50I60HZ 30 W. Use of improper voltage may cause fire hazard or electric shock.
To prevent electric shock, do not dismantle, repair or modify this product. Maintenance and cleaning should be followed exactly as instructed in this manual. In the event of a malfunction, please contact a professional maintenance centre.
Do not use in areas where flammable or explosive materials are stored.
Do not place this device in direct sunlight or near objects that generate high temperature heat. The heat may cause deformation or warping of the outer casing.
Do not use the humidifier in a room that already has humidity levels above 65% relative humidity. Excessive humidity in the room gives rise to condensation on cold surfaces such as walls or windows. Do not operate the unit without water in the basin.
Do not insert foreign objects into the device. Do not touch the transducer or the lower water basin when the unit is operating. Do not scratch the transducer.
Do not submerge this device in water. Water or cleaning liquids may only be used on parts to be cleaned according to the cleaning and maintenance instructions.
Only use lime scale remover or vinegar to clean mineral deposits from the basin or transducer. Do not use any harsh detergents that may damage the unit.
If you smell an abnormal odour, please turn off and unplug the unit and call technical support.
Clean and dry the device before storage (including the removal of all water from the inside of the device). Store the machine in a cool and dry place outside the reach of children.
Do not use fabrics or other materials to cover this device. Obstructed air inlets and outlets will result in improper operation of this unit and may result in fire or other damage.
To prevent interference and damage to other electronic devices, this machine should be placed at least 1 meter away from a computer, television, radio or other electronic equipment.
The ultrasonic humidifier should be cleaned regularly for proper operation and long life. See cleaning instructions For safety reasons and to prevent fire or electric shock, unplug the power cord from the electric outlet socket whenever you:
- Do not use the device for a long period of time.
- Remove the tank, clean or service the machine or the permanent filter.
- Move or transport the device.
If the power cord is damaged, then it must be replaced by an authorised service person to prevent electric shock or fire.
Product Description
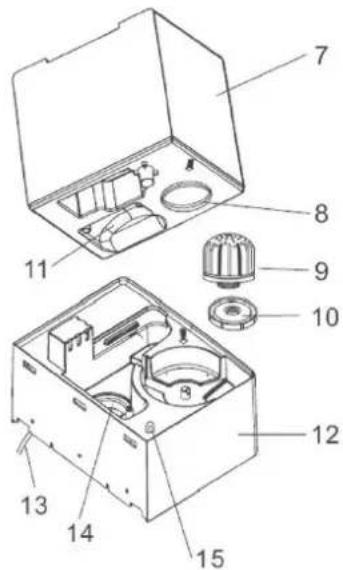
Components:
1 Output jets
2 Top water tank handle
3 Front Panel
4 Digital display
5 Night-light
6 Control buttons
7 BL (1.6 gal) water tank
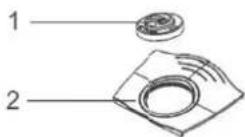
8 Water tank opening for fi lling
9 Permanent reusable while dust & Anti-Microbial Filter
10 Water tank lid and seal
11 Handle for convenience when refi lling/caring water tank
12 Lower body and basin
13 Power Cord
14 Transducer
15 Power Light
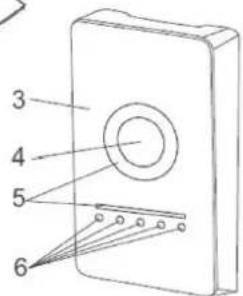
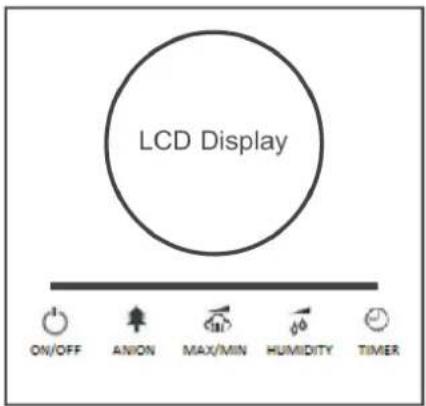
Control Panel
The device can be controlled by fi ve Buttons located on the front of the control panel under the display.
LED Display Buttons
ON/OFF Switches the humidifier on/off
ANION Switches anion on/off
MAX/MIN Sets mist speed to different levels
HUMIDITY Choose to setup mist volume, humidity
TIMER Sets timer
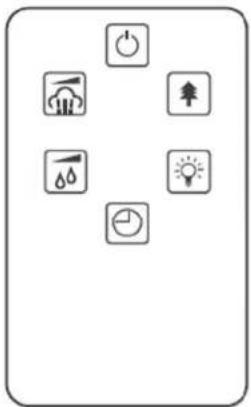
Remote Control
The unit is equipped with a very useful remote control. The remote control duplicates the six-button control panel just below the humidifier's LCD display.
You can activate the remote control by removing the protective fi lm from the battery area located at the bottom edge of the unit just below our logo.
natural_image
Pure electrical circuit symbols without any text or labels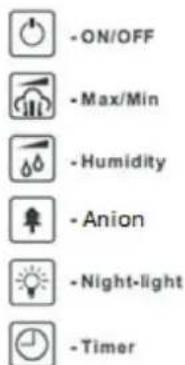
LED Display
The LED display shows the numeric values for temperature and relative humidity and the length of time remaining on the timer. It also displays the icons used to indicate other humidifier functions.
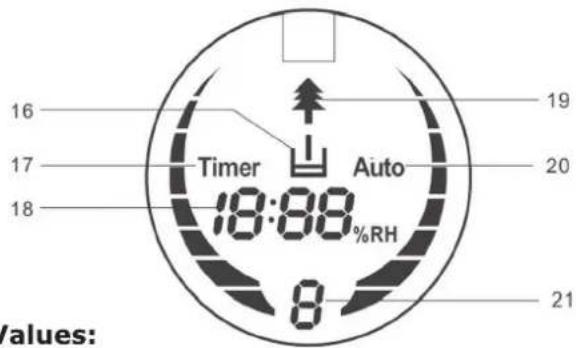
LED Display Icons and Values:
16 Empty water tank indicator icon
17 Timer setting on/off indicator icon
18 Value of time remaining in timer, Shows values for both the desired relative humidity and the actual relative humidity
19 Ions on/off! Indicator icon
20 Humidity setting on/off indicator Icon
21 Mist volume indicator (low, medium and high)
Operating Instructions
Before getting started. please remove the SPS-807 from its box and allow it to become accustomed to the room temperature for at least 30 minutes especially if the machine is cold from the outside air. The SPS-807 is designed to operate at temperatures between 5-40°C and relative humidity of less than 80%.
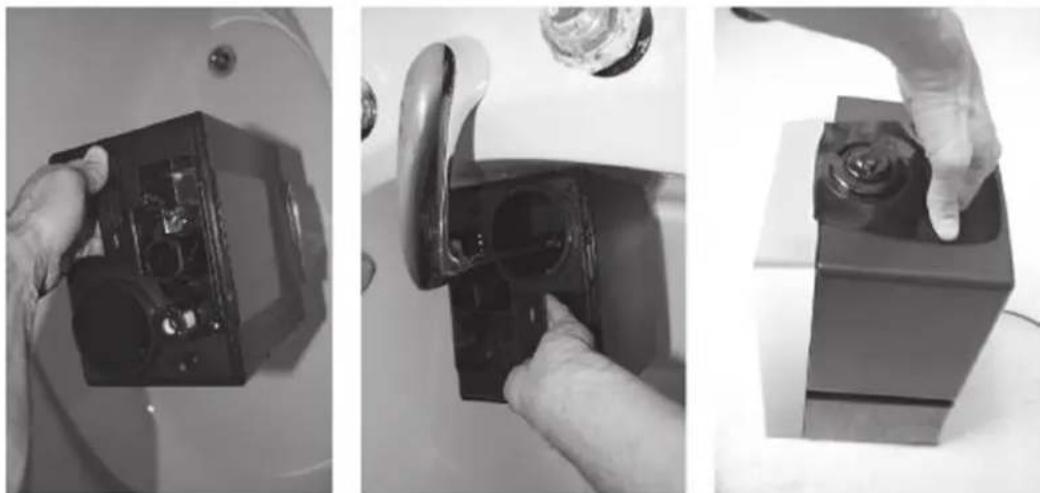
To get started, grasp the water tank by the handle at the top and lift from the base. Next fl ip the tank over and unscrew and remove the water tank lid antd filter

natural_image
Three-panel black-and-white photo showing a hand adjusting a battery casing, with no visible text or symbols.Then place the water tank under the faucet for fi lling' grasping it from the handle under the water tank. Fill the tank with tap water (or other clean water source with water temperature under 40°C),
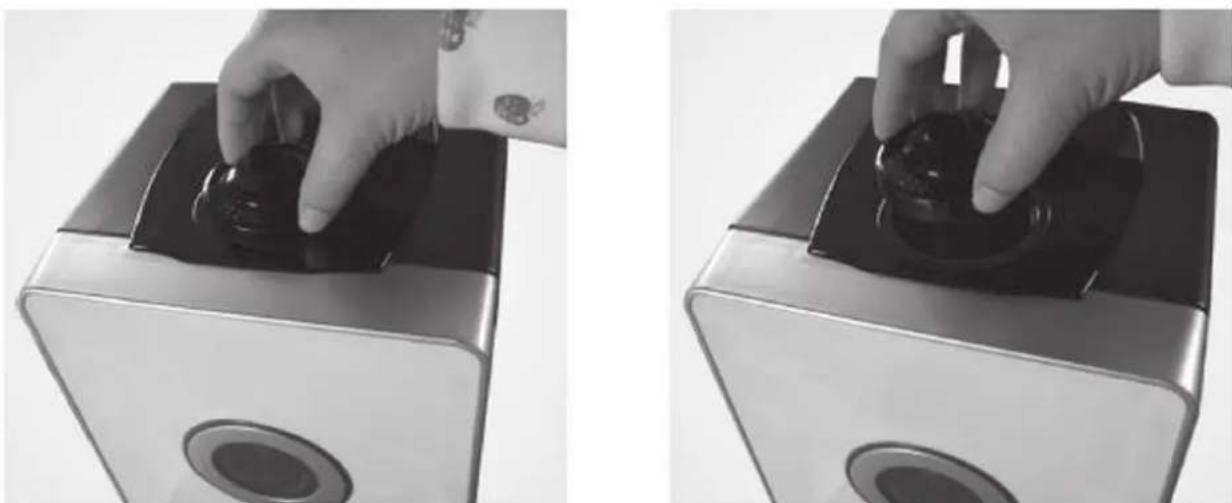
re-insert the lid and fi Iter Flip the water tank once again until it is right side up. Ensure that the basin is clean and then carefully place the water tank back on the lower body.
natural_image
Three-panel black-and-white photo showing hands installing or adjusting a device component, no visible text or symbolsWait a few seconds until the water tank lid starts to release water into the basin. You will hear a bubbling sound as the air enters the water tank. Plug the power cord into the electrical outlet (NEVER SWITCH ON THE HUMIDIFIER WITHOUT WATER IN THE BASIN). If the humidifier is switched off, the values for humidity will now be displayed.
Press the ON/OFF Button to activate the humidifier. The machine is now operating in manual mode. It will release cool mist on a constant basis with the mist intensity level automatically set to medium. The two jets at the top of the machine can be rotated to blow mist in two directions. You may also lift the jets from the water tank, adjust the positions and reinsert them back into the top of the water tank. The output jets should not be set to spray directly onto people, electrical devices or any obstructions. It is best to direct the jets into the open air.
natural_image
Two black-and-white photos showing hands operating a black circular device on a square base, with no visible text or symbols.The MAX/MIN Button changes the mist level (low, medium, high). This change is displayed on the LED screen by the mist volume indicator (#21). If the machine is in the automatic mode, it will automatically adjust the mist intensity.
Pressing the HUMIDITY button activates automatic mode (when the LED display starts to blink the word 'Auto'). You can select the desired humidity level by pressing HUMIDITY button repeatedly until the required humidity level is displayed (from 45% to 90% in increments of 5%). Once you select your desired humidity level, simply stop pressing the button and you humidity level will be set. Wait another 5 seconds and the numeric value on the LED display will switch to the current humidity level as measured by the built-in Hygrostat. When the humidity level in the room reaches the set humidity level, the machine will go into automatic sleep state and stop producing mist. When the rooms actual humidity level drops below your set humidity level, then the machine will start producing mist again.
You can deactivate automatic mode very easily by pressing the setup button until you reach 90% RH. Press the button one more time and you will now be in the manual mode. You will know that you are in the manual mode because the blinking 'Auto' Icon disappears.
Pressing ANION button will activate the anion generator and start sending healthy ions into the air, it will be represented by the tree icon (#19) displayed on the LED screen. Long press to switch on/off night-light and power light.
Pressing the TIMER button to set the timer (when the LED display starts to blink the word „Timer“)The timer function determines how many hours the humidifi er will operate. You can set the timer simply by pressing +I- once for each hour that you would like to run the unit. Many people set the timer for 8-9 hours (during their sleep) but it can be set from 1 hour to 12 hours. When the timer is set, the length of time is displayed in the middle of the LED display (#17). As time passes, the time value decreases until it goes to 00:00 and the machine shuts off.
Once you have set the automatic humidity and the timer, the value of time remaining in timer. the desired relative humidity and the actual relative humidity will displayed 40 seconds alternating in the middle of LED display( #18 )
If the humidifier should run out of water, you will hear a beeping sound before the machine will automatically shut off. The LED screen will display the Empty Water Tank icon (#16).
The bright LED display is designed to automatically dim alter 30 seconds of pressing any of the LED panel buttons. The power light is also dimmed because the water tank is tinted. The result is a soft blue glow. The light levels are bright enough to indicate that the machine is operating, yet low enough to ensure a restful sleep in near darkness.
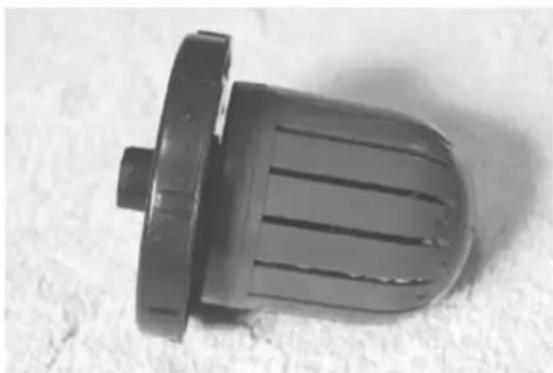
The SP8-807 is equipped with a Permanent Reusable White Dust & Anti-Microbial Filter. It consists of an inner cylinder, an outer cover and a number of small plastic and ceramic balls. The plastic balls are embedded with nano-silver, an anti-microbial agent designed to purify the water and destroy microbes such as bacteria and mould. The ceramic balls function to soften the water by adhering to minerals that cause white dust. They also serve to remove any unpleasant odour from the water. The filter requires cleaning about once a month or 1.000 hours of use. See the maintenance section of more information.
natural_image
Close-up of a black plastic mechanical component with ridged surface and flange (no text or symbols visible)Troubleshooting
| Trouble | Possible reasons | Solution |
| Power icon is off or does not work. | Humidifier is not plugged into the power outlet. | Connect power cord to electrical outlet and press power button. |
| Power light is on but no mist | No water in water tank. | Fill water tank with water. |
| The mist has a strange odour. | A new machine. | Remove the water tank, unscrew the lid and let it air out in a cool area for 12 hours. |
| It either has dirty water or the water has been stagnant too long. | Clean the water tank and refill with clean water. | |
| Power light is on, but the machine doesn't work. | Too much water in the water basin. | Remove the water tank. Take a small cup and remove some of the water from the machine's water basin. Reinsert the water tank and make sure that it sits properly. |
| The volume of spray mist is too low. | Too much mineral scale in the water basin. | Clean transducer. |
| Water is too dirty or water was kept too long in the tank. | Clean the water tank and refill with clean water. | |
| Abnormal noise | Vibration in the water tank because the water level is too low. | Fill the water tank. |
| Machine is on an unstable surface. | Move the unit to a stable flat surface. | |
| Spray mist is coming out of the area around the jets. | There are gaps between the housing around jet nozzles and the top of the water tank. | Remove the jet nozzle from the top of the water tank and clean with a damp cloth. Reattach to the water tank. |
The following is not considered faulty operation:
- If your water is very hard (containing abnormally high levels of minerals) the humidifier may produce white dust. This is not a malfunction. The solution would be to clean the filter more often or use softer water.
- If you stand very close to the humidifier, you will hear the gurgling sound of water. This is normal.
- The machine operates very quietly but it is not completely silent. Noise levels less than 35db is considered normal.
WARNING!
If the above recommended solutions do not work, please contact professional technical support. Do not attempt to disassemble, repair and reassemble the machine as it may void the warranty.
Cleaning and Maintenance
You can ensure many years of trouble free operation of your SPS—807 humidifi er by following a few simple maintenance procedures. If your water is hard, containing high concentrations of calcium and other minerals, then over a period of time white dust will start to deposit on the various surfaces in the room. A white, film-like substance will also start to develop in the water basin, on the transducer and on the inner surface of the water tank. This white fi lm will impede the proper function of the transducer and the operation of the machine.
We recommend the following:
- If your water is very hard, we recommend that you boil it first allow it to cool completely before use in the humidifi er. The boiling will reduce the mineral concentration in the water. The other option is to use distilled water if your mineral level is still too high.
- If you are using the machine on a daily basis, clean the transducer, water tank and basin once a week.
- When the water tank needs a refi II, empty the remaining water from the tank and fi ll it with fresh water.
- Clean the whole machine and make sure to keep all the parts completely dry when the machine is not in use.
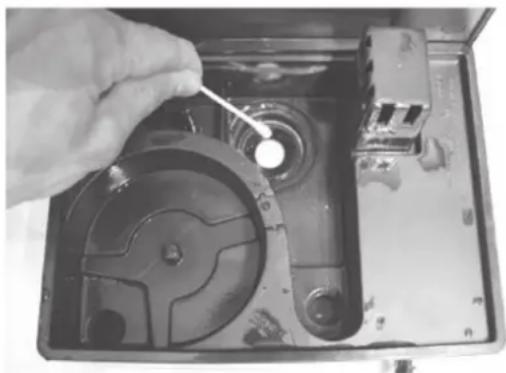
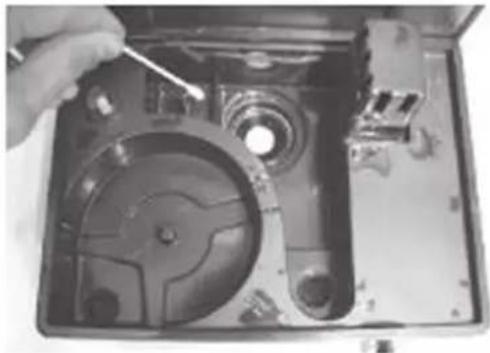
How to clean the transducer:
- Place 510 drops of vinegar on the surface of the transducer and wait for 2-5 minutes.
- Using a small brush, cotton swab or tooth brush. gently clean the mineral film from the surface of the transducer.
- Rinse the transducer with clean water.
- Never use sharp or solid objects for cleaning the transducer
natural_image
Close-up of a hand using a tool to adjust or install a CD drive into an open case (no visible text or symbols)How to clean the water basin:
-
Clean the water basin with a soft damp cloth. if there is excess film on the surfaces, then soak the cloth with vinegar and repeat the process.
-
If there is a fi lm in any of the depressions along the basin, drop a bit of vinegar into depression and clean it outwith a brush.
-
Rinse the basin with clean water.
natural_image
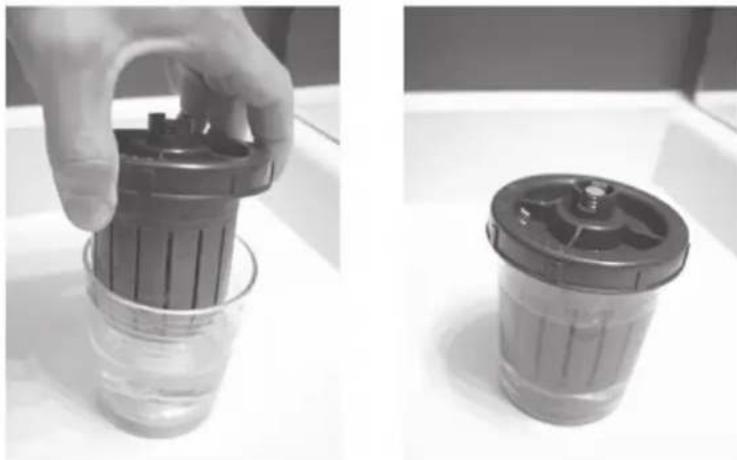
Close-up of a hand using a tool to adjust or install a mechanical component, showing internal parts and casing (no visible text or symbols)How to clean the White Dust & Anti-Microbial Filter:
- Remove the filter from the water lank.
- Put some white vinegar into a glass. Soak the filter in the vinegar for about 10 minutes
- Remove the filter from the glass and shake it several times.
- Clean and rinse the filter once again with fresh water.
natural_image
Two black-and-white photos showing a hand holding a cylindrical container with a lid, and a second empty container filled with liquid (no text or symbols visible)If you don not plan to use the humidifier for a long time. remove the filter from the water tank and let it dry thoroughly. Then wrap it in protective packaging and keep it next to the humidifier in a cool, dry and dark storage space.
How to change batteries in the remote control:
- Flip the remote on its side.
- Press the battery release on the bottom edge of the remote.
- Grasp the battery socket and pull the battery out.
- Replace battery with a lithium battery type CR2025.
Technical Data
Item number 10021651, 10021652
Power supply 220-240 V \~ 50-60 Hz
Disposal Considerations

natural_image
Simple line drawing of a trash bin with two crossed lines indicating no waste or prohibition (no text or symbols)According to the European waste regulation 2002/96/EC this symbol on the product or on its packaging indicates that this product may not be treated as household waste. Instead it should be taken to the appropriate collection point for the recycling of electrical and electronic equipment. By ensuring this product is disposed of correctly, you will help prevent potential negative consequences for the environment and human health, which could otherwise be caused by inappropriate waste handling of this product. For more detailed information about recycling of this product, please contact your local council or your household waste disposal service.
Your product contains batteries covered by the European Directive. 2006/66/EC, which cannot be disposed of with normal household waste. Please check local rules on separate collection of batteries. The correct disposal of batteries helps prevent potentially negative consequences on the environment and human health.
Declaration of Conformity
Producer: Chal-Tec GmbH, Wallstraße 16, 10179 Berlin, Germany.

This product is conform to the following European Directives:
2014/30/EU (EMC)
2014/35/EU (LVD)
2011/65/EU (RoHS)
Gentile Cliente,
natural_image
Pure electrical circuit symbols without any text or labels
natural_image
Close-up of a mechanical device with a hand holding a small component, no visible text or symbolsnatural_image
Close-up of a mechanical device with a hand holding a tool, showing internal components and casing (no visible text or symbols)natural_image
Two grayscale images showing a hand holding a black plastic container and a smaller cylindrical container (no text or symbols visible)natural_image
Hand holding a black rectangular electronic device with a circular top and base, no visible text or symbols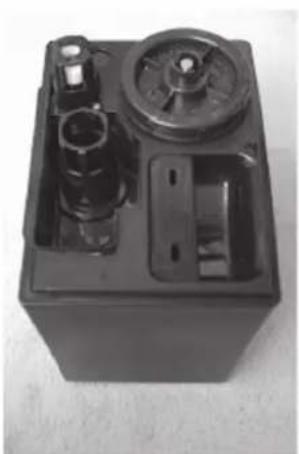
natural_image
Black rectangular battery casing with internal components and a dial (no visible text or symbols)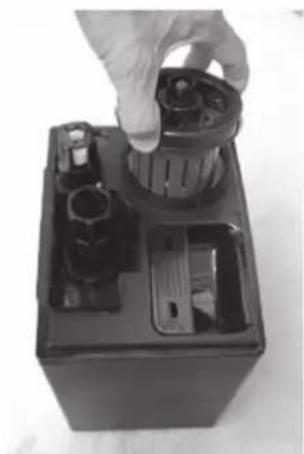
natural_image
Hand holding a cylindrical device inside a black battery casing, with no visible text or symbols.natural_image
Hand holding a black electronic device with visible ports and components, placed on a surface (no text or symbols visible)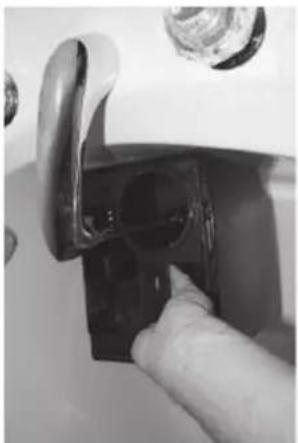
natural_image
Close-up of a hand inserting a small black plastic component into a white appliance handle (no text or symbols visible)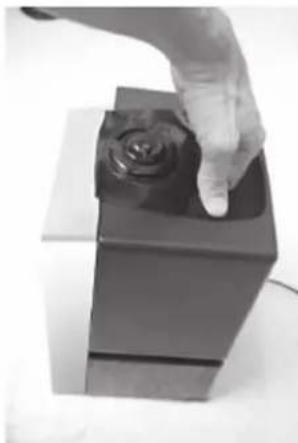
natural_image
Hand pressing a button on a black rectangular object with a rose (no text or symbols visible)natural_image
Two black-and-white photos showing hands operating a digital camera on a square base, no text or symbols visible.natural_image
Close-up of a black plastic push-button switch component (no text or symbols visible)natural_image
Symbol of a trash bin crossed with a diagonal line, no text or numbers presentTouches affi chage LED
natural_image
Pure electrical circuit symbols without any text or labels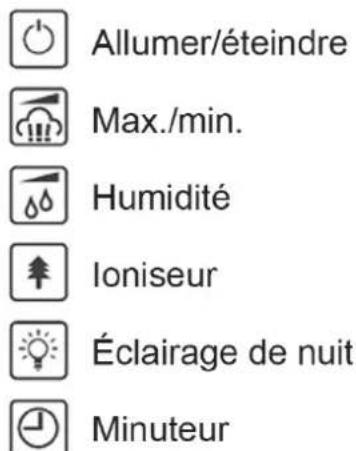
natural_image
Close-up of a hand holding a small object inside a device casing, with no visible text or symbols.natural_image
Close-up of a mechanical device with a hand adjusting a tool, showing internal components and no visible text or symbols.natural_image
Two grayscale photos showing a hand holding a container with a lid, and a close-up of a plastic container with a lid (no text or symbols visible)natural_image
Hand pressing a button on a black mechanical device (no visible text or symbols)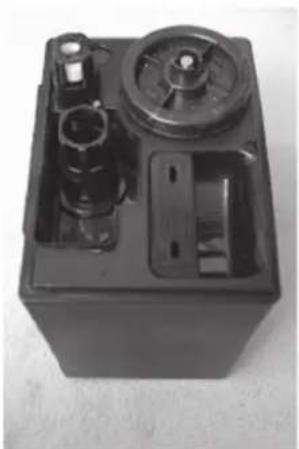
natural_image
Black plastic electrical box with internal components and mounting holes (no visible text or symbols)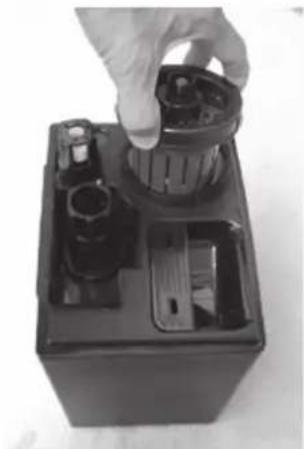
natural_image
Hand placing a cylindrical component into a black battery casing (no visible text or symbols)natural_image
Hand holding a black electronic device with a circular button, mounted on a white surface (no visible text or symbols)
natural_image
Close-up of a hand inserting a black plastic component into a door handle (no text or symbols visible)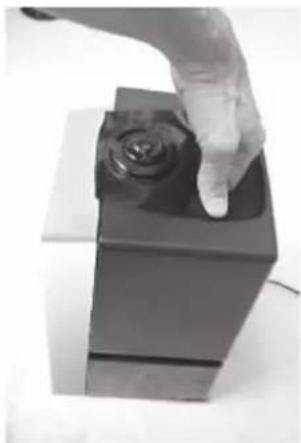
natural_image
Hand touching a black square object with a rose on top (no text or symbols visible)natural_image
Two black-and-white photos showing hands operating a digital camera on a square base, no text or symbols visible.natural_image
Symbol of a trash bin crossed with a diagonal line, no text or numbers presentPanel de control
natural_image
Pure electrical circuit symbols without any text or labels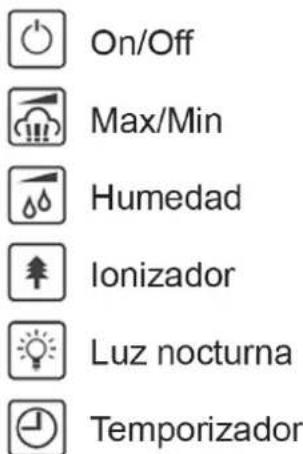
natural_image
Close-up of a hand using a tool to adjust or install a mechanical component, no visible text or symbols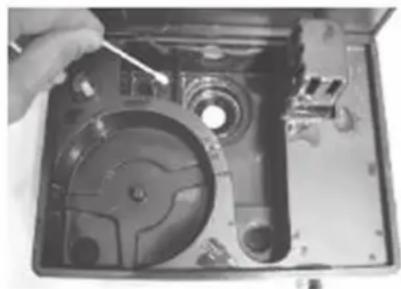
natural_image
Close-up of a hand using a tool to adjust or install a CD drive into an open case (no visible text or symbols)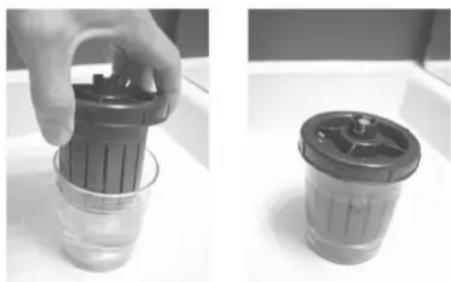
natural_image
Two grayscale photos showing a hand holding a cylindrical container and a lid, both placed on a white surface (no text or symbols visible)Reparaciones
natural_image
Three-panel black battery casing photo showing hand positioning, internal components, and final shipment (no visible text or symbols)natural_image
Three-panel black-and-white photo showing hands installing or adjusting a mechanical component, no visible text or symbolsnatural_image
Two black-and-white photos showing hands operating a digital camera on a square base, no text or symbols visible.natural_image
Close-up of a black plastic mechanical component with ridged surface and flange (no text or symbols visible)
- Bedienfeld
- Den Wassertank reinigen
- Product Description
- Components:
- Control Panel
- LED Display Buttons
- Remote Control
- LED Display
- LED Display Icons and Values:
- Operating Instructions
- WARNING!
- Cleaning and Maintenance
- We recommend the following:
- How to clean the transducer:
- How to clean the water basin:
- How to clean the White Dust & Anti-Microbial Filter:
- How to change batteries in the remote control:
- Technical Data
- Disposal Considerations
- Declaration of Conformity
- Gentile Cliente,
- Touches affi chage LED
- Panel de control
- Reparaciones
Brand : Klarstein
Model : 10021651
Category : Humidifier