Landroid L WR155E - Lawn mower WORX - Free user manual and instructions
Find the device manual for free Landroid L WR155E WORX in PDF.

User questions about Landroid L WR155E WORX
0 question about this device. Answer the ones you know or ask your own.
Ask a new question about this device
Download the instructions for your Lawn mower in PDF format for free! Find your manual Landroid L WR155E - WORX and take your electronic device back in hand. On this page are published all the documents necessary for the use of your device. Landroid L WR155E by WORX.
USER MANUAL Landroid L WR155E WORX
| Welcome | |
| Page 05 | Contact information |
| Page 06 | Safety Instruction |
| Page 10 | Information on Android |
| Get familiar with Android | |
| Page 11 | Component List |
| Page 11 | What's in the box |
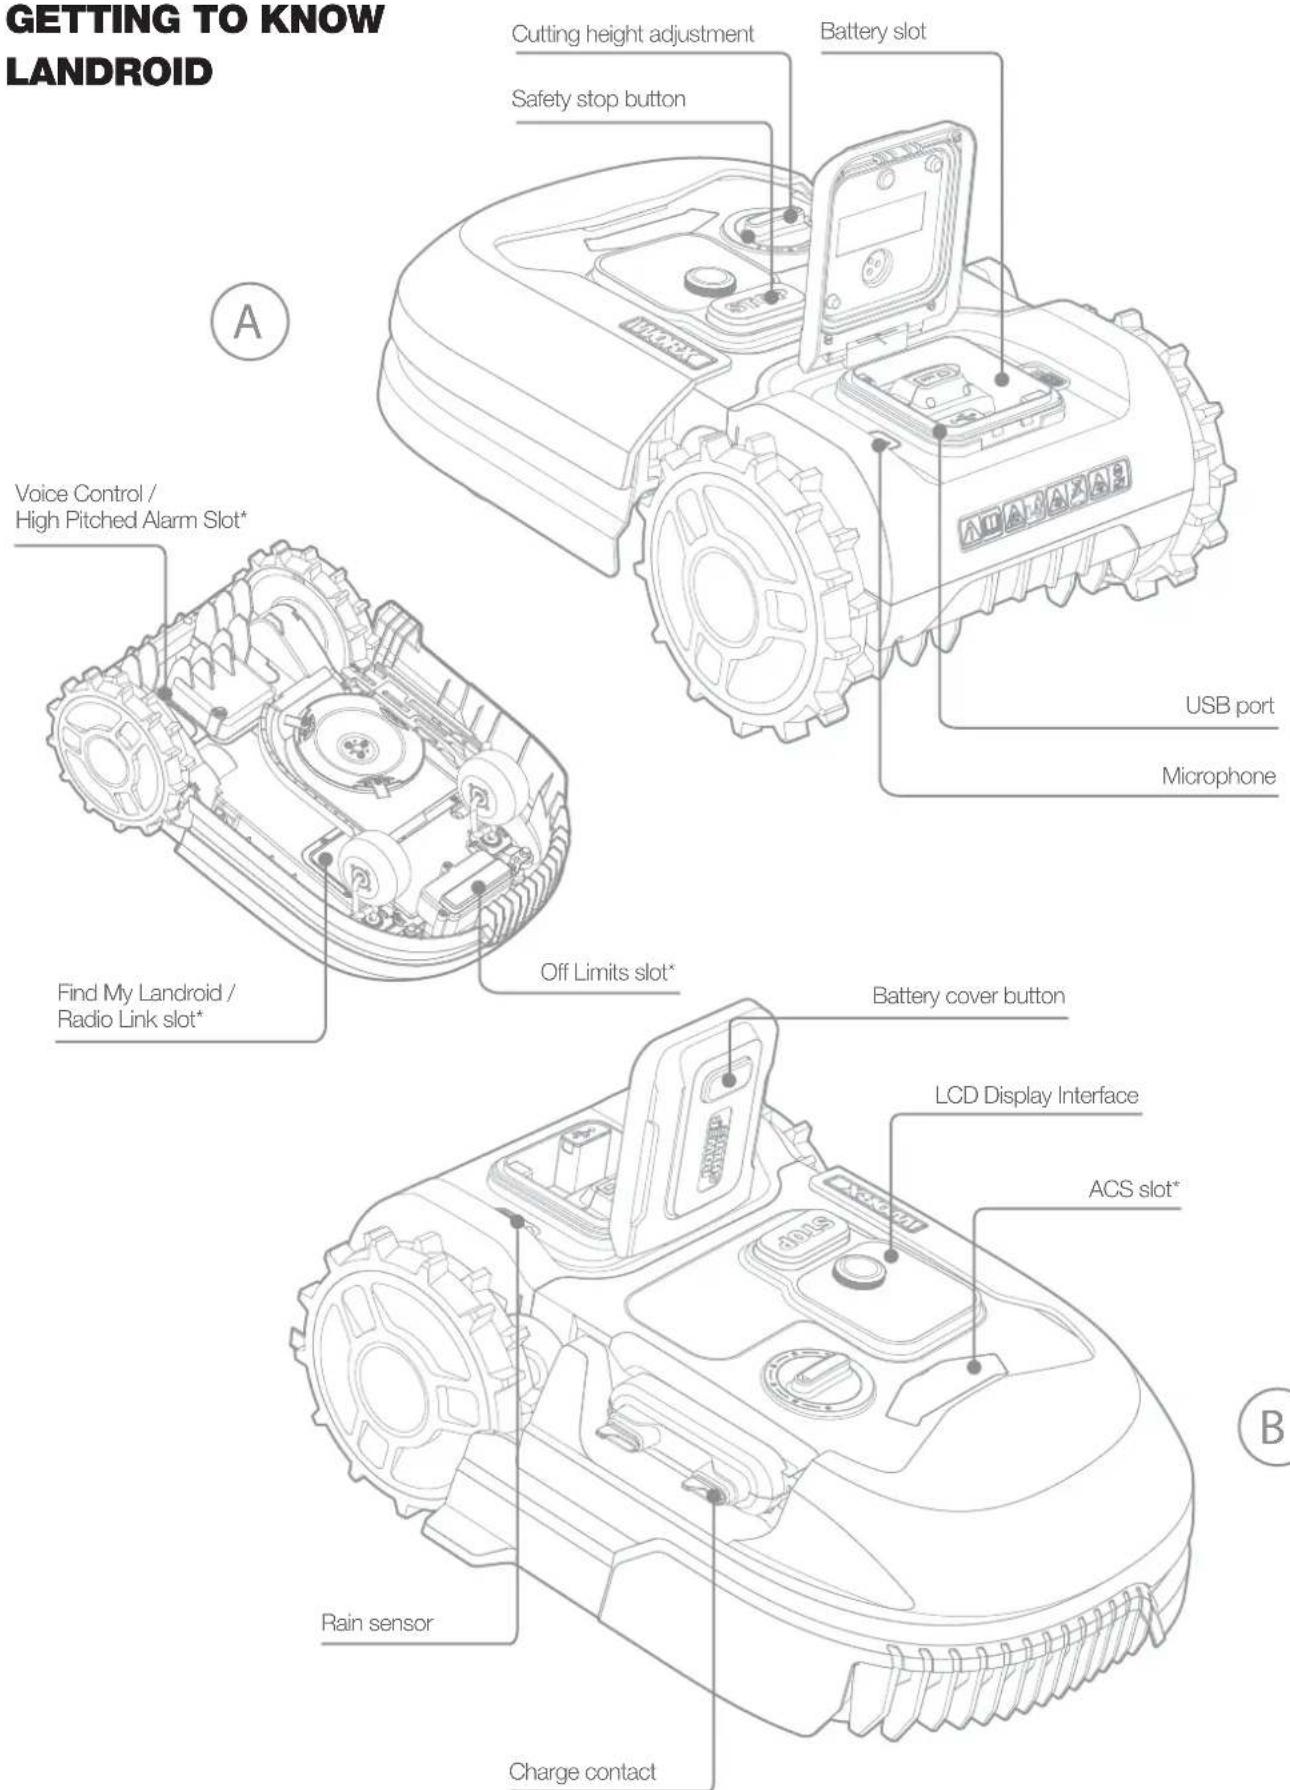
| Page 12 | Getting to know Android |
| Page 13 | Technical data |
| Page 14 | Accessories |
| Getting started | |
| Page 17 | Installation |
| Page 24 | Starting Android |
| Page 24 | Manual programming |
| Page 27 | Connecting Android to the Internet |
| Page 27 | Using the App |
| Maintenance | |
| Page 28 | Blades |
| Page 29 | Cleaning |
| Page 29 | Charging |
| Page 29 | Storage |
| Page 30 | Firmware Updates |
| Quick reference | |
| Page 31 | Operation messages |
| Page 31 | Error messages |
| Page 33 | Troubleshooting |
| Page 36 | Warranty |
Thank you for purchasing a Worx Android Robot Mower.
This manual will help you get set up and operate your Android safely and efficiently.
We're here to help:

Support
www.worx.com/Android-support

Customer Services Helpline
800-727-6260

Live Chat
www.worx.com/Android-support
WARNING: Some dust created by power sanding, sawing, grinding, drilling and other construction activities contains chemicals known to the State of California to cause cancer, birth defects or other reproductive harm. Some examples of these chemicals are:
- Lead from lead-based paints;
- Crystalline silica from bricks and cement and other masonry products;
- Arsenic and chromium from chemically-treated lumber.
Your risk from these exposures varies, depending on how often you do this type of work. To reduce your exposure to these chemicals: work in a well ventilated area, and work with approved safety equipment, such as those dust masks that are specially designed to filter out microscopic particles.
WARNING: This product can expose you to chemicals including lead and Di(2-ethylhexyl)phthalate (DEHP) which are known to the State of California to cause cancer and birth defects or other reproductive harm. For more information go to www.P65Warnings.ca.gov.
WARNING: Read all safety warnings and all instructions. Failure to follow the warnings and instructions may result in electric shock, fire and/or serious injury.
Carefully read the instructions for the safe operation of the machine. Save all warnings and instructions for future reference.
-
This appliance is not intended for use by persons (including children) with reduced physical, sensory or mental capabilities, or lack of experience and knowledge, unless they have been given supervision or instruction concerning use of the appliance by a person responsible for their safety.
-
Children should be supervised to ensure that they do not play with the appliance.
WARNING: For the purposes of recharging the battery, only use the detachable supply unit provided with this appliance.
WARNING: To reduce the risk of injury to persons and damage to the machine, do not remove battery pack before switching off the machine.
IMPORTANT
READ CAREFULLY BEFORE USE
KEEP FOR FUTURE REFERENCE
Safe operation practices
Training
a) Read the instructions carefully. Make sure you understand the instructions and be familiar with the controls and the proper use of the appliance.
b) Never allow people unfamiliar with these instructions or children to use the appliance. Local regulations can restrict the age of the operator.
c) The operator or user is responsible for accidents or hazards occurring to other people or their property.
Preparation
a) Ensure the correct installation of boundary wire as instructed.
b) Periodically inspect the area where the appliance is to be used and remove all stones, sticks, wires, bones, and other foreign objects.
c) Periodically visually inspect to see that the blades, blade bolts and cutter assembly are not worn or damaged. Replace worn or damaged blades and bolts in sets to preserve balance.
d) On multi-spindle appliances, take care as rotating one blade can cause other blades to rotate.
e) WARNING! The lawnmower shall not be operated without the guard in place.
Operation
1. General
a) Never operate the appliance with defective guards, or without safety devices, for example deflectors, in place.
b) Do not put hands or feet near or under rotating parts. Keep clear of the discharge opening at all times.
c) Never pick up or carry an appliance while the motor is running.
d) Operate the disabling device from the appliance
- Before clearing a blockage;
- Before checking, cleaning or working on the appliance.
e) It is not permitted to modify the original design of robotic lawnmower. All modifications are made at your own risk.
f) Start robotic lawnmower according to the instructions. When the power key is switched on, make sure you keep your hands and feet away from the rotating blades. Never put your hands and feet under the mower.
g) Never lift up robotic lawnmower or carry it when the power key is switched on.
h) Do not let persons who do not know how robotic lawnmower works and behaves use the mower.
i) Do not put anything on top of robotic lawnmower or its charging station.
j) Do not allow robotic lawnmower to be used with a defective blade disc or body. Neither should it be used with defective blades, screws, nuts or cables.
k) Always switch off robotic lawnmower when you do not intend to use the mower. Robotic lawnmower can only start when the power key is switched on and the correct PIN code has been entered.
L) Keep your hands and feet away from the rotating blades. Never place your hands or feet close to or under the body when robotic lawnmower is in operation.
m) To avoid using the machine and its peripherals in bad weather conditions especially when there is a risk of lightning.
n) Not to touch moving hazardous parts before these have come to a complete stop.
2. Additionally when the appliance is operating automatically
a) Do not leave the machine to operate unattended if you know that there are pets, children or people in the vicinity.
Maintenance and storage
WARNING! When the mower is turned upside down the power key must always be switched off.
The power key should be switched off during all work on the mower's underframe, such as cleaning or replacing the blades.
a) Keep all nuts, bolts and screws tight to be sure the appliance is in safe working condition.
b) Inspect the robotic lawnmower each week and replace worn or damaged parts for safety.
c) Check especially that the blades and blade disc are not damaged. Replace all blades and screws at the same time if necessary so that the rotating parts are balanced.
d) Ensure that only replacement cutting means of the right type are used.
e) Ensure that batteries are charged using the correct charger recommended by the manufacturer. Incorrect use may result in electric shock, overheating or leakage of corrosive liquid from the battery.
f) In the event of leakage of electrolyte flush with water/neutralizing agent, seek medical help if it comes into contact with the eyes etc.
q) Servicing of the appliance should be according to manufacturers' instructions.
Recommendation
To connect the machine and/or its peripherals only to a supply circuit protected by a residual current device (RCD) with a tripping current of not more than 30mA .
Residual risks
To avoid injuries, wear protective gloves when replacing the blades.
Transport
The original packaging should be used when transporting robotic lawnmower over long distances. To safely move form or within the working area:
a) Press the STOP button to stop the mower.
You select the four digit PIN code when you start the mower for the first time.
b) Always switch off robotic lawnmower if you intend to carry the mower.
c) Carry the mower by the handle at the rear under the mower. Carry the mower with the blade disc away from the body.
To satisfy FCC & IC RF exposure requirements, a separation distance of 20cm or more should be maintained between the antenna of this device and persons during device operation. To ensure compliance, operations at closer than this distance is not recommended.
This device complies with Part 15 of the FCC Rules.
Operation is subject to the following two conditions:
(1) This device may not cause harmful interference, and
(2) This device must accept any interference received, including interference that may cause undesired operation.
WARNING: Changes or modifications to this unit not expressly approved by the party responsible for compliance could void the user's authority to operate the equipment.
NOTE: This equipment has been tested and found to comply with the limits for a Class B digital device, pursuant to Part 15 of the FCC Rules.
These limits are designed to provide reasonable protection against harmful interference in a residential installation. This equipment generates, uses and can radiate radio frequency energy and, if not installed and used in accordance with the instructions, may cause harmful interference to radio communications.
However, there is no guarantee that interference will not occur in a particular installation. If this equipment does cause harmful interference to radio or television reception, which can be determined by turning the equipment off and on, the user is encouraged to try to correct the interference by one or more of the following measures:
Reorient or relocate the receiving antenna.
- Increase the separation between the equipment and receiver.
- Connect the equipment into an outlet on a circuit different from that to which the receiver is connected.
- Consult the dealer or an experienced radio/TV technician for help.
This device contains licence-exempt transmitter(s)/receiver(s) that comply with Innovation, Science and Economic Development Canada's licence-exempt RSS(s). Operation is subject to the following two conditions:
(1) This device may not cause interference.
(2) This device must accept any interference, including interference that may cause undesired operation of the device.
Limited by local law regulations, version for North America does not have region selection option.
SafetyWarnings for battery pack
a) Do not dismantle, open or shred battery pack.
b) Do not expose battery pack to heat or fire. Avoid storage in direct sunlight.
c) Do not short-circuit a battery pack. Do not store battery packs haphazardly in a box or drawer where they may short-circuit each other or be short-circuited by other metal objects. When battery pack is not in use, keep it away from other metal objects, like paper clips, coins, keys, nails, screws or other small metal objects, that can make a connection from one terminal to another. Shorting the battery terminals together may cause burns or fire.
d) Do not subject battery pack to mechanical shock.
e) In the event of battery leaking, do not allow the liquid to come in contact with the skin or eyes. If contact has been made, wash the affected area with copious amounts of water and seek medical advice.
f) Do not use any battery pack which is not designed for use with the equipment.
g) Keep battery pack out of the reach of children.
h) Always purchase the battery pack recommended by the device manufacturer for the equipment.
i) Keep battery pack clean and dry.
j) Wipe the battery pack terminals with a clean dry cloth if they become dirty.
k) Battery pack needs to be charged before use. Always use the correct charger and refer to the manufacturer's instructions or equipment manual for proper charging instructions.
I) Do not leave battery pack on prolonged charge when not in use.
m) After extended periods of storage, it may be necessary to charge and discharge the battery pack several times to obtain maximum performance.
n) Recharge only with the charger specified by Worx Do not use any charger other than that specifically provided for use with the equipment.
o) Retain the original product literature for future reference.
p) Use only the battery pack in the application for which it was intended.
q) Remove the battery pack from the equipment when not in use.
r) Dispose of properly.
s) Do not mix cells of different manufacture, capacity, size or type within a device.
t) Keep the battery away from microwaves and high pressure.
WARNING - robotic lawn mowers can be dangerous if incorrectly used. Read through the Operator's manual carefully and understand the content before using your robotic mower.
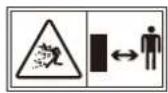
WARNING - Keep a safe distance from the machine when operating.

WARNING - Activate the disabling device before working on or lifting the mower.
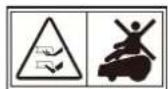
WARNING - Do not ride on the mower.

Li-Ion
Li-Ion battery, battery must be recycled

Do not burn

Batteries may enter water cycle if disposed improperly, which can be hazardous for ecosystem. Do not dispose of waste batteries as unsorted municipal waste.
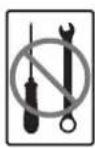
Do not disassemble mower. Repairs should be made only by authorized repair personnel.

call②recycle
POSITEC Inc. has established a partnership with the RBRC Corporation to recycle any Positec batteries with the RBRC-call2recycle seal. For environmental protection, please do not discard batteries in the trash. After the batteries' life cycle is ended, then please call 1-800-822-8837 for a free service that will properly dispose of the battery.

Class III mower
You can customize your Android's performance with accessories. Visit www.worx.com/lawn-garden/ robotic-lawn-mowers.html to learn more about these available accessory options.
COMPONENT LIST
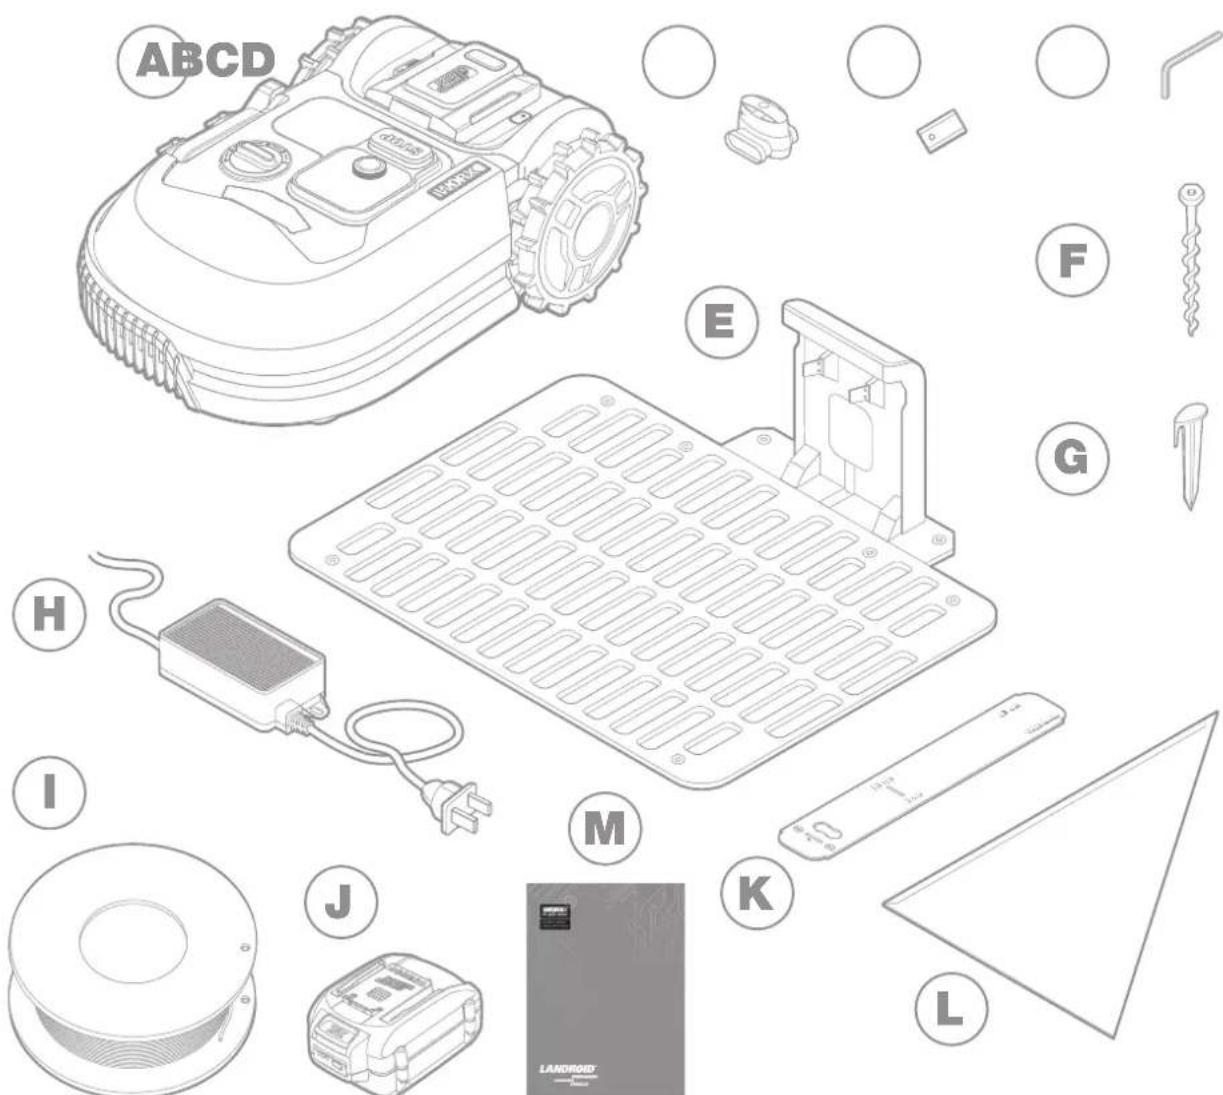
The picture is only for reference
A Worx Android
B Boundary wire connectors
C Sparebladekit
D Hex key
E Charging Station
F Charge base fixing screws
G Wire pegs
H Power supply
Boundary wire
J 20V battery
K Boundary wire distance gauge
L Bertelsen Ruler
M Manual
The picture is only for reference *Accessories:
TECHNICAL DATA
| MODEL | WR165 WR147 | WR155 | |
| Rated voltage 20V Max.* | --- | ||
| No load speed (/min) 2800 2400 2400 | |||
| Cutting area (acre) 1/8 1/4 1/2 | |||
| Cutting diameter (in.) 7" 8" 8" | |||
| Cutting height (in.) | 2.0" - 3.5" | 1.5"-3.5" | 1.5"-3.5" |
| Cutting height positions | 6 | ||
| Battery type | Lithium-ion | ||
| Battery model included | WA3575.3 | WA3578.3 | WA3671 |
| Charging time approx. (mins) | 75 | 75 | 115 |
| Android Charger model | WA3795 | WA3752 | |
| Charger rating | Input: 120 V~60 Hz, 38 W, Output: 20 V --- , 1.5 A | Input: 120 V~60 Hz, 90 W, Output: 20 V --- , 3.0 A | |
| Machinery weight (lbs) | 23.1 | 25.6 | 25.8 |
| Protection degree | III | ||
| App (WIFI/Bluetooth) | Y | ||
| Frequency band of embedded WLAN module | 2.412GHz-2.484GHz | ||
| Max. radio-frequency power of embedded WLAN module | 802.11b:+16±2dBm(@11Mbps)802.11g:+14±2dBm(@54Mbps)802.11n:+13±2dBm(@HT20,MCS7) | ||
| Frequency band of inductive loop systems | 77 Hz | ||
| Max. radio-frequency power of inductive loop systems | 82 dBμA/m | ||
- Voltage measured at no load. Initial battery voltage reaches maximum of 20 volts. Nominal voltage is 18 volts.
WHAT'S IN THE BOX
| MODEL | WR165 WR147 | WR155 | |
| Boundary wire (feet) 426.5 | 590.5 820.2 | ||
| Spare cutting blades 9 | |||
| Hex key 1 | |||
| Charging station 1 | |||
| Charging station fixing screws 8 | |||
| Wire pegs 180 | 250 340 | ||
| Power supply WA3795 WA3752 WA3752 | |||
| Boundary wire connectors | 2 | ||
| Battery pack WA3575.3 WA3578.3 WA3671 | |||
| Boundary wire distance gauge | 1 | ||
| Bertelsen Ruler | 1 | ||
| Manual | 1 | ||
We recommend that you purchase genuine replacement parts listed in the above list from the same store that sold you the mower. Refer to the accessory packaging for further details.
INTENDED USE
This product is intended for domestic lawn mowing. It is designed to mow often, maintaining a healthier and better looking lawn than ever before. Depending on the size of your lawn, your Landroid may be programmed to operate at any time or frequency.
ACCESSORIES AVAILABLE FOR PURCHASE
| Accessory | Model# |
| Find my Android | WA0866 |
| Anti-Collision Control | WA0860 |
| Off Limits Digital Fence | WA0892 |
| Android Radio Link | WA0867 |
| Android Garage | WA0810 |
| *More accessories available for purchase on Worx.com | |
HOW LANDROID WORKS
Landroid is an autonomous machine, capable of operating on its own. It knows when it needs to go to its charging station, can sense when it is raining, can stop itself if it senses a problem and knows to stop, draw back, and turn around when it bumps into something blocking its path. To prevent an accident, Landroid will also automatically stop its blade disc from rotating if it is lifted off the ground.
Self-Charging

When your Landroid needs to recharge, it will stop mowing and follow the boundary wire back to its charging station. Once charging is complete, Landroid will automatically resume mowing or stay in the charging station according to its mowing schedule.
Edge/Perimeter Mowing

Android is programmed to mow the grass along the perimeter of your lawn twice a week on Monday and Friday. If you want to change this pre-set, you can modify it via the Android App or by using the control panel in "Work time-Customize Work time" menus. See detailed instructions at the end of this manual. If you enable the Auto Schedule feature in the App, you cannot manually adjust the Border Cut feature.
Rain sensor

Landroid is weather resistant and happy to be outside. But mowing wet grass does not give you the best finish or result. Landroid is equipped with a rain sensor which detects rain and tells Landroid to stop mowing and go back to its charging station.
Rain delay time

After a rainfall, Landroid re-starts when the grass is no longer wet. The default Rain Delay time is 180 minutes. You can change the Rain Delay time setting via the Landroid App. You can also adjust this from the control panel in "General Settings-Rain Start Delay" menus.
In more extreme weather

In case of a lightning storm, protect Android by unplugging the charging station, disconnect the boundary wire, and make sure Android is not able to charge. In the winter and especially in case of very cold weather and snow, we recommend you store your Android inside.
No more grass clippings to collect

Landroid's daily mowing produces very short clippings that don't need to be de-thatched. These clippings are a perfect organic nutri
Cut to edge

The special offset blade gets as close as possible to the border of your lawn, leaving you little trimming to do.
Cutting Height

Before starting your Landroid for the first time, make sure your grass is no longer than 4 in. If longer, use a regular mower to cut it before operating Landroid. If you want to drastically shorten the height of your grass, it is recommended that you do so progressively, by adjusting the cutting height in steps.
Security & PIN Protection

To prevent unauthorized usage, Android is protected by a PIN code that you can easily set up. Set up your PIN before first use. Be sure to record your PIN in a safe place. Default PIN is 0000 or AAAA (depending on the model).
Hose cleaning

You can hose Landroid off to get rid of dirt, grass and grime that it picks up while mowing. Keep Landroid looking and performing its best.
GroundTracer

With the new auto-lifting design, its blades can raise automatically due to its floating disc, which gives it more clearance. This helps Landroid avoid certain situations that would block other robotic mowers.
INSTALLATION
It is recommended you carefully follow these installation instructions to properly install your Android. In addition to the manual, you can access comprehensive video tutorials on our YouTube Channel (Worx Tools).
This information is provided for your convenience but the video information provided online does not replace the instruction manual and the safety instructions that need to be read and understood.

Plan out your installation
Install the charging station
Lay the boundary wire
Connect charging station to AC
Power up
Landroid.
Test and get ready to mow
EVERY MINUTE SPENT IN PLANNING SAVES YOU 10 MINUTES IN EXECUTION
Instanding Landroid is even easier if you have made a clear plan of what you need to do. Proper planning will also help you avoid mistakes or having to rework the installation once it's done.
1. On the surface or buried?
Landroid's boundary wire is designed to stay on the surface of your lawn. Nearly invisible from the first day, it will be engulfed in the soil in a few weeks. If you will want to bury the wire, it is recommended to first peg it down and test the installation is successful by running Landroid over the perimeter. This allows you to easily test that the installation is successful and, if necessary, change the layout before burying the wire. Bury the wire no more than a few centimetres below ground level, so that the wire maintains a good signal.
2. Plan for the charging station
The charging station is where your Landroid goes to have its battery recharged. It's also the home where it rests in between mowing sessions.
Locate a proper position for it, bearing in mind:
A. It needs to be powered, so it should be no more than 32 ft away from an AC outlet. Using a GFCI outlet is recommended.
B. If possible, choose a shaded area to prevent the battery and charger from over-heating in direct sunlight. *Landroid Garage accessory available for purchase.
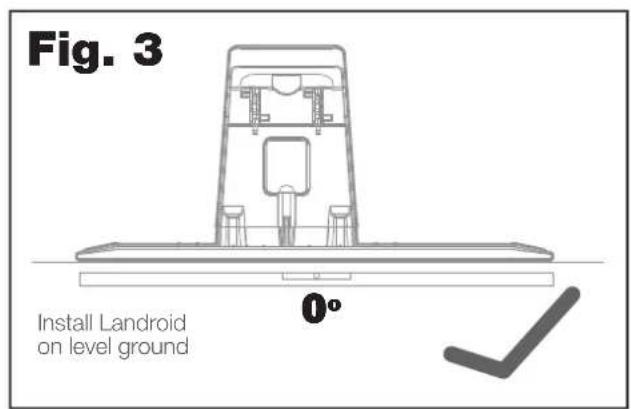
C. It should be placed on flat, level ground to ensure effective docking.
D. Avoid places close to irrigation sprinklers.
You can place the charging station on your lawn or on a hard surface like a walkway, provided that the lawn and the hard surface are at the same height (no steps).
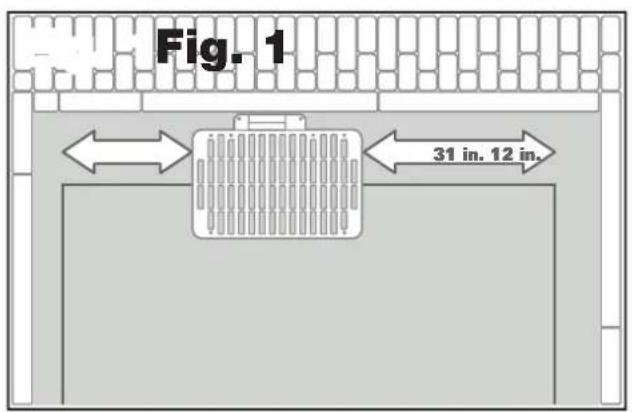
For Android to successfully dock in the charging station, the following measures will need to be taken when laying the first segments of boundary wire immediately entering and exiting the charging station.
- For the boundary wire leaving the charging station:
- There should be a minimum of 12 in. of wire coming straight from the station before any tums are made (fig. 1, left side of station).
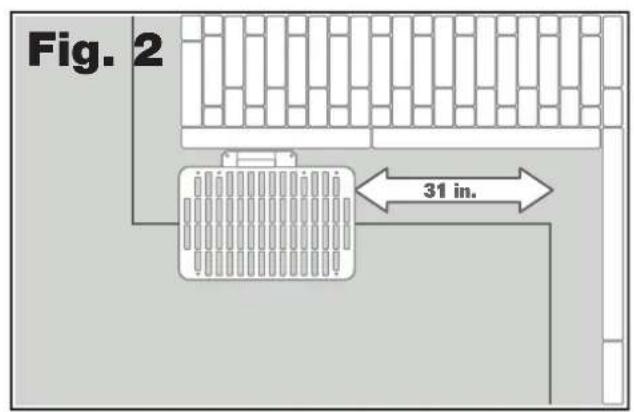
If the yard layout is such that the boundary wire makes an immediate right turn (fig. 2), then the distance requirement is not necessary. - For the boundary wire entering charging station:
- There should be minimum of 31 in. of wire going straight to the station (fig. 1, fig. 2).
3. Charging station checklist:
A. Within reach of AC outlet (GFCI outlet recommended).
B. In the shade (if possible).
C. Straight path on entrance; straight path on exit if necessary (fig. 1, fig. 2).
D. Flat land (fig. 3).
E. No irrigation sprinklers nearby.
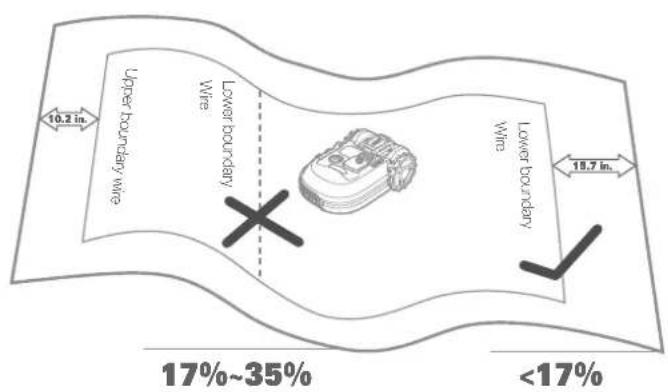
4. Placement of boundary wire on slopes
Landroid can handle slopes and inclines up to 35% or 20^ . Ensure that when you place the boundary wire, you do not place it at the bottom of the slope or incline of 17 - 35% to account for the extra gravitational force Landroid will have to overcome.
*How to calculate the slope of your lawn:
The slope would be:
$$ \frac{35\text{in.(Elevation)}}{100\text{in.(Length)}} = 35\% \text{(slope)} $$
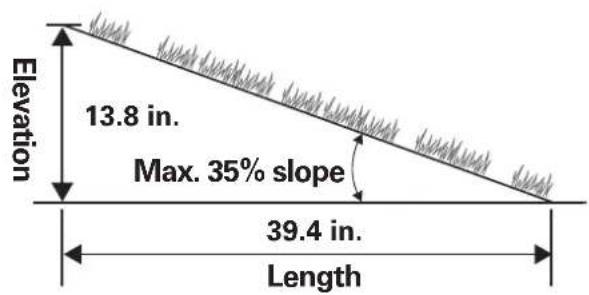
Two stakes can be placed 100 inches apart. With one stake at the bottom of the slope and the other on the slope. Tie a string to the bottom of the stake on the slope, ensure that it's leveled and tie it to the other stake. Measure the distance from the string to the ground. Use this value as the elevation in the formula.
5. Plan for the boundary wire
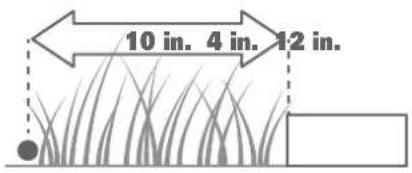
The wire has to be placed at a certain distance from the edge of the lawn. This distance changes depending on what's on the other side of the edge. Different parts of your lawn may have different border scenarios: ie. stone pavers, fence, patio, etc.
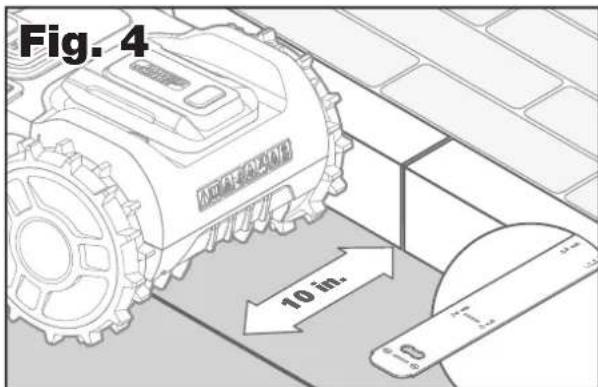
A. If the edge of the lawn borders a step: keep the wire 10 in. from the edge. (figure 1).
B. If the edge of the lawn borders a path of the same height: keep the wire 4 in. from the edge. (figure 2).
C. If the edge of the lawn borders a pool: keep the wire at least 12 in. from the edge. (figure 3).

123
If a side of your lawn borders a neighbor's lawn with a robotic mower in use, lay your wire at least 39 in. apart from your neighbor's wire to avoid possible interference.
PLAN YOUR INSTALLATION
Landroid is designed to manage the most complex of lawns. Carry out a visual inspection of your lawn so you are prepared for a trouble-free installation of the boundary wire.
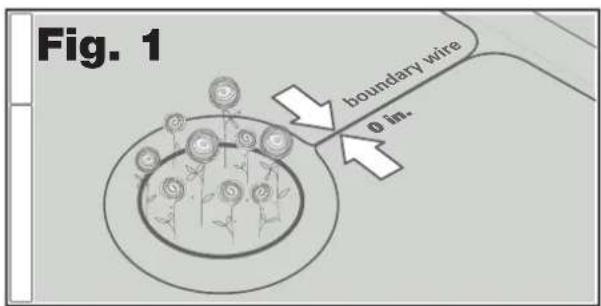
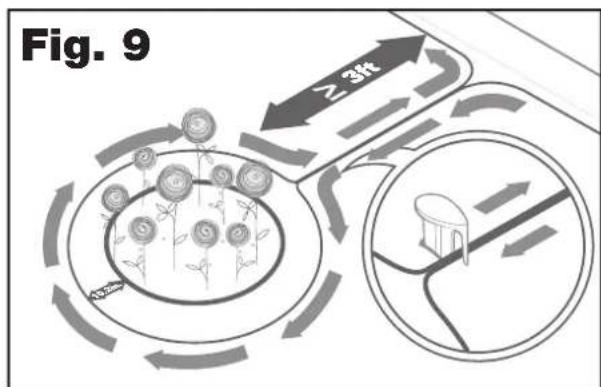
6. Identify Off-Limits Areas
You don't want Landroid to mow flowers, dive into water, or become immobilized on tree roots that are above ground. Locate these areas and surround them with boundary wire to prevent Landroid from accessing them.
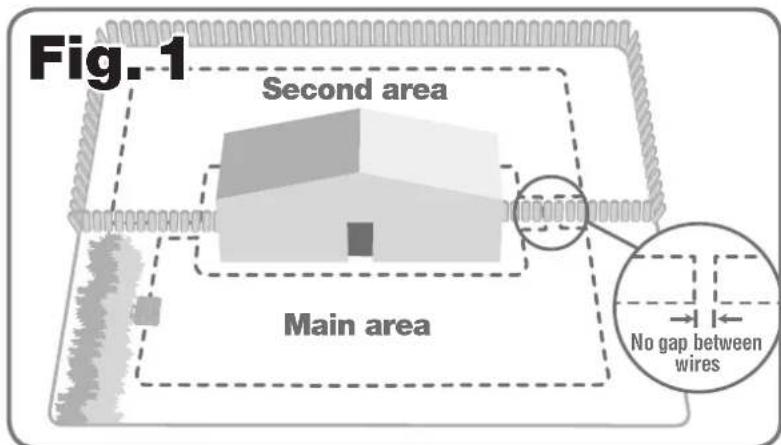
The boundary wire is a single loop that starts at the charging station, encircles your yard, and then terminates back at the charging station. To exclude the off-limits areas, the wire will need to be diverted at a right angle from the outer perimeter of the yard, directed towards the area, and then laid in a counter clockwise path around the area, as show below in Fig. 1. Then the wire would go back to the yard perimeter, making sure that there is no gap between the wires going to and coming from the off-limits area. This ensures that the mower will not "see" this section of wire and will pass over it while mowing. This exercise does not involve cutting the wire in any way, and still maintains one continuous loop.
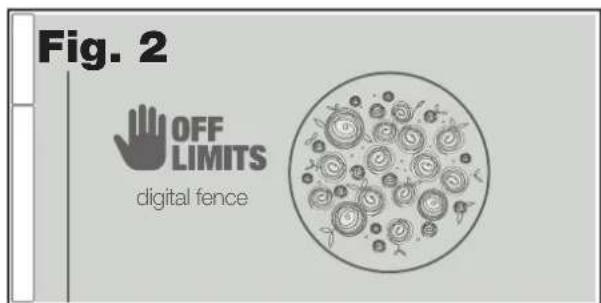
A great alternative is to purchase the Android Off Limits Digital Fence accessory. With this option, you simply surround the off-limits area with the provided magnetic strips. They do not have to be connected to the boundary wire. The Off-Limits Digital Fence is also great for protecting seasonal items (ex. a trampoline or fire pit).
7. Identify obstacles
Landroid is equipped with a bump sensor which allows you to avoid surrounding all obstacles with boundary wire. Landroid can lightly bump into solid obstacles like trees and furniture without harm. If your lawn has several obstacles like pavers and trees, we recommend purchasing the Landroid ACS (Anti-Collision Control) accessory which helps Landroid steer around obstacles instead of bumping into them.


Now that you have planned out your installation, you are ready to begin!. Before starting, you may want to use your old mower for the last time to clean up your lawn and make the installation easier.
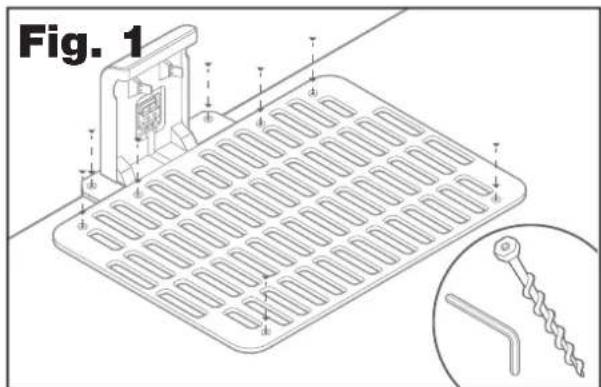
1. Secure the charging station in the selected location
A. Secure the charging station to the ground with the included screws, using the provided hex key (fig. 1)
B. See page 17 for tips on correctly installing your charging station.

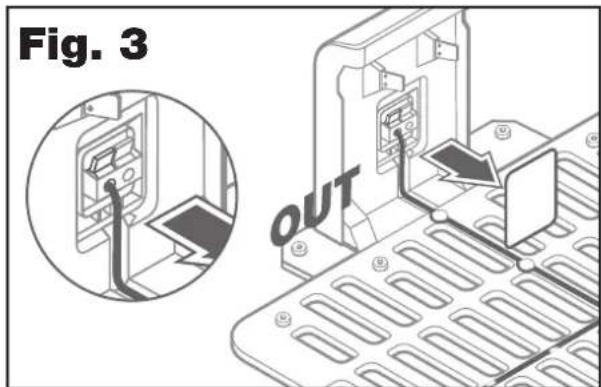
2. Connect one end of the boundary wire to the charging station
A. Strip the end of the wire with a wire stripper (fig. 2).
B. Open the plastic door and insert the stripped end into the red left clamp (fig. 3).
C. Press the wire into the guide of the charging station as shown in fig. 3.
3. Lay the boundary wire around your lawn
A. Use the supplied wire distance gauge (item K) to ensure that the boundary wire is the appropriate distance from the edge of the yard.
B. If there is a step at the edge of your lawn, keep the wire at 10 in. from it (fig. 4).
C. If the edge is flush to the lawn, keep the wire at 4 in. from the edge (fig. 5).
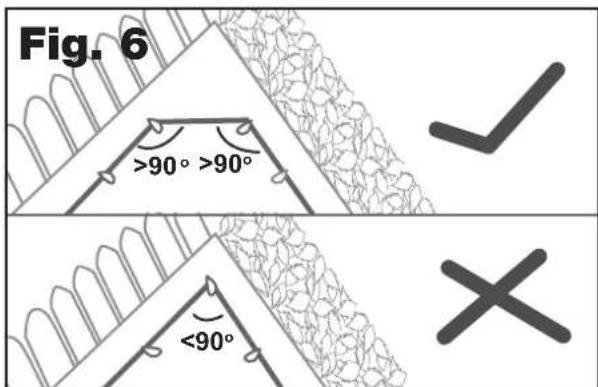
D. When laying the boundary at corners, ensure that the corner angle of the wire is great than 90^ (Fig. 6). This will ensure that the boundary sensor can properly detect the wire.

4. Secure the wire to the ground using the supplied wire pegs
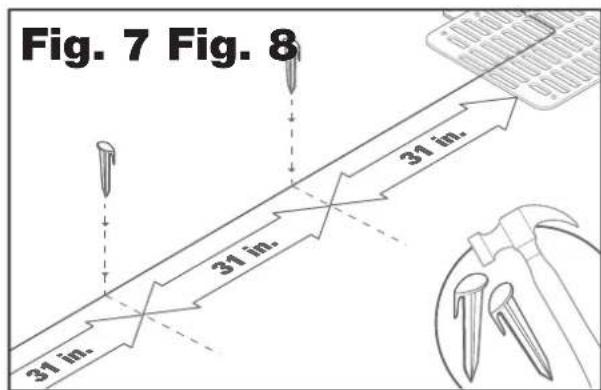
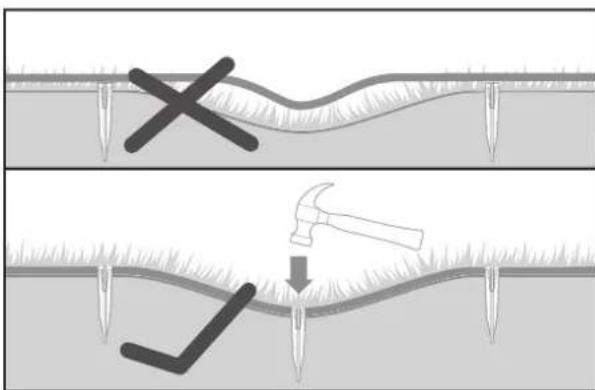
A. Space the pegs roughly 2 - 3 ft. apart (Fig. 7). For corners and turns, as wells as dips in the yard, this spacing should be reduced as necessary.
B. Make sure that the pegs are hammered all the way to the ground to ensure that there is not a gap between the wire and the ground (Fig 8) and that the wire has no slack. Any loose wire could be caught by the mower blades and potentially cut.
5. Exclude any off-limits areas, if needed
A. Lay the boundary wire as instructed until you come near the off-limits area.
B. When you are able, make a 90^ left turn with the wire so that the direction of the wire is directly towards the off-limits area (Fig 9).
C. Surround the area with the wire, making sure to keep the appropriate 10 in. of distance from the area edge according to Fig. 4. Be sure to keep a minimum distance of 3 ft. from the edge of the perimeter boundary wire (Fig. 9).
D. Always lay the wire in a clock-wise direction around the off-limits area. Failing to adhere to this rule could result in erratic mower behavior up to and including the mower traversing into the off-limits area.
E. When you have completely surrounded the off-limits area and the wire has arrived back at the starting point of the loop, return the wire to the perimeter boundary by laying the wire along the same path it took to get to the off-limits area. It is crucial that there is no gap between these two wires (Fig. 9 inset). Tip: Use the same wire peg to secure both wires. This will ensure that there is no gap between each wire.
F. Refer to pg. 18 for tips on creating an off-limits area.
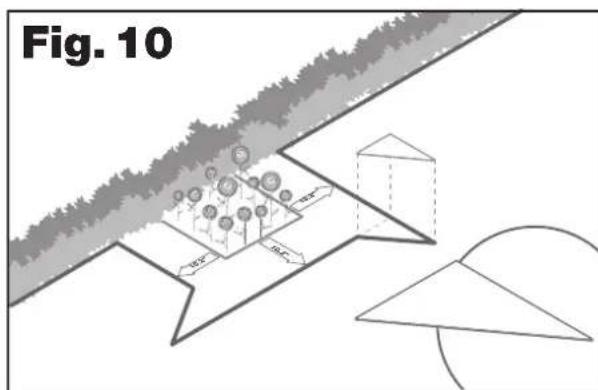
6. Bertelsen method: Perfect 90^ turns with this simple layout technique
Note: This method is only applicable for outside right angle corners.
A. The supplied Bertelsen ruler (Item L) acts as a template for the shape of the boundary wire.
B. Lay the ruler on the ground 10in past the outside corner (Fig. 10).
C. Using the ruler as a guide, lay the boundary wire around the edge of the ruler.
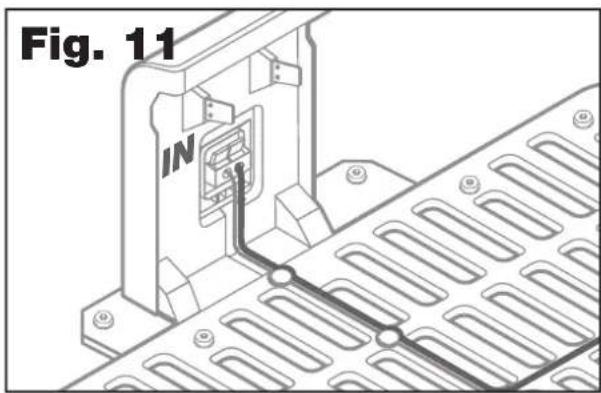
7. Complete the perimeter boundary loop
Once you have completed laying the wire around the perimeter of your lawn, you will arrive back to the charging station.
A. Place the wire into the guide of the charging station, up to the black clamp (fig. 11).
B. Cut the excess wire and strip the end with a pair of wire cutters.
C. Insert the stripped end into the black wire clamp on the right. There should be no excess wire hanging out of the terminal cover. This may cause improper docking of the mower.
8. Using the Wire Connectors

Fig. 2Fig. 1
Included with Landroid are two small, waterproof boundary wire connectors (Item B). They can be used for the following:
A. When your lawn has a very long perimeter and you need extra boundary wire to complete the installation. Please do not exceed 984 ft. of boundary wire; this is the maximum length of the boundary wire perimeter.
B. When the boundary wire is cut by accident and you need to fix it.
C. When you decide to rework your garden in the future and need to modify the original boundary wire installation.
Proper use of the boundary wire connectors
A. Insert both ends of the wire into any two of the three holes of the connector; no need to strip the wires.
B. Insert the wires fully until both wire ends are visible on the other side of the connector.
C. Press the connector firmly by using a pair of pliers. Make sure that the blue clamp is fully seated into the connector body. Check that the wires are securely connected by slightly pulling on them. If any of the wire ends comes out, then the crimping process should be repeated.
Attention: it is not recommended to simply splice the boundary wire with insulating tape or use a screw terminal block for connection. A broken circuit may occur after a period of time as soil moisture can oxidize the wire.
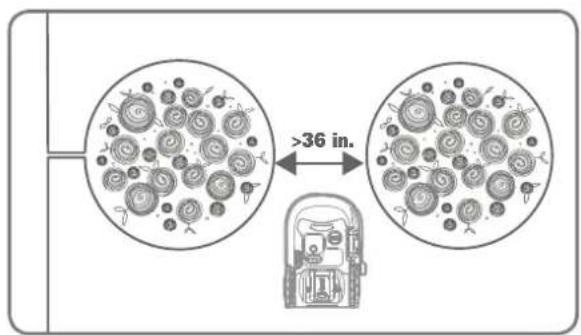
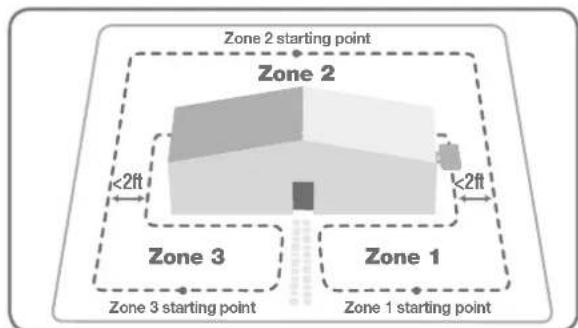
9.Zones
If your yard has more than one area and these areas are separated by a narrow opening or corridor (see figure below), then it may be necessary to establish user-defined zones in order to aid Android in reaching every part of your yard. The term narrow is defined as any passageway that is less than 2 ft. in width. A zone is essentially a starting point along the boundary wire that the Android travels to before starting to mow. This allows the mower to get to those hard to reach areas. These starting points are defined as a distance from the charging station to the zone starting point. Once the starting points are defined, you will also be able to define how frequently Android travels to each starting point. This will allow Android to travel to the hard to reach areas more frequently, ensuring that every square inch of your yard is mowed. It is necessary to define zone frequency because Android does not stay within a specific zone for a specified amount of time. Once Android starts mowing from a particular zone starting point, it will mow randomly according to its normal algorithm. Zones are set up via the control panel or Android App.
10. Final steps
There are only a few more steps to go:
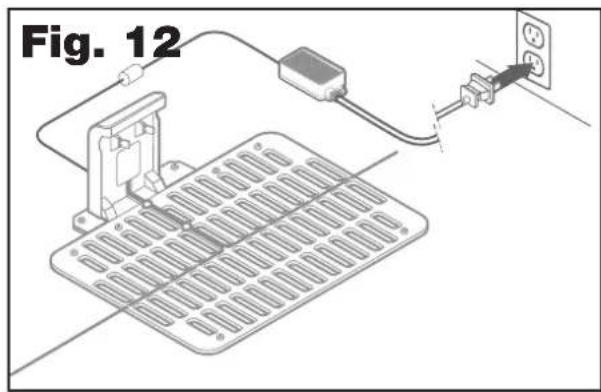
A. Connect charging station to the AC outlet (fig. 12).
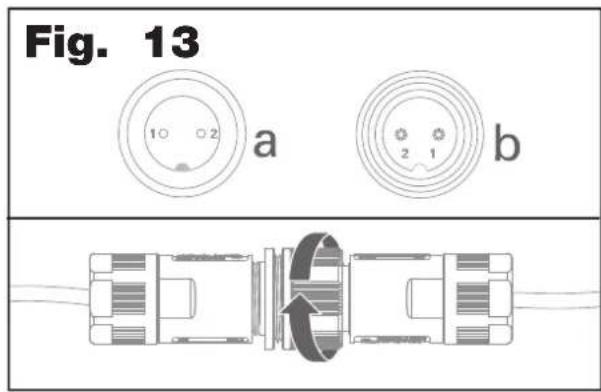
B. Connect the charging station power cord to the power supply by aligning the notch on the power cord connector (a) with the groove on the adaptor connector (b). (Fig.13).
C. When installed and connected properly, the LED light on the charging station will be green.
D. If the LED light is red, check that the boundary wire ends are properly clamped into the charging station. If problem persists, ensure the boundary wire around your lawn is not broken. If wire connectors were used, check these connections to make sure that the electrical contact is present.
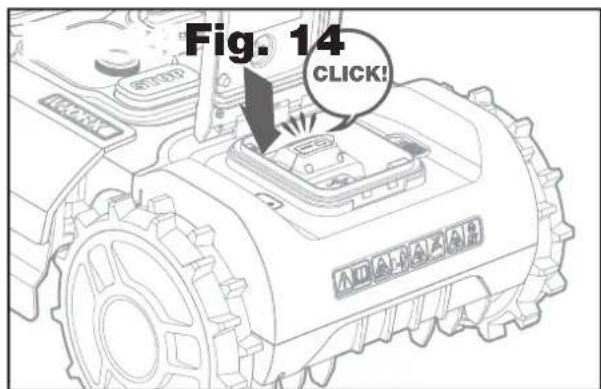
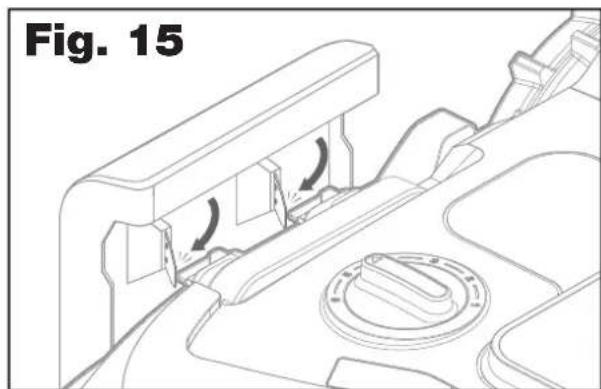
E. Open the rear of Landroid and insert the Power Share battery into the slot until it clicks (fig.14)
F. Place Landroid on the charging station and ensure that the charging terminals on Landroid have firm contact with the paddles on the charging station (fig 15). The paddles should be at a 45^ angle to ensure correct charging. The LED light will blink green when properly connected. The light will turn solid green when fully charged.
G Allow Landroid to fully charge the battery before use. While Landroid is charging, it would be a good time to download and connect Landroid to the app.
STARTING LANDROID FOR THE FIRST TIME.
Get familiar with the control panel
Android's control panel allows you to access key functions directly on the mower.
For advanced functionality and features, download the free Android app.

Read and understand all safety instructions before starting Android
A. It is recommended that you start Android from the charging station after fully charging.
B. Press until the screen lights up.
C. Rotate the knob clockwise to select the default PIN "0000". Short press OK to select each number. The screen will display "PIN code OK".
D. Press the start press . Land (w)d will start mowing.
E. You can stop Android at any time by pressing the (STOP)
F.To send Android to the charging station,press the then press OK
Functions and Features in the Control Panel
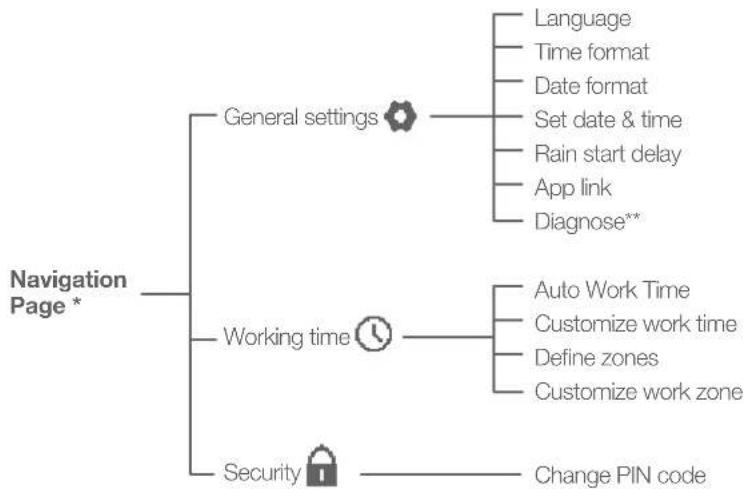
1. Settings
Rotate the clockwise to choose between General Settings, Working Time and Security. Press the on select General settings , working time security , and press once to enter. To go back one, press the
Return key. Use the same method to take the follow-up actions.
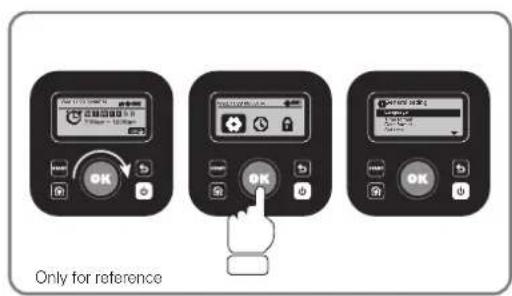
- Be continuously updated according to the software version.
** For after-sales service only
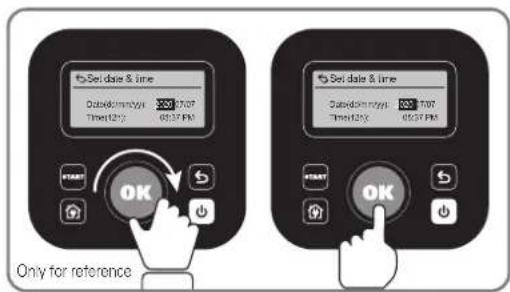
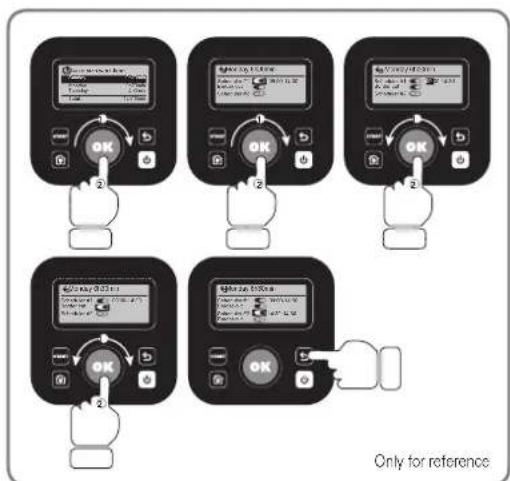
2. Set date & time
Rotate the OK clockwise to select "DAY" and press the OK. The selected number will be blinking; continue to rotate the OK clockwise to select the desired number and press the OK confirm. Use the same method to complete for month/year/ hour/minute.
3. Set a Schedule
Following the same instructions as date & time, use the select the day of the week and set the time to schedule Android. Border cut can also be enabled/ disabled for each day. Anticlockwise rotate activate the setting. For a quicker way to schedule, it is recommended to download the Android app.
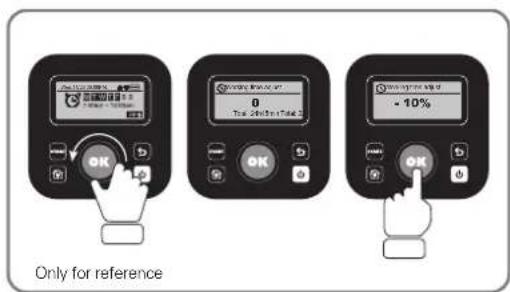
4. Customize work time
This feature enables a quick adjustment of daily work time without the need to change work times for each individual day. Anticlockwise rotate activate the setting. For example, if you wanted to increase total work schedule to compensate for a higher growth rate during the peak of mowing season, simply rotate the OK to an appropriate positive percentage increase. Conversely, if you wanted to decrease total work time to compensate for the latter half of the mowing season when growth rates slow, simply rotate the an appropriate negative percentage decrease. This setting can also be adjusted via the app.
This adjustment follows a simple calculation:
DWT × [1 + (WT% / 100)] = TWT
DWT = Daily work time
WT% = Work time percentage adjustment
TWT = Total work time
Example:
You want to decrease the current schedule of 5 hours per day, M-F, by 30% .
Rotate the (W)til the screen reads "-30%". This would subtract 30% of the current work time to yield:
(300 min) x [1 - (30/100)] = 210 minutes (3.5 hours) per day.
5. One-Time Scheduler
If your yard is split into two areas by a fence, then the One-Time Scheduler function can be used to mow the second area that does not contain the charging station. This feature eliminates the need for a separate charging station for each area. For instance, if you have a fenced-in back yard, you would have a back yard area and a front yard area. Even though there are two separate areas, there will still only be one boundary wire loop. The boundary wire will need to be configured similar to that of Fig. 1. Run the boundary wire underneath the fence to connect the two boundaries, leaving no gap between the wires that connect each area (see Fig. 1 inset). Essentially, you are implementing the same concept as you would when excluding off-limits areas as in section 5. (Exclude any off-limits areas, if needed). The only difference is that the area is external rather than internal with respect to the boundary of the first area.
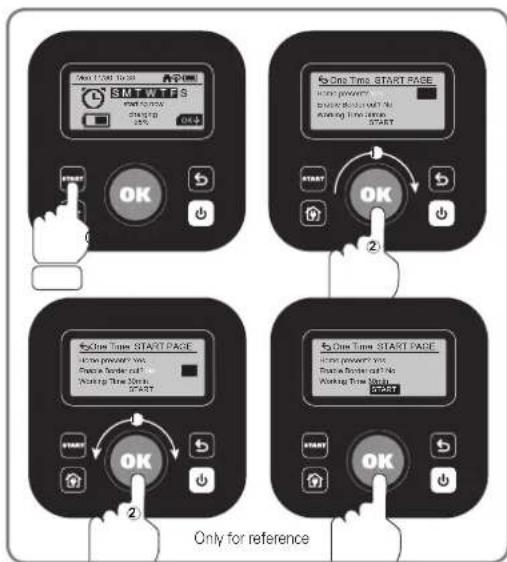
Follow these instruction for mowing the area without the charging station:
A. Power on Android and place inside the mowing area.
B. Press (STAMPTIL) three times.
C. Rotate to select "Home Present? - NO". Short press or no to confirm.
D. Select the work time by rotating until "Working Time" is selected. Short press, and then rotate select the pre-defined work
times. Short press to confirm.
E. Rotate select and restart press. Android will start to mow.

Follow these instruction for mowing the area with the charging station:
A. Power on Landroid and place inside the mowing area.
B. Press times quickly.
C. Clockwise rotate (br) select "home present? - YES/NO" (Whether the charging station is in the area or not) and short press to enter setting. Selected word will be blinking and short press to confirm.
D. Next, rotate select "ENABLE border cut-Yes/no" (whether to do border cut or not) and short press. Selected word will be blinking and short press to confirm. Then use the same method to complete working time".
E. And then Clockwise rotate select "Start" and short press to start mowing
CONNECTING LANDROID TO THE INTERNET
Why should you connect your Android?
Your Android can be connected by Wi-Fi or Bluetooth
Android is an IoT (Internet of Things) device. To get full functionality out of your Android and keep it updated with the latest software, it must be connected to the internet via your Wi-Fi network. Please see our privacy policy at https://www.worx.com/privacy-policy.
BEFORE YOU START
1. Download the app
Download the free Android App first. Find it in the Android or Apple app stores by searching "Worx Landroid" or by scanning the provided QR codes beside.
2. Ensure you have:
A. Your WiFi networkSSID and password / Bluetooth function on your smartphone.
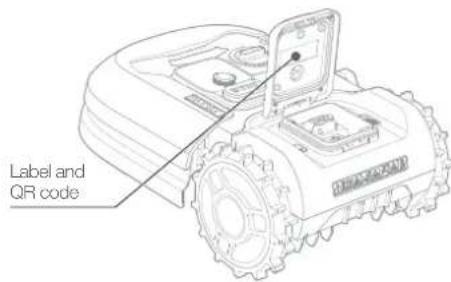
B. Android Serial Number: it can be found in the label under the rear battery door of the machine.
If you don't want to type the 20-digit Serial Number, you can simply scan the QR code next to the Serial Number with your smartphone when prompted by the app.
3. Check your settings
Wi-Fi connection
A. Landroid works with 2.4GHz Wi-Fi signal only. 5GHz frequency signals are not supported.
B. Make sure your smartphone is connected to your home Wi-Fi network.
C. Make sure the distance between your Android, smartphone and your router is as close as possible during connection.
Tip: when Landroid moves to an area of your lawn with poor or no Wi-Fi signal, alerts from the app will only be received when Landroid returns to an area with good signal.
Bluetooth connection
A. Bluetooth function on your smartphone is activated.
B. Make sure your Android is within the connectable distance.

GETION Google Play

Download on the App Store
MAINTENANCE
Your Landroid works hard and needs to be cleaned and checked at regular intervals to ensure that it is operating at maximum efficiency. This section helps you keep Landroid in good shape so it can last for years without issues. Turn off the machine and remove the battery before carrying out any service or maintenance.
Blades
A. The blade turning disc rotates both clockwise and counter-clockwise at random to use both cutting blade edges and minimize the frequency of replacing the blades.
B. Each cutting blade will last up to 2 months when it is programmed to mow every day.
C. Always check to see if the blades are chipped or damaged and replace them if necessary.
D. When the cutting blades are dull and worn out, they should be replaced with the spare blades provided with your Android. Spare blades are also available.
WARNING! Before cleaning, adjusting, or replacing the blades, turn your Android OFF and remove the battery. Always wear protective gloves.
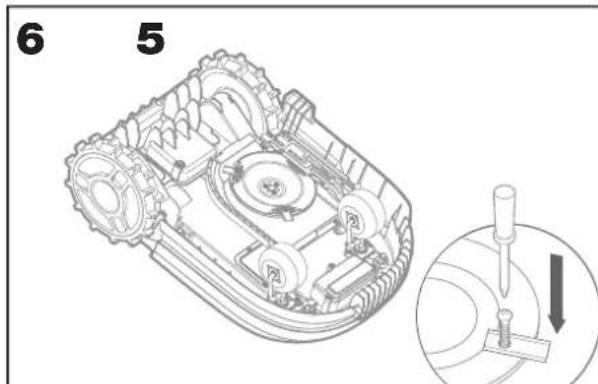
1. Replacing the Blades
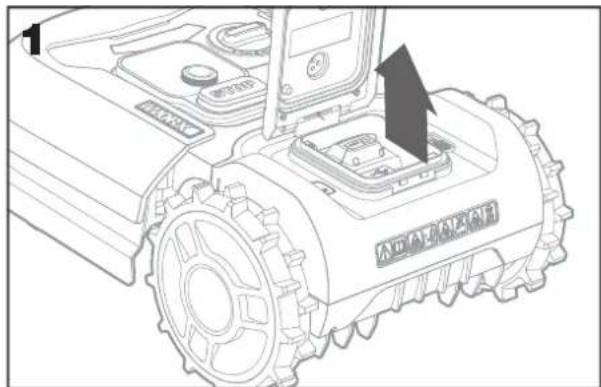
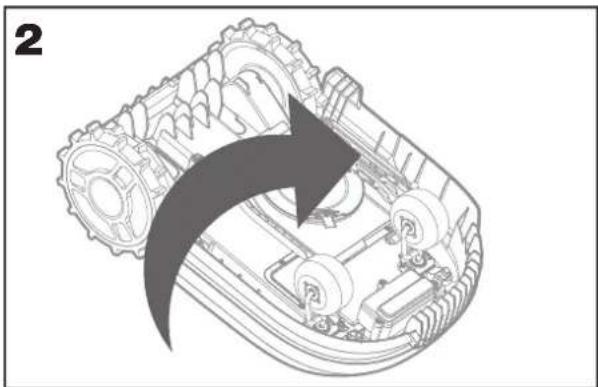
Remove the battery (fig. 1) and turn the Landroid over (fig.2). Take the screws off the blades with a screwdriver (fig.3-4). Firmly screw on the new blades (fig.5-6).

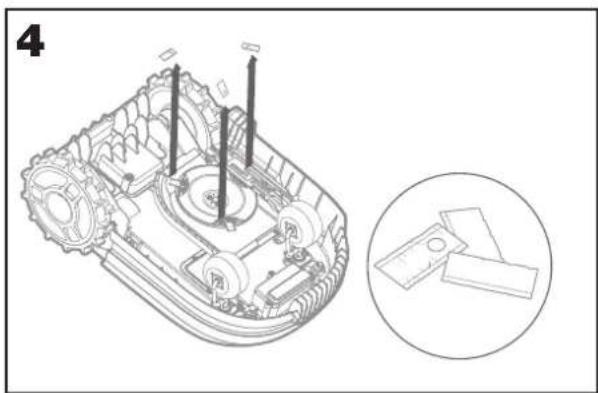
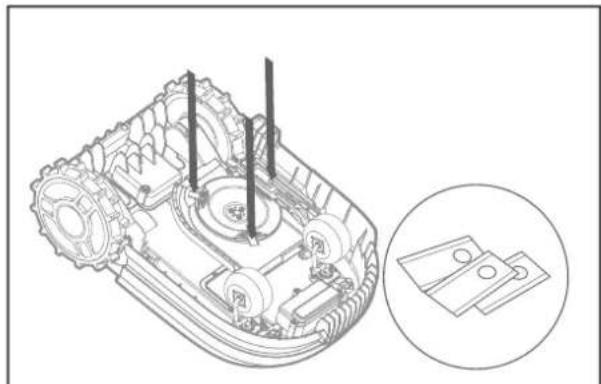
Attention: When fitting new blades, make sure you replace ALL the blades.
Always use new screws when fitting blades. This is important to ensure blade retention and blade turning disc balance. Failure to use new screws could cause serious injury.
Important: After screwing the blade to the blade disc, make sure the blade is able to spin freely.
Cleaning
Your Landroid should be cleaned regularly. This helps keep it in good condition. Excess dirt, debris, and build-up of grass from daily mowing may cause sub-optimal performance. Turn off Landroid and remove the battery before cleaning.
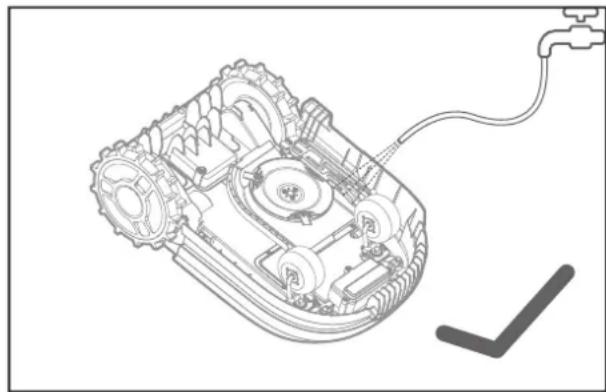
Attention: Make sure the battery cover is closed when rinsing off your Landroid.
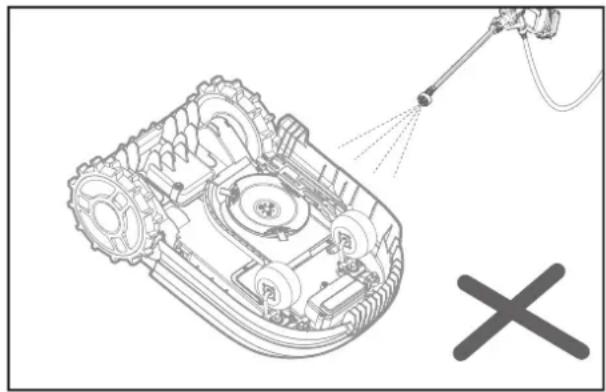
WARNING! Your Landroid can only be rinsed by using a hose! DO NOT use high pressure washer on your Landroid. High pressure water can penetrate the seals and damage electronic and mechanical parts.
1. Cleaning the top of the mower
A. Clean with a spray bottle filled with water or a hose. Do not use solvents or polishers.
B. Use a brush or a clean cloth to remove built-up dirt.
2. Cleaning the Bottom
A. Turn Android upside down.
B. Use a brush to remove debris and grass clippings.
C. Be careful not to touch the blades with your hands. Wear gloves for protection.
D. Clean the blade disc, the chassis and the front wheel(s) thoroughly with a soft brush or moist rag
E. Rotate the blade disc to ensure it rotates freely. Remove any obstructions to avoid damage to the blade disc.
F. Check that the blades spin freely around the fixing screws. Remove any obstructions.
3. Cleaning the drive wheels
A. Remove mud from the rear wheels with a brush in order to ensure good wheel traction.
4. Cleaning the charging contacts
A. Clean the contact paddles located on the charging station and the charging contacts located on the Android using a cloth B.Periodically remove any build-up of grass clippings or debris around the contact paddles and the charging contacts to ensure Landroid successfully charges each time.
Charging
The heart of Android is its 20V Li-ion Wox Powershare Battery.
A. For the proper storage of the battery, make sure it is fully charged and kept in a cool dry place.
B. The recommended Android operation temperature is between 32 - 131^ (0 - 55^)
C. The life-span of Android's battery depends on hours of usage and the length of use per day during the mowing season.
Storage
Although Android is designed and built to survive the most severe weather conditions, we recommend storing it in your shed or garage during the winter. To prepare it for winter hibernation:
A. Clean it thoroughly.
B. Fully charge the battery.
C. Tum the power off.
1. Getting back to work in the Spring
When it is time to re-start Android for the new season, please perform the following checks:
A. Update the time and date settings via the app.
B. If you notice signs of oxidation on the charging contacts of Android or the charging station, clean these with a fine grit sand paper.
C. Fully charge Android's battery before operating.
Firmware updates
Landroid is always improving and new software versions are made available for free. Always keep Android software updated to make the most of your machine.
1. Over-the-Air (OTA) updates
If your Landroid is connected to your Wi-Fi network you can check for new software updates by opening the "Update" section in the app. Please make sure your Landroid is under Wi-fi coverage when updating.
2. Check which software version you have
In order to see the software version number you have to navigate to the "Firmware Update" sub-menu of the app.
3. Manual updates
A. If your Landroid is not connected to your Wi-Fi network, you can still update it to the latest software version with a USB drive.
B. Check your account page via wwwaccount.worxlandroid.com to see if there is a new firmware version released.
C. Download the latest software version.
D. Make sure the USB drive is formatted to FAT32.
E. Copy the downloaded software file to the USB drive.
F. Make sure Android is powered off.
G. Locate the USB port which is inside the battery door.
H. Insert the USB drive in the port.
I. Place the Android on the lawn again, inside the boundary wire.
J. Power on Android. The screen will display that the firmware is being updated. Do not remove the USB drive from the mower until instructed to do so.
K. Once the upload is compete, the screen will display "Please remove the USB key".
L. Once the USB drive is removed, the mower will reboot, and if necessary, install any other updates that are part of the software package. This process may take a few minutes. Once the update is complete, the screen will go to the PIN entry screen.
NOTE: Make sure Android is within the boundary when restarting Android.
OPERATION MESSAGES
| MESSAGE LANDROID ACTION | |
| Cutting grass Cutting grass according to the mowing schedule. | |
| Raining The rain sensor detects water | Landroid will return to the charging station and stay there until the sensor is completely dry. When the sensor is completely dry, Landroid will automatically begin the rain delay countdown and then return to mow. If you want Landroid to mow before the rain delay counter is finished, simply turn it off then on again. Or you can remove the rain delay completely by setting the rain delay time to zero. |
| Going home Needs to recharge—while traveling back to the charge station, the cutting blade does not operate in order to save energy. | |
| Charging 'Charging' and charge percentage are displayed. | |
| No working time scheduled Stand-by, needs to be programmed as desired. | |
| Not working today | Stand-by, will start according to mowing schedule. |
| Work done today | |
| Zone searching Android is searching a certain area to mow based on the customized work zone parameters. | |
| Charge complete Android has completed its charging. | |
| Emergency charge Android is charging in a powered-off state. |
ERROR MESSAGES
Sometimes things can go wrong. Fortunately Landroid is smart enough to tell you if it is encountering an issue, so you can fix it. If in doubt, please visit our website at www.worx.com/landroid-support, where you will find useful videos and further support.
| MESSAGE CAUSE ACTION | ||
| Outside working area!Press START to reset. | Android cannot find the boundary wire signal. | 1. If Android is actually outside of its working area: power off the mower, take Android inside the working area, power on and press start.2. If the associated error is displayed and the mower is inside the boundary AND the charging station LED is green, then the wires leading into the charging station are most likely reversed, and need to be switched. |
| WRONG PIN! Please retry. | PIN code is wrong. Input | the correct PIN or re-set your PIN. |
| Blade motor fault!Press START to reset. | Blade disc is blocked by an object, e.g. a branch. | Turn power off and remove battery.Turn Android upside down and check if there's anything preventing the blade disc from rotating and remove any obstruction.Turn the mower upright, and power on. |
| Blade is over-loaded by thick dense grass. | Turn power off.Take Android to an area with short grass or adjust the cutting height to a higher setting.Power on. | |
| Wheels motor fault!Press START to reset. | Rear wheel is blocked in some way. | Turn power off and take Android to an area free from obstacles.Turn power on.If the error message is still displayed, turn power off. Turn Android upside-down and check if there's anything preventing the wheels from rotating.Remove any obstruction, if necessary, then turn the mower upright, and power on. |
| Upside down! Press START to reset. | This could have happened when Android came into contact with a sloping surface which made it overturn. | Turn Android upright and remove any obstruction that might have caused Android to overturn. |
| Mower stuck! Press START to reset. | Android is stuck.Also, if the rear wheels cannot move and have tried to course correct several times in a short period, or the bump sensor has been activated several times in a short period, this will cause a Stuck error. | Turn power off.Take Android to an area of your lawn free of obstacles, then turn power on.If the error message is still displayed: turn power off, turn Android upside-down. Check if there is anything preventing the wheels from rotating.Remove any obstruction, turn the Android upright, turn power on. |
| Mower lifted! Press START to reset. | Android is lifted up.Also, if the lift sensor has been activated several times in a short period, this will cause a Lifted error. | Turn power off.Take Android to an area clear of obstacles, turn power on.If the error message is still displayed: turn power off, turn Android upside-down and check if there is any obstruction that would prevent the front wheel casters from sliding into the mower body. When the mower is lifted, the casters should drop down away from the mower body. When placed back on level ground, the casters should slide back into the body.Remove any obstruction if necessary, then turn the mower upright, and power on. |
| Wire missing! Press START to reset. | Machine can't find boundary wire signal. | If the LED light is red, check if the boundary wire is well connected to the wire terminal clamps on the charging station.If the problem persists, check that the boundary wire hasn't been cut. |
| Battery temperature out of range!Please wait. | Temperature is too high (more than 55°C)or too low(less than 0°C)when charging. | Place the charging station in a shady area or wait until it reaches the normal temperature |
| Can't find charge station.Press START to reset. | Boundary wire is beyond its maximum length (984 ft.). | Take Android to the charging station.If the boundary wire length is beyond the rated limit, then the wire length should be shortened. |
| Mower locked! | With the 'Lock Function' enabled, if your Android does not receive a signal from your Wi-Fi router for 3 days, then it gets locked as a security measure. This could be because your router lost its power or because you changed your Wi-Fi router or network provider. | Please reconnect Android to the Wi-Fi network it has been originally paired with. If this is not possible, contact Cutron Service. |
NOTES
- Before turning power on, always check Android is inside its working area. If not, the message "Outside working area! Press START to reset" will be displayed. This message is also displayed when Android is partly but not completely inside its working area.
- If for any reason-i.e. a party, children playing...you want to park your Android in the charging station: press then OK. Landroid will go to its charging station and stay there. Please note Landroid will now wait until the next scheduled mowing session. If you want to re-start it at anytime, press START to start your Android.
If an error repeatedly occurs in the same area of your lawn, you might have a problem with the boundary wire so please refer to the installation instructions and check your set up is correct. - If your lawn is divided in two separated areas, connected by a corridor less than 3 ft. wide, one of which is not provided with the charging station: when Landroid runs out of charge, take it manually to the charging station.
If the problem cannot be solved, please contact our Customer Service for help.
TROUBLESHOOTING
If your Landroid does not work correctly, follow the troubleshooting guide below. If the problem persists, contact Customer Service.
| SYMPTOM CAUSE SOLUTION | ||
| The LED light on the charging station does not turn on. | There is no power. Check the charging station is connected properly to the charger and the charger is connected to a suitable power supply. | |
| Red light on the charging station. | The boundary wire isn't connected. | Check that the boundary wire has been connected correctly to the charging station. Check there are no breaks in the boundary wire. |
| Android turns on, but the blade disc does not spin. | Android is searching for the charging station. | This is normal: when Android needs to recharge, the blade disc does not rotate while it is searching for the charging station automatically. |
| Android vibrates. The blade disc is unbalanced. Blades may be damaged. | Check the blades and replace them if damaged. Remove debris and foreign objects from the blades and blade disc. | |
SYMPTOM CAUSE SOLUTION
| Grass is being cut unevenly. | Android does not work enough hours per day to cut the grass. | Try adding more hours to the mowing schedule. |
| Mowing area is too big for the size of Android you have. | Try decreasing the size of the mowing area. | |
| The blades are dull and not sharp. | Change all the blades so that maximum cutting efficiency is achieved. | |
| The cutting height is set too low for the length of the grass. | Raise the cutting height and then gradually lower. | |
| Grass or another object has wrapped around the blade disc. | Check the blade disc and remove any grass or other objects that might prevent it spinning. | |
| There is a build-up of grass in the blade disc or motor frame box. | Make sure the blade disc rotates easily. If need be, you may take off the blade disc and then remove the debris. | |
| Your Android is inside its working area and the boundary wire is connected, but the display says 'Outside working area!' Press START to reset' | The boundary wire ends are clamped incorrectly. | Reverse the boundary wire ends and reconnect to the charging station. |
| The charging time is far more than the rated charging time. | Poor connection caused by debris on the charging station. | Clean the contact paddies located on the charging station and the charging contacts on Android using fine grit sand paper. |
| The charging protection program is activated due to high temperature. | Place the charging station in a shady area or wait until the temperature has cooled down. | |
| The mower does not charge. | There is no power. Check the power cord is connected properly to the charger and the charger is connected to a suitable power supply. Make sure both the charging contacts on the mower touch the center of the contact paddies on the charging station. | |
| Android is starting to have shorter run-times between charges. | Something is lodged in the blade disc creating friction and increasing power consumption. | Take off the blade disc and clean it. Remove any foreign objects obstructing the blade disc. |
| Android is shaking heavily because the blade disc is unbalanced. | Check the blade disc and blades, remove debris and foreign objects from the blades and blade disc. Replace the blades with a new set. | |
| The battery may be exhausted or old. | Replace battery. | |
| Android is not operating at the correct time. | The clock is not set to the correct time. | Set the clock to the correct time. |
| the percentage of weekly operating time set through App. has changed. | Set the correct percentage through the App. | |
| Android cannot correctly dock with the charging station. | Charging station is not level. Use a device level to ensure that the charging station is on level ground. Re-work any unlevel spots that could cause the charging station to move while the mower drives through it. | |
| Poor connection caused by debris on the charging station paddies. | Clean the contact paddies located on the charging station and the charging contacts on the mower using a fine grit sand paper. | |
| The green light on the charging station turns on before charging is complete. | The charging station is overheating or overcooling | Place the charging station in a shady area or wait until it reaches the normal temperature |
| Landroid wheels skid or repeatedly slip. | Foreign obstacles, such as twigs and branches may be lodged under Landroid. | Remove foreign objects from underside of Android. |
| The lawn is too wet. Wait until lawn has dried. | ||
| Android runs outside the boundary wire. | The boundary wire of another Landroid or robotic mower is positioned too closely. | Ensure at least 3.2 ft. minimum distance between your boundary wire and that of your neighbor. |
| Android reverses or rotates erratically near the boundary wire. | There is boundary wire electric signal leakage due to broken insulation. | Repair damaged boundary wire with the wire connectors supplied. |
| Android slips out of its working area going down a hill. | Low grip of Landroid drive wheels. | Please check that the wheels are clean and free of mud in order to have the maximum grip possible. |
| Android system crashes when charging or on standby. | Software or display fault. Restart Android. | |
| Android shuts off when docking in the charging station. | Android fails to charge due to over temperature protection and is powered off. | Place the charging station in a shady area or wait until the temperature has cooled down. |
| Poor connection. Check the LED light on | the charging station. Check the connection between the contact paddles located on the charging station and the charging contacts on the mower. | |
| Android stops in the working area. | There is an obstacle in the working area. | Remove the obstacle from Android's working area. |
| The cutting height is set too low for the length of the grass or the grass is too dense. | Raise the cutting height and then gradually lower. | |
| The extended boundary wire should not exceed (984 ft.) or it may cause signal problem. | Reduce the length of the boundary wire. | |
| The distance between the center of the lawn and the boundary wire should not exceed 82ft. or it may cause signal attenuation. | Reduce the distance between the center of the lawn and the boundary wire perimeter within 82 ft. | |
| Android flips over. | There is an inclined obstacle on the lawn. | Exclude the obstacle from Android's working area. |
| Android fails to connect to the internet. | Please check your router has the correct settings. | Make sure your router frequency is 2.4GHz. If your router has two settings, please enable the 2.4GHz frequency band. Make sure your router is set to 802.11 mode and wireless setting is b/g/n mixed. Make sure your router has the SSID Broadcast function enabled when you connect the machine with the app. Make sure DHCP function is enabled. If you changed your Wi-Fi network, you need to connect Android to the new network. |
| Please check whether the router is disconnected or WIFI SSID is changed | Make sure the router is connected and WIFI SSID is correct | |
LIMITED WARRANTY STATEMENT FOR WORKX Android
If your WORX tool becomes defective due to faulty materials or workmanship within a period of 3 years from the date of purchase, we guarantee to do one of the following, though you may be required to pay shipping costs for return of the product to us and for shipment of the repaired/replaced product to you:
- Replace or repair all defective parts, or,
Repair a defective unit, or, - Replace the unit with a new or reconditioned unit.
This Limited Warranty is subject to the following conditions:
- Battery packs are guaranteed for a 12 month period only, regardless of online registration. (The warranty is only for the original battery packs provided with the Robotic mower or the same model number of original battery packs, please note other battery packs are excluded from the warranty.)
The ACS module, the Voice control module, the find my Landroid module and the Off limits module are guaranteed for 12 month period only, regardless of online registration.
The tool has not been misused, abused, neglected, altered, modified or repaired by anyone other than an authorized service center.
Defect or damage to the tool has not resulted from use of accessories or parts that are inappropriate for normal operation of the tool, or that are not designed for use with the tool.
The tool has been subjected to fair wear and tear.
The tool has not been used for trade or professional purposes.
The tool has not been used for rental purposes.
The tool has not sustained damage through foreign objects, substances or accidents.
Your limited warranty does not cover:
- Components that are subject to natural wear and tear caused by use in accordance with operating instructions.
Unauthorized/improper maintenance/handling or overload is excluded from this warranty as are accessories such as bulbs, blades and bits, etc. - Damage, malfunctions or failure resulting from high pressure washer or steam cleaning the product.
For warranty claims, please contact the WORX Helpline. You will need to submit a registration document and proof of purchase in the form of a valid receipt that displays date and place of purchase. Replacement tools do not come with a new warranty. The original tool's warranty will continue from the original date of purchase.
Android Helpline
1-800-727-6260
This limited warranty does not replace but is in addition to your statutory rights.
This warranty does not apply to accessories supplied with the tool.
This limited warranty applies only to the original purchaser and may not be transferred.
All repairs and replacement tools will be covered by the limited warranty for the balance of the warranty period from the date of the original purchase.
30 Days Satisfaction Guarantee
If you are not completely satisfied with the performance of your WORKX tool, simply return it within 30 days. It must be returned in its original packaging complete as purchased, including accessories and any items provided free of charge to the point of purchase for a full refund or exchange. A valid receipt that displays the date and place of purchase must be provided.
You will need to submit evidence of online registration and proof of purchase in the form of a valid receipt that displays date and place of purchase.
When calling the Helpline please have details of the WORX model number and serial number available. This will help WORX Customer Service when dealing with your call.
How to find model number and serial number? Please see below example.
TABLE DES MATIÈRES
www.worx.com/Android-support

www.worx.com/Android-support

The picture is only for reference.
Installation station de charge
MESSAGESDFONCTIONNEMENT
MESSAGE CAUSE ACTION
SYMPTOME CAUSE SOLUTIONS
SYMPTOME CAUSE SOLUTIONS
www.worx.com/Android-support

www.worx.com/Android-support