
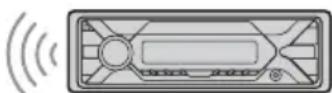
DSXA410BT - Car stereo SONY - Free user manual and instructions
Find the device manual for free DSXA410BT SONY in PDF.

| Product type | Car radio |
| Brand | Sony |
| Model | DSX-A410BT |
| Dimensions (W x H x D) | 178 mm x 50 mm x 119 mm |
| Weight | 0.7 kg |
| Power supply | 12 V DC (negative ground) |
| Rated current | 10 A |
| Radio frequency ranges | FM 87.5-108 MHz (Europe), MW 531-1602 kHz, LW 153-279 kHz |
| Wireless communication | Bluetooth version 3.0 (max. range 10 m) |
| NFC | Yes (13.56 MHz) |
| USB port | Yes (max. current 1 A) |
| AUX input | 3.5 mm stereo mini jack |
| Outputs | Speakers (4 x 55 W max), subwoofer output, power antenna output |
| Main functions | RDS radio, Bluetooth hands-free, USB playback (MP3/WMA/AAC/FLAC), NFC One-touch, Sony Music Center, Siri Eyes Free, Android voice recognition |
| Equalizer | 10 preset bands + customizable |
| Extra Bass | Adjustable (1, 2, OFF) |
| Sound enhancements | Fader, Balance, High-pass/low-pass filter, microphone gain |
| Display | LCD screen (adjustable backlight, sound sync) |
| Maintenance | Clean connectors with cotton swab |
| Safety | Warning alarm, AUTO OFF function, deactivatable demo mode |
| Spare parts and repairability | Replaceable fuse (see manual for specifications) |
Frequently Asked Questions - DSXA410BT SONY
User questions about DSXA410BT SONY
0 question about this device. Answer the ones you know or ask your own.
Ask a new question about this device
Download the instructions for your Car stereo in PDF format for free! Find your manual DSXA410BT - SONY and take your electronic device back in hand. On this page are published all the documents necessary for the use of your device. DSXA410BT by SONY.
USER MANUAL DSXA410BT SONY
FM/MW/LW Digital Media Player
LIMPOBOI PECNBEP
Operating Instructions
GB
Bedienungsanleitung
DE
Mode d'emploi
FR
To cancel the demonstration (DEMO) display, see page 19. For the connection/installation, see page 32.
For safety, be sure to install this unit in the dashboard of the car as the rear side of the unit becomes hot during use.
For details, see "Connection/Installation" (page 32).
Made in Thailand
The nameplate indicating operating voltage, etc., is located on the bottom of the chassis.

Hereby, Sony Corporation declares that this equipment is in compliance with Directive 2014/53/EU.
The full text of the EU declaration of conformity is available at the following internet address: http://www.compliance.sony.de/
This equipment is intended to be used with the approved version(s) of software that are indicated in the EU Declaration of Conformity.
The software loaded on this equipment is verified to comply with the essential requirements of the Directive 2014/53/EU.
Software version: 1
The software version can be checked in the firmware setup item of the general setup menu.
Notice for customers: the following information is only applicable to equipment sold in countries applying EU Directives
This product has been manufactured by or on behalf of Sony Corporation.
EU Importer: Sony Europe B.V.
Inquiries to the EU Importer or related to product compliance in Europe should be sent to the manufacturer's authorized representative, Sony Belgium, bijkantoor van Sony Europe B.V., Da Vincilaan 7-D1, 1930 Zaventem, Belgium.

Disposal of waste batteries and electrical and electronic equipment (applicable in the European Union and other European countries with separate
collection systems)
This symbol on the product, the battery or on the packaging indicates that the product and the battery shall not be treated as household waste. On certain batteries this symbol might be used in combination with a chemical symbol. The chemical symbols for mercury (Hg) or lead (Pb) are added if the battery contains more than 0.0005% mercury or 0.004% lead. By ensuring these products and batteries are disposed of correctly, you will help prevent potentially negative consequences for the environment and human health which could otherwise be caused by inappropriate waste handling. The recycling of the materials will help to conserve natural resources.
In case of products that for safety, performance or data integrity reasons require a permanent connection with an incorporated battery, this battery should be replaced by qualified service staff only. To ensure that the battery and the electrical and electronic equipment will be treated properly, hand over these products at end-of-life to the applicable collection point for the recycling of electrical and electronic equipment. For all other batteries, please view the section on how to remove the battery from the product safely. Hand the battery over to the applicable collection point for the recycling of waste batteries. For more detailed information about recycling of this product or battery, please contact your local Civic Office, your household waste disposal service or the shop where you purchased the product or battery.
CAUTION
The following frequency 65 - 74 MHz range is not allocated to sound broadcasting in the European Common Allocations table and cannot be used in Europe.
Warning if your car's ignition has no ACC position
Be sure to set the AUTO OFF function (page 19). The unit will shut off completely and automatically in the set time after the unit is turned off, which prevents battery drain. If you do not set the AUTO OFF function, press and hold OFF until the display disappears each time you turn the ignition off.
Disclaimer regarding services offered by third parties
Services offered by third parties may be changed, suspended, or terminated without prior notice. Sony does not bear any responsibility in these sorts of situations.
Important notice
Caution
IN NO EVENT SHALL SONY BE LIABLE FOR ANY INCIDENTAL, INDIRECT OR CONSEQUENTIAL DAMAGES OR OTHER DAMAGES INCLUDING, WITHOUT LIMITATION, LOSS OF PROFITS, LOSS OF REVENUE, LOSS OF DATA, LOSS OF USE OF THE PRODUCT OR ANY ASSOCIATED EQUIPMENT, DOWNTIME, AND PURCHASER'S TIME RELATED TO OR ARISING OUT OF THE USE OF THIS PRODUCT, ITS HARDWARE AND/OR ITS SOFTWARE.
Dear customer, this product includes a radio transmitter.
According to UNECE Regulation no. 10, a vehicle manufacturers may impose specific conditions for installation of radio transmitters into vehicles. Please check your vehicle operation manual or contact the manufacturer of your vehicle or your vehicle dealer, before you install this product into your vehicle.
Emergency calls
This BLUETOOTH car handsfree and the electronic device connected to the handsfree operate using radio signals, cellular, and landline networks as well as user-programmed function, which cannot guarantee connection under all conditions. Therefore do not rely solely upon any electronic device for essential communications (such as medical emergencies).
On BLUETOOTH communication
- Microwaves emitting from a BLUETOOTH device may affect the operation of electronic medical devices. Turn off this unit and other BLUETOOTH devices in the following locations, as it may cause an accident.
where inflammable gas is present, in a hospital, train, airplane, or petrol station near automatic doors or a fire alarm - This unit supports security capabilities that comply with the BLUETOOTH standard to provide a secure connection when the BLUETOOTH wireless technology is used, but security may not be enough depending on the setting. Be careful when communicating using BLUETOOTH wireless technology.
- We do not take any responsibility for the leakage of information during BLUETOOTH communication.
If you have any questions or problems concerning your unit that are not covered in this manual, consult your nearest Sony dealer.
Table of Contents
Guide to Parts and Controls 5
Getting Started
Detaching the Front Panel 6
Resetting the Unit 7
Setting the Clock 7
Checking the Battery Voltage 7
Preparing a BLUETOOTH Device. 8
Connecting a USB Device 10
Connecting Other Portable Audio Device 11
Listening to the Radio
Listening to the Radio. 11
Using Radio Data System (RDS) 12
Playback
Playing a USB Device 13
Playing a BLUETOOTH Device. 13
Searching and Playing Tracks. 14
Handsfree Calling (via BLUETOOTH only)
Receiving a Call 15
Making a Call 15
Available Operations during Call 16
Useful Functions
Sony | Music Center with iPhone/Android smartphone 17
Using Voice Recognition (Android smartphone only) 18
Using Siri Eyes Free 18
Settings
Canceling the DEMO Mode 19
Basic Setting Operation 19
General Setup (GENERAL) 19
Sound Setup (SOUND) 20
Display Setup (DISPLAY). 21
BLUETOOTH Setup (BLUETOOTH) 21
Sony | Music Center Setup (SONY APP) 22
Additional Information
Updating the Firmware 22
Precautions 22
Maintenance 23
Specifications 23
Troubleshooting 26
Messages 29
Connection/Installation
Cautions 32
Parts List for Installation 32
Connection 33
Installation 35
Guide to Parts and Controls
Main unit

1 Front panel release button
2 SRC (source)
Turn on the power.
Change the source.
OFF
Press and hold for 1 second to turn the source off and display the clock.
Press and hold for more than 2 seconds to turn off the power and the display.
3 Control dial
Rotate to adjust the volume.
PUSH ENTER
Enter the selected item.
Press SRC, rotate then press to change the source (timeout in 2 seconds).
MENU
Open the setup menu.
VOICE (page 16, 18)
Press and hold for more than 2 seconds to activate voice dial, voice recognition (Android™ smartphone only), or the Siri function (iPhone only).
N-Mark
Touch the control dial with Android smartphone to make BLUETOOTH connection.
4 Display window
5 S E E K - / + )
Tune in radio stations automatically. Press and hold to tune manually.
1/(prev/next)
/ (fast-reverse/fast-forward)
6 PTY (program type)
Select PTY in RDS.
Q (browse) (page 14)
Enter the browse mode during playback. (Not available when [BT AUDIO] is selected, or a USB device in Android mode or iPod is connected.)
7 CALL
Enter the call menu. Receive/end a call. Press and hold more than 2 seconds to switch the BLUETOOTH signal.
8
back)
Return to the previous display.
MODE (page 11, 16)
9
Receptor for the remote commander
10
Number buttons (1 to 6)
Receive stored radio stations. Press and hold to store stations.
ALBUMV/
Skip an album for audio device. Press and hold to skip albums continuously.
Not available when a USB device in Android mode or iPod is connected.)
(repeat)
(Not available when a USB device in Android mode is connected.)
(shuffle)
Not available when a USB device in Android mode is connected.)
MIC (page 16)
II (play/pause)
11 EXTRA BASS
Reinforce bass sound in synchronization with the volume level. Press to change the EXTRA BASS setting: [1], [2], [OFF].
12 AUX input jack
13 DSPL(display)
Press to change display items.
SCRL (scroll)
Press and hold to scroll a display item.
14 USB port
15 Microphone (inner panel)
In order for the handsfree function to work properly, do not cover the microphone with tape, etc.
Getting Started
Detaching the Front Panel
You can detach the front panel of this unit to prevent theft.
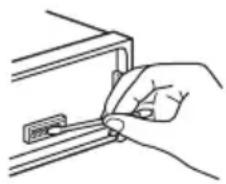
1 Press and hold OFF ① until the unit turns off, press the front panel release button ②, then pull the panel towards you to remove.
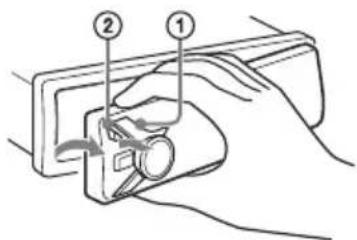
Caution alarm
If you turn the ignition switch to the OFF position without detaching the front panel, the caution alarm will sound for a few seconds. The alarm will only sound if the built-in amplifier is used.
Serial numbers
Make sure the serial numbers on the bottom of the unit and the back of the front panel are matched correctly. Otherwise you cannot make BLUETOOTH pairing, connection and disconnection by NFC.
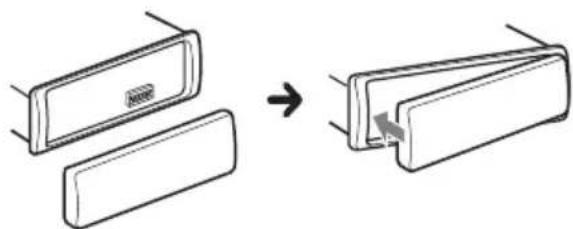
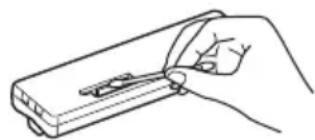
Attaching the front panel
Resetting the Unit
Before operating the unit for the first time, or after replacing the car battery or changing connections, you must reset the unit.
1 Press DSPL and (back)/MODE for more than 2 seconds.
Note
Resetting the unit will erase the clock setting and some stored contents.
Setting the area/region
After resetting the unit, the area/region setting display appears.
1 Press ENTER while [SET AREA] is displayed.
The area/region currently set appears.
2 Rotate the control dial to select [EUROPE] or [RUSSIA], then press it.
3 Rotate the control dial to select [YES] or [NO], then press it.
If the setting area/region is changed, the unit is reset, then the clock is displayed.
This setting can be configured in the general setup menu (page 19).
Setting the Clock
1 Press MENU, rotate the control dial to select [GENERAL], then press it.
2 Rotate the control dial to select [SET CLOCK], then press it.
3 Rotate the control dial to select [MANUAL], then press it.
The hour indication flashes.
4 Rotate the control dial to set the hour and minute.
To move the digital indication, press / (SEEK-/+).
5 After setting the minute, press MENU.
The setup is complete and the clock starts.
To display the clock
Press DSPL.
To set the clock automatically
Select [AUTO
Checking the Battery Voltage
You can check the current battery voltage. (Not available while the source is off and the clock is displayed.)
1 Press DSPL repeatedly until the battery voltage display appears.
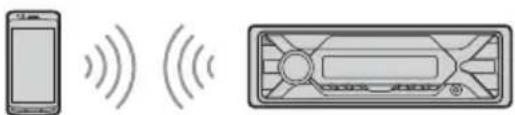
Preparing a BLUETOOTH Device
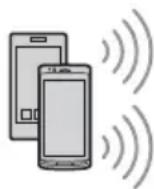
You can enjoy music, or perform handsfree calling depending on the BLUETOOTH compatible device such as a smartphone, cellular phone and audio device (hereafter "BLUETOOTH device" if not otherwise specified). For details on connecting, refer to the operating instructions supplied with the device.
Before connecting the device, turn down the volume of this unit; otherwise, loud sound may result.
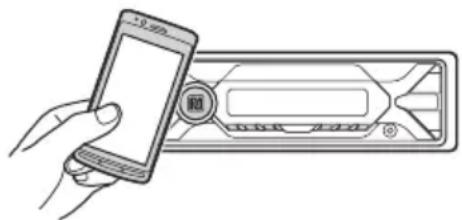
Connecting with a Smartphone using One-touch connection (NFC)
By touching the control dial on the unit with an NFC* compatible smartphone, the unit is paired and connected with the smartphone automatically.
- NFC (Near Field Communication) is a technology enabling short-range wireless communication between various devices, such as mobile phones and IC tags. Thanks to the NFC function, data communication can be achieved easily just by touching the relevant symbol or designated location on NFC compatible devices.
For a smartphone with Android OS 4.0 or lower installed, downloading the app "NFC Easy Connect" available at Google Play™ is required. The app may not be downloadable in some countries/regions.
1 Activate the NFC function on the smartphone.
For details, refer to the operating instructions supplied with the smartphone.
2 Touch the N-Mark part of the unit with the N-Mark part of the smartphone.
Make sure that rights up on the display of the unit.
To disconnect using NFC
Touch the N-Mark part of the unit with the N-Mark part of the smartphone again.
Notes
- When making the connection, handle the smartphone carefully to prevent scratches.
- One-touch connection is not possible when the unit is already connected to another NFC compatible device. In this case, disconnect the other device, and make connection with the smartphone again.
Pairing and connecting with a BLUETOOTH device
When connecting a BLUETOOTH device for the first time, mutual registration (called "pairing") is required. Pairing enables this unit and other devices to recognize each other. This unit can connect two BLUETOOTH devices (two cellular phones, or a cellular phone and an audio device).
1 Place the BLUETOOTH device within 1 m (3 ft) of this unit.
2 Press MENU, rotate the control dial to select [BLUETOOTH], then press it.
3 Rotate the control dial to select [SET PAIRING], then press it.
4 Rotate the control dial to select [SET DEVICE 1] or [SET DEVICE 2], then press it.
flashes while the unit is in pairing standby mode.
* [SET DEVICE 1] or [SET DEVICE 2] will be changed to the paired device name after pairing is complete.
5 Perform pairing on the BLUETOOTH device so it detects this unit.
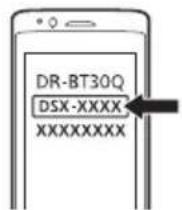
6 Select [DSX-XXXX] (your model name) shown in the display of the BLUETOOTH device.
If your model name does not appear, repeat from step 2.
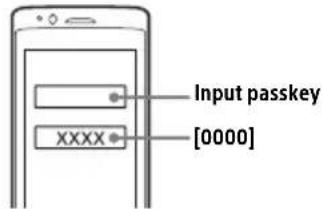
7 If passkey* input is required on the BLUETOOTH device, input [0000].
- Passkey may be called "Passcode," "PIN code," "PIN number" or "Password," etc., depending on the device.
When pairing is made, Says lit.
8 Select this unit on the BLUETOOTH device to establish the BLUETOOTH connection.
or flights up when the connection is made.
Note
While connecting to a BLUETOOTH device, this unit cannot be detected from another device. To enable detection, enter the pairing mode and search for this unit from another device.
To start playback
For details, see "Playing a BLUETOOTH Device" (page 13).
To disconnect the paired device
Perform step 2 to 4 to disconnect after this unit and the BLUETOOTH device are paired.
Connecting with a paired BLUETOOTH device
To use a paired device, connection with this unit is required. Some paired devices will connect automatically.
1 Press MENU, rotate the control dial to select [BLUETOOTH], then press it.
2 Rotate the control dial to select [SET BT SIGNAL], then press it. Make sure that lights up.
3 Activate the BLUETOOTH function on the BLUETOOTH device.
4 Operate the BLUETOOTH device to connect to this unit. or rights up.
Icons in the display:
| B | Lights up when handsfree calling is available by enabling the HFP (Handsfree Profile). |
| D | Lights up when the audio device is playable by enabling the A2DP (Advanced Audio Distribution Profile). |
To connect the last-connected device from this unit
Activate the BLUETOOTH function on the BLUETOOTH device.
To connect with the audio device, press SRC to select [BT AUDIO] and press (play/ pause). To connect with the cellular phone, press CALL.
Note
While streaming BLUETOOTH audio, you cannot connect from this unit to the cellular phone. Connect from the cellular phone to this unit instead.
Tip
With BLUETOOTH signal on: when the ignition is turned to on, this unit reconnects automatically to the last-connected cellular phone.
Connecting with an iPhone/iPod (BLUETOOTH Auto Pairing)
When an iPhone/iPod with iOS5 or later installed is connected to the USB port, the unit is paired and connected with the iPhone/iPod automatically. To enable BLUETOOTH Auto Pairing, make sure [SET AUTOPAIR] in [BLUETOOTH] is set to [ON] (page 21).
1 Activate the BLUETOOTH function on the iPhone/iPod.
2 Connect an iPhone/iPod to the USB port.
Make sure that lights up on the display of the unit.
Notes
- BLUETOOTH Auto Pairing is not possible if the unit is already connected to another BLUETOOTH device. In this case, disconnect the other device, then connect the iPhone/iPod again.
- If BLUETOOTH Auto Pairing is not established, see "Preparing a BLUETOOTH Device" (page 8).
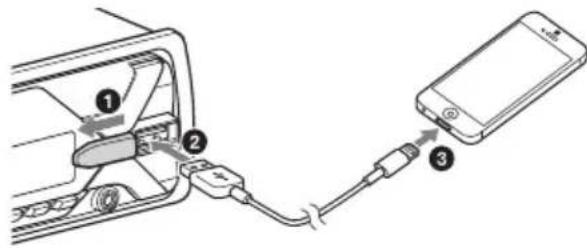
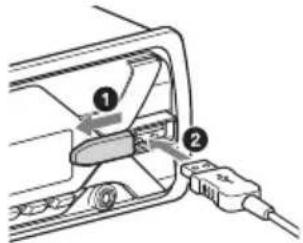
Connecting a USB Device
1 Turn down the volume on the unit.
2 Connect the USB device to the unit.
To connect an iPod/iPhone, use the USB connection cable for iPod (not supplied).
Connecting Other Portable Audio Device
1 Turn off the portable audio device.
2 Turn down the volume on the unit.
3 Connect the portable audio device to the AUX input jack (stereo mini jack) on the unit with a connecting cord (not supplied)*.
- Be sure to use a straight type plug.
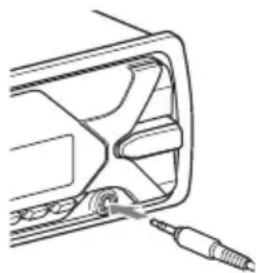
4 Press SRC to select [AUX].
To match the volume level of the connected device to other sources
Start playback of the portable audio device at a moderate volume, and set your usual listening volume on the unit. Press MENU, then select [SOUND] [SET AUX VOL] (page 21).
Listening to the Radio
Listening to the Radio
To listen to the radio, press SRC to select [TUNER].
Storing automatically (BTM)
1 Press MODE to change the band (FM1, FM2, FM3, MW or LW).
2 Press MENU, rotate the control dial to select [GENERAL], then press it.
3 Rotate the control dial to select [SET BTM], then press it. The unit stores stations in order of frequency on the number buttons.
Tuning
1 Press MODE to change the band (FM1, FM2, FM3, MW or LW).
2 Perform tuning.
To tune manually
Press and hold 1 / >1 (SEEK-/+ to locate the approximate frequency, then press 1 / >1 (SEEK-/+ ) repeatedly to finely adjust to the desired frequency.
To tune automatically
Press I / I (SEEK-/+).
Scanning stops when the unit receives a station.
Storing manually
1 While receiving the station that you want to store, press and hold a number button (1 to 6) until [MEM] appears.
Receiving the stored stations
1 Select the band, then press a number button (1 to 6).
Using Radio Data System (RDS)
Setting alternative frequencies (AF) and traffic announcement (TA)
AF continuously retunes the station to the strongest signal in a network, and TA provides current traffic information or traffic programs (TP) if received.
1 Press MENU, rotate the control dial to select [GENERAL], then press it.
2 Rotate the control dial to select [SET AF/ TA], then press it.
3 Rotate the control dial to select [SET AF-ON], [SET TA-ON], [SET AF/TA-ON] or [SET AF/TA-OFF], then press it.
To store RDS stations with the AF and TA setting
You can preset RDS stations along with an AF/TA setting. Set AF/TA, then store the station with BTM or manually. If you preset manually, you can also preset non-RDS stations.
To receive emergency announcements
With AF or TA on, emergency announcements will automatically interrupt the currently selected source.
To adjust the volume level during a traffic announcement
Level will be stored into memory for subsequent traffic announcements, independently from the regular volume level.
To stay with one regional program (REGIONAL)
When the AF and REGIONAL functions are on, you will not be switched to another regional station with a stronger frequency. If you leave this regional program's reception area, set [SET REG-OFF] in [GENERAL] during FM reception (page 20).
This function does not work in the UK and some other areas.
Local Link function (UK only)
This function enables you to select other local stations in the area, even if they are not stored on your number buttons.
During FM reception, press a number button (1 to 6) on which a local station is stored. Within 5 seconds, press again a number button of the local station.
Repeat this procedure until the local station is received.
Selecting program types (PTY)
1 Press PTY during FM reception.
2 Rotate the control dial until the desired program type appears, then press it.
The unit starts to search for a station broadcasting the selected program type.
Type of programs
NEWS (News), AFFAIRS (Current Affairs), INFO (Information), SPORT (Sports), EDUCATE (Education), DRAMA (Drama), CULTURE (Culture), SCIENCE (Science), VARIORED (Varied), POP M (Pop Music), ROCK M (Rock Music), EASY M (Easy Listening), LIGHT M (Light classical), CLASSICS (Serious classical), OTHER M (Other Music), WEATHER (Weather), FINANCE (Finance), CHILDREN (Children's program), SOCIAL (Social Affairs), RELIGION (Religion), PHONE IN (Phone In), TRAVEL (Travel), LEISURE (Leisure), JAZZ (Jazz Music), COUNTRY (Country Music), NATION M (National Music), OLDIES (Oldies Music), FOLK M (Folk Music), DOCUMENT (Documentary)
Playback
Playing a USB Device
In these Operating Instructions, "iPod" is used as a general reference for the iPod functions on an iPod and iPhone, unless otherwise specified by the text or illustrations.
For details on the compatibility of your iPod, see "About iPod" (page 23) or visit the support site on the back cover.
AOA (Android Open Accessory) 2.0, MSC (Mass Storage Class) and MTP (Media Transfer Protocol) type USB devices* compliant with the USB standard can be used. Depending on the USB device, the Android mode or MSC/MTP mode can be selected on the unit.
Some digital media players or Android smartphones may require setting to MTP mode.
- e.g., a USB flash drive, digital media player, Android smartphone
Notes
-
For details on the compatibility of your USB device, visit the support site on the back cover.
-
Smartphones with Android OS 4.1 or higher installed support Android Open Accessory 2.0 (AOA 2.0). However, some smartphones may not fully support AOA 2.0 even if Android OS 4.1 or higher is installed. For details on the compatibility of your Android smartphone, visit the support site on the back cover.
-
Playback of the following files is not supported. MP3/WMA/AAC/FLAC:
copyright-protected files
- DRM (Digital Rights Management) files
- Multi-channel audio files
MP3/WMA/AAC:
- lossless compression files
Before making a connection, select the USB mode (Android mode or MSC/MTP mode) depending on the USB device (page 20).
1 Connect a USB device to the USB port (page 10).
Playback starts.
If a device is already connected, to start playback, press SRC to select [USB] ([IPD])
appears in the display when the iPod is recognized).
2 Adjust the volume on this unit.
To stop playback
Press and hold OFF for 1 second.
To remove the device
Stop playback, then remove the device.
Caution for iPhone
When you connect an iPhone via USB, phone call volume is controlled by the iPhone, not the unit. Do not inadvertently increase the volume on the unit during a call, as a sudden loud sound may result when the call ends.
Playing a BLUETOOTH Device
You can play contents on a connected device that supports BLUETOOTH A2DP (Advanced Audio Distribution Profile).
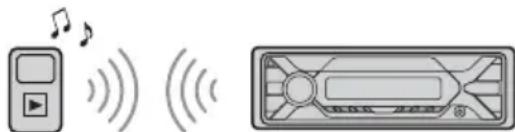
1 Make BLUETOOTH connection with the audio device (page 8).
To select the audio device, press MENU, then select [BLUETOOTH] [SET AUDIODEV] (page 21).
2 Press SRC to select [BT AUDIO].
3 Operatethe audio device to start playback.
4 Adjust the volume on this unit.
Notes
- Depending on the audio device, information such as title, track number/time and playback status may not be displayed on this unit.
- Even if the source is changed on this unit, playback of the audio device does not stop.
- [BT AUDIO] does not appear in the display while running the "Sony | Music Center" application via the BLUETOOTH function.
To match the volume level of the BLUETOOTH device to other sources
Start playback of the BLUETOOTH audio device at a moderate volume, and set your usual listening volume on the unit.
Press MENU, then select [SOUND] [SET BTA VOL] (page 21).
Searching and Playing Tracks
Repeat play and shuffle play
Not available when a USB device in Android mode is connected.
1 During playback, press (repeat) or (shuffle) repeatedly to select the desired play mode.
Playback in the selected play mode may take time to start.
Available play modes differ depending on the selected sound source.
Searching a track by name (QuickBrowZerTM)
Not available when a USB device in Android mode or iPod is connected.
1 During USB playback, press (Browse)* to display the list of search categories.
When the track list appears, press back) repeatedly to display the desired search category.
- During USB playback, press (Browse) for more than 2 seconds to directly return to the beginning of the category list.
2 Rotate the control dial to select the desired search category, then press it to confirm.
3 Repeat step 2 to search the desired track. Playback starts.
To exit the Quick-BrowZer mode
Press (browse).
Searching by skipping items (Jump mode)
Not available when a USB device in Android mode or iPod is connected.
1 During USB playback, press (Browse).
2 Press (SEEK +).
3 Rotate the control dial to select the item.
The list is jumped in steps of 10% of the total number of items.
4 Press ENTER to return to the QuickBrowZer mode.
The selected item appears.
5 Rotate the control dial to select the desired item, then press it.
Playback starts.
Handsfree Calling (via BLUETOOTH only)
To use a cellular phone, connect it with this unit. You can connect two cellular phones to the unit. For details, see "Preparing a BLUETOOTH Device" (page 8).

Receiving a Call
1 Press CALL when a call is received with a ringtone.
The phone call starts.
Note
The ringtone and talker's voice are output from the front speakers. To select the speakers for handsfree calling, press MENU, then select [BLUETOOTH] [SET VOICE-OUT] (page 22).
To reject the call
Press and hold OFF for 1 second.
To end the call
PressCALL again.
Making a Call
You can make a call from the phonebook or call history when a cellular phone supporting PBAP (Phone Book Access Profile) is connected. When two cellular phones are connected to the unit, select either phone.
From the phonebook
1 Press CALL.
When two cellular phones are connected to the unit, rotate the control dial to select either phone, then press it.
2 Rotate the control dial to select [PHONE BOOK], then press it.
3 Rotate the control dial to select an initial from the initial list, then press it.
4 Rotate the control dial to select a name from the name list, then press it.
5 Rotate the control dial to select a number from the number list, then press it.
The phone call starts.
From the call history
1 Press CALL.
When two cellular phones are connected to the unit, rotate the control dial to select either phone, then press it.
2 Rotate the control dial to select [RECENT CALL], then press it.
A list of the call history appears.
3 Rotate the control dial to select a name or phone number from the call history, then press it.
The phone call starts.
By phone number input
1 Press CALL.
When two cellular phones are connected to the unit, rotate the control dial to select either phone, then press it.
2 Rotate the control dial to select [DIAL NUMBER], then press it.
3 Rotate the control dial to enter the phone number, and lastly select [ ] (space), then press ENTER*.
The phone call starts.
- To move the digital indication, press I▶/▶I (SEEK -/+).
Note
[ ] appears instead of [#] on the display.
By redial
1 Press CALL.
When two cellular phones are connected to the unit, rotate the control dial to select either phone, then press it.
2 Rotate the control dial to select [REDIAL], then press it.
The phone call starts.
By voice tags
You can make a call by saying the voice tag stored in a connected cellular phone that has a voice dialing function.
1 Press CALL.
When two cellular phones are connected to the unit, rotate the control dial to select either phone, then press it.
2 Rotate the control dial to select [VOICE DIAL], then press it.
Alternatively, press and hold VOICE for more than 2 seconds.
3 Say the voice tag stored on the cellular phone.
Your voice is recognized, and the call is made.
To cancel voice dialing
Press VOICE.
Available Operations during Call
To adjust the ringtone volume
Rotate the control dial while receiving a call.
To adjust the talker's voice volume
Rotate the control dial during a call.
To adjust the volume for the other party (Mic gain adjustment)
Press MIC.
Adjustable volume levels: [MIC-LOW], [MIC-MID], [MIC-HI].
To reduce echo and noise (Echo Canceler/ Noise Canceler Mode)
Press and hold MIC.
Settable mode: [EC/NC-1], [EC/NC-2].
To switch between handsfree mode and handheld mode
During a call, press MODE to switch the phone call audio between the unit and cellular phone.
Note
Depending on the cellular phone, this operation may not be available.
Useful Functions
Sony | Music Center with iPhone/Android smartphone
Downloading the latest version of "Sony | Music Center" application is required from the App Store for iPhone or from Google Play for Android smartphone.
Notes
- For your safety, follow your local traffic laws and regulations, and do not operate the application while driving.
- "Sony | Music Center" is an app for controlling Sony audio devices which are compatible with "Sony | Music Center", by your iPhone/Android smartphone.
- What you can control with "Sony | Music Center" varies depending on the connected device.
To make use of "Sony | Music Center" features, see the details on your iPhone/Android smartphone.
For further details on "Sony | Music Center," visit the following URL: http://www.roy.net/smcga/ - Visit the website below and check the compatible iPhone/Android smartphone models.
For iPhone: visit the App Store
For Android smartphone: visit Google Play
Establishing the Sony | Music Center connection
1 Make the BLUETOOTH connection with iPhone/Android smartphone (page 8).
To select the audio device, press MENU, then select [BLUETOOTH] [SET AUDIODEV] (page 21).
2 Launch the "Sony | Music Center" application.
3 Press MENU, rotate the control dial to select [SONY APP], then press it.
Connection to iPhone/Android smartphone starts.
For details on the operations on iPhone/
Android smartphone, see the help of the application.
If the device number appears
Make sure that the number is displayed (e.g., 123456), then select [Yes] on the iPhone/Android smartphone.
To terminate connection
Press MENU, rotate the control dial to select [SONY APP], then press it.
Selecting the source or application
You can operate to select the desired source or application on iPhone/Android smartphone.
To select the source
Press SRC repeatedly. Alternatively, press SRC, rotate the control dial to select the desired source, then press ENTER.
To display the source list
Press SRC.
Announcement of SMS by voice guide (Android smartphone only)
Messages of SMS are automatically read out through the car speakers when they are received.
For details on settings, refer to the help of the application.
Replying a message of SMS (Android smartphone only)
You can reply a message by touching the reply icon.
1 Activate the "Sony | Music Center" application, then touch the [Reply] (reply) icon. The message input display appears on the "Sony | Music Center" application.
2 Input a reply message by voice recognition. The list of message candidates appears on the "Sony | Music Center" application.
3 Rotate the control dial to select the desired message, then press it. The message is sent out.
Making sound and display settings
You can adjust the settings relating to sound and display via iPhone/Android smartphone.
For details on settings, refer to the help of the application.
Using Voice Recognition (Android smartphone only)
1 Press and hold VOICE to activate voice recognition.
2 Say the desired voice command into the microphone.
To deactivate voice recognition
Press VOICE.
Notes
Voice recognition may not be available in some cases.
- Voice recognition may not work properly depending on the performance of the connected Android smartphone.
- Operate under conditions where noise such as engine sound is minimized during voice recognition.
Using Siri Eyes Free
Siri Eyes Free allows you to use an iPhone handsfree by simply speaking into the microphone. This function requires you to connect an iPhone to the unit via BLUETOOTH. Availability is limited to iPhone 4s or later. Make sure that your iPhone is running the latest iOS version. You must complete BLUETOOTH registration and connection configurations for the iPhone with the unit in advance. For details, see "Preparing a BLUETOOTH Device" (page 8). To select the iPhone, press MENU, then select [BLUETOOTH] [SET AUDIODEV] (page 21).
1 Activate the Siri function on the iPhone.
For details, refer to the operating instructions supplied with the iPhone.
2 Press and hold VOICE for more than 2 seconds.
The voice command display appears.
3 After the iPhone beeps, speak into the microphone.
The iPhone beeps again, then Siri starts responding.
To deactivate Siri Eyes Free
Press VOICE.
Notes
- The iPhone may not recognize your voice depending on usage conditions. (For example, if you are in a moving car.)
- Siri Eyes Free may not function properly, or the response time may lag in locations where iPhone signals are difficult to receive.
Depending on the iPhone's operating condition, Siri Eyes Free may not function properly, or may quit. - If you play a track with an iPhone using the BLUETOOTH audio connection, when the track starts playback via BLUETOOTH, Siri Eyes Free automatically quits and the unit switches to the BLUETOOTH audio source.
- When Siri Eyes Free is activated during audio playback, the unit may switch to the BLUETOOTH audio source even if you do not specify a track to play
- When connecting the iPhone to the USB port, Siri Eyes Free may not function properly, or may quit.
- When connecting the iPhone to the unit via USB, do not activate Siri with the iPhone. Siri Eyes Free may not function properly, or may quit.
- There is no audio sound while Siri Eyes Free is activated.
Settings
Canceling the DEMO Mode
You can cancel the demonstration display which appears when the source is off and the clock is displayed.
1 Press MENU, rotate the control dial to select [GENERAL], then press it.
2 Rotate the control dial to select [SET DEMO], then press it.
3 Rotate the control dial to select [SET DEMO-OFF], then press it. The setting is complete.
4 Press back) twice. The display returns to normal reception/play mode.
Basic Setting Operation
You can set items in the following setup categories: General setup (GENERAL), Sound setup (SOUND), Display setup (DISPLAY), BLUETOOTH Setup (BLUETOOTH), Sony | Music Center Setup (SONY APP)
1 Press MENU.
2 Rotate the control dial to select the setup category, then press it.
The items that can be set differ depending on the source and settings.
3 Rotate the control dial to select the options, then press it.
To return to the previous display
Press (back).
General Setup (GENERAL)
AREA
Specifies the area/region to use this unit: [EUROPE], [RUSSIA]. If the area/region currently set is changed, this unit is reset, then the clock is displayed. (Available only while the source is off and the clock is displayed.)
DEMO (demonstration)
Activates the demonstration: [ON], [OFF].
CLOCK (clock) (page 7)
Sets the clock: [AUTO
CAUT ALM (caution alarm)
Activates the caution alarm: [ON], [OFF] (page 6).
(Available only while the source is off and the clock is displayed.)
BEEP
Activates the beep sound: [ON], [OFF].
AUTO OFF
Shuts off automatically after a certain time when the unit is turned off: [ON] (30 minutes), [OFF].
STEERING
Registers/rewets the setting of the steering wheel remote control.
(Available when connected with the connection cable (not supplied).) (Available only while the source is off and the clock is displayed.)
STR CONTROL (steering control)
Selects the input mode of the connected remote control. To prevent a malfunction, be sure to match the input mode with the connected remote control before use.
CUSTOM
Input mode for the steering wheel remote control
PRESET
Input mode for the wired remote control excluding the steering wheel remote control (automatically selected when [RESET CUSTOM] is performed.)
EDIT CUSTOM
Registers the functions (SOURCE, ATT, VOL +/-, SEEK +/-, VOICE, ON HOOK, OFF HOOK) to the steering wheel remote control:
1 Rotate the control dial to select the function you want to assign to the steering wheel remote control, then press it.
2 While [REGISTER] is blinking, press and hold the button on the steering wheel remote control you want to assign the function to. When registration is complete, [REGISTERED] is displayed.
3 To register other functions, repeat steps 1 and 2.
(Available only when [STR CONTROL] is set to [CUSTOM].)
RESET CUSTOM
Reset the setting of the steering wheel remote control: [YES], [NO].
(Available only when [STR CONTROL] is set to [CUSTOM].)
Notes
- While making settings, only button operation on the unit is available. For safety, park your car before making this setting.
If an error occurs while registering, all the previously-registered information remains. Restart registration from the function where the error occurred. - This function may not be available on some vehicles. For details on the compatibility of your vehicle, visit the support site on the back cover.
USB MODE
Changes the USB mode: [ANDROID], [MSC/MTP]. (Available only when the USB source is selected.)
AF/TA (alternative frequencies/traffic announcement)
Selects the alternative frequencies (AF) and traffic announcement (TA) setting: [AF-ON], [TA-ON], [AF/TA-ON], [AF/TA-OFF].
(Available when any source is selected.)
REGIONAL
Restricts reception to a specific region: [ON], [OFF]. (Available only when FM is received.)
BTM (best tuning memory) (page 11)
(Available only when the tuner is selected.)
FIRMWARE
(Available only while the source is off and the clock is displayed.)
Checks/updates the firmware version. For details, visit the support site on the back cover. FW VERSION (firmware version)
Displays current firmware version.
FW UPDATE (firmware update)
Enters firmware update process: [YES], [NO].
Updating the firmware takes a few minutes to complete. During the update, do not turn the ignition to the OFF position, nor remove the USB device.
Sound Setup (SOUND)
This setup menu is available when any source is selected.
EQ10 PRESET
Selects an equalizer curve from 10 equalizer curves or off:
[OFF], [R&B], [ROCK], [POP], [HIP-HOP], [EDM], [JAZZ], [SOUL], [COUNTRY], [KARAOKE]*, [CUSTOM].
The equalizer curve setting can be memorized for each source.
- [KARAOKE] reduces the vocal sound but cannot fully remove it during playback. Also, using a microphone is not supported.
EQ10 CUSTOM
Sets [CUSTOM] of EQ10.
Selects the equalizer curve:
[BAND1] 32 Hz, [BAND2] 63 Hz, [BAND3] 125 Hz, [BAND4] 250 Hz, [BAND5] 500 Hz, [BAND6] 1 kHz, [BAND7] 2 kHz, [BAND8] 4 kHz, [BAND9] 8 kHz, [BAND10] 16 kHz.
The volume level is adjustable in 1 dB steps, from -6 dB to +6 dB.
BALANCE
Adjusts the sound balance: [RIGHT-15] - [CENTER] - [LEFT-15].
FADER
Adjusts the relative level: [FRONT-15] - [CENTER] - [REAR-15].
([ATT] is displayed at the lowest setting.)
Selects the subwoofer phase: [NORM], [REV].
LPF FREQ (low pass filter frequency)
Selects the subwoofer cut-off frequency: [80Hz], [100Hz], [120Hz].
HPF FREQ (high pass filter frequency)
Selects the front/rear speaker cut-off frequency:
[OFF], [80Hz], [100Hz], [120Hz].
AUX VOL (AUX volume)
Adjusts the volume level for each connected auxiliary device: [+18dB] - [0dB] - [-8dB]
This setting negates the need to adjust the volume level between sources.
(Available only when the AUX is selected.)
BTA VOL (BLUETOOTH audio volume level)
Adjusts the volume level for each connected BLUETOOTH device: [+6dB] - [0dB] -[-6 dB].
This setting negates the need to adjust the volume level between sources.
Display Setup (DISPLAY)
DIMMER
Changes the display brightness: [ON], [OFF], [CLK] (clock).
To set this function to be active only during a fixed period, select [CLK], then set the start and end times.
- To set the brightness when the dimmer function is activated:
Set [DIMMER] to [ON], then adjust [BRIGHTNESS].
- To set the brightness when the dimmer function is deactivated:
Set [DIMMER] to [OFF], then adjust [BRIGHTNESS].
The brightness setting is stored and applied when the dimmer function is activated or deactivated.
BRIGHTNESS
Adjusts the display brightness. The brightness level is adjustable: [1] - [10].
SND SYNC (sound synchronization)
Activates the synchronization of the illumination with the sound: [ON], [OFF].
AUTO SCR (auto scroll)
Scrolls long items automatically: [ON], [OFF].
(Not available when the AUX or tuner is selected.)
BLUETOOTH Setup (BLUETOOTH)
PAIRING (page 8)
Connects up to two BLUETOOTH devices: [DEVICE 1], [DEVICE 2].
[DEVICE 1] or [DEVICE 2] will be changed to the paired device name after pairing is complete.
AUDIODEV (audio device)
Selects the audio device. [ ] appears on the device paired with [DEVICE 1] or the current A2DP compatible audio device.
RINGTONE
Selects whether this unit or the connected cellular phone outputs the ringtone: [1] (this unit), [2] (cellular phone).
AUTOANS (auto answer)
Sets this unit to answer an incoming call automatically: [OFF], [1] (about 3 seconds), [2] (about 10 seconds).
AUTOPAIR (auto pairing)
Starts BLUETOOTH pairing automatically when iOS device version 5.0 or later is connected via USB: [ON], [OFF].
BT SIGNL (BLUETOOTH signal) (page 9)
Activates/deactivates the BLUETOOTH function.
BT INIT (BLUETOOTH initialize)
Initializes all the BLUETOOTH related settings (pairing information, device information, etc.): [YES], [NO].
When disposing the unit, initialize all the settings.
(Available only while the source is off and the clock is displayed.)
VOICE-OUT (voice output)
Selects the speakers for handsfree calling: [VOICE FRONT] (front speakers), [VOICE REAR] (rear speakers), [VOICE ALL] (all speakers).
(Available only while the source is off and the clock is displayed.)
Sony | Music Center Setup (SONY APP)
Establish and terminate "Sony | Music Center" function (connection).
Additional Information
Updating the Firmware
To update the firmware, visit the support site on the back cover, then follow the online instructions.
Notes
- Using a USB device (not supplied) is required for updating the firmware. Store the updater in the USB device, and connect the device to the USB port, then perform the update operation.
- Updating the firmware takes a few minutes to complete. During the update, do not turn the ignition to the OFF position, nor remove the USB device.
Precautions
Cool off the unit beforehand if your car has been parked in direct sunlight.
- Do not leave the front panel or audio devices brought in inside the car, or it may cause malfunction due to high temperature in direct sunlight.
Power antenna (aerial) extends automatically.
To maintain high sound quality
Do not splash liquid onto the unit.
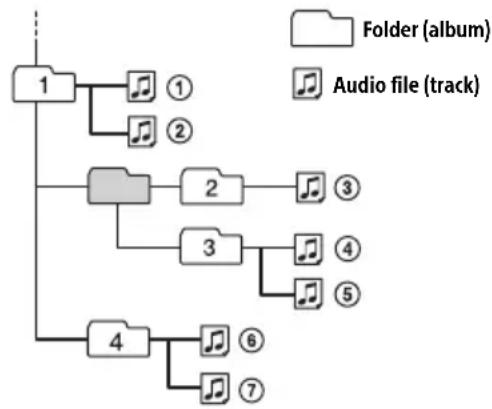
Playback order of audio files
About iPod
- You can connect to the following iPod models. Update your iPod devices to the latest software before use.
Compatible iPhone/iPod models
| Compatible Model Bluetooth® USB | ||
| iPhone X √ | √ | |
| iPhone 8 √ | √ | |
| iPhone 8 Plus √ | √ | |
| iPhone 7 √ | √ | |
| iPhone 7 Plus √ | √ | |
| iPhone SE √ | √ | |
| iPhone 6s √ | √ | |
| iPhone 6s Plus √ | √ | |
| iPhone 6 √ | √ | |
| iPhone 6 Plus √ | √ | |
| iPhone 5s √ | √ | |
| iPhone 5c √ | √ | |
| iPhone 5 √ | √ | |
| iPhone 4s √ | √ | |
| iPod touch (6th generation) | √ | √ |
| iPod touch (5th generation) | √ | √ |
| iPod nano (7th generation) | √ | |
- Use of the Made for Apple badge means that an accessory has been designed to connect specifically to the Apple product(s) identified in the badge, and has been certified by the developer to meet Apple performance standards. Apple is not responsible for the operation of this device or its compliance with safety and regulatory standards. Please note that the use of this accessory with an Apple product may affect wireless performance.
If you have any questions or problems concerning your unit that are not covered in this manual, consult your nearest Sony dealer.
Maintenance
Cleaning the connectors
The unit may not function properly if the connectors between the unit and the front panel are not clean. In order to prevent this, detach the front panel (page 6) and clean the connectors with a cotton swab. Do not apply too much force. Otherwise, the connectors may be damaged.
Notes
- For safety, turn off the ignition before cleaning the connectors, and remove the key from the ignition switch.
- Never touch the connectors directly with your fingers or with any metal device.
Specifications
Tuner section
FM
Tuning range: When [AREA] is set to [EUROPE]: 87.5 MHz - 108.0 MHz When [AREA] is set to [RUSSIA]: FM1/FM2: 87.5 MHz - 108.0 MHz (at 50 kHz step) FM3: 65 MHz - 74 MHz (at 30 kHz step) Antenna (aerial) terminal: External antenna (aerial) connector Usable sensitivity: 7 dBf
Selectivity: 75 dB at 400kHz
Signal-to-noise ratio: 73 dB
Separation: 50 dB at 1 kHz
Frequency response: 20Hz - 15,000Hz
MW/LW
Tuning range:
MW:531kHz-1,602kHz
LW:153kHz-279kHz
Antenna (aerial) terminal:
External antenna (aerial) connector
Sensitivity: MW: 26 V , LW: 50 V
USB Player section
Interface: USB (Full-speed)
Maximum current: 1 A
Maximum number of recognizable folders and files:
Folders (albums): 256
Files (tracks) per folder: 256
Compatible Android Open Accessory protocol (AOA): 2.0
Corresponding codec:
MP3 (.mp3)
Bit rate: 8 kbps - 320 kbps (Supports VBR
(Variable Bit Rate)
Sampling rate: 16 kHz - 48 kHz
WMA (.wma)
Bit rate: 32 kbps - 192 kbps (Supports VBR
(Variable Bit Rate)
Sampling rate: 32kHz 44.1 kHz, 48 kHz
AAC (.m4a, .mp4)
Bit rate: 16 kbps - 320 kbps (stereo)
Sampling rate: 8kHz - 48kHz
FLAC(.flac)
Bit depth: 16 bit, 24 bit
Sampling rate: 44.1 kHz, 48 kHz
Wireless Communication
Communication System:
BLUETOOTH Standard version 3.0
Output:
BLUETOOTH Standard Power Class 2
(radiated -9 dBm)
Maximum communication range:
Line of sight approx. 10m (33 ft)*1
Frequency band:
2.4 GHz band (2.4000 GHz - 2.4835 GHz)
Modulation method: FHSS
Compatible BLUETOOTH Profiles:
A2DP (Advanced Audio Distribution Profile) 1.3
AVRCP (Audio Video Remote Control Profile) 1.3
HFP (Handsfree Profile) 1.6
PBAP (Phone Book Access Profile)
SPP (Serial Port Profile)
Corresponding codec:
SBC (.sbc), AAC (.m4a)
*1 The actual range will vary depending on factors such as obstacles between devices, magnetic fields around a microwave oven, static electricity, reception sensitivity, antenna (aerial)'s performance, operating system, software application, etc.
*2 BLUETOOTH standard profiles indicate the purpose of BLUETOOTH communication between devices.
NFC Communication
Frequency band and maximum power spec
NFC: 13.56 MHz < 60 dBμA/m at 10 m
Power amplifier section
Output: Speaker outputs
Speaker impedance: 4 -8
Maximum power output: 55W× 4 (at 4
General
Outputs:
Audio outputs terminal (REAR, SUB)
Power antenna (aerial)/Power amplifier control terminal (REM OUT)
Inputs:
Remote controller input terminal
Antenna (aerial) input terminal
Power requirements: 12 V DC car battery (negative ground (earth))
Rated current consumption: 10 A
Dimensions:
Approx. 178mm× 50mm× 119mm
(71 / 8 in × 2 in × 4^3 / 4 in)(w / h / d)
Mounting dimensions:
Approx. 182mm× 53mm× 102mm
(7^1 / 4 in × 2^1 / 8 in × 4^1 / 8 in) (w/h/d)
Mass: Approx. 0.7kg (1 lb 9 oz)
Package contents:
Main unit (1)
Parts for installation and connections (1 set)
Your dealer may not handle some of the above listed accessories. Please ask the dealer for detailed information.
Design and specifications are subject to change without notice.
Copyrights
The Bluetooth® word mark and logos are registered trademarks owned by the Bluetooth SIG, Inc. and any use of such marks by Sony Corporation is under license. Other trademarks and trade names are those of their respective owners.
The N-Mark is a trademark or registered trademark of NFC Forum, Inc. in the United States and in other countries.
Windows Media is either a registered trademark or trademark of Microsoft Corporation in the United States and/or other countries.
This product is protected by certain intellectual property rights of Microsoft Corporation. Use or distribution of such technology outside of this product is prohibited without a license from Microsoft or an authorized Microsoft subsidiary.
Apple, iPhone, iPod, iPod nano, iPod touch, and Siri are trademarks of Apple Inc., registered in the U.S. and other countries. App Store is a service mark of Apple Inc.
IOS is a trademark or registered trademark of Cisco in the U.S. and other countries and is used under license.
Google, Google Play and Android are trademarks of Google LLC.
libFLAC
Copyright (C) 2000-2009 Josh Coalson
Copyright (C) 2011-2013 Xiph.Org Foundation
Redistribution and use in source and binary forms, with or without modification, are permitted provided that the following conditions are met:
-
Redistributions of source code must retain the above copyright notice, this list of conditions and the following disclaimer.
-
Redistributions in binary form must reproduce the above copyright notice, this list of conditions and the following disclaimer in the documentation and/or other materials provided with the distribution.
- Neither the name of the Xiph.org Foundation nor the names of its contributors may be used to endorse or promote products derived from this software without specific prior written permission.
THIS SOFTWARE IS PROVIDED BY THE COPYRIGHT HOLDERS AND COLNTRIBUTORS "AS IS" AND ANY EXPRESS OR IMPLIED WARRANTY, INCLUDING, BUT NOT LIMITED TO, THE IMPLIED WARRANTY OF MERCHANTABILITY AND FITNESS FOR A PARTICULAR PURPOSE ARE DISCLAIMED. IN NO EVENT SHALL THE FOUNDATION OR COLNTRIBUTORS BE LIABLE FOR ANY DIRECT, INDIRECT, INCIDENTAL, SPECIAL, EXEMPLARY, OR CONSEQUENTIAL DAMAGES (INCLUDING, BUT NOT LIMITED TO, PROCUREMENT OF SUBSTITUTE GOODS OR SERVICES; LOSS OF USE, DATA, OR PROFITS; OR BUSINESS INTERRUsION) HOWEVER CAUSED AND ON ANY THEORY OF LIABILITY, WHETHER IN CONTRACT, STRICT LIABILITY, OR TORT (INCLUDING NEGLIGENCE OR OTHERWISE) ARISING IN ANY WAY OUT OF THE USE OF THIS SOFTWARE, EVEN IF ADVISED OF THE POSSIBILITY OF SUCH DAMAGE.
Troubleshooting
The following checklist will help you remedy problems you may encounter with your unit.
Before going through the checklist below, check the connection and operating procedures.
For details on using the fuse and removing the unit from the dashboard, see "Connection/Installation" (page 32).
If the problem is not solved, visit the support site on the back cover.
General
No sound or the sound is very low.
The position of the fader control [FADER] is not set for a 2-speaker system.
The volume of the unit and/or connected device is very low.
- Increase the volume of the unit and connected device.
No beep sound.
An optional power amplifier is connected and you are not using the built-in amplifier.
The contents of the memory have been erased.
The power supply lead or battery has been disconnected or not connected properly.
Stored stations and correct time are erased. The fuse has blown.
Makes a noise when the position of the ignition is switched.
The leads are not matched correctly with the car's accessory power connector.
During playback or reception, the demonstration mode starts.
If no operation is performed for 5 minutes with [DEMO-ON] set, the demonstration mode starts.
- Set [DEMO-OFF] (page 19).
The display disappears from/does not appear in the display window.
The dimmer is set to [DIM-ON] (page 21).
The display disappears if you press and hold OFF.
- Press OFF on the unit until the display appears.
The connectors are dirty (page 23).
The display/illumination flashes.
The power supply is not sufficient.
- Check that the car battery supplies enough power to the unit. (The power requirement is 12 V DC.)
The operation buttons do not function.
Press DSPL and (back)/MODE for more than 2 seconds to reset the unit.
The contents stored in memory are erased.
For your safety, do not reset the unit while you are driving.
The clock set automatically is not accurate.
The clock data on radio waves is not accurate.
- Set the clock manually (page 7).
Radio reception
Stations cannot be received.
The sound is hampered by noises.
The connection is not correct.
- Check the connection of the car antenna (aerial).
If the auto antenna (aerial) will not extend, check the connection of the power antenna (aerial) control lead.
Preset tuning is not possible.
The broadcast signal is too weak.
65 MHz to 74 MHz in FM3 cannot be tuned in.
[AREA] is set to [EUROPE].
Set [AREA] to [RUSSIA] (page 19).
RDS
RDS services cannot be received (when [AREA] is set to [RUSSIA]).
FM3 is selected.
- Select FM1 or FM2.
RDS services are unavailable in the current region.
The SEEK starts after a few seconds of listening.
The station is non-TP or has weak signal.
- Deactivate TA (page 12).
No traffic announcements.
Activate TA (page 12).
The station does not broadcast any traffic announcements despite being TP.
Tune in another station.
PTY displays [ - - - ]
The current station is not an RDS station.
RDS data has not been received.
The station does not specify the program type.
Program service name flashes.
There is no alternative frequency for the current station.
- Press / (SEEK -/+ ) while the program service name is flashing. [PI SEEK] appears and the unit starts searching for another frequency with the same PI (program identification) data.
USB device playback
You cannot play items via a USB hub.
This unit cannot recognize USB devices via a USB hub.
A USB device takes longer to play.
The USB device contains files with a complicated tree structure.
The sound is intermittent.
The sound may be intermittent at a high-bit-rate.
DRM (Digital Rights Management) files may not be playable in some cases.
The audio file cannot be played.
USB devices formatted with file systems other than FAT16 or FAT32 are unsupported.*
* This unit supports FAT16 and FAT32, but some USB device may not support all of these FAT. For details, refer to the operating instruction of each USB device or contact the manufacturer.
Operations for skipping an album, skipping items (Jump mode), and searching a track by name (Quick-BrowZer) cannot be performed.
These operations cannot be performed when a USB device in Android mode or iPod is connected.
- Set [USB MODE] to [MSC/MTP] (page 20).
- Remove the iPod.
The USB mode of the device is not set to the appropriate mode.
- Make sure that the USB mode of the device is set to MSC/MTP mode.
The sound cannot be output during playback in Android mode.
While the unit is in Android mode, the sound outputs only from the Android smartphone.
- Check the status of the audio playback application on the Android smartphone.
- Playback may not perform properly depending on the Android smartphone.
NFC function
One-touch connection (NFC) is not possible.
If the smartphone does not respond to the touching.
- Check that the NFC function of the smartphone is turned on.
Move the N-Mark part of the smartphone closer to the N-Mark part on this unit.
If the smartphone is in a case, remove it.
NFC receiving sensitivity depends on the device. If One-touch connection with the smartphone fails several times, make BLUETOOTH connection manually.
BLUETOOTH function
The connecting device cannot detect this unit.
Before the pairing is made, set this unit to pairing standby mode.
While connected to a BLUETOOTH device, this unit cannot be detected from another device.
- Disconnect the current connection and search for this unit from another device.
When the device pairing is made, set the BLUETOOTH signal output to on (page 9).
Connection is not possible.
The connection is controlled from one side (this unit or BLUETOOTH device), but not both.
- Connect to this unit from a BLUETOOTH device or vice versa.
The name of the detected device does not appear.
Depending on the status of the other device, it may not be possible to obtain the name.
No ringtone.
Adjust the volume by rotating the control dial while receiving a call.
Depending on the connecting device, the ringtone may not be sent properly. Set [RINGTONE] to [1] (page 21).
The speakers are not connected to the unit. Connect the speakers to the unit. To select the speakers for ringtone, press MENU, then select [BLUETOOTH] [SET VOICE-OUT] (page 22).
The talker's voice cannot be heard.
The speakers are not connected to the u
- Connect the speakers to the unit. To select the speakers for talker's voice, press MENU, then select [BLUETOOTH] [SET VOICE-OUT] (page 22).
A call partner says that the volume is too low or high.
Adjust the volume accordingly using Mic gain adjustment (page 16).
Echo or noise occurs in phone call conversations.
Lower the volume.
Set EC/NC Mode to [EC/NC-1] or [EC/NC-2] (page 16).
If the ambient noise other than the phone call sound is loud, try reducing this noise. E.g.: If a window is open and road noise, etc., is loud, shut the window. If an air conditioner is loud, lower the air conditioner.
The phone is not connected.
When BLUETOOTH audio is played, the phone is not connected even if you press CALL.
- Connect from the phone.
The phone sound quality is poor.
Phone sound quality depends on reception conditions of cellular phone.
Move your car to a place where you can enhance the cellular phone's signal if the reception is poor.
The volume of the connected audio device is low (high).
Volume level will differ depending on the audio device.
- Adjust the volume of the connected audio device or this unit.
The sound skips during playback of a BLUETOOTH audio device.
Reduce the distance between the unit and the BLUETOOTH audio device.
If the BLUETOOTH audio device is stored in a case which interrupts the signal, remove the audio device from the case during use.
Several BLUETOOTH devices or other devices which emit radio waves are in use nearby.
-
Turn off the other devices.
-
Increase the distance from the other devices.
The playback sound stops momentarily when the connection between this unit and the cellular phone is being made. This is not a malfunction.
The connected BLUETOOTH audio device cannot be controlled.
Check that the connected BLUETOOTH audio device supports AVRCP.
Some functions do not work.
Check if the connecting device supports the functions in question.
A call is answered unintentionally.
The connecting phone is set to answer a call automatically.
Pairing failed due to a timeout.
Depending on the connecting device, the time limit for pairing may be short.
Try completing the pairing within the time.
Cannot pair.
The unit may not be able to pair with a previously paired BLUETOOTH device after initializing the unit if the pairing information of the unit is on the BLUETOOTH device. In this case, delete the pairing information of the unit from the BLUETOOTH device, and then pair them again.
BLUETOOTH function cannot operate.
Turn off the unit by pressing OFF for more than 2 seconds, then turn the unit on again.
No sound is output from the car speakers during handsfree call.
If the sound is output from the cellular phone, set the cellular phone to output the sound from the car speakers.
Siri Eyes Free is not activated.
Perform the handsfree registration for an iPhone that supports Siri Eyes Free.
Set the Siri function on the iPhone to on.
Cancel the BLUETOOTH connection with the iPhone and the unit, and reconnect.
Sony | Music Center operation
Application name is mismatched with the actual application in "Sony | Music Center".
Launch the application again from the "Sony | Music Center" application.
While running the "Sony | Music Center" application via BLUETOOTH, the display automatically switches to [BT AUDIO].
The "Sony | Music Center" application or BLUETOOTH function has failed.
Run the application again.
The "Sony | Music Center" application is automatically disconnected when the display switches to [IPOD].
The "Sony | Music Center" application on iPhone/ iPod does not support iPod playback.
- Change the source of the unit to other than [IPOD], then establish the "Sony | Music Center" connection (page 17).
The "Sony | Music Center" connection is automatically disconnected when the USB mode of the unit is changed to [ANDROID].
The Android smartphone is not supporting playback in Android mode. Set the USB mode of the unit to [MSC/MTP], then establish the "Sony | Music Center" connection (page 17).
Messages
The following messages may appear or flash during operation.
INVALID
The selected operation could be invalid.
[USB MODE] cannot be changed during iPod playback.
READ: Now reading information.
Wait until reading is complete and playback starts automatically. This may take some time depending on the file organization.
- (underscore): The character cannot be displayed.
For USB device playback:
HUB NO SUPRT: USB hubs are not supported.
IPD STOP: iPod playback has finished.
OperateryouriPod/iPhone to start playback.
NOT SUPPORT -Android MODE
A USB device not supporting AOA (Android Open Accessory) 2.0 is connected to the unit while [USB MODE] is set to [ANDROID].
Set [USB MODE] to [MSC/MTP] (page 20).
USB ERROR: The USB device cannot be played.
Connect the USB device again.
USB NO DEV: A USB device is not connected or recognized.
Make sure the USB device or USB cable is securely connected.
USB NO MUSIC: There is no playable file.
Connect a USB device containing playable files (page 24).
USB NO SUPRT: The USB device is not supported.
For details on the compatibility of your USB device, visit the support site on the back cover.
OVERLOAD: The USB device is overloaded.
Disconnect the USB device, then press SRC to select another source.
The USB device has a fault, or an unsupported device is connected.
For RDS operation:
NO AF: No alternative frequencies.
Press 144 / 10 (SEEK-/+)while the program service name is flashing. The unit starts searching for another frequency with the same PI (program identification) data ([PI SEEK] appears).
NO PI: No program identification. The selected station has no PI (program identification) data.
Select another station.
NO TP: No traffic programs.
The unit will continue searching for available TP stations.
For BLUETOOTH function:
BTA NO DEV: The BLUETOOTH device is not connected or recognized.
Make sure the BLUETOOTH device is securely connected, or the BLUETOOTH connection is established with the BLUETOOTH device.
ERROR: The selected operation could not be performed.
Wait for a while, then try again.
UNKNOWN: A name or phone number cannot be displayed.
WITHHIELD: The phone number is hidden by the caller.
For Sony | Music Center operation:
APP: A connection with the application is not established.
Make the "Sony | Music Center" connection again (page 17).
APP DISCNCT: The application is disconnected.
Make the "Sony | Music Center" connection (page 17).
APP DISPLAY: A screen setting display of the application is open.
Exit the screen setting display of the application to enable button operation.
APP LIST: The contents list of the USB is open.
Exit the list of the application to enable button operation.
APP MENU: A setting display of the application is open.
Exit the setting display of the application to enable button operation.
APP NO DEV: The device with the application installed is not connected or recognized.
Make the BLUETOOTH connection and establish the "Sony | Music Center" connection again (page 17).
APP SOUND: A sound setting display of the application is open.
Exit the sound setting display of the application to enable button operation.
OPEN APP: The "Sony | Music Center" application is not running.
Launch the application.
For steering wheel remote control operation:
ERROR: An error occurred during the function registration.
Register again from the function where the error occurred (page 20).
TIMEOUT: The function registration failed due to a timeout.
Try completing the registration while [REGISTER] is blinking (about 6 seconds) (page 20).
For firmware update operation:
FILE ERROR: The updater is not stored in the USB device.
Store the updater in the USB device, then try again (page 22).
UPDATE ERROR - PRESS ENTER: Firmware update is not completed properly.
Press ENTER to clear the message, then try again. During the update, do not turn the ignition to the OFF position, nor remove the USB device (page 22).
Insert the USB device storing the updater, and then press ENTER.
If these solutions do not help improve the situation, consult your nearest Sony dealer.
Connection/Installation
Cautions
- Run all ground (earth) leads to a common ground (earth) point.
- Do not get the leads trapped under a screw, or caught in moving parts (e.g., seat railing).
- Before making connections, turn the car ignition off to avoid short circuits.
- Connect the power supply lead ④ to the unit and speakers before connecting it to the auxiliary power connector.
- Be sure to insulate any loose unconnected leads with electrical tape for safety.
Precautions
- Choose the installation location carefully so that the unit will not interfere with normal driving operations.
- Avoid installing the unit in areas subject to dust, dirt, excessive vibration, or high temperature, such as in direct sunlight or near heater ducts.
- Use only the supplied mounting hardware for a safe and secure installation.
Note on the power supply lead (yellow)
When connecting this unit in combination with other stereo components, the amperage rating of the car circuit to which the unit is connected must be higher than the sum of each component's fuse amperage rating.
Mounting angle adjustment
Adjust the mounting angle to less than 45^ .
Parts List for Installation
①
②

(3)
(4)


- This parts list does not include all the package contents.
- The bracket ① and the protection collar ③ are attached to the unit before shipping. Before mounting the unit, use the release keys ② to remove the bracket ① from the unit. For details, see "Removing the protection collar and the bracket" (page 35).
- Keep the release keys ② for future use as they are also necessary if you remove the unit from your car.
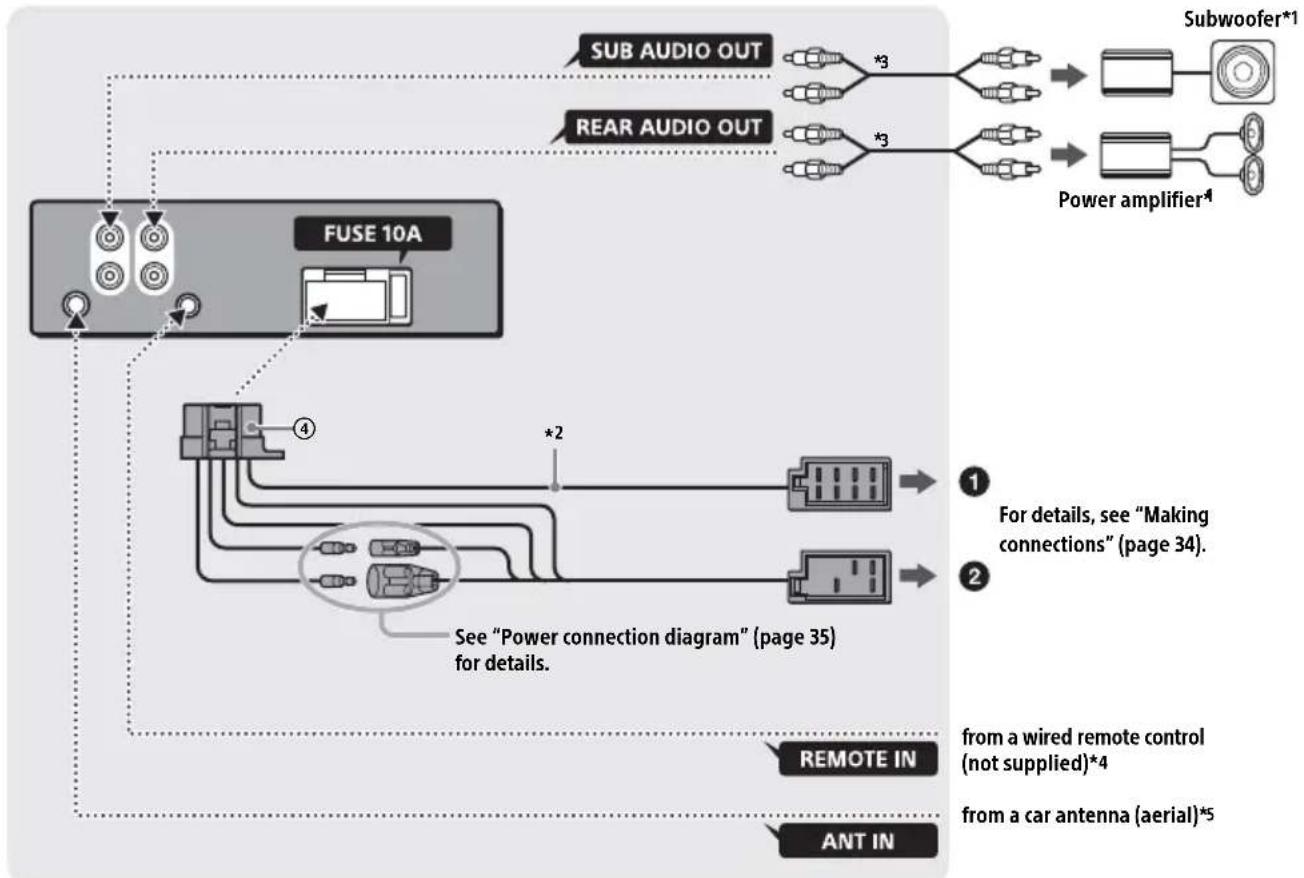
Connection
1 Not supplied
2 Speaker impedance: 4 - 8 × 4
*3 RCA pin cord (not supplied)
4 Depending on the type of car, use an adaptor for a wired remote control (not supplied). For details on using the wired remote control, see "Using the wired remote control" (page 35).
5 Depending on the type of car, use an adaptor (not supplied) if the antenna connector does not fit.
Making connections
If you have a power antenna (aerial) without a relay box, connecting this unit with the supplied power supply lead ④ may damage the antenna (aerial).
To the car's speaker connector
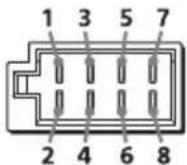
| 1 | Rear speaker (right) | ⊕ | Purple |
| 2 | ⊗ | Purple/black striped | |
| 3 | Front speaker (right) | ⊕ | Gray |
| 4 | ⊗ | Gray/black striped | |
| 5 | Front speaker (left) | ⊕ | White |
| 6 | White/black striped | ||
| 7 | Rear speaker (left) | ⊕ | Green |
| 8 | Green/black striped |
To the car's power connector
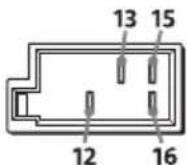
| 12 | continuous power supply | Yellow |
| 13 | power antenna (aerial) / power amplifier control (REM OUT) | Blue/white striped |
| 15 | switched power supply Red | |
| 16 | ground (earth) Black |
Subwoofer Easy Connection
You can use a subwoofer without a power amplifier when it is connected to a rear speaker cord.
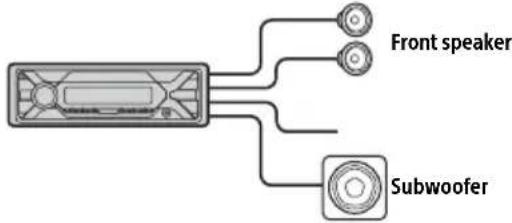
Notes
- Preparation of the rear speaker cords is required.
- Use a subwoofer with an impedance of 4 Ω to 8 Ω, and with adequate power handling capacities to avoid damage.
Memory hold connection
When the yellow power supply lead is connected, power will always be supplied to the memory circuit even when the ignition switch is turned off.
Speaker connection
Before connecting the speakers, turn the unit off.
- Use speakers with an impedance of 4 to 8 , and with adequate power handling capacities to avoid damage.
Power connection diagram
Make sure your car's auxiliary power connector, and match the connections of cords correctly depending on the car.
Auxiliary power connector

Common connection
Yellow Yellow
| 12 | continuous power supply | Yellow |
| 15 | switched power supply Red |
When the positions of the red and yellow leads are inverted
Yellow Yellow
| 12 | switched power supply | Yellow |
| 15 | continuous power supply | Red |
When the car without ACC position
After matching the connections and switching power supply leads correctly, connect the unit to the car's power supply. If you have any questions and problems connecting your unit that are not covered in this manual, consult the car dealer.
Using the wired remote control
1 To enable the wired remote control, set [STR CONTROL] in [SET STEERING] to [PRESET] (page 19).
Installation
Removing the protection collar and the bracket
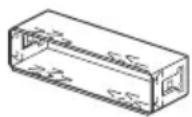
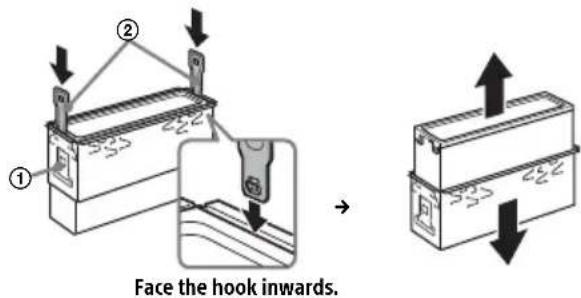
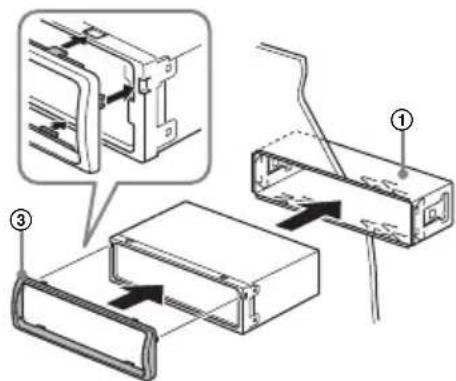
Before installing the unit, remove the protection collar ③ and the bracket ① from the unit.
1 Pinch both edges of the protection collar ③ then pull it out.
2 Insert both release keys ② until they click, and pull down the bracket ①, then pull up the unit to separate.
Mounting the unit in the dashboard
Before installing, make sure the catches on both sides of the bracket 1 are bent inwards 2mm /32 in).
1 Position the bracket ① inside the dashboard, then bend the claws outward for a tight fit.
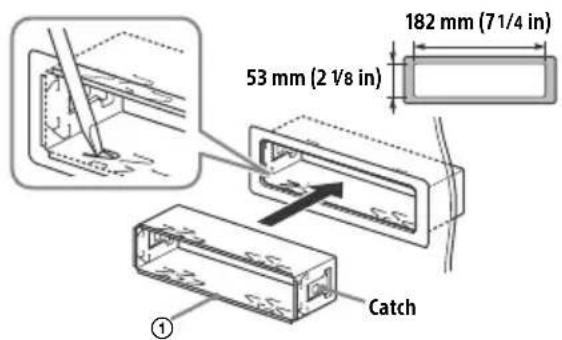
2 Mount the unit onto the bracket ①, then attach the protection collar ③.
Notes
- If the catches are straight or bent outwards, the unit will not be installed securely and may spring out.
Make sure the 4 catches on the protection collar ③ are properly engaged in the slots of the unit.
Detaching and attaching the front panel
For details, see "Detaching the Front Panel" (page 6).
Resetting the unit
For details, see "Resetting the Unit" (page 7).
Fuse replacement
When replacing the fuse, be sure to use one matching the amperage rating stated on the original fuse. If the fuse blows, check the power connection and replace the fuse. If the fuse blows again after replacement, there may be an internal malfunction. In such a case, consult your nearest Sony dealer.
(2,4000 GHz - 2,4835 GHz)
A2DP (Advanced Audio Distribution Profile) 1.3
AVRCP (Audio Video Remote Control Profile) 1.3
HFP (Handsfree Profile) 1.6
PBAP (Phone Book Access Profile)
SPP (Serial Port Profile)
Raccordement/Installation
Attention 35
La lecture commence.
La lecture commence.
La lecture commence.
Appel mains libres (via BLUETOOTH uniqueness)
DEMO (demonstration)
Permet d'activer la démonstration : [ON], [OFF].
CLOCK (horloge) (page 7)
Permet de régler l'horloge: [AUTO
Protocole AOA (Android Open Accessory) compatible : 2.0
Codec correspondent : MP3 (.mp3)
Débit binaire : 8 kbits/s - 320 kbits/s (pris en charge de VBR (Variable Bit Rate))
Appareil principal (1)
Copyright (C) 2000-2009 Josh Coalson
Copyright (C) 2011-2013 Xiph.Org Foundation
Raccordement/Installation
Attention
[BAND1] 32 Hz, [BAND2] 63 Hz, [BAND3] 125 Hz, [BAND4] 250 Hz, [BAND5] 500 Hz, [BAND6] 1 kHz, [BAND7] 2 kHz, [BAND8] 4 kHz, [BAND9] 8 kHz, [BAND10] 16 kHz.
Interfaccia: USB (Full speed)
Profili BLUETOOTH compatibili2: A2DP (Advanced Audio Distribution Profile) 1.3 AVRCP (Audio Video Remote Control Profile) 1.3 HFP (Handsfree Profile) 1.6 PBAP (Phone Book Access Profile) SPP (Serial Port Profile)
Codec correspondenti: SBC (.sbc), AAC (.m4a)
Copyright (C) 2000-2009 Josh Coalson
Copyright (C) 2011-2013 Xiph.Org Foundation
[BAND1] 32 Hz, [BAND2] 63 Hz, [BAND3] 125 Hz, [BAND4] 250 Hz, [BAND5] 500 Hz, [BAND6] 1 kHz, [BAND7] 2 kHz, [BAND8] 4 kHz, [BAND9] 8 kHz, [BAND10] 16 kHz.
Copyright (C) 2000-2009 Josh Coalson
Copyright (C) 2011-2013 Fundación Xiph.Org
Pon3BODntelb: CoHn KopnpoeuH 1-7-1KoHaH, MnHaTo-Ky, TokNo 108-0075, JnoHna
B ueJx 6e3oNaChOCTNo o6raTeNbHO yctaHaBnBaIte 3To yCTpoiCTBO Ha npbOpHoi nAHeN ABTomOBnJI, TaK KaEro 3aDnHЯ qAcTb HarpeBaETcBO Bpemr pa6tbl. Ioppo6Hee cm."YcTaHOBka/NoDKnIOueHne" (cTp.38).
Tabnukac yka3aHneM pa6oery HapjxHnI INpyrX xapaKTePncTnK haoDntcHa HnKHe nahen KOpnyca.
Iata n3rotOBneHn yKa3aHa Ha TOBape, a TaKke HnyakOBKe B CNeDyUoUeM fOpMaTe:MM.YYYY, rJe MM-Mecu n YYYYY-YroN 13rotOBneHn.
DaHb annapat npedctabnreT n3 ce6aBtOMoBnIbHyIO ayDnOCnCTemy, KOtopa Jaet BaBO3MOxHOCTb IpocJyUWBaTb ayDnO3aNCSn,NCNoJIb3yR B TOM uCJIe My3bIkaJIbHbIe npINoXeHNu CnyK6bl.
YcnoBna XpaHnna
Tobapbl coxpanbIOT ByyNAKOBAHHOM BnDE B
Temhbx,Cyxnx,NUCTbIX,XOPOWBeHTNlUPyeMbIX
PomeueHnX,N0JIPOBaHHbIX OT MeCT XpaHnna
KNCnot NZeNoeY.
TemnepaTypa XpaHnna:OT-20do +60^. OTHOCTNBnABnJXHOCTb XpAHnna:80%.
Pa6oay TemnpaTypa:OT 0do 40^ Pa6oay OTHOCtNBnABnJXHOCTb:40-60%
CpOK XpaHnna He yCTaHOBHeN.

YTNIN3aunnncnoB3OBaHHbIX 3JeMeHToB NITaHnI OTCJyXNBwero 3NeKtpuYeCKoRIO 3NeKtpoHHoro 6OpUdoBaHn (DInpeKTHBa npImeHaeTcB
CTpaHax EbpocO3a n dpyrnx eBponecknx CTpaHax, rIe deNCTBYOT CNCTEmbl pa3dJIbHorO c6opa oTXoIOB)
IpeynpexdeHne InraCnyaeb, KOrda B 3amke 3axnraHn HET noLoXeHn ACC Y6eintecb, yTo hAcTpoEHa FyHKuN ATO OFF (ctp.22).Pocne BblKnIOUeHn yCTPOIcTBa erO nHTAHne 6yDet aBtOMaTHueCKN OTKIOUeHO uePe3 yCTaHOBJIeHHOE BPEM, yTO npDoTbpaaaet pa3prdky akkymJyTopa.Ecnn FyHKuN AUTO OFF He 3aDaHa, To npK kAnDom BblKnIOUeHN 3axnraHn HaxmMaTe n UdepXnBaIte KhoNky OFF Do tex nop, noka Dncnne He noracHeT.
OTka3 OT OTBETCTBEHHOCTN B OTHoUeHn Ycnyr, npedocTabIaEmbIX CTOPOHHM NocTabuNKamn
Cnyk6bl, npdeoctabIeMbIe cToPOHHMn NOCTaBUNKAMN, MOYT 6bITb N3MeHeHbl, pnoctaHOBLeHbl nIN OTMeHbI 6e3 npedBapntelbHoro yBeOMJIeHn. KomnaHry Sony He Hecet OTBeTCTBeHHOCTNu 3a CNTyaun Noo6HOro poJa.
Baxhoe npimechne
BHHMaHne!
KOMNHAHNASONHYINPIKAKNXYCNOBHXHE HECETOTBETCTBEHHOCTN3AJIIOBOI CJUYAHbI, KOCBEHNbI, NOBOCHbI INJIN DPYTNE BnDbI YUPEBA,BKJIIOUAYA(BE3 OTRAHNueHNI)YNYUSEHHbIE DOXOdbI, YNYUSEHHYOBIPYUKY,NOTEPIO DAHHbIX, HEBO3MOXHOCTbNCPOJIb3OBAHNAIPODyKTA INJIN JIOBOTOCBRAHHOROCHM OBOPYDOBAHNA, PPOCTONI NOTEPIO BPEMEHN POKYNATELEM,CBRAHHBIE INJIN PPONCTEKAIOUUEIN3NCPOJIb3OBAHNA DAHHORIOPODyKTA,A TAKXE OBOPYDOBAHNA INJIN PPORPMMHOBOSECNEEHNA BXODAIEBO COCTABPPODYKTA.
B coCTabe daHHoro npoDyKta UMeETcra paHnopepeaOooee yCtpoIcTBO.
CorlaacHO HOpMaTbHOMy aKTy 3KOHOmUeCKoKOMnCCnn dIa Ctpan EByPOnbl (UNECE) N°10 npON3BOAnTeJI TpaHCnOpTHbIX CpeJCTB MOrYT OROBaPnBaTb ONpeJeJIeHHbe YcIOBnY UcTaHOBKn paIIOpePaIooXuCTPOINCTB B TpaHCnOpTHbIe CpeJCTBa.
PpeXe Yem yCTaHaBnBaTb DaHHbI npOyKT B CBOI aBTOMo6nJIb, n3yHTe pyKOBoDCTBO I0 3KcNlyatauIN aBTOMo6nJIra Jn6o
npOKOHcyIbTnpyuTeC b cero npOn3BOIDnTeJeM nII npOdaBcOM.
Bb3OBbl 3KCTpeHHbIX cIyX6
Данная АВТOMОБИЛБНА РAPНУТРА BLUETOOTHи ПОДКЛЮЧЕН Hoe K HeN 3ЛЕКТРОН Hoe yCTpoICTBO ИСПОЛБ3YIOT paДИОСИГHAJIы, COTOBbie Ha3eMHbIe ceTи, a TAKKHe 3aNPoRpaMMnPoBAHbIe ПОЛБ3OBaTeIeM ФУнкци N He rapaHTnpYIOT СТаБиьhoe ПОДКЛЮчЕНе B рЯд eClyuaeB. ПОТOMу пп NeO6xOДМоCTn COBepSITb BAЖньI Вbl3OB (HaNPuIMep, 3aNPocuTb 3KCTpeHNYI MeДицИнСКУ O NOMOUsb) HNKOrda He NOlaRaIteCb ТOLьКо Ha OДH O 3ЛЕКТРОHHO yCTpoICTBO.
Приимechаши Касателно Исторьаня Текhalоги BLUETOOTH
MinkpoBoJHbI, n3nyaemblye yCTpOiCTBOM BLUETOOTH, moryt nomeWatab pa6oTe MeuHcKnx 3JIeKTPoHHbIX yCTpOiCTB. HaxoJaCb BYka3aHHbIX HnKe MeCTax, BbIKIOuaTe DaHHbI annpaT n dpyrne yCTpOiCTBa BLUETOOTH, tak KaK nCNoJb3OBaHne TaKx yCTpOiCTB MoKet npNBecTN K HechacThbIM Clyyam.
- MecTa, B KOTOpbIX npucytCTByIOT IerKo BOCnJaMeHryUcneCra3bl, BoJIbHNuCbI, Noe3da, camOJLetb Nn ABTO3aPpABOChIe CTaHcN.
- MecTa pAdom C aBTOMaTnueeCKMn DBepeaMn UJN CNCTeMaMn NOXapHOc CNrHaJI3aUIn.
- DaaHbI aannapat noDepKINBaET yHKUIN oBecneueHHa 6e3oNaCHOCTn, COOTBeTCTByIOUne cTAndapTy BLUETOOTH n CnyXaUne dJa 6e3oNaCHO rnoKlOuEHHc NcNoIb3OBaHNEm TexHOJOrn BLUETOOTH, npuem ypoBeHb 6e3oNaCHOCTn 3aBNCNT OT NcNoIb3yEmBX HaCTpOeN MoKeT 6bITb HeOCTaTOH BbcOKM. Pnpepaue HOpMaun CncNoIb3OBaHNem 6ecnpoBOADHO TExHOJOrn BLUETOOTH coBIOdaTe OCTopoXHOCTb.
KOMnHaNnaSony He Hecet OTBeTCTBHeHOctn 3a yTeUky NHOpMaun, Npepaemoc n CnOJIb3OBaHmE TexHOJorn BLUETOOTH.
B clyuae BO3HnKHOBeHn BOpocOB nIIN npo6JeM, KacaUxxCra DaHHoro yCTpOiCTBa, KOToPbIe He ONuCaHbI B 3TOM pyKOBoODCTBe, o6paTntEc b K 6nJkaWemy dInepy Sony.
Copepkanne
CnpaBoUHnK no DeTaJIaM n OprHaHm ynpaBHeHn. 5
Haayano pa6oTbl
ChyTne nepeDne nnHeJI. 7
Ipeepa3ka yctpoiCTBa. 7
YcTaHOBka YacOB. 8
PpOBepKa HnprJKeHnB AKKMyJTope 8
IoproTOBka yCTpoNCTBa BLUETOOTH. 8
IopKnHueHne ycTpoNcTbA USB. 11
PoiKJIuOHeHneIpyrTOpeHocHoro ayIOUcTPOJCTBa 12
PpocnyuBauHne paanno
PpocnyuBaHne paAno. 12
CnCTemblpaIIOaHbIX(RDS). 13
Bocnpon3BeJeHne
BocnpoN3BeDeHne yCToPoiCTBa USB 14
BocnpoI3BeJeHne c yCTpoIcTBA BLUETOOTH 15
Ponck N Bocnpoun3BeJeHne KOMno3nui 16
CobepweHne TelefoHHoro 3BOHka BpeKIme 6ecnpoBODHn rapHHTypbl (ToIbko uepe3 BLUETOOTH)
PpneM BXOJaIeRo BbI3OBA 17
CobepueHne BbI3Oba 17
Onepaun,doctynhble BO BpeMy Bbl0Ba.19
Pone3HbIe yHKcUN
IcnoB3OBAHne Sony | Music Center Ha iPhone nn cMapTfoHe c OC Android 19
IcnoB3OBAHne yHKu npacno3HaBaHnpeu (ToIbko IJn cMapTfoHOb c OC Android) .21
IcnoJb3ObaHne yHKcun Siri Eyes Free. 21
NapaMeTpbI
OTmeHa pexkma DEMO. 22
OchOBHbIe Oepaunn HacTpoiKu npaMeTpOB 22
HactpoKa o6uix npaMeTPOB (GENERAL) 22
HacptpoKa 3Byka (SOUND) 24
Hactpoika dincpjiea (DISPLAY) 25
HacpoKa BLUETOOTH (BLUETOOTH) 25
HacpoKa npInoJoxEny Sony | Music Center (SONY APP) 26
DOnOpHnTeJbHa nHΦopMaζηa
O6HOBJIeHHe MmKpOIpoPpaMMbl 26
MepbI npedocTopoXHocTn 26
YxOД 3a yCTpoIcTBOM 28
Texnueckne xapaKTepeNCTNI 28
Ponck n yctpaHene HeNCnpaBHOCTeI 31
Co06ueHnA 35
YctahOBka/NoDKJIouyeHne
BHHMaHHe! 38
IpeueHb detae JyUCTaHOBKn 38
PoiKluoyene. 39
YcTaHOBka 41
CnpaBoUHnK no DeTaIaM n opraHam ynpabJeHna
OchOBHoe yctpoNCTBO
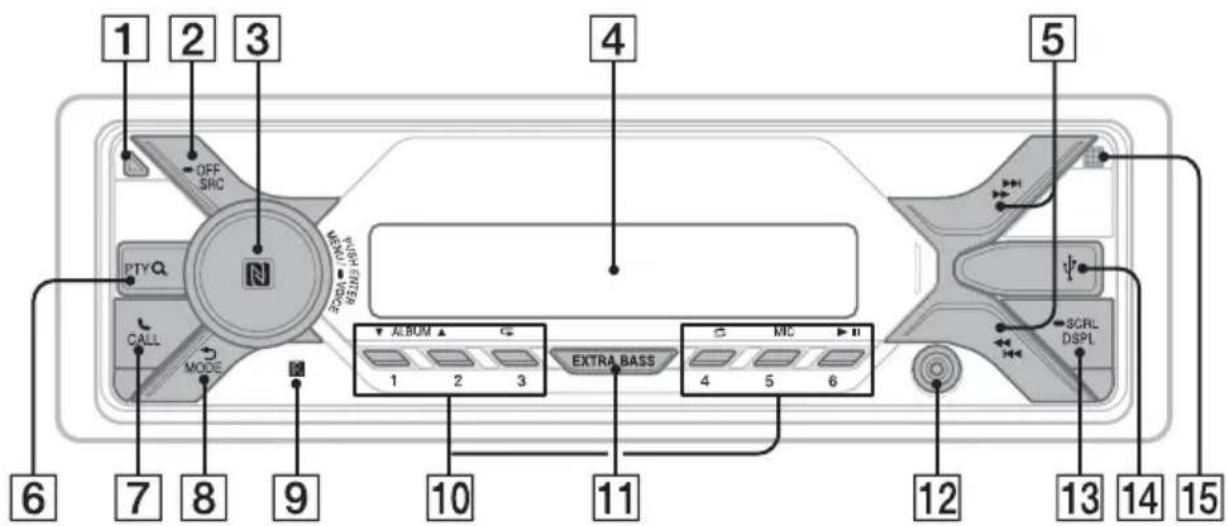
1 Khonka ChraTna nepedne naHeJn
2 SRC (NCTOHTHnK)
BkJIOueHne nHTaHn.
CmeHa nCTouHnka.
OFF
Haxmnte u ydepknaBaiTe B TeueHne 1 cekyHdbI DnBbIKIOUeHn NCTOCHNka N OTO6paXeHn YacOB.
Haxmte u ydepkubate 6oJee 2 ckyd nBbIKIOueHn IITaHn N dncnne.
3 DnCKOBbI peryJrTop
IobopaunBaTe IJpeylnpOBAHn ypoBn rpoMKoCTn.
PUSH ENTER
OTKpbITNE BbIbpaHHOro nyHKTa MeHIO.
YTO6bY Bb6paTb DpyroN NCTOCHNK CnHana, HaxMNTe KNONKY SRC, NOBepHNTe NUCKOBBI peryIaTOp, a 3aTeM HaxMNTe erO (BpeMa OxndaHna -2cekyHdb).
MENU
BxOД B MeHIO HaCTpoiKn.
VOICE (crp. 18, 21)
HaKmTe DnCKOBi peYJrTOp u ydepXnBaIte ero HaxaTbIM 6oJee 2 cekyH, YTO6bl aKTINBnPOBaTb fYHKUIO rOLOCOBOrHO Habopa Homepa, fYHKUIO paCNO3HaBAHnpeu (ToIbKO dJa CMapTfoHOBcOC AndroidTM), nII fYHKUIO Siri (ToIbKO dJa iPhone).
3HaK N
YTO6bI yCTaHOBnTb NOKJIIOUeHHe No BLUETOOTH, KOCHNTecb IuCKOBOro peryIaTopa cMaprfoHom C OC Android.
4 Okowko ducnner
5 S E E K - / + )
ABTomatnuecka HactpoKa Ha paNocTaHcun.
HaKMTe u ydepXnBaTte dna HactpoKn
BpyHyIO.
1/>I (npedbyuəa/cneyuoua)
<//> (yckopeHHa nepeMoTKa Ha3a/ yckopeHHa nepeMoTKa Bnepe)
6 PTY (tn nporpammbi)
Bb6op Tuna nporpaMMbl (PTY) B RDS.
Q (o630p) (ctp. 16)
PepexoBpekmO63opa npn Bocnpon3BeDeHnn.
(Heioctyno,ecn Bb6paH peKmB TBAUDIO] nnnoKluoyo yCTpoiCTBO USB BpeKmE Android nn yCTpoiCTBO iPod.)
7 CALL
BxO B MeHIO Bbl3OBOB. PpneM 3aBepWeHne Bbl3OBA.
Haxmnte KhoNky u yedeXnBaIte ee HaxaToi 6oJee 2 cekyH, YTObI nepeKIOuHTb CnHaI BLUETOOTH.
8 Ha3aD)
Bo3BpaT K npeIbIyUeMy 3KpaHy. MODE (ctp.12,19)
9 PnpemHnK CnHaJOB CnyIbTa DnCTaHcUHOHOrO ynpabBHeH
10 HomepHbIe KhoNKn (1-6)
PpneM coXpaHeHHbIX B namrTn paNIOCTaHcI. Haxmnte u ydepXnbaiTe dIra coXpaHeHn cTaHcI.
ALBUM▼/▲
Ipnock aJIb6Oma dIaynoyctpoNCTBa.
Haxmnte uydepkunBaTe nIa HnpepbIBHO nponycka aIb6OMOB.
(HeDocTyHNO, ecnnoNIOKNIUOeHO yctpoiCTBO USBBpejkmE Android nnu yctpoiCTBO iPoo
C (noBTop)
(HeDocTyHNO, ecnI NOdkNIOUeHO yCTpOINCTBO USB B pexnme Android.)
(cnyaHna noCneObaTeNbHOCTb)
(HeDocTyHNo, ecn noKIOUeHO yCTpOINCTBO USB B pexkme Android.)
MIC (ctp. 19)
II (Bocnpon3BepeHne/nay3a)
11 EXTRA BASS
YcJIeHHe 3ByaHaNja6acOBOro 3Byka npOnOpCuNoHaJIbHO yPoBnIO rPOMKocTn. HaxMITE, YTO6bI n3MeHHTb HaCTpOrykEXTRA BASS:[1],[2],[OFF].
12 BxoJHoe rHe3do AUX
13 DSPL(ducnne)
HaxmTeIaN3MeHeHnIHdkaUuN DcJIeJ.
SCRL (npokpyTKa)
Haxmnte u yedepxnbaiTe dny npokpytkn Hndkaun.
14 NopT USB
15 MmKpoΦoH (BHyTppeHHnaHeJIb)
ДяHopmaльбов pa6obtbyФункин Handsfree He 3aKneuBaIte MnkpoOH JeHToI nT. n.
Hauano pa60tbI
Сятыпешень панели
Bo n36exaHne kpaXn yCTpoNCTBa MOxHO CHrTb C Hero nepeHIO npHeIb.
1 HaxmTe u ydepxnBaTKe KhoNky OFF ① do Tex nop, noka yctpoNCTBO He OTKIOUHTc. HaxmTe KHOKNy CHaTna nepedHe naHeJI ② , a 3aTeM NotHnTe naHeJIb Ha ce6n CHMnTe ee.
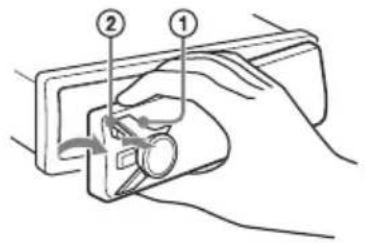
PpeynpeiTeIbHbI 3ByKOBoCnHaI
EcnI Do NOBOPoTa BbIKNoUaTeJIa 3aXnIraHnB
noLoKeHne OFF c yCTpoiCTBa He 6bla ChraTa
pePnHa naHeJIb, To B TeueHne HeCKoNkNX
ceKyHd 6yDet CblWeH npeDynpeDInTeJbHbI
3ByKOBoCnHaI. 3ByKOBoCnHaI 6yDet
CblWeH, TOnbKO eCNl NcNOJb3YeTcR BCTpoEHbI
ycNJnteJIb.
3aBODcNe HOMepa
Y6eIITecb, YTO 3aBODcKHe HOMepa B HuxKeH qactn annapata n Ha 3aJHe N qactn nepeJeH naHeN CoBpAoiT. Ecnn OH He C0BaJaO, Bam He ydaCTc BbINOHNrB cOprrKeHne No KaHaIy BLUETOOTH, co3DaBaTb N 3akpbIBaTb NOKnIOueHnC nOMoUbTo texHOIoTN NFC.
YctahOBka nepedne naheJI
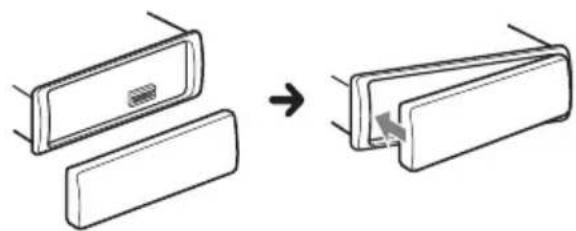
Ipee3arpy3ka yctpoiCTBa
Ipeed nepBbIM nCNoB3OBAHnem yctpoNCTBa, nocLe 3aMeHbI aBTOMo6uNbHoro aKKyMylTopa nn NOBTOPHOro NODcoEINHeHnKa6eJeHoe6xOdmo nepe3arpy3ntb yctpoNCTBO.
1HaXMMTe uYdePKNBaIte KhoNk DSPL nHa3aD)/MODE 6oJee 2 cekyHd.
PpimueaHne
Ipe3arpy3ka yctpoiCTBa npBBeTe K ydaJIeHIO HAcTpoE YacOB IN HeKOTOpbIX CoXpaHeHHbIX 3JIeMeHTOB COdepxIMOFO.
YctaHOBKa cTpaHbI/perNoHa
Nocne nepe3arpy3kn yctpoiCTBa OTKPOeTcMeHIO NaCTPOk n CTpaHb/peHoHa.
1Ipn oTo6paKeHn [SET AREA]HaXmTe KhoNkY ENTER. OTo6pa3ntcTekyuaCTpaHa nn peHNoH.
2 NobopaunBaJnCKOBbI peYJrTOp, Bbl6epntE [EUROPE] nJn [RUSSIA], a 3aTeM HaxMMte JnCKOBbI peYJrTOp.
3 NobopaunBaJnCKOBbIpeyJrTOp, Bbl6epnte [YES] nIn [NO], a 3aTeM HaxMMte DnCKOBbI peYJrTOp. Ppi n3MeHn npnOHa nIn cTpaHbI yCTpoNCTBO nepe3arpyuNTc, noCne Yero Ha dncnnee oTo6pa3rTa qacbl.
3TOTnapaMeTpMOKHOHaCTpOHTBMeHIO6UHX npapaMeTPOB (cTp.22).
YctahOBka yacob
1 HaKMITE KhoNky MENU, NOBepHnte DnCKOBbI peYJrTOp dJa BbIbopa [GENERAL], 3aTeM HaKMTe DnCKOBbI peYJrTOp.
2 NobopaunBaJdNcKObI peYJrTOp, Bbl6epnte [SET CLOCK], a 3aTeM HaxMMte dNcKObI peYJrTOp.
3 NobepHyB dNcKObI peYJrTOp, Bb6epnte [MANUAL], a 3aTeM hXMMTe dNcKObI peYJrTOp. HauHET MmraTb INDnKaUz yaca.
4 NobopaunBaIte DnCKOBbI peYJrTOp Iy UCTaHOBKn 3HaueHnra YacOB n MInHyT. Iy BbIbopa HactpanBaemoro pa3pda IcNoJIb3yIte KHOJKN //> (SEEK-/+).
5 NocJe yCTaHOBKn MmHyT haxMnte KhoNky MENU. YctaHObKa 3aBepWeHa, nocJe yero qacbl HaHyT OTCyET BpeMeHn.
ДлгоTOбрахенячав надмITE Kногky DSPL.
Длг abTomatnueckon Hactpoyn YuacobВ DeiCTBnN 3 BbI6epnte [AUTO
2 Haxmte KhoNky MENU. NobopaunBaJ DnCKOBbI peYJrAToP, Bbl6epnte [BLUETOOTH], 3aTeM Haxmte DnCKOBbI peYJrAToP.
3 NobopaunBaJ DNCKOBBI peYyIaTOp, BbI6epuTe [SET PAIRING], a 3aTeM HaxMMTE DNCKOBBI peYyIaTOp.
4 NobopaHbAДИСКOBыI peRyJIaTOp, BbI6epuTe [SET DEVICE 1] nIi [SET DEVICE 2], a 3aTeM haXmIte IINCKOBbI peRyJIaTOp.
MnraeT, KOrda annapaT HaxoNTcBpeKmE OKndaHnCOnpJKeHn.
*No 3aBepweHn conpJKeHn BmecTo HaJIncu [SET DEVICE 1] nnn [SET DEVICE 2] 6ydet OTO6paKaTbCnMn CoPjKeHHOrO yCTpoNCTBa.
5 BbINOJIHnTe cOpJxKeHne Ha yCTpOiCTBe BLUETOOTH, uTo6bl OHO o6hApyKnIo annapaT.
6 BbIbepnte npHKT [DSX-XXXX] (Ha3BaHne MoJeN BaWero annapata), OTo6paKaemn Ha dncnnee yCTpoNCTBa BLUETOOTH.
Ecni Ha3BaHne MoJen BaJero annapaTa He OTo6paXaEcra, NOBtOpTe BCE onepauu, HauHHa C DeIcTBn2.
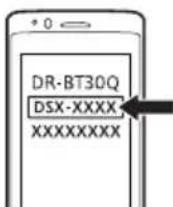
7 Ecnn Ha yctpoiCTBe BLUETOOTH Heo6xoIMo BBecTN KIOU dOCTyNa*, BBeIte [0000].
*B 3abncmoctn OT nCNOb3yeMOrO yctpoiCTBa KIOU DOCTyNa MoXeT Ha3bBaTbCra "CeKpeTHbl KOd", "NIH-KoD", "Homep NINH", "napoiB" u T. d.
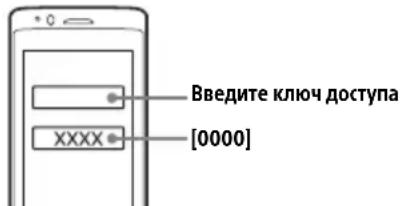
Iocne ydauchoro copjxehn6ydet OTo6paKaTbC3HaQOK
8 BbIbePte daHHbI aannapat Ha yCTpoiCTBe BLUETOOTH, uTo6bI co3daTb noKIOUeHne BLUETOOTH.
NII TO6paXaIOCTc,ecIN NIOKJIIOueHne CO3DAHO.
PpimueaHne
Bo Bpem noKlnouHn K yctpoNCTBY BLUETOOTH npromy yctpoNCTBy He ydaTc8 ObHApXkntb daHHbI annapaT. T06bl yctpoNCTBO CMORIO obHApXkntb annapaT, BKIOHTe peKIM COmpJxHHe N BbINOHNTE nonck daHHoro annapaTa Ha dpYROM yctpoNCTBe.
BkIIOueHHe FyHKcN BOCpON3BeDeHn
Подрбные сбendeоня CM.В pa3дени "Bocpon3BeHne c yctpoiCTBa BLUETOOTH" (ctp.15).
OTKIOUeyHe cOpJKeHHoro yCTpoNCTBa
YTo6bl nocLe cOnpJxEHHo daHnHO aannapata u yctpoiCTBa BLUETOOTH OTKJIIOuHTb nx dpyr ot dpyra, BblONHnTe DeIcTBn 2-4.
Повлоченк conрженистуBluetooth
YTo6bI NcNoJIb3OBaTb COnpJxKeHHOe yCTpoiCTBO, Heo6xoJIMo Co3dTaB NOdkJIOUeHne K aannapaty. HeKOTOpBIE COnpJxKeHHbIe yCTpoiCTBa NoDKJIIOuHaOTcA BtOMaTnueckn.
1 HaKMnte KhoNky MENU. NobopaunBaJ DNCKOBBI peYIaTOp, BbI6epuTe [BLUETOOTH], 3aTeM HaKMnte DNCKOBBI peYIaTOp.
2 NobopaunBaJ DNCKOBbI peYJrTOp, Bbl6epnte [SET BT SIGNL], a 3aTeM HaxMMte DnCKOBbI peYJrTOp. Y6eDNTecb, yTO BKJIIOUeH INDNkAToP
3 AKTINBnpyTe yHKuHb BLUETOOTH Ha yCTpoNCTBe BLUETOOTH.
4 BbINOHNHeo6xOaMbIe DeiCTBnHa yctpoNCTBe BLUETOOTH, TTo6bl NOKIOuHTb eR K DaHOMy aannapaty. 1JIN DyET CBETNTbCra.
3NauchnHa nucnPnee
1ymehbwnTe rpoMkoctb Ha annapaTe.
2 PoiKJIIOUHTe yCTpoIcTBO USB K annapaty.
ABTOMaTnueckoe coxpaHeHne (BTM)
1 Haximam KhoNky MODE, n3MeHnTe dnaana30n (FM1, FM2, FM3, MW nn LW).
2 HaKmTe KhoNky MENU, nobepHnTe dNcKObIy peYJrTOp IJIaB6opa [GENERAL], 3aTeM HaKmTe DnCKOBbl peYJrTOp.
3 NOBOPaHbAДИСКOBbIpyrJrTOp, Bbl6epnte [SETBTM],3aTeM HaxmTe IINCKOBbIpyrJrTOp.
PaHIOCTaHcIIN 3aKpeJIJIOTc3a HOMepHbIMKHOJIKAMN COXpaHJOTcB NAmrTu yCTpOuCTBaB NOPAnKe YAcTOT.
Hactpoika
1 Haximam KhoNky MODE, n3MeHnte dnaa30n (FM1, FM2, FM3, MW nn LW).
2 BbINOJIHHTe HAcTpoIky.
ДяНастpoиВучHyI
HakimayиУдержьаяКногиI<|im_start|><|im_start|><|im_start|><|im_start|><|im_start|><|im_start|><|im_start|><|im_start|><|im_start|><|im_start|><|im_start|><|im_start|><|im_start|><|im_start|><|im_start|><|im_start|><|im_start|><|im_start|><|im_start|><|im_start|><|im_start|><|im_start|><|im_start|><|im_start|><|im_start|><|im_start|><|im_start|><|im_start|><|im_start|><|im_start|><|im_start|><|im_start|><|im_start|><|im_start|><|im_start|><|im_start|><|im_start|><|im_start|><|im_start|><|im_start|><|im_start|><|im_start|><|im_start|><|im_start|><|im_start|><|im_start|><|im_start|><|im_start|><|im_start|><|im_start|><|im_start|><|im_start|><|im_start|><|im_start|><|im_start|><|im_start|><|im_start|><|im_start|><|im_start|><|im_start|><|im_start|><|im_start|><|im_start|><|im_start|><|im_start|><|im_start|><|im_start|><|im_start|><|im_start|><|im_start|><|im_start|><|im_start|><|im_start|><|im_start|><|im_start|><|im_start|><|im_start|><|im_start|><|im_start|>
ДлгавTomatnueckон Habtpoikn
ИспльзуITE KHONKI /▶/SEEK-/+).
ПОИС OCTaHOВITcR, KOrDa yCTpoiCtBO HaIDeT
paNIOCTaHcNIO.
CoxpaheHne BpyHyu
1 Bo Bpem npnema paHIOCTaHcnn, KOtOpyIO Heo6XoIMo COxpaHNTb, HaxMnte N ydepKuBaIte HOMepHyIO KhoNkY (1-6), noka He noRbITcra NHdNkaun [MEM].
PpHem padnoctaHcH, coXpaHeHHbIX B namrtn
1 BbIbepuTe dnaana3OH, 3aTeM haxmnte HomepHyIO KhoNky (1-6).
CnCTeMbI paAnoHaHHbIX (RDS)
YcTaHOBka aIbTepHaTnBhblX qAcTOT (AF) n coo6uHm o TekyuEe cnTuaunn Ha doporax (TA)
Функця AF BbINOJIHЯET NOCTOHHYIO nepeHaCTpoIky paIIOCTaHcIy, IMeIoUx cMbI cnIbHbI CNrHaN B Cetn, a FyHKzra TA oBecneuBaET npmE COo6ueHn IIN nporpaMM (TP) O TeKyuEe CNTyaCIn Ha DOpOrax, ecn INx npmE BO3MOKeH.
1 HaXMMTe KhoNky MENU, noBepHnTe DnCKOBbl peYJrTOp IJa BbIbopa [GENERAL], 3aTeM HaXMMTe DnCKOBbl peYJrTOp.
2 NobopauHbA dNcKOBbl peYIaTOp, BbI6epnTe [SET AF/TA], 3aTeM haxMnte dNcKOBbl peYIaTOp.
3Поворачвая диCKOBьнpeулгOTop, Bbl6epnte [SET AF-ON], [SET TA-ON], [SET AF/TA-ON] nIn [SET AF/TA-OFF], 3aTeM haxmnte dNcKOBьнpeулгOTop.
Bo Bpem npnemaB dnaana3oHe FM haxmnte HOMepHyo KhoNky (1-6),Ira KOtopoI 3aIporpaMMnpOBaHa MeCTHa r CTaHcIy. He 60JIee yem uepe3 5 cekyHd eue pa3 HaxmTe HOMepHyo KhoNky MeCTHO CTaHcIu. NOBTOpy, POKa He bdyet HaJeHa MeCTHa paAnOCTaHcIy.
Bb6op TnOB nporpaMM (PTY)
1 Haxmte PTY Bo Bpem npnemaB dnaana3oHe FM.
2 NobopauBaIte DnCKOBbl peYJrTOp, noka He OTo6pa3ntc Tpe6yeMbI TnnporpaMMbl, 3aTeM HaXMMTe DnCKOBbl peYJrTOp.
YcTPOIcTBo HauHET NOnCK CTaHcUIn, nepeaIOSeI npOrpAMMy BbIbpaHHoro Tnna.
Tn nporpamM
NEWS (HOBOCn), AFFAIRS (Tekuizne co6bITn), INFO (NHeOpMaun), SPORT (CnpT), EDUCATE (O6pa3oBaHnE), DRAMA (Драматческne nepeDAu), CULTURE (KylbTypa), SCIENCE (Hayka), VARIOED (Pa3HbIe TeMbI), POP M (ПОп-узык), ROCK M (Pok-My3bIka), EASY M (Дорохная my3bIka), LIGHT M (ЛerKaJ Klnaccnuecka My3bIka), CLASSICS (Cepbe3HaJa Klnaccnuecka My3bIka), OTHER M (ПочаЯ My3bIka), WEATHER (ПогOna), FINANCE (Финансbl), CHILDREN (РограмMbIдя DeTeu), SOCIAL (ОьшecTBeHHaЯЖИЗн), RELIGION (Религу), PHONE IN (перетач с teleфоньIM 3BOHKam paDIOscnywateJe), TRAVEL (ПуteшостBna), LEISURE (Дocyr), JAZZ (ДжаЗовая my3bIka), COUNTRY (My3bIka B CTnJIe "KaHTpN"), NATION M (ТНИЧЕСКАМУ3bIka), OLDIES (Старая my3bIka), FOLK M (ФОнК-узык), DOCUMENT (ДOKум entaJIbHbIe NepeDAu)
Bocnpon3BedeHne
Bocnpo3BeDHe yCTpoiCTBa USB
B daHNo IHCTpyKuN No 3KcNlyaTaun TepMnH "iPod" npImeHaTcra nIy o6o6eHn CcbIOK Ha yHKuN iPod B iPod n iPhone, ecn nHoe He cKa3aHO B TeKCTe nn Ha pncyHke.
CbeHnO cOBMeCTMmOCTNaIeO yCTPOINCTBa iPod cm. B pa3dene "CbeHnO6 yCTPOINCTBe iPod" (cTp. 27) nnn Ha Be6-caTe noDpeKKn, yKa3aHHOM Ha nocJeDHe CTpaHnCe oBLOKKn.
Moryt nCnoJb3ObaTbca yctpoiCTBa USB* Tnna AOA (Android Open Accessory) 2.0, MSC (3anomHaouee yctpoiCTBO 6oIbwoemKoctn) m MTP (npotokoi nepeaun MylbTmmeia), COBmecTmblc co cTaNdapTom USB. B 3abncmoctn OT Tnna NcNoJIb3yEmoYo yctpoiCTBa USB ha annapate moXHO bIbpaTb pexim Android nn MSC/MTP. Ira HeKOTopbIX MoJeNeu uΦpOBbIX nIeepob nn CmapTfoHOB c OC Android moXeT noTpbeoBaTbcpexim MTP.
- Hanpimep, ΦЛeш-нakоNTeMb USB, UNФpoBoN nIeep, cMapTФОH c OC Android.
PpmeaHn
Для полученя подробьх сбедию o coBmecTnmoCTny cystpoiCTba USB nocetnte Be6-caNT noDpeKKn, yKa3aHHbI Ha 3aHHe n CTopoHe 6bLOKKN.
- CmapTfoHbI c yctaHOBJIeHHoN OC Android 4.1 nnn 60nee no3dHeBepCnIOndepKNaHOT Android Open Accessory 2.0 (AOA 2.0). OHaKO, HeKOtOpBle CmapTfoHbI MOrT He NOHOCbIO NOpeKNaBaTb AOA 2.0, daJne ecn yCTaHOBJIeHa OC Android 4.1 nnn 60nee no3dHbI BepCnI. DnI noJyueHn IooPb6hIX CBeDeHn o COBMeCTmOcTN BaJeRo CMapTfoHa c OC Android Nocetnte Be6-caIT NoDepKKn, YKa3aHHbI Ha 3aJHe CTopoHc ObNoXKn.
Bocpnoun3BeHeHnepeuNCHeHHbIXHxkeaIIOB He IIOJIepKNUBaETc.
MP3/WMA/AAC/FLAC:
- aaibl, 3aunueHHbte abTOPCKMn npabamn;
-ФaIbIcDRM(ynpabJIeHHeUΦpoBbIMn npabAMN);
MHOROKaHaBbHbe 3ByKObIe aaiJIbl.
MP3/WMA/AAC: - faibl, cKaTbIe 6e3 nOTepn daHHbIX.
Ipepe yctaHOBKo coeHHeHnB bIbepnte peXMM USB (pexim Android nnn MSC/MTP) B 3aBNCIMOCTN OT Tnna NcNoJb3yeMOrO yCTPOINCTBa USB (ctp.23).
1ПОДКЛЮЧИТЕ yCTpoIcTBO USB K nOpTy USB (CTp. 11).
HaHHeTcBocnpOn3BeDeHne.
YTo6bHaayatb Bocnpo3BedeHne,ecnI yCTpoiCTBOyKeIOKJIIOUeHO,HaKMITE KHOKNKY SRC n BBi6epnte [USB] (nocne toro kaK yCTpoiCTBO iPod 6ydt paCno3HaHo,Ha dinCnlee oTo6pa3ntcra [IPD]).
2 Otperynpyte rpoMkoCTb Ha daHHOM yctpoiCTBe.
ДлЯ OCTaHOBKINBOcnpOn3BeDeHnA
HaKMMTe u yIepXINBaIte KHOJKy OFF B TeueHne 1 CeKYHbl.
2 NobopaunBaJ dNcKOBbI peYJrTOp, Bbl6epnTe [PHONE BOOK], a 3aTeM HaxMMTe dNcKOBbI peYJrTOp.
3 NobopaunBaJnCKOBbIpeRyJIaTOp, Bbl6epnte HnHuaJB CnncKe, a 3aTeM HaXMMTe DnCKOBbI peRyJIaTOp.
4 NobopaunBaJ DNCKOBbI peYJrTOp, Bbl6epnte nMaB CnncKe, a 3aTeM HaxMMte DNCKOBbI peYJrTOp.
5 NobopaunBaJ DNCKOBbI peYJrTOp, Bbl6epnte Homep B CnncKe, a 3aTeM HaXMMTe DNCKOBbI peYJrTOp.
HaHHeTcTeJIeOHHbI pa3roBOp.
CobepseHne Bbl3Oba n3 KypHaJaBb130BOB
1 HaXmTe KhONKy CALL.
EcnK annapaTy noDKIIOUeHbI DBa Mo6nJIbHbIX TelefoHa,To NOBOPaUNBaJ NsCKOBbl peYJrTOp,BbIbepnte IIO6oN3 TeLEFOHOB,a 3aTeM HAKMTe DnCKOBbl peYJrTOp.
2 NobopaunBaJ dNcKObI peYJrTOp, BbI6epTe [RECENT CALL], a 3aTeM HaxMMTe dNcKObI peYJrTOp.
OTo6pa3nTcra CnncOK JyPhHaIa BbI3OBob.
3 NOBOPaHbA DnCKOBbI peRyJrTOp, Bbl6epnte Nmra HmH OmepeOHa B KypHaJIe Bbl3OBb, a 3aTeM HaXMMTe DnCKOBbI peRyJrTOp.
HaHTeTcTeJIeOHHbIpa3roBOp.
CobepweHne Bbl3Oba nyTem BBOda Homepa TenefoHa
1 HaXMMTe KhoNky CALL.
EcnK annapaTy noKnIoueHbI DBa Mo6nIbHbIX TeJefoHa,TO NOBOPaUNBa DNCKOBbl peRyJrTOp,Bb6epnte IIO6oN3TeJefoHOB,a 3aTeM HaxMtTe NsCKOBbl peRyJrTOp.
2 NOBOPaUNBaI DnCKOBbI peRyJrTOp, Bbl6epuTe [DIAL NUMBER], a 3aTeM HaxMMTe DnCKOBbI peRyJrTOp.
3 NOBEPHNTe DnCKOBbI peYyIaTOp, BBeDHTe HOMeP TeJefoHa, NOTOM Bbl6epHTe [ ] (npo6eJ), a 3aTeM HaxMNTE ENTER*.
HaHHeTcTeIeOHHbI pa3roBOp.
*IyBb6opaHaCTpaNBaemoropap3pna IcnoJb3ynte KhoNkI (SEEK-/+).
Приимechане
HaIncnnee BmecTo CmB0na[#]OTo6pa3ntcra CmB0n[.
CobepweHne BbI3Oba nyTem nobTophoro Habopa Homepa
1 HaXmTe KhoNky CALL.
EcnK aannapaty noDKIIOUeHbI DBa Mo6NJIbHbIX TeJeOHa, To NOBOPaUNBaJ NsCKOBbl peYrJrTO, BbI6epnte JIO60n3 TenefoHOB, a 3aTeM HaxMtTe NsCKOBbl peYrJrTOp.
2 NobopaunBaJdNcKOBbIpeRyJIaTOp, Bbl6epnTe [REDIAL], a 3aTeM HaXMMTe dNcKOBbI peRyJIaTOp.
HaHHeTcTeJIeOHHbI pa3roBOp.
CobepueHne Bbl3Oba c NOMOuI0 TOLOCBbIX METOK
BbMOKeTe COBepuNTb Bbl3OB, npOn3Hecra RoIOCOByIO MEkY, XpaHryIOcR B NOKJIIOUeHHOM MoNbHOM TeJefoHe, KOToPbIO OChaueH cyHKnueI rOIOcoBOrHO Habopa Homepa.
1HaXMMTe KHonKy CALL.
EcnK aannapaty noKnIOueHb IBa Mo6nIbHbIX TeJeOHa, TO NOBOPaUNBAJ NCKOBbl peYJrTOp, Bb6epnte JIOBOuN3 TeJeOHOB, a 3aTeM HaxMMte NCKOBbl peYJrTOp.
2 NobopaunBaI DnCKOBbl peYyIaTOp, BbI6epnte [VOICE DIAL], a 3aTeM HaxMMte DnCKOBbl peYyIaTOp.
Kpome TOrO, Bbl MoKeTe HaKaTb KhoNky VOICE u ydepXnBaTb ee HaxaToI 6oJe 2 cekyHd.
3 POn3HeCnTe rOLOCOByIO MeTKy, XpaHraSyUocB Mo6NlBHom TeJeΦOHe.
Baasa peuh 6ydt pacno3HaHa, nocne yero 6ydt coBepweH Bb3OB.
Otmeha roIocoboro ha6opa Homepa
HaxmTe VOICE.
Onepaun,doctynbIe BO BpeMa Bbl30Ba
HactpoKa rpoMkoCTMeIoN BbI3OBA
Pn noctynneHN BXOJaIero Bbl3Oba NOBepHnte DnCKOBbl peyIaTOp.
Hactpoika rpoMkoCTn roJoloca cO6eEdnka
Bo Bpemr TelefoHHoro pa3roBopa nobepHnte DnCKOBbl peyIaTOp.
HactpoKa rpoMKocTn IJIra co6eecdNka (HactpoKa ycJIeHna CnHaHa c MnkpofoHa)
Haxmnte MIC.
Mожно Использоват b cеДуюше нас相对较имаьемы урови Грмковости: [MIC-LOW], [MIC-MID] n [MIC-HI].
UmehseHne ypoBn 3xo n Wyma (peKmEcho Canceler/Noise Canceler)
HaKmTe KhoNky MIC u ydepkBaBae ee HaKaToi.
BblMOKeTe BbI6paTb CneNyUoUne peKmbl: [EC/ NC-1] n [EC/NC-2].
IpeekIIOueHne MeKdpy peKIMOM 6ecnpoBODHOI raphNtypbI n O6blHbIM peKIMOM TelefoHa
Bo Bpemr TeJefoHHoro pa3roBopa c nOmoIbIO KhoNk MODE BB MoKeTe nepeKluOaTb 3ByK MeKdy annapaTOM M6uNbHbIM TeJefoHOM.
PpmeaHne
OCTyNHOCTb 3TOI ONepaun 3aBnCtOT nCNOJb3yEmoM MoDeN MObNbHOro TeJefoHa.
PoiJe3HbIe yHKcUIN
Исповане Sony | Music Center на iPhone iOSmapsфоhe c OC Android
Bam notpe6yeTcKaaTaB nocJeHIO BepCIO npinoKeHn "Sony | Music Center" n3 App Store (ДЯ iPhone) nnn n3 Google Play (ДЯ смарфОна OC Android).
Ppimechann
PaHnco6bHeHHo 6e30NaChOCTn CO6JIIOaIte MeCTHbIe 3aKOHbI INpapBnla DOpOXHOr ODbHXeHNr I He NcPONb3yIte 3TO npNIOXKeHne BO BpeM BOxKeHnA ABtOMo6nI.
"Sony | Music Center" - 3TO npuioxene nIy npabJeHHn coBMeCTnMbIMn C "Sony | Music Center" ayNooyctpOienCTbAMn Sony c nomoUb iPhone nnncMapTfoHOB c OC Android.
- IpeueHb cyHKuN, KOToBIMn Bbl CMOxete ynpabJIaTb c NOMOUsbIO npNJIOXeHnra "Sony | Music Center", 3aBNCUT OT NOKJIIOUeHHOro yCTpOJCTBa.
- CbeHnO TOM, kak nCnoJIb3ObaTb yHKUIN "Sony | Music Center", cm. Ha cBoem iPhone uIN cMaprfoHe c OC Android.
- DonohntelbHbIe CBeHeHn O npJIoXeHn "Sony | Music Center" cm. no cNeDyUoEMy URL-aDpecy: http://www.sony.net/smcqa/
- Nocetnte yka3aHHb HnHexe Be6-caNT u3yUHTe cnncOK coBmecTumbIX moJeNei iPhone n cMapTfoHOB C OC Android. DnI aiPhone: nocetnte App Store DnIcMapTfoHOB C OC Android: nocetnte Google Play
Cɔздане подклоченя к "Sony | Music Center"
1 Co3aTe IoKJIOueHne BLUETOOTH K iPhone nn cMapToHcy c OC Android (cTp. 8).
YTo6bI Bbl6paTb Heo6xOJnMooe ayDIOyCTpOiCTBO, HaxMnte KhoNky MENU, 3aTeM Bbl6epuTE [BLUETOOTH] SET AUDIODEV.
2 3anyctnte npniloxeHne "Sony | Music Center".
3 HaKMnte KhoNky MENU, nobepHnte DnCKOBbl peYJrTop dIy Bb6opa [SONY APP], 3aTeM HaKMnte DnCKOBbl peYJrTop.
HaHHeTcIpoeCCIOKJIIOueHnK iPhone nIcmapTOHcyOC Android.
CbeHn o pa6oTe c iPhone nn CmapTfoHom c OC Android cm. B pa3eJe "CnpabKa" npJIOKeHn.
Ecnn oTo6paxkaetc Homep yctpoiCTBa
Y6eIntecb, yTO OTo6paKaetcHOMep ycTpoiCTBa (Ha npimep, 123456), 3aTeM Bbl6epnte [Ja] Ha iPhone nn CmapTfohe c OC Android.
3aBepweHne noDKIOUoyehn
Haxmnte KhoNky MENU, noBepnTe nCKOBbl peRyIaTOp dIra BbIbopa [SONY APP], 3aTe m Haxmnte DnCKOBbl peRyIaTOp.
BbI6Op NCTOuHnKa CnHaJa NJI npNIOXeHnA
BblMOxTe Bb6paTb Heo6XoIMMbI NCTOCHNK CnHana nn npNoJoxHe Ha iPhone nn cMapTfoHe c OC Android.
Bb6op nCTouHnKa cnHaJa
HaKMTe KHONky SRC HeckoJbKO pa3. KpOme TORO, MoXHO HaKaTb KHONky SRC, NOBepHyTB NcCKOBbl peYJrTOp, Bbl6paTb Tpe6yEmbl NCTOuHNk, a 3aTeM HaKaTb KHONky ENTER.
OTo6paXeHne CnNcKa NCToUHNKOB CNrHaJIOB
HaXmTe KhONky SRC.
06bYBHeHne SMS c nOmoUbIO yHKcnn BocnpOn3BeDeHnpeu (TolbKO dIa cMaprfoHOB c OC Android)
Pn noyuhen SMS cntema aBtomatueckn 3aHTbIbaet nX uepe3 dHAmNK aBTOMO6NJIA.
CbeHnO COOTBeTCTBHyUOuNx npaMeTpax cm. B pa3dene "CnpabKa" npuNoKeHn.
OTBeT Ha SMS (ToIbKO dIa CMapTfoHOBOC Android)
BblMOxTeOTBetNTbHaCOo6uEHe,HaXaB 3HaQOKOTBeTa.
1 3anyCTnTE npuIooKeHne "Sony | Music Center", a 3aTeM hauKMnTe 3NaUOK [Reply] (OTBeTnTB). B npuIooKeHn "Sony | Music Center" oTo6pa3ntcra 3KpaH BBOda coo6ueHn.
2Прон3HecnteOTBetHaCOO6ueHHe,INcNoIb3yA pyHKnIO paCNO3HaBaHnpeuN. B npJIoKxeHn "Sony | Music Center" oTo6pa3ntcra cnCOK 7a6JIOHOB COo6ueHn.
3 NOBOPaUHbA dNCKOBbI peYJrAToP, BbI6epnte Heo6xOuMoe coo6ueHne, a 3aTeM hXMMTe dNCKOBblpeyJrAToP. Coo6uHHe 6yDet OTnpabNeHo.
HacpoKa npaMeTpOB 3Byka N DnCnpe
C nomoubIO iPhone nn cMaprfoHa c OC Android Bbl MOKeTe HacTpOnTb npaMeTpbl, CBraHHbIe CO 3BYKOM IN DCnJIeem.
CbeHnO cootBeTcByUoInx npaMeTpax cm. B pa3dene "CnpabKa" npuNoKeHH.
ИспOLTбоване Функциnpacno3HaBaHЯ peu (ToIbkoДдя cMapTфОнВ c OC Android)
1TuO6bI aKTHBnPoBaTb yHKUIO paCNo3HaBaHna peu, HaxMMTe KHOKNKY VOICE u ydepxNBaTe ee HaKaToi.
2 POn3Hecnte Heo6xOIMyIO roIocobyIO KOMaHdy B MmKpOfoH.
BbIKIoueHne yHKunn pacno3HaBaHna peu
Haxmnte VOICE.
Ppimechann
B HeKOTOpbIX CnyaX fYHKUpaCnO3HaBaHnpeu MoKET 6bTb HEDOCTVnHa.
- Φύнкця paçno3HabAHЯ peу может pa6oTaTb
- He npabnIbHO. KaueCTBO pa6oTbI 3ToI Φύнкци
- 3aBnCIT OT NOДКЛIOUeHHOrO CMapTΦOHa C
- OC Android.
- IcnoIb3yIte fYHKUIO npn MInHmAlbHom ypOBHe Wyma (HaNPmep, Wyma ot dBnIaTeJ).
3 NOBOPaUNBaI DnCKOBbI peYJrTOp, Bbl6epnte npaMeTpbl, a 3aTeM HaxMMTe IuCKOBbI peYJrTOp.
CLOCK (yacbl) (ctp. 8)
YcTaHOBka YacOB: [AUTO
CAUT ALM (npeynpeiTeIbHbI 3ByKOBoCnHaJ)
BkHoueHne npEynpeIeIbHO 3ByKOBOcHana: [ON], [OFF] (ctp. 7).
(OCTyHOTOBKOPnBBIKHOeHHOM NTOUHNKE,KOrdaOTOpkaAOTcyaCbI.)
BEEP
AKTINBn3aun 3BykoBOrO cnHaJa: [ON], [OFF].
AUTO OFF
AByTOMaTnueckoe OTKNoUeHne uepe3 onpeJeIeHHoe BpeM,ecNyCTpOiCTBO BbIKNoUeHo:[ON](30MNHyT),[OFF].
STEERING
Perncpaun/nu3MeHeHne HacptpoKn nybTa
DnCTaHnOHHoro ynpabJeHnHa pyne.
(DocTyHNo npN noKnIOueHnN
coeHNHTbHOro Ka6eJra (He BXoIIT B
KOMnJIeKT NOCTaBKn).)(OcTynHO ToIbKO npN
BblKIOUeHHOM NCTOCHNKe, KOrDa
OTobpaKaIoTcYacbl.)
STR CONTROL (nybT dNCTaHIOHHOR ynpabNeHa pyne)
Bb6op peKIma BBOda NODKIOUeHHORO NylbTa DNCTaHNoOHoro ynpabLeHnra. Bo n36exaHne HeNCpabHOCTeNpePeNcNoIb3OBaHnem NO6epnte COOTBeTCTBYUuN pEKIM BBOda Dnna NODKIOUeHHORO NylbTa DNCTaHNoOHoro ynpabHeHnra.
CUSTOM
PexnmbB0daIyIyIbTaNCTaHIOHOYnpabHeHa pyne.
PRESET
PexnmbOdaIpyoBODHOroNylbTa
INCTaHcNoHOrOynpabLeHnna3a
NCKJIIOUeHnEMnylbTaINCTaHcNoHOrO
ynpabLeHnHa pyJe(BblbpaETcra
ABTOMaTneckn npn BblOnHeHn [RESET
CUSTOM]).
EDIT CUSTOM
PerncpaunyaHKnCn(SOURCE,ATT,VOL + / - 1 SEEK + / - VOICE,ONHOOKuOFFHOOK)IyIyIbTaIINCTaHcNHOHHoroYnpabLeHnHa pyJe:
1 NobopaunBaJNCKOBbIpeyIaTOp, BbI6epnte yHKuHIO,KOTOPyIO HxKHO Ha3HaHTbIpyIbTaIcCTaHIOHHORO ynpaBHeHnaPye,a 3aTeM haxmTe DNCKOBbI peyIaTOp.
2ПиMuIraHoueM coo6ueHnN [REGISTER] HaxMMte N yIepKuBaITe KHOKNy Ha NylbTe IINCTaHcUHOHHOrO ynpabLeHnHa pyJe, KOtOpOi Tpe6ByETcHa3HaunTb fYHKcUIO. No 3aBepSeHnN peRNCtpaCnN OTo6pa3NTcA [REGISTERED].
3ДяpeRnCTpaunIpyruxyHKuIN NOBTOPeJeCTBnue 1N2. (OcTyHNO,ToJbKOecn3HaueHne napaMeTpa [STR CONTROL] yctahOBnEHO Ha[CUSTOM].)
RESET CUSTOM
N3mHeHnE HaCTpoe KnybTa DnCTaHcNoHHOr ynpabIeHnHa pyne: [YES], [NO]. (OctynHO, Toblko ecnn 3NaueHne napameTp a [STR CONTROL] yctahOBJeHo Ha [CUSTOM].)
PpMueaHn
BoBpMa n3MeHeHnHaCTpoeK DoCTyHnTOJbKO KHONOHOe ynpaBneHne Ha daHHOM yCTpoiCtBe. B ceJIax 6e3OpaNCHoCTn OCTaHOBnTe aBTOMO6NJb nepeI n3MeHeHnem 3Tnx HAcTpoEk.
- EcnBovBpemperntpaun npoun3oJet Own6ka, Bcra paHee 3aperntpnpobHnna HOpmauncoxpanTc. BbInOnHnTe npoueDpy perntpaun 3aHOBo, NaHnHa cToi FyHKnui, rJe npounOuJa Own6ka.
3TaФyHKUIMOKeT6bITbHeIOCTYINHAB HeKOTOpbIX TpaHCnOpTHbIX CpeCDTBax.ДЯ NOJyueHINNoPpOBbIX CBeDeHIn O COBMeCTMnOCTNaBaIero TpaHCnOpTHoro CpeDCTBaNOCeTtE Be6-caT NODepKKn, YKa3aHHbI Ha 3aIHei CTopoHEoBLOXKn.
USB MODE
Измение рекиma USB: [ANDROID], [MSC/MTP].
(ДОCTУПНО,TOЛБКOKORДa Bbl6paH NICTOчнK USB.)
AF/TA (aJIbTePHaTnBHbIe YAcToTbI/COo6UeHnO TeKyuEe CNTyaCmN Ha DOporax)
BkIIOUeHne/OTKIIIOUeHne aJIbTePHaTINBbIX
chaTOT (AF) n COO6UeHn O TeKyuSei CuTyauuN
Ha Ioporax (TA): [AF-ON], [TA-ON], [AF/TA-ON], [AF/TA-OFF].
(IOCTyNHO,ecnBbIbpaH KaKoJ-Jn60 nCTOuHNK.)
REGIONAL
PpneM orpaHnUbaeTcOnpeJeHhbIM perNoHom: [ON], [OFF]. (OocTyuHToIbko npn npneMe FM.)
BTM (namrBo ONTmAbHOB NaCTpOKn) (CTp.12) (DocTyNHO, TOnbKO KOrDa BbIbpaTIOHep.)
FIRMWARE
(OCTynHO TOIbKO npN BbIKIOueHHOM NTOUHKe, KOrDa OTo6paKaIoTcYacbl.)
IpoBepka/O6HOBLeHne Bercn MnkponporpaMMbl. IOpO6HbIe CBeJeHn MOxHo HaHTNa Be6-caTe, aDpec KOTOPOryKa3aHa Ha 3aHHe O6LoXKe.
FW VERSION (Bepcna MnkponporpaMMbl) OTo6paKeHne TeKyuue Bepcn MnkponporpaMMbl.
FW UPDATE (o6HOBJIeHHe MKNpOnporpaMMbl) 3aynck o6HOBJIeHnM NkponporpaMMbl: [YES], [NO].
O6HOBJIeHHe MIKpONpORpaMMbI 3aHUMaET HeCKoJIbKO MNHyT. Bo BpeM o6HOBJIeHn He NOBOPaUNBaTe BbIKIOUcATEJb 3aXnraHn B nIoJKeHHe OFF n He OTcoEINHnTe NcNoJIb3yEmoe yCTpoNCTBO USB.
HactpoIka 3Byka (SOUND)
3To MeHIO HaCTpOIKN IOCTyINHO npnNCNoB3OBaHN NIO6oRo NCTOuHnKa CnHaJa.
EQ10 PRESET
Bb6op KpnbOu 3KBaIaI3epa n3 10 KpNbBbIX 3KBaIaI3epa nII N BbIKIOUeHne 3KBaIaI3epa: [OFF], [R&B], [ROCK], [POP], [HIP-HOP], [EDM], [JAZZ], [SOUL], [COUNTRY], [KARAOKE]*, [CUSTOM].
BbipahnyIO nJa KaKDoRo NCTOChnKa KpnuByIO 3KBaNa3epa MoKHO 3aHeCTN B PAmrTb.
*PnBb6ope[KARAOKE]3Byk BOKana BO BpeM BOCnpoun3BeDeHn npRnyuaeTc, Ho He yCTpaHareTc NOHocTbIO. NcNoJb3ObaHne MnkpofoHa He noDnepxNBAeTc.
EQ10 CUSTOM
Bb6op BapnaHTa [CUSTOM] dIe EQ10.
Bb6op KpB0N 3KBaIaI3epa:
[BAND1] 32 Γu, [BAND2] 63 Γu, [BAND3] 125 Γu, [BAND4] 250 Γu, [BAND5] 500 Γu, [BAND6] 1 κΓu, [BAND7] 2 κΓu, [BAND8] 4 κΓu, [BAND9] 8 κΓu, [BAND10] 16 κΓu.
YpOBeHb rPOMKocTn HAcTpaNBaeTcB DnaNa3OHe OT-6D5do+6D5cwaRom1d5.
BALANCE
Perynipobka 3BykoBoro 6aHaHca: [RIGHT-15] - [CENTER] - [LEFT-15].
FADER
PeryunpoBka OTHOCnteJbHoro ypoBn: [FRONT-15] - [CENTER] - [REAR-15].
S.WOOFER (ca6ByΦep)
SW LEVEL (ypoBc6ByΦepa)
PerynipOBka ypOBHr pOMKocTn ca6ByΦepa: [+6dB] -[0 dB]-[-6 dB], [ATT].
([ATT] oTo6paXkaeTc, ecn yCTaHOBJeHO MInHmAlbHoe 3HaueHne.)
SW PHASE (φa3a ca6Byφepa)
Bb6op a3b ca6Byepa:[NORM], [REV].
LPF FREQ (chaToTa hNJIbTpHa Hn3Knx YaCTOT)
Bb6op rpaHnHOn yactoTb1 ca6Byeepa: [80Hz], [100Hz], [120Hz].
HPF FREQ (yactota cnIbTpabBbICOKNX yactOT)
Bb6op rpaHnHOn qacTObI nepeDnHex/3aDnHex rpoMkoROBOpuTeJe: [OFF], [80Hz], [100Hz], [120Hz].
AUX VOL (ypoBeHb rpomKoctn AUX)
HacpoKa ypOBn rPOMKocTn KaKDoT ONoCoEINHeHHOro DOnOInHnteBHOrO ycToiCTBa: [+18dB] -[0dB]-[-8dB].
3Ta HacTpoKa NCKIIOUaET Heo6xoIMMoCTb peYIpOBKn rPOMKoCTn dJa pa3HbIX nCTOuHNKOB.
(ДocунTOЛьКО KOrДa Bbl6paH nCTOuHnK AUX.)
BTA VOL (ypoBeHb rpoMKocTn 3ByKa yCTpOncTBA BLUETOOTH)
HacptpoKa ypOBnra rPOMKocTn Ia KaXdOro
noKnIoueHHoro ycPtpoNCTBa BLUETOOTH: [+6dB] -[0 dB]-[-6 dB].
3Ta HacTpoKa NCKIIOuae THeo6XoIMOCtB peYInpOBKn rPOMKoCTn dJa pa3HbIX nCTOuHNKOB.
HactpoKa dnCpIeA (DISPLAY)
DIMMER
NcnoB3yeTcIyIIN3MeHEnIaPKoCTn IucnIe:[ON],[OFF],[CLK](BpeM).
YTo6bI 3a yHKnna 6bIina aKTHBHa TOnbKO B TeueHne OnpedeJIeHHoro BpeMeHN, Bbl6epnte [CLK], a 3aTeM 3aJaIte Bpem Haayala n OKOHuaHn.
- YTO6bI 3aAdTb RaKoCTb npn BKNIOUeHHOJ YHKUNynpaBLeHnnoDCBETKOJ: yCTaHOBInTe dJa [DIMMER] 3HaueHne [ON] n OtperyLnpuyTe [BRIGHTNESS].
-утобы 3адаь яркocь пи Вькючehнов функши управленья посветков: установпдг [DIMMER] зсаней [OFF] и otperулируне [BRIGHTNESS].
HactpoKa npKocT coXpaHareTc n npimeHareTc npu BKluOeHn nn BbIKluOeHn fYHKUy UnpaBLeHn noDCBETKo.
BRIGHTNESS
PeryunpoBka npKocn nnncnJe.
HactpaBaeMbI dnaNa3OH ypoBHa npKoCTn: [1] - [10].
SND SYNC (cHxpoHn3aunno 3Byky)
BkIIOueHHe CnHXPOHn3aUu NIOcCBETKn CO 3ByKOM: [ON], [OFF].
AUTO SCR (aBtOMaTnuecka npokpyTk)
ABTomaTnuecka npokpyTKaДЛINHHbIX
JIeMeHToB: [ON], [OFF].
(Heioctyno,ecn BbipaH nCTouHnK AUXnn TIOHEp.)
Hactpoika BLUETOOTH (BLUETOOTH)
PAIRING (cTp. 9)
Подкlioуене ДО дByx устpoистВ BLUETOOTH: [DEVICE 1], [DEVICE 2].
IIO 3aBepueHn cOnpXeHn BMeCTO HaDnnci [DEVICE1] nIn [DEVICE2] 6yDet OTo6paXaTbcn Nm8 cOnpXeHHOrO yCTpoNCTBa.
AUDIODEV (aydnooyctpoiCTBO)
Bb6op ayuoyctpoiCTBa. Ha annapate, cponjxHHom C yctpoiCTBOM [DEVICE 1] uIn TekyIIM ayuoyctpoiCTBOM, COBmecTumbIM C npophiIeM A2DP, oTo6paxaetc cnMBON [].
RINGTONE
Bb6op yctpoiCTBa,Ha KOTOPOM DOnJXHa 3ByaTb MeIoDnA Bb3OBA (annapaTnn IN NOKJIIOUeHHbIMo6NJbHbTIeNeΦOH):
[1] -annapat, [2] -Mo6nIbHbI TeIeΦOH.
AUTO ANS (aBtOMaTnueckn OTBeT)
HacpoKa annapataIЯ aBToMaTnueeCKOrO OTBeTa Ha BxOJaUne BbI3OBbl: [OFF],
[1]—c3aDépXKoI npu6n3nteJbHo 3cekyHdbI,
[2] -c 3aDépKko npn6Jln3nTeJbHo 10 ckyHd.
AUTOPAIR (aBToMaTnueckoe conpJKeHne)
ABTomatnueckn 3anyck cOpjxHnno BLUETOOTH npn noKIOUeHN yCTpoiCTBa C iOS5.0 nnn 6oJee no3dHeBercn upe3 USB: [ON], [OFF].
BT SIGNL (CnHnJI BLUETOOTH) (CTp. 10)
BkIIOUeHne Nn BbIKIOUeHne FyHKcNBLUETOOTH.
BT INIT (nHnuaa3aun BLUETOOTH)
HnuaJn3aun HacTpoek, Cb3aHHbIX C BLUETOOTH (cBeJeHn o cOpjxKeHn, CBeJeHn o6 yctpoiCTBe n T. d.): [YES], [NO].
Pn yTnIIN3aun DaHHoro annapaTa BbINOJIHNTe HnIuaJIN3aunIO BCEX HaCTpoEK.
(OCTyHNO TOJbKO npn BbIKNoueHHOM NTOUHKe, KOrda OTo6paKaIOTcYacbl.)
VOICE-OUT (BbIBO,IOJIOca)
Bb6epnte dHaMnKn nla Bbl3Oba 6e3
ncnoIb3oBaHnpyk: [VOICE FRONT] (nepeHnne dHaMnKn), [VOICE REAR] (3aHnne dHaMnKn), [VOICE ALL] (Bce dHaMnKn).
(OCTyHOTJbKO KOrda NCTOCHNK OTKJIIOueH N OTO6paKaIOTcYacbl.)
HacrtpoiKa npiloxeHnry Sony | Music Center (SONY APP)
Co3dahne n 3akpbItne nodkloueHnra "Sony | Music Center".
Дононтеловая Информацьа
06HOBJIeHne
MnKponporpaMMbl
YTO6bI O6HOBnTb MKNpOnpoRpaMMy, NpeeINTe Ha Be6-caNT TexHnueckOn NOdepKKn, YKa3aHHbI Ha 3aJHeN O6IOXKe, a 3aTeM CNeDyInTe YKa3aHnMa B INHTepHete.
PpmeaHn
-Дяобовеня МКрponporpaMMbI Tpe6yETcYCTPOIcTBO USB (He BXoJNT B KOMNJIeKT NOCTaBKN).CoxpaHITe nporpamMy obHOBJeHnHa yCTpoiCTBeUSB, noKJIouHTe erO K NOpTy USB n BblOnHnTeobHOBJeHne.
- 06HOBJIeHHe MmKpOIpOrpaMMbI 3aHMaET HeCKoJIbKO MNHyT. Bo BpeMg O6HOBJIeHn He NOBOPaUNBaIte BblKnIOuAteJb 3aXnIraHnB INoLoXeHne OFF n He oTcoEduHnTe nCNoJIb3yEmoe yCTpoiCTBO USB.
Mepbl npedoctopoXHOCTN
Ecnn aBtOMo6nIb 6bl npuapKObaH B COJIHeuHOM MeCTe, He BKIOUaYte yCTpOiCTBO Do TEX nOp, NOKa OHO He OXlaDITcra.
He ocTbIaIe nepeHIOI naHeJIb IJIINpepeHOChIbe ayINOyCTpoiCTBa BHTpnABTOMO6IIa, NOCOJIbky BBICOKa TeMnepaTypaBpe3YbTaTe BO3deIcTBnI PpMaBX COJIHeuHbIXJnye MoKeT pInBeCTn K IX NOBpeKdEHIIO.
- Pnp pa6oTe yctpoiCTBa aBTOMaTnueCKN BblBnraeTcAHTeHHa C3JNeKtpnueckm npnBOdom.
Для подерхань ВсICOKORO KaYeCTBa 3Byka
He npolnBaIte KndKocTHa yctpoNCTBO.
IopAIOK BocnpOn3BedeHnaaynOaaiOB
CbeHnO6yctpoiCTBe iPod
KdahHomy annapaTy MoXHO noDKIIOuATb yka3aHHbIe Hxke moJen iPod. Npeed nCNoJIb3OBAHem ycTpoNCTBa iPod ycTaHOBnTe Ha HEM nporpaMMHoe oBeCneueHne nocJeHne Bercn.
CoBmecTnMbIe MoJeiPiPhone u iPod
| Сов畿ий м京都ль | Bluetooth® | USB |
| iPhone X √ | √ | |
| iPhone 8 √ | √ | |
| iPhone 8 Plus √ | √ | |
| iPhone 7 √ | √ | |
| iPhone 7 Plus √ | √ | |
| iPhone SE √ | √ | |
| iPhone 6s √ | √ | |
| iPhone 6s Plus √ | √ | |
| iPhone 6 √ | √ | |
| iPhone 6 Plus √ | √ | |
| iPhone 5s √ | √ | |
| iPhone 5c √ | √ | |
| iPhone 5 √ | √ | |
| iPhone 4s √ | √ |
| Сов畿имая м odeль | Bluetooth® | USB |
| iPod touch (6-ую пokолени) | ✓ | ✓ |
| iPod touch (5-ую пokолени) | ✓ | ✓ |
| iPod nano (7-ую пokолени) | ✓ |
- UcnoJb3OBAHnE 3HaUka "U3roTOBJeHO nJa Apple" O3Haayet, YTO akceccyap pa3pa6oTaH CneuaJIbHo IIN NOKIIIOueHnK IpOyKTaM Apple, yKa3aHHbIM B 3HaUke, IN cepTnΦuNpOBaH pa3pa6oTuNKOM Ha COOTBeCTBnE CTaHApTAM KaueCTBa Apple. Apple He HecET OTBeTCTBeHHOCTn 3a pa6Ory 3TOrO yCTpoiCTBa IIN erO COOTBeCTBnE CTaHApTAM 6e3OnacHOCTn HOpMaTHNBbIM Tpe6OBaHNrM. ObpatIte BHImaHne, YTO uCNoJIb3OBAHne 3TOrO akceccyapa C npOdykToM Apple MoXeT NOBInrTaH Na KaueCTBO pa6Otbl BeCnpoBOdHOr cEtN.
B clyuae BO3HnKHOBEHn BONPOCoB nIIN npo6JeM, KacaUxxCra DaHHoro yCTPOcTBa, KOtOpbIe He ONCAHbIB 3TOM pyKOBoIDCTBe, ObpaNTecb K 6nXaHMeMy dInNepy Sony.
YxOa yCTpoBtBOM
ЧИстka KOHTAKTOB
Bo3MOxHO, yCTPOINCTBO He 6yDet pa6oTaB
HaJIeXaIIM O6pa3OM n3-3a 3aqrA3HeHnA
KOHTAKTOB, clyXaIINx IJRA CoEINHeHnpePHeN
NaHEIn C yCTPOINCTBOM. Bo n3bexKaHne 3TOrO
OTCOeHNHTe nepeDHIIO NaHEIn (CTp.7) n
NPOTPNTe KOHTaKtBI BaTHbIM TaMNoHOM. He
IPNIkIaNbIBaIte n3LIuHnIX ycIIN. B NPOTNBOM
ClyUae MOxHO NOBpeDITb KOHTaKtBI.
Ppimechann
BueJx6e3onacHOCTn nepeI uCTKo pa3bemOB BblKnIOUHTe 3axrHaHne N BblbTe KIOU 13 BblKnIOUaTeJIra 3axrHaHna.
- HNKOrIa He npKacaiTeCb K KOHTaTAM NaIbCaMn NN MeTaJIHueCKIMN npeDMeTaMn.
TexHnueckne xapakTepncTNKn
TIOHEP
FM
Диаэнн actpoKn:
ДяnapaMeTpA [AREA] 3aDaHo 3NaueHne[EUROPE]:87,5Mf-108,0Mf
ДяnapaMeTpA [AREA] 3aDaHO 3NaueHne[RUSSIA]:FM1/FM2:87,5Mf-108,0Mf(cwarom50Kf)FM3:65Mf-74Mf(cwarom30Kf)
AHTeHHoeTHe3do:
Pa3bem BHeuHne aHTeHHbI
IVcNoIb3yEma YyBCTBnTeNbHOCTb:7D6Φ
U36bnpaTeJIbHocTb:75d npn 400K
OTHOWeHne "CnHnHaJI-WhM": 73 d6
Pa3deneHne:50db npn1KtU
Диаэзов BOCnpoN3BOIDIMbIX YaCTOT: 20T-15000T
MW/LW
Дианэоннстpoик:
MW:531KΓι-1602KΓι
LW:153KΓι-279KΓι
AHTeHHoeTHe3IO:
Pa3bem BHeuHne aHTeHHbI
YBCTBNTeJIbHOCtB:MW:26MKB,LW:50MKB
PpOurpbBaTeIb USB
HHTepfeic:USB (nonHocKOpocTHoN)
MaKcMaJbHa cNla Toka:1A
MaKcMmaJIbHoe KOJIuYeCTBO paCnO3HaBaEmblX nanOK nΦaɪNoB:
nanok (aJIb6oMoB): 256
faiIOB (KOMno3nui) B nanke: 256
CoBmecTImaBepnI npToKoJa Android Open Accessory (AOA): 2.0
COOTBETCTBYUOuN KOJeK: MP3 (.mp3)
Ckopoocb nepepaun daHHbIX:
8K6nt/c-320K6nt/c(noДepexka VBR (nepeMeHHa nckopoctb nepeDaun daHHbIX)
Yactota dNckpeTn3aun: 16 Kf - 48 Kf
WMA (.wma)
Ckopooctb nepepaun daHHbIX:
YacToTa DnCKpeTn3auuN: 8KΓ-48KΓ
FLAC(.flac)
Pa3pIaHocTb:166nt,246nt
Yactota dNckpeTn3aun: 44,1 KfU, 48 KfU
BecnpoBnHa CB3b
Cnctema CBA3N:
CTaHdapt BLUETOOTH Bepcn 3.0
MoHOCb:
CTaHapr BLUETOOTH,Knacc MouHocTn 2
(излунец -9дБМ)
MaKcImaJIbHaJaIaJIbHOCTb CBa3N:
B npedeJax npaMO BnuDMocTn: npu6I. 10 M*1
Dnana3OH
A2DP (Advanced Audio Distribution Profile) 1.3
AVRCP (Audio Video Remote Control Profile) 1.3
HFP (Handsfree Profile) 1.6
PBAP (Phone Book Access Profile)
SPP (Serial Port Profile)
CoOTBeTcTBYUOuN KoIeK: SBC (.sbc), AAC (.m4a)
*1ФakTnueckaJaIbHOCTcBcR3N3aBnCtOT pa3JIuHbIX foAkTOPOB,HaNPmep OT npenrTCTBm MeKdy UcTPOcTBAMM, MaHHTbIX NOJEN BOKpy MKNKPOBOHOBbIX neey, CTaTNueCKOTo 3JIeKTPnueCTBa, yVBCTBnTeJIbHOCTn pnpemHnka, 3ΦΦeKTnBHOCTn aHTeHHbl, OpepaUNHOH CNCTeMbI, nporpamMHOro npNIIOKeHn I T. D.
*2 CtaHapThbIe npoФиЛn BLUETOOTH yKa3bIbAHT Ha
ць obMeHa ДaHHbIMNo npotoKoJy BLUETOOTH
MexdY yCTpoiCTbAMN.
IopKJIoueHne no NFC
Iina3OH qactOT n CpeuNkaunmaKcMaJbHO MOUHOCTN
OCHOBHOE yCTPOIcTBo (1)
IeTaJIIN DJIY UCTaHOBKN I NOJKnIOUcHNI
(1KOMnJIeKT)
Y BaIeRo DNJIepa MoKeT He 6bITb H NaIuynn HeKOToPbIX n3 npHaJdJeXHocTei, nepeUncIeHHbIX Bblwe. O6paNTecb K dIIepy Ira nOlyueHn npoPo6HOHnHOpMaun.
KoHCTpykunn H xapaKTepnCTNKN MOryT N3MeHrTbc8e3 npedBapuTeNbHO rYBeOMJIeHN.
TpaHcnpTnpoBaTb B opRnHaIbHoyn ynaKOBKe, BO Bpemra TpaHCnpTnpoBKn He 6pocatb, ObepeRaTb OT naDeHn, ydaPoB, He noDbepraTb n3JnUHeN Bn6paun.
PeaI3aIIO OcyIeCTBnTb B COOTBeTCTBnC DeIcTByIOUIMN Tpe6ObaHnMn
3aKoHOdaTeJIbCTBa.OTcIyXnBWee n3dJIneYTNIN3NPOBaTb B COOTBeTCTBmC DeIcTByIOUIMNTpe6OBaHnMn 3aKoHOdaTeJIbCTBa.
EcnHeNCpapBHOCTb He ydaetcYCTpaHNTb CNeDy
DaHHoIN HNCTpyKcUN -O6patntecb B 6nKaaHni
ABTOP3OBaHHbI SONY cHTp IIO peMOHTu n
06CJyXNBAHIO.
Abtopckne npaba
CNoBechbl TOBapHb3nak n Ilorotnbl Bluetooth
YBJIaOTc3apeNCTpnpoBAHHbIMn TOBapHbIMn
3NaKamn Kopnpaunn Bluetooth SIG, Inc. n
ncnoIb3yOTc Sony Corporation no liueH3nn.
Dpyrne TOBapHbIe 3HaKn n ToproBbIe Ha3BaHnna
PpHnAdLeXkAT COOTBeTCTBYUOUM BlaJeNbCaM.
3HaK N YBJIeTc TOBaHbIM 3HaKOM NJIN 3apeRnCTpnpoBaHHbIM TOBapHbIM 3HaKOM NFC Forum, Inc. B CLJA u npyrx ctpaHax.
Windows Media JBIAETC TOBAPHBIM 3HaKOM nIe 3apeRnCTpnpoBaHHbIM TOBAPHBIM 3HaKOM KOpnpaun Microsoft Corporation B CLJAs n/nnn Dpyrnx CTpaHax.
Данhoeиздени Зашишени onpe徴елнblIMnpaBAMn INHTeJIeKTyalbHOn co6cTBeHHocTnMicrosoftCorporation.Испльбоване ппpacnpocstpahene пообн教 ТхнOLORN,КрмкВданHomпpoДуКTe,6e3ЛицeHsNKopnapaMn Microsoft nnnabTopu3OBaHHoro npedctabNTelbCTBa kopnapaMn Microsoft 3anpeшeo.
He cIbIweH 3BykoBoi CnHaJI.
→ ΠоДКЛЮЧЕн ДОПОЛНИТeН bHbI YcUЛТeН bMOшнOCtN, a BCTpoEHbI He nCNoJb3yETcR.
YdaheHbI daHHbIe n3 naMaTn.
OTcoeHNHnCn HnHe npaBnBHO NOdknOueH npoBO, nHTAHn, n60 n3BneHa 6aTaepKa.
I3 naTn ydaJeHb 3anporpamMnpoBaHHbIe paNocTaHcH N yCTaHOBka BpeMeHN. Ipeperope npedoxpaHnteJb. CblweH wum npn pekeKnUoyehn noLoXeHnKlOua 3axuHaHn.
PpOBoJa HEnpaBnIbHO NOcOeHHeHb K pa3bemy 3JIeKTPoNITaHn BcNOMOraTeJbHOrO 06OpyDoBaHnA ABTomO6nJI.
BoBpemBaocpnOn3BeDeHnNn npHema NaHHaetc demOHCTpaun.
EcIn npn BkIIOueHHom demOHCTpaUHOHHom pexKIMe [DEMO-ON]B TeueHne 5 MNHyT He BbINoHNHOTcHnKaKHeonepaUu,HaunHaetcJ demOHCTpaUu.
- YcTaHOBnTe 3NaueHne [DEMO-OFF] (ctp. 22).
Ipona/He OTo6paXaetcHnDnkaunB OKoUke ducnner.
→ДлгдИМмepa yctaHOBNeHO 3HaueHne [DIM-ON] (CTp.25).
→Дисплел OTKнHuOTcR,ecnHaKaTb n ydePknBaTb KhoNkY OFF.
HaxmTe KhoNky OFF ha yctpoNCTBe n ydepxnBaIte ee HaxaToi, noka dncnJe Hb BKJIOHTc.
→ KoHTaKTb3aTpr3HeHb1 (cTp. 28).
Ducnnei/NoCDBETKa Mrraet.
HeDocTaOuHaNoJaaua NtAHHa.
- Y6eIntecb, yTo Ha yCTpoNCTBO nOdaETcra DOCTaTOUHO NITAHN O T ABTOMOBnIBHORO aKKyMnTOpA. (Tpe6oBaHne K NCTOuHNKy NITAHN: 12 B NoCToRHHORo ToKa.)
He pa6oTaIOT KhoNk ynpabNeHn.
Haxmnte n ydepxnbaiTe KhoNk DSPL n (Ha3aI)/MODE 6oJee 2 cekyH, qTo6bI nepe3arpy3nTb yctpoiCTBO. Coepxmoe namrtn 6ydt ydaJeHO. BueJx 6e3onacHOt N He BblONHnTe nepe3arpy3ky BO Bpem BoKdEHH.
ABTomaTnuecka YCTaHOBka yacob 6bila HToUHOI.
→ДаHHbIe YacOB Ha paIIOBOJHax ABJIOTcH HeTOUHbIMN. -YCTaHOBNTe YacBi BpyHyIO (CTp.8).
PpneM paAnocTaHcN
He ydaetc npnHrTa paHIOCTaHcun. 3Byk cnpoBQxJaetc nomexamn.
Hepabnblhoe coeHHne. -PpOBepbTe noDCoeHNHeHne aBtOMoNBHO aHTehHbI. -Ecn He BblBnraetcA bTOMaTuYeCKa aHTehHa, npOBepbTe COeHNHeHne npOBoDa ynpabJeHn aHTeHHoC 3JIeKtpueckm npuBOdom.
He ydaetcBbINOHNHTb npedBapntbHyu HactpoiKy.
→ PpepaBaeMbI paAnocurnHcNnKoM cna6.
B dnaana3oHe FM3 He ydaCTcH aCtponTb 65 MΓ-74 MΓ.
→ДЯ[AREA]BbIbpaHOB[EUROPE]. -YCTaHOBnteДЯ[AREA]3HaueHneRUSIA.
RDS
He ydaetc npnHb ycnyr RDS (kOrda nnapametpa [AREA] 3aHaHO 3HaueHne [RUSSIA]).
BbI6paH nnana3OH FM3.
- BbI6epnTe FM1 nnn FM2.
YcnyrRDS HeoctyHbI B daHHOM pernohe.
Iocne HeckoBkx CekyH npocJywnBaHH BKnOuayTc FyHKnA SEEK.
→ CtaHnIa He nepeJaet daHHbIe TP nIu nepeJaet cnIkwOM cna6bI CNrHaI. -OTKIOUHTe TA (cTp.13).
DopoxKbIe coo6ueHn He nepepaotca.
BkJIIOHTeTA(cTp.13).
→ CtaHnIa He TpaHCInpyeT DopoXhbIX coo6uEHN, XOTN OTHOCNTcK TUNy TP. HactpoiTeCb Ha dpyryIO CTaHnIO.
Pn BkIoueHn FyHKcN PTY oTo6paKaetc Hndkaun[-- - - - - - - - - - - - - - - - - - - - - - - - - - - - - - - - -
→ПинMuMaЯ CTaHcIЯ He nepeJaet daHbIe RDS.
→ DaaHHbIe RDS He npHnHaTcra.
→ CtaHnHa He yka3bIbae Ttn nporpaMMbl.
Ha3BaHne nporpamMHOy cnyr Muraet.
→ДЯ BыбраHHоь BданьМОмeHT CTaHцин He NCNoJIb3yETcAЛБТeРHaTnBHa YaCTOTa.
—Haxmte KhoNky 一 / 一 / (SEEK-/+), noka Muraet Ha3BaHne nporpaMMHO uCnyr. IoBNTc HndnKaunra [PI SEEK], n yCTpoiCTBO NaHHT NOUCk Dpyrou YaCTOTbI C TaKIMn Je daHHbIMn PI (nporpaMMHa NdeHTnΦnKaun).
Bocnpon3BepeHne c cytpoiCTBa USB
HeB03MOxHObCpON3BOOHTb daHHbIe cncNoJIb3OBaHNEM KOHcEHTpaTopa USB.
Ha daHHOM yCTpoNCTBe HeBO3MOxHO paCnO3HaBaHne yCTpoNCTB USB, noDknUoyEHbIX uepe3 KOHcHTpaTOp USB.
YcTpoiCTBO USB Tpe6yeT 6OJbWe BpemeHn dIra BocnpOn3BedeHn.
YcTpoNCTBOUSBcoJePKeNTpaJIbIcoCNoXHO pa3BeTBnEHHO CTpyKTypoNnanok.
IpepbIBnCTOCTb 3Byka.
3ByK MoKeT 6bITb IpepbIBnCTbIM npu BbICOKO CKOpocTN nepeDaun DaHHbIX.
→ B HekoToBbX CnyaX BoCpOn3BeJeHne faIIOB c DRM (ynpaBHeHne UΦpoBbIMn npaBaMn) HeBO3MOxHO.
He ydaetc Bocnpon3Bectn aydnoaui.
YcTpoNCTBa USB,OTΦOpMaTnPoBaHbIe c NOMOuBIOΦaIIOBbIX CnCTEm,OTNnUHbIX OT FAT16 nIN FAT32,He NOIePxNBaIOTc*.
* DaHHoe yCTpoNCTBO NOdepXnBaET oOpMaTbI
fauNoBou CNTeMb FAT16 n FAT32, Ondako
HeKOToPbIe yCTpoNCTBa USB moYr He noDepXnBaTb
Bce 3TN fOpMaTbI fauNoBou CNTeMb FAT. IJRA
NoJyHnra NpOboHou nHopMaunm CM.
nHcTpKUIO NO kCNJIyatauN KOHKpeTHoro
yCTpoNCTBa USB nn CBxKntecb c npOn3BOOnTeJeM.
He ydaetc BbINOHNtB onepaun nponycka aIb6oma, nponycka 3JeMeHToB (peKIM nepexoda) u noncKa KOMno3uun No Ha3BaHnIO (Quick-BrowZer).
→ 3TN onepaunn HeoocTynhbl, ecnn nodklouheHo yctpoiCTBO iPod nnn ycTpoiCTBO USB b pexnme Android.
-ДляnapaMeTppa[USB MODE]yctaHOBnte 3haueHne MSC/MTP.
OTKlnHnTe yCTpoNCTBO iPod.
Ha yctpoiCTBe 3aDaH HeBepHbI peKm USB.
- Y6eIntecb, TTO B kaueCTBe peKmMa USB Ha yctpoIcTBe 3aDaH peKmM MSC/MTP.
B pexkme Android 3ByK c annapaTa He BOCnpOn3BODNTc.
Kornda annapat haxoJntcB pexime Android, 3ByK BOCnpoU3BOJNTcT TOIbKO CO CMapTfoHa C OC Android.
- PpOBePbTe COcToHHe npJIoXeHn IaBocPpOn3BeJeHn ayDnO Ha cMapTfoHe c OC Android.
B 3aBnCmOCTOn cMaprfoHa c OC Android BO3MOXHbI npo6Jembl C BOCpPon3BeJeHem.
Функця NFC
He ydaetc BbINoHrTaOnepaun ODHm KacAHem (ncnoJb3ObaHnem fYHKun NFC).
→ EcIn cMapTfoH He pearnpyeHa kacaHne, BblIOHNHe Yka3aHHbIe HNKe DeIcTBnI.
- PpOBepe, BkJIIOueHa JIN ΦyHKUaN NFC Ha CmApTfoHe.
- Ee60JIbIe npn6n3bTe 3HaK N Ha cMaprfoHe K 3Haky N Ha daHHom annapate.
- Ecnn Cmaptfoh B yexJe, Chnmtte yexoJ.
→ YyBCTBnTEJIbHOCTb npneMHnka NFC 3aBnCUT OT KOHKpeTHORO yCTpOInCTBa.
EcHHeckoBko pa3 He ydaetc co3DaTb NOKIOUeHne K CMapTOH OHN KacaHnEM, CO3DAIte NOKIOUeHne BLUETOOTH BpyHyIO.
Функць BLUETOOTH
IopKIOUaEMOMy yCTPOINCTBy He ydaetcra 06HapYkNTb daHHb nnnapaT.
YtobbBbINOHNbCOnpJxHHe,nepeBeDHTe annapaT B pexm OxuaHn CoPjxHn.
Nocne nodknoueHnK yctpoNCTBy BLUETOOTH Dpyromy ycTPOINCTBY He ydaCTcO6hApYkntb DaHHbI annapaT.
3akpoTe Tekyuee NoKluoyehne IN BbINOJIHTe NOnCK DaHHoro annapata Ha Dpyrom yCTPOINCTBE.
Nocne BbINONHeHnCOnpJxKeHn C yCTpoiCTBOM BKIOUHTe BbIXoHn CnHn BLUETOOTH (cTp.10).
He ydaetc co3daTb noKIOUOeHne.
POnKJIIOUeHnEM ynpaBIAET OJHa n3 CTOpOH (daHHbI aannapat nnu ycTpoiCTBO BLUETOOTH), HO He oBe OJHOBpeMeHHO.
- PoiKJIouaItecB K annapaTy c yCTpoiCTBa BLUETOOTH nHn HAObOpOT.
He OTo6paKaetcNMa O6HApYKeHHOrO yCTpOJCTBa.
→ B 3aBnCmOCTN OT COCTOHNpyrOYcTPOIcTBa,BO3MOXHO,He ydaCTcN NOyUHTbero NMR.
OTCYCTBYeT MeJIOINBbl3OBA.
→Пи потулени BXODЯшero ВьИЗОВа
настоютЕ ГомКоCTь, NOBOPaЧИВая ДИСКOBБИ
perул�тор.
B 3aBnCmOCTN OT NOkHueHHOro yctpoiCTBa MeNoIb Bbl0Ba MoKeT OTnpaBnTbcr HEnpaBnBHO.
- 3aДайтЕ ДЯ napametpa [RINGTONE] 3начене [1] (Стр.25).
→ДИнhamNKHeNoIOKJIIOUeHbI K YCTpoNCTBY.
-ПоДКЛЮЧИТЕДИНHAМИКИ K YСТРОИCTBY.ДЯ
ВыБОраДИНHAМИКOBДЯВыБОДаMeLOДИ
ВыЗОваHAЖМITE MENUиВыБерпTe
[BLUETOOTH]→SET VOICE-OUT.
He cIbIshO co6eceHnka.
→Динамкн He NOДКЛHQueHbI K yCTpoiCTBy.
—ПОДКЛHQuHTeДинамкN K yCTpoiCTBy.ДлЯВыбopaДинамкOBДЯВыБОдa roJIOcaabOHeHTa HaxMnte MENU n Bby6epnTe[BLUETOOTH] SET VOICE-OUT.
Co6ecdHnK rObOpNT, yTo BAc cIbIuHo ouehb THXO nJIn oueHb rPOMKO.
HactpoIte Heo6xoDmyIO rpoMkoCTb C nOMOuIIO npaMeTpayCUNeHnA C mKpOfoHa (cTp.19).
Bo Bpemr Tepeohhbx pa3roBopOB cbluHNo 3Xo nn m.
YMeHbWnte rPOMKoCTb.
→ BbI6epnTe IJIpeKIMa EC/NC 3HaueHne [EC/NC-1] nII [EC/NC-2] (cTp. 19).
EcIn npOBeHb OKpykaUoIero UyMa cINuKOM BbICOKN, NOnbITaHTecb YMeHbWNTb 3TOT UyM. HanpIMep, ecn OTKpbIto OKHO n CbIWeH rPOMKn Wym DOpOrn, 3akpoiTc OkHO. EcIn rPOMKO pa6OtaET KOHNIOHeP, YMeHbWNTe erO MOUHOCTb.
TelefoH He noDknloueH.
→ПиВOCnPOn3BeHEnaYdNcCytPoNCTBa BLUETOOTHTeJefoHHe6yDetNoKJIuOeH, daxe ecn Bbl HaxMeTe KhoNkyCALL.
- BbInOnHnTe nOdknUoyehne c TeIefoHa.
IInoxoeKaueCTBO3BykaBTeJefoHe.
KaueCTBO 3ByKa B MO6nJIbHOM TeJefoHe 3aBnCtOT YcNobn npneMa.
- Pn nloxux ycnoBnx npneMa nepemecntte aBTOMoBnIb B dpyroe MeCTO, B KOTOpOM yPOBeH cHHaI, npHHMaemORo MOBnIbHbIM TelefoHom, 6yTe 60JIbWe.
PROMKOCb NOKIOueHHORO aydnoyctpoiCTBa CINUKOM HN3KA JNJ CNUKOM BICOKA.
YPOBeHb rPOMKoCTn 3aBnCnT OT KOHKpeTHOrO ayDIOyCTpOcTBA.
Hactpoite rpoMkoCTb NOkNIOueHHoro ayDIOOyCTPOINCTBa Ha DaHHOM annapate.
Bo BpemBocnpn3BeDHeNcaydnoyctpoiCTBa BLUETOOTH npepbIbAeTc3Byk.
YMeHbWnte paCCToHne MeJy aAnpApaTOM ayDnOyoCTpoNCTBOM BLUETOOTH.
EcIn aynoyctpoiCTBO BLUETOOTH xpaHntcB UexJe, CHnKaIOUeM yPOBeHb CnHaJa, TO CHIMITE 3TOT YEXOI.
→ PяДOMИСПОЛБ3уETСЯHECKOЛБKO yCTpoICTB BLUETOOTHилдpyrnx yCTpoICTB,ИЗЛУЧАЮцnx paДИNOВOLHbl.
BbIKJIIOHTe npyIne yCTpoIcTba.
- YBeJIuHbTe paCCToHHe MekDy daHHbIM annapaTOM n dpyrMn yCTpOJCTBaMn.
→Пи co3daHnnoIokNIOUeHnMaJy daHHbIM aIInapaTOM mO6uNbHbIM TeJefoHOM MROBHeHNO npeKpaAaetcB OBCnpoN3BeDeHne aydno.3To HeЯBJIaETcH HeNCpapBAHOCTbIO.
He ydaetcya npabnraTb noikIIOueHHbIM aynoocptpoiCTBOM BLUETOOTH.
Y6eDnTeCb, yTO nOJKNIOUeHHOe yCTPOIcTBO BLUETOOTH noIDepKINBaET npoΦnIb AVRCP.
He pa6oTaIeHekToOpbIe fYHKUIN.
Y6eIntecb, yTO NOkIIOueHHOyeTPOINCTBO NOIepKINBaET Heo6xOINMbIe OyHKUIN.
PpOncxOaNT aBTOMaTnueckn OTBeT Ha BXOJaUb Bbl3OB.
→ ΠοДКЛЮЧЕНБИ TELEФОH HAcTpoEнТаK,чTOбы aBTOMaTUcheKN OTBeuYaTb Ha BXODЯПиE Bbl3OBbl.
He ydaocb BblnoHnTb copxKeHne n3-3a npBeBbIeHn BpeMeHn OxndaHna.
Bpemr,OTBeHHeHa cnpjxHne,3aBnCt OT NOKJIIOyAeMOrO yCTpoiCTBa N MoKeT 6bItb He6oJbWIM.
- NocTapaIteCb BblIOJIHHTb cOpJxKeHne BOTBeDeHHoe BpeM.
He ydaetcBbInolHnTb cOprrxKeHne.
COnpJxHe annapaTa c paHee conPjxHbIM yCTpoiCTBOM BLUETOOTH MoKet 6bITb HeBO3MOxHO NocLe HnIuIaI3aIuN annapaTa, ecNI CBeJeHrO o COnpJxHn annapaTa HaxoJaTcHa yCTpoiCTBe BLUETOOTH. B 3Tom Cnyae Heo6xoDmO ydaJIHTb CBeJeHrO o COnpJxHn annapaTa C yCTpoiCTBa BLUETOOTH, a 3aTeM BblONHHTb INx conPjxHne NOBTOPO.
He ydaetcya npabTb yHKnneBLUETOOTH.
→ BbIKHIOHTe annapaT, HaxkAB KHOINKY OFF uYdePKNBaA ee 60Jee 2 cekyHn, a 3aTeM CHOBA BKJIIOHTe erO.
Bo Bpemr TelefoHHoro pa3roBopa B peKnme 6ecnpoBODHO raphHTpyb HeT 3ByKa n3 rpomKorOBOpnteNe ABtOMo6nla.
Ecnn 3Byk NOCTynae T CMo6nIbHOrO TeNeΦOHa, HAcTpoTe erTo TaK, YTO6bl 3Byk OT Hero WeJ UpeezrPOMKOROBOpuTeNn ABTomO6nIa.
Функця Siri Eyes Free He BKJIOueHa.
→ BbInoJIHnTe peRncTpaIIO iPhone c fYHKUnei Siri Eyes Free bpeXmE 6ecnpoBOnHo rapHnTypbl.
→ BkIIOHTe yHKcHIO Siri Ha yCTpoiCTBe iPhone.
OTMeHnTe NOKJIouHeNBE BLUETOHT MeKny yCTpoIcTBOM iPhone n daHHbIM aannapaTOM, a 3aTEM CHOBA co3daIte erO.
YnpabLeHne npIIOxKeHnem Sony | Music Center
Ha3BaHHe npJIOXeHH He COOTBeTCTByeT akTnueckOMy npJIOXeHHIO B "Sony | Music Center".
Eue pa3 3anyctnte npnloxkeHne n3 npnloxekHna "Sony | Music Center".
Pn3anycke npnloxene "Sony | Music Center" uepe3 BLUETOOTH dncnne aBtomatueckn nepekliouaetcB pexim [BT AUDIO].
→ C6oI npJIoXeHnra "Sony | Music Center" nnn ΦyHKuIN BLUETOOTH.
3aynctnte npnloxkeHne eue pa3.
Korda dincnnei nepekniouaetcB pexum [IPOD], npiloxeHne "Sony | Music Center" aBTOMaTHueCKN OTKliouaETc.
→Пиложене"Sony | Music Center"Ha iPhone nii iPod He noДержиВаeT Функию BocnpoN3BedeHnЯ iPod.
Ha daHOM aannapate Bb6epnte nctouHnK, otIuHbI OT [IPOD], a 3aTe m co3daIte noIKnIouHe n K "Sony | Music Center" (cTp.19).
HUB NO SUPRT: He noDiepXnBaIOTcKoHueHTpaTopb USB.
IPD STOP: BOCPON3BedeHne C yCTPOJCTBa iPod 3aKOHyeHO.
→Ha iPod u nn iPhone BKIOUHTe yHKuIO BOCnpOUN3BeDEHn.
NOT SUPPORT -Android MODE
KannapaTy noKJIoueHo yCTpoiCTBO USB, He noIepxNBAIOoee npotokoi AOA (Android Open Accessory) 2.0, kOra nIpaMaTePa [USB MODE] 3aHaHO 3NaueHne [ANDROID]. - Inra napaMeTpA [USB MODE] yCTaHOBnte 3NaueHne [MSC/MTP] (cTp. 23).
USB ERROR: HeBO3MOXHO BOCIPON3BECTN yCTpoIcTBO USB.
→ CHOBa nOdkJIIOUHTe yCTpoIcTbO USB.
USB NO DEV: yctpoiCTBO USB He noKIOUeHo nJI He paCnO3HaHO.
Y6eIntecb, yTO yCTpoiCtBO USB nnn Ka6eIb USB HaJeKHO NOdkNIOUHebl.
USB NO MUSIC: OTCYCTBYeT ΦaɪnДЯ BOCNpOu3BedeHn.
IOnCOeHNHTe yCTpOINCTBO USB C BOCnPON3BOIMMbIMn faJnAmn (cTp. 29).
USB NO SUPRT: yctpoicTBO USB He NODepKINBaETc.
→Дяпolyченя поюбнix сбendeи O coBmecTUMOCTN yCtpoiCTBa USB nocetnte Be6caNT NOdepxKu, yKa3aHHbI Ha 3aHHei CTopoH eObloxkN.
OVERLOAD: yctpoicTBO USB nepenolHeNo.
→ OTKHIOHTe YCTPOINCTBO USB, a 3aTeM HaxMMTe KHOKNy SRC dIg BbIbopa dpYrOTo NcTOHnKa.
YcTpoNCTBO USB NOBpeXJDeHo, nIINoDDCOeDINHeHO HeNoDepKxNBaEmOEyCTPONCTBO.
ФункционповаимеRDS:
NO AF: OTCYTCTBYIOT aIbTePHaTHNBHbIe qACTOTbl.
→Haxmnte KhoNky I/7I (SEEK-/+), noka Muraet Ha3BaHne nporpaMMHO yCnyr. YcpoiCTBO HauHHaET nonck pyrou qactOTbIC TeMn Je daHHbIMn PI (nporpaMMnae NdeHTnΦnKaun) (noBnEeTcra INdNkaun [PI SEEK]).
NO PI:OTcYCTByeT nporpaMMHa nIeHTnΦnKaUa. Y BbIbpaHNo CTaUuN oTCyTCTbYOT daHHbIe PI (npoRpaMMHa nIeHTnΦnKaUa).
BbI6epnTe npyryIO cTaHcNIO.
NO TP: HET COO6UeHn O TeKUeN CNTyaun Ha doporax.
YcTPOIcTBO npoIOJXnT nONCK CTaHcN, nepeDaIOuNX nporpaMMy TP.
UNKNOWN: He ydaetcra OTo6pa3ntb Nmry HnHomep TelefoHa.
WITHHELD: 3BOHJaI a6OHeHT cKpbJI CBOI HOMep TeJefoHa.
EcnKpaChbI NKeJtBII npOBoDa nepeCTaBHeHbI MeCTaMn
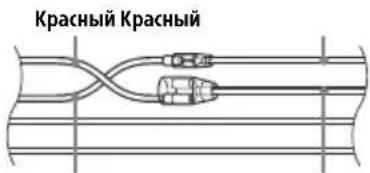
XeNTbI XeNTbI
| 12 | Источник беспераобийно эл ekтponитаня | Желтын |
| 15 | Краснын |
EcnB aBtOMo6nJe HETnoLoXeHnA ACC
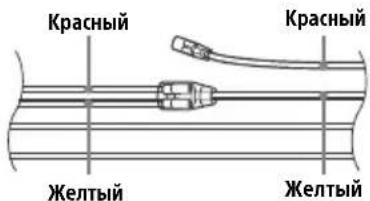
Iocne npOBepKn COOTBETCTBn CoeHHeHn I npOBOOB mNpyNbCHO rNCTOCHNkA 3JIeKTPoNTaHn N OJKNIOUHTe YCTPOINCTBO K aBTOMo6bHOMy KOHTpy JNeKTPoNTaHn.B CUYue Bo3HNKHOBEHn KaKnx-JIn6o BONpOCOB INI np6bEm, CBraHHbIX C NOJKNIOUHeHnEM yCTPOINCTBa, KOTOpBle He paCCMaTpNBaIOTcB HAcTOJaEM PYKOBOdCTBe, O6paNTteCb 3a COBETOM K DInJePy aBTOMo6bHbHOn FnpMb!.
IcnoIb3OBAHne npoBODHOro nylbTa InCTaHcNHOHHoro ynpabLeHn
1 TTo6bI aKTINBnPOBaT b npOBoHOn nYnbT dNCTaHcUHOHOrO ynpaBLeHnra, yctahOBHTe dJa [STR CONTROL] B [SET STEERING] 3HaueHne [PRESET] (cTp.23).
YCTaHOBka
OTcoeHHeHne 3aunTHoM MaHXeTbI N KPOHsTeHa
IpeE,MOHTaxKOM yCTpoNCTBa OTCOeHNHtTe 3aUNTHyIO MaHXeTy ③ IN KPOHHTeIN ① OT yCTpoNCTBa.
13axBaNTe 06a Kpa8 3aUHTHOI MaHKeTbI ③ a3aTEM BbITaUNTe ee.
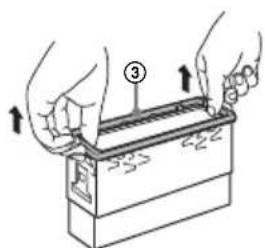
2 BCTaBbTe o6a KJIoua dIra demoHTaKa ② Do uenka, NotAHnte KPOHHTeH ① BHN3, a 3aTeM NotAHnte YcTPOHCTBO BBepx, yTO6bl OTcoEduHHt b erO.
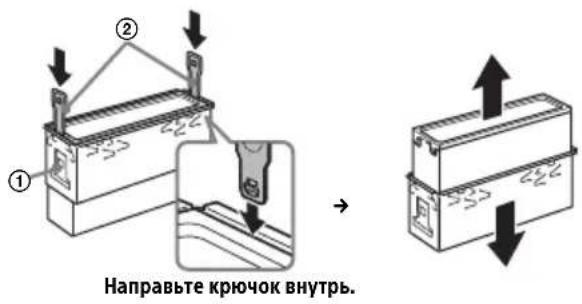
YcTaHOBka yCtpoiCTBa B npu6OpHoi nAHeIi
Ipeen yctaHOKoY6eHNTecb,TOΦHKcTOpbl C 06eHX CTOpOH KPOHHTeHa ① cOrHyTb BOBHyTpBa 2 MM.
1 YcTaHOBnTe KPOHHTeH ① B np6OpHyIO nAHeJIb, 3aTem BBirHnTe BbICTynbI HApJyK, yTO6bl OBeCneuTb NLOTHyIO fNKcaUIO.
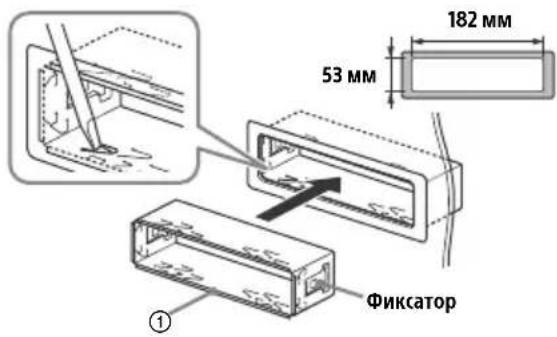
2 PnKpeNte yctpoiCTBO K KpoHHTeHy ①,3aTeM BCTaBbTe 3aUHTHyIO MaHXeTy ③.
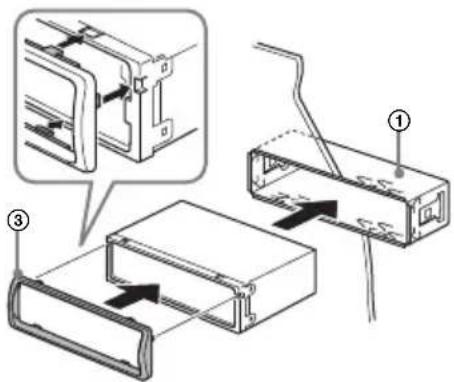
PpIMeuaHn
- EcnnФнкcatOpbI He corHytbl NIN BbIrHytbl HApyKy, yCTpoiCTBO He 6ydt YCTaHOBHeHO HaJIeKaUIM O6pa3OM M0KET BBInactb.
- Y6eIInTeCb, Yo 4 ΦuKCaTopa Ha 3aUHTHO MaHKeTe ③ HAdIeKaUMM O6pa3OM BCTaBJIeHb I B OTBepCTNA, IMeIOUneCeByCTPOINCTBE.
ChyTne u yctaHOBka nepeDnei naHei
Iopob6HbIe cBeHeHnCm.Bpa3JeNe "ChrTne nepeDHei NaHeN" (cTp.7).
Ipee3arpy3ka yctpoiCTBa
Hereby, Sony Corporation declares that this equipment is in compliance with Directive 2014/53/EU.
The full text of the EU declaration of conformity is available at the following internet address:
http://www.compliance.sony.de/
Eesti keel
If you have any questions or for the latest support information on this product, please visit the web site below:
Site d'assistance
Register your product online now at:
©2017 Sony Corporation Printed in Thailand