DABMAN i610 - Radio Imperial - Free user manual and instructions
Find the device manual for free DABMAN i610 Imperial in PDF.
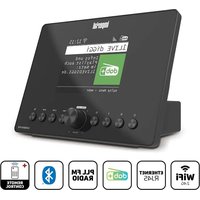
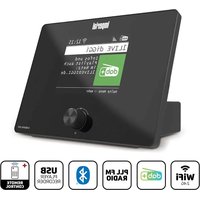
| Product type | Multiband radio (Internet, DAB/DAB+, FM, Bluetooth, AUX, USB) |
| Brand | Imperial |
| Model | DABMAN i610 |
| Dimensions (W × H × D) | 320 mm × 135 mm × 152 mm |
| Weight | Approximately 1.9 kg |
| Power supply | External power supply 100-240 V AC, 50/60 Hz, output 12 V DC / 2 A |
| Power consumption (standby) | 0.8 W |
| Power consumption (operation) | Max. 24 W |
| Display | 2.8-inch TFT color display (7.2 cm) |
| Audio | 2 speakers (3" / 5 W each) + 1 subwoofer (15 W); total power max. 25 W |
| Connectivity | WiFi 802.11 b/g/n, LAN RJ45, Bluetooth 4.2, USB 2.0, AUX IN, headphone output, Line Out |
| Supported audio formats | MP3, AAC/AAC+, WMA (up to 320 kbit/s) |
| Main functions | Internet radio (25,000 stations), DAB/DAB+, FM, Bluetooth streaming, USB playback, AUX, Spotify Connect, UPnP/DLNA, alarm, sleep timer, equalizer, weather display, control via AirMusic Control app |
| Care and cleaning | Unplug before cleaning; use a dry, soft cloth. Do not use liquids or solvents. |
| Safety | Use only the supplied power adapter; do not open the housing; avoid moisture and heat sources; observe battery polarity. |
| Spare parts and repairability | Remote control battery CR2025 (included); external power supply (ref. MR-1202000EU); telescopic antenna (included); AUX cable (included). For repairs, contact TELESTAR customer service. |
| General information | Operating manual provided in several languages; CE compliance; statutory warranty. |
Frequently Asked Questions - DABMAN i610 Imperial
User questions about DABMAN i610 Imperial
0 question about this device. Answer the ones you know or ask your own.
Ask a new question about this device
Download the instructions for your Radio in PDF format for free! Find your manual DABMAN i610 - Imperial and take your electronic device back in hand. On this page are published all the documents necessary for the use of your device. DABMAN i610 by Imperial.
USER MANUAL DABMAN i610 Imperial
TELESTAR Service Center,
Am Weiher 14,
56766 Ulmen
e-mail: service@telestar.de
Anzahl Erklärung
15, 30, 60, 90, 120, 150, 180 Minutes.
Naheres unter: www.spotify.com/connect/third-party-licenses.
The Spotify Software is subject to third party licenses found here: https://www.spotify.com/connect/third-partylicenses
Shenzhen Mao Two Power Co., Ltd
MR-1202000EU
AC 50/60Hz 0,85A
1.2. Proper use according to design 110
2.SAFETYINSTRUCTIONS. 111
2.1.Explanation of symbols 111
2.2. Safety Instruction. 114
2.3. Operational safety 115
2.4. Connecting the device. 117
2.5. Protecting the device against damage 118
2.6.Risk of injury 119
2.7. Notes on the radio interface. 120
2.8. Handling batteries 121
2.9.Cleaning the device 123
2.10. Legal information 124
3.SCOPE OF DELIVERY. 125
4. OVERVIEW OF CONTROL ELEMENTS 126
4.1. Display overview 129
5. REMOTE CONTROL 130
6. INSTALLATION 134
6.1 General operating instructions 134
6.2.Preparing the remote control. 134
6.3 Mounting the antenna 135
6.4.Power connection 135
6.5. Network connection 136
6.6.Language selection 136
6.7 Network check 136
6.8 Network configuration 137
6.8.1 Network selection 137
CONTENTS
7. SETTINGS 138
7.1.Settings 139
7.1.1 Time display 139
7.1.2 Manage My MediaU. 140
7.1.3. Network 141
7.1.3.1.LAN network settings 142
7.1.3.2.Wireless network settings 143
7.1.3.3.WIRELESS network (WPS PBC) 144
7.1.3.4. Manual configuration 144
7.1.3.4.1.DHCP 145
7.1.3.4.2. Enter SSID 146
7.1.3.4.3. Manage 146
7.1.3.5. Network check during startup. 147
7.1.4.Date & time 147
7.1.4.1. Set the date & time 148
7.1.4.2. Set the time format 148
7.1.4.3. Set the date format 149
7.1.5. Alarm clock 149
7.1.5.1.Snooze Alarm Clock. 151
7.1.5.2. Alarm clock volume 152
7.1.6. Timer 152
7.1.7.Language 153
7.1.8.Dimmer. 153
7.1.9.Display. 154
7.1.10.Power settings 154
7.1.11.Sleep timer 155
7.1.12. Temporary storage 156
7.1.13. Weather 156
CONTENTS
7.1.14.FM settings. 157
7.1.14.1.Mode. 158
7.1.14.2. Sensitivity 158
7.1.15. Local stations settings 159
7.1.16.Playback options 160
7.1.17. The device 160
7.1.18. Button 161
7.1.19.SMS 162
7.1.20. Equalizer. 163
7.1.20.1.My EQ 163
7.1.21. Resume playback after switching on. 164
7.1.22. Software update. 164
7.1.23. Reset to factory setting 165
8. OPERATION 165
8.1.Local station 165
8.2. Internet radio 166
8.2.1.Myfavourites. 166
8.2.2. Radio station / music 166
8.2.3.Local station 167
8.2.4.Sleep radio. 167
8.2.5. Recent stations. 167
8.2.6. Service 168
8.3.Media Centre 169
8.3.1. UPnP Playlist 170
8.4.FM 171
8.4.1.FM station search 171
8.4.2.FM radio operation 172
CONTENTS
8.5.DAB 173
8.5.1 DAB station search 173
8.5.2.DAB radio operation 174
8.6.Information centre. 175
8.6.1 Weather and finances 175
8.6.2. System information 176
8.7.AUX 176
8.8. Bluetooth 177
8.8.1 Establish a Bluetooth connection 177
8.8.2 Playing media via Bluetooth 178
8.9. Spotify Connect 178
9.DAILYUSEFUNCTIONS 179
9.1. Volume 179
9.2. Switching the mode. 179
9.3. Display brightness 179
9.4. Radio information 179
9.5.Weather information 180
9.5. Stop and start playback 181
9.6.Shuffle playback 181
9.7. Repeat track 181
9.8.Save favourite stations 182
9.9. Calling up local radio stations 183
CONTENTS
10.APP CONTROL 184
11.TROUBLESHOOTING. 188
12.STORAGE 191
- BRAND INFORMATION 191
14.DISPOSAL INFORMATION. 192
14.1.DISPOSING OF THE PACKAGING 192
14.2.DEVICE DISPOSAL 192
14.3.DISPOSING OF THE BATTERIES 193
15.PROPERTIES AND TECHNICAL DATA 194
16. SERVICE AND SUPPORT 197
17. CE LABELLING 198
1. FOREWORD
Dear customer,
Thank you for choosing this product.
Please read these instructions carefully, and
E
keep them for future reference.
These operating instructions are an integral part of the device!
If you sell or distribute the device, please hand over this manual.
1.2. Proper use according to design
This product is an entertainment device.
The device serves as a receiver for DAB/DAB+/UKW
radio signals, to receive internet radio signals and to
play audio files that are saved on a USB
drive or on a network drive.
Any other use or operation of the device is
seen as not intended and may cause personal or material damage.
Do not use this device for any other purpose.
Only use the device indoors.
The device is intended for private use, and thus
non-commercial use, only.
We assume that the user of the device has some general
knowledge about using electronic entertainment
devices. Any liability is voided in the case of improper use of the device.
2. SAFETY INSTRUCTIONS
2.1. Explanation of symbols
| Symbol | meaning |
| DANGER! | This signal word describes a hazard with a high level of risk, that may lead to death or severe injury if not followed. |
| WARNING! | This signal word describes a hazard with a medium level of risk, that may lead to death or severe injury if not properly followed. |
| ATTENTION! | This signal word describes a hazard with a low level of risk, that may lead to minor or moderate injuries if not properly followed. |
| NOTE! | This signal word warns against possible material damages and indicates specific instructions to operate the device. |
| This sign warns against danger. |
2. SAFETY INSTRUCTIONS
2.1. Explanation of symbols
E

Protection class II
Electric devices with a protection
class II have an increased or
double insulation at the
rated insulation voltage
between the active and touchable
parts VDE 0100 component 410,
412.1].
They are usually not connected
to the protective conductor. Even
if they have electrically conductive
surfaces, they are protected against
contact with
live parts through an increased or
double insulation.

Products labelled with this symbol
meet the requirements of
the guidelines of the European
Community.
2. SAFETY INSTRUCTIONS
2.1.Explanation of symbols
1

2

In the case of devices with wooden plugs this symbol marks the plug's polarity. 2 variants are distinguished here
Image 1: Outside plus/ Inside minus
Image 2: Inside plus / outside minus

Devices with this symbol may only be used indoors in a dry environment.
2. SAFETY INSTRUCTIONS
2.2. Safety Instruction
E

WARNING!
Inspect the device prior to use.
Should there be any damage or a defect on the device it may not be used.
Risk of injury!
There is a risk of injury for children and persons with reduced physical, sensory or mental capacities (for example partially disabled, older persons with limited physical or mental abilities) or a lack of experience and knowledge.
Store the device in a place that is out of reach for children.
This device may be used by children as of the age of 8 as well as
by persons with reduced physical, sensory
or mental abilities or a lack of experience
and/or knowledge, if they
are supervised or instructed regarding the safe use
of the device and have understood the related risks.
Never allow children to use the device unsupervised.
Risk of choking!
The packaging material is not a toy!
Store the used packaging materials (bags, polystyrene parts etc.) out of reach for children.
2. SAFETY INSTRUCTIONS
Children may not play with the packaging.
The packaging foil poses a particular risk of choking.
2.3. Operational safety

DANGER!
Risk of injury!
There is a risk of injuring oneself through electrocution on the live parts.
There is a risk of electrocution or fire due to unintentional short circuiting.
Check the device for damages prior to every use.
Should you detect visible damages or the device has visible damages, do not use it.
Should you detect a technical or mechanical problem please contact the TELESTAR service.
Only use the power unit that was included! Never use a different power unit.
Never open the casing of the device.
If there is a malfunction, immediately unplug the device from the power supply. To do so, promptly unplug the power unit from the power socket and the device.
Only use replacement parts and accessories that are shipped and approved by us.
Do not physically alter the device and do not use any
2. SAFETY INSTRUCTIONS
spare parts or additional devices that were not explicitly approved or shipped by us.
Do not use the device in areas that have a high explosion risk.
E
These include, for example, petrol storage areas, petrol stations, or areas in which solvents are stored or processed.
Do not use the device in areas with air that is polluted with particles (e.g. flour or wood-chip dust).
Performance errors may become apparent in the shape of the device becoming hot or smoke developing from the device or the power unit.
Loud or unusual sounds may also be a sign of a malfunction.
In such an event, immediately remove the power unit from the socket.
Only touch the casing of the power unit. Never pull the power unit's plug from the socket.
The device may not be used after a malfunction, until a trained person has inspected or repaired it.
If you introduce the device to a cold or warm environment, moisture may develop inside the device.
In such an event, wait approximately one hour before using the device.
Should you be gone for a longer period or in the event of a thunderstorm, unplug the device.
2. SAFETY INSTRUCTIONS
Take care to prevent moisture, water or splash water from coming into contact with the device and ensure that receptacles filled with water - e.g. vases - are not placed on or near the power unit.
In the event that foreign objects or liquid should enter the device or power unit, immediately unplug the power unit. Have a qualified specialist inspect the device before using it again. Otherwise there is a risk of electrocution.
Make sure that the device and power unit is not at risk of dripping or splash water and that there are no open flames (e.g. lit candles) near the device or the power unit.
The power unit must never be touched or grabbed with wet or moist hands.
2.4. Connecting the device
Only plug the device into properly installed, earthed and electrically secured power sockets.
Please keep the power source (socket) easily accessible.
Do not bend or squeeze any cables.
Before using the device, check whether the voltage specification on the device corresponds to your local power voltage. The specifications on the power unit must correspond to the local power grid.
Only plug the device into a properly
2. SAFETY INSTRUCTIONS
installed grid socket with 220-240 V
alternating current, 50-60 hz.
Place the radio on a solid, even surface.
The device consumes power in standby mode.
To fully switch off the device, the power
plug must be pulled from the socket or the power unit on the back of the device must be switched off.
2.5. Protecting the device against damage

NOTE!
Unfavourable surrounding conditions, such as moisture, excessive heat or a lack of ventilation may damage the device.
Only use the device in dry rooms.
Avoid direct proximity to heat sources, such as radiations, open fires [e.g. from candles], devices with a strong magnetic field, such as loudspeakers.
Do not expose the device to extreme conditions, such as direct sunlight, severe humidity, moisture, extremely high or low temperatures, open flames.
Ensure sufficient distance to other objects to prevent the device from being obstructed, so that sufficient air ventilation is guaranteed.
Avoid direct sunlight and places with an exceptional amount of dust.
2. SAFETY INSTRUCTIONS
Do not place any heavy objects on the device or the power unit.
Do not use the device in areas that have a high explosion risk.
These include, for example, petrol storage areas, petrol stations, or areas in which solvents are stored or processed.
Do not use the device in areas with air that is polluted with particles (e.g. flour or wood-chip dust)
2.6. Risk of injury

WARNING!
Excessive sound pressure levels when using ear- or headphones may lead to damaging or loss of hearing.
Listening with earphones or headphones at an increased volume over a longer period of time may injure the user.
Please check the volume before putting the earphones or headphones in or onto the ears.
Set the volume at a lower level and only raise the volume to a point that is still comfortable.
2. SAFETY INSTRUCTIONS
2.7. Notes on the radio interface
E
The device generates an electro-magnetic field.
Please pay attention to any indications in your surroundings that may prohibit or restrict the use of electronic devices.
This may be the case in hospitals, petrol stations and patrol depots or airports, for example.
If there are such warning signs, promptly unplug the device from the power source.
The components contained in the device generate electro-magnetic energy and magnetic fields. These may inhibit medical devices such as a cardiac pacemaker or defibrillator. Therefore, please maintain sufficient and safe distance between the radio and medical devices.
Should you have reason to believe that the radio has caused a disruption of a medical device, immediately switch off and unplug the radio from the power source.
2. SAFETY INSTRUCTIONS
2.8. Handling batteries
Only use the type of battery that was part of the delivery.

DANGER!
Risk of injury!
Never open batteries, short-circuit these or toss them into flames.
Never charge these batteries. There is a risk of explosion when charging
these batteries.
Make sure to note the polarity! Take care to properly connect the plus [+] and minus [-] poles, to avoid a short circuit.
Only use the batteries specified for this
product.
Remove batteries from the device if it is not in use for a longer period of time.
Immediately remove drained or leaking batteries from
the device.
Leaking batteries pose a risk of
acid-related injuries.
2. SAFETY INSTRUCTIONS
E
Store new as well as used batteries
out of children's reach.
Swallowing batteries poses a risk of internal
injuries. The battery acid contained inside the batteries may cause injuries if it comes into contact with skin.
After accidental swallowing or if there are signs
of skin burns, rinse the affected area with sufficient clear
water and seek medical attention
immediately.
Batteries are not toys!
Always keep new and used batteries away from children.
Remove leaking batteries from the device
and clean the contact points before inserting new
batteries.

WARNING!

Improper use of batteries may pose a risk of explosion!
Only use batteries of the same type.
Please refrain from combining new and old batteries in one device.
Operating Manual
2. SAFETY INSTRUCTIONS
Pay attention to the correct polarisation when inserting batteries.
Never charge these batteries.
Batteries should be stored in a cool and dry place.
Never toss batteries into fire.
If the device is not used for a longer period of time please remove the batteries from the device.
Never expose the batteries to major heat or direct rays of sunlight.
Batteries may not be bent or opened.
Stop using the remote if the battery lid no longer closes properly.
2.9. Cleaning the device
Unplug the device from the socket prior to cleaning.
Use a dry, soft cloth to clean the
device. Please refrain from using liquids when cleaning the device.
Do not use any solvent or cleaning agents, as these may damage the surface or labelling on the device.
Children may not clean the device.
2. SAFETY INSTRUCTIONS
2.10. Legal information
E
The device is intended for us in all countries of the European Union as well as Switzerland, Norway, Liechtenstein and Iceland.
The range of radio signals to be received meets all legal regulations of these countries.
If the device is to be used in a different country, the laws of that country must be considered and complied with.
3. SCOPE OF DELIVERY
Please remove all parts from the packaging and
completely dispose of all packaging materials.
Please contact us if one or more of the specified parts are
missing:
TELESTAR Service Center,
Am Weiher 14,
56766 Ulmen
e-mail: service@telestar.de
Quantity Explanation
1 DABMAN i610
1 Remote control
1 external power unit
1 Instruction manual
1 Warranty card
1 Telescopic antenna
1 AUX connection cable
1 Battery for remote control type CR 2025 / 3 V [already inserted in the remote]
4. OVERVIEW OF CONTROL ELEMENTS
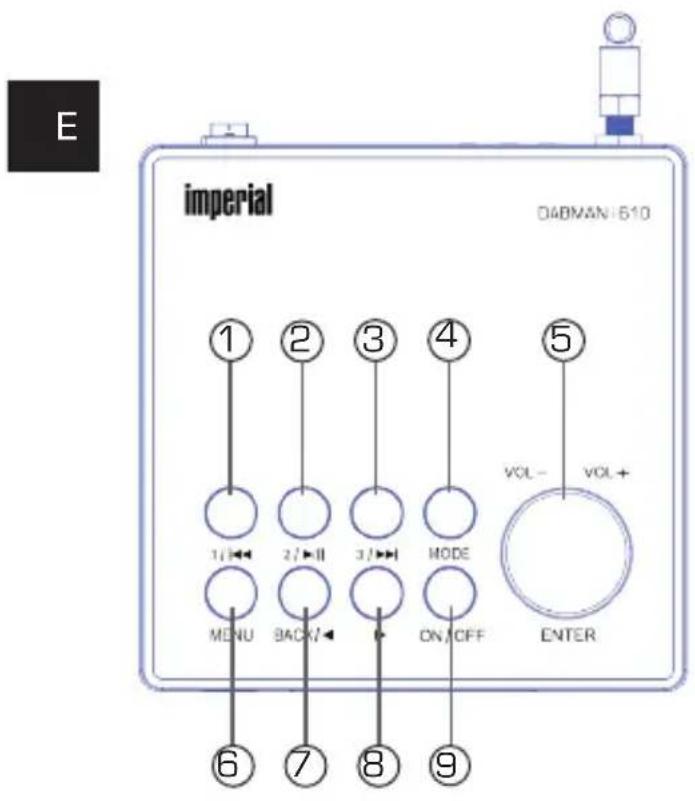

4. OVERVIEW OF CONTROL ELEMENTS
1. Station memory button 1/previous title
Switches to the 1st program memory slot in radio mode.
Use this button to select the previous track or fast reverse in
USB / Media mode.
2. Station memory button 2/Play/Pause
Switches to the 2nd program memory slot in radio mode.
Starts or pauses playback in USB / Media mode.
3. Station memory button 3/next title.
Switches to the 3rd program memory slot in radio mode.
Use this button to select the next track or fast forward in USB / Media mode.
4. Mode
Switch the device's operating mode between Internet radio, DAB
+, FM, UPnP, AUX, Bluetooth, USB and Spotify.
5. VOL+/-/ ENTER
Change the volume by turning the knob.
Confirm menu entries by pressing this button.
6. Menu button/
Opens the unit's menu.
7. BACK /Navigation
Use this button to step back in the menu or use this key to
navigate in the menu.
8. Navigation
Use these buttons to navigate the menu.
9. ON/OFF
Switch the device on or into standby using this button.
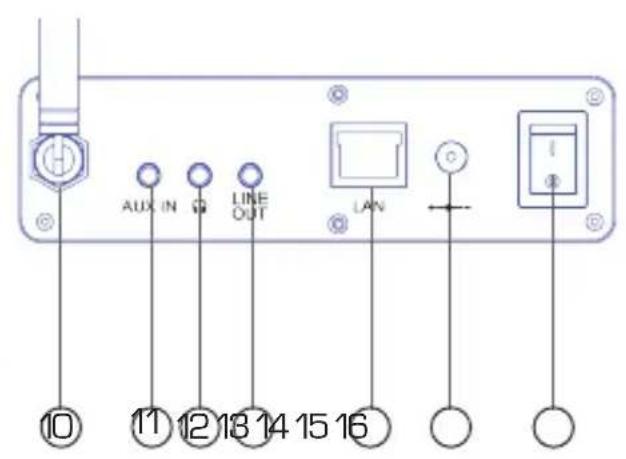
4. OVERVIEW OF CONTROL ELEMENTS
10. FM/DAB antenna
Screw in the included telescopic antenna here.
11.AUX IN
E Connect an external audio source here such as an MP3 player, smartphone or tablet with a 3.5mm AUX cinch cable.
12. Headphone jack
Insert headphones here to listen to the music played back from the radio through your headphones. If headphones are connected, music playback via the unit's speakers is interrupted.
13. LINE OUT
Here you can connect the radio to a HiFi amplifier or to a c - tive loudspeakers, to forward the music received from the radio to a sound system.
14. LAN port
Connect the unit to an existing network using a network cable to use the Internet radio function. (Alternatively, the device can also be connected via W-LAN).
15. Power supply connection
Connect the device to the power supply unit at this socket (included).
16. Power switch
Switch the device on or off here. The device is disconnected from the power supply unit in position 0.
17. USB connection
Connect the device to a USB data carrier such as a USB hard drive or USB stick to play music files from this.
4. OVERVIEW OF CONTROL ELEMENTS
4.1. Display overview
Meaning of the function symbols
Analogue FM radio reception active.
Symbolises the radio reception strength.
WIFI connection active.
No network connection via network cable.
AUX mode active.
Repeat the music track in the selected folder.
Shuffle play activated.
Repeat for the selected music track active.
Alarm clock activated.
Radio station saved on a storage slot.
USB data carried connected.

Bluetooth mode activated.
E
5. REMOTE CONTROL
The radio can be controlled using both the device buttons as well as the remote control. The remote control is the more convenient and easier way to operate the device. For this reason, this manual mainly explains how to set up and operate the radio using the included remote control.
If the device is connected to a network, you can also control the radio via the AirMusicControl app. This app is available for Android® and iOS® operating systems. Further information can be found in chapter 10.
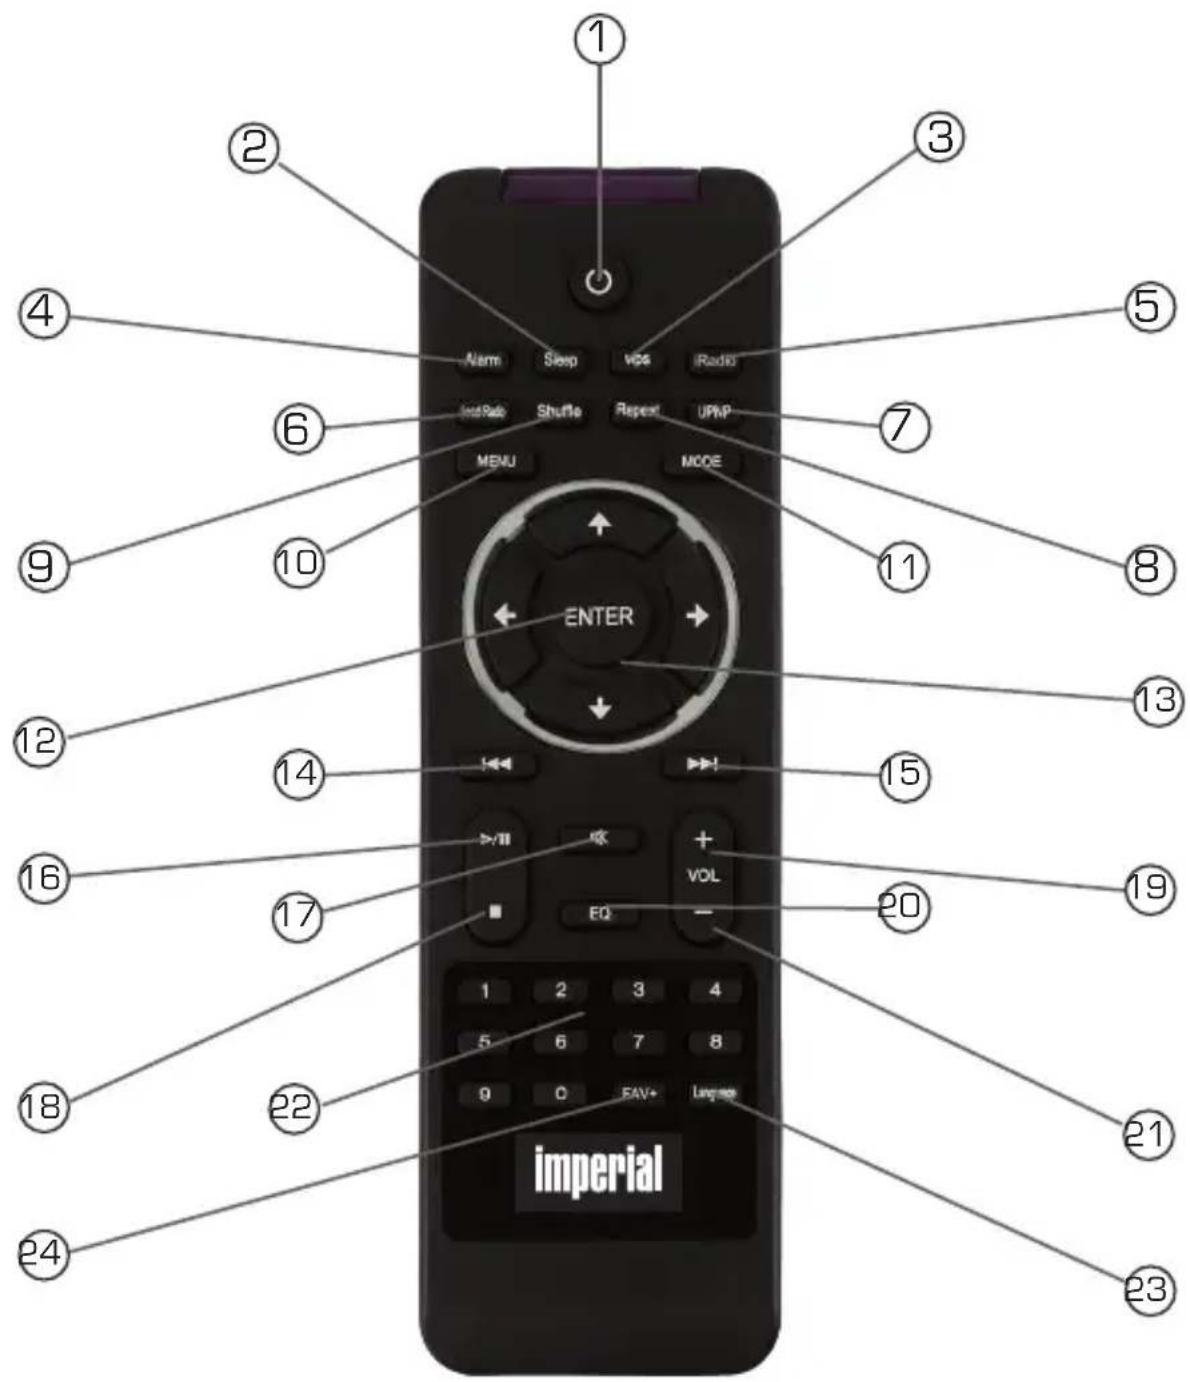
5. REMOTE CONTROL
E
5. REMOTE CONTROL
1. Standby button
Switch the device on or off using this button.
2. Sleep
E
Use these buttons to switch the Sleep Timer of the device on or off.
3. WPS button
Use this button to establish a WIFI connection to your home network. Please also read chapter 8.
4. Alarm clock
Use this button to activate the alarm function.
5. Internetradio
Press this button to enter the Internet Radio mode.
6. Local radio
7. UPNP
Activate the device's UPNP function
Read chapter 8.8 for more related information.
8. Repeat
Use this button to repeat the playback of one or more tracks
9.Shuffle
Activate the shuffle playback option
10. Menu
Activate the device's menu with this button
11.Mode
Switch between different modes.
12. Enter
Confirm an entry or selection with this button
13. Navigate up/down - right/left
You can navigate the menu with these buttons
14. Select previous track / Fast reverse
Use this button to select the previous track or fast rewind.
5. REMOTE CONTROL
15. Select next track / Fast forward
Use this button to select the next track or fast forward.
16. Play
Start or pause playback
17. Mute
Mutes the device's sound.
18. Stop
Stop playback
19. V+ volume
Increases the volume
20. EQ equaliser function
You can activate the equaliser function with this button and change custom sound settings.
21 V-volume
Decreases the volume
22. Number pad
23. Language
Change the menu language with this button.
24. Favourites button
Switches to one of the individually stored favourite stations.
6. INSTALLATION
6.1 General operating instructions
E
Switch the unit on or off using the standby button on the remote control.
You can increase the volume using the VOL+ button on the remote control.
You can decrease the volume using the VOL+ button on the remote control.
The menu items can be selected the buttons.
Using the ENTER button, you can confirm a selection.
6.2. Preparing the remote control
Remove the battery transport lock on the remote control. To do this, pull out the plastic tab on the battery case of the remote control. This establishes the battery contact.
To replace the remote control battery, open the battery compartment on the back of the remote control.
Unscrew the screw with a suitable Phillips screwdriver. Pull the battery compartment out of the remote control. Remove the battery and insert a new battery of the same type.
6. INSTALLATION

There is a risk of explosion if not used properly! Please read the related safety information in Chapter 2.8.
Pay attention to the correct polarity of the battery!
Then reinsert the battery compartment and replace the screw.
6.3 Mounting the antenna
Screw the included antenna into the radio's antenna connector.
6.4. Power connection
Connect the included power supply unit to the corresponding socket on the back of the device. Now plug the power supply unit into a 230V socket. Then pull out the telescopic antenna on the back of the radio to its full length to ensure the best possible reception if you wish to receive terrestrial transmitters via the antenna.
6. INSTALLATION
6.5. Network connection
E
To use the radio's Internet functions, the device must be connected to a network. You can use a cable (LAN) or the integrated WIFI receiver to make a connection. If you are using a LAN cable, connect it to the LAN connector (see image on page 24, point 13).
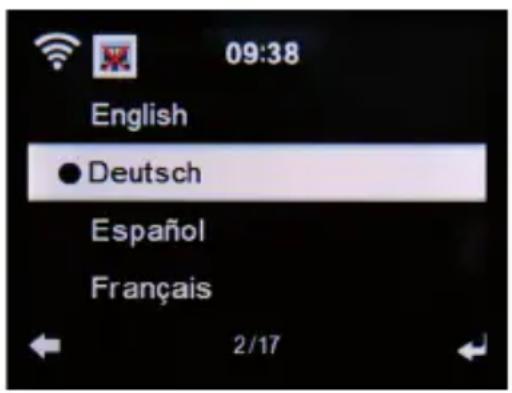
6.6. Language selection
Turn on the main switch on the back of the unit. The radio will start.
Use the up/down buttons on the remote control to select the menu language. Confirm the desired menu language with the ENTER button on the remote control.
6.7 Network check
If you want to connect the radio to your home network, confirm the following menu prompt with Yes. With this setting, the radio checks the available networks each time it turns on.
6. INSTALLATION
6.8 Network configuration
To connect the radio to your network, confirm the following prompt with Yes. If you do not wish to connect the device to a network, you can skip this menu item by selecting No.
6.8.1 Network selection
Select the type of connection you want to connect to the radio. If you have connected a LAN cable, select Cable network; If you want to connect via WIFI, select wireless network.
When you select the connection via WIFI [wireless network], all available WIFI networks are displayed. Select the network to be connected to and press ENTER to confirm.
Enter the WIFI password. Use the buttons to choose a character, the button lets you jump further.
Confirm your entry with ENTER.
Please note that the registration process with the router may take a while.
You can return to the main menu by pressing the menu button on the unit or on the remote control. The menu is automatically exited after 10 seconds and the last radio mode chosen is switched to.
Navigate the main menu using the buttons.
The device's main menu consists of the following menu items:
7. SETTINGS
E

Settings

Local stations

Internet radio

Media Centre

radio DAB+ radio


Centre
Information

AUX Bluetooth


Spotify
You can select the menu items using the arrow buttons. Confirm the selection with the ENTER button on the remote control or by pushing the ENTER button on the unit.
7. SETTINGS
7.1. Settings

Press the MENU button on the remote control or the device and use the buttons to select the menu item settings.
Confirm our choice with the ENTER button on the remote control or pressing the ENTER button on the unit.
You can change individual device settings under this menu item.
7.1.1 Time display
In this menu item you can set the way the device displays time in standby mode.
Use the buttons on the remote control to select the time display menu item.
Confirm the selection with the ENTER button on the remote control or by pushing the ENTER button on the device.
Use the buttons on the remote control to select the analog or digital menu item.
Confirm the selection with the ENTER button on the remote control or by pushing the ENTER button on the device.
When analogue is selected, the unit displays an analogue clock in standby mode. A digital clock is shown when digital is selected.
7. SETTINGS
7.1.2 Manage My MediaU
E
Here you can activate or deactivate the MediaU management function.
With MediaU you can create an custom station list and play these stations.
To create and activate your station list, you will need to register on:
http://www.medayou.net/web
One you have logged in, you can register your radio,
Enter your radio's MAC address as the serial number. The radio's MAC address can be found in the information centre.

Please also read chapter 8.6.2.
In the settings menu, use the buttons of the remote control
to select the item manage My MediaU.
Confirm the selection with the ENTER button on the remote control or by pushing the ENTER button on the device.
Use the remote's▼▲ button to select the menu item activate to activate this function.
Confirm the selection with the ENTER button on the remote control or by pushing the ENTER button on the device.
7. SETTINGS
7.1.3. Network
For the device to function as an Internet radio, the network your radio is connected to needs to have the following features:
The network router used must have a
DHCP server function so that the device can
be assigned an automatic IP address in the network.
The UPnP function must be activated in the router of the network in order to be able to transfer media content and recognise devices in the network.
If these properties are met in the router, the radio can easily be integrated into the network.
Press the MENU button on the remote control or on the device and use the buttons to select settings in the menu.
Confirm our choice with the ENTER button on the remote control or pressing the ENTER button on the unit.
Use the buttons on the remote control to select the menu item network.
Confirm our choice with the ENTER button on the remote control or pressing the ENTER button on the device.
7. SETTINGS

Select the desired menu item with the buttons and confirm the entry with ENTER.
7.1.3.1. LAN network settings
If you want to integrate the radio into your network with a network cable, you can activate a wired network connection in these settings.
Use the buttons on the remote control to select the wired network settings menu item.
Confirm the selection with the ENTER button on the remote control or by pushing the ENTER button on the device.
Activate or deactivate a network connection via a LAN cable by selecting the corresponding menu item.
Confirm the selection with the ENTER button on the remote control or by pushing the ENTER button on the device.
7. SETTINGS

NOTE!
The network function via a LAN cable is activated when the device is started from standby mode.
If you plug in the network cable when the device is on, switch it off using the power button on the radio or the power button on the remote control and then on again.
E
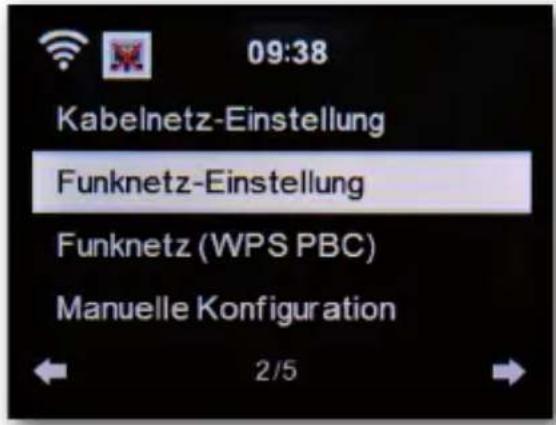
7.1.3.2. Wireless network settings
If you want to integrate your radio via WIFI into a WIFI network, you can switch the WIFI function on or off in this menu. If the WIFI function is activated, you can make all further settings here to integrate the radio into a wireless network.
Use the buttons on the remote control to select WIFI network settings and press the ENTER button on the remote or confirm by using ENTER on the device.
Activate or deactivate a network connection via WIFI by selecting the corresponding menu item.
Confirm the selection with the ENTER button on the remote control or by pushing the ENTER button on the device.
Once the wireless network is activated, the device scans all WIFI networks within range and displays them in a list.
Use the remote control's buttons to select the network you would like to connect to.
Enter the WIFI password. Use the buttons to choose a character, the button lets you jump further.
7. SETTINGS
Confirm your entry with ENTER.
Please note that the registration process may take a while.
E 7.1.3.3. WIRELESS network (WPS PBC)
WPS is a function on WIFI devices that allows you to establish a network connection at the touch of a button without having to enter a password.
This makes it easier to create a connection.
This radio-supported push button configuration can be used if the network router to which a connection is to be established has a WPS button. (Some routers offers this directly as a software solution in the operating system).
To establish a network connection this way,
please proceed as follows.
Use the buttons on the remote control to select WIRE
LESS network (WPS PBC) and press the ENTER button on the
remote or confirm by using ENTER on the device.
Now press the WPS button on your network router
within 120 seconds, or activate the WPS function in the router's
user interface.
The network connection is now established automatically.
7.1.3.4. Manual configuration
In this section, you can configure the network configuration of the radio yourself to match it with the network settings.
7. SETTINGS
This function should only be performed by users with experience in this area.
Here you can deactivate the DHCP function to assign a manual IP address to your radio.
Use the buttons on the remote control to select the manual configuration and press the ENTER button on the
remote or the ENTER button on the device.
In the next item, select the network connection cable network or wireless network that you want to edit manually.
Press the ENTER button on the remote or confirm with the ENTER button on the device.
7.1.3.4.1. DHCP
DHCP enables connected clients to be integrated into an existing network without manually configuring the network interface. Required information such as IP address, netmask, gateway, name server (DNS) are assigned automatically.
The DHCP function is activated at the factory.
If the DHCP function is deactivated, the information required for a network connection must be set manually.
You can deactivate the DHCP function in this menu item.
Use the buttons on the remote control to select the manual configuration and press the ENTER button on the remote or confirm with the ENTER button on the device.
Activate or deactivate the DHCP function in the next step.
Press the ENTER button on the remote control or confirm by pressing the ENTER button on the device.
7. SETTINGS
To manually configure the wireless network settings, you can set the SSID here.
A Service Set Identifier (SSID) is a freely selectable name of a WIFI device through which it can be addressed. It is therefore also referred to as the WIFI's (wireless) network name.
The factory default name of the radio with which the unit is visible in a WIFI network is DABMAN i610.
You can set a new name here.
Use the buttons on the remote control to select enter SSID and press the ENTER button on the remote or confirm by using ENTER on the device.
Use the buttons on the remote control to select the letters or characters you want to assign to the network name. Confirm each entry with the
ENTER button on the remote control or confirm with the ENTER button on the unit.
7.1.3.4.3. Manage
In this menu item you can select the WIFI
network in which the radio is to be registered.
Use the buttons on the remote control to select Manage and press the ENTER button on the remote or confirm by using ENTER on the device.
Select the WIFI network which you would like to connect the device to and press the ENTER button on the remote control or confirm with the ENTER button on the unit.
7. SETTINGS
7.1.3.5. Network check during startup
In this menu item you can determine whether the device should check the network connection to a network access point (network router) each time it is switched on.
This automatic check is activated at the factory. It is recommended that you leave this function enabled to ensure that the radio can connect to the network when it is turned on.
Use the buttons of the remote control to select the menu item check network when switching on and press the ENTER button on the remote control or confirm by pressing the ENTER button on the device.
Activate or deactivate this function with the buttons of the remote control and confirm by pressing the ENTER button on the device or by pressing the ENTER button on the remote control.
7.1.4. Date & time
Set the time and date in this menu item.
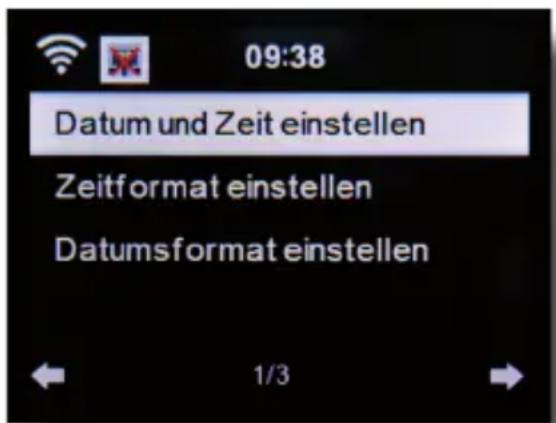
7. SETTINGS
The device is factory-configured to automatically set the time. If the device is connected to the Internet via a network, the time and date are automatically synchronised. It is thus not necessary to set the time.
7.1.4.1. Set the date & time
Use the buttons on the remote control to select Set date and time and press the ENTER button on the remote or confirm by using ENTER on the device.
Select the Manual setup menu item and
press the ENTER button on the remote control or confirm with ENTER on the unit.
Use the buttons on the device or on the remote control to set the time or date.
Please use the buttons to jump to the next or previous field. Using the ENTER button on the remote or a short press of the ENTER button on the radio concludes the entry.
7.1.4.2. Set the time format
Change the time format here to set how the time is displayed.
You can choose a 12- or 24-hour display.
Select the Set Time Format menu item and press
the ENTER button on the remote control or confirm
by pressing the ENTER button on the device.
Now change the time display to the desired format and confirm with ENTER on the remote control or confirm
by pressing the ENTER button on the device.
7. SETTINGS
7.1.4.3. Set the date format
Change the date format here to set how the date is displayed.
Select the Set Date Format menu item and press
the ENTER button on the remote or confirm with the ENTER button on the device.
Now change the date display to the desired format and confirm with ENTER on the remote control or with the ENTER button on the unit.
7.1.5. Alarm clock
The device may be used as a radio alarm clock.
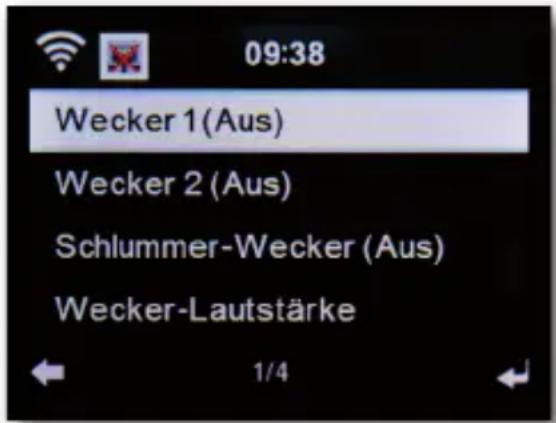
You can set up to 2 alarm times in this menu item.
You can also set whether the alarm clock will wake you up with a sound, a melody, an Internet radio station, a DAB+ radio station, music via a connected USB
data carrier or with a FM station.
To set up an alarm time, proceed as follows:
7. SETTINGS
E
Use the buttons on the remote control in the Settings menu to select the Alarm clock and press the ENTER button on the remote control or confirm with the ENTER button on the unit.
Select Alarm clock 1 or Alarm clock 2 and confirm by pressing the ENTER button on the device or use the
ENTER button on the remote control.
Activate the alarm clock via the On option.
Deactivate the alarm clock via the Off option.
Once you have activated the alarm, you can set the repeat intervals,
the alarm time and type in the following menu.
Repeat:
Here you can choose daily, once, or one or several days of the week.
Time:
Set the time at which the alarm clock is to be triggered here. Use the numeric keypad on the remote control or the buttons on the device.
Source:
Decide which alarm signal you would like to activate here.
A sound, melody, Internet radio, FM, DAB/DAB+ or USB.
Please note that when selecting FM, DAB/DAB+ or Internet radio, at least one favourite station must be stored for the respective reception mode. If no favourite is stored in the selected reception mode, the empty message appears.
To confirm single entries, save these with the ENTER button. To return to the menu, hit the arrow button.
Please also read chapter 9.8. on saving a favourite station.
7. SETTINGS
To stop an alarm, hit the standby button on the remote control.
To active that snooze function, press the ENTER button during an alarm.
The alarm will then be paused for 5 minutes.
After 5 minutes, the alarm is reactivated.
7.1.5.1. Snooze Alarm Clock
You can set a time after which an alarm will sound.
In this menu you can activate this function and define a time period.
Use the buttons on the remote control in the Settings menu to select the Alarm clock and press the ENTER button on the remote control or confirm with the ENTER button on the unit.
Select the snooze alarm line and confirm with the ENTER button on the remote control or on the device.
Deactivate the function via the off option, or set a period after which the alarm becomes active.
The following times are can be chosen:
5 minutes: Alarm sounds after 5 minutes
10 minutes: Alarm sounds after 10 minutes
20 minutes: Alarm sounds after 20 minutes
30 minutes: Alarm sounds after 30 minutes
60 minutes: Alarm sounds after 60 minutes
90 minutes: Alarm sounds after 90 minutes
120 minutes: Alarm sounds after 120 minutes
7. SETTINGS
7.1.5.2. Alarm clock volume

Under Alarm Volume, set the volume for the alarm signal.
Use the buttons on the remote control in the Settings menu to select the Alarm clock and press the ENTER button on the remote control or confirm with the ENTER button on the unit.
Select the Alarm Volume line and press ENTER on the remote control to confirm with the ENTER button on the unit.
Adjust the desired volume using the VOL+ buttons on the remote control or on the unit.
7.1.6. Timer
You can use the timer to set a time after which the radio triggers an alarm.
Use the buttons on the remote control in the
settings menu to select the Timer and press the ENTER button on the remote or confirm with the ENTER button on the device.
Specify the time in minutes and seconds using the buttons.
Increase or decrease the time in increments of seconds by pressing incrementally. Press and hold the or button to speed up the time change in both directions.
After confirming the entry with ENTER on the remote control or by pressing the ENTER button on the unit, the timer becomes active. An alarm signal sounds after the set time elapses.
The timer can be interrupted with the ENTER button on the remote control or by pressing the ENTER button on the unit. The timer alarm can also be stopped with these buttons.
7. SETTINGS
7.1.7. Language
You can set the menu language here.
Use the buttons on the remote control in the Settings menu to select Language in the menu and press the ENTER button on the remote control or the ENTER button on the unit.
Use the buttons to select the language and confirm your selection.
7.1.8. Dimmer
You can adapt the brightness of the display by using the dimmer function. The device is factory-set with the highest brightness level. This menu item allows you to custom-adjust the brightness level.
Use the buttons on the remote control in the Settings menu to select Dimmer in the menu and press the ENTER button on the remote control or the ENTER button on the unit.
7. SETTINGS
Power saving mode:
When the power saving mode is activated, the display is dimmed to the set brightness if the device is not operated within 15 seconds.
E
Select the Power Saving Mode option and confirm your selection. Then use the buttons to select the brightness level you want for this mode.
Switching on:
When this menu item is activated, the display is permanently dimmed to the set brightness.
Select the Switch on option and confirm your selection. Then use the buttons to select the brightness level you want for this mode.
7.1.9. Display
Change the colour display to black and white if needed.
Use the buttons on the remote control in the Settings menu to select Display and press the ENTER button on the remote control or confirm with the
ENTER button on the unit.
Change the display colour to monochrome if needed.
7.1.10. Power settings
Whenever the radio is not playing music, the device will automatically turn off. This is the case, for example, if there is no signal in DAB radio mode or if no playback device is connected in AUX mode. Here you can determine whether or after what time the radio should
7. SETTINGS
automatically switch from operation to standby mode.
You can choose between 5, 15 and 30 minutes.
Using the buttons of the remote control, select the menu item Power settings in the Settings menu and press the ENTER button on the remote control or confirm by pressing the ENTER button on the device.
Select a period of time after which you want the unit to automatically switch off.
If you do not want the radio to switch off automatically, continue to the Switch off line.
Confirm your entry with ENTER on the remote control or by pressing the ENTER button on the unit.
Please note:
This device is factory-set to 15 minutes.
7.1.11. Sleep timer
Using the Sleep Timer function, the device can be switched off automatically after a set time has elapsed.
Use the buttons on the remote control to select Sleep Timer from the Settings menu and press the ENTER button on the remote control or ENTER button on the unit to confirm.
Select Switch off to disable this function or select a preset time.
You can select the following times:
15, 30, 60, 90, 120, 150, 180 minutes.
Confirm your selection by pressing the ENTER button on the remote or ENTER button on the device.
7. SETTINGS
7.1.12. Temporary storage
E
Here you can change the buffering time for music playback from the network. An increase in the buffering time can compensate for transmission disruptions in order to avoid an impairment of the playback.
Use the buttons of the remote control to select the menu item Buffering in the Settings menu and press the ENTER button on the remote control or the ENTER button on the device.
Select a preset buffering time.
Confirm your selection by pressing the ENTER button on the remote or ENTER button on the device.
7.1.13. Weather
If the device is connected to the Internet, you can display weather information on the device's screen. In this menu item you can define the location of the displayed weather. In addition, you can set the temperature unit.
The weather information is shown in standby mode. The radio then automatically switches between the weather and current time. Please also read chapter 9.5.
Please note:
For the weather forecast, the device accesses an Internet server on which the weather information is stored. Therefore, the weather data displayed may differ from the actual weather data at your location.
The following settings are available:
Local settings:
Operating Manual
7. SETTINGS
Select a location for which you want to display the weather forecast and weather information.
Temperature unit
Specify which temperature unit is to be used.
You can choose between Celsius (^ C) and Fahrenheit (^ F) .
Standby display
Specify here whether the radio should display weather data in standby or not.
Change the settings as follows:
Use the buttons on the remote control to select the weather menu item in the settings menu and press the ENTER key on the remote or the ENTER button on the device.
Confirm your entry with ENTER on the remote control or by pressing the ENTER button on the unit.
7.1.14. FM settings
In this menu item you can select between Stereo and Mono for FM radio reception.
This setting can be useful when you are receiving an FM station, but the signal is weak and full of interference. In such a case, change the reception to mono to improve the quality.
If you select Stereo, the received radio signal is output in stereo quality. If a poor reception leads to signal interference, the radio can automatically switch to mono reception mode.
This threshold value, as of which the radio switches to monomode, can be set in the Sensitivity option.
7. SETTINGS
Which radio stations are to be found during an FM search can be set in the Sensitivity option.
E
Use the buttons on the remote control in the Settings menu to select the FM Setting and press the ENTER button on the remote control or confirm with the ENTER button on the unit.
7.1.14.1.Mode
Select this menu item to switch FM reception from stereo [factory setting] to mono.
Confirm your entry with ENTER on the remote control or by pressing the ENTER button on the unit.
7.1.14.2. Sensitivity
Search sensitivity:
Select here which FM stations are to be found during a scan:
The radio shall only receive stations with a strong signal.
The radio shall only receive stations with a standard signal.
Also receive stations with a weak
signal.
Confirm your entry with ENTER on the remote control or by pressing the ENTER button
on the unit.
Stereo sensitivity:
Here you can select the setting to automatically switch the radio to mono mode if the reception quality is not sufficient to achieve optimum stereo.
7. SETTINGS
Confirm your entry with ENTER on the remote control or by pressing the ENTER button on the unit.
7.1.15. Local stations settings
To make it easier for you to search for stations in your area using Internet radio, you can search for specific radio stations from your region in the device's menu.
For this purpose, the location must be communicated to the device.
You can enter your location manually or activate an automatic location selection.
With this information, the radio can suggest radio stations to you using the Local Stations function.
Please also read chapter 9.9.
Use the buttons on the remote control in the Settings menu to select Local stations settings and press the ENTER button on the remote control or confirm with the ENTER button on the unit.
The following options are available:
Automatic detection
With this selection, the radio automatically detects your location if the radio is connected to the Internet.
Manual setup (country)/(province)/(city)
In these settings you can enter your location manually. You can limit your location setup to only one country and increase the accuracy in the province area. Manual determination (city) is the most precise way to determine the position.
7. SETTINGS
Confirm your entry with ENTER on the remote control or by pressing the ENTER button on the unit.
Manual setup (US-Zipcode)
In this setting, you can determine the location by entering a postal/zip code.
Please note that this function is only available for locations within the USA.
Enter the postcode using the buttons on the remote control and confirm your entry with the ENTER button.
7.1.16. Playback options
The settings made here determine the default setting when playing audio files from a USB media.
Use the buttons on the remote control in the Settings menu to select Playback settings and press the ENTER button on the remote control or the ENTER button on the unit.
Choose the desired playback setting and confirm your selection by pressing the ENTER button on the remote control or by pressing the ENTER button on the device.
7.1.17. The device
The device can communicate with DLNA-enabled devices. For example, it is thus possible to play audio files on a DLNA-enabled mobile device on the radio.
Renaming
Operating Manual
7. SETTINGS
Here you can change the name of the device under which the radio is displayed on a DLNA device.
Use the buttons on the remote control to select the letter you want to use and confirm your entry with the ENTER button on the remote control or the ENTER button on the device.
AirMusic Control App
This function shows a QR in the display. If you scan this QR Code with a smartphone or tablet, you will be directed to the download page of the AirMusic Control App.
Further information about the app can be found in chapter 10.
7.1.18. Button
In this setting, you can assign a function to the button MODE on the device. When you press the button MODE, your chosen function will be carried
out. Use the buttons on the remote control in the Settings menu to select button in the menu and press the ENTER button on the remote control or the ENTER button on the unit.
Now select the function you want to use for the MODE button from the displayed list.
Confirm your entry with ENTER on the remote control or by pressing the ENTER button
on the unit.
7. SETTINGS
7.1.19.SMS

The radio set allows you to activate short message texts (SMS), which were created via the 'AirMusic Control' app, via the radio, or to send them to selected and previously entered phone numbers by pressing a button.
You can use this function to set up a maximum of 3 mobile phone numbers to which SMS messages are sent.
Please proceed as follows:
Set SMS function to MODE button
Assign the SMS function to the button.
Please also read chapter 7.1.18.
Use the buttons on the remote control in the Settings menu to select the SMS line and press the ENTER button on the remote control or confirm with the ENTER button on the unit.
To do this, select SMS 1, SMS 2, SMS 3.
Enter the mobile phone number(s) (country code and telephone number) which shall receive the notifications, e.g. German country code example: 49170xxxxxxxxx.
Press the ENTER button on the remote control or
press the ENTER button on the device.
Set SMS text for message:
Call up the AirMusic Control app on your Smartphone/Tablet or similar and select the 'settings'
option there.
For information on the AirMusic Control App, refer to chapter 10.
7. SETTINGS
On the settings page, you can change or rename the device name of the radio and create and save the corresponding notification via the SMS Settings selection option.
Once the notification via the app has been entered and saved, the SMS notification can be started via the MODE button on the radio (optionally via the remote control).
Sending the SMS message.
Press the MODE button for a few seconds to send the message to the phone numbers specified beforehand. The radio's display indicates the transmission of the SMS with a send symbol.
7.1.20. Equalizer
In this section, you can select certain sound presets. In addition, you can optionally create custom sound presettings.
Use the buttons on the remote control in the Settings menu to select the Equalizer clock and press the ENTER button on the remote control or confirm with the ENTER button on the unit.
Select a sound preset with the buttons on the remote control and confirm with ENTER on the remote control or the ENTER button on the device.
7.1.20.1. My EQ
You can custom set the sound in this area.
Select My EQ using the buttons on the remote control and press the button.
7. SETTINGS
In line T, change the high-frequency range according to your preferences.
In line B, change the low-frequency range according to your preferences.
E
In line L you can activate or deactivate the Loudness function.
Confirm your settings by pressing ENTER on the remote control or pressing the ENTER button on the device.
7.1.21. Resume playback after switching on
In this menu item you can determine whether the playback of a music file via a connected USB data carrier should be continued automatically after switching on.
Use the buttons of the remote control in the setting menu to select Continue playback after switching on and press the ENTER button on the remote control or the ENTER button on the device.
Switch the function on or off.
7.1.22. Software update
To improve the functions of the device, it may be necessary to update the operating software. The USB interface allows you to update your radio's operating software, which can be downloaded from www.telestar.de if necessary. The software provided on the website must be unpacked. The unpacked file is then transferred to an appropriate storage medium and connected to the radio via the USB port. A description of the exact procedure can be found in the download file.
7. SETTINGS
7.1.23. Reset to factory setting
You can reset all the radio settings you have made to the factory settings. This is useful if you have made changes that have resulted in the device not functioning optimally. Use the buttons of the remote control in the settings menu to select Reset to factory settings and press the ENTER button on the remote control or confirm with the ENTER button on the device.
Select Yes if you want to reset the device, select No if you want to cancel the process.
Please note: When you activate this function, all menu settings and stored stations will be deleted.
8. OPERATION
8.1. Local station

Under Local Station the radio stations that you have added via Local Station Setting (chapter 7.1.15) are displayed.
Press the MENU button on the remote control or on the unit, and use the buttons to select Local Station.
Under this menu item, a selection of different Internet radio stations is sorted according to regions, which can be called up more easily this way. In this menu item, select a desired programme list using the buttons.
Confirm your entry with ENTER.
8. OPERATION
8.2. Internet radio
E

Press the MENU button on the remote control or on the unit, and use the buttons to select Internet Radio. Confirm your settings by pressing ENTER on the
remote control or pressing the ENTER button on the device. You can select and manage all Internet stations in the Internet radio menu. A wide range of radio stations are available. Your radio has to be connected to a network that is online for this.
8.2.1. My favourites
In this menu you can select one of 5 favourite stations that you have saved via the unit's station memory buttons.
Alternatively, the radio stations can also be called up via the station memory buttons on the unit or by entering a number directly with the remote control.
To save a favourite station, please consult Chapter 9.8.
8.2.2. Radio station / music
Choose between different radio station lists by using the buttons and confirm with the ENTER button on the device.
Various lists are available here.
Top 20 radio stations worldwide
8. OPERATION
Radio stations sorted by genre
Radio stations sorted by country and region
Radio station by recommendation.
Confirm your settings by pressing ENTER on the
remote control or pressing the ENTER button on the unit.
8.2.3. Local station
Under this menu item, common Internet radio stations as well as DAB+ radio stations are sorted according to regions and can thus be accessed more easily. The Local Station function is described in chapter 8.1.
8.2.4. Sleep radio
In this area, the radio accesses Internet radio stations with background sounds.
You can choose between several soundscapes here.
Use the buttons and confirm with the ENTER button on the device.
8.2.5. Recent stations
This menu item lists the Internet radio stations that you accessed last.
Note: The content of the menu sub-item 'Last heard' requires that you have already used the Internet radio mode.
8. OPERATION
8.2.6. Service

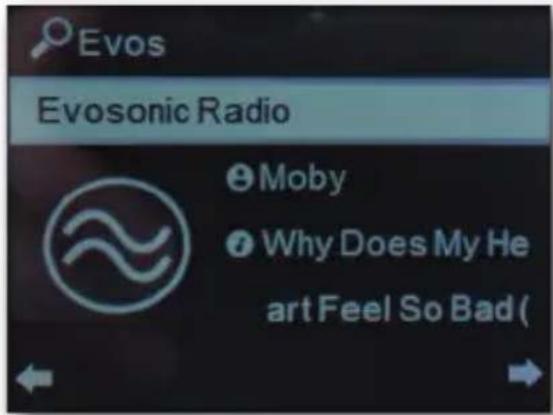
This menu item lets search for a specific radio station on the Internet. The name of the radio station must be entered.
Select Find station in the Service menu and confirm with the ENTER key on the device.
Use the buttons and confirm with ENTER.
Use the buttons on the remote control to enter the name of the radio station in the search box. Press the button to move one character forward. Confirm your entry with ENTER.
The radio will now search for all stations that match this entry.
Select a station with the buttons and confirm with the
ENTER button on the device.
Alternatively, you can add new radio stations if you know the Internet address.
Please enter the Internet address of the radio provider. You can obtain the URL of the radio stream from the radio station provider. The radio station stream will then be saved under My Favourites.
You can enter the streaming URL as follows:
Use the buttons of the remote control to select Service in the Internet radio menu and press the ENTER button on the remote control or on the device.
Select Add new station and confirm with ENTER.
The URL address of the radio station must be entered.
Use the buttons and confirm with ENTER.
Use the buttons on the remote control to enter the name of the radio station in the search box. Press the button to move one character forward. Confirm your entry with ENTER.
8. OPERATION
8.3. Media Centre

Press the MENU button on the remote control or on the unit, and use the buttons to select Media Centre. If the DABMAN i610 is integrated into a wireless network, the radio can also be used as a media player to play music files from network devices such as PCs or smartphones via UPnP or DLNA. The devices must be integrated into the same home network for this and the corresponding media content must be approved for sharing in the network.
To select the Media Player option, do the following:
Use the buttons to select the source you want to play music from.
You can choose between USB (USB data carrier connected to the device's USB port) and UPnP (music files via the UPnP protocol if they are available in the same network as the radio).
Select a track you would like to play and confirm with the ENTER button on the device.
Press to skip to the next track.
Press to jump back one track.
The button pauses or resumes playback.
The [Stop] button stops playback.
8. OPERATION
8.3.1. UPnP Playlist
E
Under UPnP you can create a playlist in which you can individually save music tracks.
To add a music track to the playlist proceed as follows:
In UPnP mode, select a track you want to play and press ENTER on the unit to confirm.
Press and hold the ENTER button on the unit or on the remote control for approx. 3 seconds while the title is playing. A saving symbol will appear.
The selected track is now included in the playlist.
To add more songs to the playlist, do the same.
You can open the playlist in the My Playlist line of the Media Centre menu,
Using the buttons, select My Playlist and confirm with the ENTER button.
To delete the playlist, proceed as follows:
In the Media Center menu, use the buttons to select Empty My Playlist and press ENTER to confirm.
To clear the list, switch to the Yes field with the button and confirm with the ENTER button. This will delete the playlist.
8. OPERATION
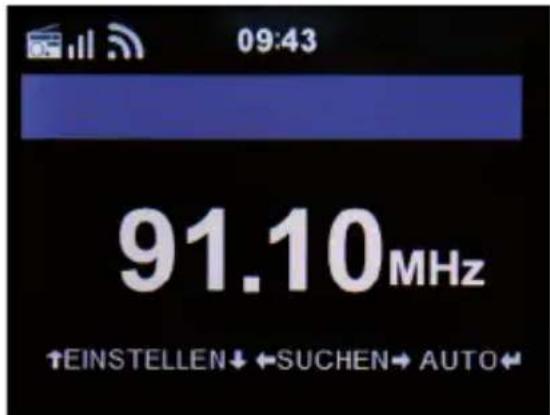
8.4.FM

Press the MENU button on the remote control or on the unit, and use the buttons to select FM.
This menu includes all relevant settings for receiving radio stations via FM.
8.4.1. FM station search
When the DABMAN i610 is switched to FM mode for the first time, a station scan must be performed. An automatic and a manual search function are available for this purpose.
Automatic FM search
After switching to FM, press the ENTER button.
Confirm the Auto Scan prompt with Yes to start a scan.
8. OPERATION
The device starts the automatic station search and saves all found channels.
E
Please note that the reception sensitivity and the related number of radio stations found depends on the search sensitivity settings. For FM search sensitivity settings, refer to chapter 7.1.14.2.
Manual FM search
You can also search for FM stations manually.
To do this, use the buttonson the remote control to increase or decrease the reception frequency step by step in 0.05 MHz increments.
8.4.2. FM radio operation
To access the stored radio stations, press the or I button. Alternatively, you can also call up the first 5 stored stations using the station memory buttons 1-5 on the unit.
If you want to change the assignment of the station memory buttons, press the or button to perform a scan for the next receivable station. If necessary, repeat this step until you have found the desired station. Then press the desired station selection button 1-5 (see chapter 4) for approx. 2 seconds.
The station is now stored on this button.
Please also read chapter 9.8 about saving favourite stations.
8. OPERATION
8.5. DAB

Press the MENU button on the remote control or on the unit, and use the buttons to select DAB.
8.5.1 DAB station search
In addition to FM, the radio can also play the DAB+ radio, which can be received digitally via an antenna.
The first time you switch to DAB mode, the unit starts an automatic station scan to find all the stations that can be received at your location.
The station search will start and the display will show the number of stations found so far. Once the scan is complete, the radio will start playing the first DAB station found in the scan.
Station selection
In DAB mode, press the ENTER button. The DAB station list will open.
Use the buttons on the remote control to navigate to a desired station and press the ENTER button to make your selection.
The radio has a favourite memory, in which you can store popular stations as you like. To store a station, switch to the station to be stored as described above. Now press and hold the FAV button on the remote control for approx. 5 seconds. Use the buttons
8. OPERATION
to move the station to the desired favourite position and press the OK button to save the station on this position.
E
Alternatively, you can store up to 5 stations on the unit using the station memory buttons 1-5. To do so, switch to a desired station and press and hold one of the 5 station memory buttons for approx. 5 seconds. The station is then stored at the corresponding position.
For further information on saving favourite stations, please refer to chapter 9.8.
8.5.2. DAB radio operation
You can access the Favourites list using the FAV button or by pressing the desired number button on the remote control.
The first 5 stations in the Favourites list can also be called up using the station memory buttons on the device.
8. OPERATION
8.6. Information centre


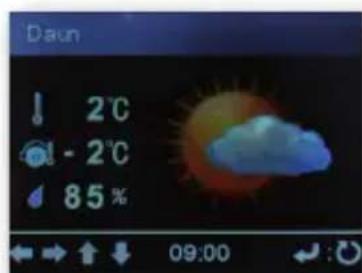
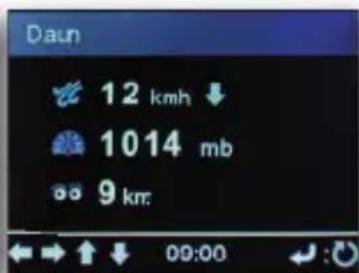
8.6.1 Weather and finances
Press the MENU button on the remote control or on the unit, and use the buttons to select the Information Centre.
Current weather and financial information is available in this section.
In the Weather Information section, select the country and city for which you want to view the weather forecast.
Confirm your selection by pressing ENTER. Navigate the menu with the buttons.
The weather information can be shown in standby mode.
Use the button to add the selected weather information to the standby weather display. You can activate the weather display for standby mode as described in chapter 7.1.13 above.
Similar to the weather forecast, you can display stock exchange quotations from all over the world under the item Financial Services.
8. OPERATION
8.6.2. System information
E
Use this menu to check the details of the connected network. The information includes the MAC address that is required to register your device when you register for mymediaU. (Please also read chapter 7.1.2)
8.7.AUX

You can connect an external music playback device, such as an MP3 player, to the radio.
To do so, connect an external device to the back of the radio using a suitable cable and switch on the device.
If necessary, press the MODE button on the remote control several times during operation until AUX appears in the display below the time or press the menu button and use the button to select the AUX menu item. Now you can play music from the external device. The control (previous track, back, stop, play) is done via the connected device, the playback volume can be controlled via the VOL+VOL- buttons on the radio or via the external device.
Please note that you need a suitable cable to connect the external device. On the radio, the AUX IN input is suitable for a 3.5 mm stereo jack plug.
8. OPERATION
8.8. Bluetooth
The DABMAN i610 can also be connected to an external device (e.g. smartphone/tablet) via Bluetooth.
Via the Bluetooth connection, the radio can play media
[locally stored MP3 files, streamed music, web radio] on an external device.
The Bluetooth mode is recommended if you are near the radio with a device to be connected and no network connection is available.
Select Bluetooth from the menu.
A Bluetooth connection must be established before you can send audio files to the radio via Bluetooth.
8.8.1 Establish a Bluetooth connection
If you have selected Bluetooth mode on the radio,
it is in pairing mode and will search for Bluetooth devices to connect to.
Now activate the Bluetooth function of the external device to
be connected (for further details, please refer to the operating
manual of that device]. Search for "DABMAN i610" in the list of
available devices, select it and establish the connection. In the
radio display a double arrow appears in the upper left corner of
the display. A beep also announces the 'Connection'.
8. OPERATION
8.8.2 Playing media via Bluetooth
E
If you have established a Bluetooth connection as described in Chapter 8.9.1, you can play music files stored on an external device via the DABMAN i610.
To do so, proceed as follows:
Start playback of the music on the external device by switching to the corresponding playback function [MP3 player, etc.] or select a track from the respective playlist and start playback.
8.9. Spotify Connect
Use your phone, tablet or computer as a remote control for Spotify.
Go to Spotify.com/connect to learn how.
The Spotify Software is subject to third party licenses found here: https://www.spotify.com/connect/third-partylicenses
9. DAILY USE FUNCTIONS
9.1. Volume
Adjust the volume using the VOL+/VOL- buttons on the remote control or on the device.
9.2. Switching the mode
Press the MODE button on the remote control or on the unit to switch between DAB Radio, FM Radio, AUX, UPnP, Internet Radio and USB modes.
Please note that the MODE button calls up the function described above in the factory setting. If you have assigned another function to the MODE button, as described in Chapter 7.1.18., you will need to call up the operating modes using the MENU button.
9.3. Display brightness
Use the Dimmer button on the remote control to change the brightness of the display. Press the Dimmer button to reduce the brightness. Press the button again to increase the brightness.
9.4. Radio information
In the Internet or DAB radio mode, you can call up additional information about the radio station you have tuned to, as long as it broadcasts further information.
This additional information can include details on the track and art
9. DAILY USE FUNCTIONS
ist of the current music track as well as the name of the current show or information about the broadcast rate.
E
To do this, use the buttons on the device or the remote control.
9.5. Weather information
If the device is in standby mode, you can call up weather information and forecasts via the display.
Use the buttons on the device or remote control to switch between the different weather displays.
For general information on presetting the weather information, refer to chapter 7.1.13.
9. DAILY USE FUNCTIONS
9.5. Stop and start playback
To start playing a song via UPnP or USB, press the /II button on the remote control. Press the button on the remote control.
9.6.Shuffle playback
You can switch on shuffle mode for music files on a USB data carrier. This will play the music files in a random order.
Press the shuffle button on the remote control to do so.
This symbol will appear

Press the Shuffle button again to stop random playback.
9.7. Repeat track
The Repeat function offers the possibility to automatically repeat one or more tracks on the USB data carrier.
Press the repeat button on the remote control to do so.
This symbol will appear

In this mode, all songs in the currently selected folder are played on repeat.
Press the repeat button on the remote control once more. This
symbol will appear
In this mode, only the currently selected track is repeated.
9. DAILY USE FUNCTIONS
9.8. Save favourite stations
E
In any reception mode (DAB/FM/Internet), you can store them as favourite stations.
Storing stations in the Favourites list can be done as follows:
Select the station you want to store and confirm with the ENTER button.
The stations/favourites 1-5 can be assigned via the 1-5 buttons directly on the unit by pressing and holding the respective buttons (1-5) for approx. 3 seconds. A folder symbol appears on the display with an arrow symbol, indicating the save was successful.
After the fifth station slot, you only save stations with the FAV+ button on the remote control:
Select the station from the complete list and press ENTER to confirm the desired station. Now press the FAV+ button for approx. 3 seconds.
The station selected for saving is displayed in this list as a free list slot and can be moved to the desired list position using the buttons.
The ENTER button completes the storage and the station is added/attached to the Favourites list.
The created Favourites list can be called up in the currently selected mode (DAB, FM, Internet radio) by briefly pressing the FAV button.
9. DAILY USE FUNCTIONS
9.9. Calling up local radio stations
You can use the LOCAL RADIO button on the remote control to call up predefined radio stations from your region. Please also read chapter 7.1.15. Press the LOCAL RADIO button on the remote control to access the radio station overview for your region.
10. APP CONTROL

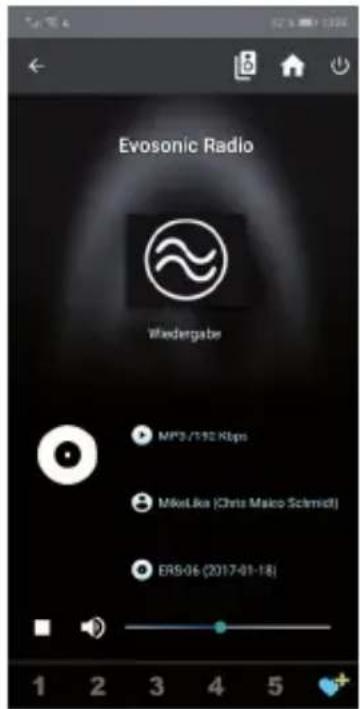
Air Music Control
The radio can be controlled with a smartphone or tablet and a corresponding app. All important functions of the radio can thus be conveniently controlled via a mobile device.
You can download the AIR Music Control app for Android and Apple iOS. You can also use the app to play local music files on your smartphone on the radio.
App for Android® devices:

App for iOS® devices

10. APP CONTROL
Please note:
This description corresponds to the app as at 02.2019.
In the course of updates to the app's software, the app functions or appearance may change!
Download the application from the Google Play Store® for
Android® operating systems, or from the iTunes Store for iOS®
operating systems and install the app on your smartphone.
Make sure that the radio and your mobile device are registered
on the same network.
Start the app.
When starting the app, it automatically detects the radio if it is registered in the same network.
The main menu of the app is structured the same way as the radio menu. The icons used in the app are similar to the icons in the radio menu.
Main menu
Start the desired function by tapping on the
respective symbol.
10. APP CONTROL
E
Internet radio
In this mode, all typical functions can also be selected during internet
radio operation.
You can select the station storage slots 1-5 in the lower area.
Media Centre
In this area, you can connect to media servers in your network.
In addition, you can access music files that are stored on a connected USB data carrier.
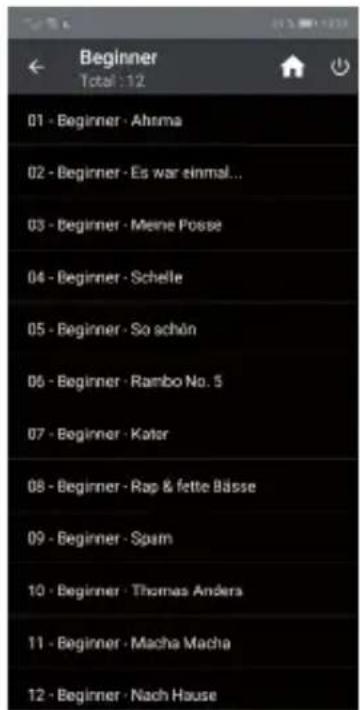
10. APP CONTROL
FM radio
In this mode you can operate the FM radio.
E
DAB
In this mode you can operate DAB+ radio.
11. TROUBLESHOOTING
E
| Symptom | Possible cause and remedy |
| Empty displayRadio no reactingto operation | Connect the powerusing the includedpower unit. Check that the main switchon the back of the device is switchedon. |
| Remote control doesnotwork | Battery is empty or not inserted prop-erly. Please check that the battery hasbeen inserted the right way around.Point the remote control at the device. |
| DAB+ receptioninterrupted | No stationsRun ascan search (see chapter 8.5.1.)Antenna not fullyextracted. Change the radio's location(e.g. near a window),run another scan search. |
| FM reception inter-rupted | Antenna not fully extended, pull the FMantenna out to itsfull length.Changethel location of thereadio. |
11. TROUBLESHOOTING
| Symptom | Possible cause and remedy |
| AUX playback does not work | DABMAN i610 in the wrong mode Change the mode to AUX Cable connection faulty. Check the cable connection between the radio and the external device File with low bit rate. Check the audio file. Tip: For MP3 files the bitrate should be 192Kbit/s or higher. |
| Poor audio quality when playing music | |
| Volume too low Check | the volume settings on the DAB-MAN i610. Check the volume setting of the paired device on which you are playing the music. |
| No network connection can be made | Check the WIFI functioning. Activate the DHCP function of the router to which the radio is to be registered. There may be an active firewall in the network. |
11. TROUBLESHOOTING
| Symptom | Possible cause and remedy |
| No WIFI connection can be made | Check the availability of the WIFI networks. Reduce the distance between the WIFI router and the radio. Make sure that you are using the correct WEP/WPA password when logging on to a WIFI router. |
| No internet radio station available | Check the network access points. The radio station is currently unavailable. The station's link has been changed or is no longer transmitting. |
| USB data carrier is not recognised | Make sure that the USB device is formatted as FAT32. |
| The unit does not play any sound. All other functions are OK. | Headphones are plugged in. Unplug the headphones. |
| The app does not recognise the radio. | Make sure that your mobile device and the radio are registered on the same network. |
12. STORAGE
When not in use, please remove the power unit from the socket, disconnect the radio's cable from the device and store the device
in a dry place, protected against dust.
If the unit is not in use for a longer period of time, the battery must be removed from the remote control.
13. BRAND INFORMATION
Google Play Store® and Android® are registered trademarks of Google Inc.
iTunes Store is a service mark of Apple Inc.
IOS® is a registered trademark of Cisco in the USA and other countries and is used under license.
Other product and company names mentioned herein are trademarks or registered trademarks of their respective owners
14. DISPOSAL INFORMATION
14.1. DISPOSING OF THE PACKAGING
E
The packaging consists exclusively of materials that may be recycled. Please dispose of this according to the 'Dual system'.

14.2. DEVICE DISPOSAL
The symbol on the right of a crossed-out waste bin on wheels indicates that this device is subject to Directive 2012 / 19 / EU. This directive specifies that this device may not be disposed of in normal household waste at the end of its
service life but must be taken to specific collection centres, recycling centres or waste disposal companies.
This type of disposal is free of charge. Protect the environment and ensure a proper disposal.
Further information is available at your local waste collection company or your city or municipal office.
14. DISPOSAL INFORMATION
14.3. DISPOSING OF THE BATTERIES
Batteries and power units may not
be disposed of with the household waste. The symbol
on the right means that you as a
consumer are required
to separately dispose of all
batteries and power units. Suitable
collection bins are provided at specialist
shops and numerous public facilities.
Information about the disposal of old batteries
and power units is also available at
specialist waste disposal companies and city and municipal offices.
This type of disposal is free of charge. Protect the environment and ensure a proper disposal.
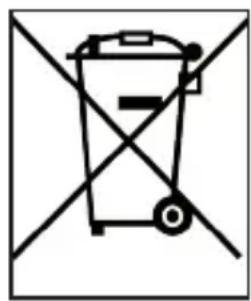
An additional chemical symbol Pb (lead) or Hg (mercury) beneath the crossed-out waste bin indicates that the battery/ power unit contains a share of more than 0.0005% mercury or 0.004% lead.
15. PROPERTIES AND TECHNICAL DATA
| Internet radio | |
| Chip set | Magic M6 approx. 25,000 Internet radio stations available |
| Audio CODECS | MP3 (bit rate up to 320 Kbits/s, sampling rate up to 48 KHz) AAC/AAC+ (bit rate up to 320 Kbits/s, sampling rate up to 48 KHz) WMA (bit rate up to 320 Kbits/s, sampling rate up to 48 KHz) |
| DAB/DAB+/FM | |
| Reception range DAB band III 174 MHz - 240 MHz FM 87.5 MHz -108 Mhz | |
| Display | |
| TFT colour display 7.2 cm / 2.8 inch | |
| Sound | |
| Loudspeaker (10W+15W output music power) 2x 3' loudspeaker max.5W 4Ω 1x Subwoofer max.15W 4Ω | |
15. PROPERTIES AND TECHNICAL DATA
| Connections | |
| Line out | 3.5 mm stereo jack socket |
| Headphones | 3.5 mm stereo jack socket |
| AUX IN | 3.5 mm stereo jack socket |
| LAN | 10/100 Mbps (RJ45) |
| Polarity | - - + |
| Power supply connec-tion | USB 2.0 standard |
| USB plug | |
| Power unit | |
| Manufacturer | Shenzhen Mao Two Power Co., Ltd |
| Model designation | MR-1202000EU |
| Inlet 100 - 240 Volt AC | 50/60Hz 0,85A |
| Outlet 12 volt DC 2 A max. | |
| Remote control battery | |
| Type CR 2025 / 3 V | |
| Dimensions and weight | |
| Width x height x depth 320 mm x 135 mm x 152 mm | |
| Weight approx. 1.9 kg | |
15. PROPERTIES AND TECHNICAL DATA
| Operating conditions | |
| Temperature range 0 | °C - 45 °C |
| Air humidity 20% - 80% relative air humidity | |
| WIFI interface | |
| Frequency range Modulation | 2.412 GHz - 2.4835 GHz CCK, DQPSK, DBPSK, 64-QAM, 16-QAM, QPSK, BPSK, IEEE 802.11b/g /n |
| IEEE standards | |
| WIFI data rate 802.11b: | 1, 2, 5.5, 11Mbps |
| 802.11g: | 6, 9, 12, 18, 24, 36, 48, 54 Mbps |
| 802.11n | HT20 bis 65 Mbps HT40 bis 135 Mbps |
| Transmitting power | 18.5dBm (Max) |
| Bluetooth | |
| Protokoll | V4.2 A2DP V1.2, AVRCP v1.5, HFP v.1.7, AVCTP v1.4, AVDTP v1.2 |
| Profile | |
| Power consumption | |
| Standby | 0.8 W |
| Operation | max. 24 W |
| Storage conditions | |
| Only store in dry rooms. | |
16. SERVICE AND SUPPORT
Dear customer!
Thank you for choosing one of our products. Our product meets the legal requirements and has been manufactured under constant quality control. The technical data correspond to the current status at the time of printing. Subject to changes.
The warranty period for the DABMAN i610 corresponds to the statutory provisions at the time of purchase.
We also offer a
HOTLINE telephone service with professional support.
Professional specialists are ready to offer their assistance in our service area. Here you can ask any questions you may have about TELESTAR products and get suggestions on troubleshooting.
Our technicians are available Monday- Friday from
08:00 - 16:45 at the following phone number:
02676/9520101
or by email at: service@telestar.de
If the Service Hotline cannot help you, please send your
DABMAN i610 to the following address, preferably in its
original packaging, but definitely packed safely for transport:
TELESTAR - DIGITAL GmbH
Service Center
Your device is CE marked and complies with all necessary EU standards.
TELESTAR DIGITAL GmbH hereby declares
that the DABMAN i610 device
complies with the essential requirements and
other relevant provisions
of RoHS Directive 2011/65/EU, RE Directive 2014/53/EU
and ErP Directive 2009/125/EC.
The Declaration of Conformity for this product is available at:
All technical data and functions described in this manual reflect the current state at time of printing and may be changed without prior notice.
We are not liable for any misprints or mistakes.
Reproduction and duplications are only permitted with the express permission of
TELESTAR-DIGITAL GmbH.
As at: September 2019


imperial®
www.telestar.de
- INDICATION POUR LA MISE AU REBUT 295
14.1. ÉLIMINATION DE L'EMBALLAGE 295
14.2. ELIMINATION DE L'APPAREIL 295
14.3. ELIMINATION DES PILES 296
15. CARACTERISTIQUES ET DONNÉES TECHNIQUES....297
16. Service et assistance 300
17.Marquage CE 301
1. Avant-propos
Cher client,
TELESTAR Service Center,
Am Weiher 14,
56766 Ulmen
e-mail: service@telestar.de
15, 30, 60, 90, 120, 150, 180 minutes.
7. RÉGLAGES
7.1.15. Réglage station locale
Réglage manuel (Pays)/(Province)/(Ville)
8.2.3. Station locale
The Spotify Software is subject to third party licenses found here: https://www.spotify.com/connect/third-partylicenses
9. FONCTIONS D'USAGE QUOTIDIEN
9.1. Volume sonore
Chere cliente, cher client!
TELESTAR Service Center,
Am Weiher 14,
56766 Ulmen
e-mail: service@telestar.de
Aantal Verklaring
Toon, melodie, internetradio, FM, DAB/DAB+ of USB.
Weergaven in stand-by
The Spotify Software is subject to third party licenses found here: https://www.spotify.com/connect/third-partylicenses
9. FUNCTIONS VAN HET DAGELIJKSE GEBRUJK
9.1. Geluidsvolume
TELESTAR Service Center,
Am Weiher 14,
56766 Ulmen
E-mail: service@telestar.de
7.1.3.3. Rete wireless (WPS PBC)
IT
Con这对于 the radio riconosce automaticamente, it is a good idea to do some work on this topic.
The Spotify Software is subject to third party licenses found here: https://www.spotify.com/connect/third-partylicenses