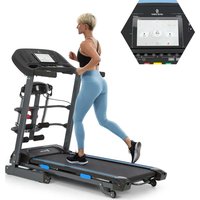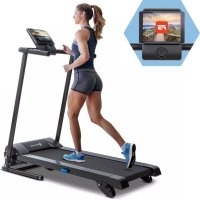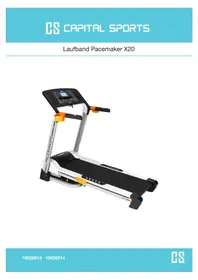
Pacemaker X20 - Treadmills Capital Sports - Free user manual and instructions
Find the device manual for free Pacemaker X20 Capital Sports in PDF.


| Product type | Treadmill |
| Brand | Capital Sports |
| Model | Pacemaker X20 |
| Dimensions (L x W x H) | 168 × 94 × 134.5 cm |
| Unit weight | 60 kg |
| Maximum user weight | 110 kg |
| Running surface | 130 × 43 cm |
| Maximum speed | 16 km/h |
| Maximum incline | 16 % |
| Motor power | 1.75 PS |
| Power supply | 230 V ~ 50 Hz (European standard) |
| Number of programs | 25 (P1 to P25) |
| Display | LCD screen with time, distance, speed, calories, pulse data |
| Pulse measurement | Pulse sensors on handles |
| Countdown function | Time, distance and calories |
| Body fat calculation | Yes (via BODY FAT button) |
| Safety key | Yes, with emergency stop |
| Safety standard | EN957 (domestic use) |
| Maintenance: lubrication | Included silicone oil, every 3 to 6 months |
| Cleaning | Soft damp cloth, vacuum underneath |
| Belt tension adjustment | Rear tightening bolts with hex key |
| Belt centering | Adjustable via the same bolts |
| Recycling | European Directive 2002/96/EC (WEEE) |
| Manufacturer | CHAL-TEC GmbH, Wallstraße 16, 10179 Berlin |
Frequently Asked Questions - Pacemaker X20 Capital Sports
User questions about Pacemaker X20 Capital Sports
0 question about this device. Answer the ones you know or ask your own.
Ask a new question about this device
Download the instructions for your Treadmills in PDF format for free! Find your manual Pacemaker X20 - Capital Sports and take your electronic device back in hand. On this page are published all the documents necessary for the use of your device. Pacemaker X20 by Capital Sports.
USER MANUAL Pacemaker X20 Capital Sports
Congratulations on purchasing this equipment. Please read this manual carefully and take care of the following hints on installation and use to avoid technical damages. Any failure caused by ignoring the mentioned items and cautions mentioned in the operation and installation instructions are not covered by our warranty and any liability.
Contents
Security Instructions 26
Device Overview 28
Control Panel 28
Basic Functions 31
Programs 32
Installation 41
Maintenance and Care. 43
Troubleshooting 46
Technical Data 47
Disposal 47
Producer 47
Security Instructions
Intended use
- This device is intended for physical exercises by running. It is exclusively designed for this purpose and may only be used for this purpose. It may only be used in the manner described in this instruction manual.
- Repairs should only be made by an autorised service.
- Making changes modifying the product compromises the product safety.
- Caution: Risk of injury. A faulty assembly may cause dangerous malfunctions.
- No liability is assumed for consequential damage.
- Subject to technical modifications and error.
- The warranty is void in case of modfictions and changes to the device not intended.
General safety instructions
-
Once fully assembled. Please check that all hardware parts such as bolts, nuts and washers are
-
positioned and secured firmly.
- Before any exercise, consult with your doctor first to establish the exercise frequency, time and intensity appropriate for your particular age and condition.
- Stop exercise immediately in case of nausea, shortness breath faint, headache pain, tightness in your chest or any discomfort.
- Children should be controlled and instructed to the correct use of the equipment. The equipment is under no circumstances suitable as a children's toy.
- Please always regularly that safety chain guard that protects the moving parts of the machine is secured and in good order. Please make sure to keep 0.5m free space around equipment.
- Be careful Use the machine Please stop exercise immediately, if you find any unusual problem or sound with the machine when assembling or using.
- Do not wear loose clothing to avoid entangling in any moving parts.
- This machine is only for indoor or family. Users' body maximum weight is 100kg . Person whose body weight exceeds this limit should not use this machine.
- Be more careful in order to avoid unnecessary hurt when moving this machine.
- Unsupervised children should be kept away from the equipment.
- Equipment shall be installed on a stable base and properly levelled
- Parents and others in charge of children should be aware of their responsibility because the natural play instruct and the fondness of experimenting of children can lead to situation and behavior for which the training equipment is not intended.
Class H & C, for home used only
Important operation instructions
- Understand that changes in speed and incline do not occur immediately. Set your desired speed on the computer console and release the adjustment key. The computer will obey the command gradually.
- Use caution while participating in other activities while walking on your treadmill; such as watching television, reading, etc. These distractions may cause you to lose balance or stray from walking in the centre of the belt; which may result in serious injury.
- In order to prevent losing balance and suffering unexpected injury, NEVER mount or dismount the treadmill while the belt is moving. This unit starts with a very low speed. Simply standing on the belt during slow acceleration is proper after you have learned to operate this machine.
- Always hold on to handrail while making control changes.
- A safety key is provided with this machine. Remove the safety key will stop the walking belt; the treadmill will shut off automatically. Insert the safety key will reset the display.
- Do not use excessive pressure on console control keys. They are precision set to function properly with little finger pressure..
Power cable / power adapter
NEVER use a ground fault circuit interrupt (GFCI) wall outlet with this treadmill. Route the power cord away from any moving part of the treadmill including the elevation mechanism and transport wheels.
- NEVER remove any cover without first disconnecting AC power.
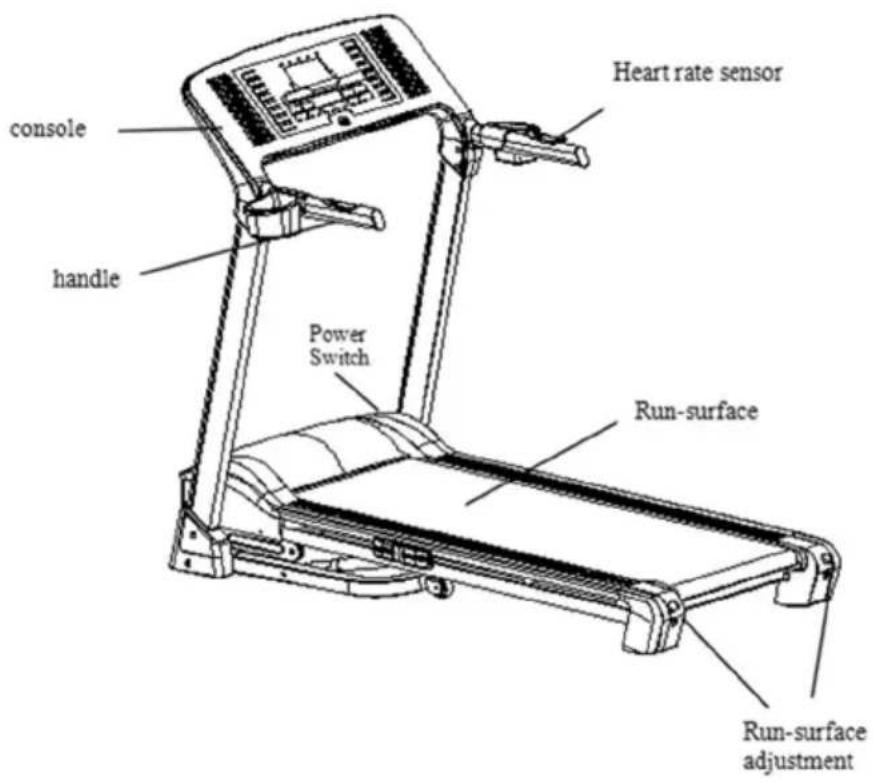
Device Overview
Control Panel
Function keys
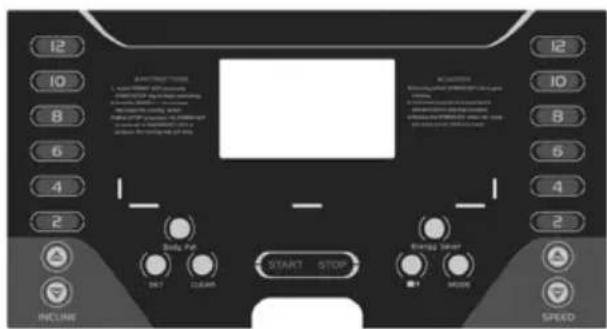
| 1 | MODE | Power on the machine, press it to choose pre-set programs P1-P25. Press START to enter,press CLEAR/SET to exit.. |
| 2 | SET | Power on the machine, press it to choose time,distance,calorie count-down training. |
| 3 | CLEAR | When running,press it to clear up time,distance and calorie. |
| 4 | START | Power on the machine, press it to start running. |
| 5 | STOP | When running,press it to stop and record the running. Press CLEAR/SET to clear up the record. |
| 6 | SPEED + | When running, press it to increase speed by 0.5km/h. Hold on it, speed is increased continuously. |
| 7 | SPEED - | When running, press it to decrease speed by 0.5km/h. Hold on it, speed is deceased continuously. |
| 8 | QUICK SPEED | Speed 2,4,6,8,10 and 12, when running, press it to choose speed. |
| 9 | INCLINE + | When running, press it to increase incline by 1 level. Hold on it, incline is increased continuously. |
| 10 | INCLINE - | When running, press it to decrease incline by 1 level. Hold on it, incline is decreased continuously. |
| 11 | QUICK INCLINE | Incline 2,4,6,8,10 and 12, when running, press it to choose incline. |
| 12 | “■,” | Music on/off key. (Depending on version.) |
| 13 | SCREEN Saver | Press it one time, close display screen, press it again, open display screen. |
| 14 | BODY FAT | Push it,then input your age,height,weight,then the console will calculate your figure is standard or not. |
| 15 | INCLINE + an der Griffstange | When running, press it to increase incline by 1 level. Hold on it, incline is increased continuously. |
| 16 | INCLINE - an der Griffstange | When running, press it to decrease incline by 1 level. Hold on it, incline is decreased continuously. |
| 17 | SPEED + an der Griffstange | When running, press it to increase speed by 0.5km/h. Hold on it, speed is increased continuously. |
| 18 | SPEED - an der Griffstange | When running, press it to decrease speed by 0.5km/h. Hold on it, speed is deceased continuously. |
User-defined modes
| 1 | Count-Down-Training | Power on the machine, press SET to enter TIME count-down training, press it again to enter DISTANCE count-down training, press it once more to enter CALORIE count-down training. Finally press CLEAR to exit. |
| 2 | TIME Count-Down | Power on the machine, press SET, TIME figure glittering, showing 30:00. Press SPEED+, - to choose the time between 5-99minutes. Press START to start at speed of 1.0km/h. Speed can be adjusted by pressing SPEED+, - . The machine stops when time shows 00:00. |
| 3 | DISTANCE Count-Down | Power on the machine, press SET two times, distance figure glittering, showing 1.0km. Press SPEED+, - to choose the distance between 1.0-9.0km. Press START to start at speed of 1.0km/h. Speed can be adjusted by pressing SPEED+, - . The machine stops when distance shows 0.00. |
| 4 | CALORIE Count-Down | Power on the machine, press SET three times, calorie figure glittering, showing 50CAL. Press SPEED+, - to choose the calorie between 10-990CAL. Press START to start at speed of 1.0km/h. Speed can be adjusted by pressing SPEED+, - . The machine stops when calorie shows 0. |
Basic Functions
Power on the treadmill
Power the treadmill on by plugging it into an appropriate wall outlet, then turn on the power switch located at the front of the treadmill below the motor shield. Ensure that the safety key is installed, as the treadmill will not power on without it. When the power is turned on, the display is ready for operation.
Self-check
When using for the first time, it is necessary to make the machine carry on self-check:
Remove the safety key, press MODE and hold, then insert the safety key again, the machine enters into self-checking state. During this state, pressing START two times, the machine begins to self-check. It stops automatically after self-checking.
Note: Don't stand on the machine when self-checking.
Qick-Start-Modus
- Press and release the START to begin belt movement, at 1.0Km / hr , then adjust to the desired speed using the + or - . You may also use the quick speed keys (2,4,6,8,10 and 12) to adjust the speed. You can also use 'speed +' or 'speed -' to adjust the speed on handrail.
- To slow the treadmill down, press and hold the 'speed -' key to desired speed. You may also press the rapid speed adjust keys: 2,4,6,8,10 and 12.
- In a state of running, single press STOP, the walking belt will gradually slow down.
- In the state of running, single press CLEAR will reset time, distance, calorie..
Incline Feature
- Incline may be adjusted anytime after belt movement.
- Incline can't be back to 0 after removing safety key.
- Incline can be back to 0 after starting machine again.
Pulse Grip Feature
Hold on both stainless steel pulse sensors in the handrails, the The Pulse (Heart Rate) console window will display your current heart rate during the workout within 15 seconds. Calorie Display Displays the cumulative calories burned at any given time during your workout.
Note: You must use both stainless steel sensors to display your pulse.
Calorie Display
Displays the cumulative calories burned at any given time during your workout.
Note: This is only a rough guide used for comparison of different exercise sessions, which cannot be used for medical purposes.
Programs
The speed that the particular program will achieve will be displayed in the Speed window. Each program has various speed changes throughout.
To select a program
- Power on the machine, press 'MODE' to choose desired program, then press and release 'START/STOP' to begin the program with default values.
- The speed window will now be showing the preset speed of the selected program.
- After every one minute speed can be altered automatically according to the programs, and can be altered manually. 3 Seconds before the ending of program a buzzer will sound three times, then the running belt will come to a stop.
1.WALKING AND JOGGING PROGRAM P1-P5
With incline +25 common +3user programs 1.Walking and jogging programs
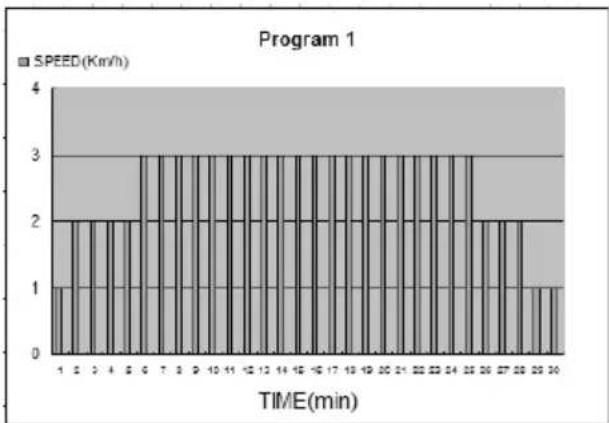
P1 PRIMARY
| TIME (mins) | 1 | 2 | 3 | 4 | 5 | 6 | 7 | 8 | 9 | 10 | 11 | 12 | 13 | 14 | 15 | 16 | 17 | 18 | 19 | 20 | 21 | 22 | 23 | 24 | 25 | 26 | 27 | 28 | 29 | 30 | 30MINS |
| SPEED (Km/h) | 1 | 2 | 2 | 2 | 2 | 3 | 3 | 3 | 3 | 3 | 3 | 3 | 3 | 3 | 3 | 3 | 3 | 3 | 3 | 3 | 3 | 3 | 3 | 3 | 3 | 2 | 2 | 2 | 1 | 1 | STOP |
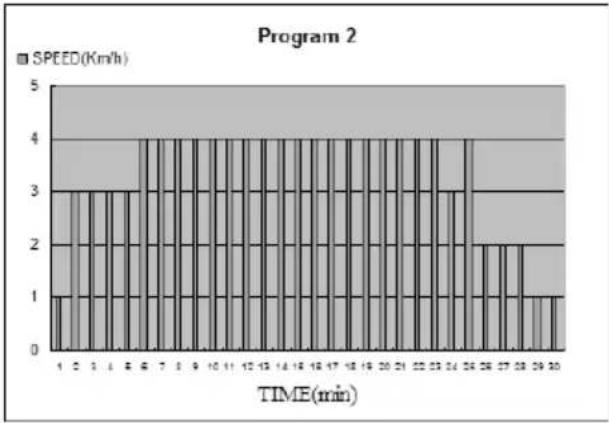
P2PRIMARY
| TIME (mins) | 1 | 2 | 3 | 4 | 5 | 6 | 7 | 8 | 9 | 10 | 11 | 12 | 13 | 14 | 15 | 16 | 17 | 18 | 19 | 20 | 21 | 22 | 23 | 24 | 25 | 26 | 27 | 28 | 29 | 30 | 30MINS |
| SPEED (Km/h) | 1 | 3 | 3 | 3 | 3 | 4 | 4 | 4 | 4 | 4 | 4 | 4 | 4 | 4 | 4 | 4 | 4 | 4 | 4 | 4 | 4 | 4 | 4 | 3 | 4 | 2 | 2 | 2 | 1 | 1 | STOP |
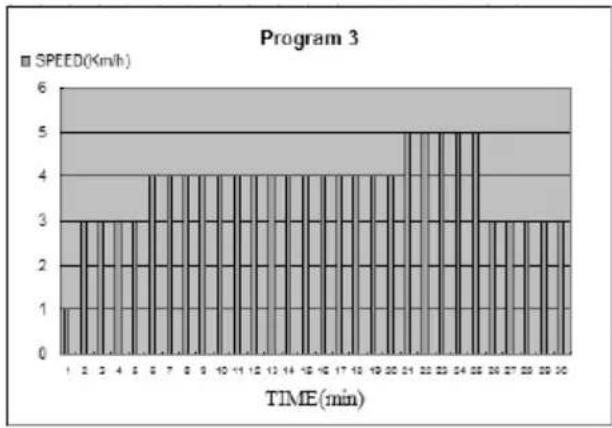
P3 WALKING
| TIME (mins) | 1 | 2 | 3 | 4 | 5 | 6 | 7 | 8 | 9 | 10 | 11 | 12 | 13 | 14 | 15 | 16 | 17 | 18 | 19 | 20 | 21 | 22 | 23 | 24 | 25 | 26 | 27 | 28 | 29 | 30 | 30MINS |
| SPEED (Km/h) | 1 | 3 | 3 | 3 | 3 | 4 | 4 | 4 | 4 | 4 | 4 | 4 | 4 | 4 | 4 | 4 | 4 | 4 | 4 | 4 | 5 | 5 | 5 | 5 | 5 | 3 | 3 | 3 | 3 | 3 | STOP |
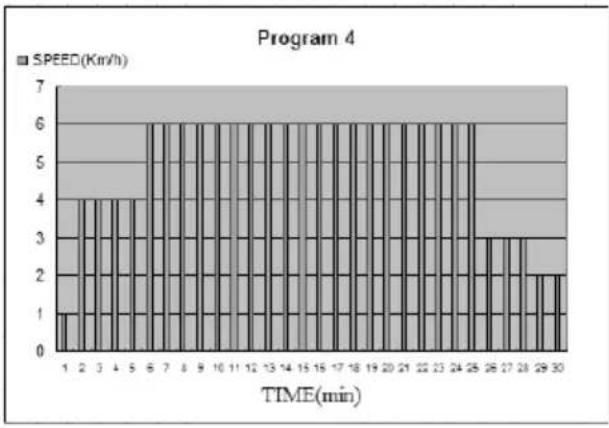
P4 JOGGING
| TIME (mins) | 1 | 2 | 3 | 4 | 5 | 6 | 7 | 8 | 9 | 10 | 11 | 12 | 13 | 14 | 15 | 16 | 17 | 18 | 19 | 20 | 21 | 22 | 23 | 24 | 25 | 26 | 27 | 28 | 29 | 30 | 30MINS |
| SPEED (Km/h) | 1 | 4 | 4 | 4 | 4 | 6 | 6 | 6 | 6 | 6 | 6 | 6 | 6 | 6 | 6 | 6 | 6 | 6 | 6 | 6 | 6 | 6 | 6 | 6 | 6 | 3 | 3 | 3 | 2 | 2 | STOP |
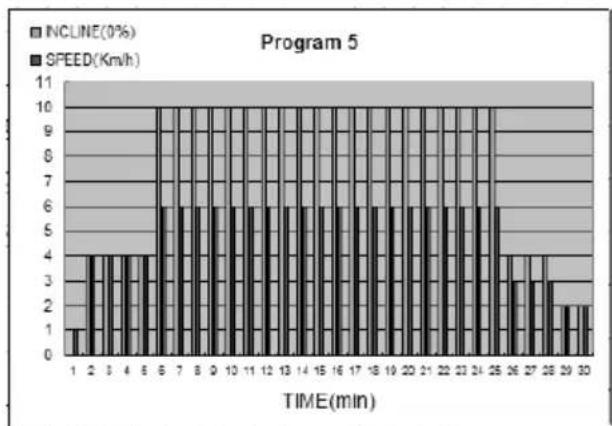
P5 INCLINE JOGGING
| Zeit (min) | 1 | 2 | 3 | 4 | 5 | 6 | 7 | 8 | 9 | 10 | 11 | 12 | 13 | 14 | 15 | 16 | 17 | 18 | 19 | 20 | 21 | 22 | 23 | 24 | 25 | 26 | 27 | 28 | 29 | 30 | 30MINS |
| Steigung (%) | 0 | 4 | 4 | 4 | 4 | 10 | 10 | 10 | 10 | 10 | 10 | 10 | 10 | 10 | 10 | 10 | 10 | 10 | 10 | 10 | 10 | 10 | 10 | 10 | 10 | 4 | 4 | 4 | 2 | 2 | STOP |
| Geschw. (km/h) | 1 | 4 | 4 | 4 | 4 | 6 | 6 | 6 | 6 | 6 | 6 | 6 | 6 | 6 | 6 | 6 | 6 | 6 | 6 | 6 | 6 | 6 | 6 | 6 | 6 | 3 | 3 | 3 | 2 | 2 | STOP |
2. Long-distance runner
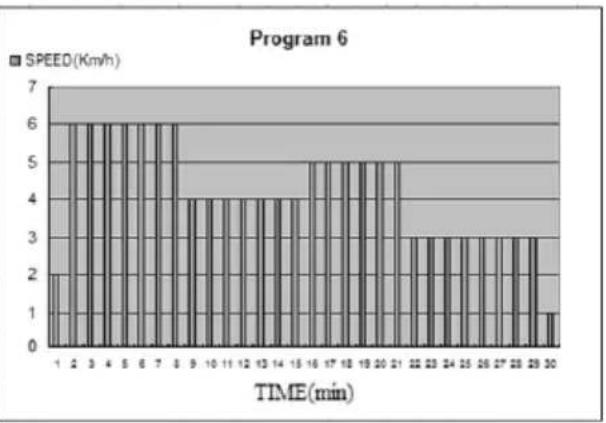
P6Runner1
| TIME (mins) | 1 | 2 | 3 | 4 | 5 | 6 | 7 | 8 | 9 | 10 | 11 | 12 | 13 | 14 | 15 | 16 | 17 | 18 | 19 | 20 | 21 | 22 | 23 | 24 | 25 | 26 | 27 | 28 | 29 | 30 | 30MINS |
| SPEED (Km/h) | 2 | 6 | 6 | 6 | 6 | 6 | 6 | 6 | 4 | 4 | 4 | 4 | 4 | 4 | 4 | 5 | 5 | 5 | 5 | 5 | 5 | 3 | 3 | 3 | 3 | 3 | 3 | 3 | 3 | 1 | STOP |
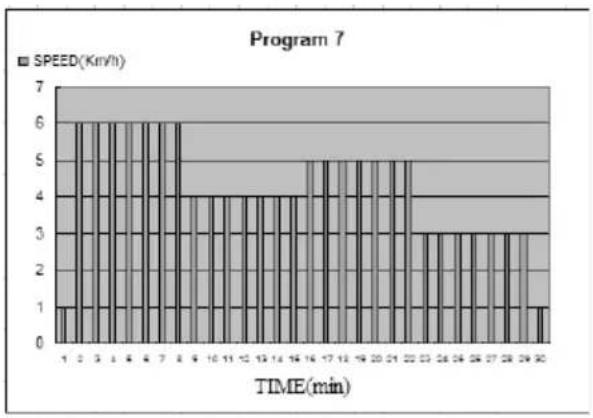
P7Runner2
| TIME (mins) | 1 | 2 | 3 | 4 | 5 | 6 | 7 | 8 | 9 | 10 | 11 | 12 | 13 | 14 | 15 | 16 | 17 | 18 | 19 | 20 | 21 | 22 | 23 | 24 | 25 | 26 | 27 | 28 | 29 | 30 | 30MINS |
| SPEED (Km/h) | 1 | 6 | 6 | 6 | 6 | 6 | 6 | 6 | 4 | 4 | 4 | 4 | 4 | 4 | 4 | 5 | 5 | 5 | 5 | 5 | 5 | 5 | 3 | 3 | 3 | 3 | 3 | 3 | 3 | 1 | STOP |
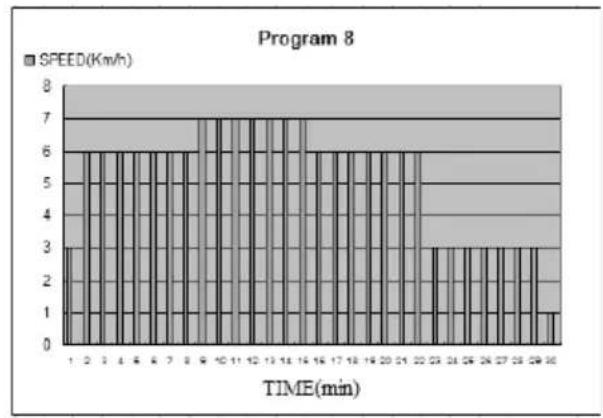
P8Runner3
| TIME (mins) | 1 | 2 | 3 | 4 | 5 | 6 | 7 | 8 | 9 | 10 | 11 | 12 | 13 | 14 | 15 | 16 | 17 | 18 | 19 | 20 | 21 | 22 | 23 | 24 | 25 | 26 | 27 | 28 | 29 | 30 | 30MINS |
| SPEED (Km/h) | 3 | 6 | 6 | 6 | 6 | 6 | 6 | 7 | 7 | 7 | 7 | 7 | 7 | 7 | 6 | 6 | 6 | 6 | 6 | 6 | 6 | 6 | 3 | 3 | 3 | 3 | 3 | 3 | 3 | 1 | STOP |
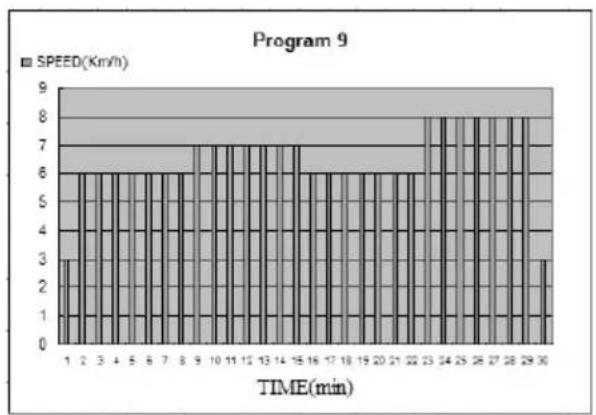
P9 Runner4
| TIME (mins) | 1 | 2 | 3 | 4 | 5 | 6 | 7 | 8 | 9 | 10 | 11 | 12 | 13 | 14 | 15 | 16 | 17 | 18 | 19 | 20 | 21 | 22 | 23 | 24 | 25 | 26 | 27 | 28 | 29 | 30 | 30MINS |
| SPEED (Km/h) | 3 | 6 | 6 | 6 | 6 | 6 | 6 | 7 | 7 | 7 | 7 | 7 | 7 | 7 | 6 | 6 | 6 | 6 | 6 | 6 | 6 | 6 | 8 | 8 | 8 | 8 | 8 | 8 | 8 | 3 | STOP |
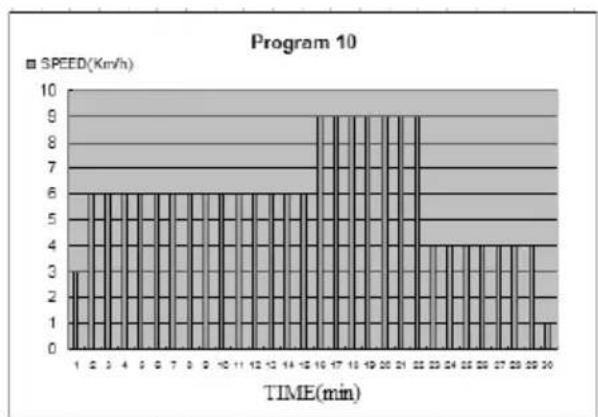
P10 Runner5
| TIME (mins) | 1 | 2 | 3 | 4 | 5 | 6 | 7 | 8 | 9 | 10 | 11 | 12 | 13 | 14 | 15 | 16 | 17 | 18 | 19 | 20 | 21 | 22 | 23 | 24 | 25 | 26 | 27 | 28 | 29 | 30 | 30MINS |
| SPEED (Km/h) | 3 | 6 | 6 | 6 | 6 | 6 | 6 | 6 | 6 | 6 | 6 | 6 | 6 | 6 | 6 | 9 | 9 | 9 | 9 | 9 | 9 | 9 | 4 | 4 | 4 | 4 | 4 | 4 | 4 | 1 | STOP |
3.Middle-distance runner
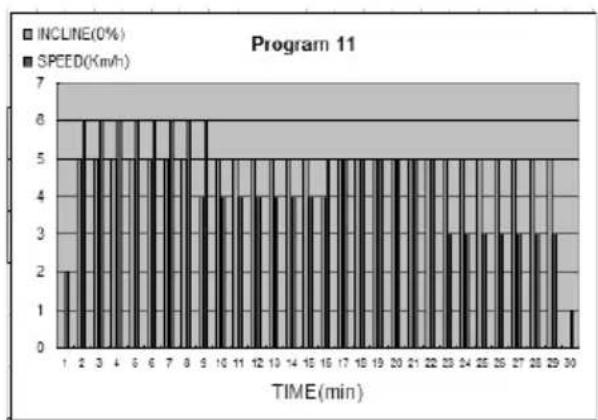
P11Runner1
| TIME (mins) | 1 | 2 | 3 | 4 | 5 | 6 | 7 | 8 | 9 | 10 | 11 | 12 | 13 | 14 | 15 | 16 | 17 | 18 | 19 | 20 | 21 | 22 | 23 | 24 | 25 | 26 | 27 | 28 | 29 | 30 | 30MINS |
| INCLINE (0%) | 0 | 5 | 5 | 5 | 5 | 5 | 5 | 5 | 4 | 5 | 5 | 5 | 5 | 5 | 5 | 4 | 5 | 5 | 5 | 5 | 5 | 5 | 5 | 5 | 5 | 5 | 5 | 5 | 5 | 0 | STOP |
| SPEED (Km/h) | 2 | 6 | 6 | 6 | 6 | 6 | 6 | 6 | 6 | 4 | 4 | 4 | 4 | 4 | 4 | 5 | 5 | 5 | 5 | 5 | 5 | 5 | 3 | 3 | 3 | 3 | 3 | 3 | 3 | 1 | STOP |
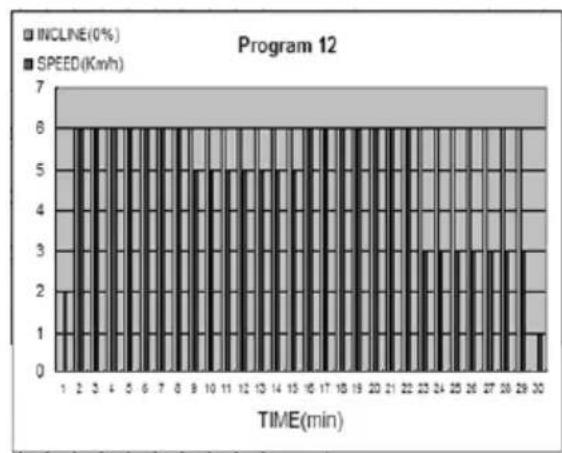
P12 Runner2
| TIME (mins) | 1 | 2 | 3 | 4 | 5 | 6 | 7 | 8 | 9 | 10 | 11 | 12 | 13 | 14 | 15 | 16 | 17 | 18 | 19 | 20 | 21 | 22 | 23 | 24 | 25 | 26 | 27 | 28 | 29 | 30 | 30MINS |
| INCLINE (0%) | 0 | 6 | 6 | 6 | 6 | 6 | 6 | 6 | 6 | 6 | 6 | 6 | 6 | 6 | 6 | 6 | 6 | 6 | 6 | 6 | 6 | 6 | 6 | 6 | 6 | 6 | 6 | 6 | 6 | 0 | STOP |
| SPEED (Km/h) | 2 | 6 | 6 | 6 | 6 | 6 | 6 | 6 | 5 | 5 | 5 | 5 | 5 | 5 | 5 | 6 | 6 | 6 | 6 | 6 | 6 | 6 | 6 | 3 | 3 | 3 | 3 | 3 | 3 | 1 | STOP |
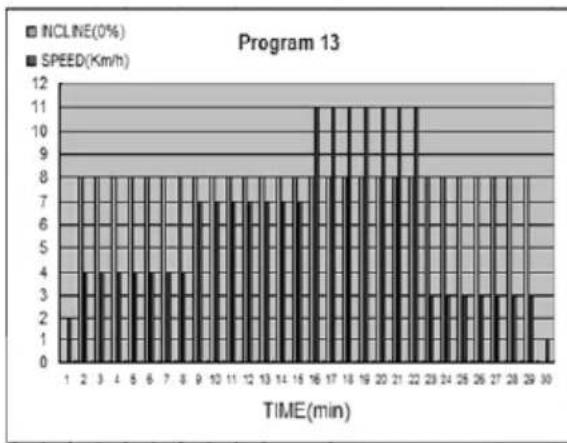
P13 Runner3
| TIME (mins) | 1 | 2 | 3 | 4 | 5 | 6 | 7 | 8 | 9 | 10 | 11 | 12 | 13 | 14 | 15 | 16 | 17 | 18 | 19 | 20 | 21 | 22 | 23 | 24 | 25 | 26 | 27 | 28 | 29 | 30 | 30MINS |
| INCLINE (0%) | 0 | 8 | 8 | 8 | 8 | 8 | 8 | 8 | 8 | 8 | 8 | 8 | 8 | 8 | 8 | 8 | 8 | 8 | 8 | 8 | 8 | 8 | 8 | 8 | 8 | 8 | 8 | 8 | 8 | 0 | STOP |
| SPEED (Km/h) | 2 | 4 | 4 | 4 | 4 | 4 | 4 | 4 | 7 | 7 | 7 | 7 | 7 | 7 | 7 | 11 | 11 | 11 | 11 | 11 | 11 | 11 | 3 | 3 | 3 | 3 | 3 | 3 | 3 | 1 | STOP |
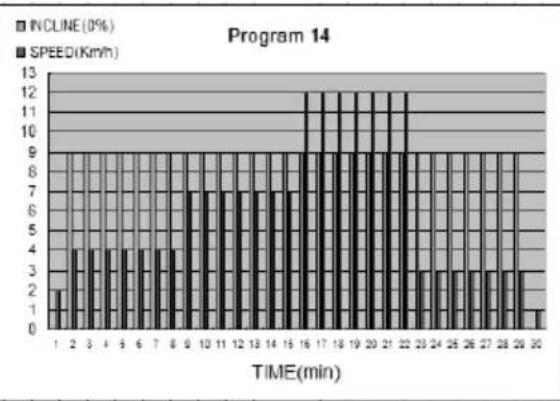
P14Runner4
| TIME (mins) | 1 | 2 | 3 | 4 | 5 | 6 | 7 | 8 | 9 | 10 | 11 | 12 | 13 | 14 | 15 | 16 | 17 | 18 | 19 | 20 | 21 | 22 | 23 | 24 | 25 | 26 | 27 | 28 | 29 | 30 | 30MINS |
| INCLINE (0%) | 0 | 9 | 9 | 9 | 9 | 9 | 9 | 9 | 9 | 9 | 9 | 9 | 9 | 9 | 9 | 9 | 9 | 9 | 9 | 9 | 9 | 9 | 9 | 9 | 9 | 9 | 9 | 9 | 9 | 0 | STOP |
| SPEED (Km/h) | 2 | 4 | 4 | 4 | 4 | 4 | 4 | 4 | 7 | 7 | 7 | 7 | 7 | 7 | 7 | 12 | 12 | 12 | 12 | 12 | 12 | 12 | 3 | 3 | 3 | 3 | 3 | 3 | 3 | 1 | STOP |
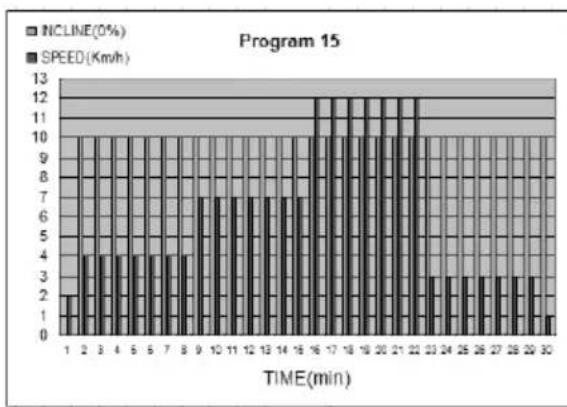
P15 Runner5
| TIME (mins) | 1 | 2 | 3 | 4 | 5 | 6 | 7 | 8 | 9 | 10 | 11 | 12 | 13 | 14 | 15 | 16 | 17 | 18 | 19 | 20 | 21 | 22 | 23 | 24 | 25 | 26 | 27 | 28 | 29 | 30 | 30MINS |
| INCLINE (0%) | 0 | 10 | 10 | 10 | 10 | 10 | 10 | 10 | 10 | 10 | 10 | 10 | 10 | 10 | 10 | 10 | 10 | 10 | 10 | 10 | 10 | 10 | 10 | 10 | 10 | 10 | 10 | 10 | 10 | 10 | STOP |
| SPEED (Km/h) | 2 | 4 | 4 | 4 | 4 | 4 | 4 | 4 | 7 | 7 | 7 | 7 | 7 | 7 | 7 | 12 | 12 | 12 | 12 | 12 | 12 | 12 | 3 | 3 | 3 | 3 | 3 | 3 | 3 | 1 | STOP |
4. Short-distance runner
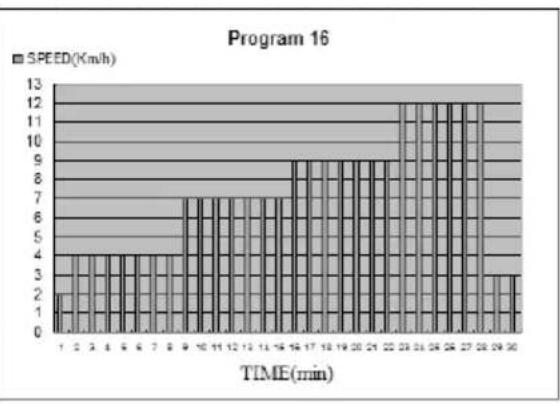
P16 Runner1
| TIME (mins) | 1 | 2 | 3 | 4 | 5 | 6 | 7 | 8 | 9 | 10 | 11 | 12 | 13 | 14 | 15 | 16 | 17 | 18 | 19 | 20 | 21 | 22 | 23 | 24 | 25 | 26 | 27 | 28 | 29 | 30 | 30MINS | |
| SPEED (Km/h) | 2 | 4 | 4 | 4 | 4 | 4 | 4 | 4 | 7 | 7 | 7 | 7 | 7 | 7 | 7 | 9 | 9 | 9 | 9 | 9 | 9 | 9 | 9 | 12 | 12 | 12 | 12 | 12 | 12 | 3 | 3 | STOP |
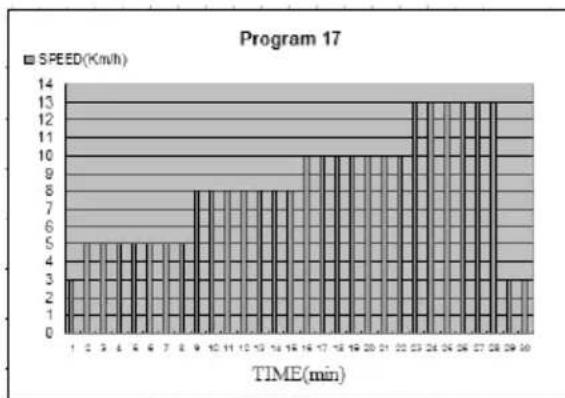
P17Runner2
| TIME (mins) | 1 | 2 | 3 | 4 | 5 | 6 | 7 | 8 | 9 | 10 | 11 | 12 | 13 | 14 | 15 | 16 | 17 | 18 | 19 | 20 | 21 | 22 | 23 | 24 | 25 | 26 | 27 | 28 | 29 | 30 | 30MINS | |
| SPEED (Km/h) | 3 | 5 | 5 | 5 | 5 | 5 | 5 | 5 | 8 | 8 | 8 | 8 | 8 | 8 | 8 | 10 | 10 | 10 | 10 | 10 | 10 | 10 | 10 | 13 | 13 | 13 | 13 | 13 | 13 | 3 | 3 | STOP |
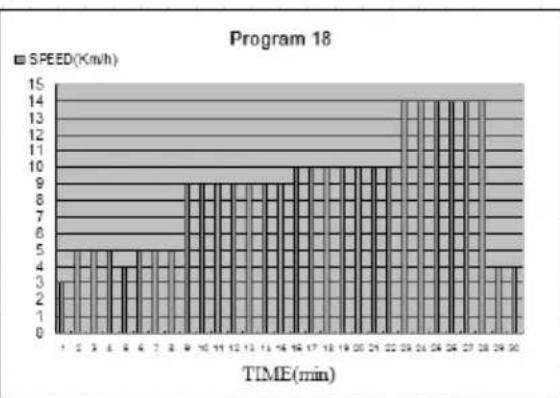
P18 Runner3
| TIME (mins) | 1 | 2 | 3 | 4 | 5 | 6 | 7 | 8 | 9 | 10 | 11 | 12 | 13 | 14 | 15 | 16 | 17 | 18 | 19 | 20 | 21 | 22 | 23 | 24 | 25 | 26 | 27 | 28 | 29 | 30 | 30MINS | |
| SPEED (Km/h) | 3 | 5 | 5 | 5 | 5 | 5 | 5 | 5 | 9 | 9 | 9 | 9 | 9 | 9 | 9 | 10 | 10 | 10 | 10 | 10 | 10 | 10 | 10 | 14 | 14 | 14 | 14 | 14 | 14 | 4 | 4 | STOP |
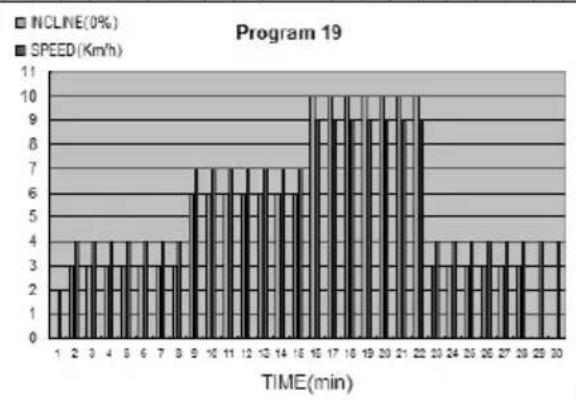
P19 Runner4
| TIME (mins) | 1 | 2 | 3 | 4 | 5 | 6 | 7 | 8 | 9 | 10 | 11 | 12 | 13 | 14 | 15 | 16 | 17 | 18 | 19 | 20 | 21 | 22 | 23 | 24 | 25 | 26 | 27 | 28 | 29 | 30 | 30MINS |
| INCLINE (0%) | 0 | 3 | 3 | 3 | 3 | 3 | 3 | 3 | 6 | 6 | 6 | 6 | 6 | 6 | 6 | 10 | 10 | 10 | 10 | 10 | 10 | 10 | 10 | 3 | 3 | 3 | 3 | 3 | 0 | 0 | STOP |
| SPEED (Km/h) | 2 | 4 | 4 | 4 | 4 | 4 | 4 | 4 | 7 | 7 | 7 | 7 | 7 | 7 | 7 | 9 | 9 | 9 | 9 | 9 | 9 | 9 | 4 | 4 | 4 | 4 | 4 | 4 | 4 | 4 | STOP |
5.Lady exerciser
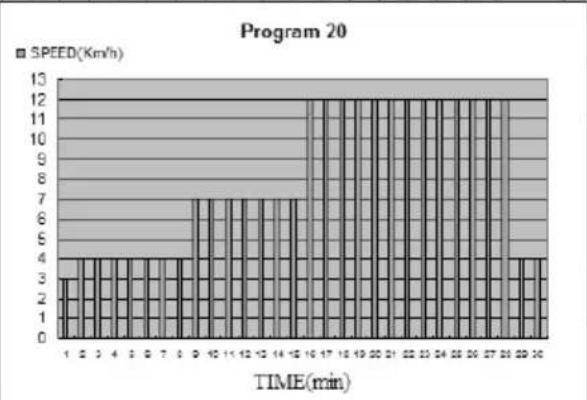
P20 Runner1
| TIME (mins) | 1 | 2 | 3 | 4 | 5 | 6 | 7 | 8 | 9 | 10 | 11 | 12 | 13 | 14 | 15 | 16 | 17 | 18 | 19 | 20 | 21 | 22 | 23 | 24 | 25 | 26 | 27 | 28 | 29 | 30 | 30MINS |
| SPEED (Km/h) | 3 | 4 | 4 | 4 | 4 | 4 | 4 | 7 | 7 | 7 | 7 | 7 | 7 | 7 | 12 | 12 | 12 | 12 | 12 | 12 | 12 | 12 | 12 | 12 | 12 | 12 | 12 | 12 | 4 | 4 | STOP |
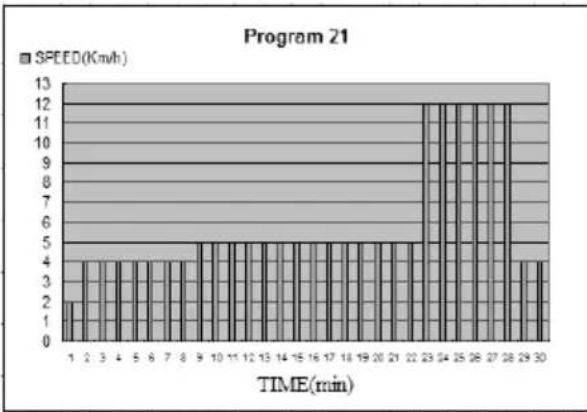
P21Runner2
| TIME (mins) | 1 | 2 | 3 | 4 | 5 | 6 | 7 | 8 | 9 | 10 | 11 | 12 | 13 | 14 | 15 | 16 | 17 | 18 | 19 | 20 | 21 | 22 | 23 | 24 | 25 | 26 | 27 | 28 | 29 | 30 | 30MINS |
| SPEED (Km/h) | 2 | 4 | 4 | 4 | 4 | 4 | 4 | 4 | 5 | 5 | 5 | 5 | 5 | 5 | 5 | 5 | 5 | 5 | 5 | 5 | 5 | 5 | 12 | 12 | 12 | 12 | 12 | 12 | 4 | 4 | STOP |
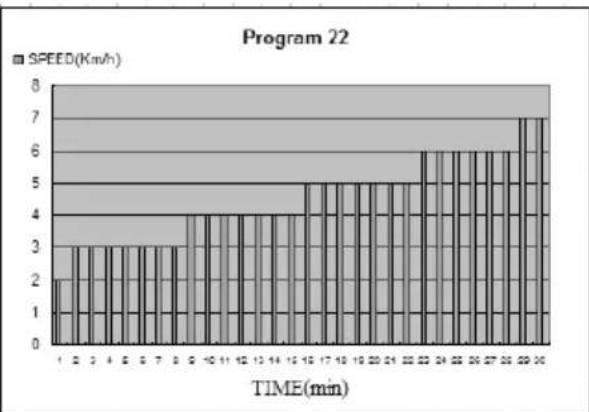
P22Runner3
| TIME (mins) | 1 | 2 | 3 | 4 | 5 | 6 | 7 | 8 | 9 | 10 | 11 | 12 | 13 | 14 | 15 | 16 | 17 | 18 | 19 | 20 | 21 | 22 | 23 | 24 | 25 | 26 | 27 | 28 | 29 | 30 | 30MINS |
| SPEED (Km/h) | 2 | 3 | 3 | 3 | 3 | 3 | 3 | 3 | 4 | 4 | 4 | 4 | 4 | 4 | 4 | 5 | 5 | 5 | 5 | 5 | 5 | 5 | 6 | 6 | 6 | 6 | 6 | 6 | 7 | 7 | STOP |
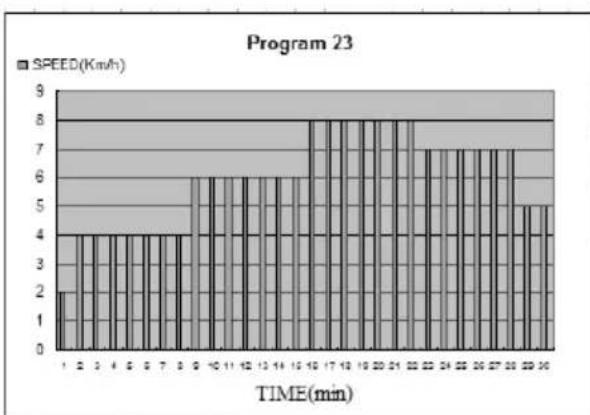
P23 Runner4
| TIME (mins) | 1 | 2 | 3 | 4 | 5 | 6 | 7 | 8 | 9 | 10 | 11 | 12 | 13 | 14 | 15 | 16 | 17 | 18 | 19 | 20 | 21 | 22 | 23 | 24 | 25 | 26 | 27 | 28 | 29 | 30 | 30MINS |
| INCLINE (0%) | 2 | 4 | 4 | 4 | 4 | 4 | 4 | 4 | 6 | 6 | 6 | 6 | 6 | 6 | 6 | 8 | 8 | 8 | 8 | 8 | 8 | 8 | 7 | 7 | 7 | 7 | 7 | 7 | 5 | 5 | STOP |
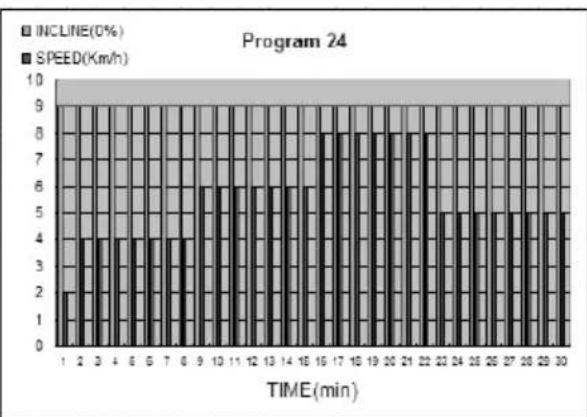
P24Runner5
| TIME (mins) | 1 | 2 | 3 | 4 | 5 | 6 | 7 | 8 | 9 | 10 | 11 | 12 | 13 | 14 | 15 | 16 | 17 | 18 | 19 | 20 | 21 | 22 | 23 | 24 | 25 | 26 | 27 | 28 | 29 | 30 | 30MINS |
| INLINE (0%) | 9 | 9 | 9 | 9 | 9 | 9 | 9 | 9 | 9 | 9 | 9 | 9 | 9 | 9 | 9 | 9 | 9 | 9 | 9 | 9 | 9 | 9 | 9 | 9 | 9 | 9 | 9 | 9 | 9 | 9 | STOP |
| SPEED (Km/h) | 2 | 4 | 4 | 4 | 4 | 4 | 4 | 4 | 6 | 6 | 6 | 6 | 6 | 6 | 6 | 8 | 8 | 8 | 8 | 8 | 8 | 8 | 5 | 5 | 5 | 5 | 5 | 5 | 5 | 5 | STOP |
P25Runner6
| TIME (mins) | 1 | 2 | 3 | 4 | 5 | 6 | 7 | 8 | 9 | 10 | 11 | 12 | 13 | 14 | 15 | 16 | 17 | 18 | 19 | 20 | 21 | 22 | 23 | 24 | 25 | 26 | 27 | 28 | 29 | 30 | 30MINS |
| INCLINE (0%) | 10 | 10 | 10 | 10 | 10 | 10 | 10 | 10 | 10 | 10 | 10 | 10 | 10 | 10 | 10 | 10 | 10 | 10 | 10 | 10 | 10 | 10 | 10 | 10 | 10 | 10 | 10 | 10 | 10 | 10 | STOP |
| SPEED (Km/h) | 2 | 4 | 4 | 4 | 4 | 4 | 4 | 4 | 6 | 6 | 6 | 6 | 6 | 6 | 6 | 8 | 8 | 8 | 8 | 8 | 8 | 8 | 6 | 6 | 6 | 6 | 6 | 6 | 5 | 5 | STOP |

Installation
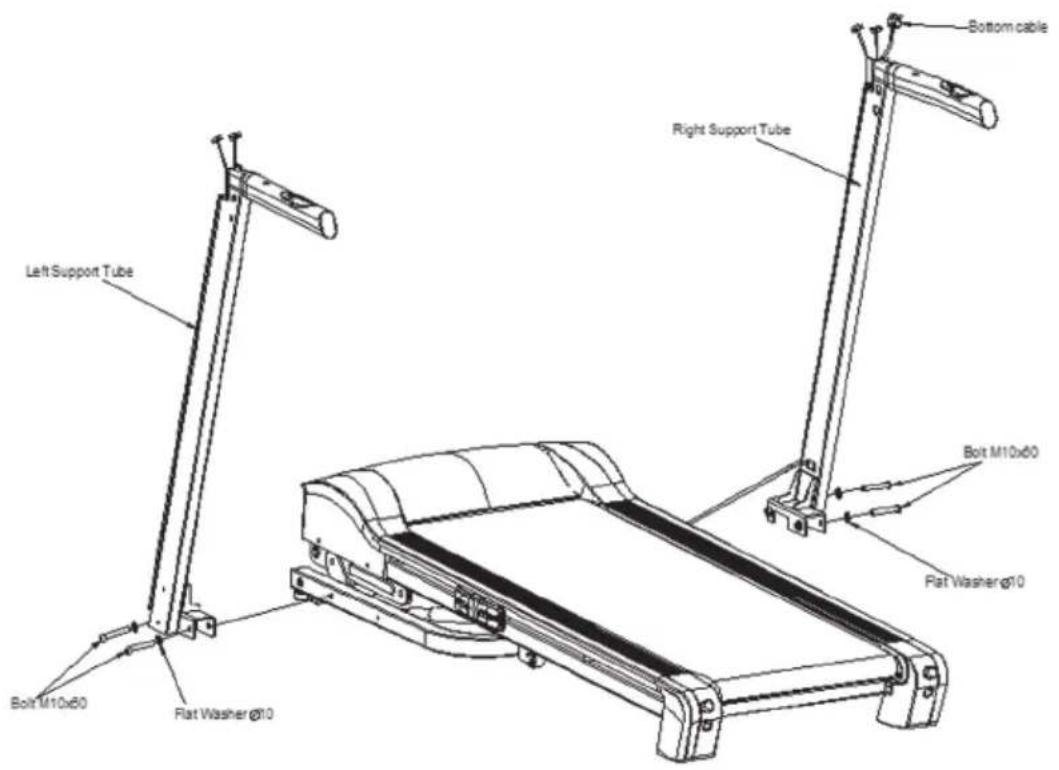
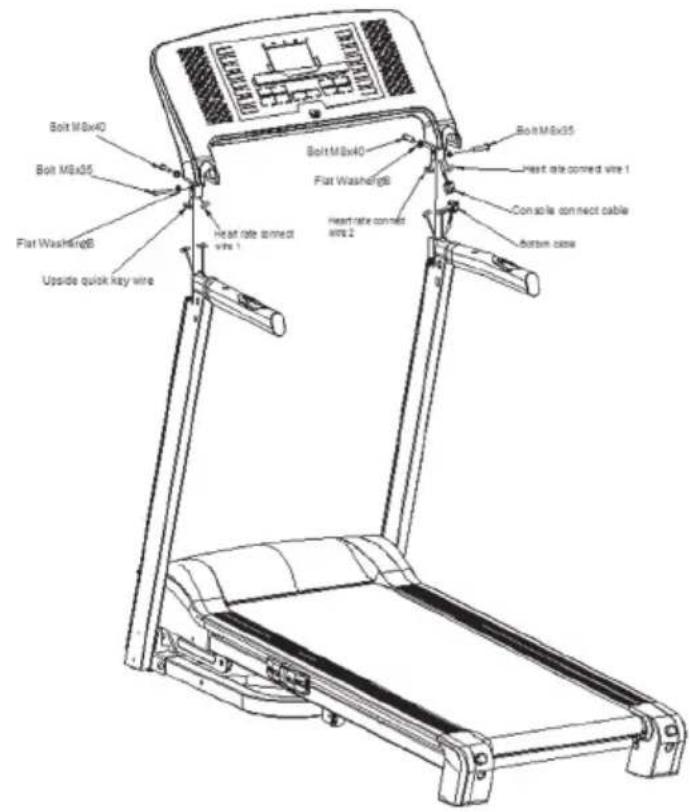
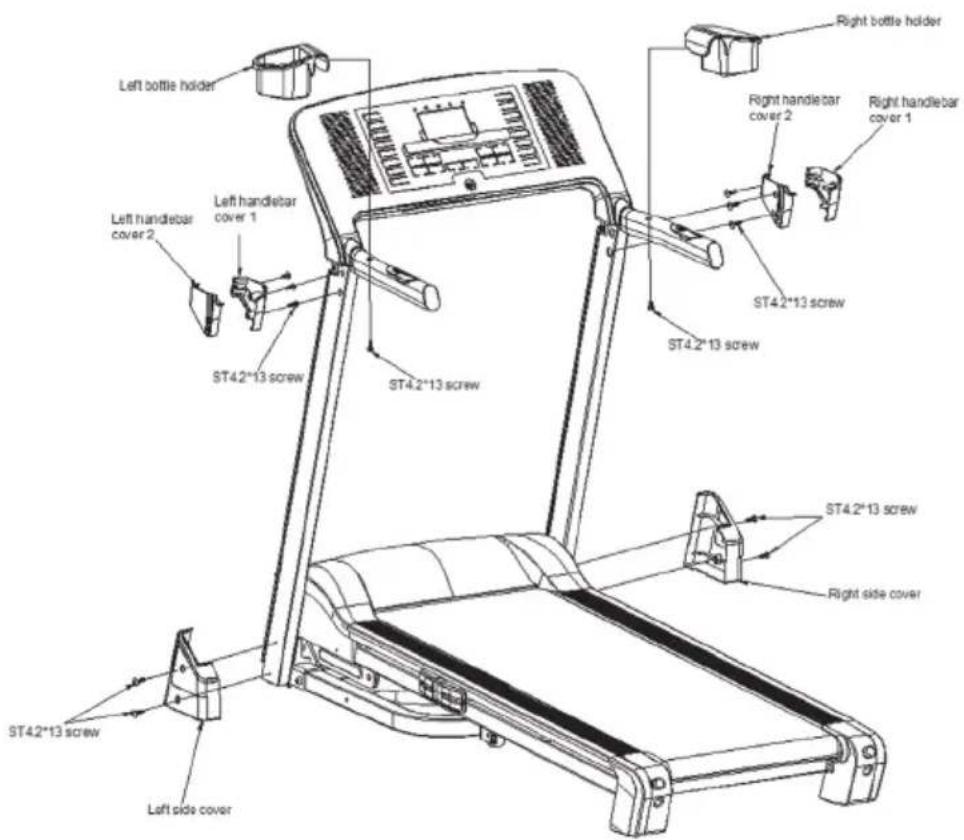
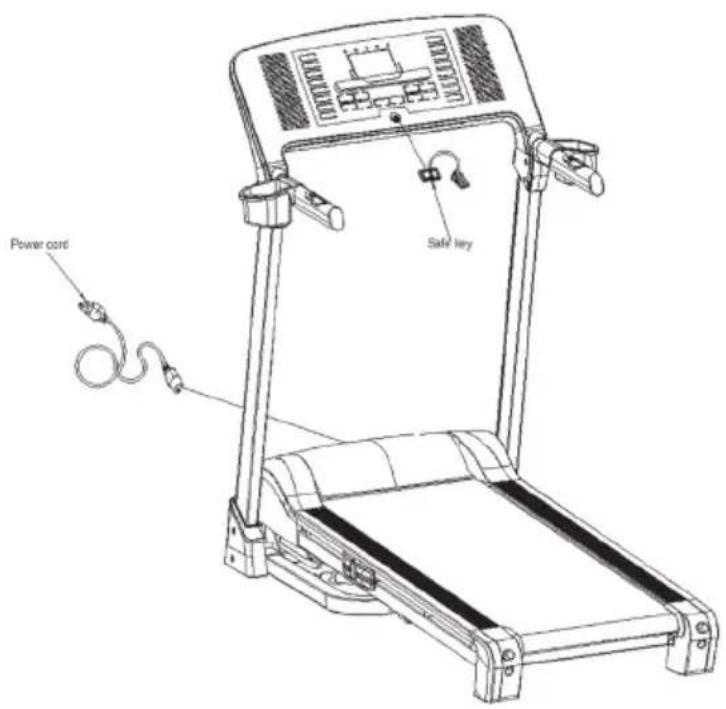
Folding and Unfolding Treadmill
Folding
First, lift the back part of the frame board with your hand till you hear a light sound, which means the folding system has been locked. Running board can't be turned to the opposite direction now.
Unfolding
Place the folded treadmill in a spacious area. Lift the back part of the frame board with your hand, then click the spring to unfold the machine. Please stand back for more than 1.5 meters and release it, then it will open automatically.
Transport
Carefully lift the treadmill at the rear roller area, grasping the two side end caps, and roll the treadmill away.
Warning: In order to unfold the treadmill by yourself, you have to be physically able to lift 20 kg easily. Otherwise seek help of another person to assist you, in order to avoid injuries.
Maintenance and Care
Reasonable cleaning/lubricating should be made to extend the life time of this unit. Performance is maximized when the belt and mat are kept as clean as possible. The mat/deck friction may play a major role in the function and life of your treadmill and that is why we recommend you constantly lubricate this friction point to prolong the useful life of your treadmill. Lubrication is provided with this unit.
WARNING: .The mat/deck friction may play a major role in the function and life of your treadmill and that is why we recommend you constantly lubricate this friction point to prolong the useful life of your treadmill. Failing to do this may void your warranty.
We recommend lubrication of the deck according to the following timetable :
- Light use (less that 3 hours per week) every 6 months
- Medium use (3-5 hours a week) every 3 months
- Heavy use (more than 5 hours per week) every 6-8 weeks
See below procedures for lubricating:
- Switch off the device and unplug the cord.
- Use a soft, dry cloth to wipe the area between the belt and deck.
- Spread lubricant onto the inside surface of belt and deck evenly (make sure the machine is turned off and power is disconnected).
- Periodically lubricate the front and rear rollers to keep them at there peak performance. If the treadmill belt/deck/roller is kept reasonably clean it is possible to expect over 1200 hours.
before additional re-lubing is necessary.
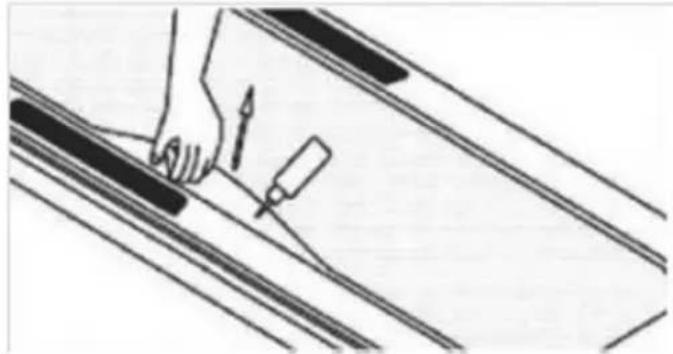
CAUTION: Unplug the device before starting with maintenance and care.
General Cleaning
- Use a soft, damp cloth to wipe the edge of the belt and the area between the belt edge and frame. A mild soap and water solution along with a nylon scrub brush will clean the top of the textured belt. This task should be done once a month. Allow to dry before using.
- On a monthly basis, vacuum underneath your treadmill to prevent dust build up. Once a year, you should remove the black motor shield and vacuum out dirt that may accumulate.
General Care
- Check parts for wear before use.
Always replace the mat if worn and any other defective parts. - If in doubt do not use the treadmill and contact our helpline.
Belt Adjustment
Belt tension adjustment. It is very important for joggers and runners in order to provide a smooth, steady running surface. Adjustment must be made from the right and left rear roller in order to adjust tension with the hexagonal wrench provided in the parts package. The adjustment bolt is located at the end of the rails as noted in diagram below.
Note: Adjustment is through the small hold on the end caps.
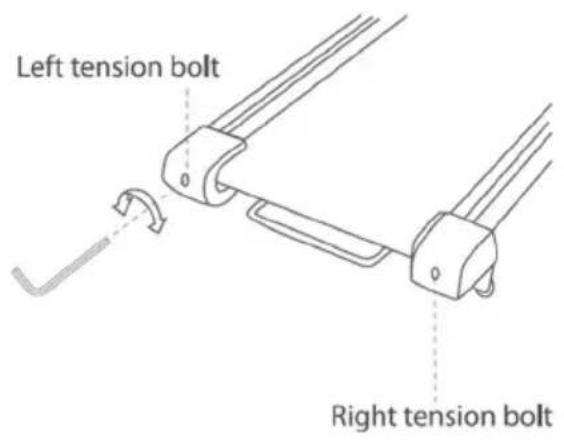
Tighten the rear roller only enough to prevent slippage at the front roller. Turn both the right and left bolt clockwise reasonably and inspect for proper tension. When an adjustment is made to the belt tension, you must also make a tracking adjustment to compensate for the change in belt tension.
Note: DO NOT OVERTIGHTEN - Over tightening will cause belt damage and premature bearing failure.
Belt tracking adjustment:
This treadmill is designed to keep the belt reasonably centered while in use. It is normal for some belts to drift near one side while the belt is running with no one on it. After a few minutes of use, the belt should have a tendency to center itself. If during use, the belt continues to move toward one side, adjustments are necessary.
The procedures are as below:
- First set speed at lowest position.
- Second check the belt shifts to which side.
If the belt shifts to right, tighten the right bolt and loosen the left bolt by using Hexagonal Wrench, until the belt is centered itself; If belt shifts to left, tighten the left bolt and loosen the right bolt by using 6mm Hexagonal Wrench, until the belt is centered. When adjusting the belt using the Hexagonal Wrenches, it is important to adjust the belt in half turn increments. Over adjusting the belt can cause damage to the mat.

Troubleshooting
This treadmill is designed in a way that in the event of an electrical fault, the machine will turn off automatically to prevent any injuries to the user and to prevent damage to the machine (i.e. motor).
When the treadmill behaves erratically, simply reset the treadmill by turning the power switch off, waiting for 1 minute then turning the power button back on.
If, after you have reset the treadmill, it is still not running correctly, please run the self-checking analyse (please refer to Self-Checking) to distinguish what type of error problem the machine is encountering.
| Error Cause and Solution | |
| E0 | No feedback from controller or speed sensor 1. Check the condition of cables and ensure that all plugs are connected between the motor controller and display. 2. Check that the speed sensor and magnet are in correct alignment and that there are no obstructions on the magnet. (The magnet can be found on the front roller near the motor belt). 3. If the running belt moves then displays the E1 error after 10 seconds, replace the speed sensor. 4. If the running belt does not move, replace the controller. |
| E1 | Self-checking failuret 1. If the running belt does not move, replace the controller. 2. Ensure that all plugs are connected between the motor controller and display. 3. Check that the speed sensor and magnet are in correct alignment and that there are no obstructions on the magnet. (The magnet can be found on the front roller near the motor belt). |
| E3 | Self-checking failure 1. If the running belt does not move, replace the controller. 2. Ensure that all plugs are connected between the motor controller and display. 3. Check that the speed sensor and magnet are in correct alignment and that there are no obstructions on the magnet. (The magnet can be found on the front roller near the motor belt). |
| No Power | 1. Check fuses (They are located on the controller under the motor cover). 2. Check power outlet (Plug something else into the power outlet to ensure that the power outlet is working correctly). 3. Check Power Cable (You may need to take it to an electrician). |
Technical Data
Power: 1.75 PS
Net. Weight: 60 kg
Max. bearing weight: 110 kg
Runway size: 130x43 cm
According to the European waste regulation 2002/96/EC this symbol on the product or on its packaging indicates that this product may not be treated as household waste. Instead it should be taken to the appropriate collection point for the recycling of electrical and electronic equipment. By ensuring this product is disposed of correctly, you will help prevent potential negative consequences for the environment and human health, which could otherwise be caused by inappropriate waste handling of this product. For more detailed information about recycling of this product, please contact your local council or your household waste disposal service.
Producer

Producer: Chal-Tec GmbH, Wallstraße 16, 10179 Berlin.
This product is conform to the following European Directives and Norms:
2004/108/EG (EMC)
2006/95/EG (LVD)
2011/65/EG (RoHS)
EN 957
Cher client,