WX312 - Drill WORX - Free user manual and instructions
Find the device manual for free WX312 WORX in PDF.

User questions about WX312 WORX
0 question about this device. Answer the ones you know or ask your own.
Ask a new question about this device
Download the instructions for your Drill in PDF format for free! Find your manual WX312 - WORX and take your electronic device back in hand. On this page are published all the documents necessary for the use of your device. WX312 by WORX.
USER MANUAL WX312 WORX
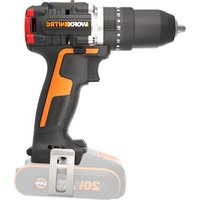
- KEY CHUCK (WX312)
- DEPTH GAUGE
- DRILL/ HAMMER DRILL FUNCTION SELECTOR
- FORWARD AND REVERSE ROTATION CONTROL LEVER
- SWITCH LOCK ON BUTTON
- VARIABLE SPEED CONTROL
- ON/OFF SWITCH
- AUXILIARY HANDLE
-
KEYLESS CHUCK (WX312.1)
-
Not all the accessories illustrated or described are included in standard delivery.
TECHNICAL DATA
Type WX312 WX312.1 (300-329-designation of machinery, representative of Impact Drill)
| WX312 WX312.1 | ||
| Voltage 230-240V~50Hz | ||
| Power input 810W | ||
| No load speed 0-2800/min | ||
| Impact rate 0-44800/min | ||
| Chuck capacity 13mm | ||
| Drilling capacity | Masonry | 16mm |
| Wood | 32mm | |
| Steel | 13mm | |
| Protection class | ☐/II | |
| Machine weight | 2.42kg | |
NOISE / VIBRATION INFORMATION
| A weighted sound pressure L | pA:87.4dB(A) |
| A weighted sound power L | wA:98.4dB(A) |
| KpA & KwA | 3.0dB(A) |
| Wear ear protection when sound pressure is over 80dB(A) | |
VIBRATION INFORMATION
| Vibration total values (triax vector sum) determined according to EN 60745: | |
| Impact drilling into concrete | Vibration emission value ah_id=12.77m/s2 |
| Uncertainty K=1.5m/s2 | |
| Drilling into metal | Vibration emission value ah_id=4.67m/s2 |
| Uncertainty K=1.5m/s2 | |

WARNING: The vibration emission value during actual use of the power tool can differ from the declared value depending on the ways in which the tool is used dependant on following examples and other variations on how the tool is used:
How the tool is used and the materials being cut or drilled. The tool being in good condition and well maintained.
The use the correct accessory for the tool and ensuring it is sharp and in good condition.
The tightness of the grip on the handles and if any anti vibration accessories are used.
And the tool is being used as intended by its design and these instructions.
This tool may cause hand-arm vibration syndrome if its use is not adequately managed.

WARNING: To be accurate, an estimation of exposure level in the actual conditions of use should also take account of all parts of the operating cycle such as the times when
the tool is switched off and when it is running idle but not actually doing the job. This may significantly reduce the exposure level over the total working period.
Helping to minimise your vibration exposure risk.
ALWAYS use sharp chisels, drills and blades
Maintain this tool in accordance with these instructions and keep well lubricated (where appropriate)
If the tool is to be used regularly then invest in anti vibration accessories.
Avoid using tools in temperatures of 10^ or less
Plan your work schedule to spread any high vibration tool use across a number of days.
ACCESSIONS
Auxiliary handle 1
Depth gauge 1
Chuck key (WX312) 1
HSS drill bit: 5,6,8mm (Each 1 pc WX312.1) 3
Masonry drill bit: 6, 8,10mm (Each 1 pc WX312.1) 3
We recommend that you purchase your accessories from the same store that sold you the tool. Use good quality accessories marked with a well-known brand name. Choose the type according to the work you intend to undertake. Refer to the accessory packaging for further details. Store personnel can assist you and offer advice.
ADDITIONAL SAFETY POINTS FOR YOUR DRILL
- Wear ear protectors with impact drills. Exposure to noise can cause hearing loss.
- Use auxiliary handles supplied with the tool. Loss of control can cause personal injury.
- Hold power tools by insulated gripping surfaces when performing an operation where the cutting tool may contact hidden wiring or its own cord. Contact with a 'live' wire will make exposed metal parts of the tool 'live' and shock the operator.
SYMBOLS

To reduce the risk of injury, user must read instruction manual

Double insulation

Warning

Wear ear protection

Wear eye protection

Wear dust mask
This product has been marked with a symbol relating to removing electric and electronic waste. This means that this product shall not be discarded with household waste but that it shall be returned to a collection system which conforms to the European Directive 2002/96/CE. It will then be recycled or dismantled in order to reduce the impact on the environment. Electric and electronic equipment can be hazardous for the environment and for human health since they contain hazardous substances.
OPERATION

NOTE: Before using the tool, read the instruction book carefully.
INTENDED USE
The machine is intended for impact drilling in brick, concrete and stone as well as for drilling in wood, metal and plastic.
1. AUXILIARY HANDLE (See Fig. A)
Slide the handle onto the drill and rotate to the desired working position. To clamp the auxiliary handle rotates the handgrip clockwise. To loosen the auxiliary handle rotate the hand grip anti-clockwise. Always use the auxiliary handle.

WARNING! Always check and rotate the handle tightly before going to avoid any accident.
2. INSTALLING THE DEPTH GAUGE (See Fig.B)
The depth gauge can be used to set a constant depth to drill. To use the depth gauge, loosen the handle by rotating the bottom section of handle anti-clockwise. Insert the depth gauge through hole in handle. Slide the depth gauge to required depth and tighten fully.
3. INSERTING A TOOL INTO CHUCK (See Fig.C1,C2,C3) KEY CHUCK (1) (WX312)
Remove chuck key from key storage tab at base of drill handle, place key into chuck, turn key anti-clockwise to undo/loosen chuck, inset drill/ tool and firmly tighten chuck by turning key clockwise. Remove key and replace in storage tab at base of drill handle.(See Fig. C1)
KEYLESS CHUCK (9) (WX312.1)
First pull the locking sleeve (a) backward until you hear a "click" sound. Then, while holding the locking sleeve, rotate and loosen the front section of the chuck to open the chuck jaws. Insert the drill bit into the chuck jaws, and while holding the locking sleeve, rotate and tighten the front section in the opposite direction. Ensure that the drill bit is in the center of the chuck jaws. Finally, push the locking sleeve forward until you hear a "click" sound. Your
drill bit is now locked in the chuck. (See Fig.C2,C3)
4. ON/OFF SWITCH
Depress the switch to start the tool and release it to stop your tool.
5. SWITCH LOCK-ON BUTTON (See Fig. D)
Depress on/off switch then lock-on button, release on/off switch first and lock-on button second. Your switch is now locked on for continuous use. To switch off your tool just depress and release the on/off switch.
6. VARIABLE SPEED CONTROL (See Fig. E)
Adjust the variable speed control to increase or decrease the speed according to the material and accessory to be used (also possible during no load operation). Low speed will provide low torque and high speed gives higher torque.
7. FORWARD AND REVERSE ROTATION CONTROL (See Fig. F)
For drilling use forward rotation marked (lever is moved to the left). Only use reverse rotation marked (lever is moved to the right) to remove screws or release a jammed drill bit.
NOTE: Never move the forward/reverse switch whilst the drill in operation or the on/off switch is locked as this will damage the drill.
8. HAMMER OR DRILLING CONTROL (See Fig. G)
When drilling masonry and concrete push the drill/impact action selector switch into the hammer position "T". When drilling wood, metal, plastic push the switch into the drill position "S".
WORKING HINTS FOR YOUR DRILL
1. Drilling masonry and concrete
Select the drill/impact action selector switch to the "hammer symbol" position. Tungsten
carbide drill bits should always be used for drilling masonry, concrete etc with a high speed.
2. Drilling steel
Select the drill/impact action selector switch to the "drill symbol" position. HSS drill bits should always be used for drilling steel with a lower speed.
3. Pilot holes
When drilling a large hole in tough material (i.e. steel), we recommend drilling a small pilot hole first before using a large drill bit.
4. Drilling tiles
Select the drill/impact action selector switch to the "drill symbol" position to drill the tile. When tile has been penetrated, switch over to "hammer symbol" position.
5. Cool the motor
If your power tool becomes too hot, set the speed to maximum and run no load for 2-3 minutes to cool the motor.
MAINTENANCE
Remove the plug from the socket before carrying out any adjustment, servicing or maintenance.
Your power tool requires no additional lubrication or maintenance.
There are no user serviceable parts in your power tool. Never use water or chemical cleaners to clean your power tool. Wipe clean with a dry cloth. Always store your power tool in a dry place. Keep the motor ventilation slots clean. Keep all working controls free of dust. Occasionally you may see sparks through the ventilation slots. This is normal and will not damage your power tool.
If the supply cord is damaged, it must be replaced by the manufacturer, its service agent or similarly qualified persons in order to avoid a hazard. If the replacement of the supply cord is necessary, this has to be done by the manufacturer or his agent in order to avoid a safety hazard.
TROUBLESHOOTING
- If your power tool does not start, check the plug on the power supply first.
- If the drill doesn't work properly, check the drill bit for sharpness, replace drill bit if worn. Check that the drill is set to forward rotation for normal use.
- If a fault can not be rectified, return the tool to an authorized dealer for repair.
ENVIRONMENTAL PROTECTION
This product has been marked with a symbol relating to removing electric and electronic waste. This means
that this product shall not be discarded with household waste but that it shall be returned to a collection system which conforms to the European Directive 2002/96/CE. It will then be recycled or dismantled in order to reduce the impact on the environment. Electric and electronic equipment can be hazardous for the environment and for human health since they contain hazardous substances.
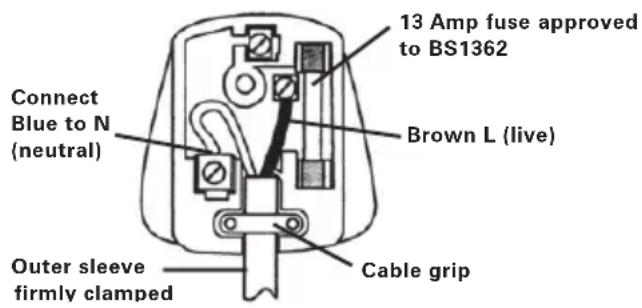
PLUG REPLACEMENT (UK & IRELAND ONLY)
If you need to replace the fitted plug then follow the instructions below.
IMPORTANT
The wires in the mains lead are colored in accordance with the following code:
Blue = Neutral
Brown = Live
As the colors of the wires in the mains lead of this appliance may not correspond with the colored markings identifying the terminals in your plug, proceed as follows. The wire which is colored blue must be connected to the terminal which is marked with N. The wire which is colored brown must be connected to the terminal which is marked with L.

WARNING: Never connect live or
neutral wires to the earth terminal of the Only fit an approved 13ABS1363/A plug he correct rated fuse.
NOTE: If a moulded plug is fitted and has to be removed take great care in disposing of the plug and severed cable, it must be destroyed to prevent engaging into a socket.
DECLARATION OF CONFORMITY
We,
POSITEC Germany GmbH
Declare that the product,
Description WORX Impact drill
Type WX312 WX312.1
(300-329-designation of machinery, representative of Impact drill)
Function Boring holes in various materials
Complies with the following directives,
2006/42/EC
2004/108/EC
2011/65/EU
Standards conform to
EN 55014-1
EN 55014-2
EN 61000-3-2
EN 61000-3-3
EN 60745-1
EN 60745-2-1
The person authorized to compile the technical file,
Name Russell Nicholson
Address Positec Power Tools (Europe)
Ltd, PO Box 152, Leeds, LS10 9DS, UK


2014/01/16
Leo Yue
POSITEC Quality Manager
HSS Bohrer 5, 6,8mm (Je 1 Stk WX312.1) 3
Mauerwerk-Bohrspitze 6, 8,10mm (Je 1 Stk WX312.1) 3
Ltd, PO Box 152, Leeds, LS10 9DS, UK


2014/01/16
Leo Yue
INFORMATIONS RELATIVE AUX VIBRATIONS
Forets HSS 5,6,8mm (1 pc chacun WX312.1) 3
Embout de perceuse 6, 8,10mm (1 pc chacun WX312.1) 3
Codice WX312 WX312.1
Ltd, PO Box 152, Leeds, LS10 9DS, UK


2014/01/16
Leo Yue
PORTABROCA SIN LLAVE DE (9) (WX312.1)
WAARSCHUWING: Controller
Ltd, PO Box 152, Leeds, LS10 9DS, UK


2014/01/16
Leo Yue
HSS furoszár: 5,6,8mm (1 pc WX312.1) 3
FúróSZár falazathoz: 6, 8,10mm (1 pc WX312.1) 3
Complies with the following Directives, 2006/42/EC 2004/108/EC 2011/65/EU
Capăt burghiu HSS (WX312.1) 3
KLICOVÉ UPÍNADLO (1) (WX312)
BEZKLIĆOVÉ UPÍNADLO (9) (WX312.1)
HSS drill bit Vrták HSS (WX312.1) 3
Masonry drill bit Vrták do muriva (WX312.1) 3
PekomeHdyeTc npno6peTaB BCE npHaIeXHoCTN B TOM Je MaRa3InHe, rJe 6bl npno6peTeH INCTpyMeHT. IcNoJIb3yIte KaueCTBeHHbIe npHaIeXHoCTN C yKa3aHnEm O6IeN3BeCTHOI
ToproboM MapK. 3a 6oone noDpo6Hoi nHΦopMauné o6paTntecb K pa3dely «PekomeHaunno IocnOJIb3OBaHIO nepΦopatopa» B 3TOI INCTpyKUnn nn CBeDeHnma H naKaOBKe npHaadJeKHOCTeN.
IOMOuB N KOHCyIbTaUH MoXHO TaKHe NOnyuHTb y npOaBuca.
DODATOČNÉ
BEZPEČNOSTNÉ
POKNY PRI PRÁCI S
VRTAČKOU
you've got the power
Copyright © 2014, Positec. All Rights Reserved.
2SDI103PK11001A6