
U947CH1 - Iron ROTEL - Free user manual and instructions
Find the device manual for free U947CH1 ROTEL in PDF.
| Product type | Steam generator with iron |
| Brand and model | Rotel U947CH1 |
| Power supply | 220-240 V ~ 50/60 Hz |
| Rated power | 2300 W |
| Maximum steam pressure | 7.5 bar |
| Steam output | 60 / 90 / 130 g/min (adjustable low, medium, high) |
| Water tank capacity | 1800 ml (1.8 L) |
| Dimensions and weight | Not provided by the manufacturer |
| Main functions | Dry ironing, steam ironing, steam burst, vertical ironing, automatic shut-off after 10 min of inactivity |
| Settings | Thermostat (3 positions), steam flow selector (low/medium/high), continuous steam control, steam burst by double press |
| Safety | Automatic shut-off, iron lock on base, insulating iron rest, overheat protection |
| Light indicators | Power-on light, temperature light, empty tank light, descaling light |
| Iron soleplate | Not specified (material not disclosed) |
| Maintenance and cleaning | Clean soleplate with damp cloth and mild detergent; manual descaling of the tank via drain valve (follow indicator lights) |
| Storage | Store cord in storage groove, lock iron, keep in a cool, dry place |
| Warranty and repairability | Manufacturer's warranty (details in the manual); repairs by authorized service; wear parts excluded |
| Compliance | CE 2014/35/EU, 2014/30/EU |
Frequently Asked Questions - U947CH1 ROTEL
User questions about U947CH1 ROTEL
0 question about this device. Answer the ones you know or ask your own.
Ask a new question about this device
Download the instructions for your Iron in PDF format for free! Find your manual U947CH1 - ROTEL and take your electronic device back in hand. On this page are published all the documents necessary for the use of your device. U947CH1 by ROTEL.
USER MANUAL U947CH1 ROTEL
natural_image
Rotel air iron machine with purple and white body, no visible text or symbols on the device itself• GEBRAUCHSANWEISUNG
- MODE D'EMPLOI
• ISTRUZIONI PER L'USO
• INSTRUCTIONS FOR USE
13
Deutsch
- Water tank
- Water tank handle
- Filling aperture
- Soleplate
- Temperature indicator light
- Iron handle
- Steam boost button
- Temperature dial
- Iron locking system
- Iron
- Insulated iron rest
- Control panel
- Cord storage groove
- Base unit
BEDIENFELD
- Panneau de commande
- Pannello di comando
- Control panel
- Betriebsanzeige
- Kontrollleuchte „Entkalkung“
- Kontrollleuchte „Wassertank leer“
- Dampfregler
- Hohe Dampfleistung
- Mittlere Dampfleistung
- Niedrige Dampfleistung
-
Ein-/Aus-Schalter
-
Témoin lumineux de mise sous tension
- Voyant « Détart-rage »
- Voyant « Réservoir vide »
- Bouton de sélection du débit vapeur
- Débit élevé
- Débit moyen
- Débit faible
-
Bouton Marche/Arrêt
-
Spia luminosa messa sotto tensione
- Spia "decalcificazione"
- Spia "serbatoio vuoto"
- Pulsante controllo del vapore
- Getto di vapore forte
- Getto di vapore medio
- Getto di vapore de- bole
-
Pulsante on/off
-
Power indicator light
- Descaling indicator light
- Refill indicator light
- Steam level control button
- High steam level
- Medium steam level
- Low steam level
- Power switch
TECHNISCHE DATEN
Spia luminosa "decalcificare" 40
- Safety instructions....48
- Main features of the steam generator iron .... 52
Automatic shut off....52
Cord storage groove....52
Descaling indicator light 52
Filling aperture 52
Iron locking system....52
Power switch 53
Refill indicator light 53
Steam boost button....53
Steam level control button....53
Steam shot....53
Temperature dial....53
- Before First Use....54
Notes on new appliance 54
Notes on water....54
• Temperature guide....55
• Using the steam generator iron 55
Dry ironing....55
Steam ironing 56
Vertical ironing 56
Refilling during use 57
• After use....57
- Cleaning and maintenance....57
Descaling the steam generator 58
- Storage .... 58
- Ironing tips....59
- Setting Chart....59
- Disposal 60
D/F/I/E 61
• Garantie / Garantie / Garanzia / Warranty 61
Deutsch
natural_image
Line drawing of a steam iron with three blades (no text or symbols)Einfüllöffnung
Fig.2
natural_image
Line drawing of two different household appliances with attached wires, one showing a cord and the other a handle (no text or symbols)Fig.1
• VOR DEM ERSTEN GEBRAUCH
natural_image
Line drawing of a steam iron being handled, showing the handle and internal structure (no text or symbols)natural_image
Technical line drawing of a mechanical assembly with no visible text or symbolsAbb.4
natural_image
Line drawing of a vintage-style air purifier device with no visible text or symbolsFig.5
• BÜGEL-TIPPS
natural_image
Line drawing of a hand using a steam iron to clean air with three fluelets (no text or symbols)natural_image
Line drawing of a steam iron device being connected to a cable, with an arrow indicating the motion (no text or symbols present)Fig.1
natural_image
Line drawing of a steam iron being handled, showing part assembly and side view (no text or symbols)Fig.3
• APRES UTILISATION
natural_image
Line drawing of a portable steam cooker with handle and front panel (no text or symbols)Fig.5
• CONSEILS DE REPASSAGE
natural_image
Line drawing of two steam covers with attached wires, one showing a hand pressing down (no text or symbols)Fig.1
Getto di vapore
natural_image
Line drawing of a steam iron with three flue holders (no text or symbols)Fig.2
Spia luminosa "decalcificare"
natural_image
Line drawing of a steam iron being placed into a bag, showing part assembly and handle mechanism (no text or symbols)natural_image
Technical line drawing of an oval-shaped mechanical component with internal components and a central circular feature (no text or symbols)Fig. 4
natural_image
Line drawing of a cartoon-style backpack with a smiling face and straps (no text or symbols)Fig.5
Please read all instructions before using the device.
○ This appliance may be used by persons with limited physical, sensory or mental abilities or lack of experience and/or knowledge, if they are supervised by persons responsible for their security or if they have been instructed about the safe use of the appliance and therefore fully understand the hazards involved.
○ This appliance must not be used by children; the appliance and its power cord must be kept away from children.
- The appliance shall always be disconnected from the mains when not in use or when left unattended, and before assembling, disassembling or cleaning. It must be unplugged by grasping the plug and never by pulling the cord.
Before plugging into a socket, it shall be ensured that the mains voltage matches the voltage specified on the rating plate of the appliance.
○ The appliance must be plugged into an outlet that is properly installed and earthed.
- The electrical installation must be in accordance with the regulations of the country where the unit is used. In case of doubt, it shall be checked and/or modified by a qualified electrician.
- The appliance shall not be operated with a damaged steam/supply cord or plug, or after the appliance malfunctions or leaks, or has been damaged in any manner. It shall be returned to the nearest authorized service facility for examination, repair or adjustment.
- Incorrect repair attempt, assembly, reassembly or use of any accessory attachment not recommended or sold by the manufacturer may cause fire, electric shock or personal injury and will void the manufacturer's warranty.
○ This appliance is not intended to be used with an adapter, a multi-socket outlet and/or an extension cord. Should it be unavoidable, they must comply with the current safety regulations and not exceed the maximum power rating.
○ Packaging materials (plastic bags, polystyrene foam, etc.) are a potential source of danger and must be kept out of reach of children.
○ This appliance is designed for domestic use only.
Handling precautions:

CAUTION - HOT: Burns can occur from touching hot parts, water or steam emitted by the appliance, or the iron soleplate.
- Handle with care, especially when ironing vertically. Never direct the steam towards people or animals.
- Do not touch the steam generator iron with wet or damp hands or feet.
- Do not immerse the appliance in liquid.
- Do not expose the steam generator iron to rain, sun, mist, dust etc. Do not leave water inside the tank if the room temperature may drop below 0°C.
○ Ensure that the mains cord and the steam hose never touch the hot soleplate of the iron.
- Do not overfill the tank and do not add softeners or other products to water.
- Do not rinse the boiler tank under running water.
- Never attempt to unscrew the cleaning valve of the boiler if the steam generator is running and connected to the power supply.
○ Always use the steam generator iron on a flat and stable surface resistant to high temperatures, such as an ironing board.
- Do not scratch the soleplate – avoid buttons, zips, hooks etc.
○ Do not iron very wet fabrics.
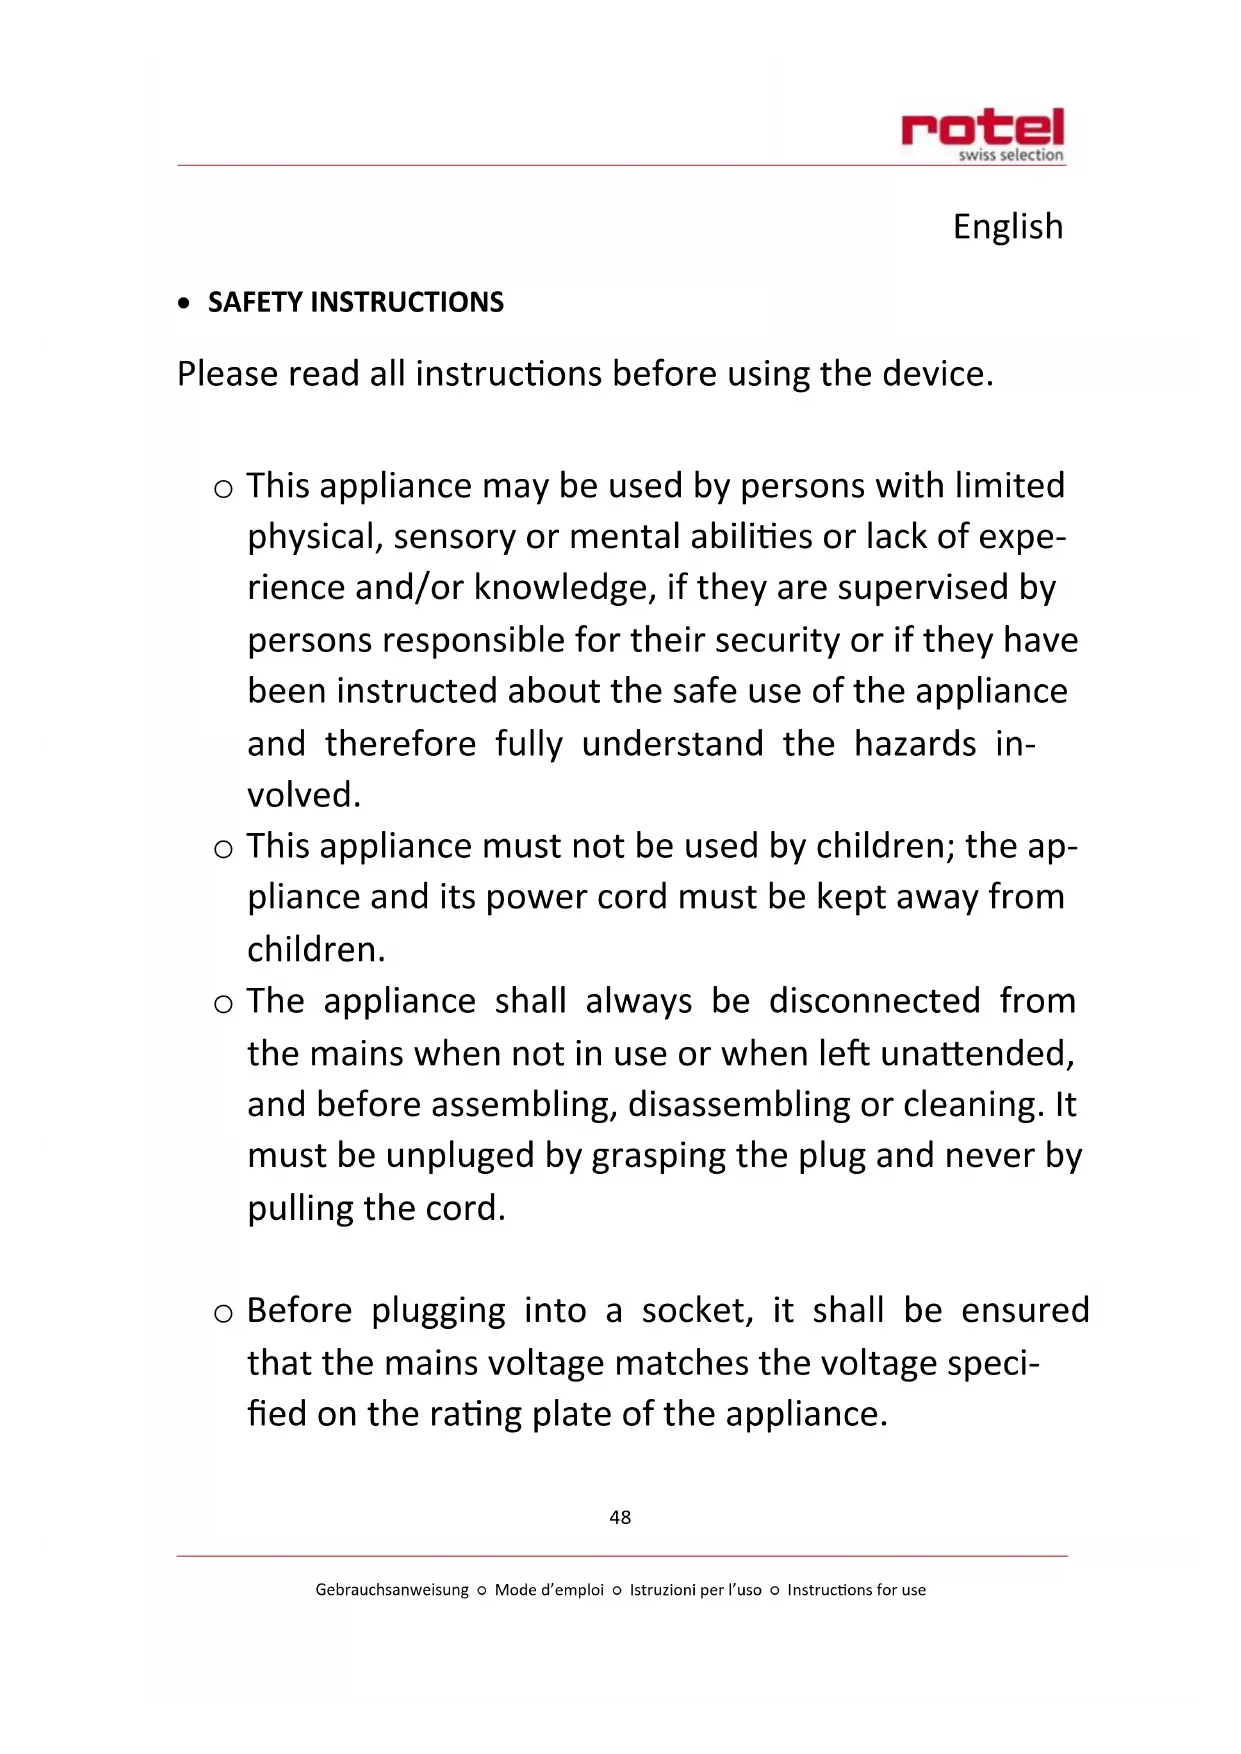
• MAIN FEATURES OF THE STEAM GENERATOR IRON
Automatic shut off
- The appliance will automatically turn off if the steam boost button is unused for ten minutes.
Cord storage groove
For a proper storage of the appliance when not in use, wrap the steam supply hose and the power cord around the cord storage groove. For further details, see chapter "STORAGE".
Descaling indicator light
If the boiler requires draining because of the scale deposit inside the boiler, the descaling indicator light will illuminate. Follow the steps described in "CLEANING AND MAINTENANCE", so that scale deposits will not stain the laundry. The indicator light will go out only after the scale has been removed.
Filling aperture
The aperture allows filling water into the water tank. The "MAX"-filling line on the water tank shall not be exceeded.
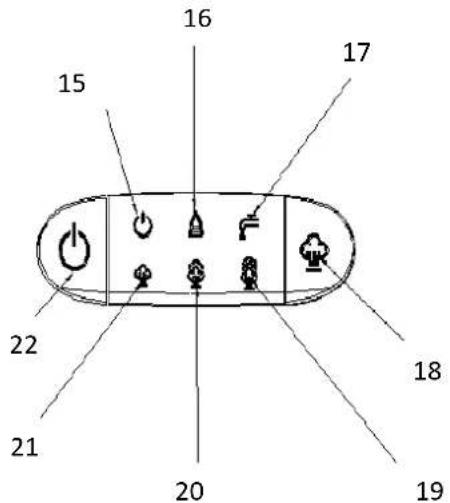
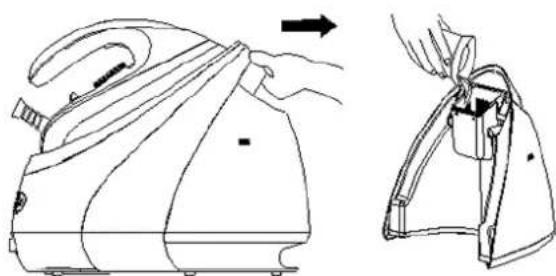
Iron locking system
To lock the iron on the base unit, put it first on its insulated iron rest and push the locking button to position “” Once the iron has been properly locked, the whole steam generator iron can be carried by its handle (Fig. 1). To unlock before use, push the locking button to position “
natural_image
Line drawing of two steam covers with attached cables, one showing a cable being inserted (no text or symbols)Fig.1
Power switch
- Press the power switch to start the appliance. The power indicator light will turn on, and the indicator light of the low steam level (default setting) will flash.
- Press the power switch for two seconds to disconnect the appliance from the power supply.
Refill indicator light
○ If the water level in the tank gets too low while steam ironing, the refill indicator light will illuminate.
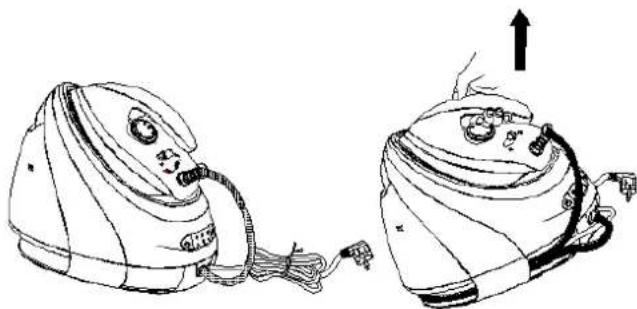
Steam boost button
During ironing, firmly press and hold the steam boost button to release a strong, continuous flow of steam, delivered through the soleplate (Fig.2).
natural_image
Line drawing of a steam iron with three spools of air underneath (no text or symbols)Steam level control button
Fig.2
○ Select the required steam level between low (standard), medium or high by pressing the steam level control button. The corresponding indicator light flashes until the selected steam level has been reached, then remains lit.
Steam shot
- Press the steam boost button twice within one second to activate the steam shot function, and remove effortlessly even the toughest creases.
Temperature dial
Turn the dial to set the required ironing temperature, based on the garment to be ironed.
The temperature indicator light is on while the appliance is heating up. Once the selected temperature has been reached, it will switch off. This indicator light goes on and off during ironing, showing that the appliance periodically heats up to maintain the selected temperature.
- BEFORE FIRST USE
○ Remove any labels, stickers and packaging from the steam generator iron and the soleplate.
- Place the appliance horizontally on a stable insulated surface, like an ironing board.
o Fully unwind and straighten the power/steam supply cord.
Fill the tank with water without exceeding the "MAX" level, connect the appliance to an earthed socket.
○ Switch on and heat up the steam station to its maximum temperature, then iron an old piece of damp cotton fabric to clean the soleplate.
Notes on new appliance
When turning on the appliance for the first time, an unpleasant smell may be noticed and some white particles may come out of the soleplate. These are harmless and will quickly disappear.
When the appliance is switched on, the steam generator may produce a pumping sound which is normal.
During the heating process of the soleplate, some steam may be released for a few seconds from the soleplate, this is normal.
Notes on water
- In hard water areas, we advise to mix tap water with distilled/demineralised water.
Do not put hot water, perfume, vinegar, starch, descaling agents, ironing aids or other chemicals in the water tank. These contain organic waste or mineral elements that become concentrated when heated and may cause spitting, brown staining or premature wear to the steam generator.
- The use of any unsuited types of water/fluids will void the manufacturer's warranty.
• TEMPERATURE GUIDE
Always check first the label on the garment for the international textile care labelling code:
 | HOT iron (three dots). Steam ironing allowed. |
| [CwCG] | WARM iron (two dots). Steam ironing allowed. |
 | COOL iron (one dot). Steam ironing may be a risk. |
 | Do not iron.Steaming and steam treatments are not recommended. |
• USING THE STEAM GENERATOR IRON
Dry ironing
- Plug the appliance into an earthed socket and press the power switch. The power indicator light turns on.
○ Set the temperature dial to the desired setting, to suit the garment to be ironed. The temperature indicator light will illuminate until the ironing temperature is reached.
WARNING: never touch the hot soleplate while ironing or at any time before the appliance has cooled down!
NOTE: There is no need to put water in the tank or select a steam level for dry ironing. However, press the steam boost button at least once every 10 minutes, or the product will automatically turn off.
Steam ironing
- Remove the water tank and fill it up to or below the "MAX" mark. The capacity of the water tank is 1.8 litres. Gently push the water tank back into its housing, until it locks into place.
o Put the iron on the insulated rest iron of the base unit.
- Plug the appliance into an earthed socket and press the power switch. The power indicator light turns on.
○ Press the steam level control button and the defaulted low steam level indicator light will flash. Select the relevant button to either increase or decrease the steam level.
The selected steam level will be displayed through its indicator light that will stop flashing and illuminate constantly when the selected steam level is reached (low, medium or high).
○ Set the temperature dial to the desired setting, to suit the garment to be ironed. The temperature indicator light will illuminate until the temperature is reached.
○ Firmly press the steam boost button to release continuous steam from the soleplate and steam ironing your garment. Activate the steam shot by pressing this button twice, to remove tough creases.
○ After ironing, press the power switch for about two seconds to turn off the appliance. All indicators lights will turn off. Remove the plug from the wall socket. Leave the iron on its insulated iron rest until it has completely cooled down.
NOTE: Some water may drip from the soleplate if the temperature setting is low. This is normal.
WARNING: The steam supply hose and the soleplate will get hot during use. Avoid direct contact. Never direct the steam toward people to avoid scalding!
Vertical ironing
- Turn the temperature dial to its highest setting.
○ Hold the iron in a vertical position two or three centimetres away from the hanging item.
Press repeatedly the steam button and move the iron gently up and down over the garment while holding it slightly taut with the other hand.
WARNING: The steam is very hot. Do not attempt to remove creases from a garment that is being worn! Never aim the steam at people, plants or animals.
Refilling during use
If the water level in the tank is too low, the refill indicator light will illuminate, a beep will be heard, and the appliance will stop producing steam.
- Place the iron on its insulated iron rest and remove the water tank by grasping its handle. Refill it with water* through the filling aperture (Fig. 3). Do not exceed the maximal capacity of the tank (1.8 litres). *See Notes on water in chapter "Before first use".
- Push it back in position and resume steam ironing once the selected steam temperature has been reached.
natural_image
Line drawing of a steam iron being adjusted for size, shown from front and side views (no text or symbols)Fig.3
- AFTER USE
○ Switch off and unplug the steam generator iron.
○ Empty the water tank to minimise scale deposit inside the appliance. It is not necessary to drain the boiler after each ironing.
- Set the iron on the insulated iron rest of the base unit and push the locking button to position " 🔍
NOTE: The whole steam generator station can now be lifted by grasping the handle.
• CLEANING AND MAINTENANCE
Before cleaning, switch off and unplug the steam generator iron. Leave to cool for two hours at least.
○ Wipe any eventual deposits on the soleplate with a damp cloth or a non-abrasive (liquid) cleaner.
Do not use anything harsh or abrasive cleaners or tools that can scratch or damage its surface or the surfaces of the steam generator.
- Clean the upper part of iron, the insulated iron rest and the base unit with a soft damp cloth. Dry them thoroughly with a clean cloth.
○ Regularly check the power cord/steam supply hose for wear, leak and damage, particularly where it enters the product, as well as the plug.
Descaling the steam generator
When the boiler requires descaling, the descaling indicator light will illuminate and the scale that forms inside the steam generator must be manually rinsed out and removed.
Turn the appliance upside down, place it on a level surface and unscrew the knob (Fig. 4).
○ Empty the boiler over a sink.
○ Using a jug, fill the boiler (in the base unit) with 14 litre of clean water and shake the base gently to clean it.
○ Empty again and make sure no water remains in the boiler.
○ After drainage, tighten up the knob and set the unit base again on a working surface.
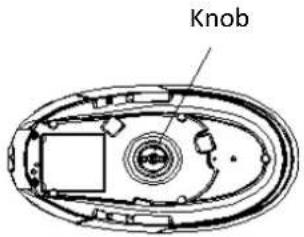
Fig. 4
NOTE: If the water is very dirty, repeat the operation until it comes out clean. Optionally mix a little white vinegar and warm water in a jug or use a diluted descaling solution to descale the steam generator.
WARNING: To avoid a risk of scald, make sure the steam generator has cooled down completely before unscrewing the knob.
- STORAGE
- Turn off and unplug the steam generator iron. Allow to cool down.
- Lock the iron on its base unit and store the power cord/supply hose:
- Fold the steam supply hose in two and wind it along the cord storage groove, then fix it at the cord storage groove;
- Fold the power cord in two and wind it along the cord storage groove, then fix it at the cord storage groove (Fig.5). Store the appliance in a cool and dry place, out of the reach of children and preferably in its original box, to keep it dust-free.
natural_image
Line drawing of a cartoon-style airplane with a helmet and side arm (no text or symbols)Fig.5
- IRONING TIPS
Separate the garments according to their correct ironing temperature. Start with the items that require a lower temperature.
When in doubt about what temperature to use, start by ironing a small section not usually seen when worn, at low temperature. You can always move up the temperature gradually to prevent scorching. Moreover, an iron heats up quicker than it cools down, which save both time and electricity.
- Fabrics such as velvet and wool, and accessories such as gloves, handbags, etc. will regain their brand-new look and texture by passing the iron near the surface of the fabric and pressing the steam button.
- Silk and other fabrics that are likely to become shiny should be ironed inside out only, without steam. Always keeps the iron moving.
- Fabrics made of pure wool (100% wool) may be steamed inside out. Consider setting a high temperature and use a damp cloth as a mat.
- Avoid placing your iron on sharp objects such as zip fasteners and metal buttons, as they could damage the soleplate.
- SETTING CHART
| Fabric | Temperature setting | Ironing Instructions |
| AcetateAcrylicElastaneNylon | o | Dry ironing only.Follow the instructions on the label of the garment.This type of fabric generally requires very gentle ironing. |
| PolyesterSynthetic mixes | o | Dry ironing only.Iron inside out. When ironing mixed fabrics, select the lowest recommended temperature. |
| Silk | oo | Dry ironing only.Iron inside out. |
| WoolLight cottonLight linen | oo | Steam ironing.Iron inside out. Place a thin lint-free cloth over the fabric to avoid it from becoming shiny. |
| CottonLinenStarched fabrics | ooo | Steam ironingDampen the fabric before ironing. Heavier fabrics and starched fabrics can be ironed on the front; darker colours and embroidered garments should be ironed inside out. |
| LinenJeansThick cotton | ooo | Steam ironingUse plenty of steam and iron dark fabrics inside out.Iron labels and cuffs on the right side for better finish. |
- DISPOSAL
- For proper disposal, please return device to a retailer, a service agent or Rotel AG.
European Directive 2012/19/EC concerning Waste Electrical and Electronic Equipment (WEEE) states that household appliances should not be disposed of using the normal solid urban waste cycle. Exhausted appliances should be collected separately to optimise the cost of re-using and recycling materials comprising the machine, while preventing potential damage to public health and the environment. The crossed-out wheeled bin symbol appears on all products to remind owners of the obligations regarding separate waste collection. Owners should contact their local authorities or appliance dealers for further information concerning the correct disposal of household appliances.
This appliance conforms to the following EU directives:

2014/35/EU (Low Voltage Directive) 2014/30/EU (Electromagnetic Compatibility Directive)
• GARANTIE / GARANTIE / GARANZIA / WARRANTY
• 2 JAHRE GARANTIE
• 2 ANS DE GARANTIE
• 2 ANNI DI GARANZIA
• 2 YEARS WARRANTY
○ Warranty commitment
We commit ourselves to repair this device free of charge, should a failure occur within the period of warranty despite proper handling. We repair all defects caused by material or manufacturing faults. The guarantee will be fulfilled either by repairing the device or replacing the defective parts, according to our judgement. A warranty does not cover damages due to wearing parts, damages and defects caused by improper handling or maintenance (such as limescale and commercial use). It will only be granted if either the warranty card stating date of purchase, dealer's stamp and signature, or the purchase receipt is sent with the device to the relevant after-sales service (see address below). Devices shall be returned in their original packaging. Transport costs are to be borne by the purchaser. Remember to specify your address to your sending, as well as a short declaration about the failure, shall the defect not be obvious.
Servicestation:
Service après-vente: Rotel AG


- Deutsch
- BEDIENFELD
- TECHNISCHE DATEN
- Einfüllöffnung
- • VOR DEM ERSTEN GEBRAUCH
- • BÜGEL-TIPPS
- • APRES UTILISATION
- • CONSEILS DE REPASSAGE
- Getto di vapore
- Spia luminosa "decalcificare"
- Handling precautions:
- • MAIN FEATURES OF THE STEAM GENERATOR IRON
- Automatic shut off
- Cord storage groove
- Descaling indicator light
- Filling aperture
- Iron locking system
- Power switch
- Refill indicator light
- Steam boost button
- Steam level control button
- Steam shot
- Temperature dial
- - BEFORE FIRST USE
- Notes on new appliance
- Notes on water
- • TEMPERATURE GUIDE
- • USING THE STEAM GENERATOR IRON
- Dry ironing
- Steam ironing
- Vertical ironing
- Refilling during use
- - AFTER USE
- • CLEANING AND MAINTENANCE
- Descaling the steam generator
- - STORAGE
- - IRONING TIPS
- - DISPOSAL
- • GARANTIE / GARANTIE / GARANZIA / WARRANTY
- ○ Warranty commitment
- Servicestation:
Brand : ROTEL
Model : U947CH1
Category : Iron