DFX600 - Flash Dörr - Free user manual and instructions
Find the device manual for free DFX600 Dörr in PDF.

User questions about DFX600 Dörr
0 question about this device. Answer the ones you know or ask your own.
Ask a new question about this device
Download the instructions for your Flash in PDF format for free! Find your manual DFX600 - Dörr and take your electronic device back in hand. On this page are published all the documents necessary for the use of your device. DFX600 by Dörr.
USER MANUAL DFX600 Dörr
THANK YOU for choosing this DORR quality product.
Please read the instruction manual and safety hints carefully before first use.
Keep this instruction manual together with the device for future use. If other people use this device, make this instruction manual available. This instruction manual is part of the device and must be supplied with the device in case of sale.
DORR is not liable for damages caused by improper use or the failure to observe the instruction manual and safety hints.
01 SAFETY HINTS
CAUTION
Please note the following important hints before first use:
- Do not trigger the studio flash directly in front of the eyes of humans or animals. This may cause an irreversible damage to the retina. Keep a minimum distance of 2,5 m and make sure that people or animals do not look directly into the studio flash.
- The flash tube and the modelling light produce high temperatures, which is also transferred to the reflector. While operation never touch the ignition wire, the flash tube, the modelling light and the reflector - risk of burns and of electric shock!
- Do not touch the modelling light and the flash tube with bare hands. Greasy fingerprints may cause the bursting of the lamps during operation! Wear thin gloves e.g. made of cotton or microfiber or use a cloth for inserting or replacing the lamps.
Cool down the studio flash before making any installations or before you store it. - Remove the protection cap before use!
Make sure that the studio flash is mounted stable and secure and cannot tip over. Risk of fire! - Only operate with the supplied original cables. Do not use an extension cord.
Take care that that nobody stumbles over the cable connections. - Keep away from flammable materials.
- The modelling light is only designed to illuminate the object while the camera settings are made. It is not suited as a permanent light since it produces high temperatures which can harm flash accessories like conical shoots, softboxes, honey combs or others (risk of melting).
- Only for photographic purposes. Not suited for permanent room lightning.
- If you notice a smell of burning, switch off the studio flash immediately at the main switch and disconnect from power. Risk of fire! Please contact your dealer.
- Do not touch or operate the device with wet hands or when standing on wet floor.
- Ensure sufficient ventilation during operation. Never cover the ventilation slots.
After use turn of the device at the main switch and disconnect from power source. - Inside the studio flash may occur high voltage. Do not attempt to repair the device by yourself. Risk of electric shock! When service or repair is required, contact qualified service personnel.
- Protect the device against impacts. Do not use the device if it has been dropped. In this case a qualified electrician should inspect the device before you use it again.
- Protect the device from rain, moisture, direct sunlight and extreme temperatures.
- Do not use the device nearby mobile phones and devices that generate strong electromagnetic fields.
- People with physical or cognitive disabilities should use the device with supervision.
- People with cardiac pacemakers, defibrillators or any other electrical implants should maintain a minimum distance of 30~cm , as the device generates magnetic fields.
- This device is not a toy. To prevent accidents and suffocation keep the device, the accessories and the packing materials away from children and pets.
- Protect the device against dirt. Never use aggressive cleansing agents or benzine to clean the device. We recommend a soft, slightly damp microfiber cloth to clean the outer parts of the device. Make sure to take off the device from power before cleaning!
- Store the device in a dust-free, dry and cool place.
- If the device is defective or without any further use, dispose of the device according to the Waste Electrical and Electronic Equipment Directive WEEE. For further information, please contact your local authorities.
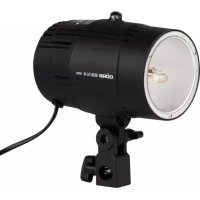
02 | PRODUCT DESCRIPTION
The powerful flashes of the DORR DFX series - designed for optimal illumination of all possible photo scenes in photo studios. Exchangeable light formers make it easy to cope with the different requirements during portrait sessions, beauty and fashion shoots, product photography, etc.
- Powerful - master all challenges of todays' photographic tasks
Bowens bayonet - the use of various light formers allows to create various light scenes
Built-in umbrella holder - for use of reflector and diffuser umbrellas - Robust metal housing with guide handle - perfect for a busy studio schedule
- Dimmable modelling light - see shadows before releasing
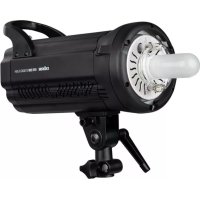
03|NOMENCLATURE
1 Protective cover
2 Release knob for protective cover/light former
3 Housing
4 Guide handle
5 Locking screw umbrella holder
6 Tripod socket
7 Locking screw tripod socket
8 Modelling light
9 Flash tube
10 Bayonet
11 Umbrella holder
12 Locking lever
13 Release button tripod socket
14 Photo cell/slave cell
15 Power level indicator
16 Off button photo cell
16a) LED photo cell
18 Power adjustment button - flash and modelling light
17 Off button acoustic standby signal
17a) LED acoustic standby signal
18a) increase power
18b} decrease power
19 Flash test button
19a) LED standby signal
20 On/Off button modelling light
20a) LED modelling light
21 SYNC Socket
22 Power plug socket
23 Main switch (O = Off / I = On)
24 Fuse compartment
04BEFOREUSE
04.1 REMOVE PROTECTIVE COVER
CAUTION
Make sure to remove the protective cover (1) before using the studio flash.
In order to remove the protective cover (1) slide the release knob (2) in arrow direction and hold it down - at the same time turn the protective cover (1) counter clockwise and remove it (1).
CAUTION
Let the flash cool down before assembling the protective cover back again.
In order to install the protective cover (1) after usage, place the 3 connecting pins over the 3 bayonet fittings and turn the protective cover (1) clockwise until you hear the connectors snap into place.
04.2 MOUNTING ONTO A LIGHT STAND [OPTIONAL ACCESSORIES]
DORR DFX studio flashes fit every studio light stand. DORR offers a wide range of light stands. Loosen the tripod socket locking screw (7) and place the studio flash onto the tripod socket (6) while pressing the tripod socket release button (13). When the flash is firmly secured on the light stand tighten the tripod socket locking screw (7).
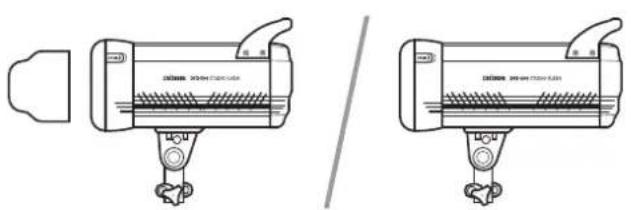
Loosen the locking lever (12) in order to adjust the flash tilt angle.
Use the guide handle (4) to adjust the flash angle when using large and heavy soft boxes.
CAUTION
Never touch the housing while adjusting the flash angle - risk of burns. Always use the guide handle (4).
In order to remove the flash from the light stand, unscrew the tripod socket locking screw (7). Press the tripod socket release button (13) and remove the flash.
04.3 USE OF LIGHT FORMERS (OPTIONAL ACCESSORIES)
Use light formers to create impressive light scenarios. Depending on the light former, picture results may vary. Use light formers to create hard or soft light. The DORR DFX studio flash series offer a Bowens bayonet to attach light formers.
You may use all light formers with Bowens bayonet. Within our DORR accessories assortment we carry a wide choice of DORR light formers as well as an optional Bowens adapter (Item No. 372960).
Furthermore optionally available:
DORR standard reflector for DFX-300/600
Item No. 371350
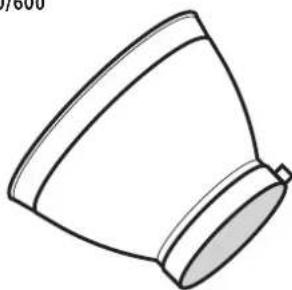
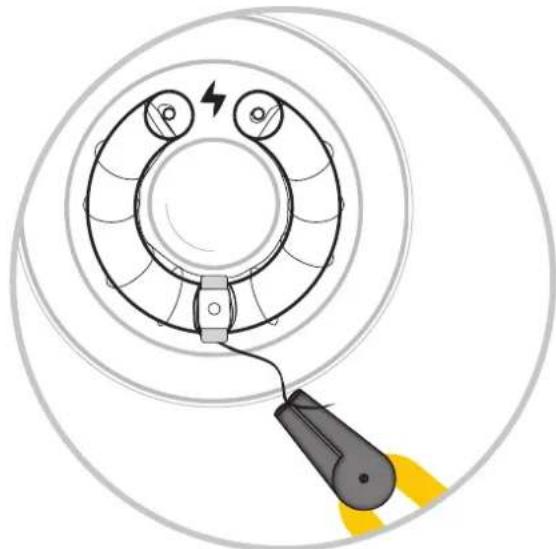
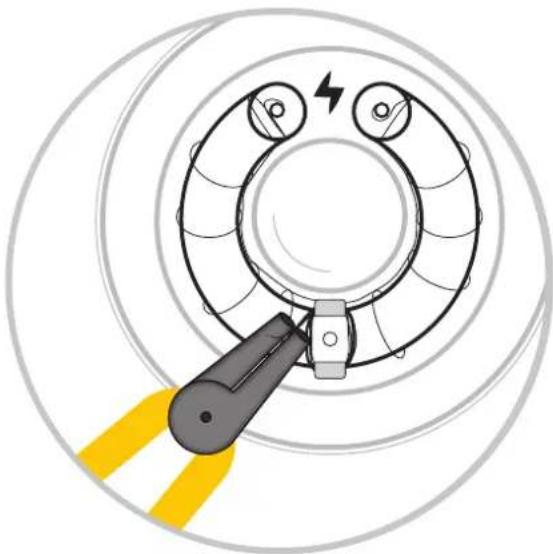
Place the light former onto the bayonet (10) matching the 3 connecting pins over the 3 bayonet fittings and move the light former clockwise until you hear the connectors snap into place.
In order to remove the light former slide the release knob (2) in arrow direction und hold it down - at the same time move the light former counter clockwise and remove it.

CAUTION
Let the flash cool down before attaching or removing any light former.
04.4 USE OF REFLECTOR AND DIFFUSER UMBRELLAS (OPTIONAL ACCESSORIES)
Open the reflector or diffuser umbrella. Place the umbrella bar in the umbrella holder (11) and tighten the umbrella holder locking screw (5).

CAUTION
Mind the minimum distance of 30cm between umbrella and flash bulb - Risk of fire!
DORR offers a wide choice of reflector and diffuser umbrellas.

COMMISSIONING
05.1 POWER CONNECTION

CAUTION
CAUTION: Before connecting or removing the power connection, make sure the main switch (23) is on position 0 = Off .
Insert the supplied mains adapter into the power plug socket (22) of your flash and connect to an electric outlet.
05.2 TURNING ON/FLASH TEST BUTTON
Turn on the flash at the main switch (23) position I = On . The main switch (23) lights up red and the power level indicator (15) is active. As soon as the LED standby signal (19a) lights up in red colour, the flash is ready to release.
Press the flash test button (19) to release a test flash.
06 | OPERATION
CAUTION
During operation never touch the flash tube or the modelling light - danger of burns and electric shock!
06.1 FLASH TRIGGER
There are several possibilities to trigger your DORR DFX studio flash:
06.1.1 Flash triggering through remote flash trigger
(optional)
We recommend triggering your flash with a remote flash trigger which works wireless and reliable. You will need an optional remote trigger kit, consisting of a remote transmitter and a remote receiver. The remote transmitter is connected with the hot shoe of your camera while the remote receiver is connected with the SYNC socket (21) of your studio flash.
06.1.2 Flash triggering via SYNC cord (optional)
Professional cameras offer a SYNC jack. Connect a SYNC cord (optional) to the SYNC socket of your flash (21) and the PC jack socket of your camera. Releasing your camera triggers the connected studio flash at the same time.
06.1.3 Flash triggering through IR flash (optional)
An IR flash (optional) emits light in infrared spectrum. IR light is invisible for human eyes; nevertheless it will be recognized by the incorporated photo cell/slave cell (14) and triggers the flash. Press photo cell On/Off button (16) to turn this function on or off. When activated, the photo cell LED (16a) will light up in red. Caution: The photo cell and IR flash need to be in direct line of sight in order to trigger correctly. Any object within the line of sight might cause the flash not to trigger.
06.1.4 Flash triggering with another flash (optional)
The DORR DFX studio flash may be triggered e.g. with an on-camera flash. Mind to turn off the pre-flash function of your on-camera flash as the photo cell/slave cell (14) will be triggered by this signal. Make sure to turn the power of the camera flash to a minimum, e.g. 1/128. This setting allows using the light of the on-camera flash only to trigger the DORR DFX studio flash, without having another disturbing light source.
06.2 TAKING PICTURES WITH DORR DFX STUDIO FLASH
After selecting the trigger mode (radio, IR flash, flash, sync cord) turn on your camera and the DORR DFX studio flash (main switch (23) position I = On).
06.3CAMERA SETTINGS
06.3.1 ISO
Choose lowest ISO setting in your camera menu, e.g. ISO 100 to achieve optimum picture results.
06.3.2 Exposure time
Choose the exposure time not shorter than the flash synchronization time of your camera. For most cameras this value is about 1/250s (for details please see the technical data of your camera). As standard value for studio photography 1/125s was established. In studio photography the exposure time has no influence on the picture result.
06.3.3 Aperture
Set the aperture to the desired value, e.g. f11.
06.3.4 Setting the flash output with a flash exposure meter (optional)
Release a test flash (see chapter 05.2) and use a flash exposure meter to measure the aperture setting. Adjust flash by using the power adjustment button: (18a) = increase power, (18b) = decrease power. Decreasing the flash power by 1.0 corresponds to a change in f-stop (=1EV). Changing the flash power is possible in steps of 0.3, this relates to 1/3 f-stop (EV).
For example:
Your flash meter shows f-stop 16/3. Your preferred f-stop setting is 11. The difference in f-stops is 1/3 (EV). The power level indicator (15) shows 4.7. Decrease the power with the adjustment button (18b) 1/3 f-stops (EV) until the power level indicator (15) shows the value of 3.3. Your picture will now be exposed correctly.
06.3.5 Setting flash output by testing
Take a picture with your desired f-stop setting. Judge the exposure by checking the picture result on the monitor of your camera. Is the picture too bright, reduce the flash output using adjustment button (18b) Decrease power. Is the picture underexposed, increase the flash output using adjustment button (18a) Increase power. Take another picture and adjust the flash output if necessary until you reach the optimum of exposure.
CAUTION: Never touch the modelling light bulb with your bare hands. Greasy residue may cause splintering of the modelling light bulb during use!
The DORR DFX studio flash is equipped with a modelling light (8). This helps to judge shadows before releasing a picture. Furthermore the autofocus function of your camera works faster and more precise when working with the modelling light.
Press the On/Off button modelling light (20) to turn on or off the modelling light. When turned on, the LED modelling light indicator (20a) lights up red. After turning on the modelling light the power level indicator (15) flashes for about 5 seconds. During this time you have the possibility to adjust power of the modelling light with buttons (18a increase power or 18b decrease power) in 8 steps from 0.1 to 0.8.
While the flash is recharging, the modelling light will be off. When the modelling light lights up again, the studio flash is ready for next release.
06.5 PHOTO CELL/SLAVE CELL
The DORR DFX studio flash is equipped with a photo cell/slave cell (14). This cell reacts to any kind of light source and triggers the DFX studio flash simultaneously. This enables you to trigger more studio flashes simultaneously. If you are working with on-camera flash, please mind to turn the flash to manual performance level, this ensures that pre-flashes of the on-camera flash are turned off. Flash source and photo cell/slave cell should be in direct line of sight. With On/Off button (16) the photo cell is either activated or deactivated. The LED photo cell (16a) lights up in red and shows an activated photo cell/slave cell.
06.6 FLASH READINESS
As soon as the DORR DFX studio flash is ready to flash again, the LED standby signal (19a) lights up in red.
06.7 ACOUSTIC STANDBY SIGNAL
The DORR DFX studio flash offers an acoustic standby signal. Press On/Off button standby acoustic signal (17) to turn on or off the beep sound. The standby acoustic signal LED (17a) lights up in red when this function is activated and you will hear a beep sound when the flash is ready to trigger again.
07 MAINTENANCE
07.1 REPLACING MODELLING LIGHT BULB
Mind the following safety hints when replacing the modelling light bulb:
- Let the flash cool down completely to avoid burns!
- Make sure the flash is disconnected from any energy source and the main power switch (23) is on position 0 = Off .
- Never touch the modelling light with your bare hands. Greasy residue may cause splintering of the modelling light bulb during use! Always wear cotton gloves (Microfi ber gloves available from DORR) or use a clean cloth when replacing the modelling light bulb.
07.2 REPLACING FLASH TUBE
CAUTION
Let the flash cool down completely to avoid burns!
CAUTION
Never touch the fl ash tube with your bare hands. Greasy residue my cause splintering of the fl ash tube during use! Always wear cotton gloves (microfi ber gloves available from DORR) or use a clean cloth when replacing the fl ash tube.
Before replacing the fl ash tube, please remove the modelling light. This prevents the modelling light from damage and gives you more space to exchange the fl ash bulb.
- Use pliers to wind off the thick flash wire from the brackets.
- Unplug the flash tube by carefully pulling out the upper two flash tube sockets.
- Plug in the new flash tube by matching the two flash tube sockets with the base of the flash and carefully push in.
- Wrap the thick fl ash wire around the bracket again.
You are welcome to contact our DORR service staff upon any question in regard of the replacement of flash tube.
07.3 REPLACING THE FUSE
CAUTION
When replacing the fuse, make sure the main power switch (23) is on position O = Off and the flash is disconnected from any energy source!
Pull out the fuse compartment (24) with a small slot screwdriver. Replace the old fuse with the new fuse which is stored in the spare fuse compartment.
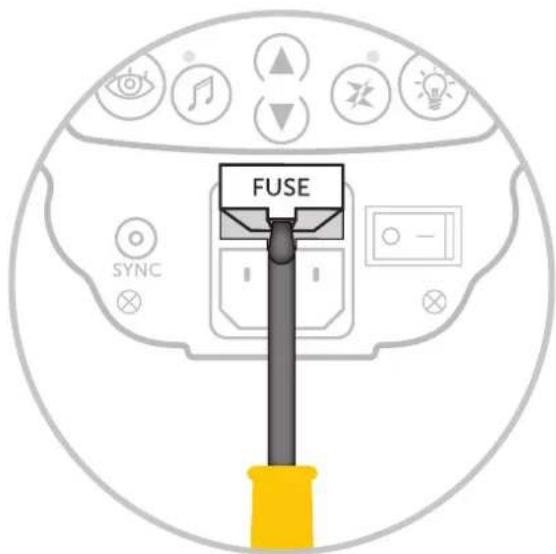
CAUTION
Only use F5AL 250V 5A type fuses to ensure safe operation.
08 | CLEANING AND STORAGE
Never use aggressive cleansing agents or benzine to clean the device. We recommend a soft, slightly damp microfieber cloth to clean the outer parts of the device. Before cleaning make sure to disconnect the device from any energy source! Store the device in a dust-free, dry and cool place. This device is not a toy - keep it out of the range of children. Keep away from pets.
09 | TECHNICAL SPECIFICATIONS
| DFX-300 DFX-600 | ||
| Flash power 300 Ws 600 Ws | ||
| Guide No. (ISO 100/2 m) 46 | 66 | |
| Power range 6 f-stops (1/3 intervals) | ||
| Recycling time approx. 0.1~0.7 s 0.1~1.2 s | ||
| Flash duration approx. 1/800~1/1200 s | ||
| Modelling light E27, 150 W (Brightness in 8 steps adjustable) | ||
| Colour temperature 5500 K ± 200 | ||
| Flash triggering via Photo cell, test button,(optional: sync cord, wireless flash trigger) | ||
| Triggering voltage | 5 V | |
| Automatic discharge | ✓ | |
| Overheating protection | ✓ | |
| Power source | AC 220-240V ~ 50 Hz | |
| Fuse | F5AL 250V 5A | |
| Operation temperature | -10°C bis 40°C | |
| Length power cableapprox. | 5 m | |
| Dimensions approx. | 100 x 170 x 260 mm | 100 x 170 x 300 mm |
| Weight approx. | 1780 g | 1890 g |
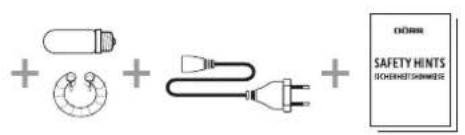
10 | SCOPE OF DELIVERY
11 | DISPOSAL, CE MARKING

11.1 WEEE INFORMATION
The Waste Electrical and Electronic Equipment Directive (WEEE Directive) is the European community directive on waste electrical and electronic equipment, which became European law in February 2003. The main purpose of this directive is to prevent electronic waste. Recycling and other forms of waste recovery should be encouraged to reduce waste. The symbol (trash can) on the product and on the packing means that used electrical and electronic products should not be disposed of with general household waste. It is your responsibility to dispose of all your electronic or electrical waste at designated collection points. Disposing of this product correctly will help to save valuable resources and it is a signifi cant contribution to protect our environment as well as human health. For more information about the correct disposal of electrical and electronic equipment, recycling and collection points please contact your local authorities, waste management companies, your retailer or the manufacturer of this device.
11.2 ROHS CONFORMITY
This product is compliant with the European RoHS directive for the restriction of use of certain hazardous substances in electrical and electronic equipment and its amendments.

11.3 CE MARKING
The CE marking complies with the European standards and indicates that the product meets the requirements of the applicable EU directives.

11 | GESTION, MARCA CE