
TrekGuide - Navigation compass CELESTRON - Free user manual and instructions
Find the device manual for free TrekGuide CELESTRON in PDF.

| Product Type | 4-in-1 Digital Navigation Compass (compass, altimeter, barometer, thermometer) |
| Brand | Celestron |
| Model | TrekGuide |
| Power Supply | 2 CR2032 lithium batteries (installed) |
| Battery Life | Not specified; built-in low battery indicator |
| Display | LCD screen with backlight (5 seconds) |
| Main Functions | Compass (16 cardinal points, degrees), altimeter (meters/feet), barometer (mbar/hPa, mmHg, inHg), thermometer (°C/°F), clock, alarm, weather forecast, max altitude |
| Temperature Measurement Range | -20°C to 60°C (displays LL.L or HH.H outside) |
| Pressure Units | mbar/hPa, mmHg, inHg |
| Compass Calibration | Automatic via 360° rotation; magnetic declination adjustment (see online manual) |
| Key Lock | Yes, via long press of LIGHT button |
| Backlight | Press LIGHT button for 5 seconds |
| Housing Material | Not specified; likely durable plastic |
| Dimensions | Not specified (compact, fits in hand) |
| Weight | Not specified (lightweight, with batteries) |
| Care and Cleaning | Wipe with a soft cloth; avoid water and shocks |
| Safety | Precautions: do not use near magnetic sources, keep horizontal for compass |
| Spare Parts and Repairability | CR2032 batteries easily replaceable; screws for battery compartment |
| General Information | Compliant with FCC Part 15; designed for ages 14 and up |
| Warranty | Not specified; contact Celestron |
Frequently Asked Questions - TrekGuide CELESTRON
User questions about TrekGuide CELESTRON
0 question about this device. Answer the ones you know or ask your own.
Ask a new question about this device
Download the instructions for your Navigation compass in PDF format for free! Find your manual TrekGuide - CELESTRON and take your electronic device back in hand. On this page are published all the documents necessary for the use of your device. TrekGuide by CELESTRON.
USER MANUAL TrekGuide CELESTRON
text_image
CELESTRON ELEMENTS™ LANDtrekguide™
4 in 1
DEVICE
Digital Compass
Barometer
Altimeter
Thermometer
INSTRUCTION MANUAL
MODEL #48006
For a more detailed instruction manual, visit the Celestron website at www.celestron.com.
LCD DISPLaY & ButtonS and BatterY ComPartment
- B/▼ button Barometer setting mode/decrease values
- A/▲ button Altitude setting mode increase values
- T/ MODE button Toggle display between button time, date, year, and alarm: Mode used in various settings
- C button Compass setting mode and exit any setting mode
- 🖼 button Turn on the backlight/Lock/Unlock keys; Level in center
- BATTERY Located in the bac k of the unit COMPARTMENT

text_image
29.7:10 4:55 5 1 3 2 4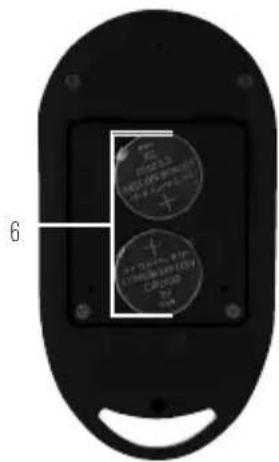
text_image
6 + 100% OFF + 100% OFF + 100% OFF + 100% OFF + 100% OFF + 100% OFF + 100% OFF + 100% OFF + 100% OFF + 100% OFF + 100% OFF + 100% OFF + 100% OFF + 50% OFF + 50% OFF + 50% OFF + 50% OFF + 50% OFF + 50% OFF + 50% OFF + 50% OFF + 50% OFF + 50% OFF + 50% OFF + 50% OFF + 50% OFF + 50% OFF + 50% + 50% + 50% + 50% + 50% + 50% + 50% + 50% + 50% + 50% + 50% + 50% + 50% + 50% + 50% + 50% + 50% + 50% + 50% + 50% + 50 + 50% + 50% + 50% + 50% + 50% + 50% + 50% + 50% + 50% + 50% + 50% + 50% + 50% + 50% + 50% + 50% + 50% + 50% + 50% + 5 + + + + + + + + + + + + + + + + + + + + + + + + + + + + + + + + + + + + + + + + + + + + + + + + + + + + + + + + + + + + + + + + + + + + + + + + + + + + + + + + + + + + + + + + + + + + + + + + + + + + - 6 6ENGLISH | 1
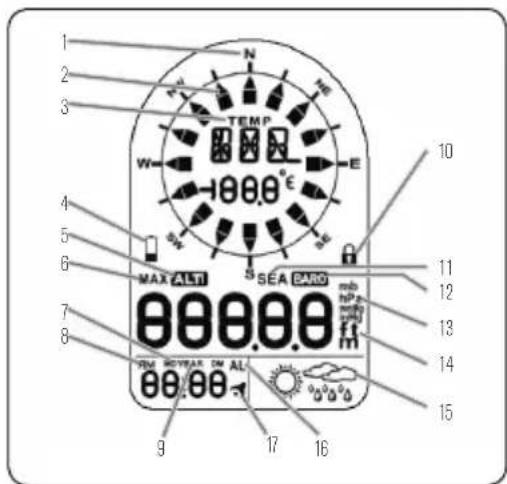
LCD DISPLaY
- Cardinal point when the compass in the north direction
- Direction arrow
- Temperature appears when not in compass mode
- Low battery indicator
- Appears when in Altimeter (Altitude) mode
- Indicates maximum altitude
- Display format of Day and Month
- AM/PM
- Year
- Keypad is locked
- Appears when sea level pressure is shown
Set UP
- 2 PCS CR2032 lithium batteries are included. When battery is low, the battery low icon (☐) will be on. Use a small screwdriver to remove the screws of the battery cover, remove the batteries with a thin knife or screwdriver, place the positive(+) side of the batteries upward, and then replace the screws.
MaIN FUNCtloN S aN DoPe ratioN S
- Press the MODE key to switch mode between Clock, Date, Year and Alarm Clock.
- Press A/▲, B/▼, C buttons to switch between: ALTIMETER/BAROMETER/COMPASS MODES.
text_image
1 2 3 N TEMP W E 10 4 5 6 MAX ALTI SEA BARO 7 8 9 17 16 15 14 13 12 11 10- Appears when in Barometer pressure mode
- Units of air pressure
- Units of altitude appear in altitude mode
tIMe Settl NG
- Press and hold "MODE" key for 3 seconds to enter settings. Press▼"or "▲" to change setting, and press "MODE" button to confirm and move to next setting.
- Setting sequence is as follows: 12/24 hour format, Hour, Minute, Second, Year, Month/Day sequence, Month, Day, Temperature unit, Air Pressure unit, and Altitude unit.
- If no button is pressed for 15 seconds, the display will return to previous mode.
- Press "C" button to exit the Time Setting Mode.
aLarM SettING
- Press "T" button to navigate to Alarm Time Display ("AL" icon displays on the LCD) Hold "T" button for 3 seconds to enter alarm clock setting mode. Press "▼" or "▲" to change setting, and press "T" button to confirm and move to next setting.
- The setting sequence is: Hour, Minute and Alarm ON / OFF.
- When the alarm is on, the symbol "⁴" appears and when it is off the symbol "⁵" disappears.
- When alarm goes off "→" will flash, press any button to stop the alarm and if no button is pressed for 15 seconds the alarm will automatically stop after 2 minutes.
ALTIMETER AND BAROMETER
When batteries are inserted, the device will automatically measure the barometer readings as well as the maximum sea level pressure reading.
Set aND reSet aLtIMeter (For aLtItUDe)
Altimeter measures in either meters or feet.
- Press "A" button to enter altimeter mode. Press "A" button again to display the maximum altitude.
- When LCD displays current altitude, press and hold "A" button for 3 seconds to enter setting. Press "▼" or "▲" to adjust altitude, and press "MODE" button to confirm. Press "▼" and "▲" at the same time, current altitude value will be reset to 0.
- When LCD displays maximum altitude, press“▼”and “▲” at the same time and the maximum will be cleared and reset to 0.
Set aND reSet Sea LeVeL PreSSUre aND
WeatHer ForeCa St ICoNS
- Press "B" button to enter Barometer mode. The LCD will display the current barometric pressure and press the "B" button again to display the sea level pressure.
- In the Sea Level pressure display, hold the "B" button down for 3 seconds to enter the setting. Press "▼" or "▲" to change the setting and press "MODE" button to confirm and move to next setting.
- The setting sequence is as: sea level pressure, toggle weather forecast icons.
- The weather forecast will start the first forecast 6 hours later after the current weather status is entered.
Note: Barometric pressure and sea level pressure measurement in mbar/hPa, mmHG or inHG. When sea level pressure is changed, the altitude will adjust itself.
ComPaSS temPerature
The compass shows the bearing in degrees due North together with 16 cardinal points.
- Press "C" button, the unit will enter Compass mode. Hold the unit horizontal. Point the 12 o'clock position of the unit in the direction you want to measure. When the direction of compass is pointing North, the direction icon outside will be shown. If no key is pressed for 30 seconds, the unit will automatically shut off the compass and return to temperature.
Notes: The compass must be kept in a level position when in use. Taking a measurement while the unit is not horizontal can result in a large measurement error. Always take bearings in the open air, because it is easily affected by disturbing sources of magnetism.
COMPASS SENSOR CALIBRATION
The compass should be calibrated before use OR when the batteries are replaced.
- In COMPASS mode hold the "C" button for 3 seconds to enter the calibration mode, and press the "C" button to start the calibration.
- Keep the unit in a level position or on top of a non-metallic table/desk. Reference the arrow showing in the LCD, rotate the compass clockwise for one full rotation slowly:
- When finished, the LCD will display "OK" if the calibration is successful or display "Fail" if it failed.
SET THE MAGNETIC DECLINATION ANGLE
Please see the online manual for full details.
- When compass mode is off, the LCD display will provide the temperature reading with unit of ^ or ^ .
- When the temperature is below -20^ the LCD display will show LL.L°C and when higher than 60^ the LCD display will show HH.H°C.
BaCkLlgHt/ keYPaD LoCk
- Press the "💡" button to turn the backlight on for 5 seconds.
- Press and hold the "💡" button for 3 seconds and the keyboard will be locked and the icon 🔒 will be shown in the LCD display. Hold the "LIGHT" button down for 3 seconds to unlock the keyboard.
www.celestron.com
Torrance. CA 90503 U.S.A. • Telephone: 800.421.9649
©2013 Celestron • All rights reserved. • Printed in China • 11-13

FCC Note: This equipment has been tested and found to comply with the limits for a Class B digital device, pursuant to part 15 of the FCC Rules. These limits are designed to provide reasonable protection against harmful interference in a residential installation. This equipment generates, uses, and can radiate radio frequency energy and, if not installed and used in accordance with the instructions, may cause harmful interference to radio communications. However, there is no guarantee that interference will not occur in a particular installation. If this equipment does cause harmful interference to radio or television reception, which can be determined by turning the equipment off and on, the user is encouraged to try to correct the interference by one or more of the following measures:
• Reorient or relocate the receiving antenna.
- Increase the separation between the equipment and receiver.
- Connect the equipment into an outlet on a circuit different from that to which the receiver is connected.
- Consult the dealer or an experienced radio/TV technician for help.
Product design and specifications are subject to change without prior notification. This product is designed and intended for use by those 14 years of age and older.

text_image
CELESTRON ELEMENTS™ LANDtrekguide™
4 EN 1 APPAREIL
Boussole numérique
Baromètre
Altimètre
Thermomètre
MANUEL D'INSTRUCTION
MODÈLE NO 48006