
RT0420T2 - Voice recorder Engel Axil - Free user manual and instructions
Find the device manual for free RT0420T2 Engel Axil in PDF.

| Product Type | HD DVB-T Receiver with Recorder |
| Brand | Engel Axil |
| Model | RT0420T2 |
| Signal Standard | DVB-T2 / DVB-T |
| Input Frequencies | 170-230 MHz (VHF), 470-860 MHz (UHF) |
| RF Bandwidth | 6, 7, 8 MHz |
| Modulation | QPSK, 16QAM, 64QAM, 256QAM |
| Video Decoding | MPEG-4 AVC/H.264 HP@L4, MPEG-2 MP@MP/HL |
| Output Resolutions | 480i/p, 576i/p, 720p, 1080i/p |
| Video Outputs | SCART, HDMI |
| Audio Decoding | MPEG-1, MPEG-2, MPEG-4 HE AAC v2 |
| Audio Output | Coaxial, SCART |
| USB Port | USB 2.0 (max capacity 500 GB) |
| Supported Media Formats | MP3, JPEG, BMP, AVI, MKV |
| Recording and Timeshift | Yes, via USB (PVR function, pause, fast forward/rewind) |
| Power Supply | 110-240 V ~ 50/60 Hz |
| Maximum Consumption | < 8 W |
| Standby Consumption | < 0.5 W |
| Remote Control | Yes, with AAA batteries (range ~7 m, angle 60°) |
| Package Contents | Receiver, remote control, power supply, user manual, quick guide |
| Operating Temperature | Not specified, but avoid heat sources |
| Humidity | Avoid excessive humidity |
| Maintenance and Cleaning | Unplug before cleaning; do not use chemical products (benzene, alcohol, gasoline) |
| Safety | Do not disassemble; in case of smoke/odor, unplug immediately |
| Recycling | Electrical/electronic device: do not dispose of with household waste, take to recycling center |
Frequently Asked Questions - RT0420T2 Engel Axil
User questions about RT0420T2 Engel Axil
0 question about this device. Answer the ones you know or ask your own.
Ask a new question about this device
Download the instructions for your Voice recorder in PDF format for free! Find your manual RT0420T2 - Engel Axil and take your electronic device back in hand. On this page are published all the documents necessary for the use of your device. RT0420T2 by Engel Axil.
USER MANUAL RT0420T2 Engel Axil
Recorder DVB-T2 HD receiver
3.1. Front Panel 60
3.2.Rear & Side Panel 60
3.3. Remote Controller 61
- INSTALLATION 62
4.1. Placing the STB 62
4.2. Connecting Cables 62
4.3. Using the Remote Control 63
4.4.Starting the STB 63
4.5. First time installation 63
5.1. program manage settings 64
5.1.1. Program Edit 64
5.2. Channel Search 65
5.2.1.Auto search 65
5.2.2. Manual search 66
5.3. Option 66
5.3.1.Language 66
5.3.2. Audio Language 66
5.3.3.Subtitle Language 67
5.4.AV Setting 67
5.5.Time Setting 67
5.6. System 68
5.6.1. Information 68
5.6.2.Factory Setting 68
5.6.3. Timer Setting 69
5.6.4.OSD Setting 69
5.6.5. USB Upgrade 69
5.6.6. OTA Upgrade 70
5.7. Media Center 70
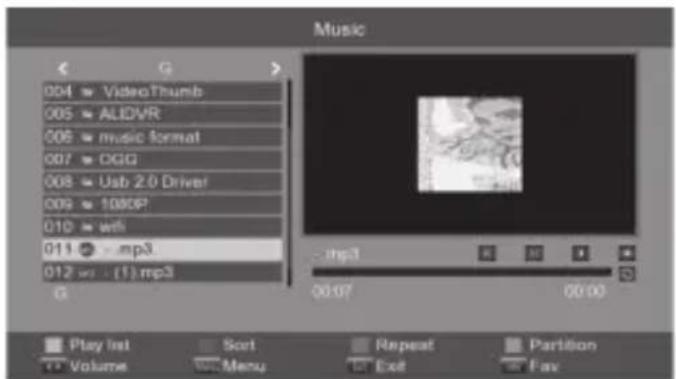
5.7.1.Music Player 70
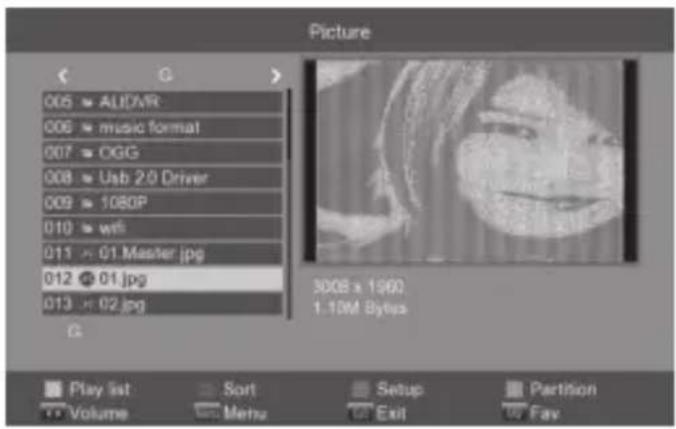
5.7.2.Picture Player 71
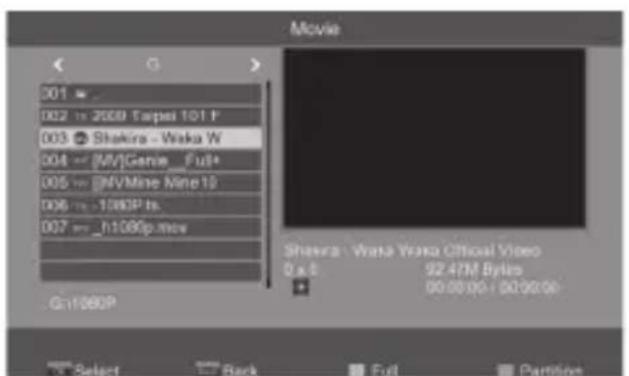
5.7.3.Movie Player 71
CONTENTS
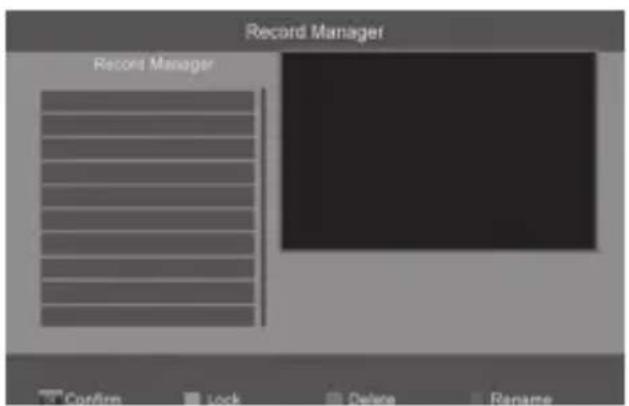
5.7.4. Record Manager 71
5.7.5.DVR Configuration 72
6.TROUBLESHOOTING 73
7. TECHNICAL SPECIFICATIONS 74
1. PRECAUTIONS
Please read the following precautions carefully before using the set-top box(STB):
- Do not disassemble the STB.
- If the STB products smoke or special smell, turn off the STB and remove the power plug.
- Power off the STB before inserting or removing video/audio cables, or when it is thundering.
- If the STB is not in use for a long period of time, power it off and remove the power plug.
- Do not put liquid containers around the STB. If the STB is wet with liquid, power it off immediately and contact professional maintenance personnel.
- Do not place heavy objects on the STB.
- Keep the STB away from heat sources, moisture, hot and humid places, and the sunlight.
- Keep the STB away from electric appliances with strong magnetic or electric field, such as microwave oven, refrigerator, and mobile phone.
- Remove the power plug before cleaning the STB shell. Do not touch the power cable with wet hands. Do not clean the STB with chemicals containing benzene, alcohol or gasoline.
2. PACKAGE CONTENTS
Before installation, please check the contents of the package.
The package should contain the following items:
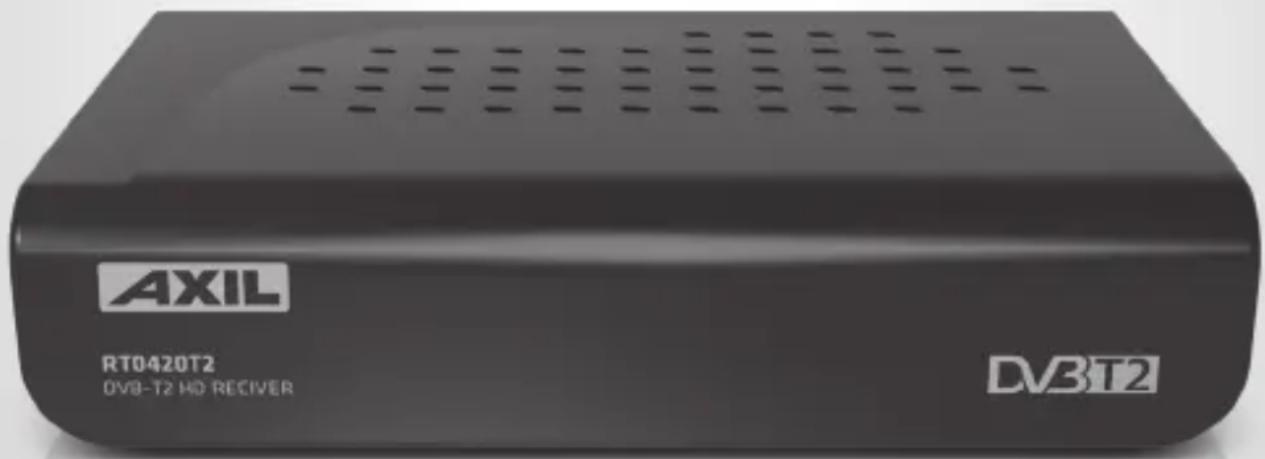
RT0420T2 receiver x1 pc
Remote control x1 pc
Power supply x1 pc
User manual x1 pc
Quick guide x1 pc
3.PRODUCT DESCRIPTION
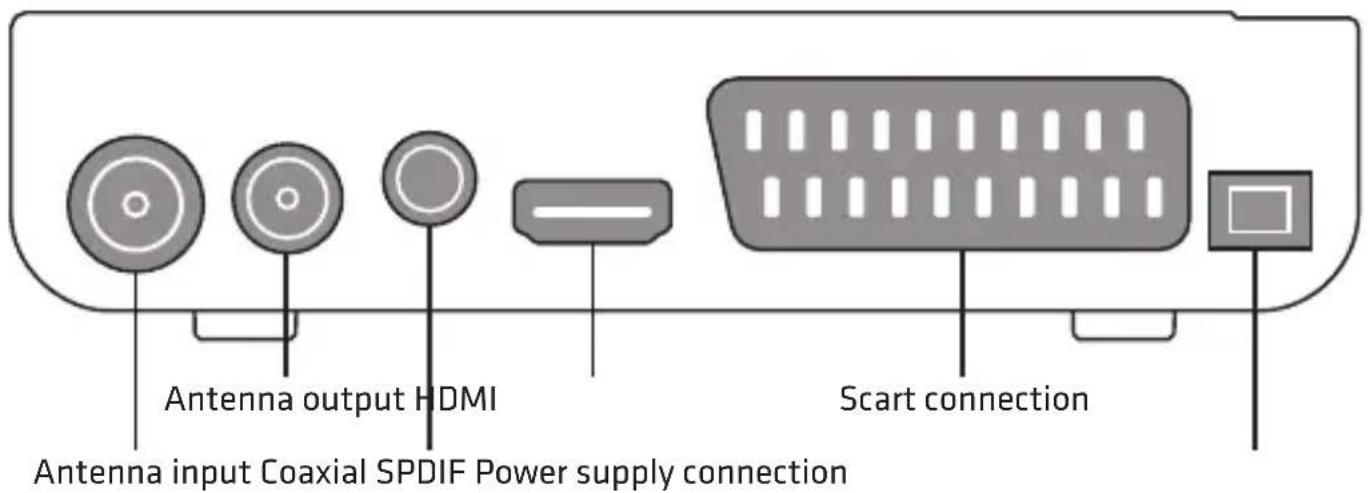
3.1. Front Panel

3.2. Rear & Side Panel
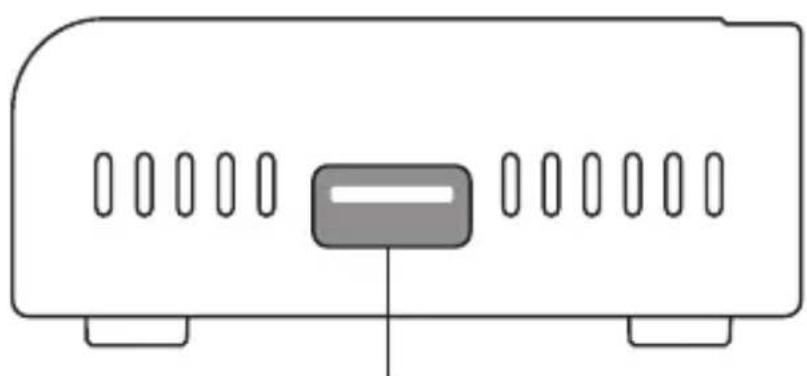
USB2.0
The picture is only for reference, please make the object as the standard.
3.PRODUCT DESCRIPTION
3.3. Remote Controller
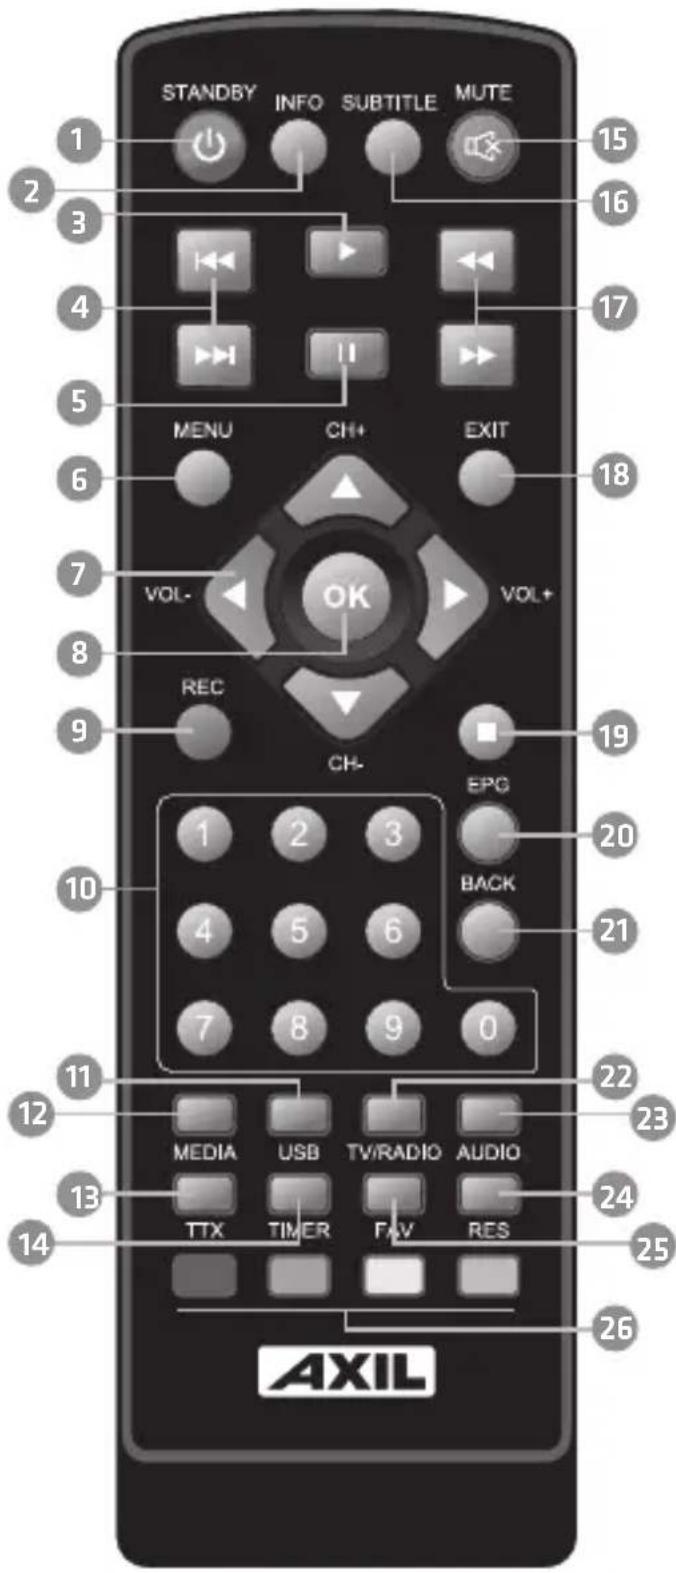
- STANDBY (Switch the STB ON or standby)
- INFO
(Displays additional channel information)
- PLAY (Starts or resumes play)
- Previous/Next
(Skips to the previous/next media track)
5. PAUSE (Pauses media play)
6. MENU (Open and close the main menu)
7. Cursor, CH+/-, VOL+/
(Cursor: Navigation buttons used to navigate menu's items) (CH + / - : Channel~Up~and Down) (VOL + / - : Volume~Up~and~Down)
8. OK (Confirms an entry or selection / Displays the list of channels)
9. REC (Record the TV program)
10. Numeric entry (Enter numeric values and select the channel directly by entering it's number)
11. USB (Enter Device List)
12. MEDIA (Enter Recorder menu)
13. TTX (Displays Teletext information)
14. TIMER (Timer wake-up)
15. MUTE (Turn off/on the volume)
16. SUBTITLE (On/Off Subtitle)
17. REV/FWD (Searches backwards / forwards during media play)
18. EXIT (Exits the current menu or returns to the previous menu)
19. STOP
(Stop program playback or recording)
20. EPG
(Open up Electronic Program Guide Menu)
- BACK (Switch to previous channel)
- TV/RADIO (Switch between TV and Radio)
- AUDIO (Selects an Audio Language or Audio mode)
- RES (Switch HDMI resolution)
- FAV (Open the Favorite list)
- RED/GREEN/YELLOW/BLUE (For interactive function/Submenu function buttons)

4. INSTALLATION
4.1. Placing the STB
Place the STB on a stable table.
Note: Do not place anything on the STB. Leave over 10cm space around two sides of the STB for radiating.
4.2. Connecting Cables
For a basic connection from your Set Top Box to your television set, you can use Scart connection. For a higher quality connection, use a direct HDMI connection, as shown below. Connect a audio amplifier use coaxial is a optional.
Note: Before the operation, power off all devices to be connected (for example, TV and STB)
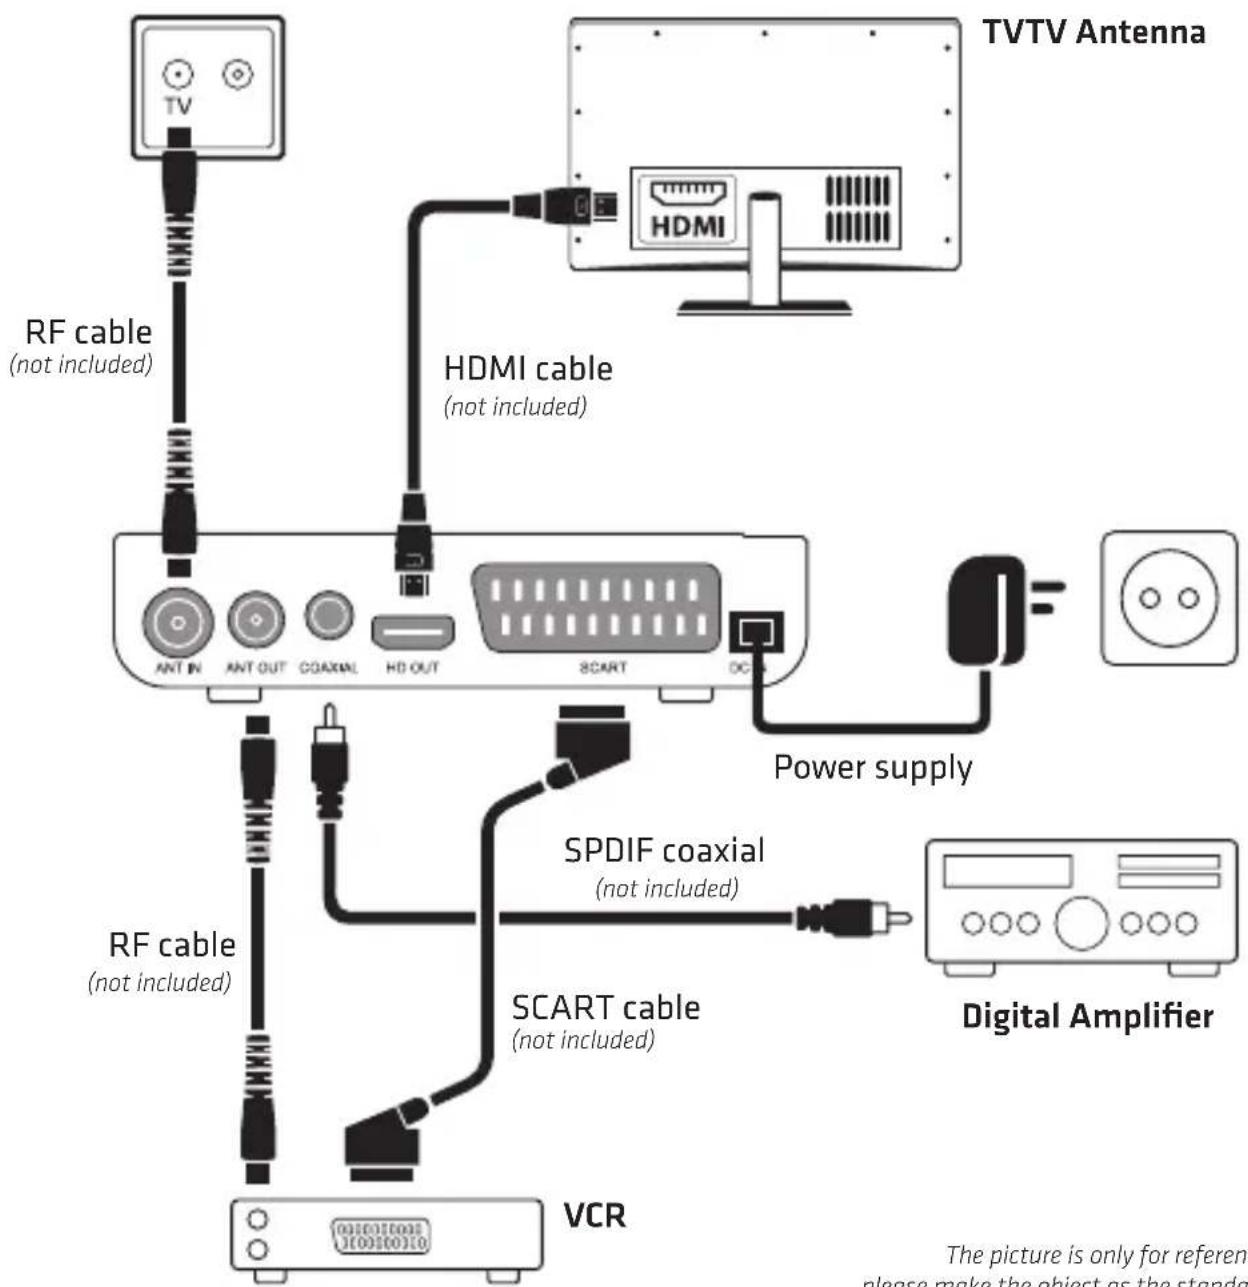
The picture is only for reference, please make the object as the standard.
4. INSTALLATION
4.3. Using the Remote Control
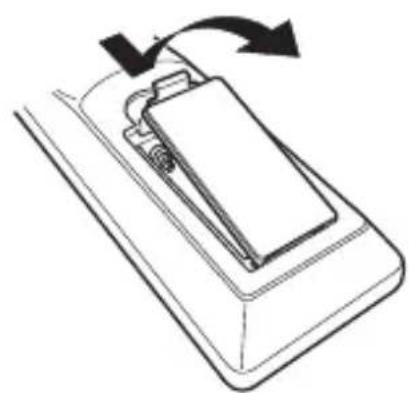
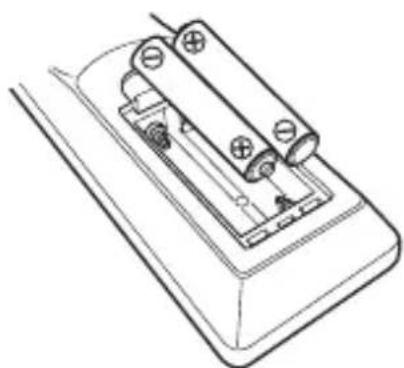
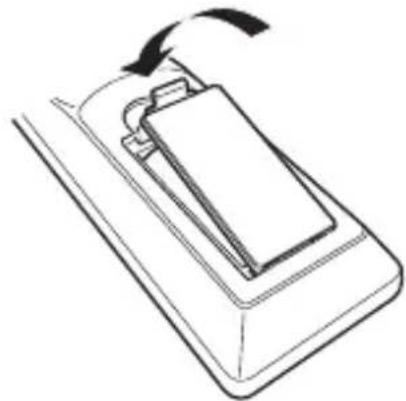
Step 1: Open the battery box cover of the controller, insert 2 × AAA batteries according to the "+" and "-" marks in the battery box, and close the cover.
-
Open the cover.
-
Install batteries
-
Close the cover
Step 2: To use the Remote Control, point it towards the front of the Digital Set Top Box. The Remote Control has a range of up to 7 meters from the Set Top Box at an angle of up to 60 degrees.
Note: Sunlight or very bright light will decrease the sensitivity of the Remote Control.
4.4. Starting the STB
Step 1: Verify that all cables are correctly connected.
Step 2: Verify that power supply of all devices is normal.
Step 3: Turn on the TV.
Step 4: Turn on the STB.
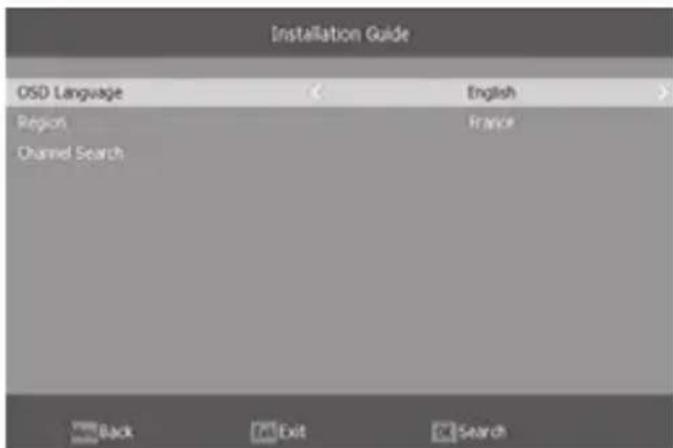
4.5. First Time Installation
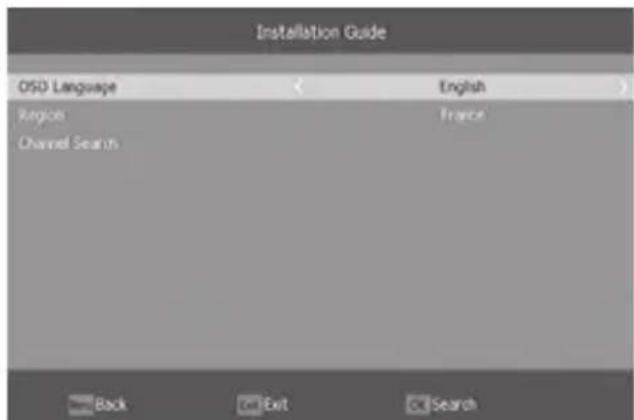
If you are using the unit for the first time or have restored the unit to factory default, the installation guide menu will appear on your TV screen.
- OSD Language:
press RIGHT/LEFT key to select a language.
2. Region:
press RIGHT/LEFT key to select country.
3. Channel Search: press OK key to auto scan.
5. BASIC OPERATION
5.1. Program Manage Settings
To access the menu, press the MENU button and select "Program". Using the RIGHT/LEFT keys to navigate through the menu. The menu provides options to adjust the program manage settings. Select an option and press OK or RIGHT to adjust that setting. Press the EXIT button to exit the menu.
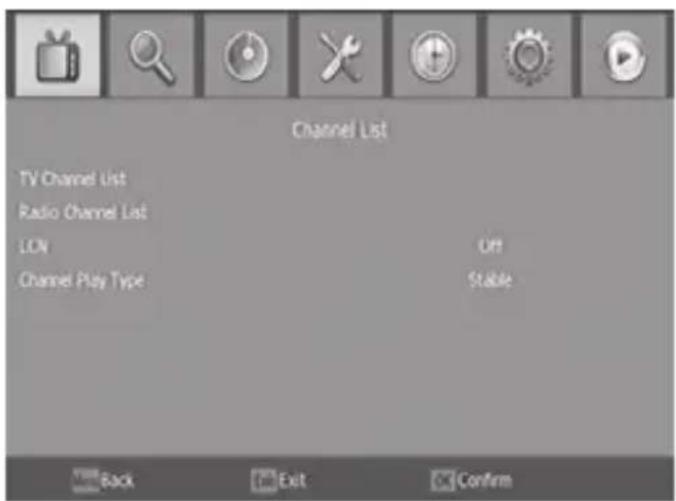
5.1.1. Program Edit
To edit your program preferences (fav, lock, skip, move, sort, rename or delete), you will need to enter the program edit menu.
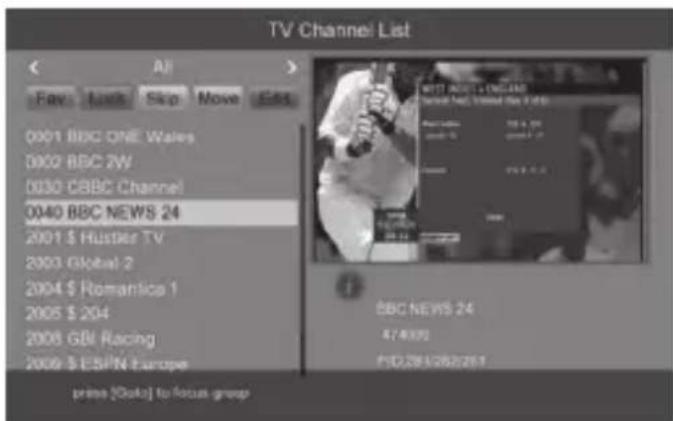
1- FAV > You can create a shortlist of favourite programs that you can easily access.
2- LOCK > You can lock selected programs for restricted viewing.
3- SKIP > Skip TV or radio channe.
4-MOVE > Move a TV or radio program.
5-SORT > Sort your channels from the following option
6- RENAME > Rename the program names.
7- DELETE > When the TV or Radio Channel List window displays, press the Blue key to enter the Edit mode. Then, press the Blue key to delete the channels.
5. BASIC OPERATION
5.2. Channel Search
To access the menu, press MENU and select "Channel Search" using the RIGHT/LEFT keys. This menu provides options to adjust the search channel settings.
Press UP/DOWN to select an option and press RIGHT/LEFT to adjust the settings. Press EXIT to exit the menu.
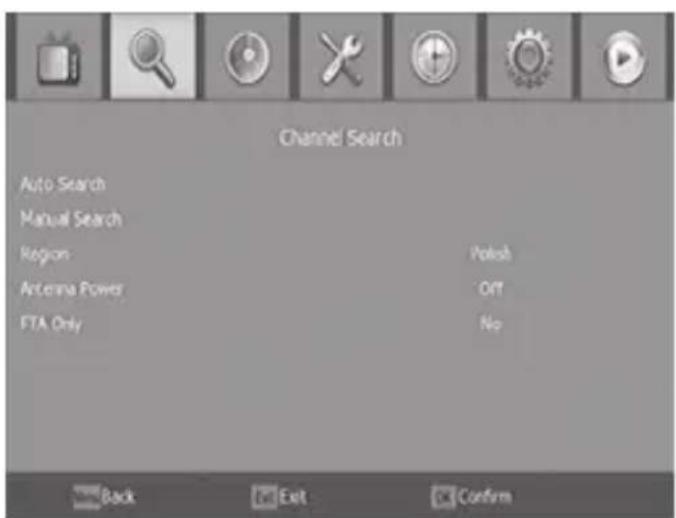

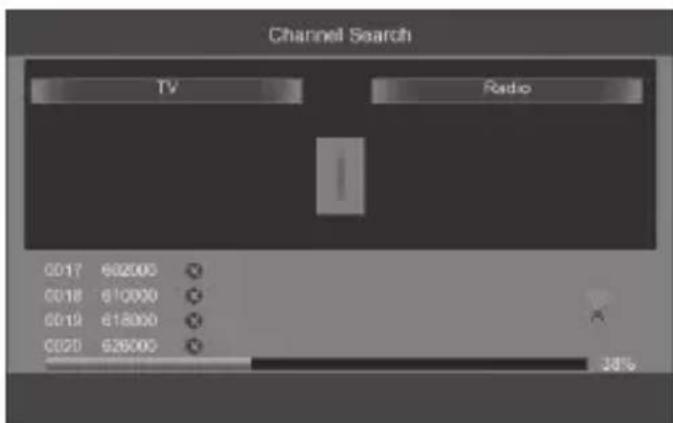
5.2.1.Auto Search
This option will automatically search for channels and save them once the scanning is complete. All previously saved channels and settings will be deleted.
Select "Auto Search" and press OK or RIGHT to start channel search.
To cancel channel search, press EXIT. Any channels that have been found will be saved.
5. BASIC OPERATION
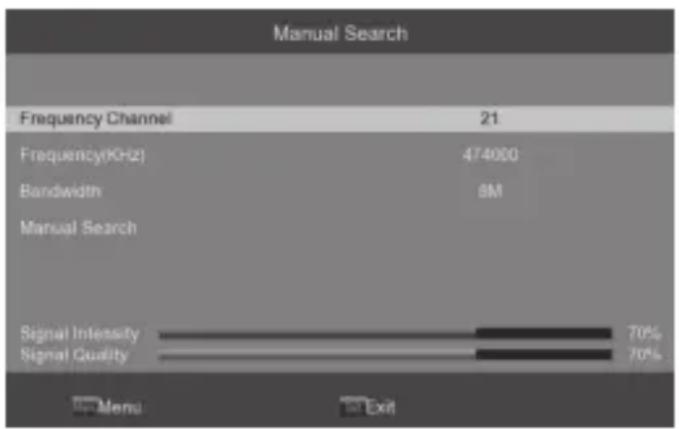
5.2.2. Manual Search
This option allows you to scan for new channels without deleting previously saved channels and settings.
- Select "Manual Search" then press OK or RIGHT. The channel search screen will appear.
- Press the RIGHT/LEFT key to select the channel frequency.
- Press OK to start searching channels.
If a channel is found, it is saved and added to the channels list. If channels can not be found during searching, the unit will exit automatically.
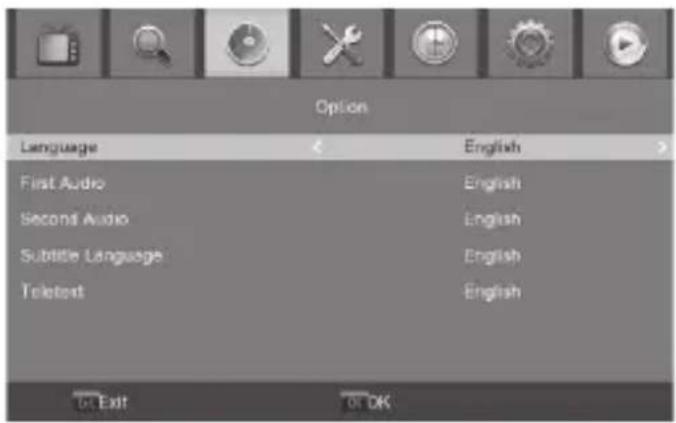
5.3. Option
To access the menu, press MENU and select "Option" using the RIGHT/LEFT keys. The menu provides options to adjust the OSD language, subtitle language and audio language.
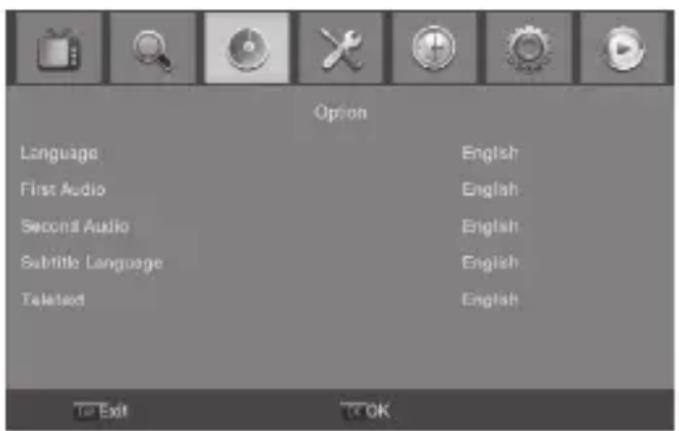
5.3.1. Language
Select an OSD language
5.3.2. Audio Language
Select the preferred audio language for watching TV channels.
5. BASIC OPERATION
5.3.3. Subtitle Language
Set the default subtitle language.

5.4. AV Setting
To access the menu, press MENU and select "System" using the RIGHT/LEFT keys. The menu provides options to adjust the system settings. Press the UP/DOWN key to select an option and press RIGHT/LEFT to adjust the setting. Press EXIT to exit the menu.

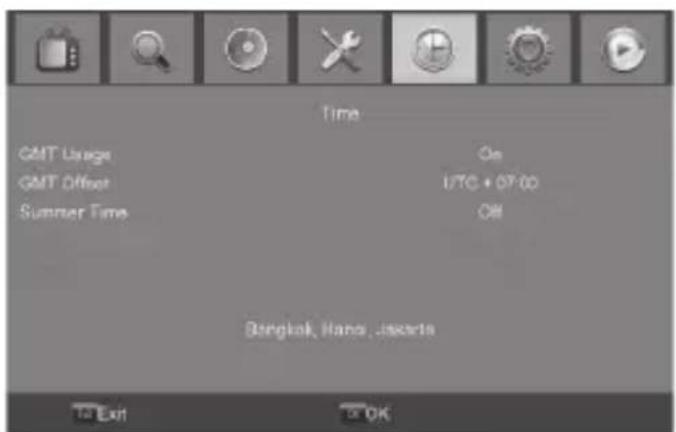
5.5. Time Setting
To access the menu, press MENU then select "Time" using the RIGHT/LEFT keys. The menu provides options to adjust the time settings. Press UP/DOWN to select an option and press RIGHT/LEFT to adjust the settings. Press EXIT to exit the menu.
5. BASIC OPERATION
5.6. System
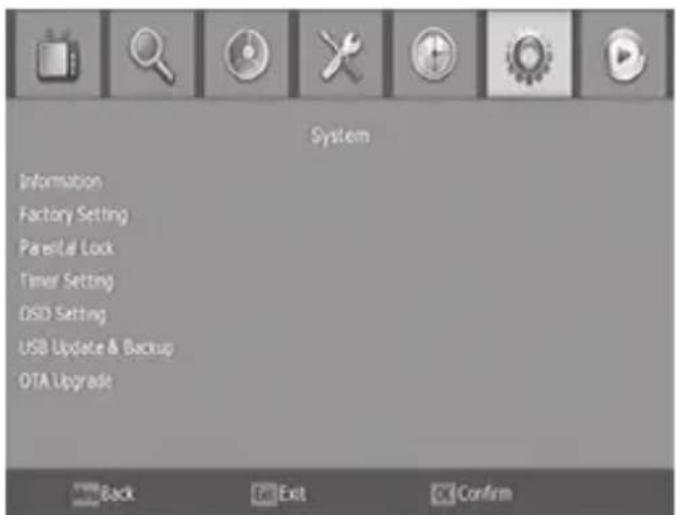
Select "System" in the Main Menu to enter the Tools menu which contains 6 submenu items: Information, Factory Setting, Timer Setting, OSD Setting, USB Upgrade and OTA Upgrade.
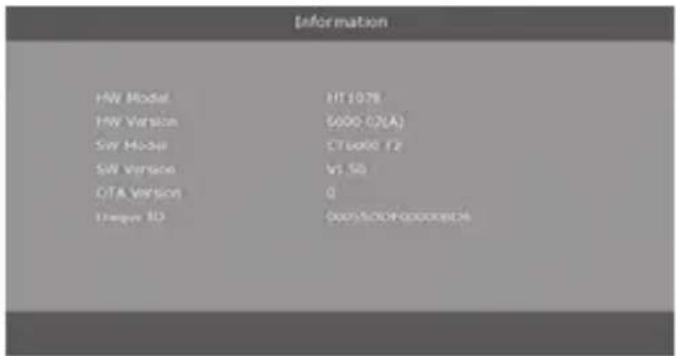
5.6.1. Information
View model, hardware and software information.
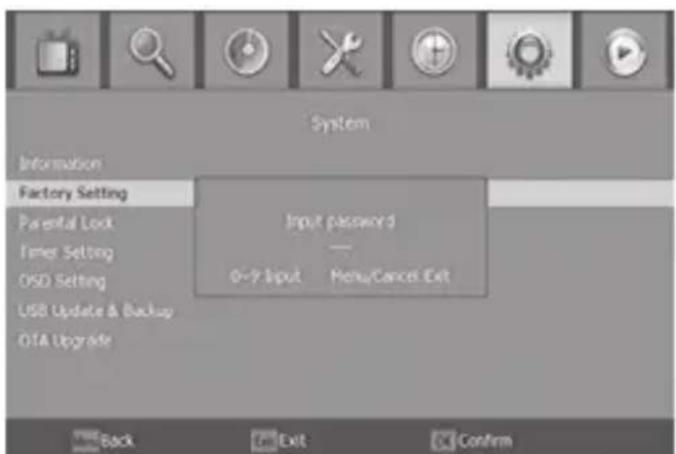
5.6.2. Factory Setting
Reset your set top box to the default factory settings. Enter your password or the default password "0000" and press OK to confirm. This option will delete all preset channels and settings.
5. BASIC OPERATION
5.6.3. Timer Setting
Timer setting here:
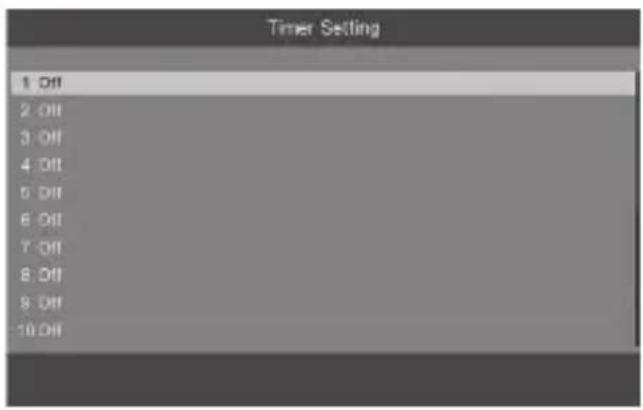
(1) Timer List
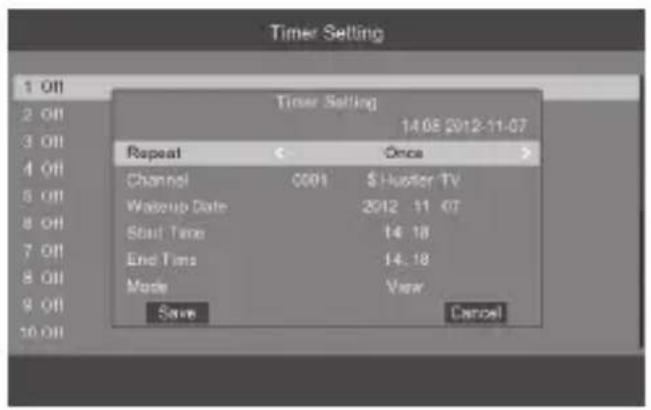
(2) Timer Setting
5.6.4. OSD Setting

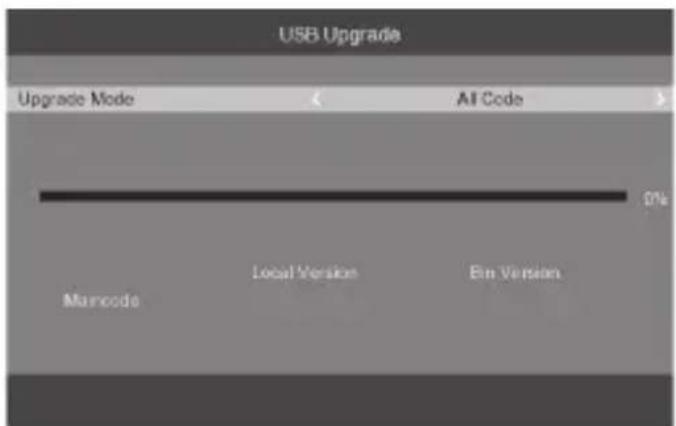
5.6.5. USB Upgrade
You can select upgrade software by USB. Select the upgrade file, press OK, it will be upgraded in the next 3 to 5 minutes. During this process, do not perform any other operations. Note: Software Update only support FAT32 U-Disk.
5. BASIC OPERATION
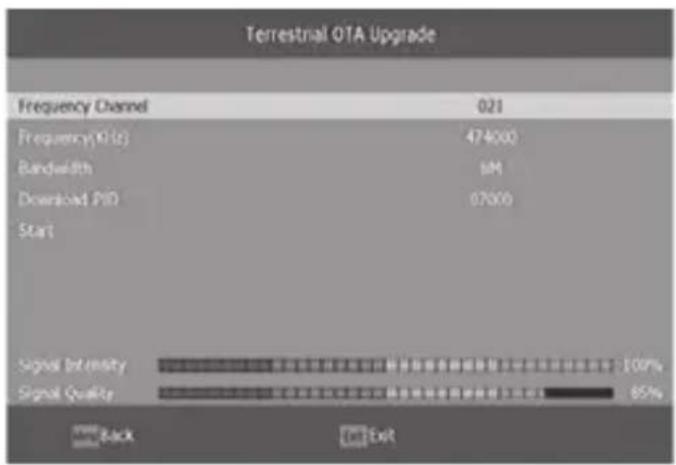
5.6.6. OTA Upgrade
1) OTA Setting.
5.7. Media Center
To access the menu, press the MENU button and select "Media Center" using the RIGHT/LEFT keys.
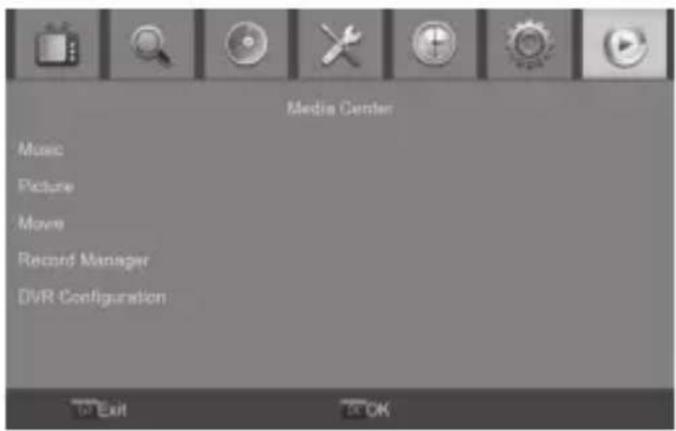
5.7.1. Music Player
5. BASIC OPERATION
5.7.2. Picture Player
5.7.3. Movie Player
5.7.4. Record Manager

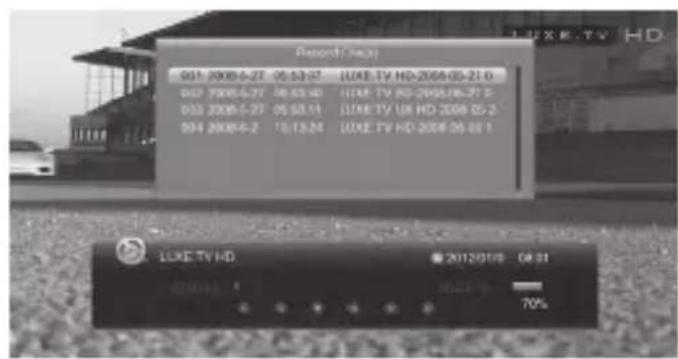

5. BASIC OPERATION
5.7.5. DVR Configuration
Timeshift.
Press "Pause" key first, then at any time you can press "Play" key, the unit will start playing recorded program from the start.
Press "Fast Forward" / "Fast Back" to move through current recording.
Note: Time shifting is only available when USB HDD is connected to system and read/write speed is high enough to support that.
Press "Stop" key first time to end the playing mode. The unit will keep recording but will return to current time. If you press "Pause" the playback will start again from the beginning of the recording. Press "Stop" key again to stop the recording.

6. TROUBLESHOOTING
| Problem Potential Reasons What to do | ||
| No picture | Power isn't connected Connect the power | |
| The power switch is not on Switch on the power | ||
| Screen shows “No Signal” | DVB-T cable not connected Plug in the DVB-T cable | |
| Aerial cable is faulty Check aerial cable and connections | ||
| No sound from Speaker | No or incorrect connection with audio cable | Connect the audio cable correctly |
| Sound on mute Turn off mute function | ||
| Only sound, no image on the screen | Resolution not supported by TV set | Press Red Color button to change resolution |
| No or incorrect connection with AV cable | Make sure cables are connected correctly | |
| The program is a radio program | Press<TV/RADIO>key to shift into TVmode | |
| Remote Control is not responding | The battery is exhausted Change battery | |
| Remote Control is not facing or close enough to the Set Top Box | Adjust the position of the Remote Control and move closer to the unit | |
| Picture is breaking up The signal is too weak Check aerial cable and connections | ||
7. TECHNICAL SPECIFICATIONS
Item Sub Item Parameter
| System | Standard ETSI EN 302 755 (DVB-T2)300 744 (DVB-T) | |
| Tuner | Input Frequency 170~230 MHz 470-860MHz | |
| RF Input Level -78 ~ -20dBm | ||
| RF Bandwidth 6MHz, 7MHz & 8MHz | ||
| Modulation QPSK, 16QAM, 64QAM, 256QAM | ||
| Video | Decoder Format MPEG4 AVC/H.264 HP@L4MPEG2 MP@MP.HL | |
| Output Format 480i/480p/576i/576p/720p/1080i/1080p | ||
| Output Port HD OUT, SCART | ||
| Audio | Decoder Format MPEG-1 (layer 16)2&3MPEG-4 HE AACv2 | |
| Audio Output Coaxial, SCART | ||
| USB2.0 | Supported Capacity 500GB | |
| Supported Media MP3, JPEG, BMP, AVI, MKV | ||
| Power | Supply Voltage | 110-240V ~ 50/60Hz |
| Maximum Power Consumption | <8W | |
| Standby Power Consumption | <0.5W | |

Notice about recycling
Your product is designed and manufactured with high quality materials and components which can be recycled and reused.
This symbol means that electrical and electronic equipment. At heir end-of-life, should be disposed of separately from your household waste.
Please dispose of this equipment at your local community waste collection/recycling centre. In the European Union there are separate collection systems for used electrical and electrical products
Please help us to conserve the environment we live in!
AXIL
RT0420T2
DVB-T2 HD PRIJEMNIK SA SNIMANJEM
SADRžAJ
1.MJERE OPREZA 77
2.SADRZAJ PAKIRANJA 77
3. OPIS PROIZVODA 78
3.1.Prednji panel 78
3.2. Stražnji panel 78
3.3.Daljinskiupravljač 79
- INSTALACIJA 80
4.1.SmjeSTanje ureda 80
4.2. Spajanje kabela 80
4.3.Upotreba daljinskog upravljača 81
4.4.Pokretanje uredaja 81
4.5. Prva instalacija 81
5.OSNOVNEOPERACije 82
5.1.Postavke upravljanja programima 82
5.1.1. Uredivanje programa 82
5.2.Pretraga programa 83
5.2.1.Automatska pretraga 83
5.2.2. Pretraga po kanalu 84
Distributor & manufacturer authorized representative:
ENGEL SYSTEMS, S.L. declares that these equipments are in compliance with the essential requirements and other relevant provisions of Directives 2014/53/EU (RED), 2011/65/EC (RoHS) and 2009/125/EC (ERP)
DVB-T2 Digital Terrestrial Receiver
RT0420T2
AXIL
With the standard or other normative documents:
LVD: (EN 60065: 2014)
EMC: (EN 50561-1: 2013+AC: 2015)
(EN 55020: 2007+A11: 2011)
(EN 61000-3-2: 2014)
(EN 61000-3-3:2013)
RoHS: (IEC62321: 2013 Ed 1.0)
(IEC62321: 2008 Ed 1.0)
ERP: (EN 62087: 2012)
(EN 50564:2011)
Victor Marsal
CEO

Barcelona, 24/07/2016

Note on environmental protection:

After the implementation of the European Directive 2002/96/EU in the national legal system, the following applies: Electrical and electronic devices may not be disposed of with domestic waste. Consumers are obliged by law to return electrical and electronic devices at the end of their service lives to the public collecting points set up for this purpose or point of sale. Details to this are defined by the national law of the respective country. This symbol on the product, the instruction manual or the package indicates that a product is subject to these regulations. By recycling, reusing the materials or other forms of utilising old devices, you are making an important contribution to protecting our environment.