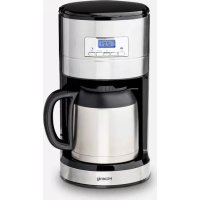
STW26 - Coffee machine H.KOENIG - Free user manual and instructions
Find the device manual for free STW26 H.KOENIG in PDF.


| Product type | Coffee machine |
| Brand | H.Koenig |
| Model | STW26 |
| Power supply | 220-240 V ~ 50/60 Hz |
| Rated power | 1000 W |
| Water tank capacity | 1.2 L |
| Type of coffee used | Ground coffee |
| Delayed programming function | Yes |
| Automatic shut-off function | Yes, after 15 minutes |
| Memory function | Yes |
| Display type | LCD screen |
| Control type | Buttons |
| Carafe material | Glass |
| Filter type | Permanent filter (reusable) |
| Warranty | 2 years |
| Maintenance | Regular cleaning and descaling |
| Safety | Burn protection, automatic shut-off |
| Included accessories | Carafe, filter, funnel |
| Recommended descaling | Citric acid or domestic descaler |
Frequently Asked Questions - STW26 H.KOENIG
User questions about STW26 H.KOENIG
0 question about this device. Answer the ones you know or ask your own.
Ask a new question about this device
Download the instructions for your Coffee machine in PDF format for free! Find your manual STW26 - H.KOENIG and take your electronic device back in hand. On this page are published all the documents necessary for the use of your device. STW26 by H.KOENIG.
USER MANUAL STW26 H.KOENIG
When using electrical appliances, basic safety precautions should always be followed to reduce the risk of fire, electrical shock and/or personal injury.
- Read all instructions.
- Make sure that your outlet voltage corresponds to the voltage stated on the rating label of the coffee maker.
- Do not touch hot surface. Use handles or knobs only.
- Do not immerse appliance, cord or plug in water or other liquid.
- Close adult supervision is necessary when appliance is used by or near children.
- Unplug from outlet when not in use and before cleaning. Allow to cool before putting on or taking off parts and before cleaning the appliance.
- Do not place the appliance on or near a hot gas or electric burner or on a heated oven.
-
Do not operate any appliance with a damaged cord or plug, or after the appliance malfunctions, or has been damaged in any manner. Return appliance to the nearest authorized service facility for examination, repair or adjustment. If its mains cord is damaged, to prevent from risks, it must be replaced by the manufacturer the nearest service agent or a qualified person.
-
Do not use accessories not recommended by the appliance manufacturer. It may result in fire, electric shock and/or personal injury.
-
Do not let cord hang over edge of table or counter, or touch hot surface.
-
To disconnect, remove plug from wall outlet. Always hold the plug. But never pull the cord.
-
Be careful not to get burned by the steam. Scalding may occur if the lid is removed during the brewing cycles.
-
Never use your coffee maker without water in it.
-
Stand the appliance on a table or flat surface.
-
Do not use appliance for other than intended use.
-
Do not use outdoors.
-
Save these instructions.
-
If the supply cord is damaged, it must be replaced by the manufacturer or its service agent or a similarly qualified person in order to avoid a hazard.
-
This appliance is intended to be used in household and similar applications such as:
-
Staff kitchen areas in shops, offices and other working environments;
-
by clients in hotels, motels and other residential type environments;
-farm houses;
—bed and breakfast type environments.
-
The appliance is only used for household, not for commercial use.
-
This appliance can be used by children aged from 8 years and above if they have been given supervision or instruction concerning use of the appliance in a safe way and if they understand the hazards involved.
Cleaning and user maintenance shall not be made by children unless they are older than 8 and supervised. Keep the appliance and its cord out of reach of children aged less than 8 years.
- This appliance may be used by persons with reduced physical, sensory or mental capabilities or lack of experience or knowledge, provided that they are supervised or instructed in the safe use of the appliance and that they fully understand the potential hazards.
Check that all accessories are complete and the unit is not damaged. Add water into water tank to the max level and brew water for several times without coffee powder, then discard the water. Clean all detachable parts thoroughly with warm water.
-
Open the top lid and fill the water tank with drinking water. The water level should not exceed the maximum level marked on the water gauge.
-
Place the funnel into the funnel support and make sure the funnel is assembled correctly. Then put the filter correctly.
-
Add coffee powder into filter. Usually a cup of coffee need a level spoon of coffee powder, but you may adjust according to personal taste. Then close the top lid.
-
Place the jug on the keeping warm plate.
-
Plug the power cord into the outlet. The LCD will display 12:00 and the colon will flash.
-
Press on/ off button once, the indicator in it will be illuminated red. The appliance will begin working.
-
The brewing process can be interrupted by pressing the on/off button once at any time during operation, the appliance will continue brewing once on/off is pressed again.
Note: You can take out the jug, pour and serve at any time. The appliance will stop dripping automatically. But the time cannot exceed 30 seconds.
- Remove out jug to serve when finish brewing (about one minute later after the coffee stops dripping out.)
Note: the coffee you get will less than the water you have added, as some water is absorbed by coffee ground.
- When the process is finished, if you do not want to serve immediately, keep the coffee maker is energized, the coffee can be kept warm in the jug. The
blue background indicator will be distinguished after brewing within 15mins and display shows current time. If it has not been manually disconnected at the completion of brewing. For an optimum coffee taste, serve it just after brewing.
- Always turn the coffee maker off and disconnect the power supply when not use.
Caution: When pour coffee, the momentary inclined angle of jug shall not be more than 45 degree from the vertical position, you shall pour the coffee slowly until the jug is empty, otherwise the coffee in the jug will rush to the bottom of jug lid, and the coffee will flow out from two edges of lid and hurt person!
AUTOMATIC START FUNCTION
If you do not want the coffee maker to start operation immediately, for example now it is 12:00, you hope that the coffee maker will automatically start at 13.03 in the evening, first follow steps 1 to 5 of above section, and then you can set the automatic start function as follows:
- Press Set Delay button one time, the word Clock is showed at the up-right corner on display.
- Press the Hour and Minute button continuously to set the present time (real clock), that is 12.00, (See fig. 1). If you not press and hold the Hour and Minute
button for 15S, the word CLOCK will not showed on display.
Note: the time cycle is 24 hours.
- Press Set Delay button again and the word Time shows on up-left corner of display.
- Set the delayed starting time by pressing Hour and Minute button repetitively, that is 13:03(see Fig. 2).
- After setting the presetting time, press the Set Delay button once, the letter TIMER on the LCD will disappear. The LCD will display the current clock. The unit will begin to brewing coffee when the delayed brew time comes.
- Press the on/off button once, the indicator in it will illuminate blue.
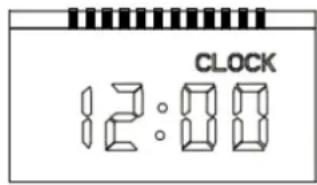
Fig. 1
Note: You may cancel the automatic start function by pressing on/off button once to stop machine, if you want to brew coffee
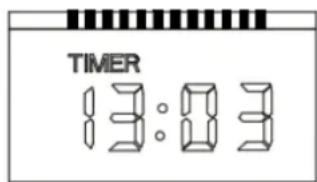
Fig. 2
again immediately, you shall press on /off button once to start brewing immediately. If you want to change the automatic start time, only following the above 1-4 steps again.
When the time is due the indicator will illuminate green, then the unit starts brewing. The blue background indicator will be distinguished after brewing within 15mins and display shows current time. If it has not been manually disconnected at the completion of brewing.
MEMORY
If the power supply has been broken off or unplug the power cord unintentionally during operation, the appliance will be continued previous operation automatically from the point when the disconnection occurred provided that the pause does not exceed 10s, even without pressing any button. In the event the pause time exceeds 10, the display shows the default setting, the appliance must be re-started.
CLEANING AND MAINTENANCE
CAUTION: Be sure to unplug this appliance before cleaning. To protect against electrical shock, do not immerse cord, plug or unit in water or liquid. After each use, always make sure plug is first removed from wall outlet.
1) Clean all detachable parts after each use in hot, sudsy water.
2) Wipe the product's exterior surface with a soft, damp cloth to remove stains.
3) Water droplets may buildup in the area above the funnel and drip onto the product base during brewing. To control the dripping, wipe off the area with a clean, dry cloth after each use of the product.
4) Use a damp cloth to gently wipe the keeping warm plate. Never use abrasive cleaner to clean it.
5) Replace all parts and keep for next use.
REMOVING MINERAL DEPOSITS
To keep your coffee maker operating efficiently, you should clean away the mineral deposits left by the water regularly according to the water quality in your area and the frequency use the appliance, the detail is as follows:
- Fill the water tank with water and descale to the maximum level in the gauge of coffee maker (the scale of water and descale is 4:1, the detail refers to the instruction of descale. Please use "household descale", you can use the citric
acid instead of the descale (the one hundred parts of water and three parts of citric acid).
- Place the jug on the keeping warm plate, pay attention to let center line of carage aligns with that of brew basket.
- Press the on/auto/off button once and the indicator in it will be illuminated red. After a while, water will drop out automatically.
- After percolate the equivalent of one cup and then switch off the appliance by pressing the on/auto/off button twice. The indicator in it will be illuminated blue and will be extinguished after 15s.
- Leave the solution work for 15 minutes, repeat the steps of 3-5 again.
- Turn the appliance on by pressing the on/auto/off button once and run off the water until the water tank is completely empty.
- Rinse by operating the appliance with water at least 3 times.
HINTS FOR GREAT-TASTING COFFEE
- A clean coffee maker is essential for making great-tasting coffee. Regularly clean the coffee maker as specified in the "CLEANING AND MAINTENANCE" section.
Always use fresh, cold water in the coffee maker. - Store unused coffee powder in a cool, dry place. After opening a package of coffee powder, reseal it tightly and store it in a refrigerator to maintain its freshness.
- For an optimum coffee taste, buy whole coffee beans and finely grind them just before brewing.
- Do not reuse coffee powder since this will greatly reduce the coffee' flavor. Reheating coffee is not recommended as coffee is at its peak flavor immediately after brewing.
- Clean the coffee maker when over-extraction causes oiliness. Small oil droplets on the surface of brewed, black coffee are due to the extraction of oil from the coffee powder.
- Oiliness may occur more frequently if heavily roasted coffees are used.
WARRANTY
The warranty period for our products is 2 years, unless otherwise stated, starting from the date of initial purchase or the date of delivery.
If you have any problems or questions, you can easily access our help pages,
troubleshooting tips, FAQ, and user manuals on our service site: https://sav.hkoeniq.com.
By typing the reference name of your device in the search bar, you can access all available online support, designed to best meet your needs.
If you still cannot find an answer to your question or problem, then click on "Did the answer solve your problem?" This will direct you to the Customer Support Request Form, which you can fill out to validate your request and get help.
WARRANTY CONDITIONS
The warranty covers all failures occurring under normal use, in accordance with the usage and specifications in the user's manual.
This warranty does not apply to packaging or transportation problems during shipment of the product by the owner. It also does not include normal wear and tear of the product, nor maintenance or replacement of consumable parts.
EXCLUSION OF WARRANTY
- Accessories and wearing parts (^*)
- Normal maintenance of the device.
- All breakdowns resulting from improper use (shocks, failure to comply with power supply recommendations, poor conditions of use, etc.), insufficient maintenance or misuse of the device, as well as the use of unsuitable accessories.
- Damage of external origin: fire, water damage, electrical surge, etc.
- Any equipment that has been disassembled, even partially, by persons other than those authorized to do so (notably the user).
- The products whose serial number would be missing, deteriorated or illegible that would not allow its identification.
- The products subjected to leasing, demonstration, or exhibition.
(*) Some parts of your device, called wear parts or consumables, deteriorate with time and frequency of use of your device. This wear and tear are normal but can be accentuated by poor conditions of use or maintenance of your device. These parts are therefore not covered by the warranty.
The accessories supplied with the device are also excluded from the warranty. They cannot be exchanged or refunded. However, some accessories can be purchased directly through our website: https://sav.hkoenig.com/.
ENVIRONMENT
CAUTION:
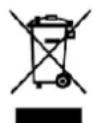
Do not dispose of this product as it has with other household products. There is a separation of this waste product into communities, you will need to inform your local authorities about the places where you can return this product. In fact, electrical and electronic products contain hazardous substances that have harmful
effects on the environment or human health and should be recycled. The symbol here indicates that electrical and electronic equipment should be chosen carefully, a wheeled waste container is marked with a cross.
FRANÇAIS
Cafetière Thermos programmable
PRECAUTIONS IMPORTANTES
SAV:https://sav.hkoeniq.com.
CONDITIONS DE GARANTIE


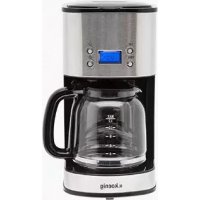
Brand : H.KOENIG
Model : STW26
Category : Coffee machine