59005 - Lighting Goobay - Free user manual and instructions
Find the device manual for free 59005 Goobay in PDF.
| Product type | LED projector without motion detector |
| Brand | Goobay |
| Model | 59005 |
| Dimensions (L x W x H) | 325 x 230 x 205 mm |
| Weight | 1190 g |
| Power supply | 220-240 V~, 50 Hz |
| Power consumption | 20 W |
| Luminous flux | 1650 lm (±10 %) |
| Color temperature | 6500 K (cool white) |
| Protection rating | IP65 |
| Protection class | I (fixed installation) |
| LED lifetime | 30000 hours |
| Mounting type | On tripod (or wall mount depending on variant) |
| Motion detector | No |
| Electrical connection | Terminal block (fixed installation by an electrician) |
| Minimum cable cross-section | 1.0 mm² |
| Operating conditions | -25 °C to +40 °C, ≤93 % RH |
| Intended use | Outdoor lighting (garden, facade, etc.) |
| Maintenance | Clean with a soft, dry cloth. Do not use chemical products. |
| Safety instructions | Read the manual before use. Installation by a specialist. Hot surface – do not touch. |
| Package contents | Spotlight, instruction manual |
Frequently Asked Questions - 59005 Goobay
User questions about 59005 Goobay
0 question about this device. Answer the ones you know or ask your own.
Ask a new question about this device
Download the instructions for your Lighting in PDF format for free! Find your manual 59005 - Goobay and take your electronic device back in hand. On this page are published all the documents necessary for the use of your device. 59005 by Goobay.
USER MANUAL 59005 Goobay
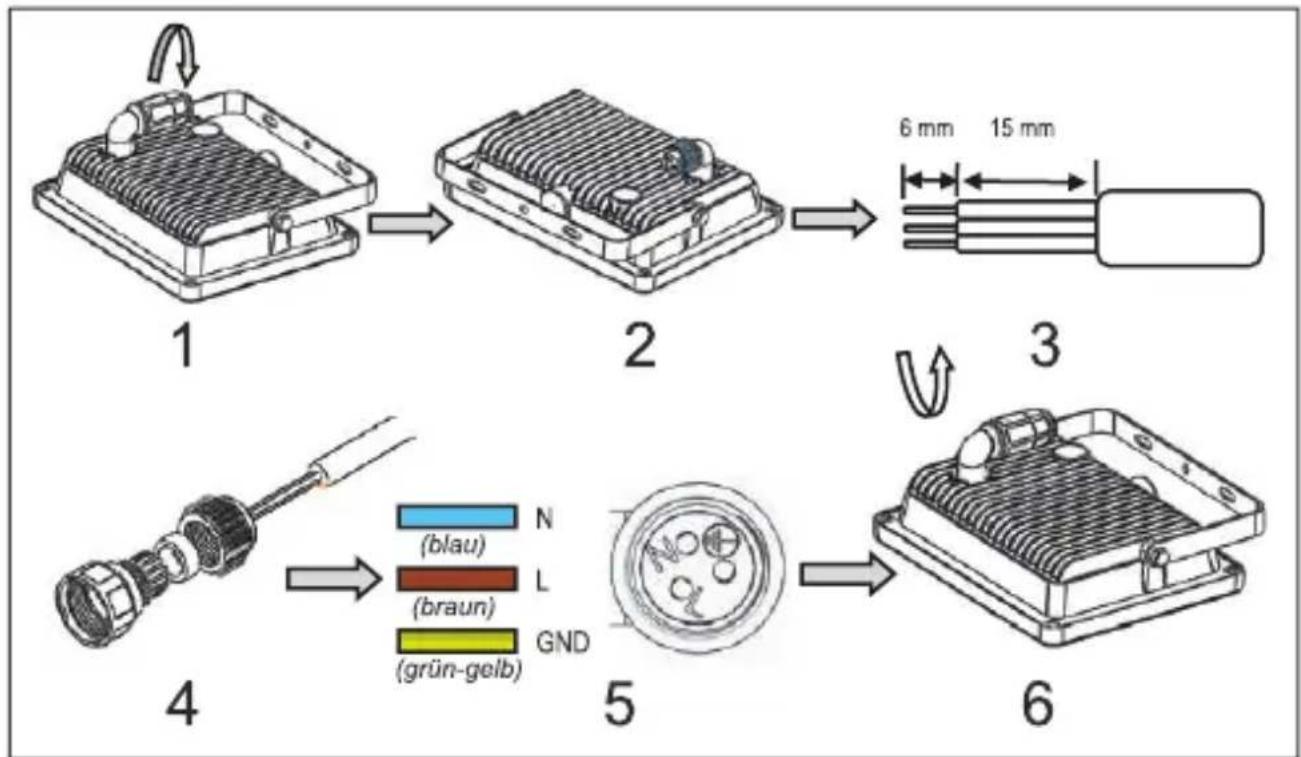
Fig.7: Festinstallation
1 Safety instructions. 14
1.1 In general 14
1.2 Warning levels.. 14
2 Description and Function 15
2.1 Product 15
2.2 Product parts.. 15
2.3 Scope of Delivery 15
2.4 General specifications 15
2.5 Specific specifications 16
3 Intended Use 17
4 Preparation 17
5 Mounting 17
5.1 Floodlight for floor mounting (Art. 59004) 17
5.2 Floodlights for wall mounting 17
5.3 Floodlights with stand 18
5.4 Floodlights with tripod 19
6 Installation 19
6.1 Models with protective contact plug 19
6.2 Models for fixed installation 20
7 Make settings 21
8 Maintenance, Care, Storage and Transport 21
9Liability notice. 21
10 Disposal Instructions 21
11 EU Declaration of Conformity 22
1 Safety instructions
1.1 In general
The user manual is part of the product and contains important information for correct use.
Read the user manual completely and carefully before use. The user manual must be available for uncertainties and passing the product.
Keep this user manual.
Installation, assembly, maintenance and repair work must be carried out only by trained electrical specialists.
Risk of electric shock
Cut off power supply before any work on the product, switch off
safety fuses and secure against reconnection.
Assure and check the absence of voltage before any work on the product.
Do not modify product and accessories.
Hot surfaces
Do not touch in or immediately after use.
Avoid proximity to flammable surfaces.
Heat storage
Do not cover the product.
Do not use in sealed environments.
Avoid stresses such as heat and cold, moisture and direct sun
light, vibration and mechanical pressure.
Motion detectors are not suitable as a component of alarm systems within the meaning of the Association of Property Insurers (VdS). They can trigger false alarms if the installation place has been chosen unfavorably.
Only use EN 60998-2-1 and EN 60998-2-2 tested terminals.
Follow local installation and building regulations.
In case of questions, defects, mechanical damage, trouble and other problems, non-recoverable by the documentation, contact your dealer or producer.
Use product, product parts and accessories only in perfect condition.
Choose mounting hardware according to the substrate conditions and the product weight.
Regularly check the tightness of product/screws.
Do not over-tighten the screws.
Threads can be damaged.
1.2 Warning levels
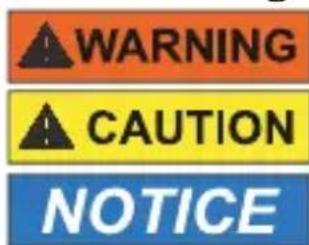
Warnings against hazards that may result in serious injuries or death in case of nonobservance.
Warnings against hazards that may result in injuries in case of non-observation.
Warnings against hazards that may result in material damage in case of non-observation.


2 Description and Function
2.1 Product
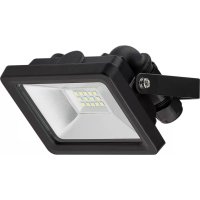
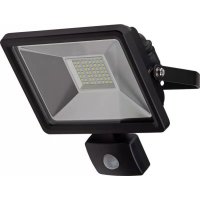
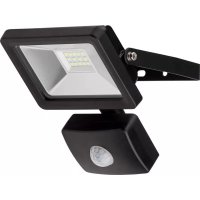
This product is a LED floodlight, some models are additionally equipped with integrated infrared motion detector. Objects are recognized by the sensor in the detection area. In case of movement changes, the connected LED floodlight is triggered.
Not dimmable.
2.2 Product parts
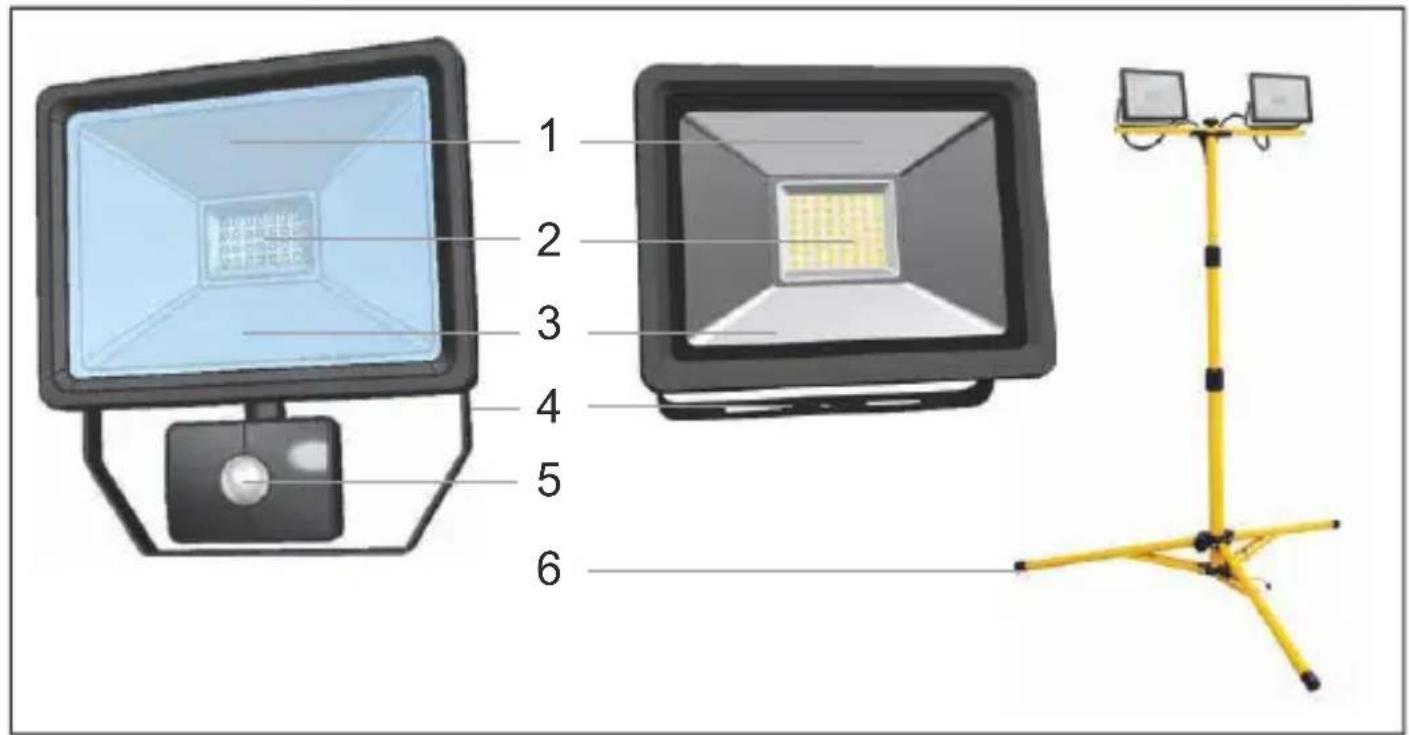
Fig.8: Product parts
1 reflector 2 LEDs 3 glass pane 4 Mounting bracket
5 IR sensor 6 Stand / Tripod
2.3 Scope of Delivery
LED floodlight with or without motion detector, operating instructions
2.4 General specifications
| input voltage 220-240 | V~ 50 Hz |
| operating conditions -25 | ~ +40 °C, ≤93 % RH |
| power factor >0.8 | |
| switching cycles >15000 |
Tab.5: General specifications
| LED life (hrs) 30000 | |
| CRI | >65 |
| Color temperature (K) 6500 | |
| protection class 1 (only | models with safety plug) |
2.5 Specific specifications
Tab.6: Specific specifications
| Article | 59001 / 59085 | 59002 / 59086 | 59003 / 59087 | 59004 59005 | 59006 | ||||||
| Power (W) | 10 | 20 | 30 | 20 | 20 | 30 | |||||
| Dimensions (mm) | 110 x 108 x 62.2 | 145.4 x 120.2 x 64.7 | 195 x 172 x 76.7 | 332 x 145 x 57 | 325 x 230 x 205 | 390 x 260 x 250 | |||||
| Weight (g) | 330 | 520 | 870 | 820 | 1190 | 1770 | |||||
| Luminous flux (±10 lm) | 830 | 1650 | 2500 | 1650 | 1650 | 2500 | |||||
| protection level | IP65 | ||||||||||
| Connection | Terminal | Safety plug | |||||||||
| Colour | |||||||||||
| Article | 58998 / 59082 | 58999 / 59083 | 59000 / 59084 | 59007 59008 | 59009 | ||||||
| Power (W) | 10 | 20 | 30 | 20 | 30 | 40 | |||||
| Dimensions (mm) | 158 x 110 x 84 | 184 x 145 x 84 | 222 x 195 x 92 | 670-1260 x 630 x 540 | 940-1850 x 950 x 830 | 740-1560 x 781 x 680 | |||||
| Weight (g) | 380 | 580 | 980 | 1870 | 2540 | 3500 | |||||
| Luminous flux (±10 lm) | 830 | 1650 | 2500 | 1650 | 2500 | 3300 | |||||
| protection level | IP44 | IP65 | |||||||||
| Detection angle (°) | 100 | - | |||||||||
| Range (m) | 10 | ||||||||||
| Switch-off delay | 10±5 s ~ 10±2 min. | ||||||||||
| Connection | Terminal | Safety plug | |||||||||
| Installation height (m) | 1.8-2.5 | - | |||||||||
| Colour | |||||||||||

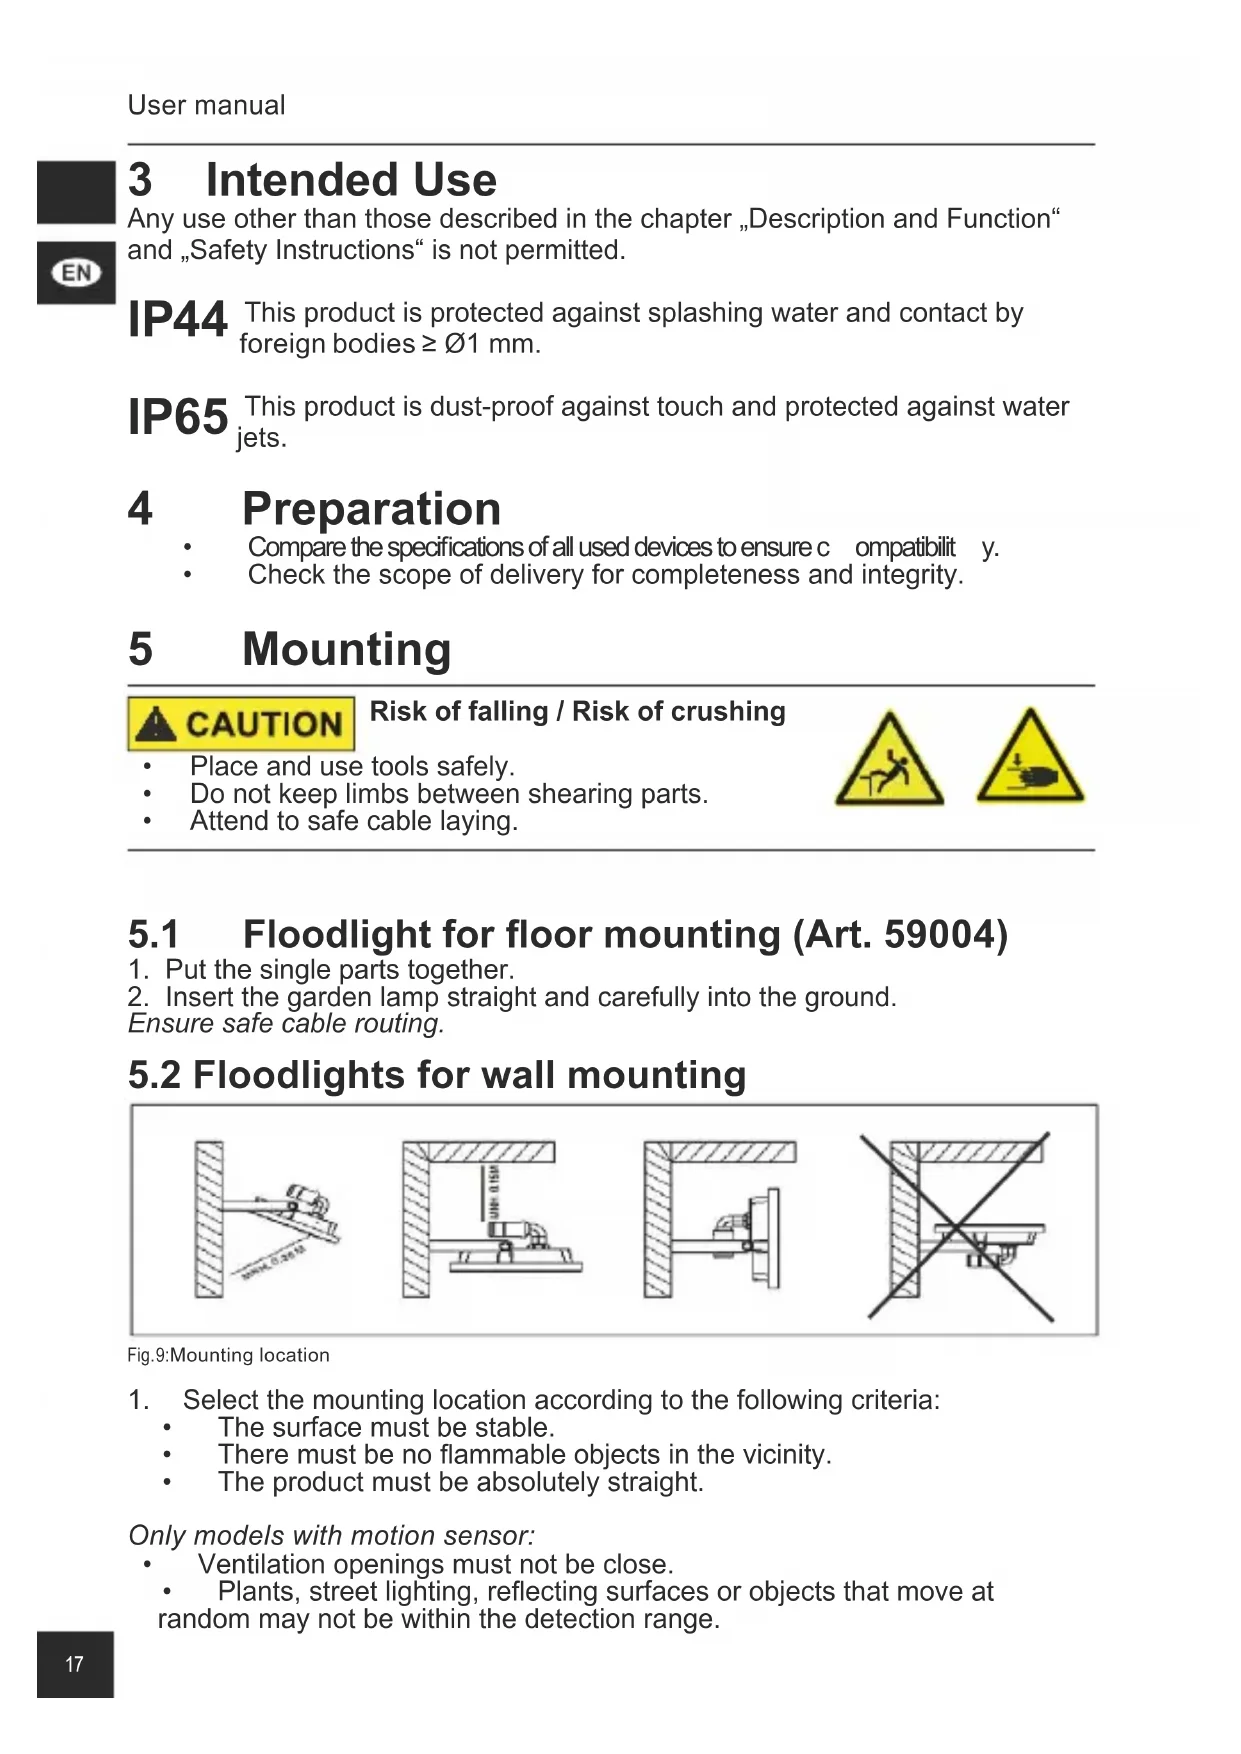
3 Intended Use
Any use other than those described in the chapter „Description and Function" and „Safety Instructions" is not permitted.
IP44 This product is protected against splashing water and contact by foreign bodies ≥ 01 mm.
IP65 This product is dust-proof against touch and protected against water jets.
4 Preparation
Compare the specifications of all used devices to ensure c ompatilit y.
Check the scope of delivery for completeness and integrity.
5 Mounting

CAUTION
Risk of falling / Risk of crushing
- Place and use tools safely.
- Do not keep limbs between shearing parts.
- Attend to safe cable laying.
5.1 Floodlight for floor mounting (Art. 59004)
- Put the single parts together.
- Insert the garden lamp straight and carefully into the ground.
Ensure safe cable routing.
5.2 Floodlights for wall mounting
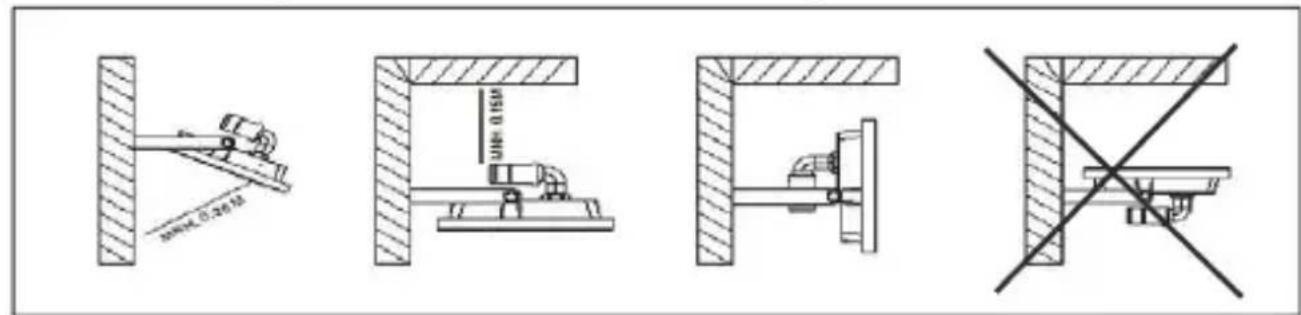
Fig.9:Mounting location
- Select the mounting location according to the following criteria:
The surface must be stable.
There must be no flammable objects in the vicinity.
The product must be absolutely straight.
Only models with motion sensor:
-
Ventilation openings must not be close.
-
Plants, street lighting, reflecting surfaces or objects that move at random may not be within the detection range.
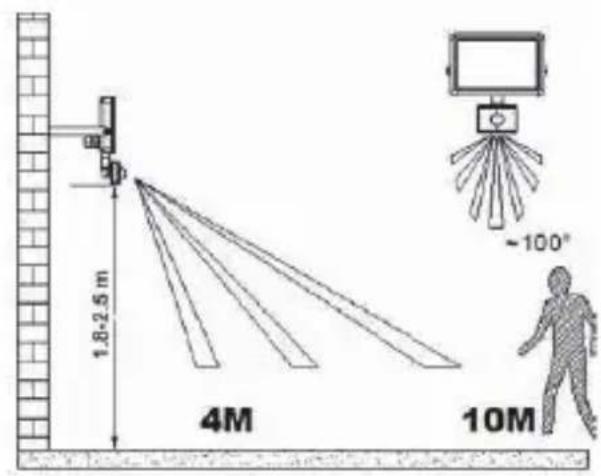
Fig.10:FIFloodlights for wall mounting -Reach
- Select suitable mounting material according to the selected surface and the product weight.
Mounting material is not included. - Mark the mounting hole spacing X and grommet Y by using the mounting bracket and a suitable pen.
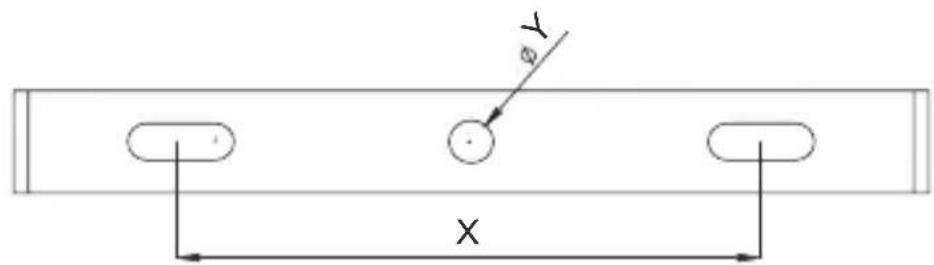
Fig.11: Floodlights for wall mounting - Mounting
Tab.7: Mounting hole spacing X and grommet Y
| Article Number XY | ||
| 59085, 59001, 59082, 58998 | 55 mm | Ø5.5 mm |
| 58999, 59083 | Ø6.5 mm59002, | |
| 59003, 59087, 59000, 59084 90 mm |
590868
- Drill the mounting holes with a suitable tool.
- Attach the LEDfloodlight motion sensor.
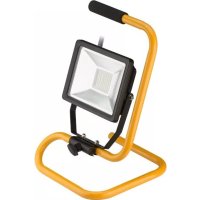
5.3 Floodlights with stand
The floaters are largely pre-assembled.
- Mount the parts as shown.
- Only place the floodlight on even, non-slipping and non-flammable surfaces.

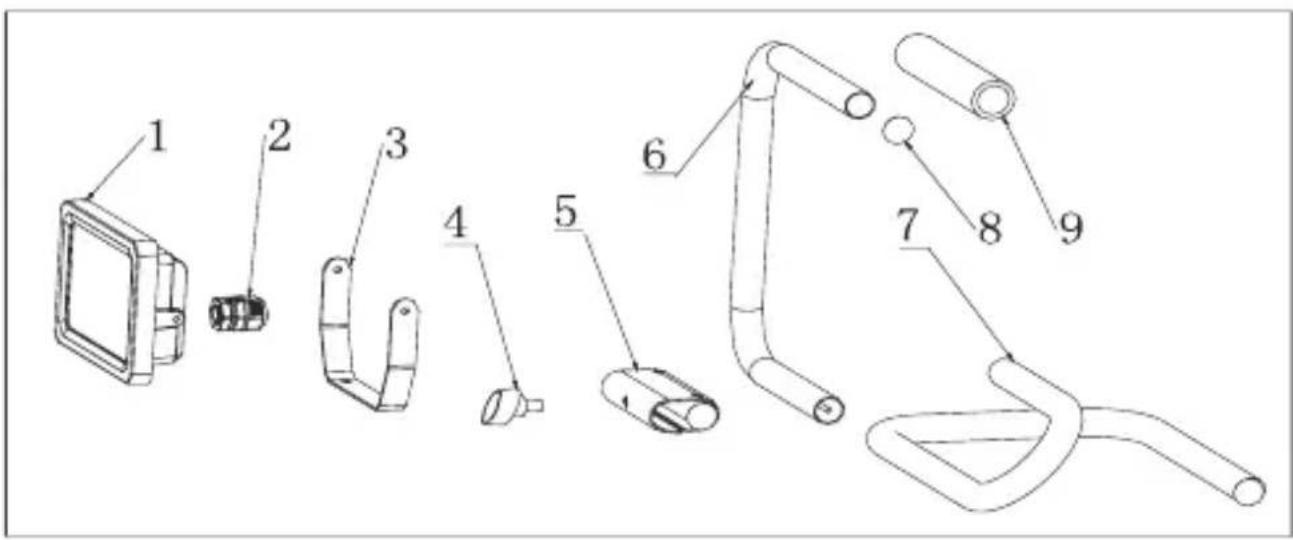
Fig.12: Floodlights with stand - Mounting
5.4 Floodlights with tripod
- Mount the tripods as shown.
- Attach the bracket (3) to the stand using the screw (4).
- Attach the floodlight (1) to the bracket (3) using screws (2).
- Only place the floodlight on even, non-slipping and non-flammable surfaces.
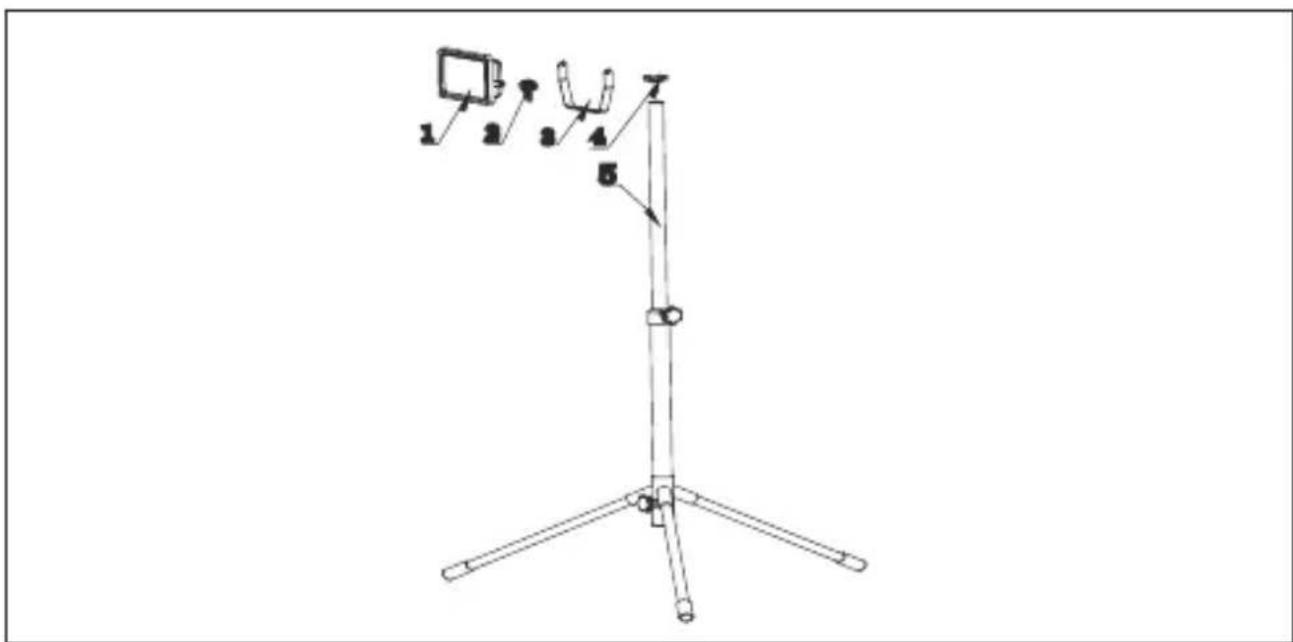
Fig.13: Floodlight with tripod - Mounting
6 Installation
6.1 Models with protective contact plug
Models with the protective contact plug installed do not have to be installed.
- Connect these to a free and easily accessible socket.
Protection class IP44 is only available when using IPX4 sockets.
6.2 Models for fixed installation

WARNING
Risk of electric shock
- Let open cable ends ONLY assemble by experienced electrician.
- Cut off power supply before any work on the product, switch off safety fuse and secure against reconnection.
Assure and check the absence of voltage before any work on the product.
Models without a mated protective contact plug must be permanently installed on the power supply.
The power cables used must have a minimum cross-section of 1.0mm^2 . Strands must be provided with wire end ferrules. The following connections are made at the luster terminal of the product:
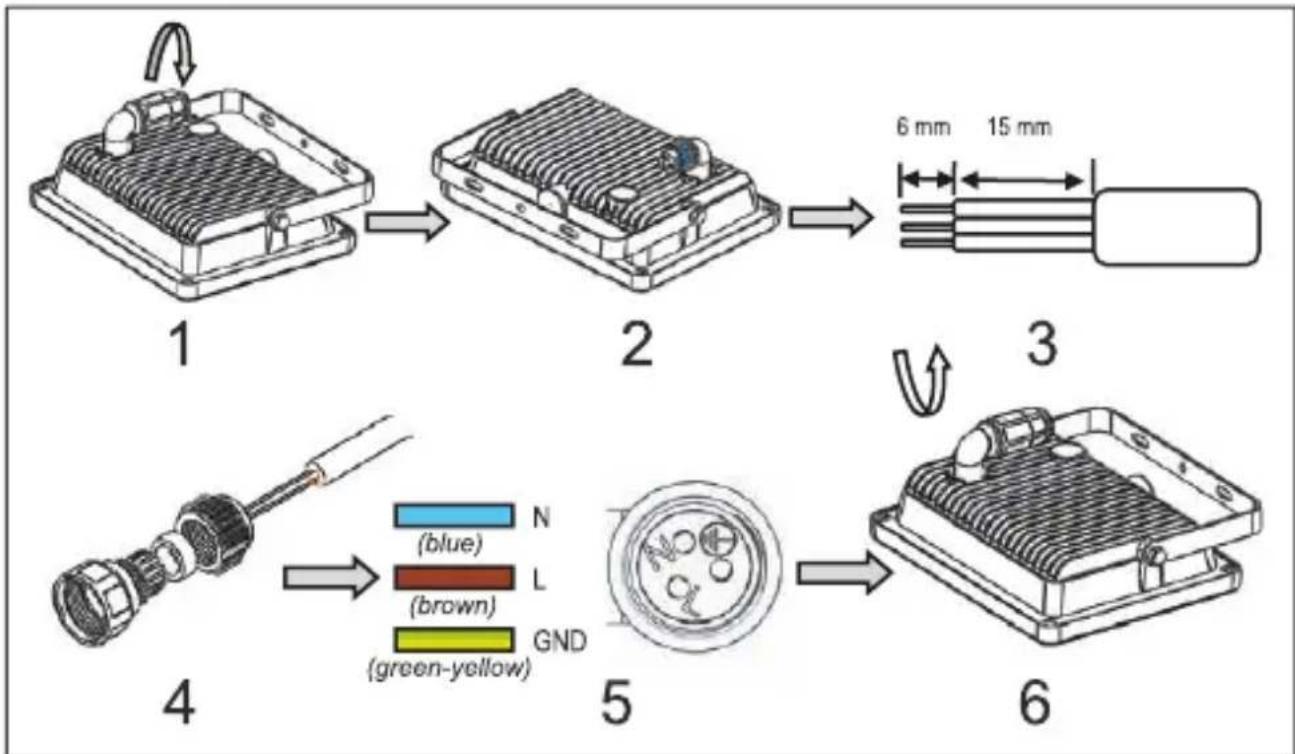
Fig.14: Fixed installation
- Turn off the fuse.
- Open the connection sleeve by turning it counter-clockwise until the connection block is released as shown in Fig. 7 - 2.
- Insulate the cables as shown in Fig. 7 - 3.
- Slide the parts of the connection sleeve shown in Figs. 7 - 4 over the connection cable.
- Screw the power cables as shown in Fig. 7 - 5 using a screwdriver.
- Close the connector by turning it clockwise, as shown in Figure 7 - 6.

7 Make settings
Only floodlights with motion sensor:
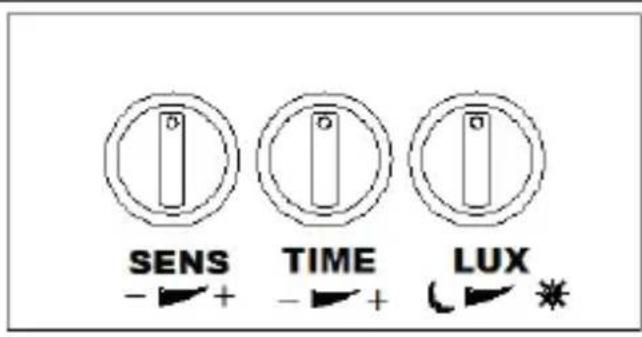
Tab.8: Adjustments (Floodights with motion sensors)
SENS: SENS adjusts the range of the PIR sensor. This is a minimum of 4m maximum of 10m .
TIME: TIME sets the switch-off delay between min. 10 ± 5 s and 10 ± 2 minutes.
LUX: LUX adjusts the sensitivity of the photo cell and detects the ambient brightness between day and night and night only.
8 Maintenance, Care, Storage and Transport
The product is maintenance-free.
NOTICE
Material Damage
Only use a dry and soft cloth for cleaning.
Do not use detergents or chemicals.
Store cool and dry.
- Store the product out the reach of children and in a dry and dust-protected ambience when not in use.
- Keep and use the original packaging for transport.
9 Liability notice
We reserve the right to printing errors and changes to product, packaging or product documentation.
See our terms of warranty. These are available in their current form under the given contact details.
10 Disposal Instructions
According to the European WEEE directive, electrical and electronic equipment must not be disposed with consumers waste. Its components must be recycled or disposed apart from each other. Otherwise contaminative and hazardous substances can pollute our environment.
As a consumer, you are committed by law to dispose electrical and electronic devices to the producer, the dealer, or public collecting points at the end of the devices lifetime for free. Particulars are regulated in national right. The symbol on the product, in the user's manual, or at the packaging alludes to these terms. With this kind of waste separation, application, and waste disposal of used devices you achieve an important share to environmental protection.
WEEE No: 82898622
11 EU Declaration of Conformity
CE With the CE sign Goobay, a registered trademark of the Wentronic GmbH ensures, that the product is conformed to the basic standards and directives.

BETRIEBSANLEITUNG 3 USER MANUAL 13 MODE D'EMPLOI 23 ISTRUZIONI PER L'USO 33
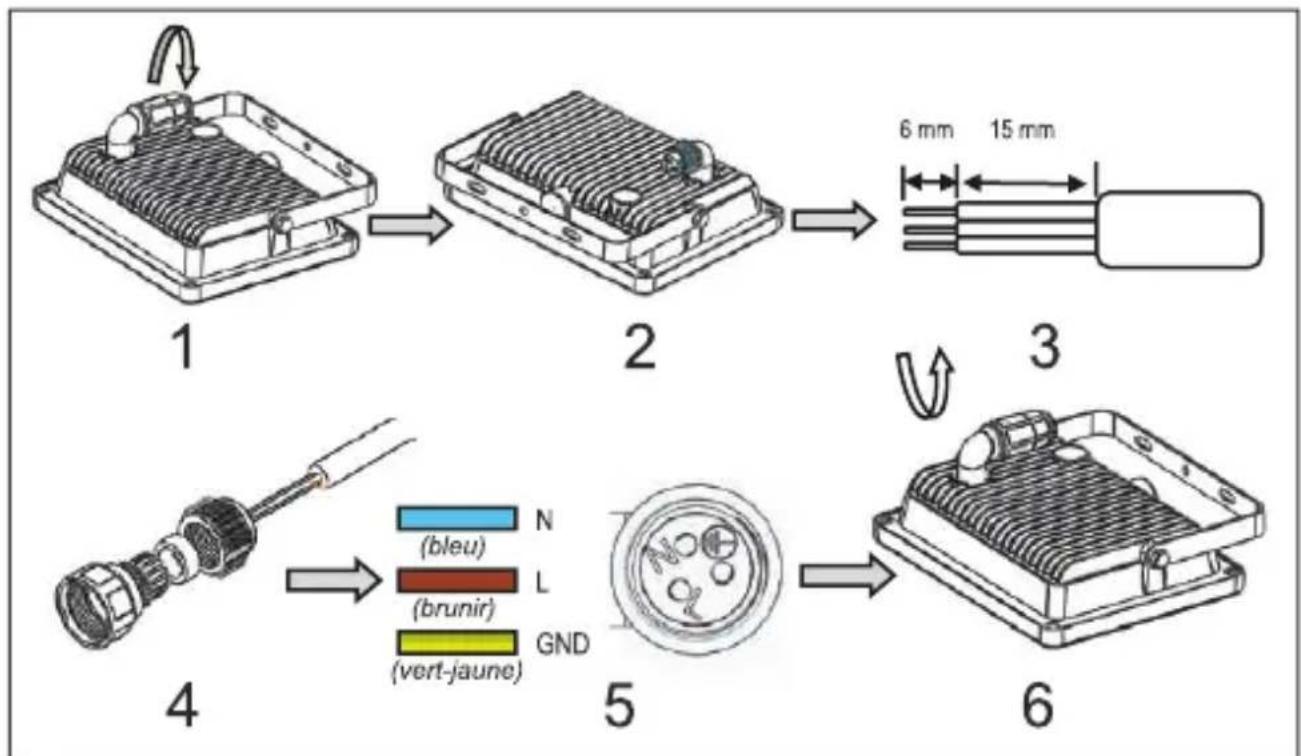
Fig.21: Installation fixe
CE With the CE sign Goobay®, a registered trademark of the Wentronic GmbH ensures, that the product is conformed to the basic standards and directives.
Betriebsanleitung
User manual
Mode d'emploi
59003 30W LED FLOODLIGHT
59087 30W LED FLOODLIGHT WHITE
59004 20W LED FLOODLIGHT WITH SINGLE SPIKE
59005 20W Portable LED worklight with stand S type
59006 30W Portable LED worklight with stand S type
58998 10W LED FLOODLIGHT WITH SENSOR
59082 10W LED FLOODLIGHT WITH SENSOR WHITE
58999 20W LED FLOODLIGHT WITH SENSOR
59083 20W LED FLOODLIGHT WITH SENSOR WHITE
59000 30W LED FLOODLIGHT WITH SENSOR
59084 30W LED FLOODLIGHT WITH SENSOR WHITE
59007 20W Portable LED worklight with Tripod
59008 30W Portable LED worklight with Tripod
59009 2x20W Portable LED worklight with Tripod
(0.14 € / minute from German landline)
© by Wentronic Deutschland
V1.5
REV2019-09-16
Hotline: +49 (0180) 5005882