Slim 1500 - Pan DUUX - Free user manual and instructions
Find the device manual for free Slim 1500 DUUX in PDF.


User questions about Slim 1500 DUUX
0 question about this device. Answer the ones you know or ask your own.
Ask a new question about this device
Download the instructions for your Pan in PDF format for free! Find your manual Slim 1500 - DUUX and take your electronic device back in hand. On this page are published all the documents necessary for the use of your device. Slim 1500 by DUUX.
USER MANUAL Slim 1500 DUUX
Thank you for choosing Duux.
We're so glad you decided to read the Instructions to your new Ubuntu conveter heater! Many users casually skimless instructions and seek up (figure it out) on their own. But studies show that people who read instructions will get up to speed more quickly and efficiently than those who spoke around with trial and error.
At 12:00 we believe in the Importance of a comfortable and healthy living environment. Enhancing your well-being by designing appealing, functional and effective products is the passion that drives us every day. With our range of innovative air treatment products we aim to provide you the best possible indoor air quality.
Slim maximizes your comfort with its powerful heating performance. It grows cold air through the heating element, effectively increasing the amount of warm air in the room to raise the temperature. There's no shortage of features either. The LED display with temperature indicator always keeps you informed while the adjustable digital thermometer with 120^ accuracy and a heating program provide full control. And thanks to it's IP21 classification, Slim can also be used in damp spaces.
Read this manual carefully to get the most out of your Sim convector heater
Table of contents
- Product overview 4
- Installation & use 5
- Functions 8
- Mlntg2026.13
- Technical specifications 15
- FAQ 16
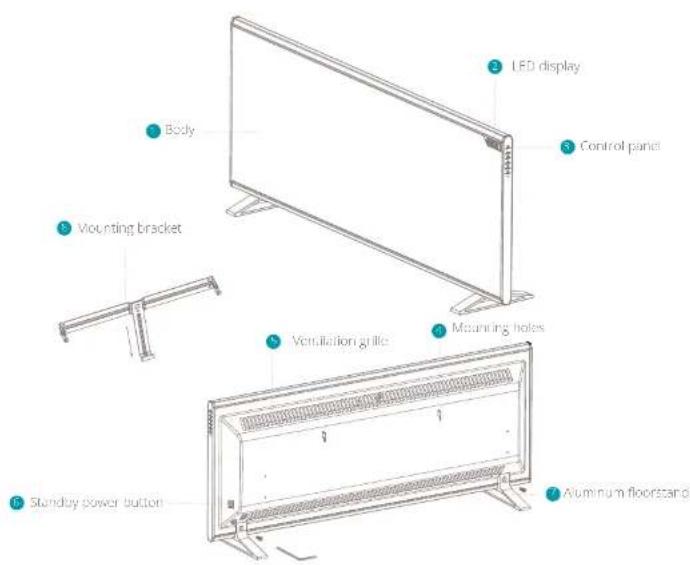
1. Product overview 2. Installation and use
A. Note: Please take notice of below instructions and the separately included winning sheet before using the protocol.
WARNING: This product is for household use only. Connect the appliance to single-phase AC power that matches the voltage specified on this rating label.
A. WARNING: In order to avoid overheating, do not cover the heater.
Installation
The symbol meaning is "DO NOT COVE"
The symbol meaning is "SO NOT INSLRT" HING IN
A The symbol meaning is 'CAUTION HIGH TEMPERATURES'
- Never leave the heater unattended while it is in use. Always turn the power switch to OFF position and unplag from the wall outlet when not in use
- Extreme caution is necessary when any heater is used by or near children, disabled or elderly persons and whenever the heater is left operating unattended. Keep children away from the heater when in use.
Do not place the heater below an electrical barline.
Do not distribute the power cord under carping.
or similar floor covering. Arrange the power cord away from traffic areas to prevent orpping.
- Do not operate the heater with a damaged power cord or plug, after malfunctions or after it has been dropped or damaged in any manner.
If the power cord is damaged, it must be replaced by the manufacturer, an authorized service agent or a qualified person in order to avoid a hazard. Avoid the use of extension cords as this may create and cause a risk of fire.
Use the heater in a well ventilated area. Do not insert or allow objects to enter the ventilation or exhaust opening. To prevent fire, do not block air vents or exhaust openings in any manner. Do not use on soft surfaces, like a bed, where openings may become blocked. Use the heater on flat, dry surfaces only.
Do not place the heater near flammable materials, surfaces or substances, as there may be a risk of fire. Keep them at least 1 m from the front of the device and keep them away from the sides and rear
- Do not use the heater in any areas where petrol, paint or other flammable liquids are stored such as grates or workshops.
Do not use this heater in the immediate surroundings of shops, shows or swimming pools. Never place the heater on a surface where it may fall into a bathrobe or other water container.
- This heater is hot when in use. To avoid burns and personal injury, do not touch hot surfaces
Make sure that no other appliances are plugged in the same electrical outlet as this may cause overload.
Children under 3 years should be kept away from less continuously supervised. Children aged from 3 years are at risk than 8 years shall only switch on/off the appliance provided that it has been placed or installed if intended normal operating position and they have been given supervision or instruction concerning use of the appliance in a safe way and understanding the hazards involved. Children aged from 3 years and less than 8 years should not play in, regulate and clean the appliance or perform maintenance.
Caution: Some parts of this product can become very hot and cause burns. Particular attention to children and vulnerable persons is required.
This appliance can be used by persons with reduced physical, sensory or mental capabilities or children aged from 8 years and above if they have been given supervision or instruction concerning use of the appliance in a safe way and understand the hazards involved. Children shall play with the appliance.
Installing the device
This heater can be used with the aluminum floorstand or wall mounted, if you use the product on a flat surface, it must be attached to the aluminum floorstand before operating the unit. Drill assembly instructions can be found below.
Note: This unit is far floor use on wall mounting only only.
Warning: Do not operate the device without the aluminum floorstand or mold bracket. Operate the heater only in upright position. Any other position, or angle could create a kozorodos situation.
A. Warning: Do not install this product vertically, or it will stop work or cause risk of fire installation products figure A,B,C,D,E
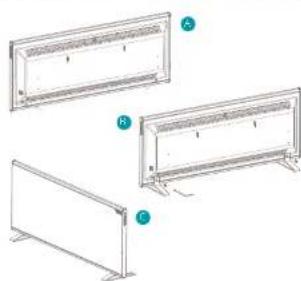
Aluminum floorstand installation
Unpack both aluminum feet and take out the rubber plug (see figure A).
Put the product on a suitable and stable position and use an alien way to attach the feet with screws (see figure B).
After the aluminium floorstand has been installed, put the product in an upright position on the floor (see figure 1). Now, the product can be operated.
A. Note: Pay attention to the correct position of the Jenn. The short side of the Jenn should be on the right side of the product.
Wall mounting installation
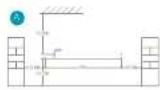
Drill 4 holes with a diameter of 8mm at the positions in figure A and solid wall plugs into 4 holes.
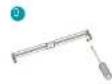
Fix the horizontal bracket or one wall with supports (figure 8).
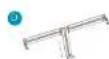
Install the vertical bracket with screws onto the horizontal bracket (see Figure C).
Once installed the bracket, add the rubber case into it and end of the vertical track to protect the brackets from scratching the premist (see figure 1).
After finishing the installation of the bracket, align the holes on back of product and click the horizontal bracket into the product. Once attached, move leftwards to fix the product (see figure E).
Note: To remove the header from the bracket, please operate by moving to opposite directions from involution.

Placement & connecting
Before using the heater, make sure that it is on a flat and stable surface. The heater must be connected to an appropriate electrical outlet. Keep tissue clothing or clothing, furniture and flammable material away from the wall outlet where the heater is plugged in.
3. Functions
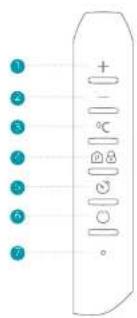

Control panel Remote control
Increase compensation
Decrease temperature
Temperature scaling
Change heating program
Tneet
Power button
Operating indicator
Power button
Tir
Temperature setting
Change healing program
12 Increase temperature
Decrease temperature
Functions
Increase the value of temperature or timer
Decrease the value of temperature or timer
Change heating program between HOME, OFFICE, or CABIN.
^ C Press this button to enter the temperature setting.
Press this button to activate the timer mode.
Press this button to select the unit or off
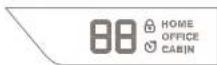
Display layout
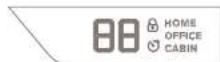
Combination button and functions
Child lock - Press the button for 5 seconds to lock all program functions. "check symbol lights on display with light on. Press for 5 seconds again to deactivate the child lock.
Light intensity Press the button for 5 seconds to adjust the intensity of the standby light by pressing the I_r or P button in total 3 intensities can be selected.
Factory reset - Press the button for 20 seconds to return the product bank to its factory setting.
Using the device
First switch the red mechanical button "POWER" to ON by pressing the suction on the right side of freezer. Further prices: the ON/OFF switch to start to turn the product on or off
Note: This unit is for floor use or wall mounting use only.
A Note: Current time (hour/minutes) need to be set before entering into one of the heating modes (Home/Occipit/Cabin) by pressing button. The current date and time can be set according to below steps:

Hour setting
The current hour can be set by pressing the timer button, which shows the number 23 and the symbol will blink on display. The time can be set by pressing -4 and -9, after which the display will show the different hours from 00 to 23. When the hour setting is completed, press the timer setting button to enter the minute settings. The display will keep blinking for 7s if no button is pressed.
Minute setting
After finishing the busin setting, the program will automatically enter into minute setting and the number 30 and 31 on the display will fill. The correct minute can be set by pressing key, after which the display will show the different minutes from 01 to 38. When the minute setting is completed, press the button to complete the time setting and to enter normal mode. The display will keep blinking for 75 if no button is pressed.
Note: if no buttons are pressed for 7 seconds then the product will go back to its setting. Only when the correct hour and minute have been confirmed, will the different operation modes function accordingly.
Remote control
Note: This heater is equipped with a remote control, which can be used in the same way as the control panel on the side of the product.
First remove the insulating paper which covers battery before using this remote camera. Below below instructions
1 Remove the battery bracket from back of remote control like figure A.
- Removes this initial starting pattern that converges battery like figure 8.
- Insert the battery bracket into remote control line figure C1.
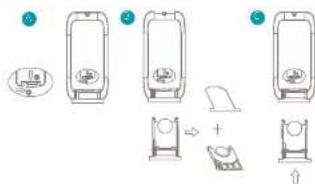
Note: Please use this extra control unit within 6 meters distance, please make sure the control angle is within 30 degrees.
Normal operating mode
In the normal operating mode the temperature can be adjusted according to the preferred temperature by pressing -bricking. The product can be used with a temperature will range of 15^ to 36^ .
Timer setting
The product can automatically shut down by using the timer function. When the product is turned on, press the button for 3 seconds to activate the timer shut down function. The display will show 30 and 60 times can be set by pressing and , after which the display will show the different hours from 00 to 23. For example, 02 minutes that the product will automatically shut down after 2 hours.
The product can also automatically turn on by using the timer function. When the product is in standby mode, press the button to set the desired timer and follow to same steps as with the timer shutdown.
A. Note: If you switch to other modes (HOME/OTC/CACB), the timer setting will be cleared automatically.
Heating mode setting
The this heater is also equipped with 3 intelligent modes called HOME, OFF-ICE and CABIN. The different modes can be activated by pressing button.
Note: Current date and time need to be set before using the intelligent healing modes. Please set the time according above Date/How/When setting steps.
Home mode setting
The default high temperature value is set as 23^ and low temperature is 18^ .
Note: there are 4 periods (P1), F2, P3, P4) in this mode.
21:09:0016:0018C
-2:16:00 29:00 23°C
23:23:0006:0018
40600080023C
The pre set temperature will follow the same cycle every day. The desired temperature can be adjusted at all times but will return to the default value in next cycle. For example, the current time is 9:00 and the desired temperature is set to 20^ . This temperature will stay in 20^ from 9:00 to 16:00 and will return back to 18^ the next day.
Office mode setting
The default high temperature value is set at 23^ and low temperature is 18^ .
Note: There are 4 periods (P1,P2,P3,P4) in this mode:
P1:07:00-12:00 23℃
P2:12.00-14.0023℃
P3:14:00-17:0023°C
P4:17:00-07:0018℃
The presse temperature will follow the same cycle every day. The desrred temperature can be adjusted at all times but will return to the usual value in next cycle.
Cabin mode setting
The default high temperature value is set at 23^ and low temperature is 18^ .
Note: There are 2 periods (91,22) in this program:
P1:08:00-23:00 24C
P2-2300-080018℃
The default temperature will stay on for a cycle of 30 days, after which the temperature will go down to a continuous 18^ . The default temperature can be adjusted and will last of one cycle of 30 days.
and will return to the default value in next cycle. The 50 days cycle can be adjusted to a shorter time frame pressing the timer button for 3s. The cdefut day will begin to flash. Press - or -to increase the requested day in the 30 day cycle. For example, changing the day to 14 to run the Calm mode for 16 days instead of 30. When the desired start day is set, confirm his by processing timer button again or leave it untouched for 3s.
4. Maintenance
- Important: Be sure to remove the power plug from the outer before carrying out maintenance.
Warning: Allow the heater to cool down before cleaning it.
A Note: In case of malfunction or doubt, do not try in repair the needle yourself, it may result in a fire hazard or electric shock.
Cleaning
Warp the exterior surface of the heater occasionally with a soft damp cloth (not dripping wet) and dry the exterior surface before operating the heater.
Warning: Do not immerse the heater in water. Do not use any cleaning chemicals such as detergents and abrasives. Do not allow the interior to get wet as this could create a hazard
Storing
To store away the heater , put the heater back intoits original package and system . It is a cleaning product
Spare parts
Spare parts and accessories can be requested at the point of purchase or local distributor.
The slim heating panel that keeps you cozy in winter.
5. Technical specifications
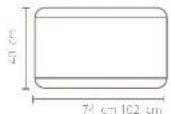
Slim 1000
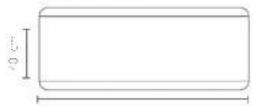
Slim 1500

Weight
6.6kg
Rated voltage:
220-240V

Frequency
50Hz

Rated power
1000W

Effective area
15m²

Power core length
1.5m

Matrmas
ABS,PP,Metal

Model no
DXCH03
Weight
8.9kg
Rated voltage:
220-240V
Frequency:
50Hz
Rated power
1500W
Effective area:
25 m^2
Power cord length:
1.5m
Main materials:
ABS,PP,Metal
特此公告。
DXCH05
The appearance
and specification of
the device may be
changed without
TOT10
6. FAQ
Q. Error code E0 shows on the display. What's wrong?
A. This product has an automatic shunt flow function if temperature decreased by 5 degrees in 10 minutes. Please contact this product by pressing the starting power button.
Q. Error code E1 or E2 shows on the display. What's wrong?
A. There is a short circuit or open circuit may have occurred. Please return the product to the point of purchase or contact the after-sales department (servic@duow.co.uk) for repair.
Q. I smell a strange odor. Is this normal?
A. This smell is generated by the heating element when first time use. This is normal and will be reduced gradually during use.
Notes

Deutsche Kabinet is an institution that offers a wide range of innovative and cutting-edge products, including:
D. empyroticus is standard ingested oil, maximal 28^ in minima: 18^
A. Let op: Dore monosheaton uui 4 peides (F1, P2, F3, F4).
11:09:00-16:00 18°C
72:16:00-23:0023C
P2300060019C
21:08:00-08:0023°C
The default high temperature value is set at 230^ and low temperature is 180^ .
- Let op: Der modus bestot un 4 periodes (P), P2, P3, F4).
P1:07:00-12:00 23℃
P2:12.00-14.0023℃
P3:14:00-17:0023°C
P4:17:00-07:0018℃
Change the programme to change the entire HOMC (maison), CFICE (bureau) to CARB (human, legger).

Normal operating mode
and specification of
The device may be
P
6. FAQ
Pulse: this is a good idea to keep on top of your unit.
Pantalla
and specification of
the device may be
changed without
NOV
Designed in The Netherlands bij Duux BV. Made in P.R.C. Duux BV, P.O. Box 145, 5400 AC Uden Netherlands, www.duux.com
© 2019 Duux. All rights reserved.
DUUX® is a trademark of Duux BV,
registered in the EU and other countries.
The brand cited belongs exclusively to the respective owners.
Specifications are subject to modification without notice.