USER MANUAL MVH-160UI PIONEER
DIGITAL MEDIA RECEIVER
RECEPTEUR NUMERIQUE MULTIMEDIA
RICEVITORE MULTIMEDIALE DIGITALE
RECEPTOR DE MEDIOS DIGITALES
DIGITALER MEDIENEMPFANGER
DIGITALE MEDIA-RECEIVER
ЦИФROВМЕДINAPEСИВЕР
MVH-X360BT MVH-160UI
Pioneer

Bluetooth
Made for

iPod iPhone
Owner's Manual
Mode d'emploi
Manufacturer:
PIONEER CORPORATION
1-1, Shin-ogura, Saiwai-ku, Kawasaki-shi,
Kanagawa 212-0031, JAPAN
EU Representative's:
Pioneer Europe NV
Haven 1087, Keetberglaan 1,
B-9120 Melsele, Belgium/Belgique
http://www.pioneer.eu
C
English:
Hereby, Pioneer, declares that this MVH-X360BT is an important part of the program and will be used in conjunction with other relevant provisions of Directive 1999/5/E/C.
Suomi:
Pioneer vukavkutei tahta MVH-3X60BT hyppinen.
Koskevien kostovskii, kostovskii, kostovskii, kostovskii, kostovskii, kostovskii, kostovskii, kostovskii, kostovskii, kostovskii, kostovskii, kostovskii, kostovskii, kostovskii,
Nederlands:
Alurolott, P., Niterian yaliktozoon, hogg a MVH-X360BT (1997) and the 1998 version of the 1998-2000 version of the 1999-2000 version of
Latviešu valoda:
Ar Soj Pectori dekarik, k MVH-X360BT atblist
Safarat al-Abdul-Ghazem, k Jusifahr jasrab imun cili arir to saaftijestajne tokumiquim.
Lietuviu kalba:
Suo Pioneer deklarouco, clad mis VH-SS603Tt inbatn esminius ir kalavimur ir itakes 1999/5E Direkyos
Malti:
Hawnekhek, Pioneer jiddikjara dan MVH-X360BJT 1998/5/EC
Hawnekhek, Pioneer jiddikjara dan MVH-X360BJT 1998/5/EC
Mehrosh chhajn relevanti hem mihi fed-Dirittative 1998/5/EC
Slovencina:
Pioneer tymto vhyaslae, 2e MVH-X360BT sphala
Molina mela, a vylek prisulneu utovanostma
Smernice 1999/5/ES
Slovenscina:
Pioneer izjavla. da je MVH-360BT v skludz u konjunktura, u konjunktura in ostalmi relevantni tologi direktive 1999/5/E/S.
Romana:
Her med ytsi Pioneer yr bilv aMVOH×360BT er. 1995. Her med ytsi ytsi ytsi ytsi ytsi ytsi ytsi ytsi ytsi ytsi ytsi ytsi ytsi ytsi ytsi ytsi ytsi ytsi ytsi ytsi ytsi ytsi ytsi ytsi ytsi ytsi ytsi ytsi ytsi ytsi ytsi ytsi ytsi ytsi
Hryatski:
Ovne Vitrka Pionate Izajagde i vane M.VH6308T. 1995. 2. Ovne Vitrka Pionate Izajagde i zahlejevin i istalin odredban. Directive 1999/5/EC.
Before you start
Thank you for purchasing this PIONEER product
To ensure proper use, please read through this manual before using this product. It is especially important that you read and observeWARN
INGs and CAUTIONs in this manual. Please keep the manual in a safe and accessible place for future reference.

If you want to dispose this product, do not mix it with general household waste. There is a separate collection system for used electronic products in accordance with legislation that requires proper treatment, recovery and recycling.
Private households in the member states of the EU, in Switzerland and Norway may return their used electronic products free of charge to designated collection facilities or to a retailer (if you purchase a similar new one).
For countries not mentioned above, please contact your local authorities for the correct method of disposal.
By doing so you will ensure that your disposed product undergoes the necessary treatment, recovery and recycling and thus prevent potential negative effects on the environment and human health.
About this unit
The tuned frequencies on this unit are allocated for use in Western Europe, Asia, the Middle East, Africa and Oceania. Use in other areas may result in poor reception. The RDS (radio data system) function only works in areas that broadcast RDS signals for FM stations.

WARNING
- Do not attempt to install or service this product by yourself. Installation or servicing of this product by persons without training and experience in electronic equipment and automotive accessories may be dangerous and could expose you to the risk of electric shock, injury or other hazards.
- Do not attempt to operate the unit while driving. Make sure to pull off the road and park your vehicle in a safe location before attempting to use the controls on the device.

CAUTION
- Do not allow this unit to come into contact with liquids. Electrical shock could result. Also, damage to this unit, smoke, and overheating could result from contact with liquids.
The Pioneer CarStereo-Pass is for use only in Germany.
Always keep the volume low enough to hear outside sounds.
- Avoid exposure to moisture.
If you experience problems
Should this unit fail to work properly, please contact your dealer or nearest authorized PIONEER Service Station.
Using this unit
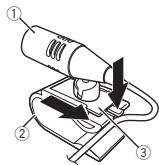
Head unit
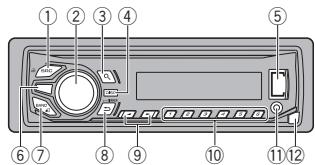
① SRC/OFF
② MULTI-CONTROL (M.C.)
③ a(list)
④ DISP
⑤ USB port
MVH-X360BT
⑥
iPod
MVH-160UI
⑦ BAND/(iPod control)
(8) (back)/DIMMER (dimmer)
9
10 1/△to6
AUX input jack (3.5 mm stereo jack)
12 Detach button
CAUTION
Use an optional Pioneer USB cable (CD-U50E) to connect the USB storage device as any device connected directly to the unit will protrude out from the unit, which could be dangerous.
Display indication
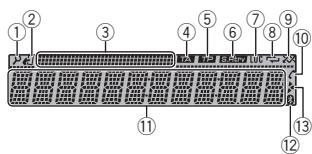
① ±b (list)
(iPod control)
② This unit's iPod function is operated from your iPod.
③ Sub information section
④ TA (traffic announcements)
⑤ TP (traffic program identification)
⑥ S.Rtrv (sound retriever)
⑦ LOC(local seek tuning)
(8) (repeat)
(9) (random/shuffle)
(auto answer)
Only for MVH-X360BT
Shows when the automatic answering function is on.
Main information section
Tuner: band and frequency
- RDS: program service name, PTV information and other literal information
- USB storage device and iPod: elapsed playback time and text information
12 (Bluetooth indicator)
Only for MVH-X360BT
13 Appears when a lower tier of folder or menu exists.
Using this unit
1 After installation of this unit, turn the ignition switch to ON.
SET UP appears.
2 Turn M.C. to switch to YES.
- If you do not use the unit for 30 seconds, the set up menu will not be displayed.
- If you prefer not to set up at this time, turn M.C. to switch to NO.
3 Press M.C. to select.
4 Follow these steps to set the menu.
To proceed to the next menu option, you need to confirm your selection.
LANGUAGE (multi-language)
This unit can display the text information from a compressed audio file even for information embedded in English, Russian or Turkish.
-
If the embedded language and the selected language setting are not the same, text information may not display properly.
-
Some characters may not be displayed properly.
Turn M.C. to select the desired setting. ENG (English)—PYC (Russian)—TUR (Turkish)
2 Press M.C. to confirm the selection.
CLOCK SET (setting the clock)
Turn M.C. to adjust hour.
2 Press M.C. to select minute.
3 Turn M.C. to adjust minute.
4 Press M.C. to confirm the selection.
FM STEP (FM tuning step)
Use FM STEP to set FM tuning step options (seek step settings).
Turn M.C. to select the FM tuning step. 100 (100 kHz) -50 (50 kHz)
2 Press M.C. to confirm the selection.
QUIT appears.
The manual tuning step is fixed at 50kHz
- When AF and TA are turned off, the seek step is fixed at 50kHz even if set to 100.
5 To finish your settings, turn M.C. to select YES.
- If you prefer to change your setting again, turn M.C. to switch to NO.
6 Press M.C. to select.
Notes
- You can set up the menu options from the system menu and initial menu. For details about the settings, refer to System menu on page 12 and Initial menu on page 13.
- You can cancel set up menu by pressing SRC/OFF.
Basic operations
Important
- Handle the front panel with care when removing or attaching it.
- Avoid subjecting the front panel to excessive shock.
- Keep the front panel out of direct sunlight and high temperatures.
- To avoid damaging the device or vehicle interior, remove any cables and devices attached to the front panel before detaching it.
Using this unit
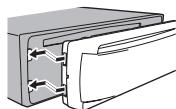
Removing the front panel
Press the detach button to release the front panel.
Push the front panel upward (I) and then pull it toward (II) you.
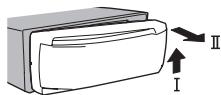
Always store the detached front panel in a protective case or bag.
Re-attaching the front panel
1 Slide the front panel to the left.
Press the right side of the front panel until it is firmly seated.
Forcing the front panel into place may result in damage to the front panel or head unit.
Turning the unit on
1 Press SRC/OFF to turn the unit on.
Turning the unit off
1 Press and hold SRC/OFF until the unit turns off.
Selecting a source
1 Press SRC/OFF to cycle between: RADIO-USB/iPod-APP (application)-AUX BT AUDIO
- USB MTP displays while the MTP connection is in use.
Only for MVH-160UI When there is an iPod connected and a source other than iPod is selected, you can switch to iPod by pressing iPod.
- BTAUDIO is not available for MVH-160UI.
Adjusting the volume
1 Turn M.C. to adjust the volume.
Note
When this unit's blue/white lead is connected to the vehicle's auto-antenna relay control terminal, the vehicle's antenna extends when this unit's source is turned on. To retract the antenna, turn the source off.
Returning to the previous display
Returning to the previous list (the folder one level higher)
Press DIMMER.
Returning to the ordinary display
Canceling the main menu
Press BAND/
Returning to the ordinary display from the list
Press BAND/
Using this unit
Radio
Basic operations
Selecting a band
Press BAND/0 until the desired band (FM1, FM2, FM3 for FM or MW/LW) is displayed.
Switching preset stations
1 Pressor
- Select PCH (preset channel) under SEEK to use this function.
Manual tuning (step by step)
1 Pressor
- Select MAN (manual tuning) under SEEK to use this function.
Seeking
Press and hold or , and then release. You can cancel seek tuning by briefly pressing or .
While pressing and holding or, you can skip stations. Seek tuning starts as soon as you release or
Notes
- For details about SEEK, refer to SEEK (left/right key setting) on page 5.
- This unit's AF (alternative frequencies search) function can be turned on and off. AF should be off for normal tuning operation (refer to AF (alternative frequencies search) on page 5).
Storing and recalling stations for each band
1 To store: Press and hold down one of the preset tuning buttons (1 / to 6 / r) until the number stops flashing.
2 To recall: Press one of the preset tuning buttons (1 / to 6 /
Switching the display
Selecting the desired text information
Press DISP to cycle between the following:
FREQUENCY (program service name or frequency)
BRDCST INFO (program service name/PTY information)
CLOCK (source name and clock)
Notes
- If the program service name cannot be acquired in FREQUENCY, the broadcast frequency is displayed instead. If the program service name is detected, the program service name will be displayed.
Depending on the band, text information can be changed.
Text information items that can be changed depend on the area.
Using PTY functions
You can tune in to a station using PTY (program type) information.
Searching for an RDS station by PTY information
Press (list).
2 Turn M.C. to select a program type. NEWS/INFO—POPULAR—CLASSICS—OTHERS
Press M.C. to begin the search. The unit searches for a station broadcasting that type of program. When a station is found, its program service name is displayed.
To cancel the search, press M.C. again.
- The program of some stations may differ from that indicated by the transmitted PTY.
- If no station is broadcasting the type of program you searched for, NOT FOUND is displayed for about two seconds and then the tuner returns to the original station.
Using this unit
PTY list
For more details about PTY list, visit the following site: http://www.pioneer.eu/eur/products/25/121/techCarAudio/PTY.html
Function settings
1 Press M.C. to display the main menu.
2 Turn M.C. to change the menu option and press to select FUNCTION.
3 Turn M.C. to select the function.
Once selected, the following functions can be adjusted.
- If MW/LW band is selected, only BSM, LOCAL and SEEK are available.
FM SETTING (FM sound quality settings)
The sound quality level can be set to match the broadcast signal conditions of the FM band signal.
Press M.C. to display the setting mode.
2 Turn M.C. to select the desired setting.
STANDARD-This is the standard setting.
- HI-FI – This is the setting to use to prioritize the high quality of stereo sound.
- STABLE - This is the setting to use to prioritize the low noise of monaural sound.
BSM (best stations memory)
BSM (best stations memory) automatically stores the six strongest stations in the order of their signal strength.
1 Press M.C. to turn BSM on. To cancel, press M.C. again
REGIONAL (regional)
When AF is used, the regional function limits the selection of stations to those broadcasting regional programs.
Press M.C. to turn the regional function on or off.
LOCAL (local seek tuning)
Local seek tuning allows you to tune in to only those radio stations with sufficiently strong signals for good reception.
1 Press M.C. to select the desired setting. FM: OFF—LV1—LV2—LV3—LV4 MW/LW: OFF—LV1—LV2
The highest level setting allows reception of only the strongest stations, while lower levels allow the reception of weaker stations.
TA (traffic announcement standby)
Press M.C. to turn traffic announcement standby on or off.
AF (alternative frequencies search)
1 Press M.C. to turn AF on or off.
NEWS (news program interruption)
Press M.C. to turn the NEWS function on or off.
SEEK (left/right key setting)
You can assign a function to the left and right keys of the unit.
Select MAN (manual tuning) to tune up or down manually or select PCH (preset channel) to switch between preset channels.
Press M.C. to select MAN or PCH
Using this unit
USB storage device
MTP connection
MTP-compatible Android devices (running Android OS 4.0 or higher) can be connected by MTP connection using the USB source. To connect an Android device, use the cable that came with the device.
Notes
- This function is not compatible with MIXTRAX.
- This function is not compatible with WAV.
Basic operations
Playing songs on a USB storage device
1 Open the USB port cover.
2 Plug in the USB storage device using a USB cable.
Stopping playback of files on a USB storage device
1 You may disconnect the USB storage device at any time.
Selecting a folder
1 Press 1/ or 2/V.
Selecting a track
1 Press or
Fast forwarding or reversing
1 Press and hold or
- When playing compressed audio, there is no sound during fast forward or reverse.
Returning to root folder
Press and hold BAND/
Switching between playback memory devices
You can switch between playback memory devices on USB storage devices with more than one Mass Storage Device-compatible memory device.
1 Press BAND/
- You can switch between up to 32 different memory devices.
Note
Disconnect USB storage devices from the unit when not in use.
Turning MIXTRAX on or off
Only for MVH-X360BT
You cannot use this function with USB MTP.
1 Press 3/MIX to turn MIXTRAX on or off.
- For more details about MIXTRAX, refer to About MIXTRAX on page 13.
- When MIXTRAX is in use, the sound retriever function is disabled.
Switching the display
Selecting the desired text information
PressDISPto cycle between the following: MP3/WMA/WAV
- TRACK INFO (track title/artist name/album title)
FILE INFO (file name/folder name)
- ELAPSED TIME (track number and playback time)
CLOCK (source name and clock)
SPEANA (spectrum analyzer)
Selecting and playing files/ tracks from the name list
1 Press to switch to the file/track name list mode.
2 Use M.C. to select the desired file name (or folder name).
Selecting a file or folder
Turn M.C.
Playing
When a file or track is selected, press M.C.
Viewing a list of the files (or folders) in the selected folder
1 When a folder is selected, press M.C.
Playing a song in the selected folder
When a folder is selected, press and hold M.C.
Selecting a repeat play range
1 Press 6 to cycle between the following:
ALL-Repeat all files
- ONE - Repeat the current file
FLD - Repeat the current folder
Playing tracks in random order
1 Press 5/20 to turn random play on or off. Tracks in a selected repeat range are played in random order.
- To change songs during random play, press to switch to the next track. Pressing restarts playback of the current track from the beginning of the song.
Pausing playback
1 Press 4/PAUSE to pause or resume.
Enhancing compressed audio and restoring rich sound (sound retriever)
Only for MVH-160UI
Press 3/S.Rtrv to cycle between: 1-2-OFF (off)
1 is effective for low compression rates, and 2 is effective for high compression rates.
Key operation is disabled when MIXTRAX is on.
Function settings
1 Press M.C. to display the main menu.
2 Turn M.C. to change the menu option and press to select FUNCTION.
Once selected, the function below can be adjusted.
- S.RTRV is not available when MIXTRAX is turned on.
S.RTRV (sound retriever)
Automatically enhances compressed audio and restores rich sound.
1 Press M.C. to select the desired setting. For details, refer to Enhancing compressed audio and restoring rich sound (sound retriever) on page 6.
Using this unit
iPod
Basic operations
Playing songs on an iPod
1 Open the USB port cover.
2 Connect an iPod to USB input.
Playback is performed automatically.
Selecting a song (chapter)
1 Pressor
Selecting an album
1 Press 1/Anor2/V.
Fast forwarding or reversing
1 Press and hold or
Notes
- The iPod cannot be turned on or off when the control mode is set to CTRL AUDIO.
- Disconnect headphones from the iPod before connecting it to this unit.
- The iPod will turn off about two minutes after the ignition is switched off.
Turning MIXTRAX on or off Only for MV+X360BT
Press 3/MIX to turn MIXTRAX on or off.
- For more details about MIXTRAX, refer to About MIXTRAX on page 13.
Switching the display
Selecting the desired text information
Press DISP to cycle between the following
- TRACK INFO (track title/artist name/album title)
- ELAPSED TIME (track number and playback time)
CLOCK (source name and clock)
SPEANA (spectrum analyzer)
Browsing for a song
1 Press to switch to the top menu of list search.
2 Use M.C. to select a category/song.
Changing the name of the song or category
1 Turn M.C.
Playlists—artists—albums—songs—podcasts—genres—composers—audiobooks
Playing
1 When a song is selected, press M.C.
Viewing a list of songs in the selected category
1 When a category is selected, press M.C.
Playing a song in the selected category
When a category is selected, press and hold M.C.
Searching the list by alphabet
When a list for the selected category is displayed, press to switch to alphabet search mode.
- You also can switch to alphabet search mode by turning M.C. twice.
2 Turn M.C. to select a letter.
3 Press M.C. to display the alphabetical list.
To cancel searching, press DIMMER.
Using this unit
Notes
- You can play playlists created with the computer application (MusicSphere). The application will be available on our website.
- Playlists that you created with the computer application (MusicSphere) are displayed in abbreviated form.
Selecting a repeat play range
1 Press 6 / 一 to cycle between the following:
- ONE - Repeat the current song
- ALL - Repeat all songs in the selected list
- When the control mode is set to CTRL iPod, the repeat play range will be same as what is set for the connected iPod.
Selecting a random play range (shuffle)
1 Press 5/20 to cycle between the following:
- SNG - Play back songs in the selected list in random order.
- ALB - Play back songs from a randomly selected album in order.
OFF-Not play back in random order.
Playing all songs in random order (shuffle all)
1 Press and hold 5 / 2× 2 to turn shuffle all on.
To turn off shuffle all, select OFF in shuffle. For details, refer to Selecting a random play range (shuffle) on page 7.
Pausing playback
1 Press 4/PAUSE to pause or resume.
Enhancing compressed audio and restoring rich sound (sound retriever) Only for MVH-160UI
1 Press 3/S.Rtrv to cycle between: 1—2—OFF (off)
1 is effective for low compression rates, and 2 is effective for high compression rates.
You can play songs from the following lists.
- Album list of the currently playing artist
Song list of the currently playing album
- Album list of the currently playing genre
1 Press and hold to switch to link play mode.
2 Turn M.C. to change the mode; press to select.
- ARTIST - Plays an album by the artist currently playing.
- ALBUM - Plays a song from the album currently being played.
GENRE - Plays an album from the genre currently being played.
The selected song/album will be played after the currently playing song.
Notes
- The selected song/album may be canceled if you use functions other than link search (e.g. fast forward and reverse).
Depending on the song selected to play, the end of the currently playing song and the beginning of the selected song/album may be cut off.
Using this unit's iPod function from your iPod
This unit's iPod function can be controlled by using the connected iPod.
CTRL iPod is not compatible with the following iPod models.
Using this unit
- CTRL AUDIO - This unit's iPod function can be controlled by using this unit.
Only for MVH-160UI
You can also switch the control mode by pressing iPod.
Notes
- Switching the control mode to CTRL iPod pauses song playback. Use the iPod to resume playback.
- The following operations are still accessible from the unit even if the control mode is set to CTRL iPod.
— Pausing
Fast forward/reverse
- Selecting a song (chapter)
- The volume can only be adjusted from this unit.
Function settings
1 Press M.C. to display the main menu.
2 Turn M.C. to change the menu option and press to select FUNCTION.
3 Turn M.C. to select the function.
Once selected, the following functions can be adjusted.
- AUDIO BOOK is not available when CTRL iPod is selected in the control mode. For details, refer to Using this unit's iPod function from your iPod on page 7.
AUDIO BOOK (audiobook speed)
Press M.C. to display the setting mode.
2 Turn M.C. to select your favorite setting.
- FASTER - Playback at a speed faster than normal
NORMAL - Playback at normal speed
- SLOWER - Playback at a speed slower than normal
S.RTRV (sound retriever)
1 Press M.C. to select the desired setting. For details, refer to Enhancing compressed audio and restoring rich sound (sound retriever) on page 7.
Using connected device applications
You can use this unit to perform streaming playback of and control tracks in iPhone or smartphone applications or just for streaming playback.
Important
Use of third party apps may involve or require the provision of personally identifiable information, whether through the creation of a user account or otherwise, and for certain applications, the provision of geolocation data. ALL THIRD PARTY APPS ARE THE SOLE RESPONSIBILITY OF THE PROVIDERS, INCLUDING WITHOUT LIMITATION COLLECTION AND SECURITY OF USER DATA AND PRIVACY PRACTICES. BY ACCESSING THIRD PARTY APPS, YOU AGREE TO REVIEW THE TERMS OF SERVICE AND PRIVACY POLICIES OF THE PROVIDERS. IF YOU DO NOT AGREE WITH THE TERMS OR POLICIES OF ANY PROVIDER OR DO NOT CONSENT TO THE USE OF GEO-LOCATION DATA WHERE APPLICABLE, DO NOT USE THAT THIRD PARTY APP.
The following is the detailed information regarding the terminals required to use the application for iPhone or smartphone on this unit.
Using this unit
For iPhone users
- This function is compatible with iPhone and iPod touch.
The device has iOS 5.0 or higher.
For smartphone users
The device has Android OS 2.3 or later.
- The device supports Bluetooth SPP (Serial Port Profile) and A2DP (Advanced Audio Distribution Profile).
The device is connected to this unit via Bluetooth.
- Compatibility with all Android devices is not guaranteed.
For details about Android device compatibility with this unit, refer to the information on our website.
Notes
- Please check our website for a list of supported iPhone or smartphone applications for this unit.
- Pioneer is not liable for any issues that may arise from incorrect or flawed app-based content.
- The content and functionality of the supported applications are the responsibility of the App providers.
Starting procedure for iPhone users
1 Connect an iPhone to USB input.
2 Select WIRED in APP CONN. SET. For details, refer to APP CONN. SET (APP connect mode setting) on page 13.
If using MVH-160UI, proceed to the next step.
3 Switch the source to APP.
4 Start up the application on the iPhone and initiate playback.
Starting procedure for smartphone users
Only for MVH-X360BT
1 Connect your smartphone to this unit using Bluetooth wireless technology. For details, refer to Connection menu operation on page 9.
2 Select BLUETOOTH in APP CONN. SET. For details, refer to APP CONN. SET (APP connect mode setting) on page 13.
3 Switch the source to APP.
4 Start up the application on the smartphone and initiate playback.
Basic operations
Selecting a track
1 Press or
Fast forwarding or reversing
1 Press and hold or
Pausing playback
1 Press BAND to pause or resume.
Switching the display
Selecting the desired text information
1 Press DISP to cycle between the following:
- TRACK INFO (track title/artist name/album title)
APP NAME (application name)
ELAPSED TIME (playback time)
CLOCK (source name and clock)
SPEANA (spectrum analyzer)
Function settings
1 Press M.C. to display the main menu.
Using this unit
2 Turn M.C. to change the menu option and press to select FUNCTION.
3 Turn M.C. to select the function.
Once selected, the following functions can be adjusted.
PAUSE (pause)
1 Press M.C. to pause or resume.
S.RTRV (sound retriever)
1 Press M.C. to select the desired setting. 1-2-OFF (off)
1 is effective for low compression rates, and 2 is effective for high compression rates.
Using Bluetooth wireless technology
Only for MVH-X360BT
Using the Bluetooth telephone

Important
Leaving the unit on standby to connect to your phone via Bluetooth while the engine is not running can drain the battery.
Operations may vary depending on the kind of cellular phone.
- Advanced operations that require attention such as dialing numbers on the monitor, using the phone book, etc., are prohibited while driving. Be sure to park your vehicle in a safe place and apply the parking brake before proceeding.
Setting up for hands-free phoning
1 Connection
Use the Bluetooth telephone connection menu. Refer to Connection menu operation on page 9.
Function settings
Use the Bluetooth telephone function menu.
Refer to Phone menu operation on page 10.
Basic operations
Making a phone call
Refer to Phone menu operation on page 10.
Answering an incoming call
When a call is received, press
Ending a call
1 Press
Rejecting an incoming call
1 When a call is received, press and hold
Answering a call waiting
When a call is received, press
Switching between callers on hold
1 Press M.C.
Canceling call waiting
Press and hold
Adjusting the other party's listening volume
Press or while talking on the phone.
- When private mode is on, this function is not available.
Turning private mode on or off
1 Press BAND while talking on the phone.
Note
If private mode is selected on the cellular phone, hands-free phoning may not be available.
Using this unit
Storing and recalling phone numbers
The functions below can be used to store phone numbers to the memory. For details, refer to Phone menu operation on page 10.
- MISSED (missed call history)
DIALLED (dialed call history)
- RECEIVED (received call history)
- PHONE BOOK (phone book)
2 To recall: Press one of the preset tuning buttons (1 / to 6 / ).
3 Press M.C. to make a call.
Switching the display
Selecting the desired text information You can change the display during a call.
Press DISP to cycle between the following:
Call time
Name of other party
Number of other party
Using voice recognition
This feature can be used on an iPhone equipped with voice recognition that is connected by Bluetooth.
1 Press and hold M.C. to switch to voice recognition mode.
To end voice recognition mode, press BAND/
Notes
-
For details on voice recognition features, check the manual for your iPhone.
-
In order for your voice commands to be recognized and interpreted correctly, ensure that conditions are suitable for recognition.
- Please note that wind blowing through the vehicle windows and noise coming from outside the vehicle can interfere with voice command operation.
- For optimum pick-up, the microphone should be placed directly in front of the driver at a suitable distance.
Speaking too soon after the start of the command may cause voice recognition to fail.
- Speak slowly, deliberately, and clearly.
Important
Connected devices may not work properly if more than one Bluetooth device is connected at a time (e.g. a phone and a separate audio player are connected simultaneously).
1 Press and hold to display the connection menu.
- You cannot perform this step during a call.
2 Turn M.C. to select the function.
Once selected, the following functions can be adjusted.
Using this unit
DEVICELIST (connecting or disconnecting a device from the device list)
1 Press M.C. to display the setting mode.
2 Turn M.C. to select the name of a device you want to connect/disconnect.
- Press and hold M.C. to swap between the Bluetooth device address and the device name.
3 Press M.C. to connect/disconnect the selected device. If the connection is established, 喜 is indicated on the device name.
- When no device is selected in the device list, this function is not available.
DEL DEVICE (deleting a device from the device list)
1 Press M.C. to display the setting mode.
② Turn M.C. to select the name of a device you want to delete.
- Press and hold M.C. to swap between the Bluetooth device address and the device name.
3 Press M.C. to display DELETE YES.
4 Press M.C. to delete the device information from the device list.
- When no device is selected in the device list, this function is not available.
While this function is in use, do not turn off the engine.
ADD DEVICE (connecting a new device)
Press M.C. to start searching.
To cancel, press M.C. while searching.
- If this unit fails to find any available cellular phones, NOT FOUND is displayed.
Turn M.C. to select a device from the device list.
- If the desired device is not displayed, select RE-SEARCH.
- Press and hold M.C. to swap between the Bluetooth device address and the device name.
3 Press M.C. to connect the selected device.
To complete the connection, check the device name (Pioneer BT Unit) and enter the PIN code on your device.
PIN code is set to 0000 as the default. You can change this code.
- A 6-digit number may display on both this unit and the Bluetooth device. Select yes if the 6-digit numbers displayed on this unit and the Bluetooth device are the same.
- 6-digit number appears on the display of this unit. Once the connection is established, this number disappears.
- If you are unable to complete the connection using this unit, use the device to connect to the unit.
- If three devices are already paired, DEVICE-FULL is displayed and it is not possible to perform this operation. In this case, delete a paired device first.
A. CONN (connecting to a Bluetooth device automatically)
Press M.C. to turn automatic connection on or off.
VISIBLE (setting the visibility of this unit)
Using this unit
Bluetooth visibility can be turned on so that other devices can discover the unit.
Press M.C. to turn the visibility of this unit on or off.
You must enter a PIN code on your device to confirm the Bluetooth connection. The default code is 0000, but you can change it with this function.
1 Press M.C. to display the setting mode.
2 Turn M.C. to select a number.
3 Press M.C. to move the cursor to the next position.
4 After inputting PIN code, press and hold M.C.
After inputting, pressing M.C. returns you to the PIN code input display, and you can change the PIN code.
DEV. INFO (Bluetooth device address display)
1 Press M.C. to display the setting mode.
2 Turn M.C. to display the device information. Device name—Bluetooth device address
GUEST MODE (guest mode)
When this mode is turned on, if a pairing is attempted while there are already three devices paired together, the unit will move to the DEL DEVICE screen automatically and prompt you to delete a device. For details, refer to DEL DEVICE (deleting a device from the device list) on page 9.
1 Press M.C. to turn the guest mode on or off.
A. PAIRING (auto pairing)
If this function is turned on while there is an iPhone connected to the unit by USB, you will be automatically prompted to pair the unit and iPhone.
1 Press M.C. to turn auto pairing on or off.
- This function may not be available depending on what version of iOS you are using.
1 Press to display the phone menu.
2 Turn M.C. to select the function.
Once selected, the following functions can be adjusted.
MISSED (missed call history)
DIALLED (dialed call history)
RECEIVED (received call history)
1 Press M.C. to display the phone number list.
2 Turn M.C. to select a name or phone number.
3 Press M.C. to make a call.
PHONE BOOK (phone book)
The contacts on your phone will normally be transferred automatically when the phone is connected. If it is not, use your phone menu to transfer the contacts. The visibility of this unit should be on when you use the phone menu. Refer to VISIBLE (setting the visibility of this unit) on page 9.
1 Press M.C. to display SEARCH (alphabetical list).
Turn M.C. to select the first letter of the name you are looking for.
- Press and hold M.C. to select the desired character type.
TOP (alphabet) OAA (Greek alphabet)- BCE (Cyrillic alphabet)
3 Press M.C. to display a registered name list.
4 Turn M.C. to select the name you are looking for.
5 Press M.C. to display the phone number list.
6 Turn M.C. to select a phone number you want to call.
7 Press M.C. to make a call.
PRESET 1-6 (preset phone numbers)
Using this unit
1 Press M.C. to display the setting mode.
2 Turn M.C. to select the desired preset number.
3 Press M.C. to make a call.
- You can also use the preset number buttons 1/ to 6 / 一 to recall a preset phone number. For more details about storing phone numbers, refer to Storing and recalling phone numbers on page 9.
PHONE FUNC (phone function)
You can set A, ANSR, R.TONE and PB INVIT from this menu. For details, refer to Function and operation on page 10.
Function and operation
1 Display PHONE FUNC.
Refer to PHONE FUNC (phone function) on page 10.
3 Turn M.C. to select the function.
Once selected, the following functions can be adjusted.
A. ANSR (automatic answering)
Press M.C. to turn automatic answering on or off.
R.TONE (ring tone select)
Press M.C. to turn the ring tone on or off.
PB INVT (phone book name view)
Press M.C. to invert the order of names in the phone book.
Bluetooth Audio
Important
Depending on the Bluetooth audio player connected to this unit, the available operations will be limited to the following two levels:
A2DP profile (Advanced Audio Distribution Profile): You can only playback songs on your audio player.
The A2DP connection can only be used with APP (smartphone) and BTA AUDIO.
AVRCP profile (Audio/Video Remote Control Profile): You can perform playback, pause playback, select songs, etc.
- To use a Bluetooth audio player with this unit, refer to this manual and the manual for your device for operating instructions.
- As the signal from your cellular phone may cause noise, avoid using it when you are listening to songs on your Bluetooth audio player.
- The sound of the Bluetooth audio player will be muted when the phone is in use.
- When the Bluetooth audio player is in use, you cannot connect to a Bluetooth telephone automatically.
- Playback continues even if you switch from your Bluetooth audio player to another source while listening to a song.
Depending on the type of Bluetooth audio player you have connected to this unit, operation and information display may not be available for some functions.
Setting up for Bluetooth audio
Before you can use the Bluetooth audio function you must set up the unit for use with your Bluetooth audio player. You will need to pair this unit with your Bluetooth audio player.
Using this unit
Using this unit
1 Connection
Use the Bluetooth telephone connection menu. Refer to Connection menu operation on page 9.
Basic operations
Fast forwarding or reversing
1 Press and hold or
Selecting a track
1 Press or
Starting playback
Press BAND/
Switching the display
Selecting the desired text information
1 Press DISP to cycle between the following:
- DEVICE INFO (device name)
- TRACK INFO (track title/artist name/album title)
- ELAPSED TIME (track number and playback time)
CLOCK (source name and clock)
SPEANA (spectrum analyzer)
Selecting a repeat play range
1 Press 6 to select a repeat play range from one or all.
- This function may not be available depending on the type of Bluetooth audio player connected.
- The repeat play range varies depending on the Bluetooth audio player in use.
Playing tracks in random order
Press 5/ to turn random play on or off.
- The random play range varies depending on the Bluetooth audio player in use.
Pausing playback
1 Press 4/PAUSE to pause or resume.
Enhancing compressed audio and restoring rich sound (sound retriever)
Only for MVH-160UI
1 Press 3/S.Rtrv to cycle between: 1-2-OFF (off)
1 is effective for low compression rates, and 2 is effective for high compression rates.
Function settings
1 Press M.C. to display the main menu.
2 Turn M.C. to change the menu option and press to select FUNCTION.
3 Turn M.C. to select the function.
Once selected, the following functions can be adjusted.
PLAY (play)
1 Press M.C. to start playback.
STOP (stop)
Press M.C. to stop the playback.
S.RTRV (sound retriever)
Press M.C. to select the desired setting.
For details, refer to Enhancing compressed audio and restoring rich sound (sound retriever) on page 11.
Audio adjustments
1 Press M.C. to display the main menu.
2 Turn M.C. to change the menu option and press to select AUDIO.
3 Turn M.C. to select the audio function.
Once selected, the following audio functions can be adjusted.
- FADER is not available when SUB.W/SUB.W is selected in SP-P/O MODE. For details, refer to SP-P/O MODE (rear output and preout setting) on page 13.
- SUB.W and SUB.W CTRL are not available when REAR/REAR is selected in SP-P/O MODE. For details, refer to SP-P/O MODE (rear output and preout setting) on page 13.
- SUB.W CTRL is not available when SUB.W is selected in OFF. For details, refer to SUB.W (subwoofer on/off setting) on page 11.
SLA is not available when FM is selected as the source.
FADER (fader adjustment)
Press M.C. to display the setting mode.
Turn M.C. to adjust the front/rear speaker balance.
BALANCE (balance adjustment)
Press M.C. to display the setting mode.
② Turn M.C. to adjust the left/right speaker balance.
EQ SETTING (equalizer recall)
1 Press M.C. to display the setting mode.
2 Turn M.C. to select the equalizer. POWERFUL-NATURAL-VOCAL-CUSTOM1-CUSTOM2-FLAT-SUPER BASS
The equalizer band and equalizer level can be customized when CUSTOM1 or CUSTOM2 is selected.
If selecting CUSTOM1 or CUSTOM2, complete the procedures outlined below. If selecting other options, press M.C. to return to the previous display.
- CUSTOM1 can be set separately for each source. However, each of the below combinations are set to the same setting automatically.
USB,iPod and APP (iPhone)
BT AUDIO and APP (smartphone)
- CUSTOM2 is a shared setting used in common for all sources.
3 Press M.C. to display the setting mode.
4 Press M.C. to cycle between the following: Equalizer band—Equalizer level
5 Turn M.C. to select the desired setting. Equalizer band: 80HZ—250HZ—800HZ—2.5KHZ—8KHZ
Equalizer level: +6 to -6
LOUDNESS (loudness)
Loudness compensates for deficiencies in the low-frequency and high-frequency ranges at low volume.
1 Press M.C. to select the desired setting
OFF (off)-LOW (low)-MID (mid)-HI (high)
SUB.W (subwoofer on/off setting)
This unit is equipped with a subwoofer output which can be turned on or off.
1 Press M.C. to select the desired setting. NOR (normal phase)—REV (reverse phase)—OFF (subwoofer off)
SUB.W CTRL (subwoofer adjustment)
Using this unit
Only frequencies lower than those in the selected range are outputted from the subwoofer.
Press M.C. to display the setting mode.
Press M.C. to cycle between the following: Cut-off frequency—Output level—Slope level Rates that can be adjusted will flash.
3 Turn M.C. to select the desired setting. Cut-off frequency: 50HZ-63HZ-80HZ-100HZ-125HZ-160HZ-200HZ Output level: -24 to +6 Slope level: -12--24
BASS BOOST (bass boost)
Press M.C. to display the setting mode.
Turn M.C. to select a desired level. 0 to +6 is displayed as the level is increased or decreased.
HPF SETTING (high pass filter adjustment)
Use this function when wanting to listen only to high-frequency sounds. Only frequencies higher than the high-pass filter (HPF) cutoff are output from the speakers.
1 Press M.C. to display the setting mode.
Press M.C. to cycle between the following: Cut-off frequency—Slope level
3Turn M.C.to select the desired setting. Cut-off frequency: OFF-50HZ-63HZ-80HZ 100HZ-125HZ-160HZ-200HZ Slope level:-12--24
SLA (source level adjustment)
This function prevents the volume from changing too dramatically when the source switches.
- Settings are based on the FM volume level, which remains unchanged.
-
The MW/LW volume level can also be adjusted with this function.
Each of the below combinations are set to the same setting automatically.
-
USB, iPod and APP (iPhone)
BT AUDIO and APP (smartphone)
1 Press M.C. to display the setting mode.
2 Turn M.C. to adjust the source volume.
Adjustment range: +4 to -4
Important
PW SAVE (power saving) is canceled if the vehicle battery is disconnected and will need to be turned back on once the battery is reconnected. When PW SAVE (power saving) is off, depending on connection methods, the unit may continue to draw power from the battery if your vehicle's ignition doesn't have an ACC (accessory) position.
1 Press M.C. to display the main menu.
2 Turn M.C. to change the menu option and press to select SYSTEM.
Once selected, the following system menu functions can be adjusted.
- MUTE MODE is not available for MVH-X360BT.
- BT AUDIO. BT MEM CLEAR. BT VERSION and APP CONN. SET are not available for MVH-160UJ.
Using this unit
LANGUAGE (multi-language)
This unit can display the text information from a compressed audio file even for information embedded in English, Russian or Turkish.
- If the embedded language and the selected language setting are not the same, text information may not display properly.
- Some characters may not be displayed properly.
1 Press M.C. to select the desired setting, ENG (English)—PYC (Russian)—TUR (Turkish)
CLOCK SET (setting the clock)
1 Press M.C. to display the setting mode.
Press M.C. to select the segment of the clock display you wish to set. Hour—Minute
3 Turn M.C. to adjust the clock.
12H/24H (time notation)
1 Press M.C. to select the desired setting. 12H (12-hour clock) -24H (24-hour clock)
AUTO PI (auto PI seek)
The unit can automatically search for a different station with the same programming, even during preset recall.
Press M.C. to turn Auto PI seek on or off.
Activate this setting when using an auxiliary device connected to this unit.
1 Press M.C. to turn AUX on or off.
DIMMER (dimmer)
1 Press M.C. to turn the dimmer on or off.
- You can also change the dimmer setting by pressing and holding DIMMER.
MUTE MODE (mutemode)
Sound from this system is automatically muted or attenuated when a signal from equipment with a mute function is received.
Press M.C. to display the setting mode.
2 Turn M.C. to select the desired setting.
MUTE-Muting
- 20dB ATT - Attenuation (20dB ATT has a stronger effect than 10dB ATT)
10dB ATT - Attenuation
BT AUDIO (Bluetooth audio activation)
You need to activate the BTAUDIO source in order to use a Bluetooth audio player.
Press M.C. to turn the BTA AUDIO source on or off.
PW SAVE (power saving)
Switching this function on enables you to reduce the consumption of battery power.
- Turning on the source is the only operation allowed when this function is on.
1 Press M.C. to turn the power save on or off.
BT MEM CLEAR (clearing the Bluetooth device data stored on this unit)
Bluetooth device data stored on this unit can be cleared. To protect your personal information, clear the device memory before you pass the unit on to someone else. The following information will be deleted.
Device list/PIN code/call history/phone book/preset phone numbers
Press M.C. to show the confirmation display. YES is displayed. Clearing memory is now on standby. If you do not want to clear the Bluetooth device data stored on this unit, turn M.C. to display CANCEL and press it again to select.
Press M.C. to clear the memory.
CLEARED is displayed and the Bluetooth device data is cleared.
While this function is in use, do not turn off the engine.
Using this unit
BT VERSION (Bluetooth version display)
You can display the system versions of this unit and of Bluetooth module.
Press M.C. to display the information.
APP CONN. SET (APP connect mode setting)
Select an appropriate option for your connected device.
Press M.C. to select the desired setting. WIRED (for iPhone)—BLUETOOTH (for smart- phone)
- This setting is not available when the source is set to APP
About MIXTRAX
Only for MVH-X360BT
MIXTRAX technology is used to insert a variety of sound effects in between songs, allowing you to experience your music as a nonstop mix complete with visual effects.
Notes
Depending on the file/song, sound effects may not be available.
- Turn MIXTRAX off if the visual effects it produces have adverse effects on driving. Refer to Operations using the MIXTRAX button on page 5.
1 Press M.C. to display the main menu.
2 Turn M.C. to change the menu option and press to select MIXTRAX.
3 Turn M.C. to select the MIXTRAX function.
Once selected, the following MIXTRAX functions can be adjusted. The function is enabled when MIXTRAX is on.
SHORT MODE (short playback mode)
You can select the length of the playback time.
1 Press M.C. to display the setting mode.
2 Turn M.C. to select the desired setting. 1.0 MIN (1.0 minute)—1.5 MIN (1.5 minutes) 2.0 MIN (2.0 minutes)—2.5 MIN (2.5 minutes) —3.0 MIN (3.0 minutes)—OFF (off)
MIX PATTERN (mix pattern)
The MIXTRAX special effects display changes with changes in the audio level.
1 Press M.C. to display the setting mode.
Turn M.C. to select the desired setting.
- SOUND LEVEL - The mix pattern changes according to the sound level.
- LOW PASS - The mix pattern changes according to the bass level.
- RANDOM - The mix pattern changes randomly according to the sound level mode and low pass mode.
DISP FX (display effect)
The MIXTRAX special effects display can be turned on or off.
1 Press M.C. to select the desired setting. ON (MIXTRAX special effects display)—OFF (normal display)
CUT IN FX (manual cut-in effect)
You can turn on or off the MIXTRAX sound effects while manually changing tracks.
1 Press M.C. to select the desired setting. ON(on)—OFF (off)
1 Press and hold SRC/OFF until the unit turns off.
2 Press and hold SRC/OFF until the main menu appears in the display.
Using this unit
3 Turn M.C. to change the menu option and press to select INITIAL.
4 Turn M.C. to select the initial menu function.
Once selected, the following initial menu functions can be adjusted.
S/W UPDATE is not available for MVH-160UI.
FM STEP (FM tuning step)
1 Press M.C. to select the FM tuning step. 100 (100kHz) -50 (50 kHz)
SP-P/O MODE (rear output and preout setting)
The rear speaker leads output and the RCA output of this unit can be used to connect a full-range speaker or subwoofer. Select a suitable option for your connection.
Press M.C. to display the setting mode.
2 Turn M.C. to select the desired setting.
- REAR/SUB.W - Select when there is a full-range speaker connected to the rear speaker leads output and there is a subwoofer connected to the RCA output.
- SUB.W/SUB.W - Select when there is a subwoofer connected directly to the rear speaker leads output without any auxiliary amp and there is a subwoofer connected to the RCA output.
- REAR/REAR - Select when there is a full-range speaker connected to the rear speaker leads output and the RCA output. If there is a full-range speaker connected to the rear speaker leads output and the RCA output is not used, you may select either REAR/SUB.W or REAR/REAR.
S/W UPDATE (updating the software)
This function is used to update this unit with the latest Bluetooth software. For about Bluetooth software and updating, refer to our website.
- Never turn the unit off while the Bluetooth software is being updated.
1 Press M.C. to start updating. Follow the on-screen instructions to finish up- dating the Bluetooth software.
1 Press and hold SRC/OFF until the unit turns off.
2 Press and hold SRC/OFF until the main menu appears in the display.
3 Turn M.C. to change the menu option and press to select SYSTEM.
4 Turn M.C. to select the system menu function.
For details, refer to System menu on page 12.
Using an AUX source
1 Insert the stereo mini plug into the AUX input jack.
2 Press SRC/OFF to select AUX as the source.
Note
AUX cannot be selected unless the auxiliary setting is turned on. For more details, refer to AUX (auxiliary input) on page 12.
Switching the display
Selecting the desired text information
1 Press DISP to cycle between the following:
Source name
Source name and clock
If an unwanted display appears
Turn off the unwanted display using the procedures listed below.
1 Press M.C. to display the main menu.
2 Turn M.C. to change the menu option and press to select SYSTEM.
3 Turn M.C. to display DEMO OFF and press to select.
4 Turn M.C. to switch to YES.
5 Press M.C. to select.
Installation
Connections

Important
- When installing this unit in a vehicle without an ACC (accessory) position on the ignition switch, failure to connect the red cable to the terminal that detects operation of the ignition key may result in battery drain.

ACC position

No ACC position
- Use of this unit in conditions other than the following could result in fire or malfunction.
Vehicles with a 12-volt battery and negative grounding.
— Speakers with 50 W (output value) and 4Ω to 8Ω (impedance value).
- To prevent a short-circuit, overheating or malfunction, be sure to follow the directions below.
- Disconnect the negative terminal of the battery before installation.
- Secure the wiring with cable clamps or adhesive tape. Wrap adhesive tape around wiring that comes into contact with metal parts to protect the wiring.
- Place all cables away from moving parts, such as the shift lever and seat rails.
- Place all cables away from hot places, such as near the heater outlet.
- Do not connect the yellow cable to the battery by passing it through the hole to the engine compartment.
Cover any disconnected cable connectors with insulating tape.
Do not shorten any cables.
-
Never cut the insulation of the power cable of this unit in order to share the power with other devices. The current capacity of the cable is limited.
Use a fuse of the rating prescribed.
-
Never wire the negative speaker cable directly to ground.
-
Never band together negative cables of multiple speakers.
-
When this unit is on, control signals are sent through the blue/white cable. Connect this cable to the system remote control of an external power amp or the vehicle's auto-antenna relay control terminal (max. 300mA 12VDC). If the vehicle is equipped with a glass antenna, connect it to the antenna booster power supply terminal.
- Never connect the blue/white cable to the power terminal of an external power amp. Also, never connect it to the power terminal of the auto antenna. Doing so may result in battery drain or a malfunction.
- The black cable is ground. Ground cables for this unit and other equipment (especially, high-current products such as power amps) must be wired separately. If they are not, an accidental detachment may result in a fire or malfunction.
This unit
① Power cord input
② Microphone input (MVH-X360BT only)
③ Microphone (MVH+X360BTonly) 4m
④ Rear output or subwoofer output
⑤ Front output
⑥ Antenna input
⑦ Fuse(10A)
⑧ Wired remote input
Installation
Hard-wired remote control adapter can be connected (sold separately).
Power cord
① To power cord input
② Depending on the kind of vehicle, the function of ③ and ⑤ may be different. In this case, be sure to connect ④ to ⑤ and ⑥ to ③
③ Yellow Back-up (or accessory)
④ Yellow Connect to the constant 12 V supply terminal.
⑤ Red Accessory (or back-up)
⑥ Red Connect to terminal controlled by ignition switch (12 V DC).
⑦ Connect leads of the same color to each other.
⑧ Black (chassis ground)
⑨ Blue/white
The pin position of the ISO connector will differ depending on the type of vehicle. Connect 9 and 11 when Pin 5 is an antenna control type. In another type of vehicle, never connect 9 and 11.
10 Blue/white
Connect to system control terminal of the power amp (max. 300mA12VDC
1 Blue/white
Connect to auto-antenna relay control terminal (max. 300mA12VDC
Yellow/black (MVH-160UI only)
If you use an equipment with Mute function, wire this lead to the Audio Mute lead on that equipment. If not, keep the Audio Mute lead free of any connections.
13 Speaker leads
White: Front left
White/black:Front left
Gray: Front right
Gray/black: Front right
Green: Rear left or subwoofer
Green/black: Rear left or subwoofer
Violet: Rear right or subwoofer
Violet/black: Rear right or subwoofer
ISO connector
In some vehicles, the ISO connector may be divided into two. In this case, be sure to connect to both connectors.
Notes
- Change the initial menu of this unit. Refer to SP-P/O MODE (rear output and preout setting) on page 13. The subwoofer output of this unit is monaural.
- When using a subwoofer of 70W (2) , be sure to connect the subwoofer to the violet and violet/black leads of this unit. Do not connect anything to the green and green/black leads.
Installation
Power amp (sold separately)
Perform these connections when using the optional amplifier.
① System remote control
Connect to Blue/white cable.
② Power amp (sold separately)
③ Connect with RCA cables (sold separately)
④ To Front output
⑤ Front speaker
⑥ To Rear output or subwoofer output
⑦ Rear speaker or subwoofer
Installation
Important
- Check all connections and systems before final installation.
- Do not use unauthorized parts as this may cause malfunctions.
- Consult your dealer if installation requires drilling of holes or other modifications to the vehicle.
- Do not install this unit where:
it may interfere with operation of the vehicle.
- it may cause injury to a passenger as a result of a sudden stop.
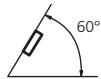
- The semiconductor laser will be damaged if it overheats. Install this unit away from hot places such as near the heater outlet.
- Optimum performance is obtained when the unit is installed at an angle of less than 60^ .
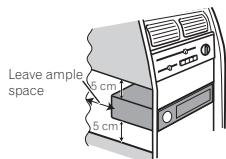
- When installing, to ensure proper heat dispersal when using this unit, make sure you leave ample space behind the rear panel and wrap any loose cables so they are not blocking the vents.
DIN front/rear mount
This unit can be properly installed using either front-mount or rear-mount installation. Use commercially available parts when installing.
DIN Front-mount
1 Insert the mounting sleeve into the dashboard.
For installation in shallow spaces, use the supplied mounting sleeve. If there is enough space, use the mounting sleeve that came with the vehicle.
Installation
2 Secure the mounting sleeve by using a screwdriver to bend the metal tabs (90^) into place.
① Dashboard
② Mounting sleeve
- Make sure that the unit is installed securely in place. An unstable installation may cause skipping or other malfunctions.
DIN Rear-mount
1 Determine the appropriate position where the holes on the bracket and the side of the unit match.
2 Tighten two screws on each side.
① Tapping screw (5mm × 8mm)
② Mounting bracket
③ Dashboard or console
Removing the unit
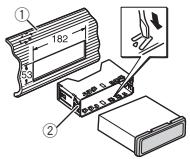
1 Remove the trim ring.
① Trim ring
② Notched tab
- Releasing the front panel allows easier access to the trim ring.
- When reattaching the trim ring, point the side with the notched tab down.
2 Insert the supplied extraction keys into both sides of the unit until they click into place.
3 Pull the unit out of the dashboard.
Removing and re-attaching the front panel
You can remove the front panel to protect your unit from theft.
For details, refer to Removing the front panel and Re-attaching the front panel on page 4.
Installing the microphone
Only for MVH-X360BT
Installation
CAUTION
It is extremely dangerous to allow the microphone lead to become wound around the steering column or shift lever. Be sure to install the unit in such a way that it will not obstruct driving.
Notes
- Install the microphone in a position and orientation that will enable it to pick up the voice of the person operating the system.
- Use separately sold clamps to secure the lead where necessary inside the vehicle.
When installing the microphone on the sun visor
1 Fit the microphone lead into the groove.
① Microphone lead
② Groove
2 Install the microphone clip on the sun visor.
With the sun visor up, install the microphone clip. (Lowering the sun visor reduces the voice recognition rate.)

① Microphone clip
When installing the microphone on the steering column
1 Detach the microphone base from the microphone clip.
To detach the microphone base from the microphone clip, slide the microphone base.
① Microphone
② Microphone clip
③ Microphone base
Installation
2 Install the microphone on the steering column.
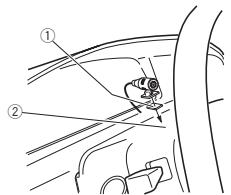
① Double-sided tape
② Install the microphone on the rear side of the steering column.
Adjusting the microphone angle

Troubleshooting
Symptoms are written in bold and causes in regular, non-indented text. Regular, indented text is used to indicate actions to be taken.
The display automatically returns to the ordinary display.
You did not perform any operation within about 30 seconds.
Perform operation again.
The repeat play range changes unexpectedly.
Depending on the repeat play range, the selected range may change when another folder or track is being selected or during fast forwarding/reversing.
Select the repeat play range again.
A subfolder is not played back.
Sub folders cannot be played when FLD (folder repeat) is selected.
Select another repeat play range.
NO XXXX appears when a display is changed (NO TITLE, for example).
There is no embedded text information.
Switch the display or play another track/file.
The unit is malfunctioning.
There is interference.
You are using a device, such as a cellular phone, that may cause audible interference.
Move electrical devices that may be causing the interference away from the unit.
The sound from the Bluetooth audio source is not played back.
There is a call in progress on a Bluetooth connected cellular phone.
The sound will be played back when the call is terminated.
A Bluetooth connected cellular phone is currently being operated.
Do not use the cellular phone at this time.
A call was made with a Bluetooth connected cellular phone and then immediately terminated. As a result, communication between this unit and the cellular phone was not terminated properly.
Reconnect the Bluetooth connection between this unit and the cellular phone.
Error messages
When you contact your dealer or your nearest Pioneer Service Center, be sure to note the error message.
Symptoms are written in bold and causes in regular, non-indented text. Regular, indented text is used to indicate actions to be taken.
Common
AMP ERROR
This unit fails to operate or the speaker connection is incorrect; the protective circuit is activated.
Check the speaker connection. If the message fails to disappear even after the engine is switched off/on, contact your dealer or an authorized Pioneer Service Station for assistance.
USB storage device/iPod
Sometimes there is a delay between the start of playback and when you start to hear any sound.
Wait until the message disappears and you hear sound.
NO AUDIO
There are no songs.
Transfer the audio files to the USB storage device and connect.
The connected USB storage device has security enabled.
Follow the USB storage device instructions to disable the security.
SKIPPED
The connected USB storage device contains DRM protected files.
The protected files are skipped.
PROTECT
All the files on the connected USB storage device are embedded with DRM.
Replace the USB storage device.
N/A USB
The connected USB device is not supported by this unit.
- Connect a USB Mass Storage Class compliant device.
- Disconnect your device and replace it with a compatible USB storage device.
CHECK USB
The USB connector or USB cable has short-circuited.
Check that the USB connector or USB cable is not caught in something or damaged.
CHECK USB
The connected USB storage device consumes more than maximum allowable current.
Disconnect the USB storage device and do not use it. Turn the ignition switch to OFF, then to ACC or ON and then connect only compliant USB storage devices.
CHECK USB
The iPod operates correctly but does not charge.
Make sure the connection cable for the iPod has not shorted out (e.g., not caught in metal objects). After checking, turn the ignition switch OFF and back ON, or disconnect the iPod and reconnect.
ERROR-19
Communication failed.
Perform one of the following operations.
-Turn the ignition switch OFF and back ON.
-Disconnect the USB storage device.
-Change to a different source.
Then, return to the USB source.
iPod failure.
Disconnect the cable from the iPod. Once the iPod's main menu is displayed, reconnect the iPod and reset it.
ERROR-23
USB storage device was not formatted with FAT12, FAT16 or FAT32.
USB storage device should be formatted with FAT12, FAT16 or FAT32.
ERROR-16
The iPod firmware version is old. Update the iPod version.
iPod failure.
Disconnect the cable from the iPod. Once the iPod's main menu is displayed, reconnect the iPod and reset it.
STOP
There are no songs in the current list. Select a list that contains songs.
NOT FOUND
No related songs. Transfer songs to the iPod.
Bluetooth device
ERROR-10
The power failed for the Bluetooth module of this unit.
Turn the ignition switch OFF and then to ACC or ON.
If the error message is still displayed after performing the above action, please contact your dealer or an authorized Pioneer Service Station.
Application
No Bluetooth device found.
Follow the instructions that appear on the screen.
CONN. Failed PRESS BAND KEY TO RETRAY
Bluetooth connection failed.
Follow the instructions that appear on the screen.
DISCONNECTED PRESS BAND KEY TO RETRAY
Bluetooth connection failed.
Follow the instructions that appear on the screen.
CHECKAPP
Connection to the application failed
Follow the instructions that appear on the screen.
STARTUPAPP
The application has not started running yet.
Follow the instructions that appear on the screen.
Handling guidelines
USB storage device
Connections via USB hub are not supported.
Do not connect anything other than a USB storage device.
Firmly secure the USB storage device when driving. Do not let the USB storage device fall onto the floor, where it may become jammed under the brake or accelerator pedal.
Depending on the USB storage device, the following problems may occur.
Operations may vary.
The storage device may not be recognized.
- Files may not be played back properly.
- The device may cause audible interference when you are listening to the radio.
iPod
Do not leave the iPod in places with high temperatures.
Firmly secure the iPod when driving. Do not let the iPod fall onto the floor, where it may become jammed under the brake or accelerator pedal.
About iPod settings
- When an iPod is connected, this unit changes the EQ (equalizer) setting of the iPod to off in order to optimize the acoustics. When you disconnect the iPod, the EQ returns to the original setting.
- You cannot set Repeat to off on the iPod when using this unit. Repeat is automatically changed to All when the iPod is connected to this unit.
Incompatible text saved on the iPod will not be displayed by the unit.
Compressed audio compatibility (USB)
WMA
File extension: .wma
Bit rate: 48 kbps to 320 kbps (CBR), 48 kbps to 384 kbps (VBR)
Sampling frequency: 32kHz 44.1kHz 48kHz
Windows Media™ Audio Professional, Lossless, Voice/DRM Stream/Stream with video: Not compatible
MP3
File extension:.mp3
Bit rate: 8 kbps to 320 kbps (CBR), VBR
Sampling frequency: 8kHz to 48kHz (32 kHz, 44.1 kHz, 48 kHz for emphasis)
Compatible ID3 tag version: 1.0, 1.1, 2.2, 2.3, 2.4 (ID3 tag Version 2.x is given priority over Version 1.x.)
M3u playlist: Not compatible
MP3i (MP3 interactive), mp3 PRO: Not compatible
WAV
File extension: .wav
Quantization bits: 8 and 16 (LPCM), 4 (MS ADPCM)
Sampling frequency: 16kHz to 48kHz (LPCM), 22.05 kHz and 44.1kHz (MS ADPCM)
- You cannot use this function with USB MTP.
Only the first 32 characters can be displayed as a file name (including the file extension) or a folder name.
Russian text to be displayed on this unit should be encoded in one of the following character sets:
- Unicode (UTF-8, UTF-16)
- A character set other than Unicode that is used in a Windows environment and is set to Russian in the multi-language setting
This unit may not work properly depending on the application used to encode WMA files.
There may be a slight delay at the start of playback of audio files embedded with image data or audio files stored on a USB storage device that has numerous folder hierarchies.
USB storage device
Playable folder hierarchy: up to eight tiers (A practical hierarchy is less than two tiers.)
Playable folders: up to 500
Playable files: up to 15000
Playback of copyright-protected files: Not compatible
Partitioned USB storage device: Only the first partition can be played.
There may be a slight delay when starting playback of audio files on a USB storage device with numerous folder hierarchies.

CAUTION
- Pioneer cannot guarantee compatibility with all USB mass storage devices and assumes no responsibility for any loss of data on media players, smart phones, or other devices while using this product.
- Do not leave a USB storage device in any place that is subject to high temperatures.
iPod compatibility
This unit supports only the following iPod models.
Made for
- iPod touch (5th generation)
- iPod touch (4th generation)
- iPod touch (3rd generation)
- iPod touch (2nd generation)
- iPod touch (1st generation)
- iPod classic
- iPod with video
- iPod nano (7th generation)
- iPod nano (6th generation)
- iPod nano (5th generation)
- iPod nano (4th generation)
- iPod nano (3rd generation)
- iPod nano (2nd generation)
- iPod nano (1st generation)
iPhone5
iPhone 4S
iPhone 4
iPhone 3GS
iPhone 3G
iPhone
Depending on the generation or version of the iPod, some functions may not be available.
Operations may vary depending on the software version of iPod.
Users of iPod with the Lightning Connector should use the Lightning to USB Cable (supplied with iPod).
Users of iPod with the Dock Connector should use CD-IU51. For details, consult your dealer.
About the file/format compatibility, refer to the iPod manuals.
Audiobook, Podcast: Compatible

CAUTION
Pioneer accepts no responsibility for data lost on the iPod, even if that data is lost while this unit is used.
Sequence of audio files
The user cannot assign folder numbers and specify playback sequences with this unit.
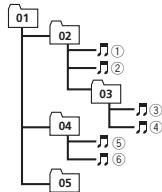
Example of a hierarchy
Level 1 Level 2 Level 3 Level 4
Folder
Compressed
audio file
01 to 05: Folder
number
① to ⑥: Playback
sequence
USB storage device
Playback sequence is the same as recorded sequence in the USB storage device. To specify the playback sequence, the following method is recommended.
Create a file name that includes numbers that specify the playback sequence (e.g., 001xxx.mp3 and 099yyy.mp3).
Put those files into a folder.
[3] Save the folder containing files on the USB storage device.
However, depending on the system environment, you may not be able to specify the playback sequence.
For USB portable audio players, the sequence is different and depends on the player.
Russian character chart
| D: C | D: C | D: C | D: C | D: C |
| A:A | B:B | B:B | F:F | J:D |
| E:E,E | J:M | J:3 | H:N, N | K:K |
| A:N | H:M | H:H | G:O | F:N |
| P:P | C:C | T:T | Y:Y | Φ:Φ |
| X:X | U:L | Q:Q | J:L, U, L | J:B |
| H:bI | b:b | J:3 | H:IO | J:Ja |
D: Display C: Character
Bluetooth profiles
In order to use Bluetooth wireless technology, devices must be able to interpret certain profiles. This unit is compatible with the following profiles.
- GAP (Generic Access Profile)
- OPP (Object Push Profile)
HFP (Hands Free Profile) 1.5
PBAP (Phone Book Access Profile)
A2DP (Advanced Audio Distribution Profile)
AVRCP (Audio/Video Remote Control Profile) 1.3
- SPP (Serial Port Profile) 1.1
Copyright and trademark
Bluetooth
The Bluetooth® word mark and logos are registered trademarks owned by Bluetooth SIG, Inc. and any use of such marks by PIONEER CORPORATION is under license. Other trademarks and trade names are those of their respective owners.
iTunes
Apple and iTunes are trademarks of Apple Inc., registered in the U.S. and other countries.
MP3
Supply of this product only conveys a license for private, non-commercial use and does not convey a license nor imply any right to use this product in any commercial (i.e. revenue-generating) real time broadcasting (terrestrial, satellite, cable and/or any other media), broadcasting/ streaming via internet, intranets and/or other networks or in other electronic content distribution systems, such as pay-audio or audio-on-demand applications. An independent license for such use is required. For details, please visit http://www.mp3licensing.com.
WMA
Windows Media is either a registered trademark or trademark of Microsoft Corporation in the United States and/or other countries.
This product includes technology owned by Microsoft Corporation and cannot be used or distributed without a license from Microsoft Licensing, Inc.
iPod & iPhone
iPhone, iPod, iPod classic, iPod nano, and iPod touch are trademarks of Apple Inc., registered in the U.S. and other countries.
Lightning is a trademark of Apple Inc.
"Made for iPod" and "Made for iPhone" mean that an electronic accessory has been designed to connect specifically to iPod or iPhone, respectively, and has been certified by the developer to meet Apple performance standards. Apple is not responsible for the operation of this device or its compliance with safety and regulatory standards. Please note that the use of this accessory with iPod or iPhone may affect wireless performance.
AndroidTM
Android is a trademark of Google Inc.
MIXTRAX
MIXTRAX is a trademark of the PIONEER CORPORATION.
Specifications
General
Power source 14.4 V DC (10.8 V to 15.1 V Allowable)
Grounding system Negative type
Maximum current consumption 10.0A
Dimensions (W× H× D)
DIN
Chassis 178mm × 50mm × 165mm
Nose 188mm × 58mm × 15mm D
Chassis 178mm × 50mm × 165mm
Nose 170mm × 46mm × 16mm
Weight 0.7 kg
Audio
Maximum power output ... 50 W × 4
70W× 1 / 2 (for subwoofer)
Continuous power output
22W× 4 (50Hz to 15000 Hz, 5 % THD, 4 load, both channels driven)
Load impedance 4Ω (4Ω to 8Ω allowable)
Preout maximum output level 2.0
Loudness contour +10 dB (100 Hz) +6.5dB 10 kHz volume: -30dB
Equalizer (5-Band Graphic Equalizer):
Frequency 80 Hz/250 Hz/800 Hz/2.5 kHz/8 kHz
Equalization range. ± 12 dB (2 dB step)
Subwoofer (mono):
Frequency 50 Hz/63 Hz/80 Hz/100 Hz 125 Hz/160 Hz/200 Hz
Slope -12 dB/occt, -24 dB/occt
Gain +6dB to -24dB
Phase Normal/Reverse
USB
USB standard specification
USB2.0 full speed
Maximum current supply
1A
USB Class . MSC (Mass Storage Class)
File system FAT12,FAT16,FAT32
MP3 decoding format ...... MPEG-1 & 2 Audio Layer 3
WMA decoding format .... Ver. 7, 7.1, 8, 9, 10, 11, 12 (2ch audio)
(Windows Media Player)
WAV signal format ......... Linear PCM & MS ADPCM
(Non-compressed)
FM tuner
Frequency range 87.5 MHz to 108.0 MHz
Usable sensitivity 9 dBF (0.8μV/75Ω mono, S/N: 30 dB)
Signal-to-noise ratio 72 dB (IEC-A network)
MWtuner
Frequency range 531 kHz to 1602 kHz
Usable sensitivity 25 V (S/N: 20 dB)
Signal-to-noise ratio 62 dB (IEC-A network)
LWTuner
Frequency range 153kHz to 281 kHz
Usable sensitivity 28 V (S/N: 20 dB)
Signal-to-noise ratio 62 dB (IEC-A network)
Bluetooth (MVH-X360BT only)
Version ..............................................Bluetooth 3.0 certified
Output power +4dBm Maximum
(Power class 2)
Note
Specifications and the design are subject to modifications without notice.
Avant de commencer
MW/LW (PO/GO): OFF—LV1—LV2
1-2-OFF (hors service)
S.RTRV (sound retriever)
1-2-OFF (hors service)
S.RTRV (sound retriever)
S.RTRV (sound retriever)
1-2-OFF (hors service)
GUEST MODE (mode invite)
1-2-OFF (hors service)
S.RTRV (sound retriever)
BASS BOOST (accentuation des graves)
MUTE MODE (mode sourdine)
BT AUDIO (activation audio Bluetooth)
1.0 MIN (1,0 minute)—1.5 MIN (1,5 minutes)—
2.0 MIN (2,0 minutes) 2.5 MIN (2,5 minutes)
3.0 MIN (3,0 minutes) OFF (hors service)
| D: C | D: C | D: C | D: C | D: C |
| A: A | B: B | B: B | F: F | J: J |
| E: E, E | J: JK | J: 3 | H: H, JI | K: K |
| A: JI | H: M | H: H | J: O | JI: I |
| P: P | C: C | T: T | Y: Y | Φ: Φ |
| D:C | D:C | D:C | D:C | D:C |
| ::X | :::U | :::Y | :::U, :U | :::B |
| :::bl | b:b | :::3 | :::10 | :::Y |
- GAP (Generic Access Profile)
- OPP (Object Push Profile)
HFP (Hands Free Profile) 1.5
PBAP (Phone Book Access Profile)
A2DP (Advanced Audio Distribution Profile)
AVRCP (Audio/Video Remote Control Profile) 1.3
SPP (Serial Port Profile) 1.1
Frequence 80 Hz/250 Hz/800 Hz/2.5 kHz/8 kHz
Phase Normale/Inverse
USB
Specification standard USB
Ver. 7, 7.1, 8, 9, 10, 11, 12 (2ca- naux audio)
(Windows Media Player)
Format du signal WAV ....PCM Lineaire & MS ADPCM
(Non compression)
Syntoniseur FM
USB,iPod e APP (iPhone)
- BT AUDIO e APP (smartphone)
Wired (per iPhone)-BLUETOOTH (per smartphone)
Estensione file:.wma
Velocity in bit: da 48 kbps a 320 kbps (CBR), da 48 kbps a 384 kbps (VBR)
Estensione file:.mp3
| D: C | D: C | D: C | D: C | D: C |
| A:A | B:B | B:B | F:F | J:D |
| E:E,E | J:JK | J:3 | H:N,N | K:K |
| A:Π | H:M | H:H | G:O | H:Π |
| P:P | C:C | T:T | Y:Y | Φ:Φ |
| X:X | U:U | Y:Y | U:U, U:U | J:B |
| H:bI | b:b | J:3 | H:I:O | J:Y |
- GAP (Generic Access Profile)
- OPP (Object Push Profile)
HFP (Hands Free Profile) 1.5
PBAP (Phone Book Access Profile)
A2DP (Advanced Audio Distribution Profile)
Consumo massimo 10,0 A
Dimensioni (L× A× P) DIN
(Windows Media Player)
- Se puede cancelar la canción o el album selecciónado mediante faciones différentes a la búsquada de enlace (p. ej., avance rápido y retroceso).
- Según la canción selección,SEO,SEO,SEO,SEO,SEO,SEO,SEO,SEO,SEO,SEO,SEO,SEO,SEO,SEO,SEO,SEO,SEO,SEO,SEO,SEO,SEO,SEO,SEO,SEO,SEO,SEO,SEO,SEO,SEO,SEO,SEO,SEO,SEO,SEO,SEO,SEO,SEO,SEO,SEO,SEO,SEO,SEO,SEO,SEO,SEO,SEO,SEO,SEO,SEO,SEO, SEO, SEO, SEO, SEO, SEO, SEO, SEO, SEO, SEO, SEO, SEO, SEO, SEO, SEO, SEO, SEO, SEO, SEO, SEO, SEO, SEO, SEO, SEO, SEO, SEO, SEO, SEO, SEO
1.0 MIN (1,0 minutes)—1.5 MIN (1,5 minutes) —2.0 MIN (2,0 minutes)—2.5 MIN (2,5 minutes)—3.0 MIN (3,0 minutes)—OFF (desactivado)
| D: C | D: C | D: C | D: C | D: C |
| A:A | B:B | B:B | F:F | J:D |
| E:E,E | J:X | J:3 | H:N, N | K:K |
| A:N | H:M | H:H | G:O | F:I |
| P:P | C:C | T:T | Y:Y | Φ:Φ |
| X:X | U:U | Y:Y | M:M, M | '':b |
| H:bI | b:b | J:3 | H:I | J:J |
| D: C | D: C | D: C | D: C | D: C |
| A:A | B:B | B:B | F:F | F:D |
| E:E,E | F:M | F:3 | H:N, N | K:K |
| A:N | H:M | H:H | G:O | F:T |
| P:P | C:C | T:T | Y:Y | φ:Φ |
| X:X | U:U | Y:Y | M:M, M | ::b |
| H:bl | b:b | J:θ | N:IO | R:Ra |
D:Anzeige C:Zeichen
Bluetooth-Profile
- GAP (Generic Access Profile)
- OPP (Object Push Profile)
HFP (Hands Free Profile) 1.5
PBAP (Phone Book Access Profile)
A2DP (Advanced Audio Distribution Profile)
AVRCP (Audio/Video Remote Control Profile) 1.3
- SPP (Serial Port Profile) 1.1
Equalizer (5-Band Graphic Equalizer):
Frequenz 80 Hz/250 Hz/800 Hz/2.5 kHz/8 kHz
S.RTRV (sound retriever)
S.RTRV (sound retriever)
S.RTRV (sound retriever)
S.RTRV (sound retriever)
BASS BOOST (bass boost)
HPF SETTING (high pass filter aanpassen)
2.0 MIN (2,0 minutes) 2.5 MIN (2,5 minu
ten)-3.0 MIN (3,0 minutes)-OFF (uit)
MIX PATTERN (mixpatroon)
Geen verwante songs.
| S: T | S: T | S: T | S: T | S: T |
| A:A | B:B | B:B | F:F | J:D |
| E:E,E | J:X | J:3 | H:N, N | K:K |
| A:N | H:M | H:H | O:O | P:I |
| P:P | C:C | T:T | Y:Y | Φ:Φ |
| S:T | S:T | S:T | S:T | S:T |
| ::X | :::U | :::Y | :::U, :U | :::B |
| M:bl | b:b | J:3 | M:JU | J:JY |
S: Scherm T: Teken
Bluetooth-profielen
- GAP (Generic Access Profile)
- OPP (Object Push Profile)
HFP (Hands Free Profile) 1.5
PBAP (Phone Book Access Profile)
A2DP (Advanced Audio Distribution Profile)
AVRCP (Audio/Video Remote Control Profile) 1.3
- SPP (Serial Port Profile) 1.1
Copyright en handelsmerken
Bluetooth
Versie 7, 7.1, 8, 9, 10, 11, 12
(2kan.audio)
(Windows Media Player)
WAV-signaalformulaat ......... Lineaire PCM & MS ADPCM
(nietgecomprimeerd)
FM-tuner
Frequeniebereik 87,5 MHz tot 108,0 MHz
Bruikbare geovliegidel ... 9 dBf (0.8 V/75Ω mono, S/R: 30 dB)
Versie .Bluetooth 3.0 gecertificated
CLOCK SET (yCTaHOBka yacoob)
Поворачиваям.M.C.,Чтобу установы.Yась.
HAKIMMAE M.C., YTO6bI Bb6paT bYCTAHOBKY MHNYT.
3 [M]yHHTb.
4 Haxmte M.C., cyTo6bI noTbePdntb Bbl6Op.
FM STEP (waar hactropon B FM-dunaana30ne)
5 7OboI3aOKOHHTb NaCTPOKY, NOBEPHrTe M.C. n BbIePBETE YES.
EcnI noHADo6BTHC BHOB I MmEHNTb HactpoKy, NopeHHTeM C.M. iBu5bePHTe NO.
6 Haxmnte M.C. nBbIbopa.
PpmeaHnA
HaCTpoNTb npaMeTpbl MeHIO MoKHO B MEHIO CNTeMb I H N aHaJIbHOM MeHIO. Boee noIpo6HyU nHΦopMaUHcM.B pa3- denax MeHIO CNTeMb I cTpTOBoE MeHIO h cTp. 144.
- Bы мочete OTменинтусторку napametpa, нахьak Honkiya SRC/OF.
IcnoJb3OBAHne daHHoro yctpoiCTBa
OCHOBhIe Onpaun

BaxHo
ПгСоюсденинс.YETANOBKЕ NGEPENHNI pAneHnIb ObaupaJIeTc c HNeOTOPOXHO.
- Obepaeta nepednoio nahenb ot cnibbIX yauapod.
- PnédoxpaHnIe NpeDnHIO nAneHb OT BO3eHCTBnI PPnOro COJNeHOrO CBetaN BILCOKIX TMENPATEy.
PpeJeMe CnTb NpeepHIO NaHEnb, 6OBaTeAeBHO OTKNoCHte OHe Bce Ka6Eni NyctPoIcCTBa, YTObSe Hne NopeBPeNy yCtpoIcCTBO n BVHTpeHHIO OTdENKc CanoHa.
ChyTne nepedne nahei
1 Tc0b6To OcbEOnHbItepeNHOIOHNaHEJI, HAKMITE HA KHONKY OCBtOENHIEHNAHENI.
2 HacKMITE ha naHelb no HanpaBHeNIO BBePx (I) nOTaHNTHa h ce6II.
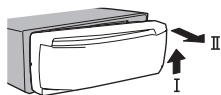
3 Cserda xpanhttme OTOeHNENHtu naheB b 3aauimn Hfymrpe nuiy xueyi.
UctaHOBka nepednei nahei
3a#nKpyTneBbI kpaanHeHnHa yctOCTBe.

2 HacKMITE Na pRaBbI KpAe npEaHne paHEnn naZafKnCpYrte ee.
B Cnyaepnnpnoexn H3N1Hrero yCnHnpepeHnaHb nnOCHOBHe yCTPOHTBOMOTy6bTbNOBPEKDeHbI.
BkIIOUeHHe yCTpoIcTBA
1 NaKIMITE KHOKNY SRC/OFF, YTO6bY BKHNOHbY cystPOCTBO.
BbKIIIOueHHe yCTpoIcTBA
1 NaHKMITE u YEDKKBIAE KOHNKY SRC/OFF, NOKA yOCTOBTO EBO HLBIKNOTCHC.
Bb6op nctouhka crrha
1 HaximmaeKhony SRC/OFFdIy Bb6opaH3 cneDyuOuNXfUkHzn: RADIO-USB/iPod-APP (npinpoKeHne-AUX-BTAUDIO
- Пи полдаковеньи no protokony MTP на досльно отобракая сUSB.MTP.
Tolko dIy MVH-160UI Ecnb noKIOueH iPod n Bb6pan IIOsoi NCOTUHNI CnHATA, KpOme iPod, MOKHO nepeKIOuHTCBaHa i Pod c NOMOtuB KOHNK iPod.
- BTAUDIO Heioctyno nMvH-160UI.
PerynipOBKa rpoMkoCTn
CoxpaHHeN N BbI3OB N3 NaMЯrTn padnoctaHcN dIg KaKdOro dnana3OHa
NcnoIb3OBAHne KHOIOK npedBaPnteBHOHaCTpoiKn
1 CoxpaenHe: hXaMnTe nYapedKmbaTe OdHy n3 KhoNOK npedBaPntelbHO Ha-ctpOKn (c 1/An no 6/),noka Homep He npekpatNT MrtBt.
2 BbI3OB: haxMMTe Ondy n3 KhONK npedBapntelbHOH NaCTPOKN (c 1/∧ no 6/)。
IcnoIb3OBAHne daHHoro yctpoiCTBa
IcnoIb3OBAHne daHHoro yctpoiCTBa
IpeeknoueHne dncnner
Bb6Op TeKCTOBHnΦopMaun
1 Hachmaie TISP DnA Bb6opa n3 cneDyiouixx fynkui:
FREQUENCY (Clyxhe6hoe nablahme npo-rampaHn Hn cTacto)
BRDCSTINFO (cnyk66hoe nabaanhe nporpammh/inhokopmaun PTY)
CLOCK(H3a3BaHMeIcTOCHNHaCnTHaNA nTaCb)
PpmeaHn
Ecnn cnjykebHOe H3aBHHe npOrpAMMbI B none FREQUENCY OTCYCTByET, BmecTo hero OTOpaxaetc KaHAn. Ecnn cnjykebHOe H3aBHHe npOrpAMMbI o6hApyKeHo, OHO 6yDet OTOpaxaTbcz.
TEKTOBAR INHOFMAGUIN MOKET MEHARTBC B 3ABUBICMOCTN OJIMNAHOA.
BOSTOByIO INHOPOMAUHO 3ABVCNTOT PERONA.
IcnoIb30BaHneФyHKCnI PTY
Mochho HachtoptbC hApaOoctaHn C no MochsoBhHnOpmaFy (TNTa npOrpAmMb).
PNTY
1 HaXMMTe (cNtCOK).
2 Khotko M.C. Bb6epTe TINI PpOpaMMbl NEWS/INFO-POPULAR-CLASSICS-OTHERS
3 Haxkmtte M.C., Yto6bI haHabt noNc. UyctpoCTBO hauHnaET noNcK padIOCTaHnI, nepedaoUoAaX dAnhBu TmT npORpAM. Ppi 6bHApuyKeHN paIOCTaHnIM naDcNJIe 6ydt NOKa3aHO HA3BaHMe daHHO npOrpAMMbI.
ДягOTМЕньюнСКАнхмITEM.C.шepe p3.
- PpOrpaMmbl HeKOTOpbX pAnIOCTaHmU MOY TOnHuaTbCz To nppPAM, yka3AHbX b nepeDabaEMOM kOePTY.
EcnHn HOnDa I3 cTaNHe NepedaeT npOrpAmMbIy HxNHO TIna,To HAn dCnPiee B TceHne pImeMBO D8yX CekHyD 6ydet nokAAHAO NOT FOUND, n 3atem TIOheP nepiDeT B PekIM pNEMA tAChuN, C KOtopoBbH Nauvat NocK.
Cnncok PTY
Boeene noopobHyu INHOpmaUo o cnNcke PTMy MoXHO nOpyuHT h a Be6-caITe: http://www.pioneer.eu/eur/products/25/121/tech/ CarAudio/PTY.html
HacroikaФунки
1 Haxmnte M.C., YTO6bI OTKpbITr IaBHOe MEHO.
2 IIOBopauHbaiTe M.C.ДЯ npOKpyTKn nyHKTOB MeHIO; HAKMITE, YTO6bl BbIbpaTB FUNCTION.
3ДЯьБИбОруФУнКИМ NOBOPAчИВайТ M.C.
Cnedyuohue BvIbpaHhIbe FyHKUIMoKHO Ha-ctpAmBaT.
Bdkna3oAnx MW/LW moXHO BbIbpaT ToJIbKO BSM, LOCAL & SEEK.
FM SETTING (hactpoikKauectBa 3Byka FM)
YOpOBHeK KAnECTBA 38yKa MOKOHO YCTAHOBITb BOOTBETCTBM N C YCBOHBM MII PNeM A CMHNA B FM-DnA3OHe.
FM: OFF—LV1—LV2—LV3—LV4
MW/LW: OFF—LV1—LV2
Hactpoika camoro bblcokoro yobOBnnoB0B- nO3B- NOCCTBNTyB pNEM TOIbKO CTaHnC Ccamblm cnilbHm CnIHALOM, aYMeHbSheHHe YOBPOH nACTPOKn O3BONET npINHMATb CTANHmC 6OJIee cIabMcRnHANOF.
TA (pejIM OJNDAHIN DOPOXKbIX CBOdOK)
1 HaxKMITE M.C., 70b6 BkIKOHTH INBbIKIOHTB PEXKIM OKXJAHDAI DOPOXHKXB CBOIDOK.
AF (NONCK aIbTePHaTINBHyX AcToT)
HANKMTIE M.C.,TOB6by BKNIOCHIT INI BYIKHO-THHTy FNYHKLIIO AF.
NEWS (npepbBaHne dIy nepeDaU HOBoCTei)
1 HAKMITE M.C., 'TTOb6 BYKIOHHTI INI BYIKHOHTI- DYFKHIIOU HOBOCTNI.
SEEK (Hacrpoika neboi npaboi KhoNOK)
PnIOCTaHOBka BOCpON3BeDEnH
1 Haxkmtte KhoNKy4/PAUSE,TOb6blKbNtOHy naayIiny BO3oBHOBHBOBcPON0H3BDEHHe.
Unyucheimen Kuchetba 38ka Ckabtbs aydinokai- loB u BCCTaHOBe HnOHTb ByCayHnA (TexHONrnn nepeo6pa3OBAHn 38ka)
TolboqDnMVAH-160UI
Hakimaiyute Khojky 3/S.Rtrv nIy bIb6opa m3 cnedyuoyuФунку:
1—2-OFF(BbIKJ)
Hactpoika 1 aΦeKETBnA daPaiOB c H3K0K TcTeNEbO cKaTmA, a Hactpoika 2 - dIa PaiOB C bCkOcE TcTeNEbO cKaTmA.
37aKnabuHaNeAeKtmbHa,ecnBkIcHepa fynKuia MIXTRAX.
IcnoIb3OBAHne daHHoro yctpoiCTBa
Hactpoika fynkui
1 HakuMITE M.C., YTO6bI OTKpbITr rnaBHOE MEHO.
2 IIOBOPaHbAte M.C.ДЯ nPOKpyTkn nyHKTOB MeHIO; HAKMHTe, YTO6bI BbIbOpTaB FUNCTION.
Bb6paHnHbe yfHKnI, KOtpoBe MoXHO haTcPbA8b, nepeKuJIeHb HIXe.
ФУн��и S.RTRV HeDctyHna,ecnB KBrNoHe-haФyHKnua MIXTRAX.
S.RTRV (sound retriever, texhONOIR pneo6ba3-OBAHRI 38yka)
ABMATMHTeCKa UyUHaAeT KaHeCTBO 38Ya CkaTbIX ayDInoFaIIOB IN BOCCTAHAbINBaE TOnHOTY 38YAHnA.
Bb6op Ha3BaHnKOMnO3nMn nn KaTeROpn
1ПоворачваiteM.C.
Пийшты-ИпОпнIHТЕМ--анБOMы-КOMПОЗИMN--нДКАБТ--ЖАнР----KOMПОЗИTOpI--AydINOKHMI
Bocnpo3BeDHeH
1 Bb6epTe KOMIO3NIOH N HAXMmTE M.C.
Посмогтспнда КСМОЗДЦИВББФАНСКАТERTORIN
1 BbIbepeHTe KaTeOpHIO n HaxMnTe M.C.
Bocnpom3BedeHne KOMnO3HIN B Byb6paHNO KaTeroPOn
[1]BüBepener TATEKOPINO, 3ATEM HAXMITE I yedepkBaIe M.C.
Ponck B cnncke no anpabuty
1 Korga cinnck Bb6panoh Kateropnn OTO6pa3NTcH Na DCnPee, HAKMNTe Q, YTObBkNIOHTb pEXKIM NONCK no anfABpYi.
ДавдыноврMHMC.,MOKHO nepetniBу peKMнONKA noI anDabity
2ДЯьБбора6yKbblNOBOPaHBAIteM.C.
13 KaMnMeTc M.C. dIa T0ObpaKEnH cINsKa No anf3Aabyt.
-ДЯOTMehbI NOUCKa HAXMITE DIMMER.
PpIMeuaHn
- MoXHo BOCpOn3BODInTb CnCKn BOCpOn3BedeHn, Co3dAnHhle C nOMOuIb pRiPNOxKeHnIaI KOMtIbTepa (MusicSphere).PnIOxKeHne MoXHo cKaaThb Ha NaHemCaiIte.
CncknBocnpoB3eHNe,Co3aHbHe CnOMoBb npinloKeHHa (MusicSphere),6byTt OTo6pakatbC B cOKpaeeHcHOM Binde.
CoxpaHene N BbI3OB TeJIefoHHbIX HOMepoB
1 CoxpaHEnHe: HauKmTe N ydepXnBaTne Ondy n3 KhoNOK npEdbaRtBeNHOHaCTpOKN (c/1 ∧ no 6/)。
Yka3aHbIe HNKe FyHKm MoKHO NcOToB3oBAtb JnO CoXpAehnBa N mApTn TeneOpOHbIXHbHomePo. IopNoBee Cm. B paZdene NcOnb3ObaHe MeHo TeneOpHa h CT 139.
- MISSED (CnncOK nponyueHHbIX Bbl3OBOB)
DIALLED (CNICOK NCXOJUNX BbI3OBOB)
- RECEIVED (CINCOK BXOJAUXX Bbl3OBOB)
PHONE BOOK (TeenefoHHbI CNpaBOOHNK)
2 BbI3OB: HaxMMTe Ondy n3 KhoNOK IpeBaPHTeBHOH NaCTPOKN (c 1/∧ no 6/)。
3 HaxMMte M.C., YTO6bI BYBIOINHITb BYBIO30.
IpeeknoueHne dncnner
BbI6op TEKCTOBH INHΦOpMaun
BovBepa 3BOKaMOxHOIMeHbTHNΦOpMa- cHIO HnAICPHe.
Hakimmaire DISPnBb6opn3 nCneJyouixnФhynKu
- PpOdoJOnKInTeJbHOCtB3BOHka
IMRAa6oHeHa
Homep a6oHeHa
IcnoIb3ObaHne yHKunrIogocBoro ynpablenn
3Ty yfHKNUO MOKHO INONIb3oBbTa H a iPone, OCHaueHOM FyHKUeI roNocOBOrO ynpabLeHn I noNDKIOUeHNO no Bluetooth.
1 HauKmteu ydepXbaaTe M.C.,TcO6bl nepeKJIOHTbCBA B pEKMMrOIOBOYpnaBbHnEe.
2 Haxmte M. C. n pno3necite ronocobyo KOMaHdy B mKPOhoH.
TcBbI ByInI n3 pexIMa rOLOCBORO ynpabneHn, HAKMITE BAND/EJ.
PpmeaHn
Плоб ShoeeоФУндуну rofonocoboro ynpableney CM.В рыковдосте к iPhone.
TcObI rONOCOBIE KOHdIbXoPOUO pa-0nHaBAnCb, Heo6xOIMo C0aTb Ira 3tOrO nOxOJHmue yCNOBJI.
YuTbIbAaTe,TOBETep,dyUOuB BOKhA ABTOMObINI NUIYM CHAPyKIMOTyC03aBaTbTOMEXnDnPaCnO3HaBaHnRrOIOOBbIX KOMAHJ.
ДяоцадиЯ OTNIMaJIbIbIx yCtObni MMKPOdOH DoJIKeH NAXOJITbC HEnOpredCTBeHNO NepeD BOINTeHem Ha HyXHOMPACCTOHHM.
- Ecnnpom3Hectn KOMaHdy CnIuKoM 6bIcTPO NOCEB KNIQUEHN FyHKUIN, CNTeMa MoKet He pacnO3HaBt ee.
Toborpnte MednepHNO,JeHOpa3dEhBO HJACHO.
NcnoIb3ObaHne MeHIO coeINHeHn

BaxHo
Ecnn OIOHBPemHNO NOKIIIOHbI Hecklonbo yUcpoTbCTB Bluetooth (HanpIMep, TeneΦOn u ayDIOINNEe), NOKIIIOHbIbIy cTePOITcBA MOrYt paOToTaB HeKOppeKTHO.
1 Tc06bI oTO6p3aHTb Ha 3KpaHe MEHO coeHNHeHn, HaxMNTe n UydpKXBaTBe KhoNk
Во вретешисторoga заразовora за поц,在небоституна.
2Дпь Вьбopa Функим поворачайт eM.C.
CnDyUHcE BbIpaHHbIe FyHKZIMoKHO NaCTPAMBaT.
IcnoIb3OBAHne daHHoro yctpoiCTBa
IcnojB3OBAHne daHHoro yctpoiCTBa
DEVICELIST (NOKKIOUOHeHne N OTKIOUOHeHne COTOBORo TenefoHa n3 cncka yctpoiCTB)
Дагонообаржениyaуctановсгор�имнонскштeteM.C.
2 NobeprHnTe M.C. nIy BbOpa HaaBAnHya CTOPICTBa, KOtOpoe Bx Oxtne NoKTHNCHITb/OTKnHHTb.
Дносякюненя Медудраpecom Иианьимем усточьBA BluetoothиУдерж KM.
3 HαKmnteM.C.,TtO6bI NpOKNIOHHTb/OTKIIoYHTb BbI6paHHOe yCTPOIHCTBO. KOrda coeINHeHne yCTaHOBHeO, prdOM cHaBaHNEM yCTPOITCTBA OTb6paKaAETcA*
EcnBIN CnCKe HEb6pO HNO OHDOYUcTPOCTBA,37a FyHNKUN HEDOTCYNHA.
DEL DEVICE (ydaenehe yctpoctba n3 cnncka)
Дагонообаржениyaуctановсгор�имнонскштeteM.C.
20 POBHnateM.C.N. dIaBoba HauBaHAny yCTOPACTBA, KOTOPOE HYNKHO YANDBT.
ADD DEVICE (noKJIOHHe HOBORO yCTPOIcTBA)
1 Haxmte M.C., YTO6bI HAaTb NcCK.
ДИА OTМЕЦИ HAZKMITE M.C. BO BPEM NO-NCKA.
- EcnI STO yctpoCTBO He HAXODIT DoCTyTNHbIX COtOBbIX TELEFOHOB, BbYBOITcR Co-6oBuEneHNE NOT FOUND.
Диьвьбора устрива n3 cnitska nobobpaivbaite M.C.
EÇınluyhexooyeptocboH Yo 06bpaKaaTeC, Bb6bpTeR RE-SEARCH.
Дипескюнчени Мекуд apdecom И haBaHmE m yctpoCTbla Bluetooth hakmTe u ydepkrkBaiTe M.C.
3 HAKMITE M.C., TQO6bI NOKIOHIOHTb Bb6paHHOe YCTPOJCTBO.
Дялзавершению畴едурь установский coedimenneя поразытей наразиме устрий STBA(Pioneer BT Unit)и вебадпг Дэустриль.
B KAncheTBe PIN-KoJa no YMOnuHaHMo YcTa-HOBHeO 0000.3ToT KOd MoKHO INMe- HInTb.
- Ilteu3nHaHoe YcNMO MoKET OTObpaKaTbC KAK HA 3OM YoCTOJICTBE, TAK Ha YoCTOJICTBE Bluetooth.
BbIepeRite Da, eCNI liTeU3n3HaHoe YcNPO Ha 3OM YoCTOJICTBE N YoCTOJICTBE Bluetooth cObnadaet.
Ha dinnee yctpoiTbna noBHTc6-3aHny HOMER. Iocne toro, KAK coeineHneYCTAHOBITcR, HOMER nCHe3aet.
- Ecπn coεθηνΗΝΕ ένεθασχόν ΚγατανΟνθής Σ πομούβικε ΣΤΟΓΟ γυχροίης ΑγατανΟθήτε ΕοθηνΗΝΕ Εναλεύδητης Εγατροίσχόν
- Ecln yyez azepréntrpoBANO trp YCTPOBCTBA, OTobpa3ntcO co6bueHne DEVICEFULL, H daHnaa Oonepaui 6yadet HeBO3MOxHa. B 3TOM cIyuae Heo6xOdimo CHaHana ydaNHT oHO n3 azepréntrpoBaHHbIX YCTPOBCTN 3n NamaytI.
A. CONN (aBtOMaTHeCKoe IIOKIIIOUHeHne K yC- tpoCTBy Bluetooth)
1 HAKMMTE M.C., YTOBSE BIKNCHOTY IINI BIKNCHOTY PEXHKM BYAMATMOECKO NOKIPKHNHOEN.
VISIBLE (HacTPOIka peXIMa BvDIMMOCTn DaHHOrO yCTPOICTBa)
Pekim BnIMoCTNI Bluteoth MoXHO BKNIOHTb 106blpynueyctpoCTBa MOrnIo 6OpayKmTb 3TO yCTPOCTBO.
1 HAKMITE M.C., 'Tb06B BKNOHTB INH BkNHOHTB PEXKMH BVIIMMOCTN.
PIN CODE (BBOД PIN-коба)
TcBbI POaTBePnTb CoeAnHeHne BluTooth, Heo6xOaMBO BEmCTn PIN-KoN haBaewmycTpoiCTbe. KoN IO MyoTHaHIO - 0000, Hc N oMooubIO TOnI FyHKUnn ERO MOKIO I3MeHNTb.
[1] リル οTOБбРаЖЕНИУ YCTAHOBОЧОНО МЕHQHA-нKMATE M.C.
2ДЯ BBi6opa HOMepa NOBepHInTe M.C.
3 [Ди посяшени КУСРО на позично Спунцero симь�а Нжимаite М.С.].
BVeDnite PIN-KOД, a 3aTeM HaxMmTE n ydepKxHbAITE M.C.
PioeBbOaKoJaHAKATIeMaM.C. MoKHO BepHyTbcra HaekpAH BbOa PIN-KOJa, rde MoKHO 3mEHeHITb PIN-KoJ.
DEV. INFO (otroşpaçehné àpeça de Bluetooth-утjohnCTBA)
[1] リル ΩTOБРЖЕΝΗΥ CTAHOBΟΥΗΟ MEΗΚΑΜΙΤΑ M.C.
2ПовернITEМ.C.,HTO6bI OTO6pa3NtB HnHOpMaMauHOB 06 yCTpoiCTBe.
HaBaBHHe yCTpoiCTBa—AApEc BluTooth-ycTPOiCTBa
GUEST MODE (roctebo peKIM)
KoRdA BKNIOUH 3OT pEXIM,TO npri NnOblTke peNCTpaun,KOJa TnY cTPOrCTBa YKe 3apeMTrpOBAnO,YcTPOrCTBO ATOBATMAtHeCKO tOKpoET 3kpan DEL DEVICE npeIIOXHT yda-nltb YcTPOrCTBO. IOnDp6Hee CM.B pa3dene DEL DEVICE.139.
1 HAKMITE M.C., T'06bl BKNIOCHIT INI BYKIOHOTY FCTOEBY PEXIM.
A. PAIRING (aBtOMaTnuecka peRnCTpaun)
Ecn3taФHyKUHRA BKNIOUeHa npn HauNCHIN
iPhone, noNDKIOHHeHOro no USB, na duCnIee abTOMATNIcCKN NOBNTC COOJIeHne, npdNaraiOu
Ie 3a aepnrntipobat iPhone.
1 Haxkmtte M.C., YTO6blb KBrIOHHTb IIN bIKIOHOTb FyHKtIOA BBTOMATNUHECKO pERNTpaIIM.
B 3ABNCHMOCTOTIENCHL3yEMOBERPCHYNOS 3Ta yHUYKNU MOKETbYbHTHeNDOCTyTHNA.
NcnoB3OBaHne MeHIO TelefoHa
1 HaxMMTE ,yTO6bI OT6pa3NTb MeHOTeJIePOna.
2ДиЯБИбОраФункIMиNoBOPaYHBaIeM C.
Cnedyouuue Bi6peHbIe FyHKUIN MOKHO HcTaPauBaT.
MISSED (CNICOK IPONYUeHHbIX Bbl3OBOB)
DIALLED (CINCOK INCXOJAIIIX BbI3OB0B)
RECEIVED (CINCOK BXOДAUNX BbI3OBOB)
HAnKmiteM M.C.DIraOTo6paKeHHa CnMcKaTeNefoOhhBxHOMeOB.
Ды Вьборma Имиу Лтелофонного HOMe-
pa noboparvaibate M.C.
3 HaxmTe M.C., YTO6bI BblNOJHnTb Bbl3OB.
PHONE BOOK (TelefoHHbI CNpaBOHnK)
IcnoJb3OBAHne daHHoro yctpoiCTBa
NtHOpmaIaI3 TeNeFOHOrO cnpabOHnka Ha BaIeM TeNEPOhe 06bUHO nepeHOcHTC rAtoMaTHueckm, KOJaTe NEPOH ONDKIOUeH. Ecln 3TOrE He npO3UOJI, nepeHecITE DAHNBE C NOMOuHbMeHO HA BaIeM TENEPOHe. PpI nOpIb3oBAHNHa MeHO TENEPOHa pEKIM BVIDIMOCnHa DAHNOM UCTpoJCTBe DOJIkEN 6BtB KBIIOUeH. CM.VISIBLE (NaCTpoIa PEKIMNA BVIDIMOCn DAHOHrCTb) HA ctr.1P3.
1 HaxKMITE M.C.Дяп OTоБрах�н�I SEARCH (cINHCA no anfBAPHTY).
2IPOBEPHNIE M.C.1T06BbYbBb4bTaNepyIO 6yBKy HYNKHOIMENH.
- Hauzmiete H uyyerkbaeHTe M.C. dansbboPA hyKHOH TnA CHMBOB.
TOP (TATNCHIK AND AFBHIT) - OAA (Ptecheknik and AFBHIT)-BCE (KPNKNILNA)
H Nakmite M.C., 706b6 10a6p3ahtb CnIOcK 3a- pERCTPPOBOAHHHX IMEH.
4 [NobopaAkhBaiMe.M.C.ДялБьбору.HyKHorO mENH].
Hakmite M, C.M. d'Ono6paekhena cnckka TepeohhhbX HOMeOB.
6 NobePHNTMe.M.C.ДагьБВОGAHomePA,СКOTOMBЛБXOTHМ.YETAHOBHTBCOEIMHEINE.
7 HaxmTe M.C., YTO6bI BbINOJHnTb Bb3OB.
PRESET 1-6 (npedabapitelbno3aadahbneHomepa)
JITAOIO6BAPKEXHNAYCTAHOBQHORO MEHO HAKMITE M.C.
2 プービーフリデ M.C., ダフロ BJIbIbIbIbIbIbIbIbIbIbIbIbIbIbIbIbIbIbIbIbIbIbIbIbIbIbIbIbIbIbIbIbIbIbIbIbIbIbIbIbIbIbIbIbIbIbIbIbIbIbIcHOMEP.
3 HaxmTe M.C., YTO6bI BbINOJHnTb BbI3OB.
- MoXHO TAKKHe IcNoIb3OaBb KNoHnI npEBaBpITeHb HnAchtpoKn c 1/A no 6/,Tc06bl Bb3BaTb npEBaPHTeBb HO CoXpaHEHHbI HOMep.
BbIop TeKCTOBoH INHOpMaun
Hakimaiye DISP nBb6oba 3n cneyuioxh xIyHK
- DEVICE INFO (Ha3BaHne yCtpoiCTBa)
- TRACK INFO (нановая посту мима постунотергалу/Nановая посту вебмога)
ELAPSED TIME (HOMEP DOROKKI IN BPEM A BOCTPON3BDEHNI)
CLOCK(HA3BaHMeIcTOCHNkA CnTHaHa n YacB)
SPEANA (aHaIIm3aTop cNeKtpa)
IcnoIb3OBAHne daHHoro yctpoiCTBa
EQ SETTING (Bb3OB HAcTpoek 3KbaJn3epa)
IITAOOTOBAPKENHUYCTAHOBQHOHORMOHEHAKMATEM.C.
Hakmite Khojky M.C., YTOb6y Bb6pa8y 3kaBaaep.
POWERFUL-NATURAL-VCALC-CUSTOM1-CUSTOM2-FLAT-SUPER BASS
PnBbIbOpe CUSTOM1 INN CUSTOM2 Bbl-ONHInTE DeINCTBNI, ONINCAHNBE HNKe. PnBbIbOpe DpyrNt HAcTPOeK HaxmNITE M.C., YTOb6 BeByhTbC K npdeBdyUcEMyDnIbnEO.
CUSTOM1 MoXHO Bb6paTb OTeJIbHO dIra KAZdoTRO NCTOHNIKCA CINHILA. OdHaKO IJIIObIX KOmbHaun, yka3aHHbIX HnKe, AOTOMaTHeCKN YCTAHBNIbAOTCR OdHaKOBbIe HAcTPOIKM.
USB,iPod u APP (iPhone)
BT AUDIO u APP (cmapTph)
- CUSTOM2 - 3to 0674 nactpOka, nCnPb3yemaJdIe BCEX INCTOHKNOB CnHnJa.
MUTE MODE Heoctynho nla MVH-X360BT.
BT AUDIO, BT MEM CLEAR, BT VERSION APP CONN. SET OTCYTCTBNYOT B MODETN MVH-160UI.
LANGUAGE (BbIbOp Ra3bika)
JaHnHOe yCTPOIcTBO MOKET OTO6paXaTb TEKCTOBYU INHOPOMAUIO M3 CkAByx aayINOaHIOB, TOM YNCIE INHOPOMAUIO HA aHTIINCKOM, yPcCKOM I YTpeiKOM 3yIbKAX.
PnI HECOBEMCTMOMCTH AACTPOE BCTPOEHORIO Bb6pAHNO R3aBBO3MOHBI NcKaeJHNA PPn BbIOBe TEKTOBx COO6UeHN.
- HexOpertBe CmBONbl MyGNT OTo6paKaTbCn HENPABINbHO.
1 Hachmite M.C. Дя Вьбора Нуххов Настюк. ENG (aHRnNcKn)—PYC (pycckn)—TUR (typeuKn)
CLOCK SET (yCTaHOBka yacob)
JITAO OTOB6PakEHHaYCTAHOBOCHOTMO HAMKMTE M.C.
2 HakuimaiTe M.C.,TTOb6 bbl6p8b cERMeHT dIcNIIeA YacoB, KTOboty HUxHO yCTAHOBtB. TaCyb—MmHytbl
[3]Овоградыт eM.C.,чтобу otретуноваь bPEMA.
CnTcOK yCTpOHTe/ PIN-KoD/cnTcOK BbI3OB0B/Te- nHnHH CnpaBOuHMK/3anporpAMMPOBAHHe HomePA
1 HAKMITE M.C., T06bIy BvBECTH Na 3kpan OKHO NOITBETRPXDHNI.
HaNcHnneIeOo6pKaaTeCry YES. PAmrTaB roToba KOnCTke.
Ecni BHe XOTHTe ydaIaTb dAnHbIe o6 ycToPTChe BTluoth, NopeBnHTe M.C., TTOsbO tOobpaanIOc coo6ouHeN CACEL, nHaJMMTe Ehe pae, YTOsbO nOtDaTbePbTbO tOMeHy
2 ONUCTKA NAMATNI OCUJSECTBNAETCRA HAXATNEM M.C.
OTo6paKaTaC coo6eBHe CLEARED, nDaHnHb 06 cYTOpCTBeLhBt Bluetooth daHnTOr.
Bo vembe BvIIOHNHEN 3tOI OpeAun He 3a- rnuuuae Debratentb ATOMObIaN.
BT VERSION (otobpaxeHneBepcnu Bluetooth)
MkoHTo 06bpa3Mb HOBe CIEHTEMHOB BEPCH DAHIOHO YUOPCTBa I MOyIN BLuetho.
1 HaxmITE M.C. Дяоотобрахени Информuaи.
McnojB3OBAHne daHHoro yctpoNCTBa
Wired (dian iPhone)-BLUETOOTH (dma cmptpohna)
37A hataprkika hedotytnha,ecnla BKAeCTBE MCTOCHNA CIRHANAABb6pao AP
HΦopMaζη o MIXTRAX
Tolbko dny MVH-X360BT
TexHONORI MIXTRAX Icnpo3yETcIaN BCTaBENHE Ctepe0e0fpeKTOB MEdY KOMIO3nIuMN, N03BOJAR Cnyuatb My3bky HOH-CTON BCOUHTAHIN C Bu3yabHbMbIe 3DpEKTAM.
Приимechаня
ДянЕКЕТОБХФАЛЮВ/КOMNIOUIKиВОЗМOKHOCTьdoBABLEHIN3BvKOBxIeФEKT-OBOTCYTCTBYET.
- BbKIOHHTe FyHKUHO MIXTRAX,ecnBnB3ayIbHe 3OΦEKTb OTBNEKAOT Bac OTOXJdHnC.M.ФYHKUKN KHOJIKN MIXTRAX Ha ctp.134.
MeHIO MIXTRAX
1 HaxMMTE M.C., YTO6bI OTKpbITr rnaBHOe MEHO.
2 NòbopαnBaiTe M.C.ДЯ nρokpytkn nyKtOB MeHó; NaXmITE, YTObI BbIbOpaTb MIXTRAX.
3ДлвБорафункшIMIXTRAXnobopaivaiteM.C.
CnEyduHouMe Bb6paHnBbIe FyHKuIN MIXTRAX MOKHO HAcTaPbAbaTb. FyHKUIN DoCTyHbI npi BKTIOEHOM pEXMIME MIXTRAX.
SHORT MODE (pezim kpatko BO Cnpo3BdeHHI)
MozhoV BuiOpBaTb NINITeHbOcThb BVPMeHHI BOcPnON3BDEHNi.
1.0 MIN (1,0 MNH)—1.5 MIN (1,5 MNH)—
2.0 MIN (2,0 MmH) 2.5 MIN (2,5 MmH)
3.0 MIN (3,0 MmH)-OFF (BbIKJ)
MIX PATTERN (n3MeHЯIQUAЯСяЗаТБКА)
CnIeJIeN cIeJIeIeΦeKToB MIXTRAX I3MeHReTcA B 3ABICIMCOHTO YOTBOH RPOKMOCTK.
I 叼IOTO6PbAKENHUYCTAHOBQHOFO MEHNO HAKMATE M.C.
[2]Повачытей М.С. Дял bбoga насточи.
- SOUND LEVEL - 3ACTBABKA 1M3HEMRETBCBA 3ABBCIMCNOT OTOBPHI rPOMKOTCH.
LOW PASS - 3ACTABKA IIMMEHETRCB A3BA BHCIMMOCTDT OYDBOH HN3KHX YACTOT.
- RANDOM - 3azbakva n3mehraetc npo0n3BOLHBO B 3abcnmoCTN OT yOUPBRA rPOMKOTN I yOUPBRA HN3KHX qACTOT.
DISPFX(3KpaHHbIe3ΦΦeKTB)
MOKHO KIOHIOHTI INI BIKIOHIOHTI 3KpAHHe 3Φ-ΦeKTb MIXTRAX.
1 HaxkMITE M.C.ДЯ BИбОРа НУХОн ИСТСПОЛ KI.
ON (3ekpHnHe 3dpeKtbl MIXTRAX)-OFF (obHbHHnnn)
CUT IN FX (300000 CBEDEHIN BpyHyIO)
Mochko BKNOHTBn HN 38KOBBe 3eFFKeTb MIX-TRAX,NEPEKHOJIa KOMON3HIN pBy.HNU
1 BctabTe MHHH-HTeKep cTepeOka6aB R rhe3do AUX.
2 Jakhmeek KHONKY SRC/OFT, YTO6bI Bbl-6pBAtx AUX A KCACTEe CIOHcHNA CIRHNA.
PpmeaHne
Hebo3MOxHO Bb6paTb AUX,ecnHne BkJIIOHeA BCNOmOrateBnBa HacToPka. Ioppo6Hyu HnΦOpmaUO CM. B pa3eNE AUX (BCNOMoTArTeBbHb BXoJ)Ha ctrp.142.
IpeeknoueHne dncnner
Bb60 TeKCTOBO INHcOpMaun
1 Hachmaie DEISPnAByb6opn3cneJeuOxHx yhuKn:
Ha3BaHHe nCTOHTHnKa
Ha3BaHHe nCTOHTHnKa CnHnA n YacBi
EcIn OTKpbIJIcH HeBepHbI 3KpaH
OTKNUHHTE HeBEPbI 3kPAn, KAK OINCAHO HNKe.
1 HakuMMTE M.C., YTO6bI OTKpbITr rnaBHOE MEHO.
2 IIOBOPaHbAte M.C.ДЯI npOKpyTkn nyHKTOB MeHIO; HAKMITE, YTO6bI BbIbOpTa bSYSTEM.
3 Повернite M.C., КTOбы OTОбразИТБ DEMO OFF, 3aTeM HaxmITE.
4 NOBeRnTe M.C.ДЯ BbIbopa YES.
5 Haxmte M.C.ДЯ BbIbopa.
YctaHOBka
CoeinnHeHn
Baxho
PnIyUcTahOBke DaHHoro UcTPOiCTBA Bu ABOtOMOJIe, B K TOPOTOM OcUTCYTBET NOJIOXENHe KJIOna 3azKmraHNA ACC,KpacshI Ka6ebN D0JIKeH 6bITb NpOKnIOH K KNEMMe, KOTOPaR ONpeJeIeR TpaOoCe HNOJOXENHe KJIOna 3azKmraHNA;B npOTNbHM CJIyAae MOKeT Bo3NHkHyb YteKa TOKa AKKymLyTA-TopHOI Bataepu.

Пложжени ACC

ПОНЖЕНИС ACCOTCYTCTBYET
- 3Kcnpyataaun daHoro yctpoCTBa B ycNoBnX,OTNnHbX OTNCAHbX HNOXe,MOKET npVBectn K NOxapary Nn c6oB Pa6oTe ycTPOCTBa.
TAPCHONTOHBE CpeCTBa C 12-BOLITOBMIM AKKUMYMTTOPOM Ia3eMJIENHeM OTPiCATeBNoHO NIOJICA.
-「GMOKOFOBOPHTENc5BTOBVXBOADHAOUMOCTb」HOT4Ω0do8Ω(CONPOTMBTHe)
Bo 3mb6ekhanie KOPOTKORO 3amblkAHN,nepe- rpeBaHn HeNCpabHOCTe Oba3aTeBbHO co6nDaaTne CNeHyUOneYkaah3N.
-
Pnyet ČátryaHOBK ŽOcoEdInHTE oPrTuCA-telbHuYIO kNEMMk AkyMmYIHTOPa.
3aKpEnHTe npObOa pRi NmOoMz 3aKIMOB ININIOJIUMHOIeHTb.Inra3aIHTb npOBOkIN 3aN3OIpYIte npObOa B MecTax INCOPNKOCOBENIc M eTaIIINeCKMN DeTALMM.
—Pa3MeCTIte BCE Ka6eHIn B ydaENHHOT NOBWKbIX DetanEi, TAKHX KAK PsHaR nepeKJIQUEHnpepeaHn HappaBIAIOUne CnDEHN.
—PazMeCTIte BCE ka6eIN B ydaJIeHN O t HaReBaIOUxCXcTeTaeN, TaKIN KAc peWetka 06OrpeBATEn.
-
3anpeaetcnoKIOHOTbXeITbI npOBd mCnIIeK AKKyMpyTOrHOB 6atapee aTOObHnepe3 CBePNHeOE OTeBPctNE BOTceKe DBrfateJI.
HbX KABeJIe H3OJIcHIOHNHOIHTO.
He ykopauhbaTe ka6eJn.
—Hnkorga He cpeaae HnOlaqno co shypara nTtAHnHa DaHnHOr YoCTbBa C cebIbNoDAH NITAHNA HpDyoe YcTOBcTO. DOnyctmAR Harpyka Ka6bena No TKO OrpAunHea.
I NcIobnytye npdeoxpAHHTeB c yka3AHHNIMnapamETPAMi.
-3aenpeaaetcnaHapmyo 3a3emnptb.OTPnIeTbNb bblBod promKOROBOPrtnen
3aepaaetc8a3bBabtbMeceOTPiau-tenbIbIeKaEBINHeckoJIbIXrPOMKOrOBOpu-ten.
-
Pπi BKNIHOHEN NITAHIN YCSTPOCTBA ynpaBnIOOCHnHAN NOAETCAHEP3 CNEH6BnI PPNOBD, PNOKNIHOHTE 3OT nPOBOD K KLEMME NytbTa YNPABLNHIN BHEWHERO yCnLTENTMOUHOCNII NIK KLEMME PENE ynpaBnEHN aHTENHbC 3NEKTPoPNPBODM (MaKc. 300 MA 12 BocTOnHHOR TOKa). EcnI ABTOMOBInb ObOpdyOBan BCTPOEHHO B OKOHHOe CTKEILO AHTENHO, NODCoEOHNITE nPOBD K KLEMME NITAHIN YCNIPTeNA aHTENHbI.
3aapeaetcnoepoednHbCHe-6enbl kAbelbKKNEMME NHTAHHN BHEWHERO yCNNTeRA MOnHCTN. Taekce 3apeaeTcnoepoehTb DAnHb NPOBOK K KNEMME NITAHNA aHTENHbC 3NeKTPonPnBODOM.B npOTIBHOM CNYaae MOKET BO3HNKHTy TyeKa TOKA aKKyMlyTOpHO bAtapEn ININ HA HeNCpABHOCTb.
YctaHOBka
- CephnykabelbraIETc3a3emJIOUIM. 3a3emJIOUINM. 3a3emJIOUINe KabeNn daHHOrO yCToPcBTA Hdpyrnx yCtoPcIBTc (oc06beHHo yCToPcTB, npDeHa3auHEnbXn DnAekCnpyatauNn npi 60bluxn ToKAX, TaKNX kAK YcunHIne BMOuchn) DOJIKNbI MOHTINPOBATcR OTDenHbNO. B nOPTNBOM cNyae INx cNyauHoe OTcoeHNHeHne MoKet npINBeCTN K NoXapy INn HeNCnPABHOCTN.
DaHHoe yCTpOcTBo
① Tne3do shHypa nHTaHn
② BxOДЯ MmKpOΦHa(TOnbKO MVH-3X60BT)
③ MnpoΦon(TolbKO MVH-X360BT) 4M
BbXoJ daaHero KaHana nnBbXoJ ca6By- 4epa
⑤ PēpečnHm BbIXoD
⑥ THe3Do aHTeHHbI
⑦ Плавский пededoxphaнть (10 A)
BxO npoBOHOro nIyIbTa NICTAHIOHOHNOynpABENHO
CnykntI nIaNDKIOHEnH npOBOHOro aadTepa npbTa dNctauHNOHOro npaBHeNn (npNoBpTaetcT oTneBHO).
Unyp nntaHn
① Krhe3dy shhypa nTaHn
2B 3A B3C M C O T N T H A B A O M O B I A P H K U N ③ N ⑤ M O Y T O T H N A T B C B. B 3TOM C N Y A E C H E N T Y O N D K I N O U T B 4 K 5 N 6 K 3
③ KenTbI
P3eBpHbN pa3bEm (IINI pa3bEm DOONIH- tene HOBO 06OpDyOBaH
④ KenTbI
Tolko nIy MVH-X360BT
YCTaHOBKa
BHIMAHHE
He Nyopkaite HamahtbHainpnoDaMnKPO
Poha BOKpy KOnoHN pyNeBoro UnpaBENH
NIN bHyara nepEeNOHIN nepeAev.3To
OChEn ONaCHO! YCTAHOBITE 3TO yCTPoiCTBO
TAKIM o6pa3OM, uTo6bl OHO He 3aTpPydHIO BO
XJDNHe.
PpmeaHn
- YctaHOBITE MINKPODOH B TAKOM NOJIOKENHI,TOb6bl OH MO YIBOINBt BOLOC YEIONBEKA,ynpabraioojoe CnCTeMOE.
-Пи Небхдмоста И спьлзугт Замы
Ддг Зakреленka Каба В салоне АвтOMБИ
н ($рдаюта отдано).
Pn yctahOBKe MmKpOfoHa Ha COHHe3aUHTHom K03bIpbKe
1 YIIOXInTe IPOBOd MKNpOfoHa B KaHaBky.
① ПобOD мнкрфога
② KaHABKa
2 YctahoBite DEpKarTeBnMKhPoFOHa Na CoIJIe3aUIMTHOM KO3bIpKe.
YctaHOBITE DePkataIb MmKpOfoHa npn NODHOM COINHUE3aUHTHOM K03bIpSke. (OnyckaHne K03bIpKa nPiBeDET K yXuDWeHIONIEHTHfKauMToRTOCA pNn CnONlb3oBaHNi TOLOCBOBIX KOMAHJ.)
①Держател萌Mнкрфога
Pn yctaHOBKe MmKpOfoHa Na KOLOHKe pyIeBOrO ynpablenna
1 OtceodinHte 6a3y MmKpOfoHa oT depKaTeMa.
TcBbIOTcoeMnHb3a8y MmKpOfoHa OTdepKaTeNa, CdBnHbe 6a3y MMKpOfoHa.
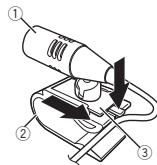
① MmKpOΦOH
② DepeKaTeB MmKpOPOHa
③ Ba3a MmKpOΦoHa
YCTaHOBKa
2 UctahOBITE MmKPOOH Na KOHKe pyneBBOYynpABNeHN.
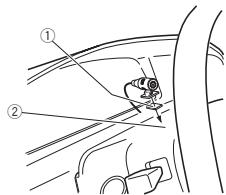
① DByCTOpOHnKneKnaJeHTa
② YCTAHOBITE MMKPOOH BA HNYPTEHNE CTOPOKE KOHOTKKI PYBENOOR OYTPABENHEI.
Perylnpobka yrgna Mnkpofoha

DononHnTeIbHa nHΦopMaun
YctpaheHne HEnCnpaBHOCTeI
CIMNTOMb BYdIeHb JxMpHbIM uPfTOM;
pNCHbN bNOKa3AhObbHbIM uPfTOM 6e3
OTcTyna.CnOc0bBy cYctPAnHe NOKa3AhObbU-
THbM uPfTOM COTcTynn.
IcnnneB aOBMAHTuCeCKN BO3BpaaTcETBC IxOChDhIpexMn.
B TcHHe 30 cekyund He bIyIObIyIOJIeHO HnKakIXn onepaun. NobTroprte onepaunio.
Iaonao3noTbHORO BcnpOnB3eDHHaCmOpN3BOBnHO NImHeRcTc.
B 3abCIMOCTOn TbVbpaHnHO DmAna30Ha BOCpONI3BEdHeN OH MOpET IImeMeHrTaBc PnI BvBopeDpyrO npAni INI DopOKxN, A TAKePnpIpePeMOTke Bnepeed/Ha3aD, BbEpoTe NdAna30n NobTporHO BocpnOn3BEdHeN eue pae.
Bloxhenna nanka He Bocnpn3BoDntcra.
BloxoenHbIe nAnKHe NEOCnPOn3BODrTcR,ecNbIb6paH dIanaa3oH FLD (noBTOpHOe BOCnPOn3BedeHne nAnK). Bb6epnte npryo nnApa3oH noBTOpHoro BOCnPOn3BedeHn.
ПИЗМЕHENД ИСПЕР OTOБРАЖАТСО NO XXXO (HANPIMEP, NO TITLE).
TeKCTOBAA HINDOPAMIAO TCYCTBYET.
IpeKeIIOUHTe DnCIIJIEN IEL BKNIOHTe
BocPONBa3BedeHne dpyrO dopOKoJy/daJIna.
3BNYOKBINTCRNOCNE TOFOKAK CINCNPIE NCUESHTCOT COO5UHIE
NO AUDIO
KOMN03nUINOTCYTCTBYOT.
PtepehCtte ayiofoaIbIha 3a10amHIAooee yctpoIbET USB n aokIOVHTNErO.
Ha nodkHoueHHOM 3anomnHaIOUeM yCTpOiCTBe
USB BkIIOeHaФyHKZna3aUNTbOT nepe3aINc.
OTKnUHcTfeYHKNUIIOa3auNTbOT nepe3aNINB COOTBeTCTBNC INHCTpyKUeN NO 3KcnPnyatauIN ZAONMHAIOoO yctPoIyCTBa USB.
SKIPPED
Ha noqknoeHHOM 3aONMnHAIOeM yCTPOIcTBe USB coepkatac faHbI, 3aunmehhhe TeXHoNIOre DRM.
3aunuennbIe paJIbI npOnyckaIOTcA.
PROTECT
Bce FainbI na NOkHIOHEHM OZAMINHOAUeMg yCTOPIEBE USB 3aUHUNBbTe HXTOHNORN DRM.
3aMeHHTe 3aONMHaIOUee yCTpoIcTBO USB.
N/A USB
JQnKIOHNOHOBNCTOEBUSBHEnpdEpxHBaETCDAHbIMHcYPTOBCM
- Podkniouche 3a0pOMHHaOJIeee yctPoiTeBTO USB KnaCa Mass Storage.
- OTOcOeHInHTe yCTPOICTBO n 3aMeHInTe ero HA COBmectnMOe 3aONOMHaIOouee yCTPOICTBO USB.
CHECK USB
Kopotkoe 3ambykaHme Ha pa3beMe USB nB Ka6e-NE USB.
Y68nttcd, Ybpaotem USB nki Ka6ebn USB he aauenmneH ne HOBpeKhen.
CHECK USB
PoiKIOHHeO 3aONMOHaHOe UcTPOIcTbOSUB nOTpe6nBET 60JIbe MAcCMMaBbHO dOnyCTHMo CINBJ TOKA.
OTcOeDnHtte 3aONMHaIOoE yCTPOICTBO USB
He nCnOJb3yTe erO. YCTAnOBte KIOU
3aXKTHaHReB bNOJoxKeNE OFF, 3aTeB - m NOJoxKeHne ACC INN ON, i 3aTeM
NoKIOuOJaTE ToJIbKO CoMBeTmBle
3aONMHaIOoNe yCTPOICTBA USB.
CHECK USB
iPod pa6oTaet, Ho He noD3apjkaetc.
Y6bIDTeBc BOTCYTBIN KOPKTOK3aMbKaHnA
B kaBeige iPod (hanPimpe,HTO kaBeIbe He zaxat
MeJyD metaJIneCkMnnpEeMaTMe).Piocne
I npOBepRi KaBeIe yCTaONBITE KIOH 3azKmraHnA
N oIIOXeJIe OFF, A tatem - B nIoNOxHeNE ON,
Ni5o 0tKnIOHITe n a3AOBIO NpKnIOHITe iPod.
DOnOHHTeIbHa HOpMaun
ERROR-19
C60H C73N
BbINOHNHe CneDyIOUne DeIcTBnA.
- YCTAHONITE KNUO 3aKIMAGHIN B N OJIOXEHNE OFF, A aTTEM -B NOJIOXEHNE ON.
-OTKIIIOHTe 3aONMnHaIOUeeycTPOiCtBO USB.
- Bb6epire DpyroT NCTOHHK CnTHANA. 3aTeM BHOBb Bb6epire USB B KaeeCTBe NCTOHKKA CnTHANA.
C60iPod.
OTKnHHTeKa6bEnI t IPoD. Iocne noBAnENHnHa nDaCnIe rnaBHOrO MeHIO pA3NoHO npKnHIOYtIPoN d nepeaqrpy3nE ro.
ERROR-23
3aannmHaiooeeyctOyOBTO USB HE otOpmatHPOBaHO B C HETMEFAT12,FAT16 nHN FAT32.
ZanomHaOaQee yCPTOBCTBOUSDQNLOB6bItbΦoPmATPOBaB8FAT12,FAT16nnFAT32.
ERROR-16
UCTapeBsaB aBepn npoAubKn iPod. O6OBHite BEPN noPooNBkn iPod
C60iPod.
OTKnHHTeKa6bEnIt oIPd.10ncne noBAnENHnHa nDaCnPee rnaBHOrO MeHNo IPd3aHoBO npKnHIOHTe oIPd npeeaRpy3ner erO.
STOP
B Tekyuem Cnncke OTCyTCTByIOT KOMno3n.
BbI6epHTe cHnCKO, cOeRjXauuM yMbKaflbHHe KOMIOHNs
NOT FOUND
KOMNo3nH He HaJeHO.
3arpy3nte kOMnO3mHnHa iPod.
Bluetooth-ycTpoiCTBO
ERROR-10
C60尼TANHNA Modynla Bluetoh daHnHO yctponCTBA.
Nopehrite KIOHJ 3aKHTAHIN B NOJXOHENE OFF, a 3aTEM B NOJXOHENE ACC INN ON.
Ecni noocte 3TIO CHOBA NOBHTCQBOOCHME O6oIbKc, CBJKtcebc JnAePOM IIN
6nKaiMCEpBnchbIM cHTpomPioneer.
PpInoxeHne
UycpnoCTBO Bluetooth No haideno. Cnueyte 3kpanHHM nodcksKaan
CONN. Failed PRESS BAND KEY TO RETRAY
CoéniéneHne Bluetooth he yctahOBHeNc. CnEyyte 3kpAHHbIM nodkacKam.
DISCONNECTED PRESS BAND KEY TO RETRAY
CoéniéneHne Bluetooth ye hctaOboHeN. CnEyyute 3kpaHbNIM nodcKa3m.
CHECKAPP
CoEINHEINE CnpINOKHEHEM HcYeTaNHOBNEO. ChnDyJIe XeKNHbIM NOKcKaHKM.
STARTUPAPP
Pondepkka cKaTbIX aydnnofoaIIOB (USB)
WMA
Pacunepnne:wma
CKoepoc3 nepedaaHdAnhBbIX:OT 48 Kbnt/c do 320 Kbnt/c (noctoHaHHa),OT 48 Kbnt/c do 384 Kbnt/c (nepeMeHHa)
YactotaDnckpeTn3aun:32KΓU,44,1KΓU,48KΓU
Windows Media™ Audio Professional, Lossless, Voice/DRAM Stream/Stream c nopepkko Bndeo: He nopepkxaetaeTc
MP3
PacunepHe: .mp3
CkoOpctb nepeAdaA daHbHy: ot 8KbNt/c do 320 KbNt/c (noCToHaH),nepeMeHHa
Yachota Dnckpetm3aun: ot 8kTu do 48 kTu (32kTu, 441kTu, 48kTu nKoBaB)
DononHnTeIbHa nHΦopMaun
CObMeTImaBepnIeTeOBID3:1.0,1.1,2.2, 2.3,2.4(TerN ID3:BepnIeZx MeHOT npHOpHTet nepedBepcnEi1.x.)
Спник BOCIPONIBEДENI M3U: He poddeprkHBAOTRA
MP3i (HHTePAKTHBnH MP3), mp3 PRO: He noD-dePekxBaIoTcR
WAV
Pacunepne: .wav
PapaRDIOHCTb KBAHTOBANH:8n16(LPCM),4 (MS ADPCM)
Yactota dncKpeTn3aun: ot 16 kTg do 48 kTg (LPCM), 22,05 kTg n 44,1 kTg (MS ADPCM)
Bocnpn3BdEHeMe 3auiuEnHbX ot KOnpOBaHn faIaIob: He noJe4DkBaWETAc
3anomnHaooee yctpoTcBO USB, codepkaaee pa3denbl: Bocpon3BODITcTOnbko nepbbl pa3den.
Пин haHane BocPOnB3BEdENIy aHyDIOaIbNOB ha 3aONMHaHOUeI yCToPcIte TB, cOpePKaIeM pa3BeTbJIeHbIe IepaXINnAnoK, MokTeB OBOHKnBt bHe6OnsuaJ 3aeDkPka.

BHIMMAHNE
- Pioneer是HapaNTPYET COBMECTMIOCTbCO
- BCEMN yctpojCTbAMN USB mass storage u
- He Hecet OTBeTCTBEHHOTCTn 3a IIObEy NOtep
- PIO DAHNbIX HA MediAPoIPrBbATEIgX,
- CMAPTOfONAX u DpyTNx yctpojCTbX pni Ic-
- NIOB3OBAHm NTOrO IaENII.
He octabrIyTe 3aONOMHaOuEe yCTPOICTBO USB B MeCTax C BbICOKoI TemnepatypoI BOdlyaX.
DOnOHHTeJIbHa INΦOpMaun
Iopdepka iPod
JaHoeO yctpOCTBO TNOIePEXBAET OTLKBIO HIXepeRcMENCHBHe MOeINi IPOD.
CdeIaHOdIa
- iPod touch (5-ro nokoJIeHnIa)
- iPod touch (4-ro nokoJIeHnA)
- iPod touch (3-ro nokoneHnA)
- iPod touch (2-ro nokoneHnA)
- iPod touch (1-ro nokoJIeHnIa)
- iPod classic
iPod c npdepkov BundeO
- iPod nano (7-ro nokoneHnA)
- iPod nano (6-ro nookolenia)
- iPod nano (5-ro nokoJIeHnIa)
- iPod nano (4-ro nokoJIeHnIa)
- iPod nano (3-ro nookolenia)
- iPod nano (2-ro nokoneHnA)
- iPod nano (1-ro nokoJIeHnA)
iPhone 5
iPhone 4S
iPhone 4
iPhone 3GS
iPhone 3G
iPhone
B 3abciNMOCTNIOTbEpcnIINpOgPARMMHOrO oBece neneHHI INI NIOKOpENHII iPOD HeKOpToBle pHyNKcIIN MORYT bByt HeNOCTYINbI.
PocneIOBaTeJIbHOCTb BOCpOn3BedeHnaydnofoaIIOB
- GAP (Generic Access Profile)
- OPP (Object Push Profile)
HFP (Hands Free Profile) 1.5
PBAP (Phone Book Access Profile)
A2DP (Advanced Audio Distribution Profile)
AVRCP (Audio/Video Remote Control Profile) 1.3
- SPP (Serial Port Profile) 1.1
Abtopckoe npabo nTOBapHbIe 3HaKIn
Bluetooth
Bluetooth (cNoBO n NoroTnbl) yBnIeTc 3apeTnPBOHbHbIM TOBaHbIM 3HaKOM n PnINaJIeXHT KOMnAHn BluTooth SIG, Inc.;NCN0N3bOAnHe PIONEER CORPORATION 3tNX TOBaHbIX 3HaKOB pa3peHoe COOTBetCTByouChien NlueHneHne. IpnCe ToTOBapHbIE 3HaKn I TopRoBBe HnMaHEoBAHn pInHaJeKxAT COOTBetCTBYUQIM BnAedIbIaM.
iTunes
Apple i iTunes raIANTc TOpROBbIMN 3hAKAMM KOMpanHm Apple Inc., 3aperyntcTprpoBaHbIMN B CUIA Jdpyrnx cTpaHAn.
MP3
IocTabka 3T0r Iaet npabTo Tbko Ha
eOu cAteHn He KEMMpeckoe IcNtB0BaHne H ne PpeOCTabnRe Iiueh3nn H ne Npda3yMeBaET npABo IcNOnb3OBaHn 3T0r
IaTeNBn B IIOb6x MoKempeCKeX (t.e. npHOCsIXn pInbbl) pRmBx TpAnCrlaNN (TeleBENHOHHbx, CNYTHKOOBx, KaebbHbx W/INn IIOb6x Dpynx), BeVAHN/WOTOKOBn nepaeJcepe3 INThePHT, NOkALbHbx CETAx W/INn Dpyrx CETAx INn B Dpynx JNeKTPOHHbx CnCTEmax PaNCpOCTaHEHn, TAKX KAK CNTEmbl PtNthO ro aYdno u Aydo n O zanpcy. Dna Takoro IcNtOB3OBaHn Heo6XdHMa CNEUaBnHa
IinCh3N. DOnOpNHITelbHyIO HfOpMaunio cm.
Ha caTBe
http://www.mp3licensing.com.
WMA
Windows Media - 3TO zaperticnpobanhaToprobaMapka uNToToprobaMapka MicrosoftCorporation B CUSA wnnu dpyrtnx ctpaanh.
DOnoJIHnTeJIbHaN HΦopMaun
B daHHOM 3dEeHm NcOnb3yOITcTeXHoNOrn, npHnAdNeKauIme Kopnpaunm Microsoft, koto-pbIe He papeaetcN cNoIb3oBaTb IIN pa-npoctpraHb7 Be3 NiueHEn3n ot Microsoft Licensing, Inc.
iPod n iPhone
iPhone, iPod, iPod classic, iPod nano i iPod touch yBRAHOTCA TOBAPbIMn 3hakAMN KompanHm Apple Inc., aperineCTpnpoBaHbIMn B CCLIa N dpyrnx cTpaHax.
LightningaYBaIeTcS TOpROBbIM 3HaKOM KOMPAnHnApple Inc.
"Made for iPod" "Made for iPhone" 03haaet, QTO 3IeKTPoHnBn PnIP6b 5pIpaSaobTaHc C qelbu NqkDnOHeHHN OnpedEnHeHO K iPod nnn iPhone COOTBetCTBeHHo, N IMeTeCer cepTnmu KaIaIaPraBaOToHka O COOTBetCTBn C texHneckmN XapakTePrcntckAmn Apple. Apple He Hecet OTBTCTBEHHoCT3a pABOT DaHORo YcTPOIBCTBA IIN erO COOTBetCTBn Co CTahdaptMa MNo TEXHKe 6eONaCHoTn IIN pERyIaTMBHbIM HOPMAMN. POxJaYctA, 6OpatNTe BHMaHHe, YTO ICNoJIb3OBaHNe DaHHoro rPi6bora c iPod nnn iPhone MoKET oPIuAteJIbHO cKa3bIbATbc Ha KaHeCTBe 6ecnpBODaHO CBsR.
AndroidTM
Android Rajanetc TOBAPbHIM 3HAKOM KOMNAHNI Google Inc.
MIXTRAX
MIXTRAX ABTNETA TROPBO MAPKÖN PIONEER CORPORATION.
DOnonHnteIbHa HOpMaun
CepinHbI HOMeP
Ha 3TOM pncyHke Ioka3aHa INΦopMaζu O MeçUe I rOe I3rTOBJIeHn yCTpOJCTBA.

Aata n3rTOBJIeHnO6OpydoBaHn
P1-ΓoI n3rOToBJIeHnI
| ГоД | 2001 | 2002 | 2003 | 2004 | 2005 | 2006 | 2007 | 2008 | 2009 | 2010 |
| Симв的对象 | A | B | C | D | E | F | G | H | I | J |
| Год | 2011 | 2012 | 2013 | 2014 | 2015 | 2016 | 2017 | 2018 | 2019 | 2020 |
| Симв的对象 | К | L | M | N | O | P | Q | R | S | T |
P2-Mecrau n3rTOBHeHn
| Мессяц | 1 | 2 | 3 | 4 | 5 | 6 | 7 | 8 | 9 | 10 | 11 | 12 |
| Симв的对象 | A | B | C | D | E | F | G | H | I | J | K | L |
DOnolHnTeIbHa HOpMaun
TexHnueckne xapaKTepeNCTNKn
067ne
ICTOCHIKIITAHIN 14,8B NocToHnHO TOKA (DO)nyCTHMb dIaIa3oHOT 10,8 B Do 15,1B)
Симета заменения .........заменhoeуорцателно...
ronoNioca
MakcHmAHnBnI hotpebIeBmEi TOK 10.0 A
Pa3mepbl(11XBxΓ):
DIN
山accn 178MM×50MM×165MM
Pepednnae naneB 188MM×58MM×15MM D
山accn 178MM×50MM×165MM
IpeednaheIb 170MM×46MM×16MM
Macca 0,7
Aydno
MaKcImaHbHaBbIXoHnA MoUHOCTb
50BT×4
70B × 1 / 2 (dπa caebyepa)
HOMHaJIbHaBbIXoDHaMoUHOCTb
22Br×4(ot50Γu,do 15000Γu,cyMMapHoe3aHeN HKeo3ΦΦmUeHTA HeINHnBx NcKaxEHnN 5%, Harpy3ka 4Ω nIra o6oix Ka- HanOB)
ConpoTnBneHneHarpy3K
4Ω(doynctmo-ot 4Ω do 8Ω)
MaKcImaJIbHaB bIXoHnA MOuHOCTb
2.0B
KoHTyp rpoMkoCTn +10d5(100Γu),+6,5d6
Yactota 50T/63T/80T/100T/
125Γu/160Γu/200Γu
Kpytn3Ha xapaKTepeNCTnKn
-12D6/OKT, -24D6/OKT
YcJIeHHe +6Dd0-24d6
Φa3a HopmaIbHa/06paTHa
USB
CTaHapTha cneuΦkaua USB
USB 2.0 nonHockopocTho
MaKcImaJIbHbI TOK NTaHnA
1A
Knacc USB . MSC (Mass Storage Class)
Фаловая систema ...FAT12,FAT16,FAT32
ΦopMaTДeKoInpOBAHЯФaJIIOB MP3
MPEG-1 u2 Audio Layer 3
ΦopMaTДeKOДиРОВАнЯФaIIOB WMA
Bercnn 7, 7.1, 8, 9, 10, 11, 12
(ДБУХКАньНьи 3ВУК)
(Windows Media Player)
ΦopMaT CnHaJa WAV ....... Linear PCM n MS ADPCM
(6e3 komnpcecm)
FM-THOHeP
Duaana3OH yactot 87,5MfUdo108,Of
Pone3nayBCTbTeNbHOCTb
9ДБΦ(0,8MKB/75Ω,MOHO
OTHOWEHNE CINHAJ/WHM:
30d6)
OTHOWEHNE CINHAN/WHM
72dB(ceTBIEC-A)
MW-TioHep
Duaana3OH yactot OT 531Ku do 1602KU
Pone3nayyBCTbTeNbHOCTb
25MKB (OTHOSEHNE CnHnA/
ym:20dB)
OTHOWEHNE CINHAN/WHM
62dB(ceTBIEC-A)
LW-THOHeP
Duaana3OH qactot . 153Ku do 281Ku
Pone3na yBCTbNTbHOCTb
28MKB (OTHOSEHNE CnHAn/
wym:20dB)
DOnonHnTeIbHa nHΦopMaun
OTHOWeHne CnHnAJI/WHM
62d5 (ceTB IEC-A)
Bluetooth (Tonbko MVH-X360BT)
Bercn .Bluetooth 3.0 certified
BbIXoHnA MoUHOCtB +4Dm MaKc.
(Knacc MouHocTn 2)
PpimMeaHne:
B COBTBCTBmC coTb8 53akoHa PoCnCKoΦDepeauni «O3aunite npab noTpe6MteJeI NnoCTAHOBHENIE
PpabnteIbCTBa Poccncko Fedepaun No
720 ot 16.06.97 kompanja Pioneer Europe
NV oroapBaet cneJyouicp cpoK cnyKbI
Hdenn, oOfMuAaNbHO nO tOcTaNReMbIX hao
pocchckn pblHKo.
AbTomO6nIbHaN 3NeKtPoHnka: 6 IeT
Ipoyne n3dennn (HayuHnKn, MnkpoOboHi
uT.n.):5net
PpIMeuaHn
XapaktepIeNtKu IN KOHCTpyKUmaY MOrTy 6bTb N3MeHeBb 6be3 ppeBaPrtBeHoro yEdoMJIeHn.
-ДанhoeуctpoihtbO npOn3BedeHO B ИнdoHNe3n.


http://www.pioneer.eu
Visit www.pioneer.co.uk (or www.pioneer.eu) to register your product.
Pioneer CarStereo-Pass
Please fill out immediately after purchase.
PIONEER ELECTRONICS (USA) INC.
P.O.Box 1540, Long Beach, California 90801-1540,U.S.A.
TEL: (800) 421-1404
PIONEER ELECTRONICS OF CANADA, INC.
340 Ferrier Street, Unit 2, Markham, Ontario L3R 2Z5, Canada
TEL: 1-877-283-5901
TEL: 905-479-4411
PIONEER ELECTRONICS ASIACENTRE PTE. LTD.
253 Alexandra Road, #04-01, Singapore 159936
TEL: 65-6472-7555
PIONEER ELECTRONICS AUSTRALIA PTY. LTD.
5 Arco Lane, Heatherton, Victoria, 3202 Australia
TEL: (03) 9586-6300
PIONEER ELECTRONICS DE MEXICO, S.A. de C.V.
Blvd. Manuel Avila Camacho 138 10 piso
Col.Lomas de Chapultepec, Mexico, D.F. 11000
TEL: 55-9178-4270
先锋股份有限公司
台北市内湖區瑞光路407號8樓
電話:886-(0)2-2657-3588
先鋒電子(香港)有限公司
香港九龍長沙灣道909號5樓
電話:852-2848-6488